manuals.online logo
Brands
  1. Home
  2. •
  3. Brands
  4. •
  5. Think Tank Photo
  6. •
  7. Camera Accessories
  8. •
  9. Think Tank Photo MindShift Rotation 22L User manual

Think Tank Photo MindShift Rotation 22L User manual

Flap Adjustment
Over time, the belt pack may catch on the side
ap when rotating. To increase the ap clearance,
follow the instructions below:
1. Adjust tension on elastic cord to lift ap to desired
position
2. Tuck away loose elastic cord into the hole on the top
right corner of the ap
Security
Leash
Quick Access Magnets vs
Full Zippered Closure
When packing/unpacking, it can
be helpful to remove the security
leash by unclipping the leash from
the belt pack. Be sure to reattach
the leash before wearing the
pack to protect your gear against
accidental damage
Our magnetic belt pack opening allows for fast access
and efcient workow, however, we provided a full
zippered closure if you nd yourself in inclement
weather or unstable footing
Magentic closure
Zipper closure
Waterproong
Water repellant should be reapplied to the
exterior of the backpack every 6 months. We
recommend Nikwax: Tent & Gear Solarproof
1105 N. Dutton Avenue, Suite C, Santa Rosa, CA 95401 USA Phone #: 1.707.284.9999 FAX #: 1.707.527.0808
For more information please visit: www.thinktankphoto.com
Rotation 22L, Rotation 34L and Rotation Pro 55L+ Backpack Instructions
Serving the needs of traveling outdoor photographers
©2020 Think Tank Photo PIN0059a
How To Rotate
1. Loosen buckles on waist belt 2. Pull down on ripcord attached to sliding buckle to
release
3. Grab the side handle on belt pack and/or thumb-
loop on waist belt to rotate the belt pack 180
degrees counter-clockwise
4. Reverse direction to stow away belt pack
5. Secure door ap by depressing ap and clicking
buckle into place
Torso Adjustment for the
22L & 34L
Torso Adjustment for the Pro 50L+
1.
Release the shoulder strap assembly from the pack by
separating the hook–and–loop closure from the back
3. Adjust the length so the “collar cut” in the shoulder
straps are in line with your neck and the waist belt is
positioned on your hips
1. Choose from three torso height attachment bars 2. Insert harness webbing through attachment bar
3. Feed the webbing through the weblock and line up
the green bar tacks
4. Attach the full hook and loop panels together
5. Slide the cover over the secured webbing assembly
Tripod Attachment – Front Panel
1.
Remove tripod strap from top compartment under logo
and release the tripod cup at the bottom of the bag
2. Place one or two tripod feet through the lower strap
and into the tripod cup. Secure the lower strap over
the remaining leg(s)
3. Afx top strap around the tripod. Depending on the
size of the tripod, you may want to wrap the strap
around the top of the tripod to secure it to the bag
Tripod Attachment –
Side Panel (34L & Pro 50L+)
1. Place one or two tripod feet in the side pocket
2. Afx side compression strap around the tripod.
Depending on the size of the tripod, you may
want to wrap the strap around the top of the
tripod to secure it to the bag
2. Adjust torso length
Hydration Hose Routing: 34L and Pro 50L+ – Front Pocket
1. Fill reservoir and place in the front pocket. Use the
tether to hold the reservoir in place
2. Guide the tube through the passthrough slot on the
left side of the front pocket
3a. 34L – Guide the tube through the pass through slot
on the left side of the main compartment and down
the shoulder straps. Secure with elastic straps and
adjust to a convenient length.
3b. Pro 50L+ – Guide the tube along the outside of
the bag and down the shoulder straps. Secure with
elastic straps and adjust to a convenient length.
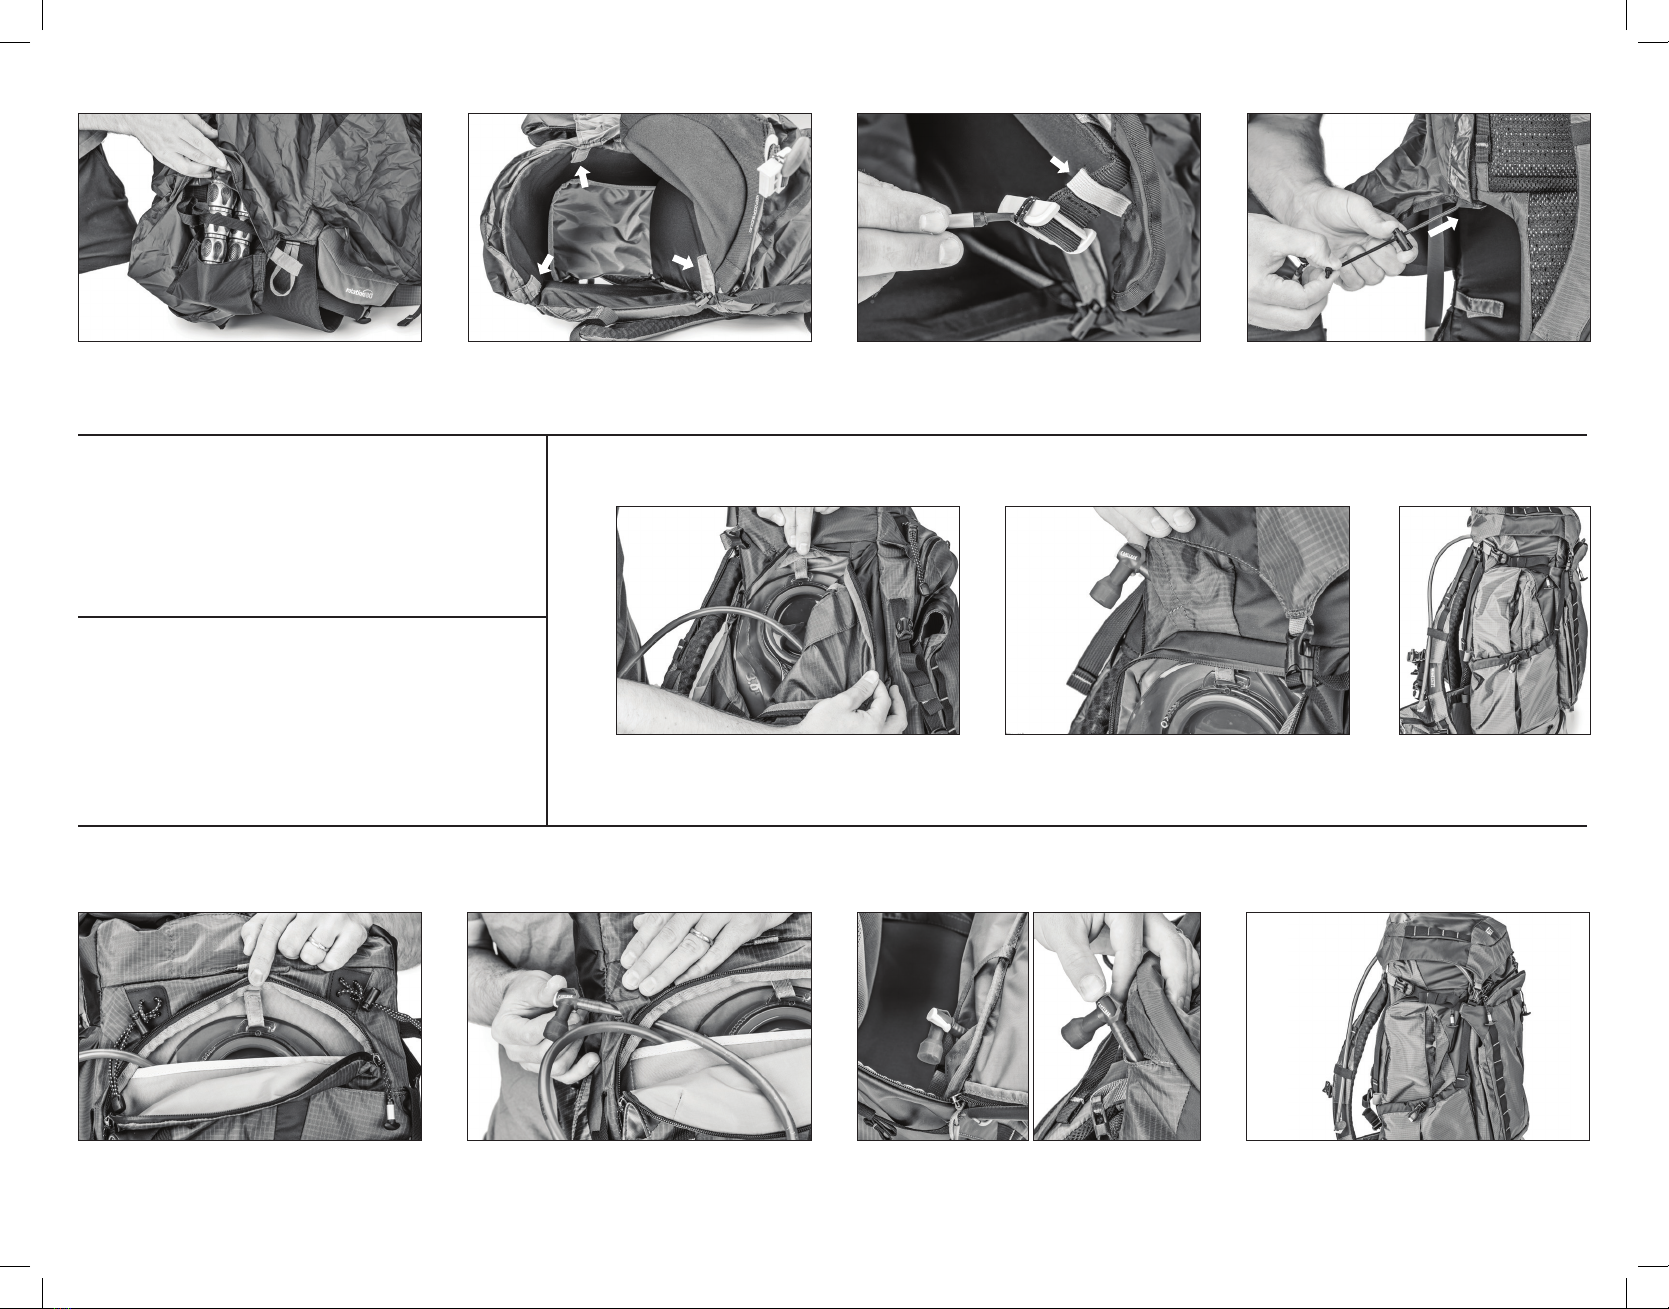
Hydration Hose Routing Pro 50L+ – Side Pocket
1. Fill reservoir and place in the side hydration pocket.
Use the tether to hold your reservoir in place
2. Guide the tube through the pass through slot and
down the shoulder straps. Secure with elastic straps
and adjust to a convenient length.
Rain Cover Attachment – Backpack
1. Locate the larger rain cover and orient the logo on the
top of the bag and wrap around top corners. If a tripod
is attached to your bag, slide the tripod legs through
the hook and loop slot on the bottom of the rain cover.
2. Remove the belt pack from the rotation compartment
3. Attach the three tabs to the inside of the rotation
compartment
4. Wrap elastic band around sliding buckle 5. Tighten up the rain cover around the edges of the
backpack
Rain Cover Attachment – Belt Pack
Easier to do when wearing the pack
1. Wrap smaller rain cover over belt pack with the logo
on the front of the pack
2. Be sure the buckle receptacle is not covered
Rain Cover - Care
If the rain cover gets dirty, soak it in cold water (no
soap) and hang to dry.
Waterproong: Water repellant should be reapplied
to the exterior of the backpack and rain cover every
6 months. We recommend Nikwax: Tent & Gear
Solarproof
Stash Master Top Load and Stash Master Pro Instructions – Sold Separately
For quick access, leave the openings unzipped and tucked away when loaded in a backpack
Stash Master Top Load – Top Opening Stash Master Pro – Top Opening Stash Master Pro – Back Opening
1. Remove the foam from the ap 1. Remove the foam from the top-panel ap 1. Remove the foam from the back-panel ap
2. Fold the loose ap in front of the Stash Master Top Load 2. Fold the loose ap in front of the Stash Master Pro 2. Fold the loose ap underneath the Stash Master Pro
Phone Holster Attachment Instructions – Sold Separately
Belt Wing Attachment
Shoulder Strap Attachment
1. Lift vertical ap and secure wing panels underneath
1. Open the wing attachment panels and secure the
vertical panel underneath the phone holster
2. Feed the vertical panel through the webbing slot on
the belt wing
2. Feed sternum strap through hole in the wing panel
closest to the midline of the backpack
3. Secure the vertical panel on the bottom of the
Phone Holster
3. Wrap the wing panels around the shoulder strap and
secure to each other on backside of shoulder strap
Visit thinktankphoto.com
to view and purchase all
available accessories!

This manual suits for next models

2

Other Think Tank Photo Camera Accessories manuals

Think Tank Photo StreetWalker Backpack V2.0 User manual

Think Tank Photo

Think Tank Photo StreetWalker Backpack V2.0 User manual

Think Tank Photo Logistics Manager 30 User manual

Think Tank Photo

Think Tank Photo Logistics Manager 30 User manual

Think Tank Photo Glass Limo User manual

Think Tank Photo

Think Tank Photo Glass Limo User manual

Think Tank Photo Belly Dancer User manual

Think Tank Photo

Think Tank Photo Belly Dancer User manual

Popular Camera Accessories manuals by other brands

Sea & Sea MDX-D300 Brochure & specs

Sea & Sea

Sea & Sea MDX-D300 Brochure & specs

Tripp Lite RBC53 specification

Tripp Lite

Tripp Lite RBC53 specification

Sea & Sea YS-15AUTO instruction manual

Sea & Sea

Sea & Sea YS-15AUTO instruction manual

AQUATECH EDGE instruction manual

AQUATECH

AQUATECH EDGE instruction manual

FeiYu Tech VB 4SE quick start guide

FeiYu Tech

FeiYu Tech VB 4SE quick start guide

pro master SM300 quick guide

pro master

pro master SM300 quick guide

Easypix GoXtreme GX1 user guide

Easypix

Easypix GoXtreme GX1 user guide

Foxtech Archer AAT user manual

Foxtech

Foxtech Archer AAT user manual

Blackmagicdesign Video Assist 12G HDR Installation and operation manual

Blackmagicdesign

Blackmagicdesign Video Assist 12G HDR Installation and operation manual

EliteProAV Tab-Tension Pro Series user guide

EliteProAV

EliteProAV Tab-Tension Pro Series user guide

HARDKORR HKPBATTMONBT instruction manual

HARDKORR

HARDKORR HKPBATTMONBT instruction manual

pro master LED30 instructions

pro master

pro master LED30 instructions

Alto-Shaam FryTech Series Installation operation & maintenance

Alto-Shaam

Alto-Shaam FryTech Series Installation operation & maintenance

ARRI LMB 4x5 user guide

ARRI

ARRI LMB 4x5 user guide

Gitzo GT3531 parts list

Gitzo

Gitzo GT3531 parts list

expoimaging expodisc quick start guide

expoimaging

expoimaging expodisc quick start guide

Sony VCT-970RM operating instructions

Sony

Sony VCT-970RM operating instructions

Mamiya BA701 instructions

Mamiya

Mamiya BA701 instructions

manuals.online logo
manuals.online logoBrands
  • About & Mission
  • Contact us
  • Privacy Policy
  • Terms and Conditions

Copyright 2025 Manuals.Online. All Rights Reserved.