ThinkGizmos TG941 User manual

TG941 - COLOUR CHANGING
HUMIDIFIER
User Manual
English p 1
Deutsch p 9
Francais p 17
Italiano p 25
Español p 33
PLEASE FOLLOW THESE INSTRUCTIONS CAREFULLY AND KEEP THIS INSTRUCTION BOOKLET FOR
FUTURE REFERENCE.
DUE TO CONTINUAL IMPROVEMENTS ACTUAL PRODUCT MAY BE DIFFERENT TO ILLUSTRATIONS
Any packaging ties, bags and screws are not part of the
product. For safety please remove and discard any
packaging ties, bags and screws before using this product.

ENGLISH MANUAL - CONTENTS
1. 1.1 Safety Information ............................................................................................... 3
IMPORTANT INFORMATION
2
2.1 Product Overview ................................................................................................. 4
2.2 Quick Start ............................................................................................................. 5
2.3 Filling / Emptying the Humidier ................................................................... 5-6
2.4 Changing the Light Colour .................................................................................. 6
2.5 Troubleshooting ................................................................................................... 7
2.6 Product Specications ......................................................................................... 7
PRODUCT DETAILS
2.
Warranty Information ................................................................................................ 8
WARRANTY
If you have any issues with your product or have any questions, please contact us
via email:
This is the quickest way to resolve any problems. You will be surprised how fast we
will get back to you on email with a resolution.
All our products are covered by our manufacturer’s warranty, details can be found
on page 8.
For more of our brilliant products, search Amazon for “Think Gizmos”.
Think Gizmos “Small enough to care big enough to deliver”.

3
1. IMPORTANT INFORMATION
1.1 Safety Information
Thank you for purchasing the Think Gizmos Colour Changing Humidier. Please read
through this instruction manual before use as it contains all the information you need about
how to correctly enjoy this product.
CAUTION
ELECTRONIC PRODUCT
Do not leave children unattended with this product. Not suitable for children under the age
of 3 Years.
This product should be used in accordance with this user manual in a safe way to avoid
electric shock or injuries.
ADULT SUPERVISION REQUIRED
WARNING! Do not try to modify this product in any way as this may invalidate your
warranty.
WARNING! Contains small parts, child supervision is required at all times.
DO NOT immerse the Colour Changing Humidier in water, it is an electrical product and
will get damaged.
AVOID exposing to excess heat or leave out in direct sunlight.
• Use the supplied power cord, Type C, 1A. If you use an alternative power cord, you must
pay attention to make sure the current specication is 1A, otherwise it will aect the
atomization eect or even damage the device.
• Pay attention to the power adaptor being used, its output cannot be lower than DC5/1A,
otherwise it will aect the atomization eect.
• Remove the shell and lid of the water tank before relling with water.
• Rell the water tank at the designated water rell place. The water amount should not
exceed the maximum water level.
• The maximum water volume is 180ml, do not exceed this amount or it can cause the
water to leak, damage to the humidier or the atomization eect to not work correctly.
• Use pure water, to avoid damage to the atomizer due to impurities in the water and to
give the best performance.
• Water temperature must be lower than 60°C (140°F).
• After use: Pour out the remaining unused water in the tank to keep the water fresh and
stop the atomizer from sitting in water when not in use.
• When cleaning the humidier wipe the inside of the case with a dry thin cloth and
wipe o any dirt from the atomizer carefully with a cotton swab. Ensure humidier is
unplugged before cleaning the device.
• DO NOT move the humidier when it is being used. Turn o and remove the USB Cable
before moving.
• Remove the Outer Shell of the humidier when moving so you can view the water level
and reduce the chance of spillage.

4
2. PRODUCT DETAILS
2.1 Product Overview
1.
2.
3.
4.
5.
6.
7.
8.
9.
1. Mist Outlet
2. Outer Shell
3. Water Tank Lid
4. Light Lid
5. Water Tank
6. USB-C Power Input
7. Humidier Base
8. On/O Button
9. Light Button

5
2.2 Quick Start
• Fill the Humidier following the Fill Instructions below.
• Connect the USB cable to a compatible USB Plug (not provided).
• Plug the USB-C end of the cable into the slot on the back of the humidier. When the
power is switched on and connect the humidier should cycle through the colours and
then the light will turn o.
• Press the button to turn on/o the humidier.
• Press the button to turn on/o the light.
• Press the button to switch through the light colours. (see below for colour switching
instructions).
2.3 Filling / Emptying the Humidier
1. Remove the Outer Shell by lifting up the shell whilst holding the base of the Humidier.
2. Locate the Water Rell Location which is marked with ‘Add Water Position’. Fill the
humidier up to the ‘Max Water’ line which is marked on the side.
Add Water Position
Max Water Line
Please Note: Do not overll the humidier.
• Press and hold the button to switch o the humidier without cycling through the
colours.

6
2.4 Changing the Light Colour
3. Place the Outer Shell back over the base to close the humidier ready for use.
4. To empty the humidier, remove the Outer Shell as above. Locate the Add Water Position
and tip the humidier up to tip the water out from the Add Water Location.
5. Once empty place the Outer Shell back over the base.
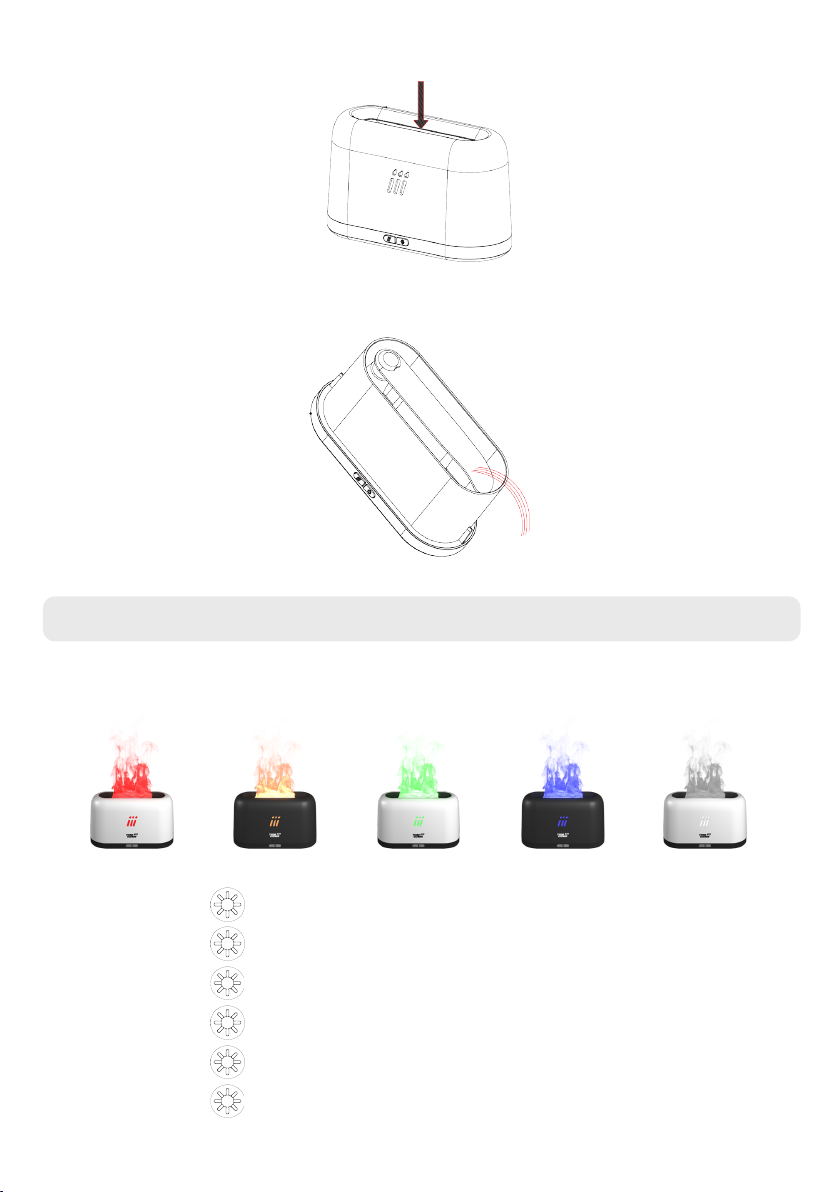
The Think Gizmos Colour Changing Humidier can light in 5 dierent colours.
Red Orange Green Blue White
To cycle through the colours follow the instructions below:
• Press the button to turn on the humidier and it will light up Red.
• Press the button again to change the colour to Orange.
• Press the button again to change the colour to Green.
• Press the button again to change the colour to Blue.
• Press the button again to change the colour to White.
• Press the button again to turn the humidier O.

7
Dimensions 17.7x10.7x7.5cm (6.9x4.2x2.9in)
Weight Approx 322g (11.35oz)
Rated Voltage/Current DC5V/1A
Water Tank Capacity 180ml
Atomization Amount 15-20ml/hour
Run Time Approx 10 Hours
2.5 Troubleshooting
PROBLEM POSSIBLE REASONS SOLUTION
After pressing the
power button the
humidier does not
power on and the light
does not light up.
Improper connection of the
power adaptor.
Reconnect the power cable
ensuring it is properly connected
and press the power button again.
The humidier is
powered on and the fan
is working but no mist
is coming out.
The water tank has run out
or has too little water.
Rell the water tank.
The power-on indicator
light is on but the
diuser cannot be
started.
The water tank has too
much water in.
Pour out some water until the
water level is equal to or lower
than the max water marker.
The humidier emits a
strange smell.
There is limescale in the
water tank / the lled water
has impurities or the water
has been left for too long.
Clean the water tank. Place the
humidier in a cool and ventilated
space to air for 12 hours and then
rell with water.
Too little mist. Too much water / dirt on
the atomizer or an improper
adaptor being used.
Pour out some water. Clean the
atomizer or make sure a 5V/1A
adaptor is being used.
Humidier is noisy. Too little water in the water
tank or the humidier is not
placed on a level surface.
Add water to the water ll line and
place the humidier on a clean
level surface.
2.6 Product Specications

WARRANTY
Warranty Information
Think Gizmos, Unit 19, Lawson Hunt Industrial Park,
Broadbridge Heath, West Sussex, RH12 3JR
Tel.: +44/(0)203 384 8304
What is Covered:
This warranty covers any defects in materials or workmanship, with the exceptions stated
below.
How Long Coverage Lasts:
This warranty runs for 2 Year from the date your Think Gizmos Colour Changing Humidier
is delivered.
What is not covered:
Any problem that is caused by abuse, misuse, or an act of God (such as a ood) are not
covered.
What We Will Do:
If the Product proves defective during the warranty period, we will provide you with the
instructions for the return, and we will take one of the following actions: (i) replace the
Product with a product that is the same or equivalent to the Product you purchased; (ii)
repair the Product; or (iii) refund to you the whole of or part of the purchase price of the
Product.
How To Get Service:
To obtain instructions on how to obtain service under this warranty, contact our customer
service by phone or email. You will nd the contact details of our customer service below.
Customer service may ask you questions to determine your eligibility under this warranty,
and if you are eligible you’ll be given instructions for returning the defective Product. If
we send you a replacement or repair your Product, we will pay the cost of delivering the
replacement or repaired Product to you.
Do not return the item to the original place of purchase, please contact Think
Gizmos direct.
8

TG941 - LUFTBEFEUCHTER MIT
FARBWECHSEL
BEDIENUNGSANLEITUNG
English p 1
Deutsch p 9
Francais p 17
Italiano p 25
Español p 33
BITTE BEFOLGEN SIE DIESE ANWEISUNGEN SORGFÄLTIG UND BEWAHREN SIE DIESE BEDIENUNGSANLEITUNG ZUM SPÄTEREN
NACHSCHLAGEN AUF.
AUFGRUND STÄNDIGER VERBESSERUNGEN KANN DAS TATSÄCHLICHE PRODUKT VON DEN ABBILDUNGEN ABWEICHEN
Etwaige Verpackungsbänder, Tüten und Schrauben
sind nicht Bestandteil des Produktes. Bitte entfernen
und entsorgen Sie aus Sicherheitsgründen alle
Verpackungsbänder, Beutel und Schrauben, bevor Sie
dieses Produkt verwenden.

DEUTSCHE BEDIENUNGSANLEITUNG - INHALTSVERZEICHNIS
1. 1.1 Sicherheitsinformation ..................................................................................... 11
WICHTIGE INFORMATIONEN
10
2.1 Produktübersicht .............................................................................................. 12
2.2 Schnellstart ........................................................................................................ 13
2.3 Befüllen / Entleeren des Luftbefeuchters ................................................. 13-14
2.4 Ändern der Lichtfarbe ...................................................................................... 14
2.5 Fehlerbehebung ................................................................................................ 15
2.6 Produktspezikationen .................................................................................... 15
PRODUKTDETAILS
2.
Garantieinformationen ........................................................................................... 16
GARANTIE
Wenn Sie Probleme mit Ihrem Produkt oder Fragen haben, senden Sie uns bitte
eine E-Mail an:
Dies ist der schnellste Weg, Probleme zu lösen. Die schnelle Antwort mit der
Lösung Ihres Problems per E-Mail wird Sie überraschen. All unsere Produkte fallen
unter unsere Herstellergarantie, weitere Informationen nden Sie auf Seite 16.
Für weitere fantastische Produkte suchen Sie auf Amazon nach “Think Gizmos”.
Think Gizmos “Klein genug für einen persönlichen Service, groß genug, diesen auch
zu liefern”

11
1. WICHTIGE INFORMATIONEN
1.1 Sicherheitsinformation
Vielen Dank, dass Sie sich für den Farbwechsel-Luftbefeuchter Think Gizmos entschieden
haben. Bitte lesen Sie diese Bedienungsanleitung vor Gebrauch durch, da sie alle
Informationen enthält, die Sie benötigen, um dieses Produkt richtig zu genießen.
VORSICHT
ELEKTRONISCHES PRODUKT
Lassen Sie Kinder mit diesem Produkt nicht unbeaufsichtigt. Nicht geeignet für Kinder unter
3 Jahren.
Dieses Produkt sollte in Übereinstimmung mit dieser Bedienungsanleitung auf sichere
Weise verwendet werden, um Stromschläge oder Verletzungen zu vermeiden.
AUFSICHT EINES ERWACHSENEN ERFORDERLICH
WARNUNG! Versuchen Sie nicht, dieses Produkt in irgendeiner Weise zu modizieren, da
dies Ihre Garantie ungültig machen kann.
WARNUNG! Enthält Kleinteile, Kinderaufsicht ist jederzeit erforderlich.
Tauchen Sie den Farbwechsel-Luftbefeuchter NICHT in Wasser, er ist ein elektrisches
Produkt und kann beschädigt werden.
VERMEIDEN Sie es übermäßiger Hitze auszusetzen oder lassen Sie es in direktem
Sonnenlicht stehen.
• Verwenden Sie das mitgelieferte Netzkabel, Typ C, 1A. Wenn Sie ein alternatives
Netzkabel verwenden, müssen Sie darauf achten, dass die Stromspezikation 1A beträgt,
da sonst die Zerstäubungswirkung beeinträchtigt oder das Gerät sogar beschädigt wird.
• Achten Sie auf das verwendete Netzteil, dessen Leistung nicht niedriger als DC5/1A sein
darf, da dies sonst den Zerstäubungseekt beeinträchtigt.
• Entfernen Sie die Schale und den Deckel des Wassertanks, bevor Sie Wasser nachfüllen.
• Füllen Sie den Wassertank an der dafür vorgesehenen Wassernachfüllstelle auf. Die
Wassermenge sollte den maximalen Wasserstand nicht überschreiten.
• Die maximale Wassermenge beträgt 180 ml. Überschreiten Sie diese Menge nicht, da
dies dazu führen kann, dass Wasser austritt, der Luftbefeuchter beschädigt wird oder
der Zerstäubungseekt nicht richtig funktioniert.
• Verwenden Sie reines Wasser, um Schäden am Zerstäuber durch Verunreinigungen im
Wasser zu vermeiden und die beste Leistung zu erzielen.
• Die Wassertemperatur muss unter 60 °C (140 °F) liegen.
• Nach Gebrauch: Gießen Sie das verbleibende unbenutzte Wasser aus dem Tank, um das
Wasser frisch zu halten und zu verhindern, dass der Zerstäuber bei Nichtgebrauch im
Wasser sitzt.
• Wischen Sie beim Reinigen des Luftbefeuchters das Innere des Gehäuses mit einem
trockenen, dünnen Tuch aus und wischen Sie eventuellen Schmutz vorsichtig mit
einem Wattestäbchen vom Zerstäuber ab. Stellen Sie sicher, dass der Luftbefeuchter
ausgesteckt ist, bevor Sie das Gerät reinigen.
• Bewegen Sie den Luftbefeuchter NICHT, wenn er verwendet wird. Schalten Sie das USB-
Kabel aus und entfernen Sie es, bevor Sie es bewegen.
• Entfernen Sie die Außenhülle des Luftbefeuchters, wenn Sie ihn bewegen, damit Sie den
Wasserstand sehen und die Gefahr des Verschüttens verringern können.

12
2. PRODUKTDETAILS
2.1 Produktübersicht
1.
2.
3.
4.
5.
6.
7.
8.
9.
1. Nebelauslass
2. Außenhülle
3. Deckel des Wassertanks
4. Leichter Deckel
5. Wassertank
6. USB-C-Stromeingang
7. Luftbefeuchterbasis
8. Ein/Aus-Taste
9. Lichttaste

13
2.2 Schnellstart
• Füllen Sie den Luftbefeuchter gemäß den nachstehenden Füllanweisungen.
• Verbinden Sie das USB-Kabel mit einem kompatiblen USB-Stecker (nicht im Lieferumfang
enthalten).
• Stecken Sie das USB-C-Ende des Kabels in den Steckplatz auf der Rückseite des
Luftbefeuchters. Wenn der Strom eingeschaltet und angeschlossen wird, sollte der
Luftbefeuchter die Farben durchlaufen und dann das Licht ausschalten.
• Drücken Sie die Taste, um den Luftbefeuchter ein-/auszuschalten.
• Drücken Sie die Taste, um das Licht ein-/auszuschalten.
• Drücken Sie die Taste, um die Lichtfarben durchzuschalten. (Anweisungen zum
Farbwechsel siehe unten).
2.3 Befüllen / Entleeren des Luftbefeuchters
1. Entfernen Sie die äußere Schale, indem Sie die Schale anheben, während Sie die Basis des
Luftbefeuchters festhalten.
2. Suchen Sie die Wassernachfüllstelle, die mit „Wasserposition hinzufügen“ gekennzeichnet
ist. Befüllen Sie den Luftbefeuchter bis zur seitlich markierten Linie „Max Water“.
Wasserposition hinzufügen
Maximale Wasserlinie
Bitte beachten Sie: Überfüllen Sie den Luftbefeuchter nicht.
• Halten Sie die botTaste gedrückt, um den Luftbefeuchter auszuschalten, ohne die
Farben zu durchlaufen.
14
2.4 Ändern der Lichtfarbe
3. Legen Sie die Außenhülle wieder über die Basis, um den Luftbefeuchter gebrauchsfertig
zu schließen.
4. Um den Luftbefeuchter zu entleeren, entfernen Sie die Außenhülle wie oben beschrieben.
Suchen Sie die Wasserzugabeposition und kippen Sie den Luftbefeuchter nach oben, um
das Wasser aus der Wasserzugabeposition zu kippen.
5. Sobald sie leer ist, platzieren Sie die Außenschale wieder über der Basis.
Der Think Gizmos Farbwechsel-Luftbefeuchter kann in 5 verschiedenen Farben leuchten.
Rot Orange Grün Blau Weiß
Um durch die Farben zu blättern, befolgen Sie die nachstehenden Anweisungen:
• Drücken Sie die Taste, um den Luftbefeuchter einzuschalten, und er leuchtet rot
auf.
• Drücken Sie die Taste erneut, um die Farbe zu Orange zu ändern.
• Drücken Sie die buTaste erneut, um die Farbe auf Grün zu ändern.
• Drücken Sie die Taste erneut, um die Farbe auf Blau zu ändern.
• Drücken Sie die Taste erneut, um die Farbe auf Weiß zu ändern.
• Drücken Sie die Taste erneut, um den Luftbefeuchter auszuschalten.

15
Abmessungen 17.7x10.7x7.5cm (6.9x4.2x2.9in)
Gewicht ca. 322g (11.35oz)
Nennspannung/Strom DC5V/1A
Fassungsvermögen des Wassertanks 180ml
Zerstäubungsmenge 15–20 ml/Stunde
Laufzeit ca. 10 Stunden ca.
2.5 Fehlerbehebung
PROBLEM MÖGLICHE
GRÜNDE
LÖSUNG
Nach dem Drücken des
Netzschalters schaltet
sich der Luftbefeuchter
nicht ein und das Licht
leuchtet nicht auf.
Unsachgemäßer Anschluss
des Netzteils.
Schließen Sie das Netzkabel
wieder an, stellen Sie sicher, dass
es richtig angeschlossen ist, und
drücken Sie erneut den Netzschal-
ter.
Der Luftbefeuchter ist
eingeschaltet und der
Lüfter läuft, aber es
tritt kein Nebel aus.
Der Wassertank ist leer oder
hat zu wenig Wasser.
Füllen Sie den Wassertank wieder
auf.
Die Betriebsanzeige
leuchtet, aber der
Diusor kann nicht
gestartet werden.
Der Wassertank enthält zu
viel Wasser.
Gießen Sie etwas Wasser aus,
bis der Wasserstand gleich
oder niedriger als die maximale
Wassermarkierung ist.
Der Luftbefeuchter
verströmt einen
seltsamen Geruch.
Im Wassertank sind
Kalkablagerungen / das
eingefüllte Wasser hat
Verunreinigungen oder
das Wasser wurde zu lange
stehen gelassen.
Reinigen Sie den Wassertank.
Stellen Sie den Luftbefeuchter 12
Stunden lang an einen kühlen und
belüfteten Ort, um ihn zu lüften,
und füllen Sie ihn dann wieder mit
Wasser auf.
Zu wenig Nebel. Zu viel Wasser / Schmutz
auf dem Zerstäuber oder
ein falscher Adapter wird
verwendet.
Gießen Sie etwas Wasser aus.
Reinigen Sie den Zerstäuber oder
stellen Sie sicher, dass ein 5V/1A-
Adapter verwendet wird.
Luftbefeuchter ist laut. Zu wenig Wasser im
Wassertank oder der
Luftbefeuchter steht nicht
auf einer ebenen Fläche.
Füllen Sie Wasser in die
Wasserfülllinie und stellen Sie den
Luftbefeuchter auf eine saubere,
ebene Oberäche.
2.6 Produktspezikationen

Think Gizmos, Unit 19, Lawson Hunt Industrial Park,
Broadbridge Heath, West Sussex, RH12 3JR
Tel.: +44/(0)203 384 8304
16
GARANTIE
Garantieinformation
Was ist abgedeckt:
Die Garantie deckt alle Defekte von Materialien und der Verarbeitung, mit Ausnahme der
unten angeführten Fälle.
Wie lange die Garantie gilt:
Die Garantie gilt für 2 Jahr ab dem Lieferdatum Ihrer Think Gizmos Luftbefeuchter mit
Farbwechsel.
Was nicht abgedeckt ist:
Jedes Problem das durch Missbrauch oder höhere Gewalt (wie Überschwemmung) entsteht
ist nicht gedeckt.
Was wir tun werden:
Sollte das Produkt innerhalb der Laufzeit der Garantie als defekt befunden werden,
erhalten Sie Anweisungen für die Rückgabe und wir werden eine der folgenden Handlungen
vornehmen: (i) wir tauschen das Produkt gegen ein gleiches oder gleichwertiges Produkt
um, (ii) wird reparieren das Produkt, oder (iii) wir erstatten Ihnen den vollen oder einen
Teilbetrag des Kaufpreises des Produkts zurück.
Wie man Service in Anspruch nehmen kann:
Kontaktieren Sie unseren Kundendienst per Telefon oder E-Mail, um Anweisungen zu
erhalten wie Sie eine Serviceleistung unter diesen Garantiebestimmungen erhalten. Sie
nden die Kontaktdaten unseres Kundendienstes weiter unten. Unser Kundendienst kann
Ihnen Fragen stellen, um festzustellen, ob es sich um einen Garantiefall handelt. Sollte dies
der Fall sein, erhalten Sie Anweisungen zur Rücksendung des defekten Produkts. Sollten wir
Ihnen einen Ersatz schicken oder das Produkt reparieren, übernehmen wir die Lieferkosten.
Schicken Sie den Artikel nicht an den Händler zurück bei dem Sie ihn erworben
haben, sondern kontaktieren Sie bitte Think Gizmos direkt.

TG941 - HUMIDIFICATEUR À
CHANGEMENT DE COULEUR
Manuel de l’utilisateur
English p 1
Deutsch p 9
Francais p 17
Italiano p 25
Español p 33
VEUILLEZ SUIVRE ATTENTIVEMENT CES INSTRUCTIONS ET CONSERVER CE LIVRET D’INSTRUCTIONS POUR RÉFÉRENCE
ULTÉRIEURE.
EN RAISON D’AMÉLIORATIONS CONTINUES, LE PRODUIT RÉEL PEUT ÊTRE DIFFÉRENT DES ILLUSTRATIONS
Les attaches, sacs et vis d’emballage ne font pas partie du
produit. Pour des raisons de sécurité, veuillez retirer et
jeter toutattaches d’emballage, sacs et vis avant d’utiliser ce
produit.

MANUEL FRANCAIS - SOMMAIRE
1. 1.1 Information sur la sécurité .............................................................................. 19
INFORMATIONS IMPORTANTES
18
2.1 Présentation du produit ................................................................................... 20
2.2 Démarrage rapide ............................................................................................. 21
2.3 Remplissage / Vidange de l’humidicateur .............................................. 21-22
2.4 Changer la couleur de la lumière .................................................................... 22
2.5 Dépannage ......................................................................................................... 23
2.6 Spécications du produit ................................................................................. 23
DÉTAILS DU PRODUIT
2.
Informations sur la garantie .................................................................................. 24
GARANTIE
Si vous avez des problèmes avec votre produit ou si vous avez des questions,
n’hésitez pas à nous contacter par mail:
Cela est la manière plus rapide de résoudre les problèmes. Vous seriez étonné à la
vitesse de notre réponse avec une résolution.
Tous nos produits sont couverts par la garantie de notre fabricant, les détails sont
à la page 24.
Pour savoir en plus sur nos produits incroyables, cherchez “Think Gizmos” en
Amazon.
Think Gizmos “Assez petit pour tenir à coeur, assez grand pour livrer”.

19
1. INFORMATIONS IMPORTANTES
1.1 Information sur la sécurité
Merci d’avoir acheté l’humidicateur à changement de couleur Think Gizmos. Veuillez lire ce
manuel d’instructions avant utilisation car il contient toutes les informations dont vous avez
besoin pour proter correctement de ce produit.
PRODUIT ELECTRONIQUE
Ne laissez pas les enfants sans surveillance avec ce produit. Ne convient pas aux enfants de
moins de 3 ans.
Ce produit doit être utilisé conformément à ce manuel d’utilisation de manière sûre pour
éviter les chocs électriques ou les blessures.
SURVEILLANCE D’UN ADULTE REQUISE
ATTENTION! N’essayez pas de modier ce produit de quelque manière que ce soit car cela
pourrait annuler votre garantie.
ATTENTION! Contient de petites pièces, la surveillance d’un enfant est requise en tout
temps.
NE PAS immerger l’humidicateur à changement de couleur dans l’eau, c’est un produit
électrique et il sera endommagé.
ÉVITEZ de l’exposer à une chaleur excessive ou laissez-le à la lumière directe du soleil.
• Utilisez le cordon d’alimentation fourni, Type C, 1A. Si vous utilisez un cordon
d’alimentation alternatif, vous devez faire attention à vous assurer que la spécication
actuelle est de 1A, sinon cela aectera l’eet d’atomisation ou même endommagera
l’appareil.
• Faites attention à l’adaptateur secteur utilisé, sa sortie ne peut pas être inférieure à
DC5/1A, sinon cela aectera l’eet d’atomisation.
• Retirez la coque et le couvercle du réservoir d’eau avant de le remplir d’eau.
• Remplissez le réservoir d’eau au point de remplissage d’eau désigné. La quantité d’eau
ne doit pas dépasser le niveau d’eau maximum.
• Le volume d’eau maximum est de 180 ml, ne dépassez pas cette quantité ou cela peut
provoquer une fuite d’eau, endommager l’humidicateur ou l’eet d’atomisation ne pas
fonctionner correctement.
• Utilisez de l’eau pure, pour éviter d’endommager l’atomiseur en raison d’impuretés dans
l’eau et pour donner les meilleures performances.
• La température de l’eau doit être inférieure à 60°C (140°F).
• Après utilisation : versez l’eau inutilisée restante dans le réservoir pour garder l’eau
fraîche et empêcher l’atomiseur de rester dans l’eau lorsqu’il n’est pas utilisé.
• Lors du nettoyage de l’humidicateur, essuyez l’intérieur du boîtier avec un chion n et
sec et essuyez soigneusement toute saleté de l’atomiseur avec un coton-tige. Assurez-
vous que l’humidicateur est débranché avant de nettoyer l’appareil.
• NE PAS déplacer l’humidicateur lorsqu’il est utilisé. Éteignez et retirez le câble USB
avant de vous déplacer.
• Retirez la coque extérieure de l’humidicateur lorsque vous vous déplacez an de
pouvoir voir le niveau d’eau et de réduire les risques de déversement.
AVERTISSEMENT

20
2. DÉTAILS DU PRODUIT
2.1 Présentation du produit
1.
2.
3.
4.
5.
6.
7.
8.
9.
1. Sortie de brume
2. Coque extérieure
3. Couvercle du réservoir d’eau
4. Couvercle léger
5. Réservoir d’eau
6. Entrée d’alimentation USB-C
7. Base de l’humidicateur
8. Bouton Marche/Arrêt
9. Bouton d’éclairage
Table of contents
Languages:


