ThinkVision Pro2820 User manual

ThinkVision Pro2820 Flat Panel Monitor
User’s Guide

Product Number
60B5-RAR6-WW
FirstEdition(November2013)
©Copyright Lenovo 2013
All rightsreserved.
LENOVO products, d t , computer softw re, nd services h ve been developed exclusively t priv te expense nd re sold to government l entities s commerci l items
sdefined by 48 C.F.R. 2.101 withlimited nd restricted rightsto use, reproduction nd disclosure.
LIMITED ANDRESTRICTED RIGHTSNOTICE:IF products, d t , computer softw re, or services redelivered pursu nt Gener lServices Administr tion
"GSA" contr ct,use,reproduction, ordisclosure issubject to restrictions set forth in Contr ct No.GS-35F-05925.
© Copyright Lenovo 2013
i

Contents
Product Number ................................................................................................................................................................................................................... i
Contents................................................................................................................................................................................................................................ ii
Safety information...............................................................................................................................................................................................................iii
Safety and Maintenance Guidelines.................................................................................................................................................................................. iv
Chapter 1 Getting started...............................................................................................................................................................................................1-1
Shipping contents.............................................................................................................................................................................................................1-1
Product overview..............................................................................................................................................................................................................1-2
Types of adjustments.......................................................................................................................................................................................................1-2
User controls.....................................................................................................................................................................................................................1-3
Cable lock slot...................................................................................................................................................................................................................1-4
Setting up your monitor...................................................................................................................................................................................................1-4
Connecting and turning on your monitor.....................................................................................................................................................................1-4
Registering your option ...................................................................................................................................................................................................1-
Chapter 2 djusting and using your monitor ...............................................................................................................................................................2-1
Comfort and accessibility.................................................................................................................................................................................................2-1
Arranging your wor area...............................................................................................................................................................................................2-1
Quic tips for healthy wor habits..................................................................................................................................................................................2-2
Accessibility information..................................................................................................................................................................................................2-2
Adjusting your monitor image........................................................................................................................................................................................2-3
Using the direct access controls......................................................................................................................................................................................2-3
Using the On-Screen Display (OSD) controls.................................................................................................................................................................2-3
Selecting a supported displaymode ..............................................................................................................................................................................2-6
Understanding power management.............................................................................................................................................................................2-6
Caring for your monitor...................................................................................................................................................................................................2-7
Detaching the monitor stand..........................................................................................................................................................................................2-7
Chapter 3 Reference information..................................................................................................................................................................................3-1
Monitor specifications......................................................................................................................................................................................................3-1
Troubleshooting................................................................................................................................................................................................................3-2
Manual image setup........................................................................................................................................................................................................3-3
Manually installing the monitor driver ..........................................................................................................................................................................3-4
Service information.................................................................................................................................................................3-8
ppendix Service and Support.................................................................................................................................................................................... -1
Registering your option................................................................................................................................................................................................... A-1
Online technical support................................................................................................................................................................................................. A-1
Telephone technical support .......................................................................................................................................................................................... A-1
Worldwide telephone list............................................................................................................................................................................................... A-1
ppendix B Notices..........................................................................................................................................................................................................B-1
Recycling information......................................................................................................................................................................................................B-2
Collecting and recycling a disused Lenovo computer or monitor..............................................................................................................................B-2
Disposing of Lenovo computer components ...............................................................................................................................................................B-3
Trademar s.......................................................................................................................................................................................................................B-3
Tur ish statement of compliance....................................................................................................................................................................................B-4
©Copyright Lenovo2013
ii
Safety information
General Safetyguidelines
For tips to help you use your computer s fety, go to:
http://www.lenovo.com/s fety
Before inst lling this product, re d the S fety Inform tion.
© Copyright Lenovo 2013
iii

Safety and Maintenance Guidelines
Important SafetyInformation
The power cord is designed for use with your monitor. To use a different cord, use only a power source and connection
compatible with this monitor.
W
W
W
WA
AA
AR
RR
RN
NN
NI
II
IN
N
N
NG
GG
G: Always connect your monitor, the computer, and other equipment to a grounded (earthed) power
outlet. To reduce the risk of electric shock or damage to your equipment, do not disable the power cord grounding
feature. The grounding plug is an important safety feature.
W
WW
WA
A
A
AR
R
R
RN
NN
NI
I
I
IN
NN
NG
GG
G: For your safety, be sure that the grounded power outlet you plug the power cord into is easily
accessible to the operator and located as close to the equipment as possible. To disconnect power from the
equipment, unplug the power cord from the power outlet by grasping the plug firmly. Ne er pull on the cord.
C
CC
CA
AA
AU
UU
UT
TT
TI
II
IO
OO
ON
N
N
N: To protect your monitor, as well as your computer, connect all power cords for your computer and its
peripheral de ices (such as a monitor, printer, or scanner) to a surge protection de ice such as a power strip with
surge protection or uninterruptible power supply (UPS). Not all power strips pro ide surge protection; the power strips
must be specifically labelled as ha ing this ability. Use a power strip whose manufacturer offers a damage
replacement policy, so you can replace your equipment if surge protection fails.
C
C
C
CA
A
A
AU
U
U
UT
TT
TI
II
IO
OO
ON
NN
N: A certified power supply cord has to be used with this equipment. The rele ant national installation
and/or equipment regulations shall be considered. A certified power supply cord not lighter than ordinary poly inyl
chloride flexible cord according to IEC 60227 (designation H05VV-F 3G 0.75mm² or H05VVH2-F2 3G 0.75mm²) shall be
used. An alternati e flexible cord is synthetic rubber.
S
S
S
Sa
a
a
af
f
f
fe
ee
et
tt
ty
y
y
y
P
P
P
Pr
r
r
re
e
e
ec
cc
ca
aa
au
u
u
ut
t
t
ti
ii
io
oo
on
n
n
ns
s
s
s
■Use only a power source and connection compatible with this monitor, as indicated on the label/back plate of the
monitor.
■ Be sure the total ampere rating of the products connected to the outlet does not exceed the current rating of the
electrical outlet, and the total ampere rating of the products connected to the power cord does not exceed
the rating of the power cord. Look on the power label to determine the ampere rating (Amps or A) for each
de ice.
■ Install your monitor near a power outlet that you can easily reach. Disconnect the monitor by grasping the plug
firmly and pulling it from the outlet. Ne er disconnect the monitor by pulling the cord.
■ Do not allow anything to rest on the power cord. Do not walk on the cord.
■ While using VESA mount application, the AC Inlet must face to down side. Do not face any other position.
M
MM
Ma
aa
ai
ii
in
nn
nt
t
t
te
e
e
en
nn
na
aa
an
nn
nc
cc
ce
e
e
e
G
GG
Gu
uu
ui
i
i
id
d
d
de
e
e
el
ll
li
ii
in
n
n
ne
e
e
es
ss
s
To enhance the performance and extend the life of your monitor:
■ Do not open your monitor cabinet or attempt to ser ice this product yourself. If your monitor is not operating
properly or has been dropped or damaged, contact your Leno o authorized dealer, reseller, or ser ice
pro ider.
■ Adjust only those controls that are described in the operating instructions.
■ Turn your monitor off when not in use. You can substantially increase the life expectancy of the monitor by using
a screen sa er program and turning off the monitor when not in use.
■ Keep your monitor in a well- entilated area, away from excessi e light, heat, or moisture.
■ Slots and openings in the cabinet are pro ided for entilation. These openings must not be blocked or co ered.
Ne er push objects of any kind into cabinet slots or other openings.
■ Unplug the monitor from the power outlet before cleaning. Do not use liquid cleaners or aerosol cleaners.
■ Do not drop the monitor or place it on an unstable surface.
■ When remo ing the monitor base, you must lay the monitor face down on a soft area to pre ent it from getting
scratched, defaced, or broken.
C
CC
Cl
ll
le
ee
ea
aa
an
nn
ni
ii
in
nn
ng
g
g
g
t
tt
th
h
h
he
e
e
e
M
M
M
Mo
o
o
on
nn
ni
ii
it
t
t
to
oo
or
rr
r
The monitor is a high-quality optical de ice that requires special care when cleaning. To clean the monitor, follow
these steps:
1. Turn off the computer and the monitor.
2. Unplug your monitor from the power outlet before cleaning.
C
CC
CA
A
A
AU
UU
UT
TT
TI
II
IO
OO
ON
NN
N: Do not use benzene, thinner, ammonia, or any olatile substance to clean the monitor screen or
cabinet.
These chemicals may damage the monitor. Do not use liquid or aerosol cleaners. Ne er use water to clean an LCD
screen.
3. Wipe the screen with a dry, soft, clean cloth. If the screen requires additional cleaning, use an antistatic screen
cleaner.
4. Dust the monitor housing. Use a damp cloth to clean the cabinet. If the cabinet requires additional cleaning, use a
clean cloth dampened with isopropyl alcohol.
5. Plug in the monitor.
6. Turn on the monitor and the computer.
iv © Copyright Lenovo 2013

Chapter 1 Getting started
This User’s Guide cont ins det iled inform tion on the ThinkVision Pro2820 Fl t P nel Monitor. For quick overview, ple se see the
Setup Poster th t w s shipped with your monitor.
Shipping contents
The product p ck ge should include the following items:
● Inform tion Flyer
● Fl t P nel Monitor
● Power Cord
● An log Interf ce C ble
● USB 3.0 C ble
● DP Cable
Ch pter 1. Getting st rted 1-1
Note: To tt ch VESA mount, ple se see
“Det ching the monitor st nd” on p ge 2-7.
Product overview
This section will provide inform tion on djusting monitor positions, setting user controls, nd using the c ble lock slot.
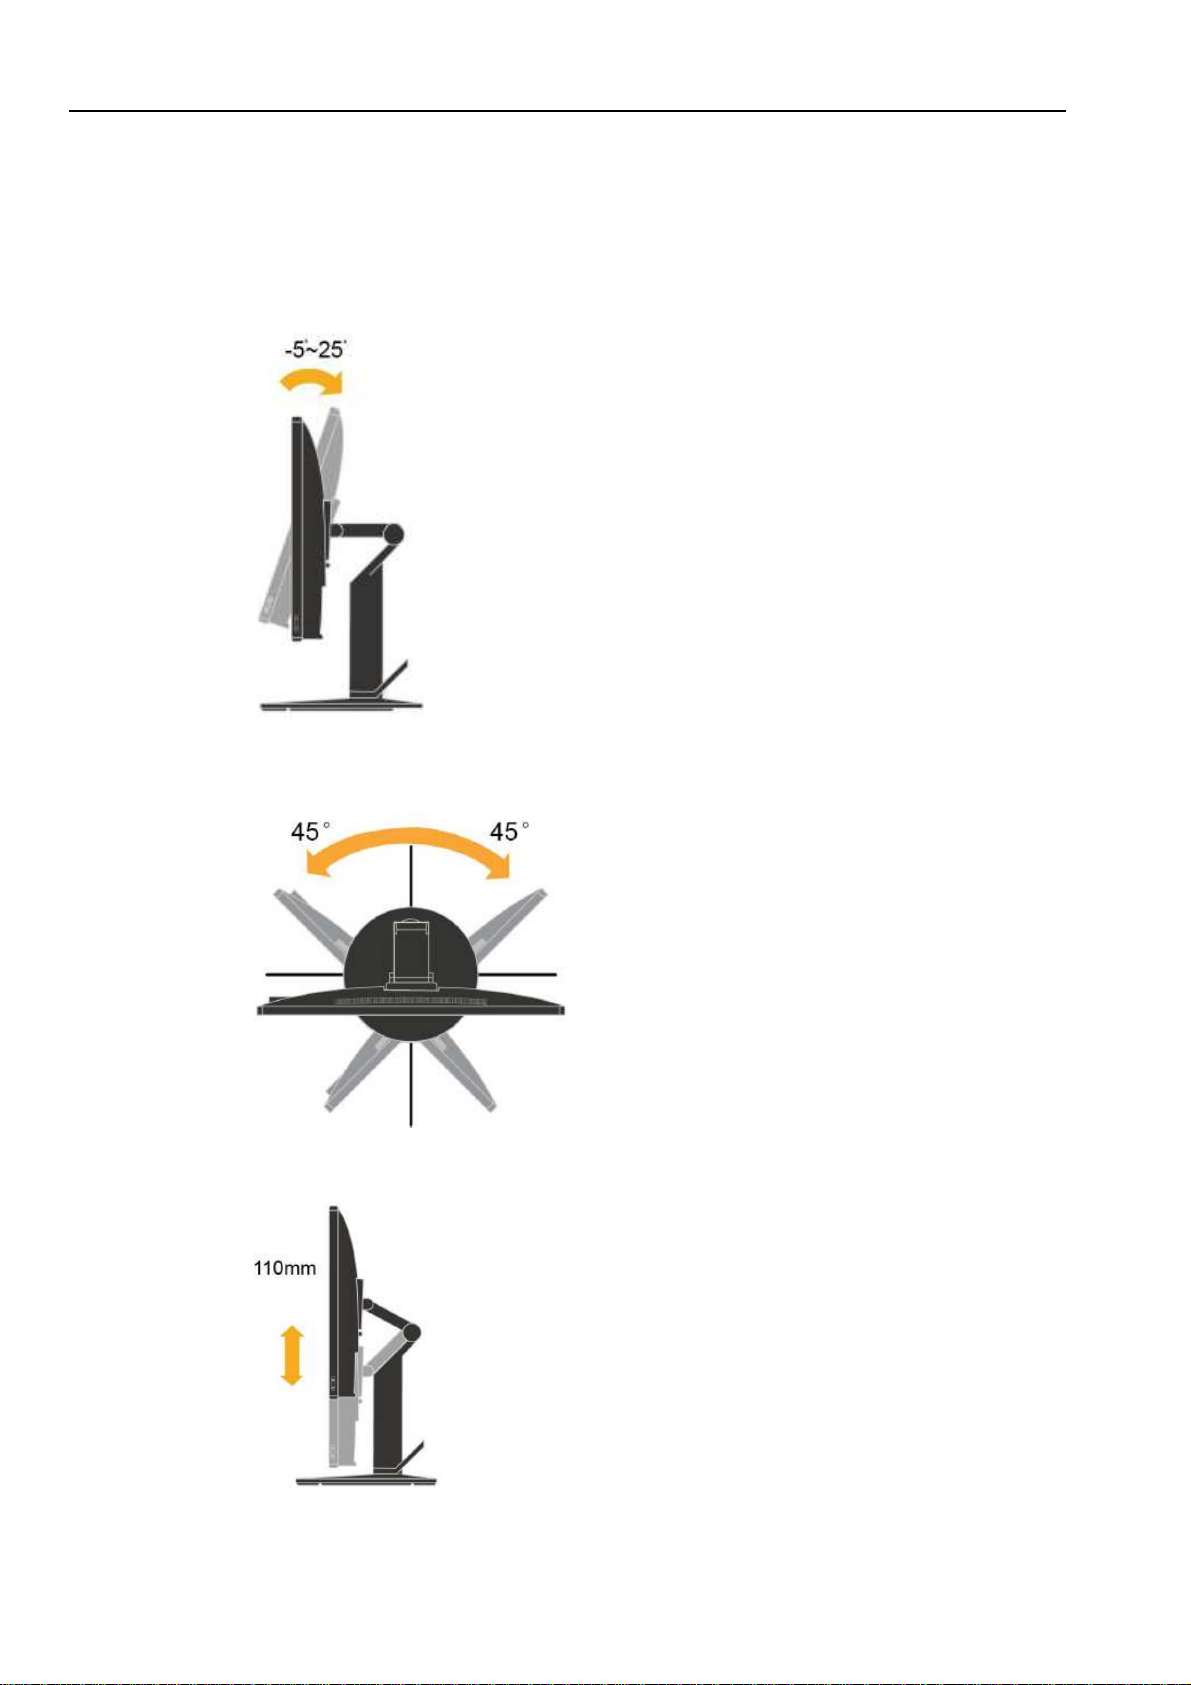
Types of adjustments
Tilt
Ple se see the illustr tion below for n ex mple of the tilt r nge.
Swivel
With the built-inpedest l, you c n tilt nd swivel the monitor for the most comfort ble viewing ngle.
Height Adjustment
After pressing the top of the monitor, you c n djust the height of the monitor.
1-2 ThinkVision Pro2820 Fl t P nelMonitor User’s Guide
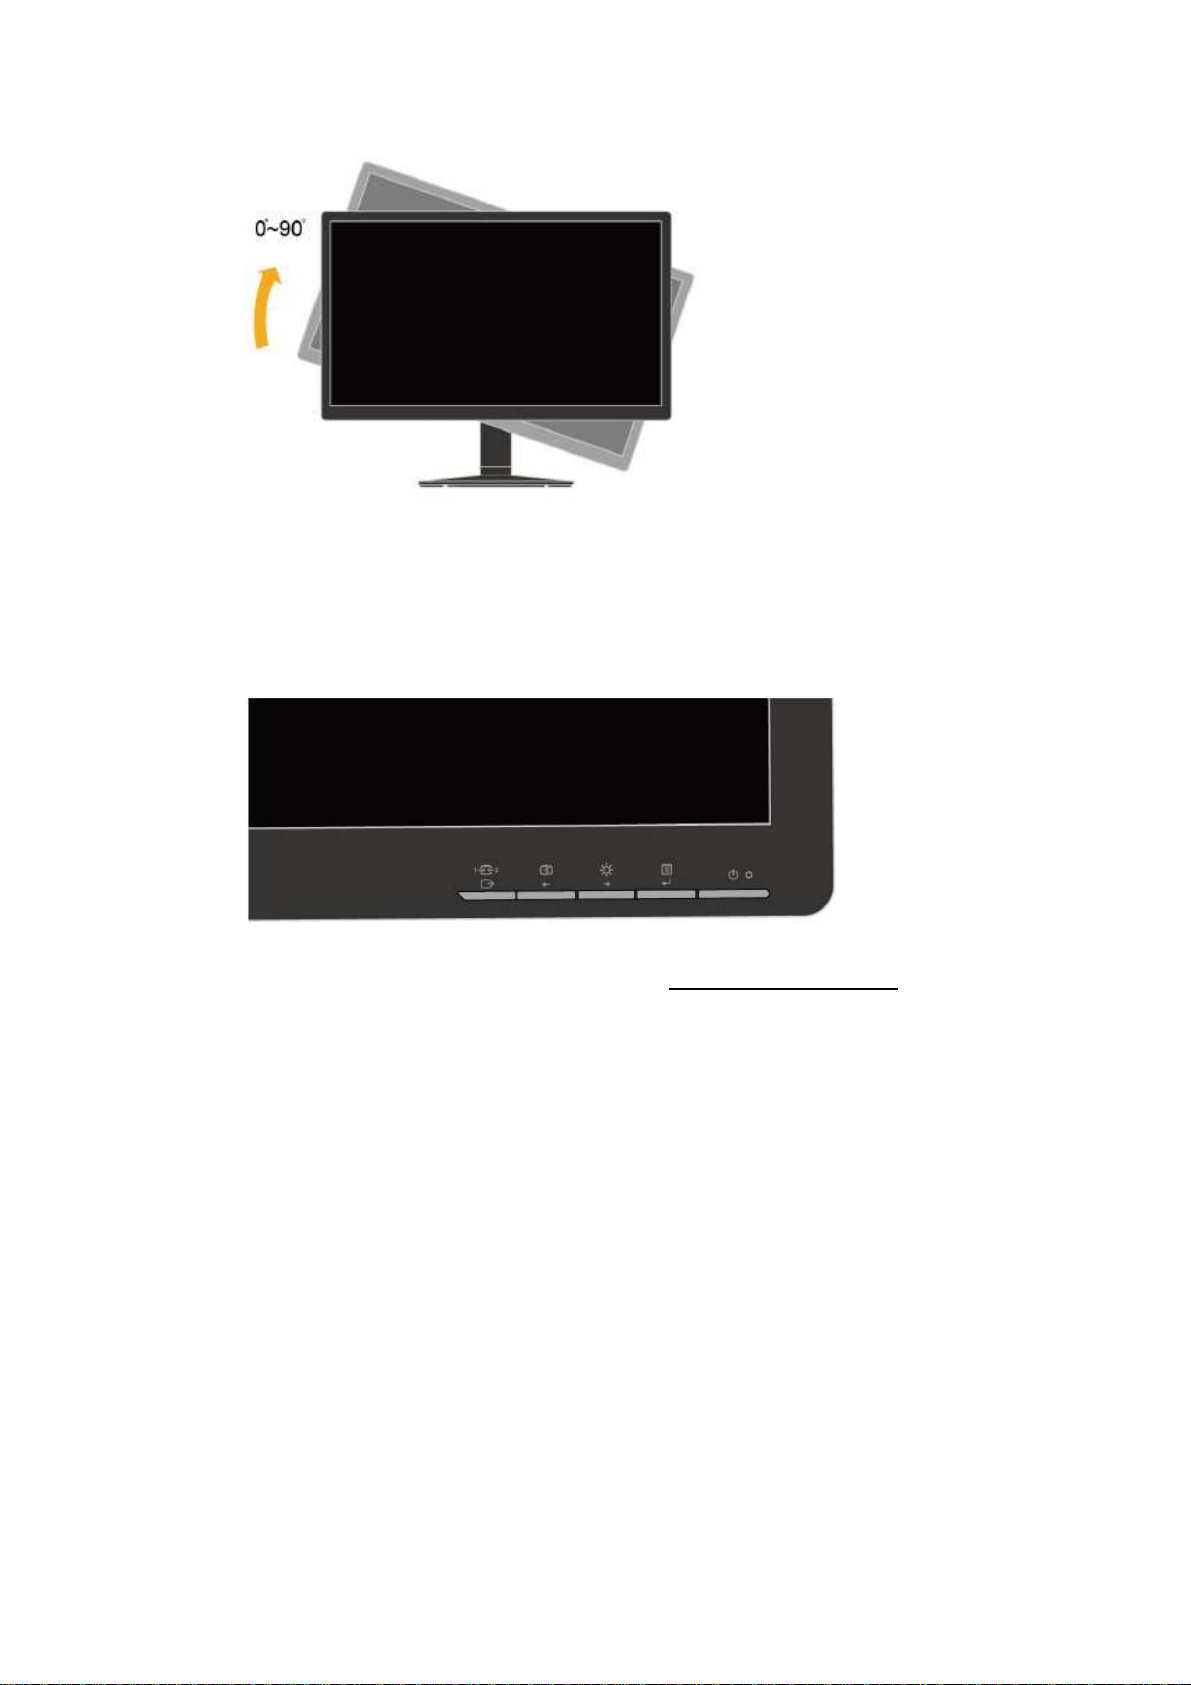
MonitorPivot
- Adjust height to the top position before rot tion the monitor.
- Rot te clockwise until the monitor stops t 90°.
User controls
Your monitor h scontrolson the front which re usedto djust the displ y.
Forinform tion on how to use these controls, ple se see “Adjusting your monitor im ge ” on p ge 2-3.
Ch pter1. Getting st rted 1-3

Cable lock slot
Your monitor is equipped with c ble lock slot loc ted on the re r of your monitor. Ple se follow the
instructions th t c me with the c ble lock to tt ch it.
Setting up your monitor
This section providesinform tion to help you set up your monitor.
Connecting and turning on your monitor
Note: Be sure to re d the S fety Inform tion loc ted in the Monitor S fety, troubleshooting nd W rr nty
Guide before c rrying out this procedure.
1. Power off your computer nd ll tt ched devices, nd unplug the computer power cord.
2. Connect the n log sign l c ble to the D-SUB connector of the monitor nd the other end on the b ck of
the computer.
1-4 ThinkVision Pro2820 Fl t P nelMonitor User’s Guide
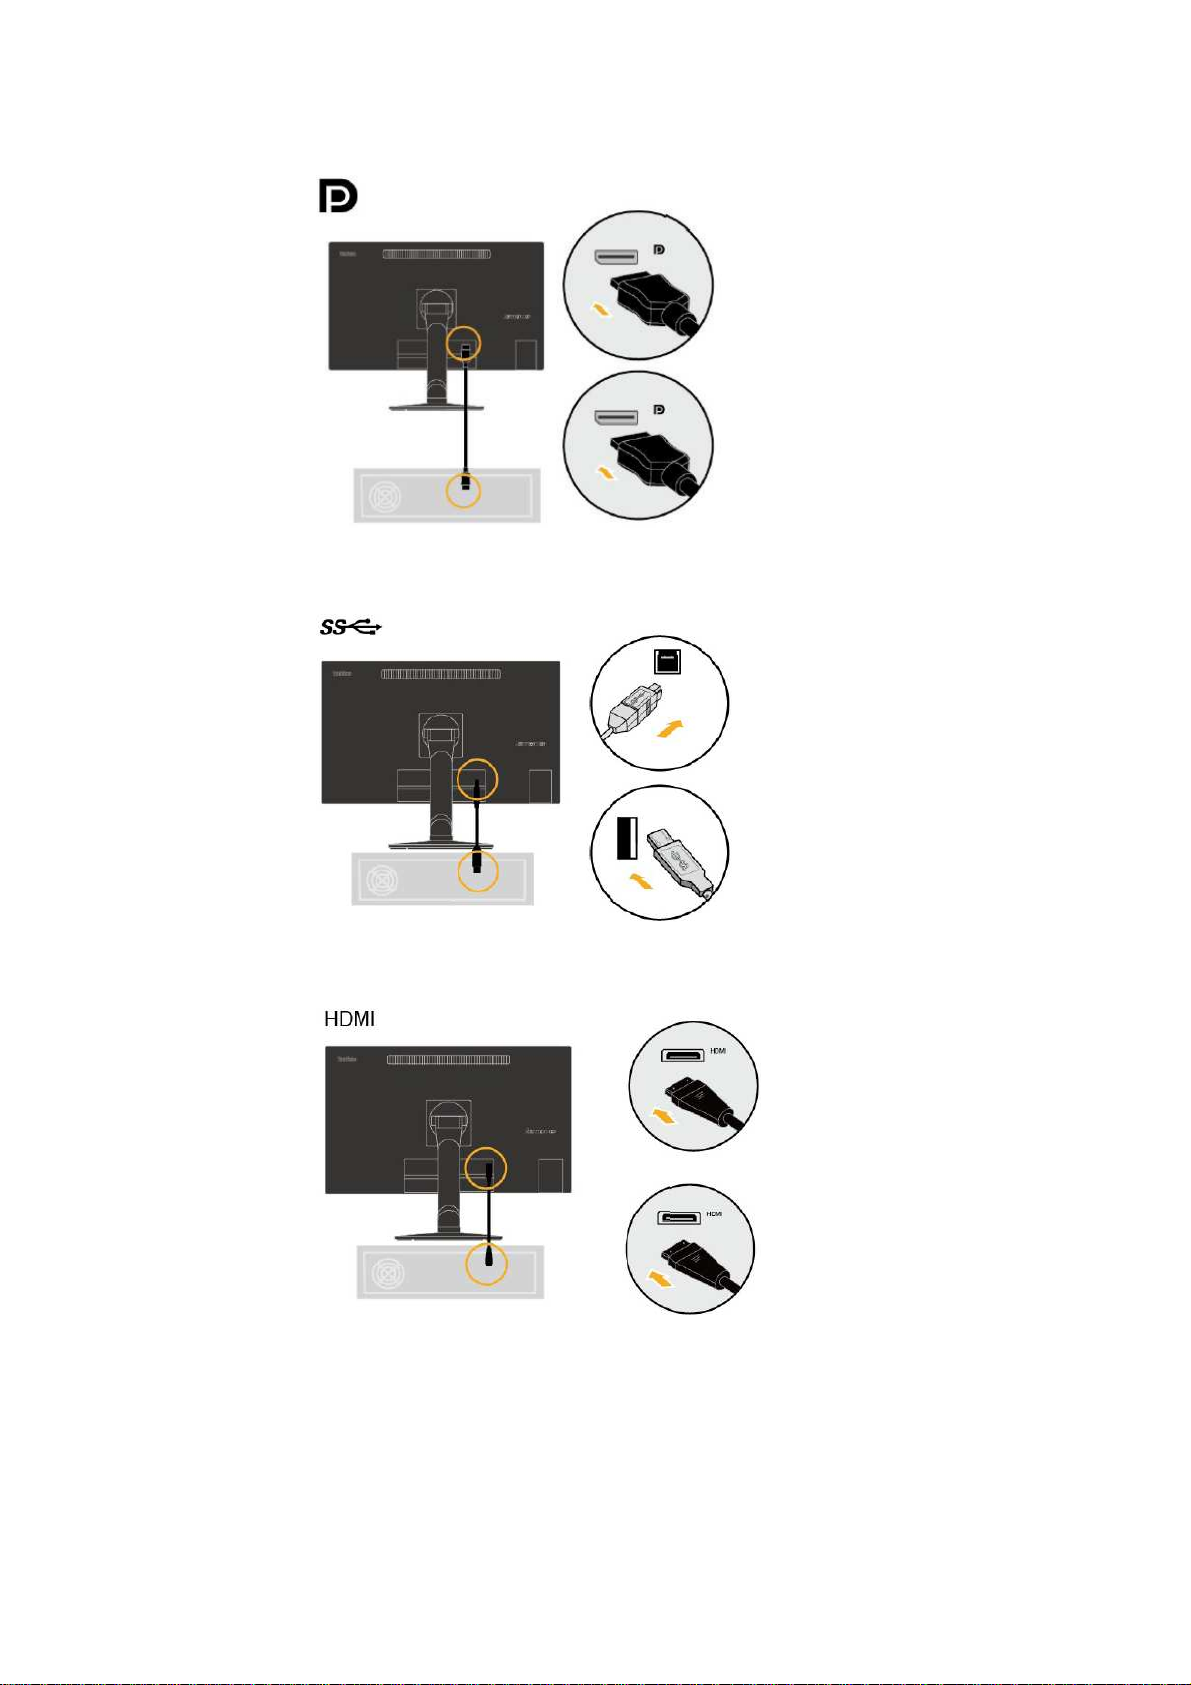
3. Connect one end of the DP c ble to the DP connector on the b ck of the computer, nd the other end
to the DP connector on the monitor.
4. Connect one end of the USB hub c ble to the USB connector on the b ck of the computer, nd the
other end to the upstre m USB connector on themonitor.
5. Connect one end of the HDMI c ble to the HDMI connector on the b ck of the computer, nd the
other end to the HDMI connector on the monitor.
Ch pter1. Getting st rted 1-5
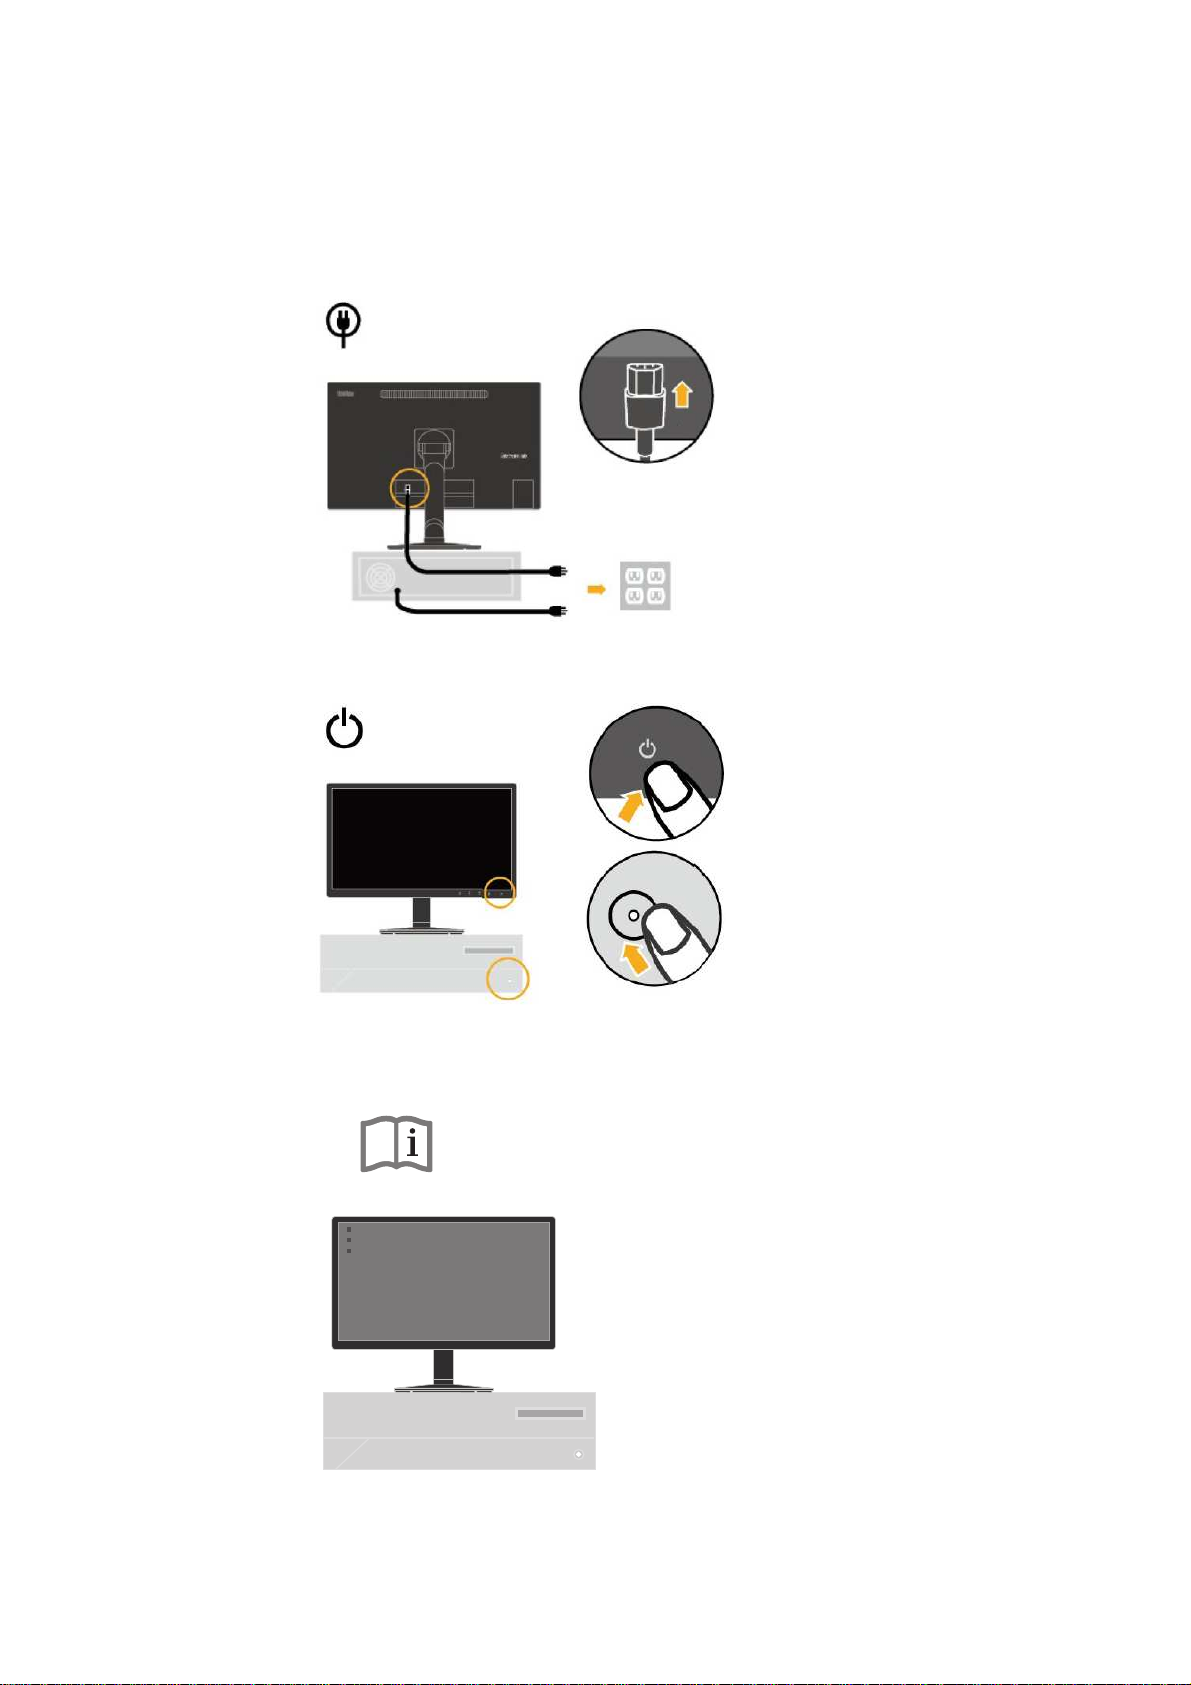
6. Plug the monitor power cord nd the computer cord into grounded electric l outlets.
Note: A certifiedpower supply cord h sto be used with this equipment. The relev nt n tion l
inst ll tion nd/or equipment regul tions sh ll be considered. A certified power supply cord not lighter
th n ordin ry polyvinyl chloride flexible cord ccording to IEC 60227 (design tion H05VV-F 3G 0.75mm²
or H05VVH2-F2 3G 0.75mm²) sh ll be used. Altern tive flexible cord be of synthetic rubber ccording
to IEC 60245 (design tion H05RR-F 3G 0.75mm²) sh ll be used.
7. Power on the monitor nd the computer.
8.
To install the monitor driver, you must download it from Lenovo website
(http://support.lenovo.com/Pro2820D) and follow the instructions on page 3-4.
1-6 ThinkVision Pro2820 Fl t P nelMonitor User’s Guide

9. To optimize your monitor im ge, if using the n log c ble, press the Autom tic Im ge Setup key
Autom tic im ge setup requires th t the monitor is w rmed up for t le st 15 minutes. This is not required
if you re using the Digit l c ble.
Note: If utom tic im ge setup does not est blish the im ge th t you prefer, perform m nu l
im ge setup. See “M nu l im ge setup” on p ge 3-3.
Registering your option
Th nk you for purch sing this Lenovo
®
product. Ple se t ke few moments to register your product nd
provide us with inform tion th t will help Lenovo to better serve you in the future. Your feedb ck is v lu ble
to us in developing products nd services th t re import nt to you, s well s in developing better w ys to
communic te with you. Register your option on the followingWeb site:
http://www.lenovo.com/register
Lenovo will send you inform tion nd upd tes on your registered product unless you indic te on the Web
site questionn ire th t you do not w nt to receive further inform tion
.
Ch pter1. Getting st rted 1-7

Chapter 2 Adjusting and using your monitor
This section will give you inform tion on djusting nd using your monitor.
Comfort and accessibility
Good ergonomic pr ctice is import nt to get the most from your person l computer nd to void
discomfort. Arr nge your workpl ce nd the equipment you use to suit your individu l needs
nd the kind of work th t you perform. In ddition, use he lthy work h bits to m ximize your
perform nce nd comfort while using your computer.
Arranging your work area
Use work surf ce of ppropri te height nd v il ble working re to llow you to work in
comfort.
Org nize you work re to m tch the w y you use m teri ls nd equipment. Keep your work
re cle n nd cle r for the m teri ls th t you typic lly use nd pl ce the items th t you use most
frequently, such s the computer mouse or telephone, within the e siest re ch.
Equipment l yout nd setup pl y l rge role in your working posture. The following topics
describe how to optimize equipment setup to chieve nd m int in good working posture.
Positioningandviewingyourmonitor
Position nd djust your computer monitor for comfort ble viewing by considering the following
items:
● Viewing distance: Optim l viewing dist nces for monitors r nge from pproxim tely 510mm
to 760mm (20 in to 30 in) nd c n v ry depending on mbient light nd time of d y. You c n
chieve different viewing dist nces by repositioning your monitor or by modifying your posture
or ch ir position. Use viewing dist nce th t is most comfort ble for you.
● Monitor height: Position the monitor so your he d nd neck re in comfort ble nd neutr l
(vertic l, or upright) position. If your monitor does not h ve height djustments, you might h ve
to pl ce books or other sturdy objects under the b se of the monitor to chieve the desired height.
A gener l guideline is to position the monitor such th t the top of the screen is t or slightly below
your eye-height when you re comfort bly se ted. However, be sure to optimize your monitor
height so the line of site between your eyes nd the center the monitor suits your preferences for
visu l dist nce nd comfort ble viewing when your eye muscles re in rel xed st ted.
● Tilt : Adjust the tilt of your monitor to optimize the ppe r nce of the screen content nd to
ccommod te your preferred he d nd neck posture.
● General location: Position your monitor to void gl re or reflections on the screen from
overhe d lighting or ne rby windows.
The following re some other tips for comfort ble viewing of your monitor:
● Use dequ te lighting for the type of work you re performing.
● Use the monitor brightness, contr st, nd im ge djustment controls, if equipped, to optimize
the im ge on your screen to meet your visu l preferences.
● Keep your monitor screen cle n so you c n focus on the screen’s contents.
Any concentr ted nd sust ined visu l ctivity c n be tiring for your eyes. Be sure to periodic lly
look w y from your monitor screen nd focus on f r object to llow your eye muscles to rel x.
If you h ve questions on eye f tigue or visu l discomfort, consult vision c re speci list for
dvice.
2-1 ThinkVision Pro2820 Fl t P nel Monitor User’s Guide

uick tips for healthy work habits
The following inform tion is summ ry of some import nt f ctors to consider to help you
rem in comfort ble nd productive while you use your computer.
● Good posture starts with equipment setup: The l yout of your work re nd the setup of
your computer equipment h ve l rge effect on your posture while using your computer. Be
sure to optimize the position nd orient tion of your equipment by following the tips outlined in
“Arr nging your work re ” on p ge 2-1 so you c n m int in comfort ble nd productive
posture. Also, be sure to use the djustment c p bilities of your computer components nd office
furniture to best suit your preferences now nd s your preferences ch nge over time.
● Minor changes in posture can help avoid discomfort: The longer you sit nd work in front of
your computer, the more import nt it is to observe your working posture. Avoid s summing
ny one posture for n extended period of time. Periodic lly m ke minor modific tions in your
posture to help deter ny discomforts th t might rise. M ke use of ny djustments th t your
office furniture or equipment provide to ccommod te ch nges in posture
● Short, periodic brea s help ensure healthy computing: Bec use computing is prim rily
st tic ctivity, it is p rticul rly import nt to t ke short bre ks from your work. Periodic lly, st nd
up in front of your work re , stretch, w lk for drink of w ter, or otherwise t ke short bre k
from using your computer. A short bre k from work gives your body welcome ch nge in
posture nd helps to ensure you rem in comfort ble nd productive while you do work.
Accessibility information
Ch pter 2. Adjusting nd Using your monitor 2-2
Lenovo is committed to providing gre ter ccess to inform tion nd technology to people with
dis bilities. With ssistive technologies, users c n ccess inform tion in the w y most ppropri te
to their dis bility. Some of these technologies re lre dy provided in your oper ting
system; others c n be purch sed through vendors or accessed at:
https://lenovo.ssbbartgroup.com/lenovo/request_vpat.php
Adjusting your monitor image
This section describes the user control fe tures usedto djust your monitor im ge.
Using the direct access controls
The direct ccess controls c n be used whenthe On Screen Displ y (OSD) is not displ yed.
Note: The direct ccess controls re gr y.
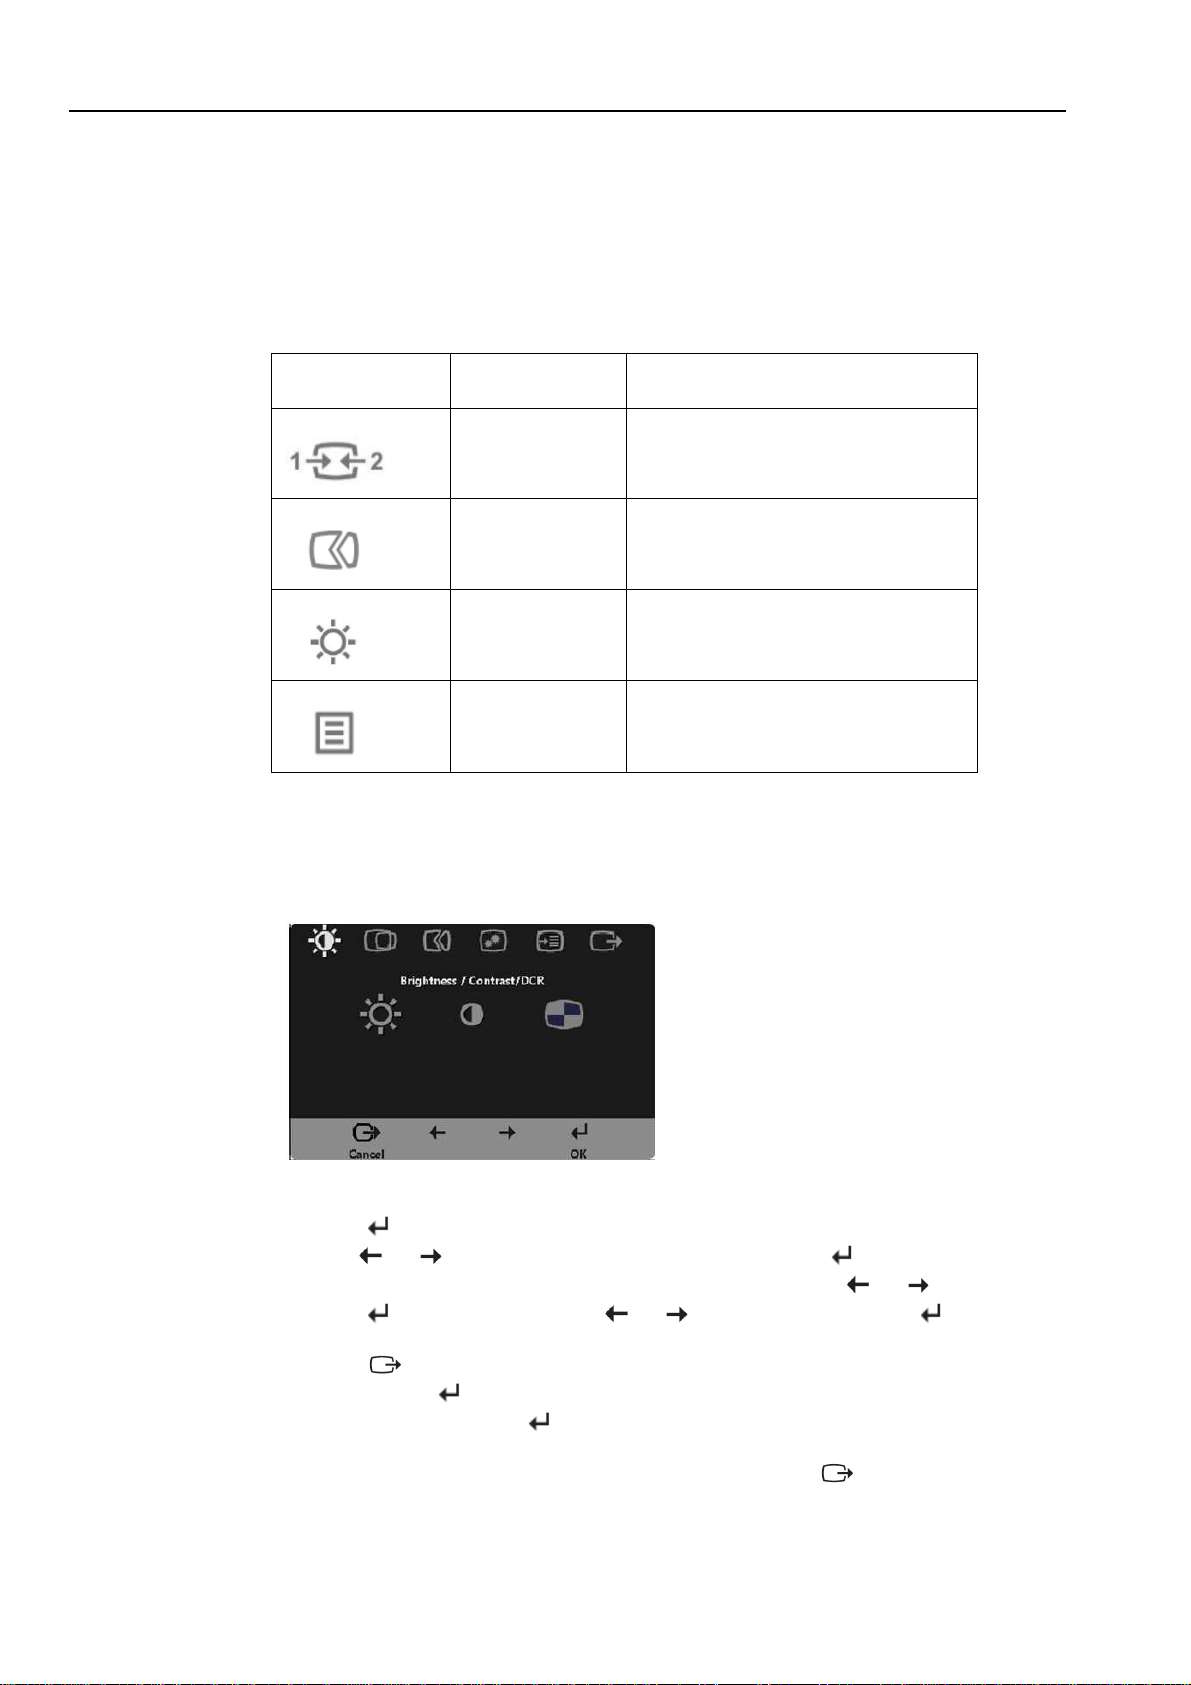
Table2-1.Directaccesscontrols
Icon Control Description
Input Ch nge Switches the video input source.
Im ge Setup Activ tes utom tic im ge djustment.
Brightness Direct ccess to Brightness djustment.
M in menu Open m in OSD menu
Using the On-Screen Display (OSD) controls
The settings djust ble with the user controls re viewed through the On-Screen Displ y (OSD),
s shown below.
To use the controls:
1. Press to open the m in OSD menu.
2. Use or to move mong the icons. Select n icon nd press to ccess th t
function. Ifthere is sub-menu, you c n move between options using or , then
press to select th t function. Use or to m ke djustments. Press to
s ve.
3. Press to move b ckw rds through the sub-menus nd exit from the OSD.
4. Press nd hold for 10 seconds to lock the OSD. This will prevent ccident l djustments
to the OSD. Press nd hold for 10seconds to unlock the OSD nd llow djustments to
the OSD.
5. En bles DDC/CI by def ult. Use OSD Exit Key, press nd hold the buttons for 10 seconds to
dis ble/en ble DDC/CI function. The words " DDC/CI Dis ble/DDC/CI/En ble" showson the
screen.
2-3 ThinkVision Pro2820 Fl t P nelMonitor User’s Guide

Table2-2.OSDfunctions
Ch pter 2. Adjusting nd Using your monitor 2-4
OSD Icon on Main Menu Submenu Description Controls and Adjustments
Brightness/Contr st
Brightness
Contr st
DCR
Adjusts over ll brightness
Adjusts difference between light nd
d rk re s
En ble dyn mic contr st r tio.
-
--
-
+
++
+
-
--
-
+
++
+
On
Off
Im ge Position
Horizont l Position
Vertic l Position
Moves the im ge left or right.
Moves the im ge up or Down.
Im ge Setup
Autom tic
M nu l
Autom tic lly optimizes the im ge.
M nu lly optimizes the im ge. See
“M nu l im ge setup” on p ge 3-3
● Clock
● Ph se
● S ve
● Adobe RGB
Im ge Properties
Colour
Adjusts intensity of red, green, nd
blue.
Preset mode
● Neutr l
● sRGB
● Reddish
● Bluish
Custom
● Red: Incre ses or decre ses the
s tur tion of ‘red’ in the im ge.
● Green: Incre ses or decre ses the
s tur tion of ‘green’ in the im ge.
● Blue: Incre ses or decre ses the
s tur tion of ‘blue’ in the im ge.
● S ve: S ves the custom
colour choices.
Input Sign l
This monitor c n ccept video sign ls
through different connectors. Most
desktop computers use D-SUB
connector. Select digit l mong OSD
Controls when you use
DP&MHL/HDMI connector.
- Selects D-SUB (An log)
- Selects DP
- Selects MHL/HDMI
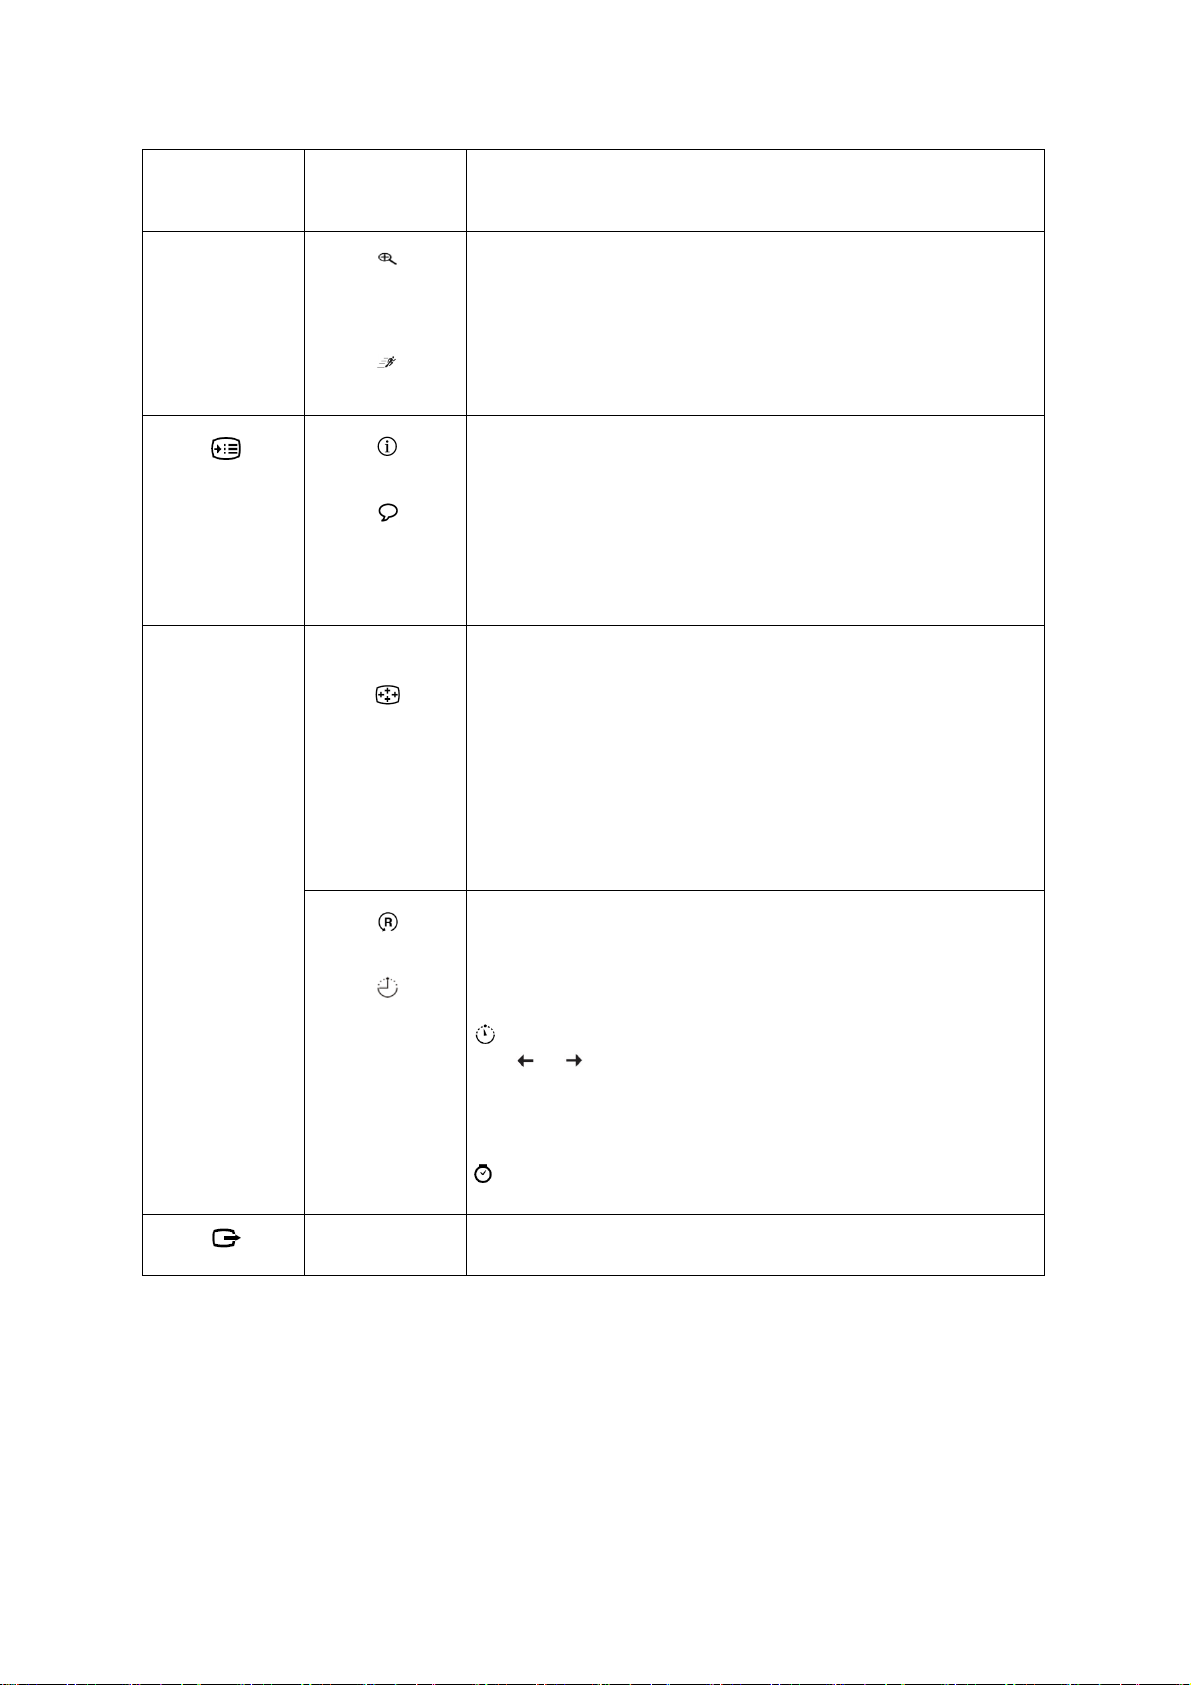
Table2-2.OSDfunctions
2-5 ThinkVision Pro2820 Fl t P nel Monitor User’s Guide
OSD Icon on Main
Menu
Submenu Description
Sc ling
Over
Drive
● Origin l AR
S me Aspect R tio with input sign l
● Full
Exp nd im ge to full screen
Response time enh ncement
On
Off
Options
Inform tion
Menu L ngu ge
Shows resolution, refresh r te, nd product det ils.
Note: This screen does not llow ny ch nges to the settings.
This section lists the l ngu ges supported by your monitor.
Note: The l ngu ge chosen only ffects the l ngu ge of the OSD. It h s no effect on ny
softw re running on the computer.
Menu Position
Def ult
Custom
Menu position djusts menu loc tion on the screen.
Returns the menu position to the def ult settings.
● Horizont l: Ch nges the horizont l position of the OSD
● Vertic l: Ch nges the vertic l position of the OSD.
● S ve
F ctory Def ult
Accessibility
● C ncel
● Reset
Resets monitor to the origin l f ctory settings.
Controls button nd menu settings for ccessibility preferences.
Button repe t r te:
Select or to ch nge.
● Off
● Def ult
● Slow
Menu time out: Sets the length of time the
OSD will rem in ctive fter the l st time button is pressed.
Exit
Exit the m in menu
Selecting a supported display mode
The displ y mode the monitor uses is controlled by the computer. Therefore, refer to your
computer document tion for det ils on how to ch nge displ y modes.
The im ge size, position nd sh pe might ch nge when the displ y mode ch nges. This is
norm l nd the im ge c n be re djusted using utom tic im ge setup nd the im ge
controls.
Unlike CRT monitors, which require high refresh r te to minimize flicker, LCD or Fl t
P nel technology is inherently flicker-free.
Note: If your system h s previously been used with CRT monitor nd is currently
configured to displ y mode outside the r nge of this monitor, you m y need to re- tt ch
the CRT monitor tempor rily until you h ve re-configured the system; prefer bly to
1920x1080 t 60Hz, which is the N tive Resolution Displ y mode.
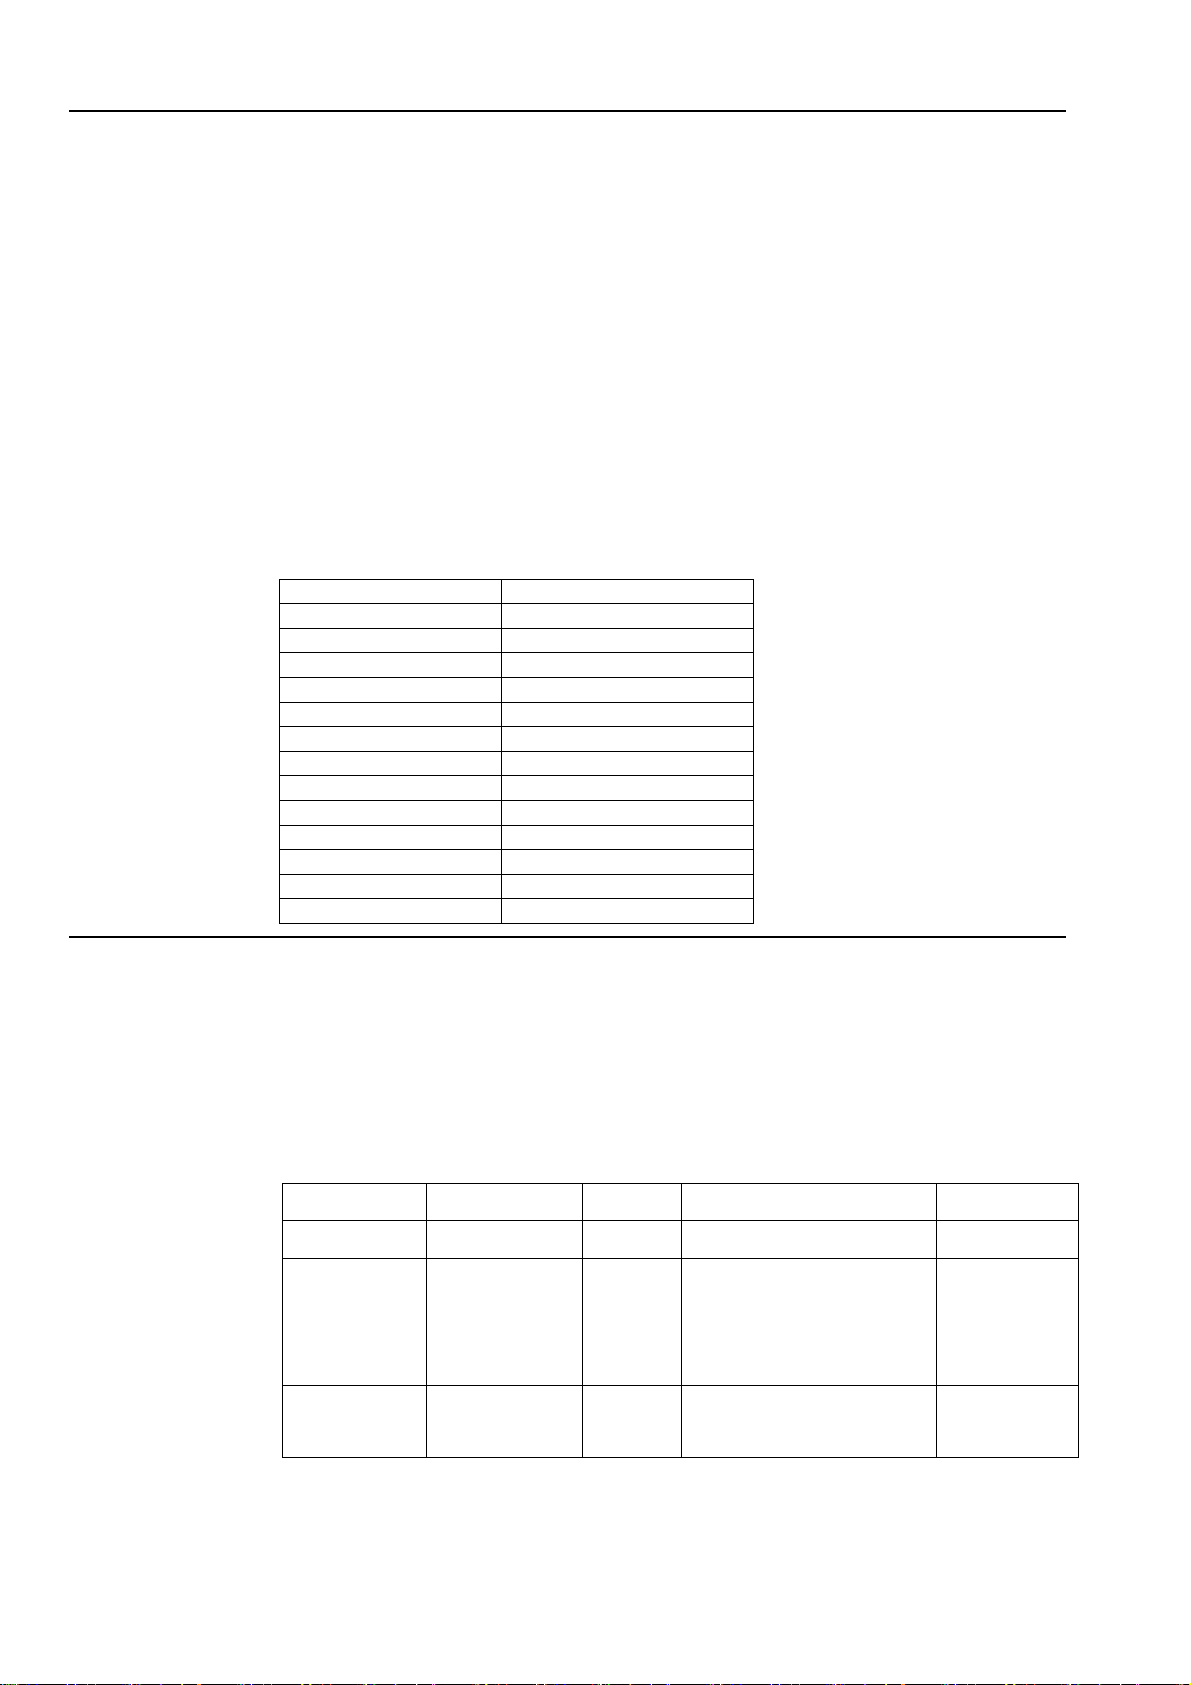
The displ y modes shown below h ve been optimized t the f ctory.
Table2-3.Factorysetdisplaymodes
Address bility Refresh r te
640x480 60Hz,75Hz
720x400 70Hz
800x600 60Hz,75Hz
1024x768 60Hz,75Hz
1152x864 75Hz
1280x720 60Hz
1280x800 60Hz
1280x1024 60Hz,75Hz
1366x768 60Hz
1440x900 60Hz
1600x900 60Hz
1680x1050 60Hz
1920x1080 60Hz
Understanding power management
Power m n gement is invoked when the computer recognizes th t you h ve not using
your mouse or keybo rd for user-defin ble period. There re sever l st tes s described in
the t ble below.
For optim l perform nce, switch off your monitor t the end of e ch working d y, or
whenever you expect to le ve it unused for long periods during the d y.
Table2-4.Powerindicator
St te Power Indic tor Screen Restoring Oper tion Compli nce
On Ste dy green Norm l
St ndby/
Suspend
Ste dy mber Bl nk Press key or move the mouse.
There m y be slight
del y re ppe rs.
Note: St ndby lso occurs
if there is no im ge output to the
monitor.
ENERGY STAR
Off Off Off Press power key to switch on
There m y be slight del y before
the im ge re ppe rs.
ENERGY STAR
Ch pter2. Adjusting nd Using
your monitor
2-6

Caring for your monitor
Be sure to turn off the power before you perform ny m inten nce on the monitor.
Do not:
● Apply w ter or liquid directly to your monitor.
● Use solvents or br sives.
● Use fl mm ble cle ning m teri ls to cle n your monitor or ny other electric l equipment.
● Touch the screen re of your monitor with sh rp or br sive items. This type of cont ct m y
c use perm nent d m ge to your screen.
● Use ny cle ner which cont ins n nti-st tic solution or simil r dditives. This m y h rm the
co ting of the screen re .
Do:
● Lightly d mpen soft cloth with w ter nd use this to gently wipe the covers nd the screen.
● Remove gre se or finger m rks with d mp cloth nd little mild detergent.
Detaching the monitor stand
1. After pl cing the monitor f ce down on cle n surf ce or soft cloth, push the hook of the st nd nd lift
the st nd up to remove it from the monitor .
3-7 ThinkVision Pro2820 Fl t P nel Monitor User’s Guide
2. You c n h ng the monitor on the w ll through the VESA holes.

Chapter 3 Reference information
This section cont ins monitor specific tions, instructions to m nu lly inst ll the monitor driver,
troubleshooting inform tion, nd service inform tion.
Monitor specifications
Table3-1.Monitorspecificationsfortype-model 60B5-RAR6-WW
Ch pter 3. Reference Inform tion 3-1
Dimensions Height
Depth
With
519.97 mm (20.47 in.)
289.95 mm (11.42 in.)
665.90 mm (26.22 in.)
St nd Tilt r nge
Swivel
Lift
Pivot
R nge: -5°/+25°
R nge: -45°/+45°
R nge: 110mm
Yes (clock wise 90 degree)
VESA mount Supported 100 mm (3.94 in.)
Im ge
View ble im ge size
M ximum height
M ximum width
Pixel pitch
711.20 mm (28.00 in.)
341.2 mm (13.43 in.)
620.9 mm (24.44 in.)
0.32mm (0.010 in.) (V)
Power input Supply volt ge
M x supply current
100-240 VAC, 60/50 Hz
1.5 A
Power consumption
Note: Power consumption figures
re for the monitor nd the power supply
combined.
M x Consumption
Typic l Consumption
St ndby/Suspend
Off
65W
60W
≦1.2W
≦0.5W
Video input (An log) Input sign l
Horizont l ddress bility
Vertic l ddress bility
Clock frequency
An log Direct Drive, 75 ohm 0.7 V
1920 pixels (m x)
1080 lines (m x)
205 MHz
Video input (Digit l) Input sign l
Horizont l ddress bility
Vertic l ddress bility
Clock frequency
DP
1920 pixels (m x)
1080 lines (m x)
10.8Gpbs(m x)
Video input (Digit l) Input sign l
Horizont l ddress bility
Vertic l ddress bility
Clock frequency
MHL/HDMI
1920 pixels (m x)
1080 lines (m x)
10.8Gpbs(m x)
Communic tions VESA DDC CI
Altitude Test Oper tion 8000 ft
Supported Displ y Modes
(VESA St nd rd modes between
noted r nges)
Horizont l frequency
Vertic l frequency
N tive Resolution
VGA: 30 kHz – 81 kHz
DP: 30 kHz – 81 kHz
HDMI: 30 kHz – 81 kHz
50 Hz – 75 Hz
1920 x 1080 t 60 Hz
Table of contents
Other ThinkVision Monitor manuals


