THOMSON 500011 User manual

EN 6Nm drive kit
for rolling shutters and blinds
ref. 500011
20Kg
2m
www.thomsonbox.eu
V2

6NM DRIVE KIT
FOR ROLLING SHUTTERS AND BLINDS
TABLE OF CONTENTS
A - SAFETy iNSTruCTiONS 05
1 - OPERATING PRECAUTIONS 05
2 - MAINTENANCE AND CLEANING 05
3 - RECYCLING 05
B - prOduCT dESCripTiON 06
1 - CONTENTS OF THE KIT 06
2 - MOTOR 06
3 - MANAGEMENT MODULE 07
4 - REMOTE CONTROL 07
C - ABOuT THE THOMBOX CONCEpT 08
d - iNSTALLATiON 09
1 - INSTALLING THE TUBULAR MOTOR 09
2 - INSTALLING THE MANAGEMENT MODULE 16
3 - CONNECTING THE MANAGEMENT MODULE 16
4 - REMOTE CONTROL 17
E - CONFiGurATiON 18
1 - PROGRAMMING 18
2 - SETTING MOTOR END STOPS 18
3 - PROGRAMMING WITH OTHER ACCESSORIES 19
4 - INVERTING RAISING AND LOWERING 19
F - uSiNG THE prOduCT 20
1 - USING THE PRODUCT WITH THE REMOTE CONTROL 20
2 - USING THE PRODUCT WITH ANY DEVICE 20
3 - USING THE PRODUCT WITH THE THOMBOX 20
4 - DELETING A DEVICE FROM THE REMOTE CONTROL MEMORY 20

3EN
5 - REMOVING ALL DEVICES FROM A REMOTE CONTROL CHANNEL 20
6 - CLEARING FEATURE 20
7 - USING THE GROUP SELECTOR 21
8 - REPLACING THE REMOTE CONTROL BATTERY 21
9 - MOTOR SAFETY FEATURES 21
G - FAQ 22
H - TECHNiCAL ANd LEGAL iNFOrMATiON 23
1 - TECHNICAL CHARACTERISTICS 23
2 - WARRANTY 24
3 - HELP AND ADVICE 24
4 - PRODUCT RETURNS/AFTER-SALES SERVICE 24
5 - DECLARATION OF CONFORMITY 24


5EN
A - SAFETy iNSTruCTiONS
1 - OPERATING PRECAUTIONS
• Donotallowchildrentooperatetheproduct.
• This product's control module is designed
exclusivelyforindooruse.
• The product is designed to motorise a blind
or shutter rolled around a tube of octagonal
cross-sectionof40mmindiameter.
• The electrical installation must meet current
standards(NFC15-100)andshouldpreferably
bedonebyaqualiedperson.
• Ensure that no-one is within the shutter's
movement area when installing or conguring
it.
• Ensurethatanyonewhohasnotbeentrained
inusingthedrivedoesnotoperatetheshutter.
• The motorised shutter must not be installed
inan explosiveatmosphere(presenceof gas,
ammablesmoke).
• Theupperandlowermotorendstopsensors
are triggered by the shutter motor ring. Do
not initiate the shutter when the motor is not
installed,asnothingwillstopitfrommovingif
theringisnotengaged.
2 - MAINTENANCE AND CLEANING
• Read all the instructions given in this manual
before carrying out maintenance on the
product.
• Before carrying out any maintenance,
disconnect the power supply (circuit breaker
setto'OFF').
• Do not make any modications to the drive
withouttheagreementofourtechnicalsupport
department.
• Intheeventofbreakdown,thedamagedpart
should be replaced by an original part and
nothingelse.
• Periodically check the installation for any
signs of wear or damage to the shutter, the
mechanicalpartsandthemounting.
• Donotusethedeviceifrepairsorconguration
arerequired.
3 - RECYCLING
Disposing of used batteries in the
household waste is strictly forbidden.
Batteries/accumulatorscontainingharmful
substances are marked with symbols
(shownopposite)whichindicatethatitisforbidden
to discard them in the household waste. The
corresponding heavy metal designations are as
follows:
Cd=cadmium,Hg=mercury,Pb=lead.
You can dispose of these batteries/accumulators
at local recycling amenities (centres for sorting
recyclable materials) which are required to accept
them.Keepbatteries/buttoncells/accumulatorsout
ofreachofchildrenandstoretheminasafeplace
notaccessibletothemastheycouldbeswallowed
by children or domestic animals. May be fatal if
swallowed.Intheeventthatabatteryisswallowed,
consult a doctor or go to A&E immediately. Never
short-circuit the batteries, and do not burn or
rechargethemastheymayexplode!
This logo denotes that devices which are
no longer in use must not be disposed
of as household waste as they are likely
to contain hazardous substances which
are dangerous to both health and the
environment. Return the equipment to your local
distributor or use the recycling collection service
providedbyyourlocalcouncil.
6NM DRIVE KIT
FOR ROLLING SHUTTERS AND BLINDS
EN 6
B - prOduCT dESCripTiON
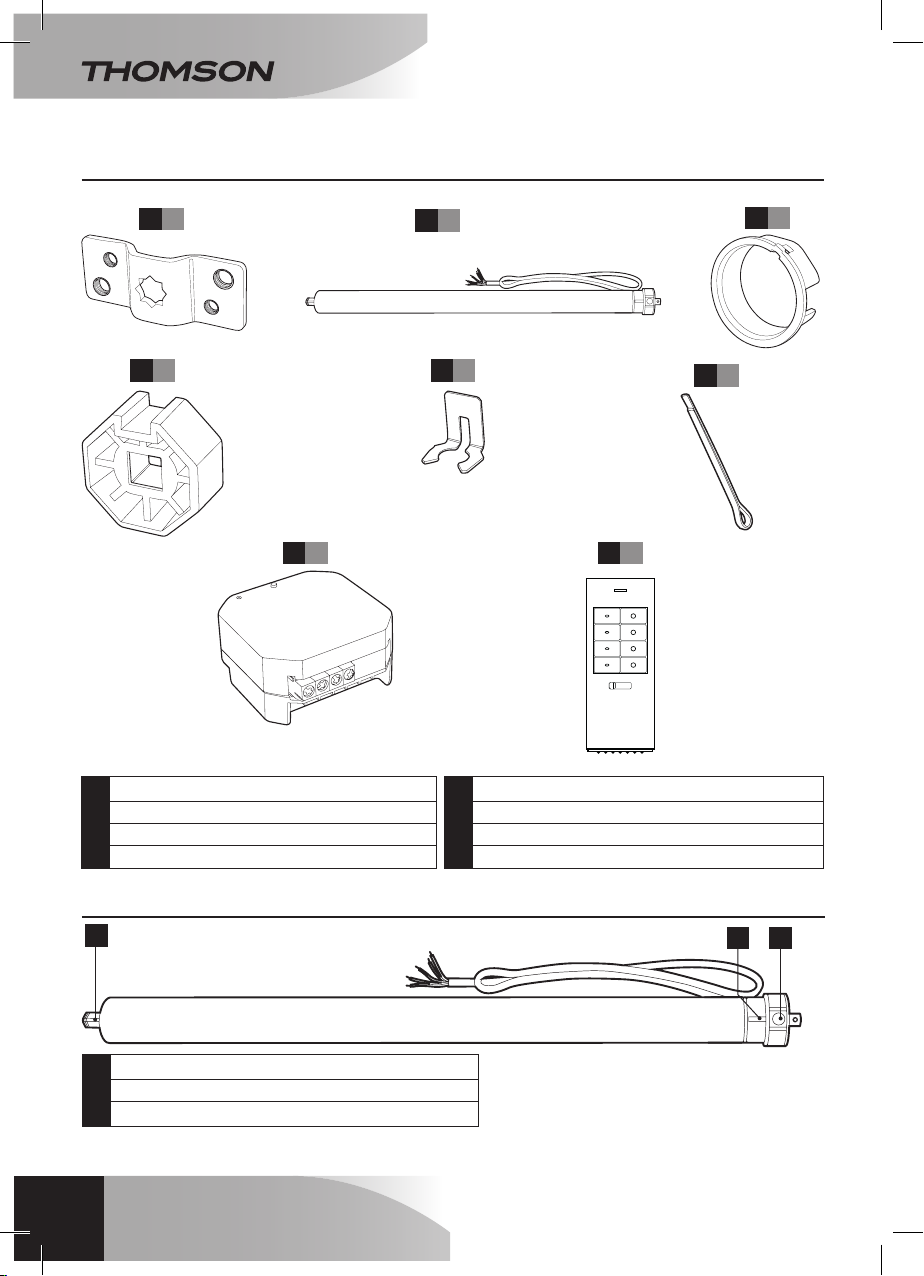
1 - CONTENTS OF THE KIT
2 - MOTOR
1
32
1 Motoranchorplate.
2 Tubularmotor.
3 Shuttertubeconnectorring.
4 Headadaptor.
1 Endstopcongurationbutton.
2 Shuttertubeconnectorringlocation.
3 Outputshaft(onlydrivenpartinthewholemotor).
5 Snapring.
6 Pin.
7 Managementmodule.
8 Remotecontrol.
1x 1
4x 1 5x 1
8x 1
6x 1
7x 1
2x 1 3x 1
6NM DRIVE KIT
FOR ROLLING SHUTTERS AND BLINDS
7EN
B - prOduCT dESCripTiON
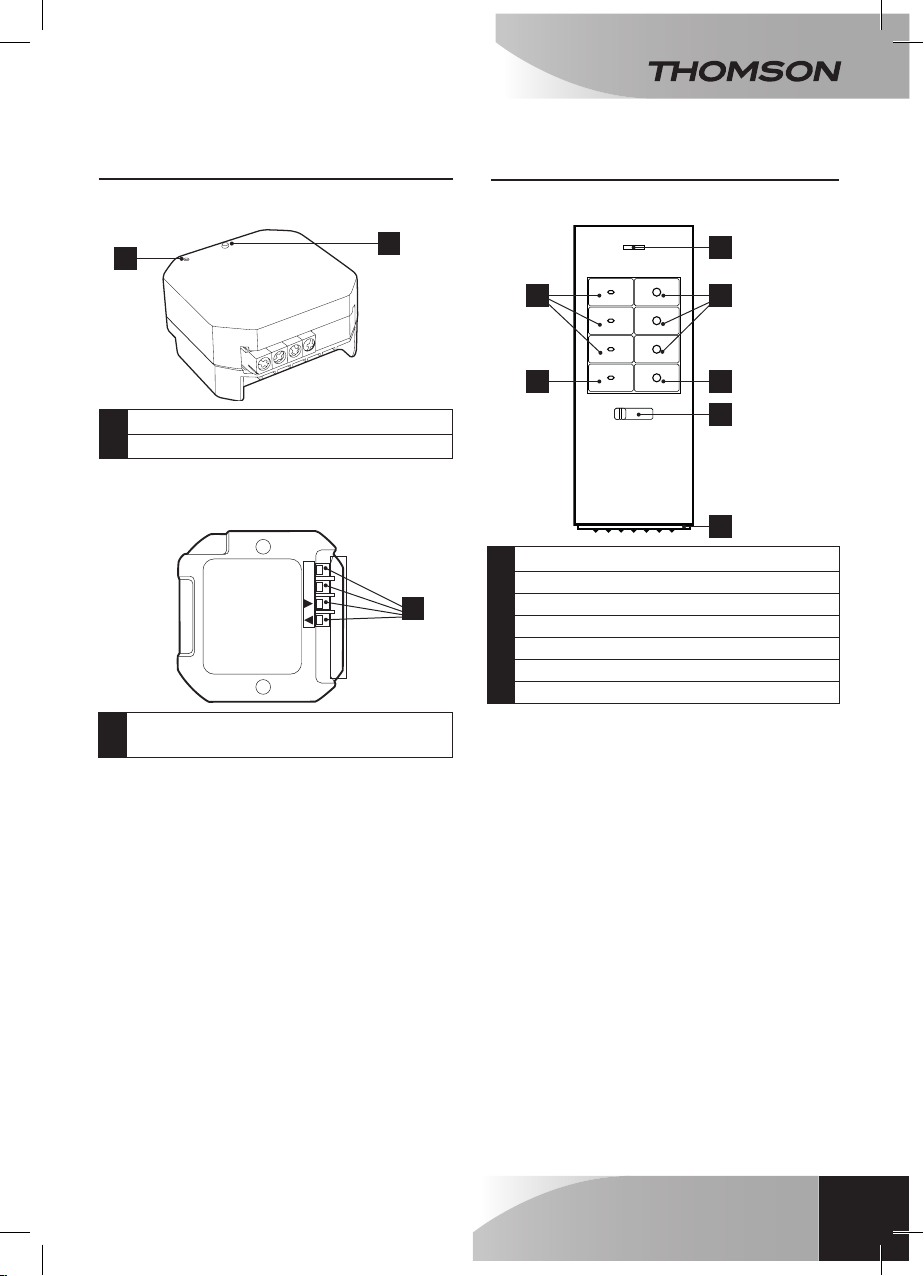
3 - MANAGEMENT MODULE
Front
Rear
Front
35
1
1
2
1 Systemonindicatorlight.
2 Pairingbutton
1 Terminalblocksforconnectingtothemotor
andthemainssupply.
6NM DRIVE KIT
FOR ROLLING SHUTTERS AND BLINDS
4 - REMOTE CONTROL
2
4
3
5
1
6
7
1 Systemonindicatorlight.
2 Channel1,2,3onbuttons.
3 Channel1,2,3offbuttons.
4 3-channelonbutton.
5 3-channeloffbutton.
6 Groupselector(1,2,3or4).
7 Batterycompartment.

EN 8
C - ABOuT THE THOMBOX CONCEpT
The Thombox is a home automation unit which
connectstoyourADSLmodem(Freebox,Livebox,
etc.)andenablesyoutomanageyourhomesecurity
from any location as if you were using the actual
alarmcontrolunitathomeorremotely.Thesystem
alsoallowsyoutocontrolyourcomfortaccessories
(lighting, etc.), openers (shutter motors, garage
doors,etc.) and manageyour energy use(heating
andelectricityconsumption)withjustafewclickson
acomputer,touchscreentabletorsmartphone,from
anywhereintheworldwithaninternetconnection.
Toenabletheaboveandbeabletocreatescenes
(action sequences) which will simplify your day-
to-day life, you need to register your Thombox
(only when you rst install it), and pair your ARW
technology compatible accessories with it. The
Thomboxiscompletelymodularandthereisnolimit
tothenumberofaccessoriesitcancontrol.
6NM DRIVE KIT
FOR ROLLING SHUTTERS AND BLINDS
9EN
d - iNSTALLATiON
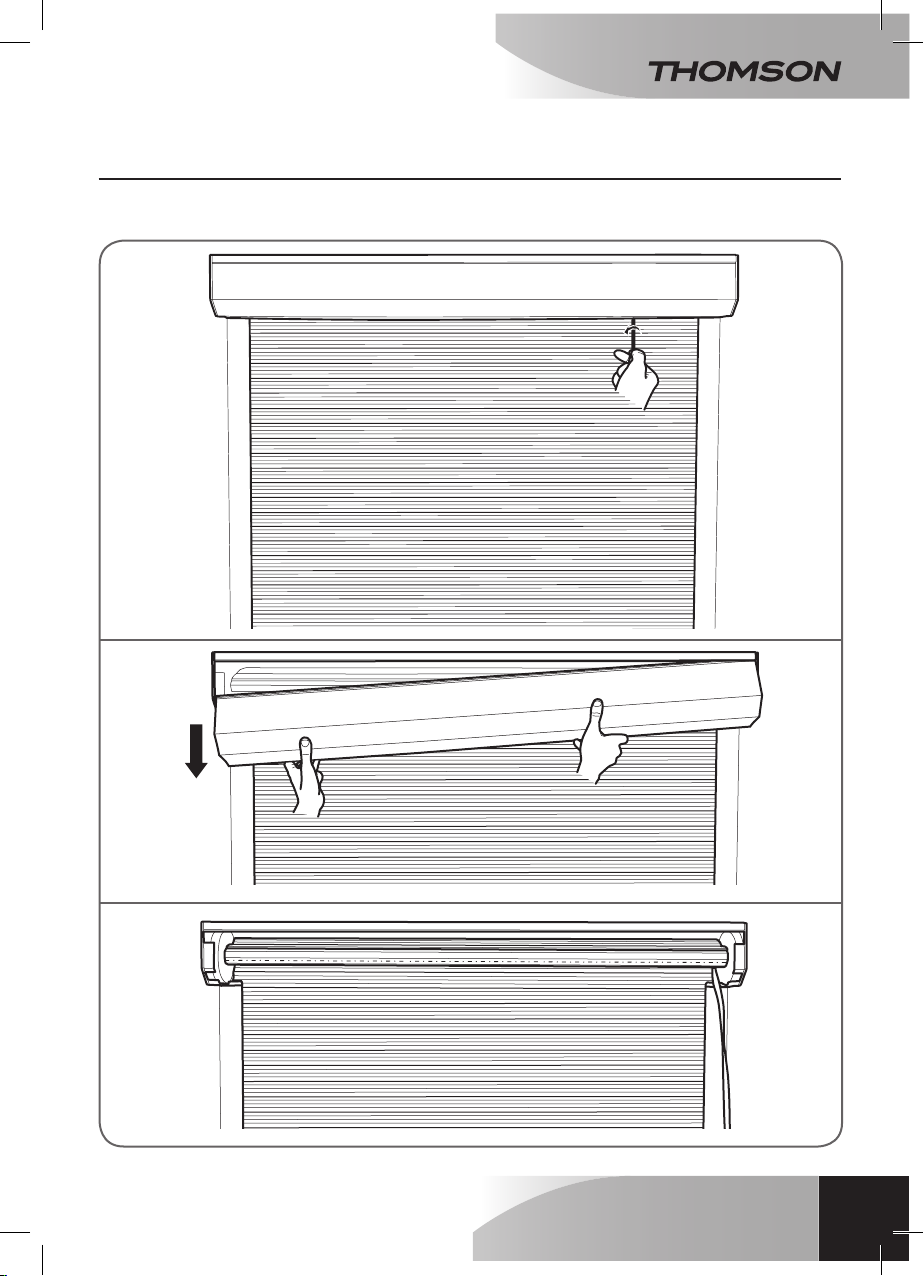
1 - INSTALLING THE TUBULAR MOTOR
Removetherollingshuttercover.
6NM DRIVE KIT
FOR ROLLING SHUTTERS AND BLINDS
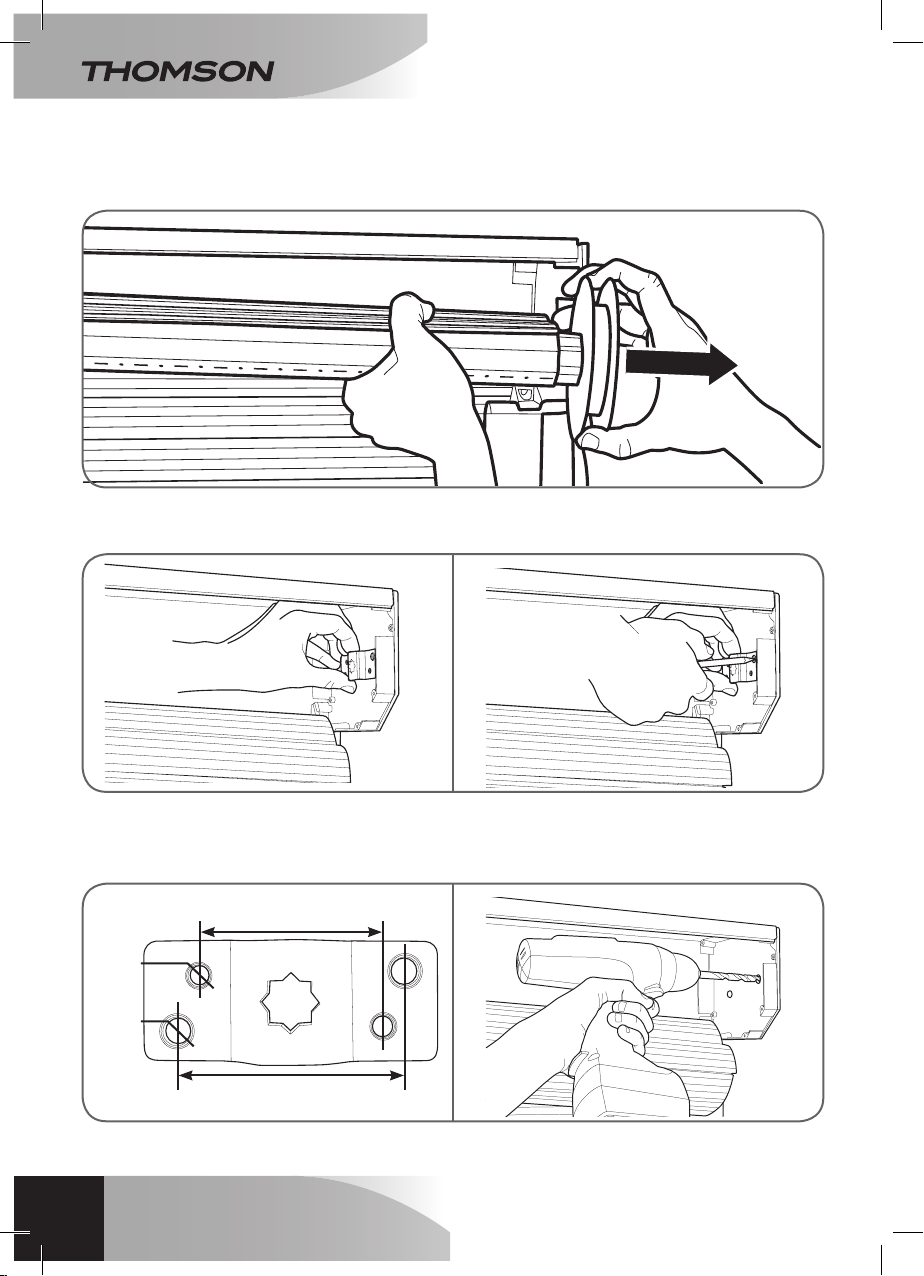
Removeoneofthetwopivotsattheendoftheoctagonaltubearoundwhichtheshutterrolls.Removeany
controldeviceormanuallocksuchasstraps,handles,locks,etc.fromtheshutter.
Themotoranchorplatewillbeplacedinsidetheshutterhousingdriveplate.Removeallobstaclessothat
thereisaatsurface.Strengthenifrequired.
Notetheaxisoftheaxlethatthemotorwillreplace,thenplacethemotoranchorplate,aligningtheaxis.
Removethesideplateifrequired,thenmarkanddrilltheholes.
Takecarenottodamageanycomponentswhendrilling.
EN 10
d - iNSTALLATiON
47mm
58mm
Ø6mm
Ø6mm
Ø8mm
Ø8mm
6NM DRIVE KIT
FOR ROLLING SHUTTERS AND BLINDS
Table of contents


