Displaying Playback Information
Press DISPLAY repeatedly during playback to
show various playback information on screen.
They include current title and chapter, play-
back time, audio, subtitle and angle settings.
Changing Audio and Subtitle
Settings
On the player, press DISPLAY during playback
and then press repeatedly to change audio
setting and press repeatedly to change
subtitle setting.
On the remote control, press LANGUAGE (for
audio) or SUBTITLE (for subtitle) repeatedly
for corresponding setting.
Tips: For VCD playback, press DISPLAY once
and then press repeatedly to select audio
channel: mono left, mono right or stereo;
press repeatedly to select PBC mode (if
available on the disc) on or off. Alterna-
tively, press LANGUAGE (for audio channel
selection) or PLAYBACK CONTROL (for PBC
on/off) repeatedly on the remote control for
corresponding setting.
Changing Angle
Press ANGLE (remote control) repeatedly
to select angle setting (if available on the
DVD disc).
Accessing Disc Menu
At anytime during playback, press TOP MENU
(or MENU on the remote control) to access
disc’s menu and press TITLE to access disc’s
title menu (if available).
Random Playback
Press RANDOM (remote control) to select random
mode on or off. Tracks or chapters will be played
in random order when the function activated.
Searching
Press SEARCH (remote control) to enter search
menu (show on top of the screen). For DVD, you
can direct access to a title, chapter or time on
the disc by inputting the values with the numeric
keys on the remote control. Press to select a
search method (title, chapter or time).
Program Playback
When playback is stopped, press PROGRAM
(PROG on the remote control) to show the
program menu.
1. Highlight an input field by using V
keys. “T” stands for title and “C” for
chapter.
2. Use the numeric keys on the remote control
to input values.
3. Repeat steps 1 and 2 to program more.
4. Highlight “PLAY” on screen and press OK
to start playback. Highlight “CLEAR” on
screen and press OK to clear all programs.
Rating feature is a parental guardian feature
which disables playback of certain DVDs based
on their ratings from 1 (most restive) to 8 (least
restrictive). DVDs that are rated above the level
you set will not play until the correct password
is entered.
If a password has been set, you cannot change
the rating without entering the correct password.
To set up the password, highlight the Password
part to input a 4-digit password with the numeric
keys on the remotr control. Press OK to set the
password.
Note:password is not defined until you set.
Language Setup
Setup the language of the OSD, Audio, Subtitle
and Menu. Also register your DivX VOD files in
the DivX[R] VOD menu (see “More Information”
for details).
• For DivX playback, you need to select the
correct character set between Western and
Central European in “Divx Subtitle” in order
to display properly subtitles in some eastern
European languages.
Audio Setup
Setup the audio output format.
Video Setup
Setup the brightness, contrast, hue and saturation
levels.
Digital Setup
Setup the DRC (Dynamic Range Compression).
Quick Start
1. Press POWER ON/OFF to turn on the
player. The DVD logo appears on the
screen.
2. Open the disc compartment door. Place
a disc in the tray with the printed side
up. Push back the compartment door.
The player will automatically try to read
and play the disc. If a menu appears,
one of its options can be selected to
start playing the disc. Select it using V
keys and press OK.
Player Setup
When disc playback is stopped, press SETUP
and the player’s setup menu will show on
screen.
Select a menu icon using keys. Then select
one of the available options using V keys.
Press key to access the submenus and use V
keys to select an option. Press OK to confirm
your selections. Return to a previous menu
using key.
To exit from the player menu, press SETUP
again.
System Setup
Setup the source, TV system, TV type,
password, rating, screen format and restore to
default settings.
Accessories
Check that all the following accessories come
with your unit in the package:
1. Audio/Video cable x 2
2. Lithium ion Polymer Battery x 1
3. AC/DC power adapter x 1
4. Car power adapter x 1
5. Carrying case x 1
6. DVB-T decoder x 1
7. Antenna x 1
8. Remote controller x 1
Connections
Quick Start & Player Setup DVD Playback DVD Playback
General ControlsSafety Information Precautions
English
DTH740DVBT
user
manual
More Information
The descriptions and characteristics in this owner’s manual are for the purpose of general reference only and
not as a guarantee. In order to provide you with the highest quality product, we may make changes or modi-
fications without prior notice. The English version serves as the final reference on all product and operational
details should any discrepancies arise in other languages.
EN
Please read this user manual carefully to ensure proper use of this product. Keep this manual for future reference.
Tocom: 56384680
General Precautions
• Water and Moisture - Do not use this
product near water for example, near
a bathtub, wash bowl, kitchen sink, or
laundry tub; in a wet basement; or near
a swimming pool; and the like. Do not
spill liquids on your Portable DVD or its
components as they may touch danger-
ous voltage points or short-out parts that
could result in a fire or electric shock.
To clean your Portable DVD use a soft
slightly damp cloth. Always allow all the
components to dry completely before
using again.
• Cleaning - Unplug this product from the
wall outlet before cleaning. Do not use
liquid cleaners or aerosol cleaners. Use a
damp cloth for cleaning.
• Heat - The product should be placed
away from heat sources such as radiators,
heat registers, stoves, or other products
(including amplifiers) that produce heat.
Do not expose the Portable DVD or any
of its components to extreme heat or
cold. Do not expose the player to direct
sunlight.
• Attachments - Do not use attachments
not recommended by the product manu-
facturer as they may cause hazards.
• Servicing - Do not attempt to service this
product yourself as opening or removing
covers may expose you to dangerous
voltage or other hazards. Refer all servic-
ing to qualified service personnel.
• AC/DC power adapter cords should be
routed so that they are not likely to be
walked on or pinched by items placed
upon or against them, paying particular
attention to cords at plugs, convenience
receptacles, and the point where they
exit from the product.
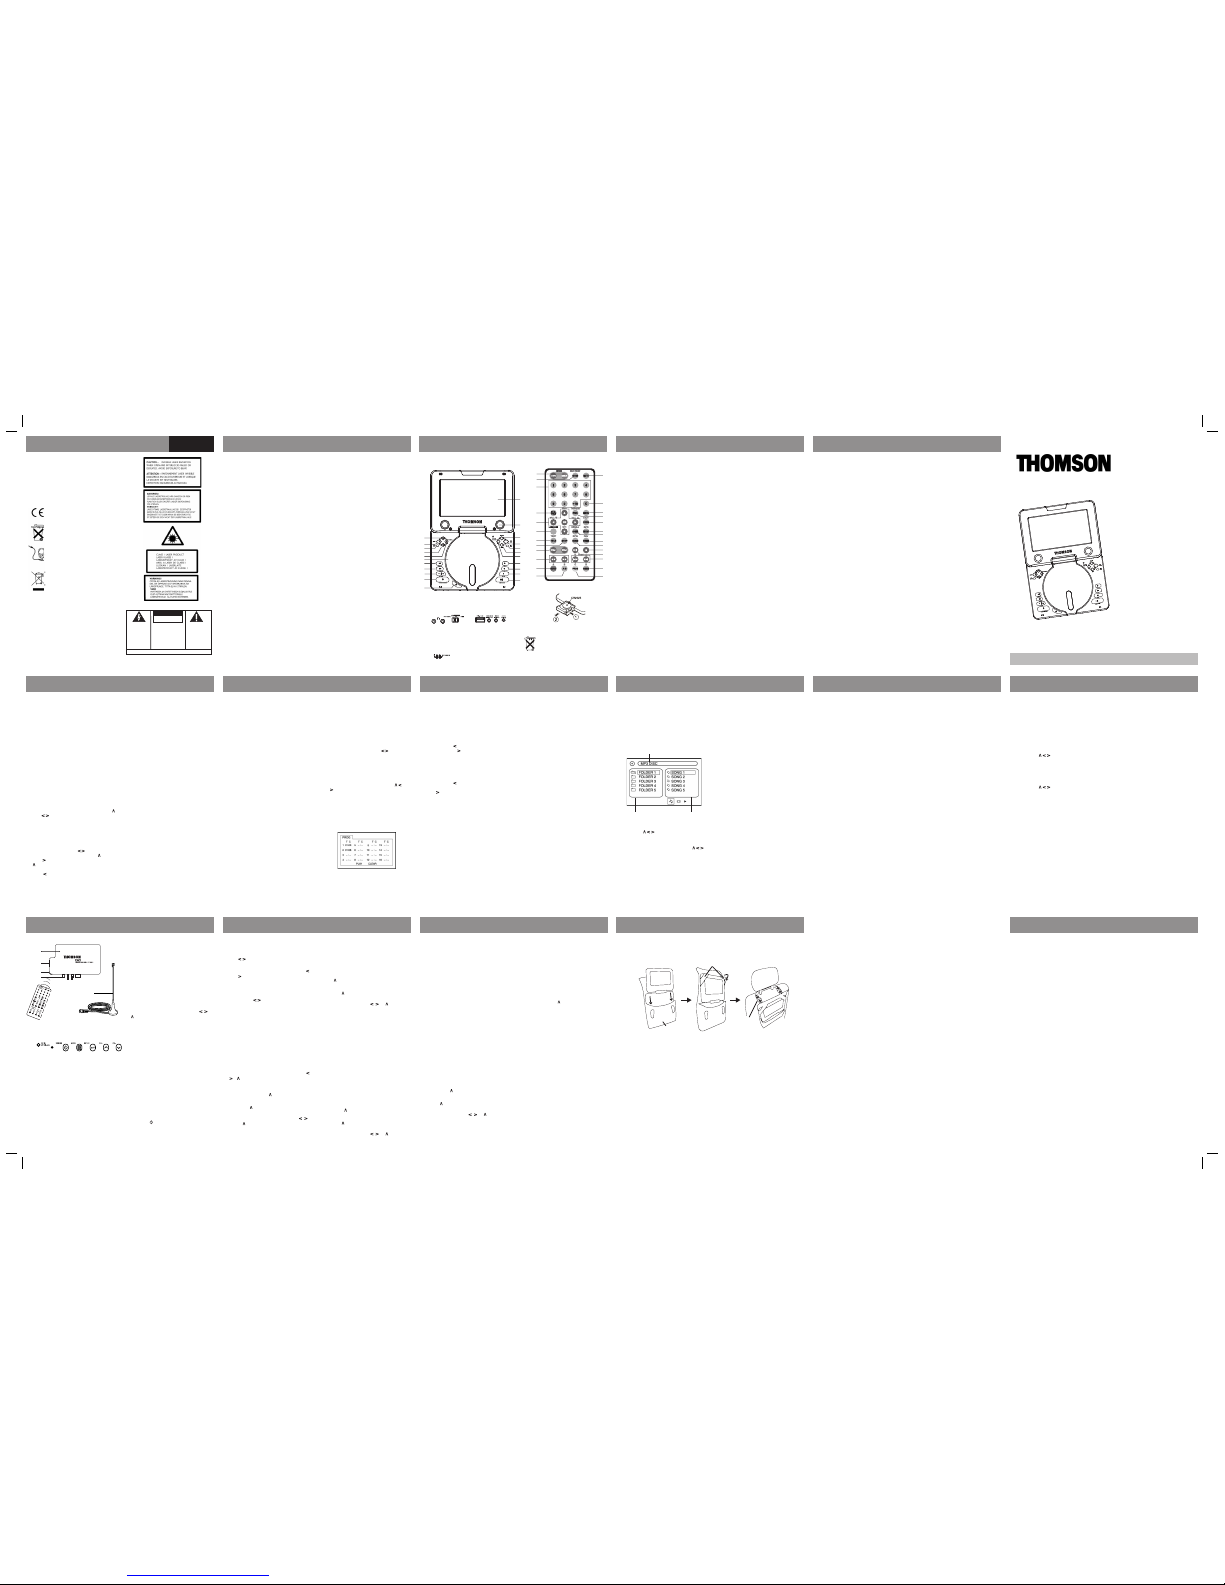
General Controls
1. LCD display
2. Speakers
3. Selects display information
4. Enters player’s setup menu or disc’s
menu
5. Returns to disc’s menu
6. Enters disc’s title menu (if available)
7. Accesses repeat and program modes
8. Searches forward
9. Searches backward
10. Stops playback
11. Starts and pauses playback
12. Moves upward in menu
13. Moves leftward in menu, selects audio
setting
14. Confirms selections
15. Moves downward in menu
16. Moves rightward in menu, selects
subtitle setting
17. Disc compartment door
18. Skips forward a chapter/track
19. Skips backward a chapter/track
20. Adjusts volume
21. Switches on / off the player
22. Opens disc compartment door
23. Headphone jacks
24. Function switch
25. USB connector
26. Audio input / digital output jack
27. Video in / out jack
28. Power jack
29. Power indicator
30. Low battery indicator
31. Muting sound
32. Clears input
33. Enters disc’s menu
34. Enters VCD playback control menu
35. Selects zoom options
Connecting the Power Adapter
• Connect the power adapter to the DC
jack of the unit.
• Connect the other side of the
power adapter with the wall plug or car
adapter.
• Turn on the power.
• Disconnect the adapter if the set is not
used for a period of time.
Installing the Battery
• Plug in the battery at the bottom of the
unit.
• Slide the battery to the side until a
“click” is heard.
• The unit is now powered by the battery.
Removing the Battery
• Turn the unit upside down.
• Locate the lock at the bottom.
• Push down the lock and slide the bat-
tery to the side to release.
Charging the Battery
• Connect the power adapter to the
power jack of the unit.
• Turn off the power to start charging.
• The indicator is red when charging and
will turn green when the battery is fully
charged.
• The battery cannot be charged while
the unit is being used.
External Connections
This player can output sound and picture to ex-
ternal devices. To do so, slide the Function Switch
on the rear side of the unit to the DVD MODE
position. Always switch off the player before
connecting to any devices.
1. Connect the smaller yellow connector to the
VIDEO IN/OUT jack of the player.
2. Connect the larger yellow connector (with
pin) to the video input jack of external
device.
3. Connect the black connector to the AUDIO
IN/DIGITAL OUT jack of the player.
4. Connect the orange connector (with pin) to
the audio input jack of the external decice.
This player can also be used as a display for other
devices, such as DVD player, game console etc. To
do so, slide the Function Switch on the rear side
of the unit to the AV IN position. Always switch
off the player before connecting to any devices.
1. Connect the smaller yellow connector to the
VIDEO IN/OUT jack of the player.
2. Connect the larger yellow connector
(without pin) to the video output jack of
external device.
3. Connect the black connector to the AUDIO
IN/DIGITAL OUT jack of the player.
4. Connect the white and red connectors
(without pin) to the audio output jacks of
the external decice.
Playback
For basic playback, refer to “Quick Start”.
Note: The player stores the point where
playback was interrupted. If you press PLAY/
PAUSE again, playback resumes from this
point. To stop playback completely or to start
from the beginning, press STOP twice.
Accelerated Play
While the disc is playing, press REV or FWD
one or more times to vary the speed and
direction of the accelerated play. Press PLAY/
PAUSE to resume normal playback.
Still Image
While the disc is playing, press PLAY/PAUSE
once to freeze frame.
Frame Advance
While the disc is paused, press STEP (remote
control) to activate STEP mode. Each press
of STEP will advance forward image by
image. Press PLAY/PAUSE to resume normal
playback.
Changing Chapter / Track
While the disc is playing, press SKIP REV /
FWD to go immediately to the next or previ-
ous chapter, or to the next or previous track.
Repeat Playback
During playback, press REPEAT repeatedly
to select repeating a chapter or a title (DVD
discs).
A-B Repeat
During playback, press A-B (remote control)
once at the start and press again at the end
of a desired repeat section. The section will
repeat continuously until you press A-B to
resume normal playback.
Playback of MP3, WMA and
JPEG Files
Your player also supports playback of MP3,
WMA and JPEG files. When a disc is loaded,
the player will automatically search for sup-
ported files and begin playback automatically.
During playback of MP3 and WMA files and
stop mode of JPEG files, the following screen
will appear:
• Use V keys to move to different
files or directories.
• Press OK to play the file highlighted.
• While viewing JPEG files, press V
keys will rotate or flip picture respec-
tively.
• Program playback is available for mp3
and WMA discs, refer to “Program Play-
back” for details. Input folder number
under column “D” and file number
under column “F”.
The unit is not working.
• Turn off the power, and then turn it on
again.
• Make sure power cord or battery is
properly connected and battery is not
empty.
• The unit cannot operate when the car
adaptor power supply voltage is above
16V.
There is no sound or picture.
• Check the connection to the mains
socket or battery.
• Make sure the power switch is on.
• Make sure the power outlet is opera-
tional.
• Make sure the power cord is not dam-
aged.
• Make sure the volume is not set too
low.
There is no sound or sound quality
is poor.
• Make sure the audio jacks are securely
connected.
• Make sure the audio connector is not
damaged.
• Make sure the volume is turned up.
• Make sure you have set the player’s
audio settings correctly.
• Make sure you have entered the correct
AV input for your TV.
• Make sure the audio is not set to mute.
There is no picture or picture quality
is poor.
• Make sure that the Function Switch is
on the proper position.
• Make sure the video jacks are securely con-
nected.
• Make sure you have entered the correct AV
input for your TV.
• Make sure the video connector is not dam-
aged.
• Make sure you have set the player’s video
settings correctly.
• Make sure the battery level is not low.
It is impossible to read the disc
• Make sure the disc is inserted with the
printed side up.
• Make sure the disc is not warped, damaged,
deformed, stained or scratched.
• Check that the disc format is supported by
the player.
• Check that the disc’s regional code matches
that of the player. This player’s regional
code is 2.
Remote control is not working
• Battery may be empty.
• Make sure you are pointing to the remote
sensor on the player while using.
You have forgotten your rating pass-
word.
• Enter 9688 in the password menu to clear
the memory. Keep this master password out
of the reach of children. Refer to “Player
Setup - System Setup” for details.
Playback of Various Media Formats
Folder directory File directory in
current folder
Name of current file
Troubleshooting Tips
More Information
Car Mounting
You can easily mount the player on the back of a car seat with the help of the carrying case. See
illustration below:
Carrying case
DVD player
Elasticated strap
Clasp strap
Specifications
• Model: DTH740DVBT
• TV System: PAL/NTSC
• Supported Disc Formats: DVD, SVCD, VCD,
CD, HDCD, CD-R, CD-RW, DVD+/-R, DVD+/-
RW
• Supported File Formats: DivX, MPEG, MP3,
WMA, JPEG, Kodak Picture CD
• DVD Regional Code: 2
• AV Input/Output: Composite x 1
• Power Requirement: DC in 9V (power
adapter bundled)
• Power Consumption: <10W
• Operating Temperature: 5oC to 35oC (41oF to
95oF)
• Operating Humidity: 5% to 90% (no
condensation)
• Size (without battery): 200(W) x150(D) x
32(H) mm
• Weight: 1087g
DVD Copy Protection
This product incorporates copyright protection
technology that is protected by U.S. patents and
other intellectual property rights. Use of this copy-
right protection technology must be authorized
by Macrovision Corporation, and is intended for
home and other limited consumer uses only unless
otherwise authorized by Macrovision. Reverse
engineering or disassembly is prohibited.
Playback via USB Connector
MP3, WMA and JPEG files stored on a USB device
can be played via the USB connector on the rear
side of the player. Playback operations are the
same as files on discs as shown above. When an
USB device is connected, a selection menu appears
on the screen for playback from USB or disc.
Audio CD
Your player also supports playback of audio CD.
Playback starts automatically after an audio CD is
loaded. Program playback is available for audio
CD, refer to “Program Playback” for details. You
only need to input the desired track numbers.
DVD Regional Code
Your DVD player has been designed to process
regional management information that is stored
on DVD discs. The regional code for your player
is 2 (Europe, Japan, the Middle East, Egypt, South
Africa). Only DVD discs that have regional codes
of 2 or ALL (for all regions) can be played by
your player.
• Power Sources - This product should be
operated only from the type of power source
indicated on the marking label. If you are
not sure of the type of power supply to your
home, consult your product dealer or local
power company. Do not use any battery
other than the orginal ones provided by
Thomson.
• When using your Portable DVD player, do
not sit or stand too close to the screen.
36. Selects display information
37. Selects DVD’s angle setting
38. Returns to top of menus
39. Enters search menu
40. (STOP) - stops playback
41. (PLAY/PAUSE) - starts and pauses playback
42. (SKIP FWD/ SKIP REV) - skips backward or
forward a chapter or track
43. Selects random playback mode
44. Enters program mode
45. DVB-T / DVD
46. Enters player’s setup menu
47. Numeric input keys
48. Selects subtitle setting
49. Navigation keys in indicated direction, press
OK to confirm selection
50. Selects language setting
51. Enters title menu (if available)
52. Enters step advance mode
53. Adjusts volume
54. (FWD / REV) - search backward or forward
55. Selects repeat modes
56. Performs A-B repeat
Notes on the remote control
On the remote control, remove the plastic tab
from the battery compartment before first use. To
replace battery, slide the release lock to the right
and pull out the battery tray. (One button type,
CR2025 battery required)
When using the remote control, make sure you
are pointing to the remote sensor located at the
front of the player (where the power indicator
is located).
CAUTION
Danger of explosion if battery is incorrectly
installed.
Replace only with the same or equivalent type
of battery.
Zoom
During playback, press ZOOM (remote control)
repeatedly to select a zoom in or out option to
enlarge or reduce image size.
Muting
Press MUTE (remote control) to cut sound output.
Press again to restore.
Screen Saver and Power Saving
Screen saver will show when the player is idle for
more than 5 minutes. Press any key to de-activate
it. If there is no further key activation for another
5 minutes, the LCD screen will shut down for
power saving. Press any key to turn the screen
on again.
Antenna
1. DVB-T decoder
2. Antenna socket
3. IR window
4. A/V and DC IN/OUT sockets
5. Antenna
6. Power socket
7. Power On light
8. Decoder On/Off switch
9. Open the main menu of your DVB-T
decoder
10. Enter the menu
11. Move up in the menu / Select the next
channel
12. Move down in the menu / Select the
previous channel
TV function (cont’d)
Getting started
1. Once the decoder has been switched on,
a menu appears on the screen. Use the
keys to select the language for the
menus.
2. Press V and select a country. Use the
keys to choose a country.
3. Select OK to confirm.
4. A new menu appears to select the
required TV image format (4/3 or 16:9).
Use the key to make your choice
and select OK to confirm.
5. Once you have confirmed your choice,
the device starts searching for the avail-
able TV and radio channels.
Favourite lists
The concept behind the channel list is to
make it easy for you to access the channels
you spend the most time watching or radio
stations you listen to most frequently.
Once a list has been defined, you can press the
FAV button to activate your favourites list.
Then when you change channels using the
V buttons, only your favourite channels or
stations are included in the loop.
1. Press MENU and select the Favourite
lists line using V .
2. Select OK to confirm.
3. Use V to select, create, edit or delete
your favourites. Select OK to confirm.
Follow the instructions using the , ,
V, , OK keys.
4. Press MENU to return to the main
menu.
Setup
Use this menu to change the TV reception set-
tings, to set the time and date and to restore the
system’s factory settings. If you restore the factory
settings, all your settings will be deleted.
1. Press MENU and select the Setup line using
V .
2. Select OK to confirm.
3. Use V to select, create, edit or delete your
favourites. Select OK to confirm. Follow the
instructions using the , , V, , OK keys.
4. Press MENU to return to the main menu.
TV Configuration
Select the image format (4/3, 16:9), the display
mode (PAL, SECAM) and the sound settings
(mono, stereo).
Time Settings
Set the date, time and time zone.
Factory Settings
Delete all settings and restore the factory
configuration.
Installation
This menu indicates the quality of signal recep-
tion and can be used to re-install channels or add
new channels.
1. Press MENU and select the Installation line
using V .
2. Select OK to confirm.
3. Use V to select, create, edit or delete your
favourites. Select OK to confirm. Follow the
instructions using the , , V, , OK keys.
4. Press MENU to return to the main menu.
TV function (cont’d)
Signal information
This menu indicates the level of reception and
the quality of the signal received according to the
selected channel number.
Channels installation
Use this function to re-install all the TV and radio
channels. You can also add more channels to the
list of channels that has already been memorised.
Channel searches can be run automatically
(Standard) or manually (Manual) depending on
the level of reception of the antenna in the place
where the device is located.
You can also search for unencrypted channels
only, encrypted channels only or both.
New channels
Use this menu to install new channels.
User preferences
Use this menu to configure your preferences for
the language used for the menus, subtitles and
sound. Other visual settings are available, includ-
ing subtitles and menu banners. You can also
configure the parental control settings.
1. Press MENU and select the User preferences
line using V .
2. Select OK to confirm.
3. Use V to select, create, edit or delete your
favourites. Select OK to confirm. Follow the
instructions using the , , V, , OK keys.
4. Press MENU to return to the main menu.
Languages
This menu is used to configure your language
preferences for the menus, subtitles and sound.
Appearances
Certain visual settings, such as subtitles and menu
banners, can be configured in this menu. Choose
your settings and select OK to confirm.
Access control
This function lets you prevent or limit access to
certain channels.
System information
1. Press MENU and select the System informa-
tion line using V .
2. Select OK to confirm.
3. The screen that appears shows the technical
characteristics of your DVB-T decoder.
4. Press MENU to return to the main menu.
Using the remote control
To use the remote control with your DVB-T
decoder, set the switch on the remote control
to DVB-T.
Always point the remote control at the IR
reception window on the decoder, otherwise
the decoder will not respond to the com-
mands sent from the remote control.
Settings and use of the decoder
Change the settings using the MENU, , , V,
, OK keys on the remote control.
The MENU, ENTER, CH+, CH- keys on the rear
of the decoder can also be used to navigate
in the menus.
Setting up the decoder
1. Connect the DVB-T decoder to the rear
of your DVD player.
2. Insert the mains power adapter plug in
the DC socket on the decoder.
3. Insert the power plug of the adapter in
a mains wall socket or in an adapter for
vehicles.
4. Connect the antenna cable to the socket
provided and place the antenna on
a metal surface that acts as a ground
plane for the antenna for better recep-
tion.
5. Press to switch on the DVD player.
6. Press the ON / OFF switch on the rear
to switch on the decoder.