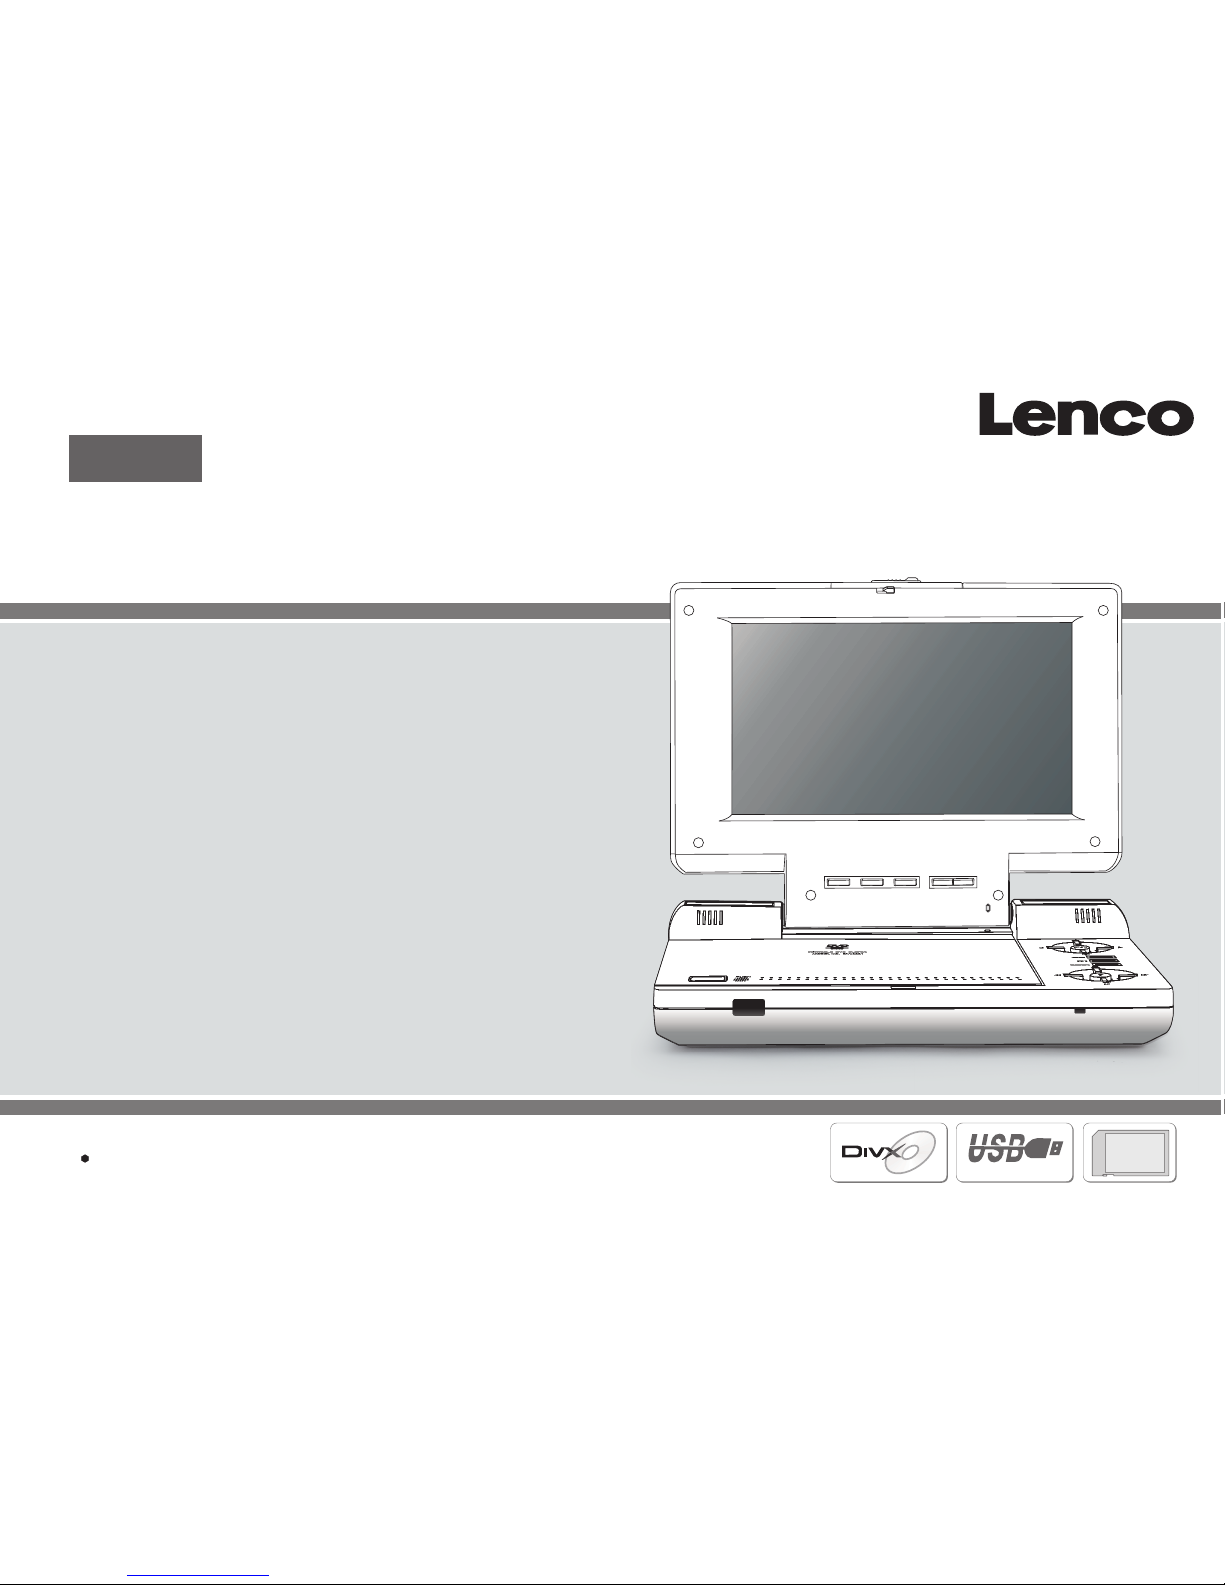
LENCO DVP-722 - User manual
Please read thismanual before operating
OWNER`S MANUAL
MODEL NO :DVP-722
PORTABLE DVD PLAYER
ENGLISH
16:9 / 4:316:9 / 4:3 REVERSEREVERSE MODEMODE UPUP DOWNDOWN
ENTER
MPEG4
UNIVERSAL SERIAL BUS
SD/MMC/MS
CARD


Table of Contents
5
1
Table of Contents.......................................................................................................................................................................1
Safety Information......................................................................................................................................................................2
Remote Control..........................................................................................................................................................................3
Description................................................................................................................................................................................4
Using the Remote Control...........................................................................................................................................................5
Connecting Earphones to the DVD Player.....................................................................................................................................6
Connecting to an External Component .........................................................................................................................................7
Connecting to a TV......................................................................................................................................................................8
Connecting to a Stereo Component..............................................................................................................................................9
....................................................................................................................................................................10
.........................................................................................................................................................................11
Using the AC Adaptor................................................................................................................................................................12
Using the Battery Pack..............................................................................................................................................................13
Cautions in Using Battery Pack..................................................................................................................................................14
Playing a Disc......................................................................................................................................................................15-19
Playing MP3 and Regular Audio CD...........................................................................................................................................20
Playing Picture CD...................................................................................................................................................................21
Setting TV system, Screen Saver, TV type (4:3/16:9), Password,Rating, Default.......................................................................22-23
Setting Language for OSD, Voice, Subtitle, Menu........................................................................................................................24
Setting Audio output.................................................................................................................................................................25
Setting Video's Brightness, Contrast, Hue, Saturation.................................................................................................................26
Adjusting LCD Screen...............................................................................................................................................................27
Troubleshooting..................................................................................................................................................................28-29
Specifications..........................................................................................................................................................................30
Using Card Reader
Using USB Port

Safety Information
5
2
CLASS 1 LASERPRODUCT / KLASSE 1 LASERPRODUKT / LUOKAN 1 LASER LAITE / KLASS 1 LASER APPARAT / PRODUCTO
LASER CLASE.
INVISIBLE LASER RADIATION WHEN OPENAND INTERLOCKSDEFEATED. AVOIDEXPOSURE TO BEAM.
1.Toprevent fire orelectrical shock, donot expose thisPlayer to rainor moisture.
2.Toavoid electrical shock,do not openthe cabinet, nouser-serviceable parts inside,refer servicing toqualified personnel only.
3.Certain countries mayregulate the disposalof the batteryused to powerthis product. Pleaseconsult with yourlocal authority.
4.Listening with earphones for many hoursat maximum volumemay damage yourhearing.
5.The Player shouldbe connected toa power supplyonly of thetype described inthe operating instructionsor as markedon the Player.
Please read allof the safetyand operating instructionsbefore operating thisPlayer, followall warnings placedon the Player
and in theuser's manual. Thesesafety and operatinginstructions should beretained for futurereference.
WARNING
SAFETY WARNING
Safety Information
Do not exposethe system toexcessive moisture, rain,sand, or heatsources.
Place the DVDPlayer on afirm, flat surface.
Keep the DVDPlayer away fromdomestic heating equipmentand direct sunlight.
When placing theDVD Player ina cabinet, allowabout one inchof space allaround the DVD Player for ventilation.

Remote Control
5
3
P/N
TITLE
DISPLAY
ANGLE LANGUAGE SUBTITLE
MUTE
L/R
1234
5678
ENTER
SLOW
ZOOM
REPEAT MARK GOTO
STANDBY
90
MENU/PBC
SETUP
10+
Remote Control
2
3
4
5
6
7
8
9
10
11
12
15
16
17
18
19
20
21
22
23
24
14
13
25
14.STANDBY Button
15.DISPLAYButton
16.MUTE Button
17.ANGLE Button
18.LANGUAGE Button
19.SLOW Button
20.PLAY/PAUSE ( )Button
21.STOP Button
22.FAST REVERSE( ) Button
23.FAST FORWARD ( ) Button
24.REPEAT Button
25.MARK Button
Togglesbetween putting thePlayer on
standby and poweron.
Displays the currentdisc playback
information.
Selects the voicelanguage in aDVD.
Press once tostart play,
press again topause.
Stops disc play.
Use to marka point wherethe playback
starts each timewhen the MARKbutton
is pressed lateron.
Use to accessvarious
camera angles ona DVD.
Allows you torepeat play
a title, chapter, track, ordisc.
1
1.MENU/PBC Button
2.L/R Button
3.P/N Button
4.TITLE Button
5.SUBTITLE Button
6.Number Buttons (0,1,...,9)
7.10+ Button
8.
9.SETUP Button
10.SKIP FORWARD ( )Button
11.SKIP BACKWARD ( ) Button
12.ZOOM Button
13.GOTO Button
Brings up thedisc menu.
Selects left, rightand stereo
sound tracks.
Selects PAL/NTSC TV systems.
Selects the subtitle'slanguage.
Uses to input10 to 999(combining this
button and otherdigit number buttons).
Brings up thesetup MENU
to set upthe system's
language, audio, display,
password etc.
Use to enterthe specific chapter, track
or time toplayback.
ENTER/DIRECTION Buttons
Use to skipto next title,chapter or track.
Use to skipto previous title,
chapter or track.
REMOTE CONTROL

Front View
Right View
Bottom View
Left View
Description
5
4
8.MENU/PBC
1.OPEN
2.EARPHONE / SPEAKER VOLUME
3.EARPHONE JACK
5.POWER ON/OFF
6.INPUT / OUTPUT
7.VIDEO
8.AUDIO OUT
9.AUDIO IN
1
2
1.(16:9/4:3)/REVERSE/MODE/
DOWN/UP
2.OPEN
3.DISC COVER
4.LCD
6.SPEAKER
4.DC IN 12V
10.PAUSE/STEP
9.STOP
11. PLAYBACK BUTTONS PLAY
FAST REVERSE
FAST FORWARD
SKIP-FORWARD
SKIP-PREVIOUS
5. LCD on/offswitch
7.CURSOR(UP/DOWN/LEFT/RIGHT),
ENTER( )
1
2
3
4
5
7
8
9
11 10
64
5
6
7
8
93
2
1
10
2
10.SPDIF: Digital audiosignal
output jack
1.RELEASE LATCH(Battery
pack separation switch)
2.BATTERYPACK
1
3
4
5
2.REMOTE CONTROL SENSOR
1.LED LIGHT
3.3-in-1 card slot
4.LED LIGHT
5.USB slot

Using the Remote Control
Installing the battery
1. Press thelocking tab inthe arrow direction.
Using the remote control
(1)
(2)
(3)
(4)
Point the remotecontrol directly atthe remote sensor
on the frontof the DVDPlayer.
5
5
2. Pull outthe battery tray.
3. Insert a3V lithium batteryinto the
tray with thepolarity ( +) facing up
as marked.
4. Replace thebattery tray bypushing it
until it clicksinto place.
Remote Control Sensor
P/N
TITLE
DISPLAY
ANGLE LANGUAGE SUBTITLE
MUTE
L/R
1234
5678
SETUP
ENTER
SLOW
ZOOM
REPEAT
MARK
GOTO
STANDBY
90
MENU/PBC
REMOTECONTROL
MODELNo.:RMC-220
10+
16:9 / 4:316:9 / 4:3 REVERSEREVERSE MODEMODE UPUP DOWNDOWN
ENTER
o
30
o
30

Connecting Earphones to the DVD Player
You can attach an earphone with a stereo mini-jack plug to the phone jack ( ) for private listening. Its volume is adjustable
using the VOLUME control dial. Youcan also connecta second earphoneto the AUDIO OUT jack, but itsvolume cannot be
adjusted.
Note: When theearphone is connectedto the PhoneJack ( ),the speaker willbe disconnected.
Notes on DSP
The DSP decodes the digitalaudio signal into stereo dts or Dolby digital audio signal for speaker and earphone playback after
converting the signalto analog andamplifying it.
The 5.1 digitalsignal passes throughwithout decoding andcan be accessedby the SPDIFjack on thePlayer.
5
6
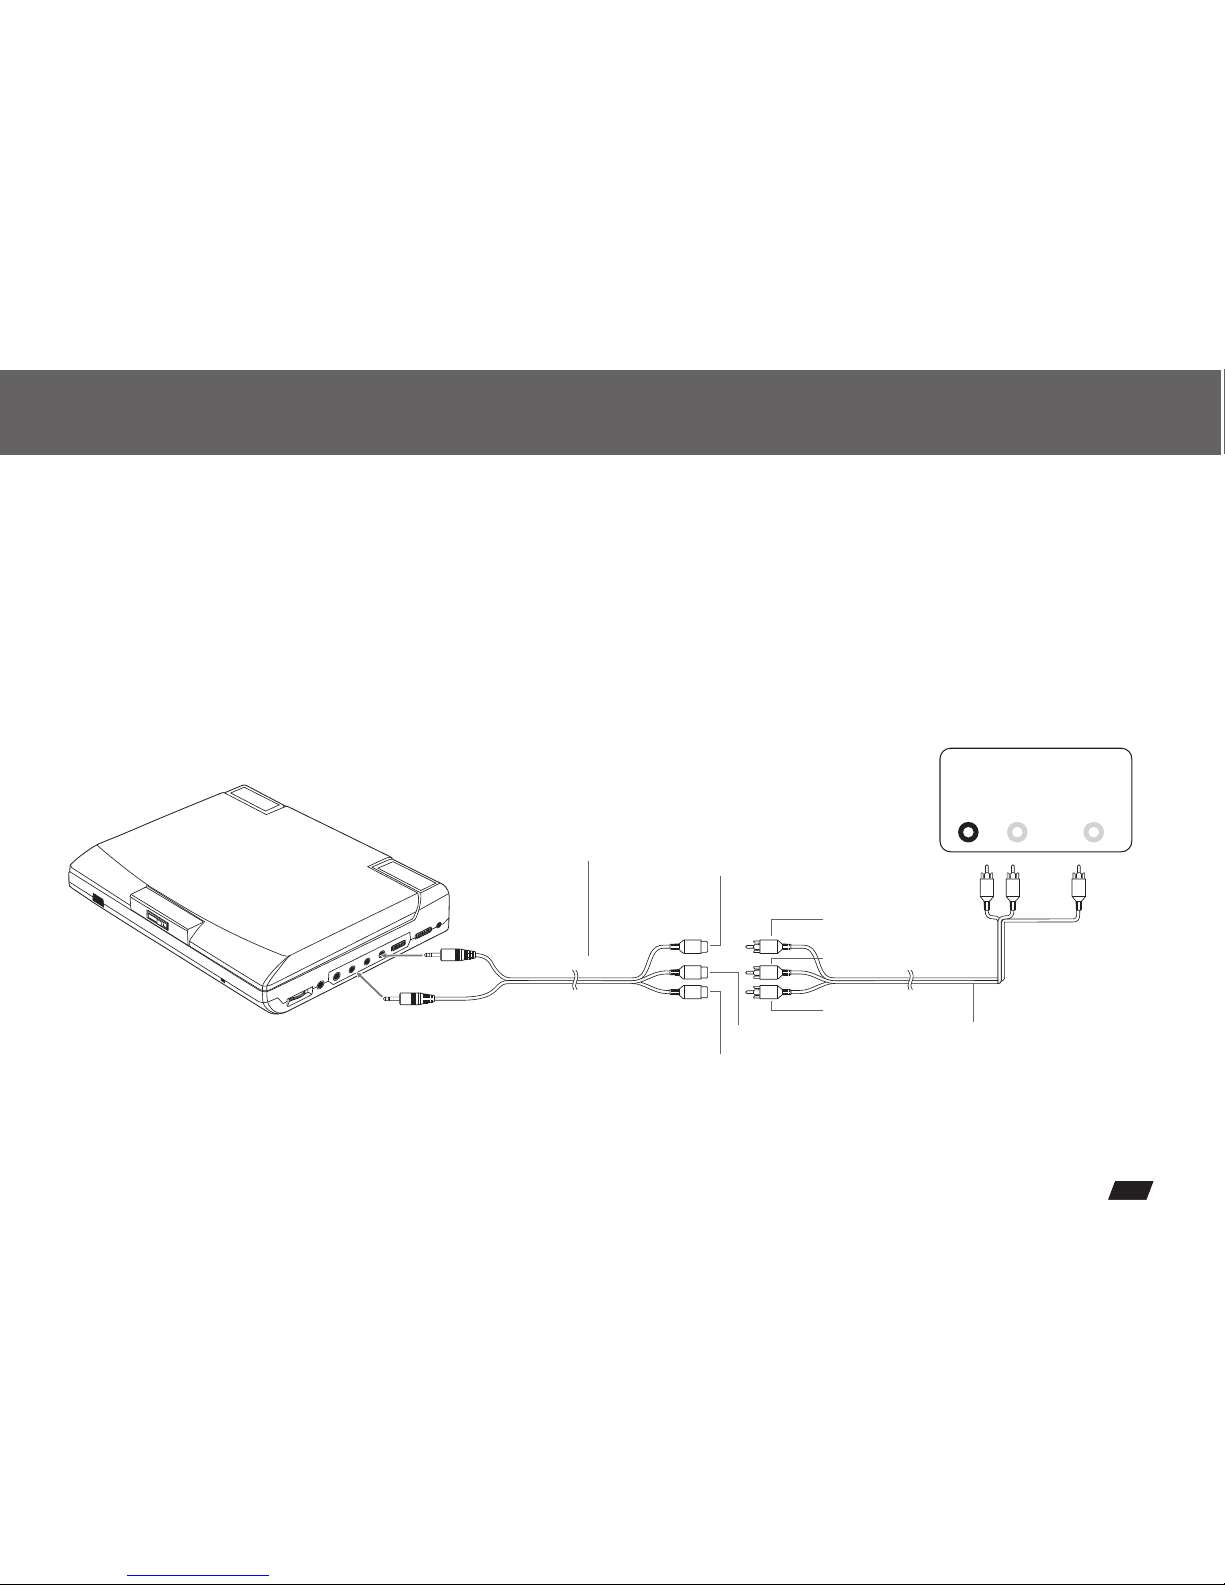
Connecting to an External Component
You can enjoy video from VCR or camcorder on your DVD player.
1. Turnoff DVD player, VCRand other components.
2. Connect theaudio and videocables as illustratedbelow.
3. Slide INPUT/OUTPUT to INPUT.
4.Turn on power.
AUDIO
OUT
VIDEO
OUT
LR
VCR or othercomponent equipped withexternal output connectors
Video in: Yellow
Audio(left):White
Audio(right):Red
AV adaptorcable (provided)
(Mini-jack to RCA)
Audio (black)
Video(yellow)
AV CABLE(Not provided)
Audio(left):White
Audio(right):Red
Video out: Yellow
5
7
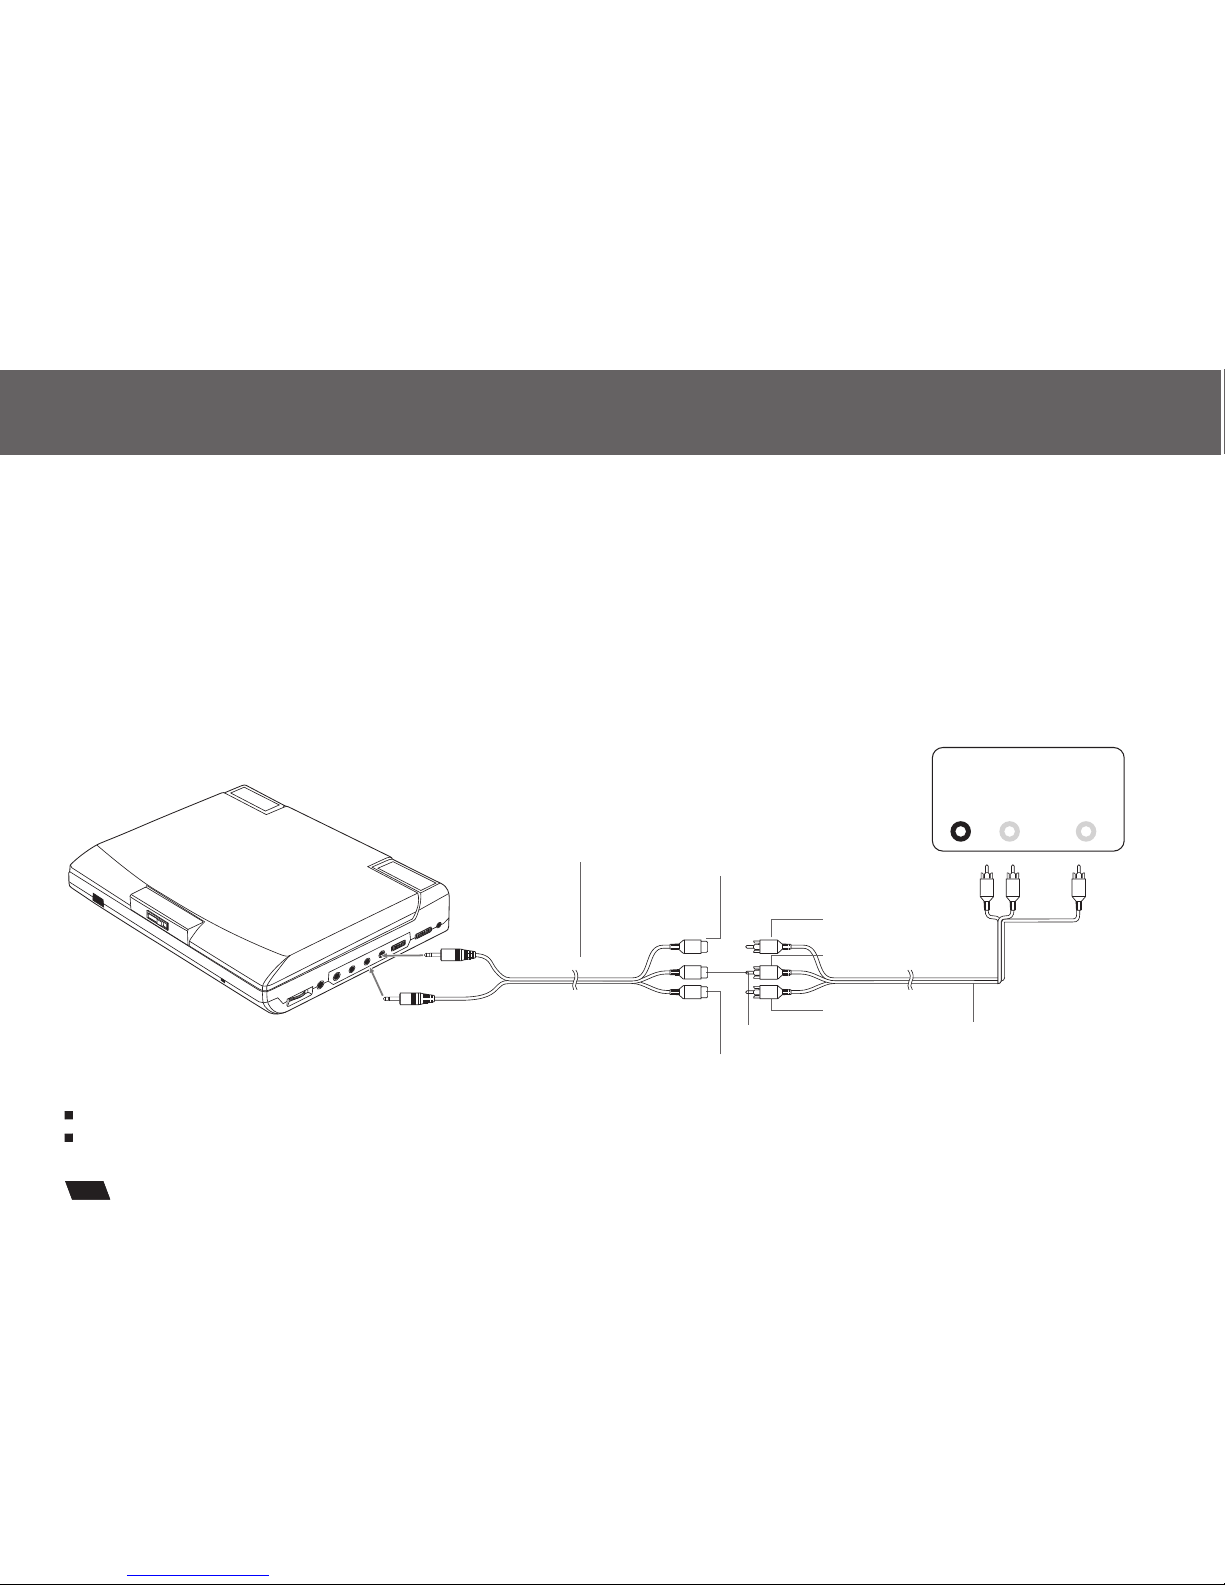
Connecting to a TV
TIPS
If you wishto view videoon your TV only, close the display panel of your Player.
With the displaypanel shut, usethe remote tocontrol the Player.
You can enjoy DVD quality video on TV screen.
1. Turnoff DVD player and other components.
2. Connect theaudio and videocables as illustratedbelow.
3. Slide INPUT/OUTPUT to OUTPUT.
4.Turn on power.
5.Repeatedly pressTV/Video button on your TV to select the input from the DVD player.
AUDIO
IN
VIDEO
IN
LR
Video out: Yellow
Audio(left):White
Audio(right):Red
AV adaptorcable (provided)
(Mini-jack to RCA)
Audio (black)
Video(yellow)
AV CABLE(Not provided)
Audio(left):White
Audio(right):Red
Video in: Yellow
Connect to aTV equipped with external connectionjacks
5
8
Other manuals for DVP-722 -
1
Table of contents
Other LENCO Portable DVD Player manuals

LENCO
LENCO MES-212 User manual

LENCO
LENCO DVP-934 User manual

LENCO
LENCO TDV1001BK User manual

LENCO
LENCO MES-220 DVX - User manual

LENCO
LENCO DTVR-700 User manual

LENCO
LENCO DVP-911 BK User manual

LENCO
LENCO SNOOPY DVP-7 User manual

LENCO
LENCO DVP-742 User manual

LENCO
LENCO DVT-950 User manual

LENCO
LENCO DVP-1027 User manual

LENCO
LENCO DVP-735 User manual

LENCO
LENCO DVP-935 User manual

LENCO
LENCO DVP-743 User manual

LENCO
LENCO DVP-1023 CR - User manual

LENCO
LENCO DVP-1045 User manual

LENCO
LENCO DVP-1039 User manual

LENCO
LENCO MES-202 User manual

LENCO
LENCO MES-219 MPEG4 - User manual

LENCO
LENCO DVP-705 User manual

LENCO
LENCO DVP-852 User manual


