Thrustmaster T510 User manual

1/6
User Manual
PACKAGE CONTENTS - HARDWARE
- 1 Dolby Digital Prologic II & Dolby Digital decoder unit with dual headphone connector
- 1 belt clip for decoder unit
- 1 Dolby Digital stereo headphone set
- 1 battery charger adapter (1.58 m)
- 2 AAA rechargeable batteries
- User Manual
DOLBY DECODER AND HEADPHONE TECHNICAL FEATURES
Audio modes supported Dolby Digital, Dolby Pro Logic II.
Dolby Headphone modes Dolby Digital, Stereo. Headphone can be used as standard stereo
headphone set with decoder powered off.
Audio input Optical and analog line-in connector. Automatic optical or analog
input signal detection.
Frequency response 20Hz – 20kHz.
Headphone driver Ø 40mm.
DOLBY DIGITAL SOUND
Dolby Digital sound is a truly advanced technological process, decoding sound signals over 5 channels
plus an extra channel specifically reserved for special low frequency sound effects. (This channel, referred
to as LFE for “Low Frequency Effect”, represents the well-known “point one” in the 5.1 hardware standard.)
Dolby Digital reproduces the main sound signals over 6 (5.1) channels, as follows:
- The subwoofer channel emits only low frequencies and special effects (LFE), delivering impressive,
realistic sensations (during explosions, for example).
- The center channel emits mainly character dialog, adding to the realism of conversations.
- The four other channels emit the other sound signals independently (music, ambiance, sound effects,
etc.). Their interaction provides a spatial sound sensation worthy of the best movie theaters: a
revolving sound or one moving from right to left will be physically transmitted as such by the relevant
channel speakers, immersing the listener completely in the film.
COPYRIGHT
© 2004 Guillemot Corporation S.A. All rights reserved. Thrustmaster® is a registered trademark of Guillemot Corporation S.A. Dolby®, Pro Logic®
and the DOLBY DIGITAL, DOLBY HEADPHONE and DOLBY PROLOGIC II symbols are registered trademarks of Dolby Laboratories, Inc. © 2004
Dolby Laboratories, Inc. All rights reserved. PlayStation®, PS one™ and the PlayStation® symbols are trademarks and/or registered trademarks of
Sony Computer Entertainment, Inc. Microsoft®, Xbox® and the Xbox™ logo are either registered trademarks or trademarks of Microsoft Corporation
in the United States and/or other countries. GameCube™ is a trademark of Nintendo Co., Ltd. All other trademarks and brand names are hereby
acknowledged and are property of their respective owners. Illustrations not binding. Contents, designs and specifications are subject to change
without notice and may vary from one country to another.

2/6
PACKAGE CONTENTS - CONNECTIVITY
1 long optical cable (2.5 m)
1 short optical cable (0.5 m)
1 optical to SPdif adapter (0.5 m)
1 male 3.5 mm Jack to male 3.5 mm
Jack cable (2.5 m)
1 male RCA to 3.5 mm Jack cable
(2.5 m)
1 female RCA to female 3.5 mm Jack
cable (0.225 m)
1 Xbox to SCART cable with optical
input (1.9 m)

3/6
DESCRIPTION OF DECODER COMPONENTS
1. Analog/Optical input. Enables connection of
an analog or digital audio source.
2. Dolby Pro Logic II decoder mode LED, Left
channel LED in Dolby Headphone mode.
3. Dolby Headphone decoder mode LED,
Center channel LED in Dolby Headphone
mode.
4. Dolby Digital decoder mode LED, Right
channel LED in Dolby Headphone mode.
5. Digital signal input LED, Surround Left
channel LED in Dolby Headphone mode.
6. Stereo headphone mode LED.
7. Analog signal input LED, Surround Right
Channel LED in Dolby Headphone mode.
8. Headphone volume control. Move the switch
up or down to adjust output volume.
9. Battery charger adapter connector. Enables
connection of the battery charger adapter
provided.
10. MUTE mode button. Press this button to
mute the headphone sound; the Dolby
Headphone LED will flash while the decoder
is in mute mode.
11. OUTPUT mode selection button. Press this
button to switch between the Dolby
Headphone and Stereo headphone modes.
12. TEST button. Performs a Dolby Headphone
mode functional test by successfully
activating the Left, Center, Right, Surround
Right and Surround Left channels (displayed
clockwise on the decoder front panel).
13. Power OFF/ON switch.
14. Charge status LED. This LED lights up when
the decoder is connected to the supplied
battery charger adapter.
15. Dual headphone connector. Connect one or
two headphone set(s) to this connector.

4/6
CONNECTING AN AUDIO SOURCE TO THE 5.1 DECODER UNIT
1. Verify that the power switch located on the front of the 5.1 decoder unit is in the OFF position.
2. Switch off the audio source you wish to use.
3. Connect the analog or optical cable (included) to the Analog/Optical Input connector on the decoder
unit.
4. Connect the other end of the analog or optical cable to the analog, digital optical or SPdif output on
the audio source.
5. Turn the connected audio source on, then push the power switch located on the front of the
5.1 decoder unit in the ON position.
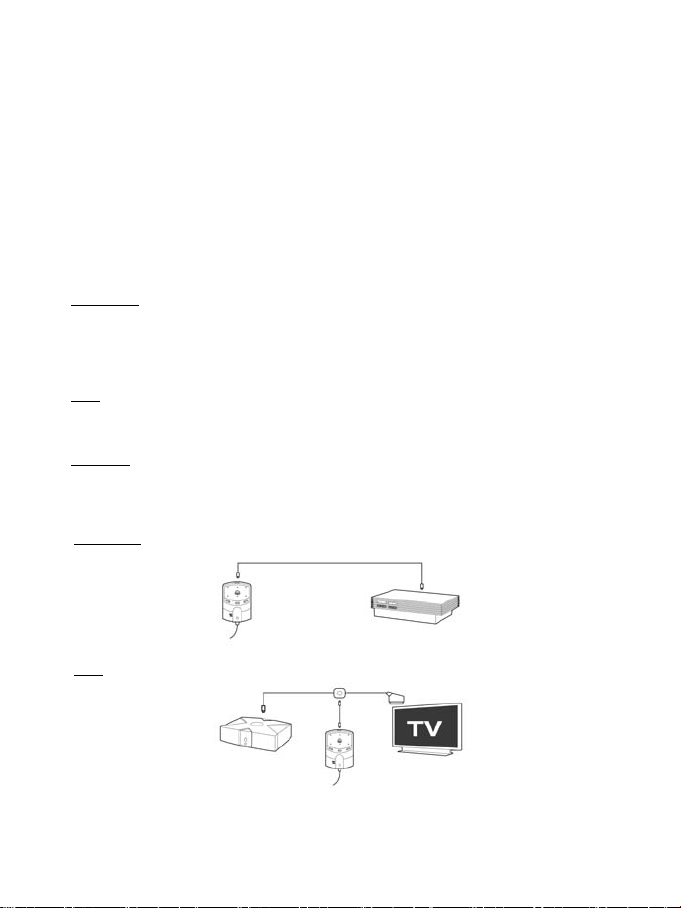
CONNECTING A GAMES CONSOLE TO THE 5.1 DECODER UNIT
1. Verify that the power switch located on the front of the 5.1 decoder unit is in the OFF position.
2. Before connecting your games console to the decoder unit, please proceed as follows:
PlayStation 2:
-Enable the DIGITAL OUT (OPTICAL) option in your console’s control panel.
-In DVD mode: once your DVD has loaded, press the Select button on the controller, select
Setup, then Audio Setup, and enable the DIGITAL OUT (OPTICAL) option.
Xbox:
-Enable the DOLBY DIGITAL option in your Xbox console’s audio settings.
-In game mode: enable the DOLBY DIGITAL option in the game’s advanced options.
3. After selecting these options, connect the relevant cable to your games console, proceeding
as follows:
PlayStation 2:
Xbox:
4. Turn the connected audio source on, then push the power switch located on the front of the
5.1 decoder unit in the ON position.
CONNECTING A DVD PLAYER / SATELLITE LOUDSPEAKER SYSTEM TO THE 5.1 DECODER UNIT
1. Verify that the power switch located on the front of the decoder unit is in the OFF position.
2. Switch your DVD player or satellite loudspeaker system off.
3. Connect the optical cable (included) to the Analog/Optical Input connector on the 5.1 decoder unit.

5/6
4. Connect the other end of the optical cable to the digital, optical or SPdif output on your DVD player or
satellite loudspeaker system.
5. Turn your DVD player or satellite loudspeaker system on, and select the Dolby Digital or SPdif option in
your DVD player’s or satellite loudspeaker system’s options (if applicable); then push the power switch
located on the front of the 5.1 decoder unit in the ON position.
CONNECTING A PC OR MACINTOSH TO THE 5.1 DECODER UNIT
1. Verify that the power switch located on the front of the decoder unit is in the OFF position.
2. Connect the analog or optical cable (included) to the Analog/Optical Input connector on the 5.1
decoder unit.
3. Connect the other end of the analog or optical cable to the relevant output on your PC or Macintosh –
analog, digital, optical or SPdif.
Note: If you are using your computers “optical” output, the following considerations apply:
- When setting your DVD player software’s audio options, select the Dolby Digital or SPdif option.
- Many games now contain 5.1 technology, and do not necessarily use Dolby Digital; hence, when
running a game on your computer, your 5.1 decoder unit may remain in Dolby ProLogic II mode – this
is normal.
4. Turn your DVD player or satellite loudspeaker system on, and select the Dolby Digital or SPdif option in
your DVD player’s or satellite loudspeaker system’s options (if applicable); then push the power switch
located on the front of the 5.1 decoder unit in the ON position.
TROUBLESHOOTING NOTE
Please note that when connecting an audio source to your 5.1 decoder unit using an ANALOG connection
(e.g. 3.5 mm Jack or RCA cables), you may still your Dolby Digital headphone as standard stereo
headphones, even if your 5.1 decoder unit is powered off. However, when connecting an audio source to
your 5.1 decoder unit by means of an OPTICAL / SPDIF connection, powering your 5.1 decoder unit off will
also deactivate the output.
CHARGING THE 5.1 DECODER UNIT’S BATTERIES
The 5.1 decoder unit’s charge status LED (item no. 14 in the decoder components table) operates as
follows:
-Flashes when the decoder unit’s batteries are empty
-Displays a steady red light when the decoder unit’s batteries are being charged
-Displays a steady green light when the decoder unit’s batteries are fully charged
Please take note of following recommendations when using the battery charger adapter:
-Always disconnect the battery charge adapter from the 5.1 decoder unit once the decoder unit’s batteries
are fully charged; this will avoid damaging the decoder unit.
-To guarantee the best possible sound, avoid charging the 5.1 decoder unit’s batteries when the decoder
unit is in use.
TECHNICAL SUPPORT
If you encounter a problem with your product, please go to http://ts.thrustmaster.com and click Technical
Support. From there you will be able to access various utilities (Frequently Asked Questions (FAQ), the
latest versions of drivers and software) that may help to resolve your problem. If the problem persists, you
can contact the Thrustmaster products technical support service (“Technical Support”):

6/6
By email:
In order to take advantage of technical support by email, you must first register online. The information
you provide will help the agents to resolve your problem more quickly. Click Registration on the left-
hand side of the Technical Support page and follow the on-screen instructions. If you have already
registered, fill in the Username and Password fields and then click Login.
By telephone:
United
Kingdom 020 7216 0047 price of a national phone call, Monday to Friday from 12PM to 10PM
United States
/ Canada 514-279-9911 price of a long distance phone call, Monday to Friday
from 7AM to 5PM (Eastern time)
Australia 1902 262 514 $1.98/min, Monday to Friday from 9AM to 6PM
Denmark 82 33 28 58 price of a national phone call, Monday to Friday from 1PM to 10PM
Finland 09 81 71 01 54 price of a national phone call, Monday to Friday from 2PM to 11PM
Norway 23 50 01 16 price of a national phone call, Monday to Friday from 1PM to 10PM
Sweden 08-51992032 price of a national phone call, Monday to Friday from 1PM to 11PM
WARRANTY INFORMATION
Worldwide, Guillemot Corporation S.A. (“Guillemot”) warrants to the consumer that this Thrustmaster product will be free from material defects and
manufacturing flaws for a period of two (2) years from the original date of purchase. Should the product appear to be defective during the warranty period,
immediately contact Technical Support, who will indicate the procedure to follow. If the defect is confirmed, the product must be returned to its place of
purchase (or any other location indicated by Technical Support).
Within the context of this warranty, the consumer’s defective product will, at Technical Support’s option, be either repaired or replaced. Where authorized
by applicable law, the full liability of Guillemot and its subsidiaries (including for indirect damages) is limited to the repair or replacement of the Thrustmaster
product. The consumer’s legal rights with respect to legislation applicable to the sale of consumer goods are not affected by this warranty.
This warranty shall not apply: (1) if the product has been modified, opened, altered, or has suffered damage as a result of inappropriate or abusive use,
negligence, an accident, normal wear, or any other cause not related to a material defect or manufacturing flaw; (2) in the event of failure to comply with the
instructions provided by Technical Support; (3) to software not published by Guillemot, said software being subject to a specific warranty provided by its
publisher.
Additional warranty provisions
In the United States of America and in Canada, this warranty is limited to the product’s internal mechanism and external housing. Any applicable implied
warranties, including warranties of merchantability and fitness for a particular purpose, are hereby limited to two (2) years from the date of purchase and
are subject to the conditions set forth in this limited warranty. In no event shall Guillemot Corporation S.A. or its affiliates be liable for consequential or
incidental damage resulting from the breach of any express or implied warranties. Some States/Provinces do not allow limitation on how long an implied
warranty lasts or exclusion or limitation of incidental/consequential damages, so the above limitation may not apply to you. This warranty gives you specific
legal rights, and you may also have other legal rights which vary from State to State or Province to Province.
DECLARATION OF CONFORMITY
EC COMPLIANCE NOTICE: this equipment has been tested and found to comply with the limits of the Council Directive 89/336/EEC of 3 May 1989 on the
approximation of the laws of the Member States relating to electromagnetic compatibility, amended by Directive 93/68/EEC. The audio translator has been
tested and found to comply with EN 50081-1 /1992: EN55022, EN 50082-1 /1997: EN61000-4-2/-3/-8, EN 50204. In a domestic environment this product
may cause radio interference in which case the user may be required to take adequate measures.
CANADIAN COMPLIANCE NOTICE: this Class B digital apparatus meets all requirements of the Canadian Interference-Causing Equipment Regulations.
This equipment has been tested and found to comply with the limits for a Class B digital device, pursuant to Part 15 of the FCC rules. Operation is subject
to the following two conditions:
(1) This device may not cause harmful interference, and
(2) This device must accept any interference received, including interference that may cause undesired operation.
These limits are designed to provide reasonable protection against harmful interference in a residential installation. This equipment generates, uses and
can radiate radio frequency energy and, if not installed and used in accordance with the instructions, may cause harmful interference to radio
communications. However, there is no guarantee that interference will not occur in a particular installation. If this equipment does cause harmful
interference to radio or television reception, which can be determined by turning the equipment on and off, the user is encouraged to try to correct the
interference by one or more of the following measures:
-Reorient or relocate the receiving antenna.
-Increase the separation between the equipment and receiver.
-Connect the equipment into an outlet on a circuit different from that to which the receiver is connected.
-Consult the dealer or an experienced radio/TV technician for help.
1/6
Manuel de l’utilisateur
CONTENU DE LA BOÎTE
- Décodeur Dolby Digital ProLogic II avec double prise casque
- Étui de transport pour le décodeur
- Casque stéréo Dolby Digital
- Adaptateur/chargeur de batteries (1,58 m – DC – 5V – 500mA)
- 2 batteries rechargeables AAA
- Manuel de l’utilisateur
DÉCODEUR ET CASQUE – CARACTÉRISTIQUES TECHNIQUES
Modes audio disponibles
(décodeur)
Dolby Digital, Dolby Pro Logic II.
Modes audio disponibles
(casque)
Dolby, stéréo. Le casque est utilisable en tant que casque stéréo
standard lorsque le décodeur est éteint.
Entrée audio Connecteur d’entrée optique et analogique. Détection automatique
des signaux d’entrée optiques ou analogiques.
Plage de fréquences 20Hz – 20kHz.
Haut-parleurs casque Ø 40mm.
LE SON DOLBY DIGITAL
Véritable avancée technologique, le son Dolby Digital est un procédé de codage exclusivement
numérique des signaux sonores sur 5 canaux plus un canal spécifique réservé aux effets spéciaux des
sons concentrés dans l’extrême grave (ce canal, appelé LFE pour « Low Frequency Effect », constitue le
fameux « point un » du standard d’équipement noté 5.1).
Dolby Digital reproduit les principaux signaux sonores sur 6 (5.1) canaux de la manière suivante :
- Le canal des basses va diffuser uniquement les basses fréquences et leurs effets spéciaux (LFE)
procurant ainsi des sensations impressionnantes de réalisme lors des explosions par exemple.
- Le canal central va diffuser principalement les dialogues des personnages, renforçant le réalisme
des échanges.
- Les quatre autres canaux vont diffuser individuellement les autres signaux sonores (musiques,
ambiance, effets sonores, etc.). Leur interaction vous apportera une sensation spatiale digne des
meilleures salles de cinéma : un son tournoyant ou provenant de la droite vers la gauche sera
physiquement retransmis comme tel par les enceintes satellites, vous immergeant entièrement dans le
film.
Ce décodeur est compatible avec tout casque audio (y compris sans fil).
2/6
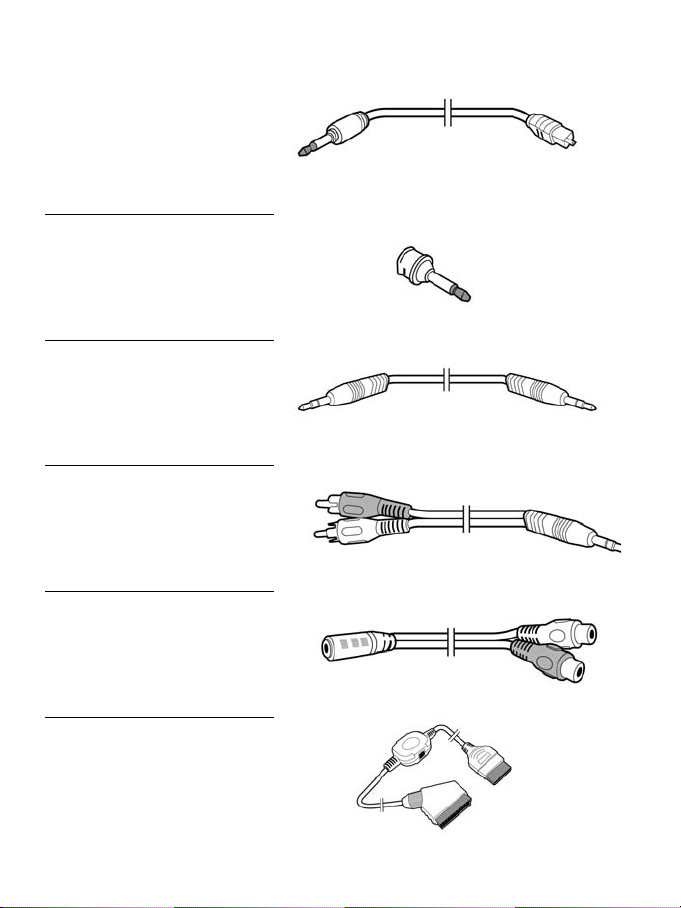
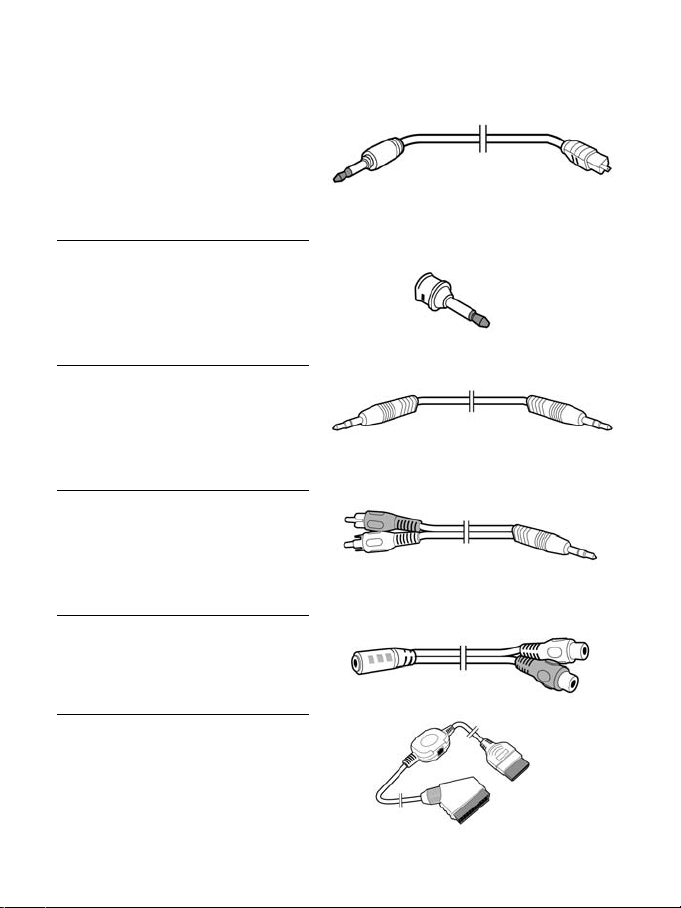
CONTENU DE LA BOÎTE - CONNECTIVITÉ
Câble optique long (2,5 m)
Câble optique court (0,5 m)
Adaptateur optique - SPdif (0,5 m)
Câble à deux fiches mâles Jack 3,5 mm
(0,5 m)
Câble 2 fiches mâles RCA – 1 fiche
Jack 3,5 mm mâle (2,5 m)
Câble 2 fiches femelles RCA – 1 fiche
Jack 3,5 mm femelle (0,225 m)
Câble Xbox – PÉRITEL avec
connecteur d’entrée optique (1,9 m)

3/6
DESCRIPTION DES COMPOSANTS DU DÉCODEUR
1. Entrée analogique/optique. Permet le
raccordement d’une source audio
analogique ou numérique.
2. Témoin du mode Dolby Pro Logic II, témoin
du canal gauche en mode Dolby Headphone.
3. Témoin du mode Dolby Headphone, témoin
du canal central en mode Dolby Headphone.
4. Témoin du mode Dolby Digital, témoin du
canal droit en mode Dolby Headphone.
5. Témoin de connexion de signal numérique,
témoin du canal Surround gauche en mode
Dolby Headphone.
6. Témoin du mode stéréo.
7. Témoin de connexion de signal analogique,
témoin du canal Surround droit en mode
Dolby Headphone.
8. Réglage du volume. Déplacez le curseur
vers le haut ou le bas pour ajuster le volume.
9. Connecteur du chargeur de batteries.
Autorise le raccordement du chargeur de
batteries fourni.
10. Bouton du mode MUTE (SOURDINE).
Appuyez sur ce bouton pour désactiver
temporairement le son du casque ; le témoin
Dolby Headphone clignote lorsque le
décodeur se trouve en mode sourdine.
11. Bouton de sélection du mode OUTPUT
(SORTIE). Appuyez sur ce bouton pour
sélectionner les modes Dolby Headphone et
stéréo.
12. Bouton TEST. Effectue un test opérationnel
du mode Dolby Headphone en activant
successivement les canaux gauche, central,
droit, Surround droit et Surround gauche
(dans le sens horaire sur le décodeur).
13. Commutateur OFF/ON (MARCHE/ARRÊT).
14. Témoin de charge. Ce témoin s’illumine
lorsque le décodeur est connecté au
chargeur de batteries fourni.
15. Double prise casque. Cette prise vous
permet de connectez un ou deux casque(s)
au décodeur.
4/6
CONNEXION D’UNE SOURCE AUDIO AU DÉCODEUR 5.1
1. Vérifiez que le commutateur situé sur la face avant du décodeur 5.1 se trouve sur la position OFF.
2. Éteignez la source audio que vous souhaitez utiliser.
3. Raccordez le câble analogique ou optique adéquat (fourni) sur le connecteur Analog/Optical Input du
décodeur.
4. Branchez l’autre extrémité du câble analogique ou optique à la sortie analogique, optique ou SPdif de
la source audio.
5. Mettez la source audio connectée sous tension, puis placez le commutateur situé sur la face avant du
décodeur 5.1 sur la position ON.
CONNEXION D’UNE CONSOLE DE JEU AU DÉCODEUR 5.1
1. Vérifiez que le commutateur situé sur la face avant du décodeur 5.1 se trouve sur la position OFF.
2. Avant de connecter votre console de jeu au décodeur, veuillez effectuer les réglages suivants :
PlayStation 2 :
-Activez l’option DIGITAL OUT (OPTICAL) dans le panneau de configuration de votre console.
-En mode DVD : après avoir inséré votre DVD, appuyez sur la touche Select de la manette,
sélectionnez Réglages puis Réglage audio, et activez l’option DIGITAL OUT (OPTICAL).
-En mode jeu : activez l’option DPII dans les options avancées du jeu (si l’option est disponible.)
Xbox :
-Activez l’option DOLBY DIGITAL dans les options audio de votre console Xbox.
-En mode jeu : activez l’option DOLBY DIGITAL dans les options avancées du jeu.
GameCube :
-En mode jeu : activez l’option DPII dans les options avancées du jeu (si l’option est disponible.)
3. Après avoir sélectionné ces options, connectez le câble adéquat à votre console de jeu comme suit :
PlayStation 2 :
Xbox :
4. Mettez la source audio connectée sous tension, puis placez le commutateur situé sur la face avant
du décodeur 5.1 sur la position ON.

5/6
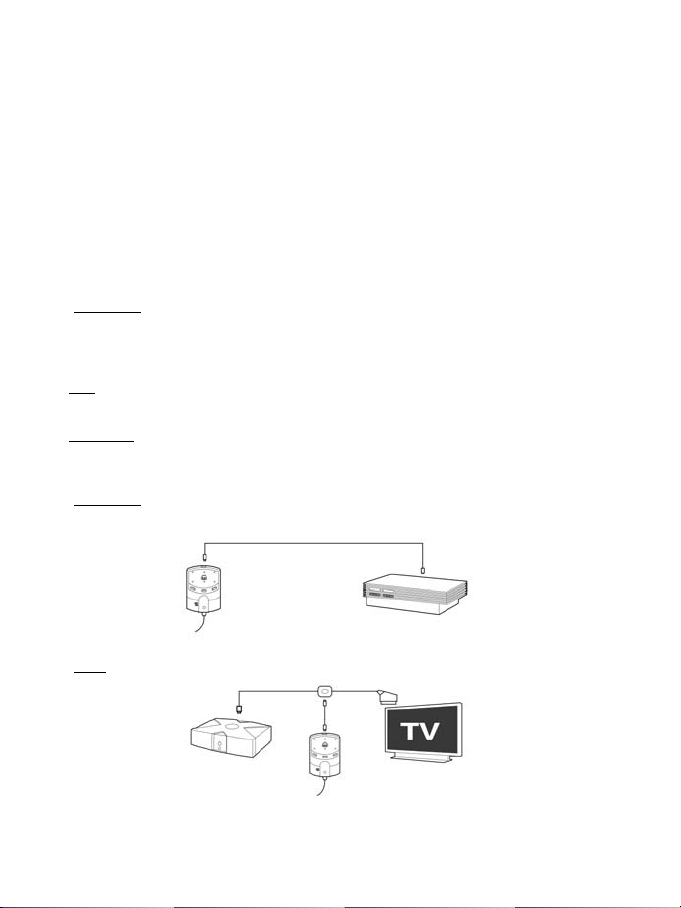
CONNEXION D’UN LECTEUR DE DVD / DÉMODULATEUR SATELLITE AU DÉCODEUR 5.1
1. Vérifiez que le commutateur situé sur la face avant du décodeur 5.1 se trouve sur la position OFF.
2. Éteignez votre lecteur de DVD ou démodulateur satellite.
3. Branchez le câble optique (fourni) au connecteur Analog/Optical Input de votre décodeur 5.1.
4. Branchez l’autre extrémité du câble optique sur la sortie numérique, optique ou SPdif de votre lecteur
de DVD ou démodulateur satellite.
5. Mettez votre lecteur de DVD ou démodulateur satellite sous tension, puis sélectionnez l’option Dolby
Digital ou SPdif option dans les options de votre lecteur de DVD ou démodulateur satellite (le cas
échéant) ; placez ensuite le commutateur situé sur la face avant du décodeur 5.1 sur la position ON.
CONNEXION D’UN PC OU D’UN MACINTOSH AU DÉCODEUR 5.1
1. Vérifiez que le commutateur situé sur la face avant du décodeur 5.1 se trouve sur la position OFF.
2. Branchez le câble analogique ou optique (fourni) au connecteur Analog/Optical Input de votre
décodeur 5.1.
3. Branchez l’autre extrémité du câble optique sur la sortie numérique de votre PC ou Macintosh –
analogique, numérique, optique ou SPdif.
Remarque : Si vous utilisez la sortie « optique » de votre ordinateur, gardez à l’esprit les points
suivants :
- Accédez aux options audio de votre logiciel de lecture de DVD et sélectionnez l’option Dolby Digital
ou SPdif.
- De nombreux jeux intègrent désormais la technologie 5.1 et n’utilisent pas nécessairement la
technologie Dolby Digital ; par conséquent, si vous exécutez un jeu sur votre ordinateur, le mode
Dolby ProLogic II restera vraisemblablement activé sur votre décodeur 5.1 – c’est tout à fait normal.
INFORMATIONS DE DÉPANNAGE
Si vous raccordez une source audio à votre décodeur 5.1 au moyen d’une connexion ANALOGIQUE (par
ex. câbles Jack 3,5 mm ou RCA), vous pouvez utiliser votre casque stéréo Dolby Digital en tant que
simple casque stéréo, même si votre décodeur 5.1 n’est pas sous tension. Toutefois, le fait d’éteindre
votre décodeur 5.1 lorsque celui-ci est connecté à une source audio au moyen d’une connexion
OPTIQUE / SPDIF aura pour effet de désactiver le son.
RECHARGE DES BATTERIES DU DÉCODEUR 5.1
Le témoin de charge du décodeur 5.1 (no. 14 dans la tableau descriptif des éléments du décodeur)
fonctionne comme suit :
-Il clignote lorsque le niveau des batteries du décodeur est faible
-Il s’illumine d’une lueur rouge stable lorsque les batteries du décodeur sont en cours de charge
-Il s’illumine d’une lueur verte stable lorsque les batteries du décodeur sont entièrement rechargées
Veuillez tenir compte des recommandations suivantes lorsque vous utilisez l’adaptateur/chargeur
de batteries :
-Déconnectez systématiquement l’adaptateur/chargeur de batteries du décodeur 5.1 lorsque les
batteries du décodeur sont entièrement chargées ; vous éviterez ainsi d’endommager votre décodeur.
-Afin de garantir un son d’une pureté optimale, évitez de recharger les batteries de votre décodeur 5.1
lorsqu’il se trouve en cours d’utilisation.

6/6
SUPPORT TECHNIQUE
Si vous rencontrez un problème avec votre produit, rendez-vous sur le site http://ts.thrustmaster.com et cliquez sur Support
Technique. Vous aurez alors accès à différents services (Foire Aux Questions (FAQ), dernières versions des pilotes et
logiciels) susceptibles de résoudre votre problème. Si le problème persiste, vous pouvez contacter le support technique des
produits Thrustmaster (« Support Technique ») :
Par e-mail :
Pour bénéficier du support technique par e-mail, vous devez d’abord vous enregistrer en ligne. Les informations fournies vont
permettre aux techniciens de résoudre plus rapidement votre problème. Cliquez sur Enregistrement à gauche de la page
Support technique et suivez les instructions à l’écran. Si vous êtes déjà enregistré, renseignez les champs Nom d’utilisateur et
Mot de passe puis cliquez sur Connexion.
Par téléphone :
France 0892 690 024 0,34 €/min, du lundi au vendredi de 13h à 17h et de 18h à 22h
Belgique 02 / 732 55 77 prix d’un appel national, du lundi au vendredi de 9h à 12h30 et de 14h à 17h30
Suisse 22 567 51 20 prix d’un appel national, du lundi au vendredi de 13h à 22h
Canada 514-279-9911 prix d’un appel longue distance, du lundi au vendredi de 7h à 17h (heure de l’Est)
Informations relatives à la garantie
Dans le monde entier, Guillemot Corporation S.A. (« Guillemot ») garantit au consommateur que le présent produit Thrustmaster est exempt de
défauts matériels et de vices de fabrication, et ce, pour une période de deux (2) ans à compter de la date d’achat d’origine. Si, au cours de la période
de garantie, le produit semble défectueux, contactez immédiatement le Support Technique qui vous indiquera la procédure à suivre. Si le défaut est
confirmé, le produit devra être retourné à son lieu d’achat (ou tout autre lieu indiqué par le Support Technique).
Dans le cadre de la garantie, le consommateur bénéficiera, au choix du Support Technique, du remplacement ou de la réparation du produit
défectueux. Lorsque la loi applicable l’autorise, toute responsabilité de Guillemot et ses filiales (y compris pour les dommages indirects) se limite à la
réparation ou au remplacement du produit Thrustmaster. Les droits légaux du consommateur au titre de la législation applicable à la vente de biens de
consommation ne sont pas affectés par la présente garantie.
Cette garantie ne s’appliquera pas : (1) si le produit a été modifié, ouvert, altéré, ou a subi des dommages résultant d’une utilisation inappropriée ou
abusive, d’une négligence, d’un accident, de l’usure normale, ou de toute autre cause non liée à un défaut matériel ou à un vice de fabrication ; (2) en
cas de non-respect des instructions du Support Technique ; (3) aux logiciels non-édités par Guillemot, lesdits logiciels faisant l’objet d’une garantie
spécifique accordée par leurs éditeurs.
Stipulations additionnelles à la garantie
Aux États-Unis d’Amérique et au Canada, cette garantie est limitée au mécanisme interne et au boîtier externe du produit. Toute garantie implicite
applicable, incluant les garanties de qualité marchande ou d’adaptation à un usage particulier, est limitée à deux (2) ans à compter de la date d’achat
et soumise aux conditions de la présente garantie limitée. En aucun cas, Guillemot Corporation S.A. ou ses sociétés affiliées ne sauraient être tenues
responsables envers qui que ce soit de tous dommages indirects ou dommages accessoires résultant du non-respect des garanties expresses ou
implicites. Certains États/Provinces n’autorisent pas la limitation sur la durée d’une garantie implicite, ou l’exclusion ou la limitation de responsabilité
pour les dommages indirects ou accessoires, de sorte que les limitations ou exclusions ci-dessus peuvent ne pas vous être applicables. Cette garantie
vous confère des droits spécifiques ; vous pouvez également bénéficier d’autres droits qui peuvent différer d’un État/Province à l’autre.
DÉCLARATION DE CONFORMITÉ
UTILISATEURS EUROPÉENS :
Cet appareil a été testé et est conforme à la Directive 89/336/CEE du Conseil du 3 mai 1989 concernant le rapprochement des législations des États
membres relatives à la compatibilité électromagnétique, modifiée par la Directive 93/68/CEE. Cet appareil a été testé et est conforme aux directives EN
50081-1 /1992: EN55022, EN 50082-1 /1997: EN61000-4-2/-3/-8, EN 50204. Le fonctionnement de ce matériel dans un environnement résidentiel provoque
parfois des interférences radioélectriques ; il incombe dans ce cas à l’utilisateur d’y remédier.
UTILISATEURS CANADIENS :
Cet appareil numérique de la classe B respecte toutes les exigences du Règlement sur le matériel brouilleur du Canada.
COPYRIGHT
© 2004Guillemot Corporation S.A. Tous droits réservés. Thrustmaster® est une marque déposée de Guillemot Corporation S.A. Dolby®, Pro Logic®
et les logos sont des marques déposées de Dolby Laboratories, Inc. © 2003 Dolby Laboratories, Inc. Tous droits réservés. PlayStation®, PS
one™ et les symboles PlayStation® sont des marques et/ou des marques déposées de Sony Computer Entertainment, Inc. Microsoft®, Xbox® et le
logo Xbox™ sont des marques déposées ou des marques de Microsoft Corporation aux États-Unis et/ou dans d’autres pays. GameCube™ est une
marque de Nintendo Co., Ltd. Toutes les autres marques déposées et noms commerciaux sont reconnus par les présentes et sont la propriété de
leurs propriétaires respectifs. Illustrations non contractuelles. Le contenu, la conception et les spécifications sont susceptibles de changer sans
préavis et de varier selon les pays.

1
/
6
Benutzerhandbuch
PACKUNGSINHALT - HARDWARE
- 1 Dolby Digital Prologic II & Dolby Digital Decoder mit dualem Kopfhöreranschluß
- 1 Gürtelclip für den Decoder
- 1 Dolby Digital Stereokopfhörer
- 1 Batterieladegerät (1,58 M - DC – 5V – 500mA)
- 2 AAA wiederaufladbare Batterien
- Bedienungsanleitung
DOLBY DECODER AND HEADPHONE TECHNICAL FEATURES
Unterstützte Audiomodi Dolby Digital, Dolby Pro Logic II.
Dolby Kopfhörer-Modi Dolby Digital, Stereo. Kopfhörer kann als Standardstereo-Kopfhörer
bei ausgeschaltetem Decoder verwendet werden.
Audio Eingänge Optischer und analoger Line-In-Anschluß. Automatische optische
und analoge Signalerkennung.
Frequenzreichweite 20Hz – 20kHz.
Kopfhöreranschluß Ø 40mm.
Dieser Dekoder ist kompatibel mit allen Kopfhörern (inkluse dem kabellosen Kopfhörern).
DOLBY DIGITAL SOUND
Dolby Digital Sound ist ein wirklich hochentwickeltes technisches Verfahren, das Soundsignale von 5
Kanälen plus einem extra Kanal für Soundeffekte aus den besonders niedrigen Frequenzen decodiert.
(Dieser Kanal, der als LFE für”Low Frequency Effect” bezeichnet ist, repräsentiert den bekannten Punkt
Eins im 5.1 Standard.)
Dolby Digital reproduziert die Hauptsoundsignale über 6 (5.1) Kanäle wie folgt:
- Der Subwoofer-Kanal übermittelt nur niedrige Frequenzen und Spezialeffekte (LFE) für beeindruckende
realistische Klangerlebnisse (während Explosionen beispielsweise).
- Der Center-Kanal übermittelt hauptsächlich für den Realismus der Konversationen den
Charakterdialog.
- Die vier anderen Kanäle übermitteln die anderen Soundsignale unabhängig voneinander (Musik,
Ambiente, Soundeffekte, etc.). Deren Interaktion liefert ein räumliches Klangerlebnis wie in den besten
Kinos: Einen umlaufenden Sound oder ein Geräusch, das sich von der linken Seite auf die rechte
Seite bewegt, wird physikalisch durch die entsprechend relevanten Lautsprecher (Kanäle) übermittelt,
die den Hörer komplett in den Film eintauchen lassen.
2
/
6
PACKUNGSINHALT - VERBINDUNGEN
1 langes optisches Kabel (2,5 m)
1 kurzes optisches Kabel (0,5 m)
1 optisch auf S/PDIF Adapter (0,5 m)
1 3,5mm-Cinch-Kabel (2,5 m)
1 Männchen RCA auf 5 mm Stecker Kabel
(2,5 m)
1 Weibchen RCA auf Weibchen Klinke Kabel
(0,225 m)
1 Xbox auf SCART Kabel mit optischem
Eingang (1,9 m)

3
/
6
Beschreibung der Decoder-Komponenten
1. Analoger/Optischer Eingang. Verbindung mit
einer analogen oder digitalen Audioquelle.
2. Dolby Pro Logic II Decodermodus-LED, Linker
Kanal-LED im Dolby Kopfhörer-Modus.
3. Dolby Kopfhörer Decodermodus-LED, Center
Kanal-LED im Dolby Kopfhörer-Modus.
4. Dolby Digital Decodermodus-LED, Rechter
Kanal-LED im Dolby Kopfhörer-Modus.
5. Digital Signaleingang-LED, Hinterer Linker
Kanal-LED im Dolby Kopfhörer-Modus.
6. Stereo Kopfhörermodus-LED.
7. Analoge Signaleingang-LED, Hinterer Rechter
Kanal-LED im Dolby Kopfhörer-Modus.
8. Kopfhörer-Lautstärkeregelung. Bewegen Sie
den Regler auf oder ab, um die Lautstärke
anzupassen.
9. Anschluß für das Batterieladegerät. Verbindung
für das mitgelieferte Batterieladegerät.
10. MUTE Modusknopf. Diesen Knopf drücken, um
den Kopfhörer stumm zu schalten. Die
Kopfhörer-LED wird blinken, wenn der der
Decoder im Mutemodus ist.
11. OUTPUT Moduswahl. Diesen Knopf drücken,
um zwischen dem Dolby Kopfhörer- und Stereo
Kopfhörer-Modus umzuschalten.
12. TEST Knopf. Führt einen Dolby-Kopfhörer
Funktionstest aus, indem nacheinander der
Linke, Center, Rechte, Hintere Rechte und
Hintere Linke Kanal aktiviert wird (wird im
Uhrzeigersinn auf dem Decoder angezeigt.
13. Power OFF/ON Schalter.
14. Ladestatus-LED. Diese LED leuchtet auf, wenn
der Decoder mit dem mitgelieferten
Batterieladegerät verbunden ist.
15. Dual Kopfhöreranschluß. Schließen Sie einen
oder zwei Kopfhörer an diesen Anschluß an.
4
/
6
CONNECTING AN AUDIO SOURCE TO THE 5.1 DECODER UNIT
1. Verify that the power switch located on the front of the 5.1 decoder unit is in the OFF position.
2. Switch off the audio source you wish to use.
3. Connect the analog or optical cable (included) to the Analog/Optical Input connector on the decoder unit.
4. Connect the other end of the analog or optical cable to the analog, digital optical or SPdif output on the
audio source.
5. Turn the connected audio source on, then push the power switch located on the front of the 5.1 decoder unit
in the ON position.
VERBINDEN EINER SPIELKONSOLE MIT DEM 5.1 DECODER
1. Stellen Sie sicher, daß der Power-Schalter auf der Vorderseite des Decoders auf der Position OFF steht.
2. Bevor Sie Ihre Spielkonsole mit dem Decoder verbinden, gehen Sie bitte wie folgt vor:
PlayStation 2:
-Aktivieren Sie die Option DIGITAL OUT (OPTICAL) in den Einstellungen Ihrer Konsole.
-Im DVD Modus: Wenn Ihre DVD geladen ist, drücken Sie den Select Knopf auf Ihrem Controller, wählen
Sie Setup, dann Audio Setup, und aktivieren Sie die DIGITAL OUT (OPTICAL) Option.
-Im Spielmodus: Aktivieren Sie die Option DPII in den erweiterten Optionen Ihres Spiels.
Xbox:
-Aktivieren Sie die Option DOLBY DIGITAL In den Audioeinstellungen Ihrer Xbox.
-Im Spielmodus: Aktivieren Sie die Option DOLBY DIGITAL in den erweiterten Optionen Ihres Spiels.
GameCube:
-Im Spielmodus: Aktivieren Sie die Option DPII in den erweiterten Optionen Ihres Spiels.
3. Nachdem Sie diese Optionen gewählt haben, verbinden Sie die relevanten Kabel mit Ihrer Konsole und
gehen Sie dabei wie folgt vor:
PlayStation 2:
Xbox:
4. Schalten Sie die angeschlossene Audioquelle an, danach drücken Sie den Power-Schalter an der
Vorderseite des Decoders auf die Position ON.

5
/
6
ANSCHLUSS EINES DVD PLAYERS / SATELLITEN DEMODULATORS/DECODERS AN DEN 5.1
DECODER
1. Versichern Sie sich, daß der Power-Schalter an der Vorderseite des Decoders auf der Position OFF
steht.
2. Schalten Sie Ihren DVD Player oder Satelliten Demodulator/Decoder ab.
3. Verbinden Sie das optische Kabel (enthalten) mit dem Analog/Optical Input Anschluß am Decoder.
4. Verbinden Sie das andere Ende des optischen Kabels mit dem digitalen, optischen oder S/PDIF-
Ausgang Ihres DVD Players oder Satelliten Demodulators/Decoders.
5. Schalten Sie Ihren DVD Player oder Satelliten Demodulator/Decoder an und wählen Sie die Option
Dolby Digital oder S/PDIF in den Systemoptionen Ihres DVD Players oder Satelliten Demodulators/
Decoders (sofern verfügbar); dann drücken Sie den Power-Schalter auf der Vorderseite des Decoders
auf die Position ON.
ANSCHLUSS EINES PCS ODER MACINTOSH AN DEN 5.1 DECODER
1. Versichern Sie sich, daß der Power-Schalter an der Vorderseite des Decoders auf der Position OFF
steht.
2. Verbinden Sie das analoge oder optische Kabel (enthalten) mit dem Analog/Optical Input Anschluß am
Decoder.
3. Verbinden Sie das andere Ende des analogen oder optischen Kabels an den relevanten Anschluß Ihres
PCs oder Macintosh – analog, digital, optisch oder über S/PDIF.
Hinweis: Sollten Sie den optischen Ausgang Ihres Rechners verwenden, müssen Sie folgende Dinge
beachten:
- In den Audio-Einstellungen Ihrer DVD Player-Software wählen Sie die Option Dolby Digital oder
S/PDIF.
- Viele Spiele beinhalten bereits 5.1 Technologie, nutzen aber nicht immer Dolby Digital. Daher sollte
beim Spielen Ihr Decoder im Dolby ProLogic II Modus bleiben – das ist normal.
TROUBLESHOOTING HINWEIS
Bitte beachten Sie, wenn Sie eine Audioquelle mit einem analogen Kabel (zum Beispiel 3,5mm Klinke oder
RCA-Kabel)an den Decoder anschließen, können Sie Ihren Dolby Digital Kopfhörer immer noch als
Standard Stereo-Kopfhörer verwenden, auch wenn Ihr 5.1 Decoder ausgeschalten ist. Wenn Sie jedoch
eine Audioquelle mit einem optischen oder S/PDIF-Kabel anschließen, wird, wenn Sie den Decoder
ausschalten, der Ausgang ebenfalls deaktiviert.
LADEN DER BATTERIEN DES 5.1 DECODERS
Die Ladestatus-LED des Decoders (Nr. 14 in der Komponententabelle des Decoders) funktioniert wie folgt:
-Blinkt, wenn die Batterien des Decoders leer sind
-Zeigt ein rotes Licht, wenn die Batterien des Decoders geladen werden
-Zeigt ein grünes Licht, wenn die Batterien des Decoders vollständig geladen sind
Bitte beachten Sie die nachfolgenden Empfehlungen, wenn Sie das Ladegerät verwenden:
-Stecken Sie das Ladegerät immer vom Decoder ab, wenn die Batterien vollständig geladen sind, damit
Schäden am Decoder vermieden werden.
-Um den bestmöglichen Klang zu gewährleisten, vermeiden Sie es, den Decoder zu laden, wenn Sie ihn
verwenden.

6
/
6
TECHNISCHER SUPPORT
Sollten Sie mit Ihrem Produkt ein Problem haben, besuchen Sie bitte die Seite http://ts.thrustmaster.com und
klicken Sie auf Technischer Support. Von dort aus können Sie auf verschiedene Instrumente zugreifen (Fragen
und Antworten (FAQ), die neuesten Versionen von Treibern und Software), die Ihnen bei der Lösung Ihres
Problems helfen könnten. Falls das Problem weiterhin besteht, können Sie mit dem technischen Support der
Thrustmaster Produkten in Kontakt treten („Technischer Support“):
Per Email:
Um den Vorzug des technischen Supports per Email in Anspruch nehmen zu können, müssen Sie sich zunächst
online registrieren. Mit den Informationen, die Sie uns so zukommen lassen, können die Mitarbeiter Ihr Problem
schneller lösen. Klicken Sie auf Registrierung links auf der Seite des technischen Supports und folgen Sie den
Instruktionen auf dem Bildschirm. Falls Sie bereits registriert sind, füllen Sie die Textfelder Anwendername und
Paßwort aus und klicken dann auf Login.
Per Telefon:
Deutschland 0190/662789 0,433 €/Minute, Montag bis Freitag
von 15 bis 18 Uhr und 19 bis 22 Uhr
Schweiz 22 567 51 20 Zum Preis eines landesweiten Telefongesprächs, Montag bis Freitag
von 13 bis 22 Uhr
GEWÄHRLEISTUNGSINFORMATION
Guillemot Corporation S.A. („Guillemot“) bietet dem Kunde weltweit eine 2-jährige Garantie auf Materialschäden und Herstellungsmängel ab dem
Kaufdatum. Sollte das Produkt dennoch während dieser 2 Jahre Schäden oder Mängel aufweisen, kontaktieren Sie unverzüglich den Technischen
Support, der Ihnen mitteilt, wie weiter zu verfahren ist. Sollte ein Defekt vorliegen, muß das Produkt dort zurückgegeben werden, wo es gekauft
wurde (oder an die vom Technischen Support angegebene Adresse).
Im Rahmen dieser Garantie wird das defekte Produkt des Kunden nach Ermessen des Technischen Supports entweder repariert oder ersetzt.
Überall wo es geltendes Recht zulässt, wird die volle Haftung von Guillemot und seinen Niederlassungen (einschließlich für indirekte
Beschädigungen), begrenzt auf die Reparatur oder den Ersatz des Thrustmaster Produktes, übernommen. Die Rechte des Käufers entsprechend
geltendem Recht im jeweiligen Land werden nicht durch diese Garantie beeinflusst.
Diese Garantie tritt nicht ein bei: (1) falls am Produkt etwas verändert wurde oder es geöffnet wurde, ein Schaden durch unangebrachte Nutzung,
Fahrlässigkeit, einen Unfall, Verschleiß oder irgendeinen anderen Grund verursacht wurde, der nicht im Zusammenhang mit einem Materialdefekt
oder Herstellungsmangel aufgetreten ist; (2) im Falle der Nichteinhaltung der durch den Technischen Support erteilten Anweisungen; (3) Die
Software, die nicht von Guillemot herausgegeben wurde, unterliegt der speziellen Garantie des Herausgebers.
COPYRIGHT
© 2004 Guillemot Corporation S.A. Alle Rechte vorbehalten. Thrustmaster® ist ein eingetragenes Warenzeichen der Guillemot Corporation S.A.
Dolby5®, Pro Logic® und die DOLBY DIGITAL, DOLBY HEADPHONE und DOLBY PROLOGIC II Logos sind eingetragene Warenzeichen der Dolby
Laboratories, Inc. © 2003 Dolby Laboratories, Inc. Alle Rechte vorbehalten. PlayStation®, PS one™ und das PlayStation® Logo sind
Warenzeichen und/oder eingetragene Warenzeichen von Sony Computer Entertainment, Inc. Microsoft®, Xbox® und das Xbox™ Logo sind
entweder eingetragene Warenzeichen oder Warenzeichen der Microsoft Corporation USA und/oder anderen Ländern. GameCube™ isr ein
Warenzeichen von Nintendo Co., Ltd. All anderen Warenzeichen und Markennamen hiermit anerkannt und Eigentum der jeweiligen Eigentümern.
Illustrationen nicht bindend. Inhalte, Designs und Spezifikationen können ohne vorherige Bekanntmachung geändert werden und können von einem
Land zu einem anderen variieren.
29/07/2004
1/6
Gebruikershandleiding
INHOUD VAN DE DOOS - HARDWARE
- 1 Dolby Digital Prologic II & Dolby Digital decoder met dubbele koptelefoonaansluiting
- 1 riemclip voor de decoder
- 1 Dolby Digital stereokoptelefoon
- 1 batterij-oplader (1,58 m)
- 2 AAA-batterijen, oplaadbaar
- Gebruikershandleiding
DOLBY DECODER EN KOPTELEFOON - SPECIFICATIES
Deze decoder is compatibel met alle koptelefoons (inclusief draadloze koptelefoons).
DOLBY DIGITAL SOUND
Dolby Digital Sound is een zeer geavanceerd technisch proces waarbij geluidssignalen worden
gedecodeerd op vijf kanalen, plus een extra kanaal voor speciale geluidseffecten in de lage frequenties.
(Dit extra kanaal, ook wel LFE genoemd, “Low Frequency Effect”, is vergelijkbaar met de bekende “point
one” in de 5.1 hardwarestandaard.)
Bij Dolby Digital Sound worden de belangrijkste geluidssignalen weergegeven op 6 (5.1) kanalen. Als
volgt:
- Op het subwooferkanaal worden uitsluitend lage frequenties en speciale effecten (LFE)
weergegeven, wat zeer realistische en indrukwekkende geluidsimpressies oplevert (bijvoorbeeld bij
explosies).
- Het middenkanaal wordt voornamelijk gebruikt voor dialogen, waardoor ook bij gesprekken tussen
personages een extra niveau van realisme wordt bereikt.
- Op de vier overige kanalen worden de andere geluidssignalen onafhankelijk van elkaar weergegeven
(muziek, omgevingsgeluid, effecten, enzovoort). De interactie tussen deze afzonderlijke signalen
zorgt voor een ruimtelijke geluidssensatie die je normaal alleen in de modernste bioscopen
verwacht. Als het geluid rondgaat of van links naar rechts beweegt, wordt het ook echt als zodanig
weergegeven door de desbetreffende kanaalspeakers, waardoor de kijker (en luisteraar) zich
volledig voelt opgenomen in de film.
Ondersteunde audio-
modi
Dolby Digital, Dolby Pro Logic II.
Dolby koptelefoon-modi Dolby Digital, Stereo. Te gebruiken als normale stereokoptelefoon als
de decoder is uitgeschakeld.
Audio-ingang Optische en analoge line-in aansluiting. Automatische detectie van
optisch of analoog ingangssignaal.
Frequentiebereik 20Hz – 20kHz.
Driver koptelefoon Ø 40mm.

2/6
INHOUD VAN DE DOOS - AANSLUITINGSMATERIAAL
1 lange optische kabel (2,5 m)
1 korte optische kabel (0,5 m)
1 optische to-SPdif adapter (0,5 m)
1 3,5 mm stekker (male-to-male, 3,5 mm)
Stekkersnoer (2,5 m)
1 stekkersnoer (2,5 m) (male RCA-to-male,
3,5 mm)
1 stekkersnoer (0,225 m) (female RCA-to-female,
3,5 mm)
1 Xbox-to-SCART kabel met optische ingang
(1,9 m)
Table of contents
Languages:
Popular Media Converter manuals by other brands

Rockwell Automation
Rockwell Automation Allen-Bradley 1606-XLDD240E Reference manual

Hagstrom
Hagstrom KE-USB36 user manual

Cobalt Digital Inc
Cobalt Digital Inc 9262 user manual

Baumer
Baumer HMG 10-SSI Installation and operating instructions

Trelawny
Trelawny VL303Ex Operation and maintenance manual

Prodys
Prodys ProntoNet user manual

Texas Instruments
Texas Instruments TPS53319EVM-136 user guide

Vicpas
Vicpas IND110 Technical manual

Optics
Optics DirekTronik VGDF-200 user manual

LDT
LDT S-DEC-4-DC-G operating instructions

SRS Light Design
SRS Light Design DSR10 instruction manual

KTI Networks
KTI Networks KGC-261-DP-BT/G installation guide


