THRUSTME KICKER User manual

INSTRUCTION MANUAL
thrustme.no
K I C K E R
1
2
LANGUAGE
Page 3-24 English
Page 25-47 Norwegian
Page : 48-70 German
Warnings and advisories at the end of each language.
Advarsler og veiledning står på slutten av hvert språk.
Warnungen und Anleitungen befinden sich am Ende jeder
Sprache.
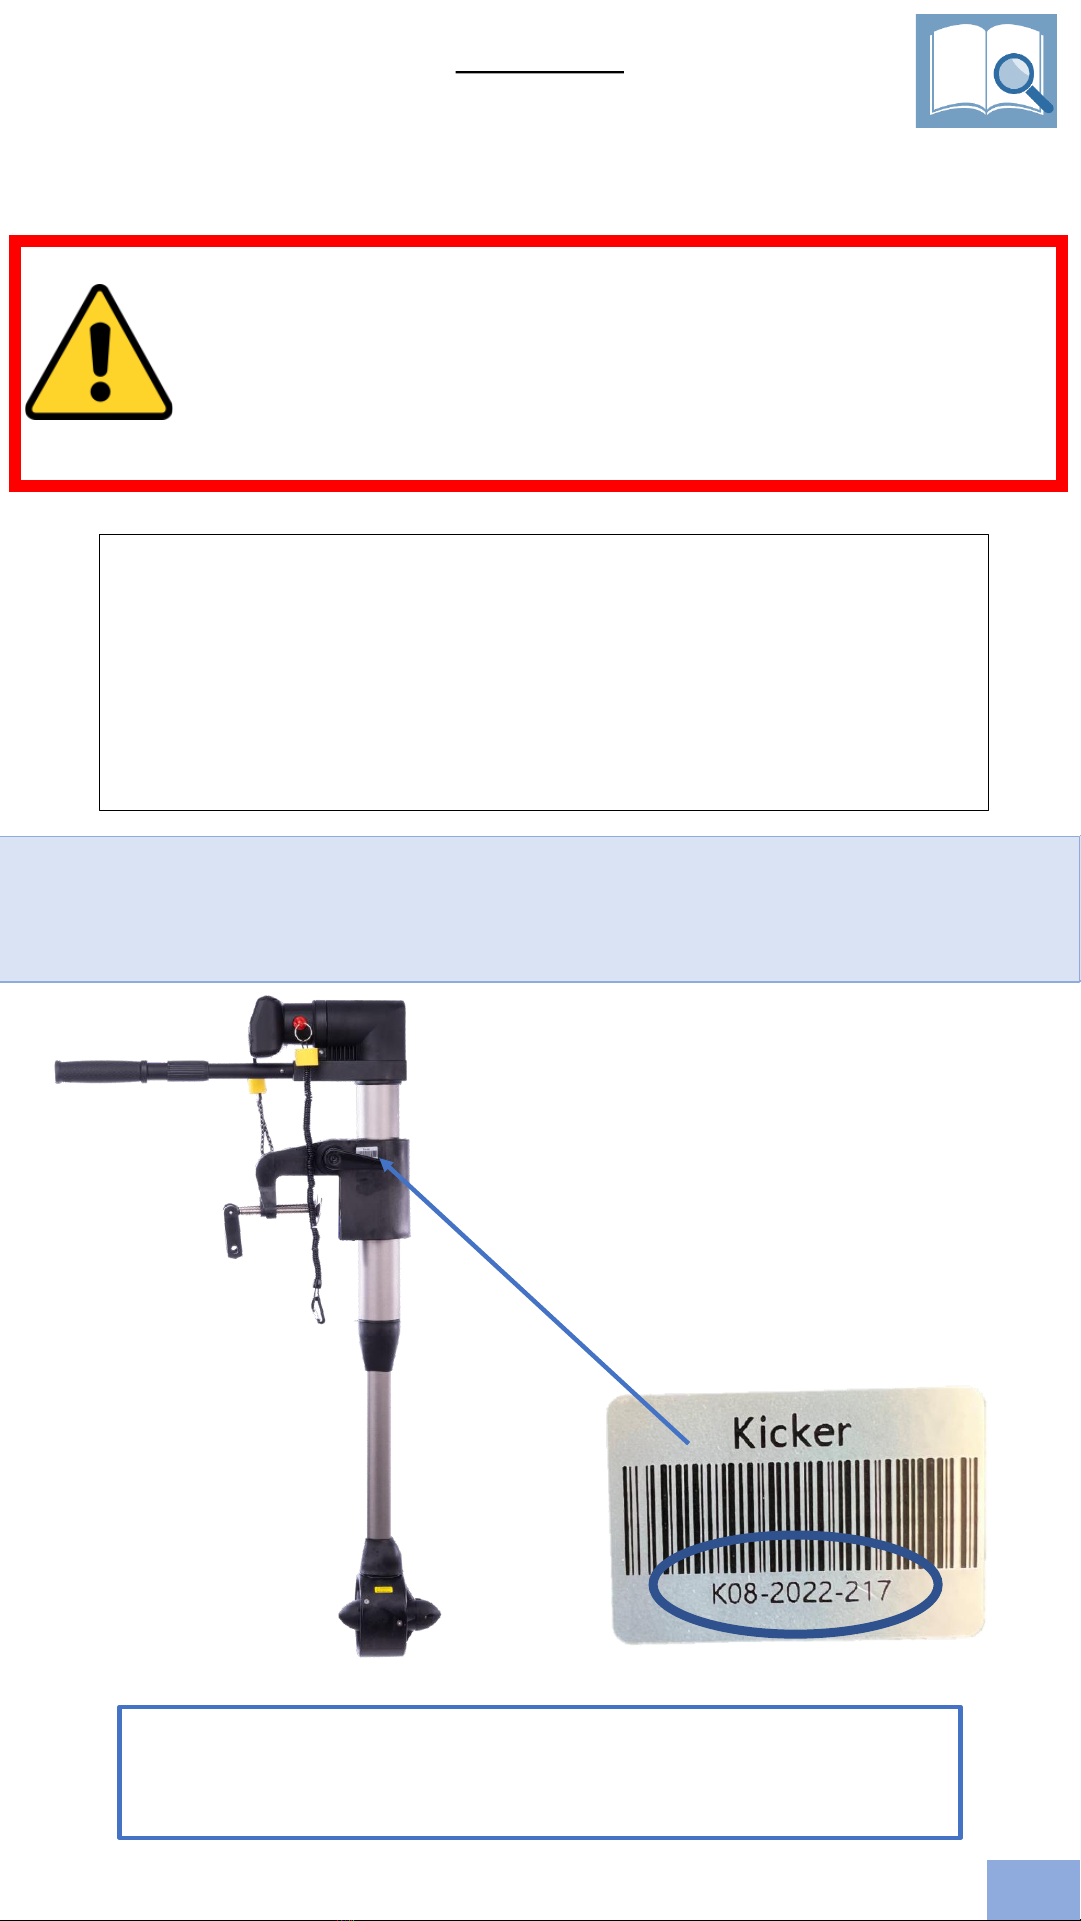
We recommend that you write down the
serial number in this manual for future
reference.
Serial Number: K_ _ _ - _ _ _ _-_ _ _ _
This example will be written K008-2022-0217
Sticker located here
EN
After use in seawater, run the thruster in a bucket with freshwater for
a short while, also clean all parts with fresh water to prolong the life
of the components.
ALWAYS REMOVE the magnetic kill switch
when not using the Kicker. This is to
prevent an unintentional start-up.
3
Recommended action before use
EN
Important information:
•Before every use check that the propeller is rotating freely
and not stuck. Make sure the magnetic kill switch is not
attached to avoid unintended startup.
If the propeller is stuck, please contact your nearest dealer.
DO NOT try to force the motor to run, forcing it to run may
cause fire in the motor.
•The unit is fully charged (to ensure max endurance).
•Display :
Problem: If the display don’t have the correct % on the
indication (or the % changes rapidly), the chip in the
battery that communicates with the display are not aligned
with the display.
Solution: To reset this issue, run the motor until the
battery is empty and fully charge the motor again (you may
need to do this 2-4 times to get the correct alignment).
This issue is most common on new motors or motors that
have not been used for a long period of time .
•Make sure you have read and understood the instruction
manual before using the motor.
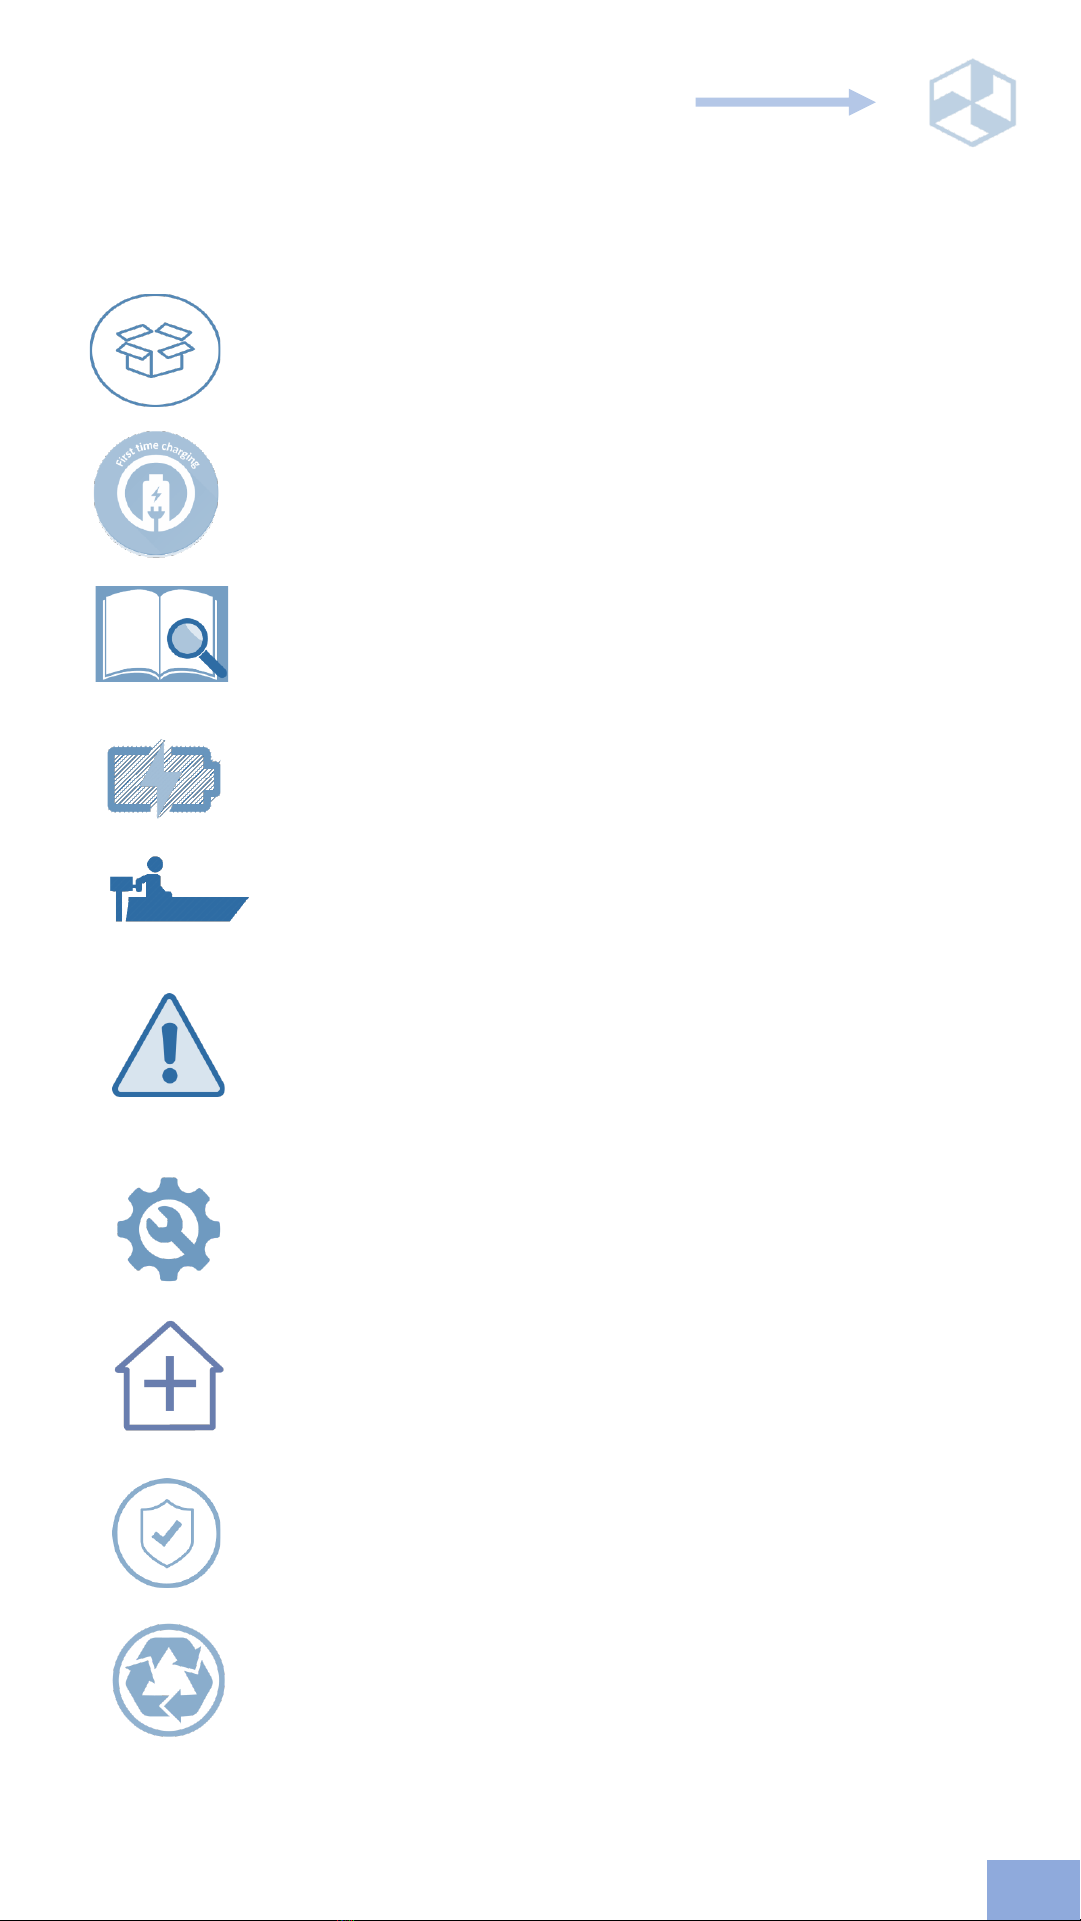
TABLE OF CONTENTS
What's in the box
How things work
How to charge and store the batteries
Maintenance and service
Recycle and disposal
Spare parts and extras
Find your icon on the pages to learn more
Warranty
Warnings
EN
Mounting the motor
First time Charging the Kicker and Remote
4

ADDITIONAL EQUPMENT
Fast charger
INPUT : 100 -240 VAC
OUTPUT : 21V/ 10 A
Charge time internal battery 1,5 hour
EN
12V Charger for Car/ Boat
INPUT : 12V - 48V DC/ 5A /50W
OUTPUT : 21V/ 2 A
Charge time internal battery 6 hour`s
Please contact your local dealer or visit our webpage for
ordering the products.
www.thrustme.no
Velcro
To minimize lateral movement from the Kicker
Universal ThrustME tool
Tool for tightening screws or change worn parts
Propeller knife
Cuts seaweed, fishing line and other things that
might get caught in the propeller
5

INCLUDED
Wristband for remote X1
Magnetic kill switch X1
KICKER charger 110-240V X1
KICKER remote X1
EN
KICKER safety cord X1
KICKER motor X1
KICKER bag X1
6
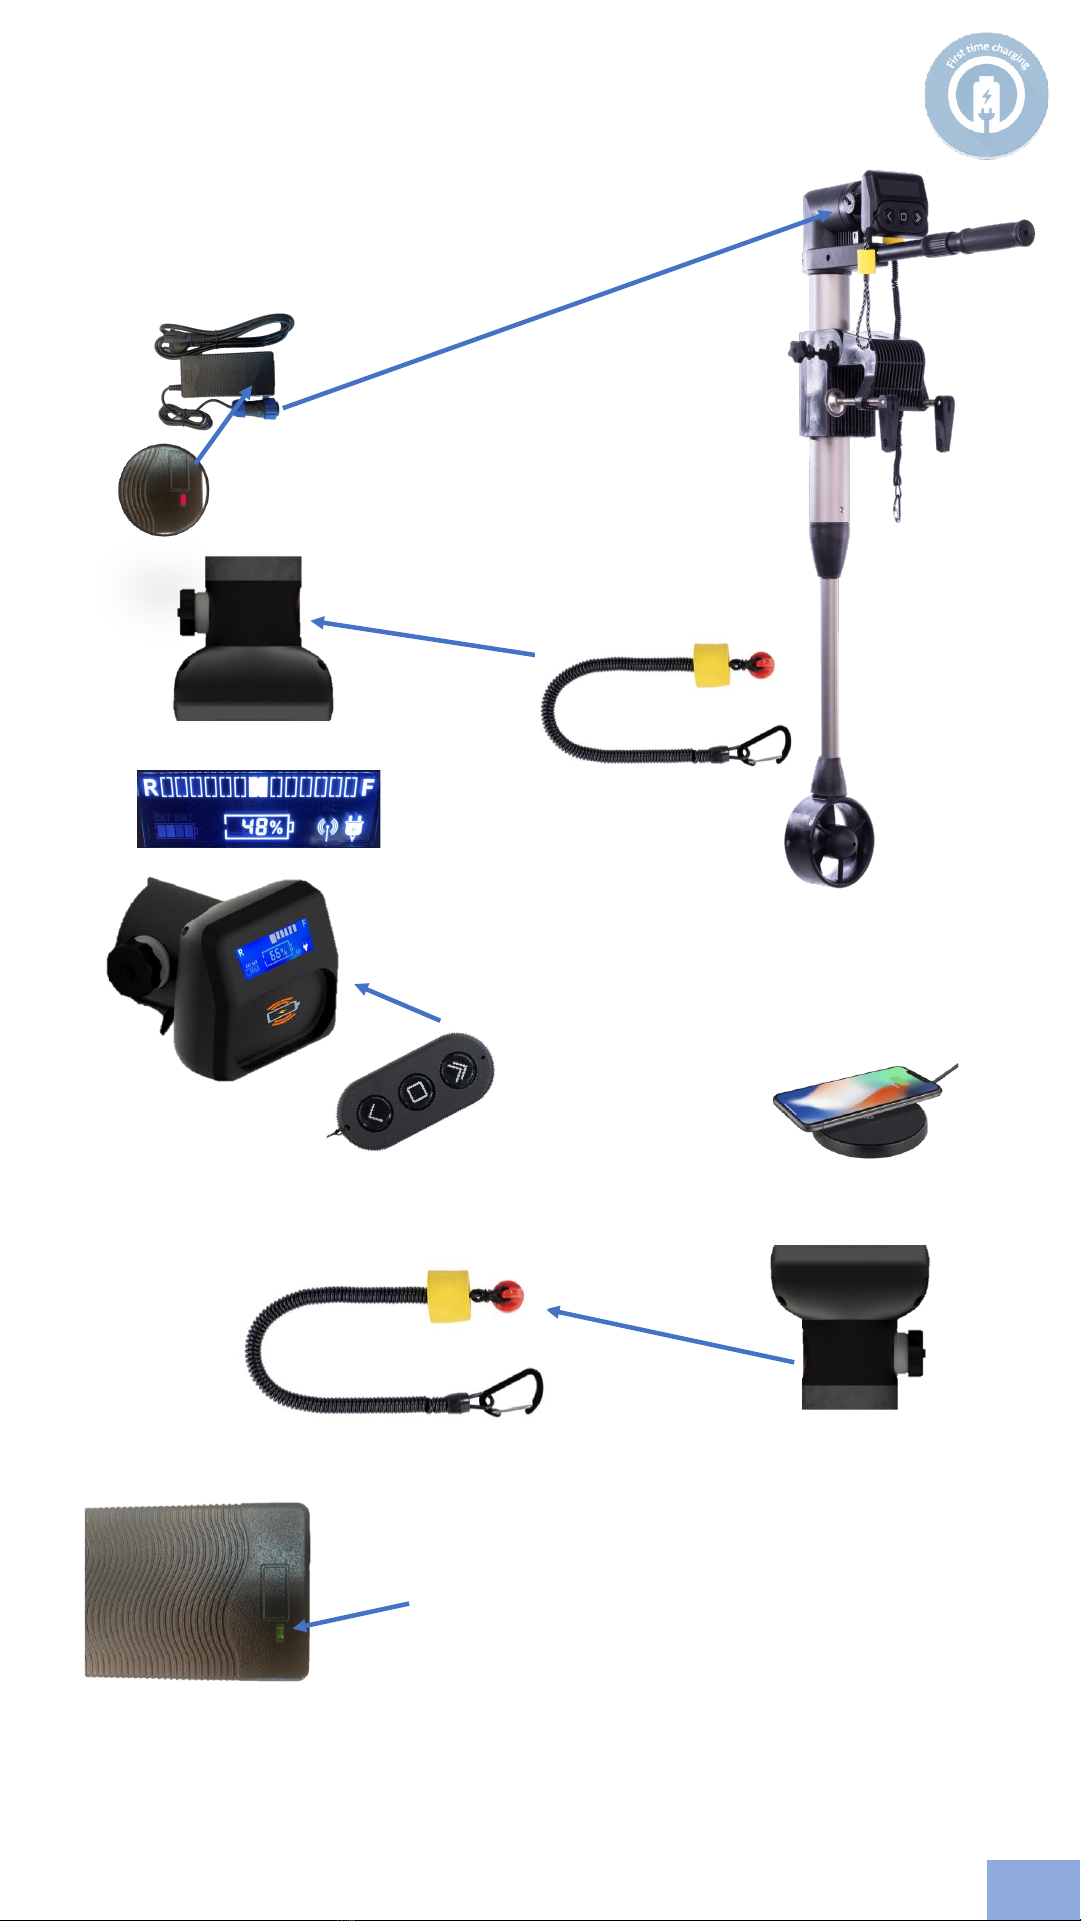
QUICK GUIDE
EN
For first time use –please do the following steps.
Connect the charger to the Kicker
Attach the kill switch
Verify that the
display is ON
Insert the remote in the charging slot located under
the display to charge the remote
(kill switch) needs to be installed to charge the
remote.
NOTE : The remote control can also be charged on
a regular induction plate used on newer cell
phones.
After 20 minutes remove the kill switch
Leave the KICKER to be charged.
Red-light on charger indicates charging
Green-light: Charging complete
If the display is showing 100%, please continue charging until
you have green light on the charger.
ENJOY YOUR KICKER 7

NOTE: This endurance chart is only a guideline; endurance may vary
depending on weather, weight of cargo and persons onboard,
temperature, wind and type or size of watercraft used.
EN
8
DISPLAY FUNCTIONS
1. External battery status when connected
2. Indicator for reverse thrust
3. Indicator for stop ( the motor is not running )
4. Indicator for forward thrust
5. Battery indicator (ex. showing 48% remaining of the internal battery)
6. Remote connected
7. Internal battery charging
The KICKER is protected with an automatic circuit breaker and temperature sensors. If
the motor stops while running, it needs to be reset. Before resetting check that the
propeller is free for seaweed or other objects. If the battery temperature is too high,
the KICKER needs time to cool down.
Remove kill switch and re-connect for system reset.
ENDURANCE CHART
STEP 6 is a «Boost mode». when this is engaged endurance time will decrease rapidly
23
1
4
5
6
7
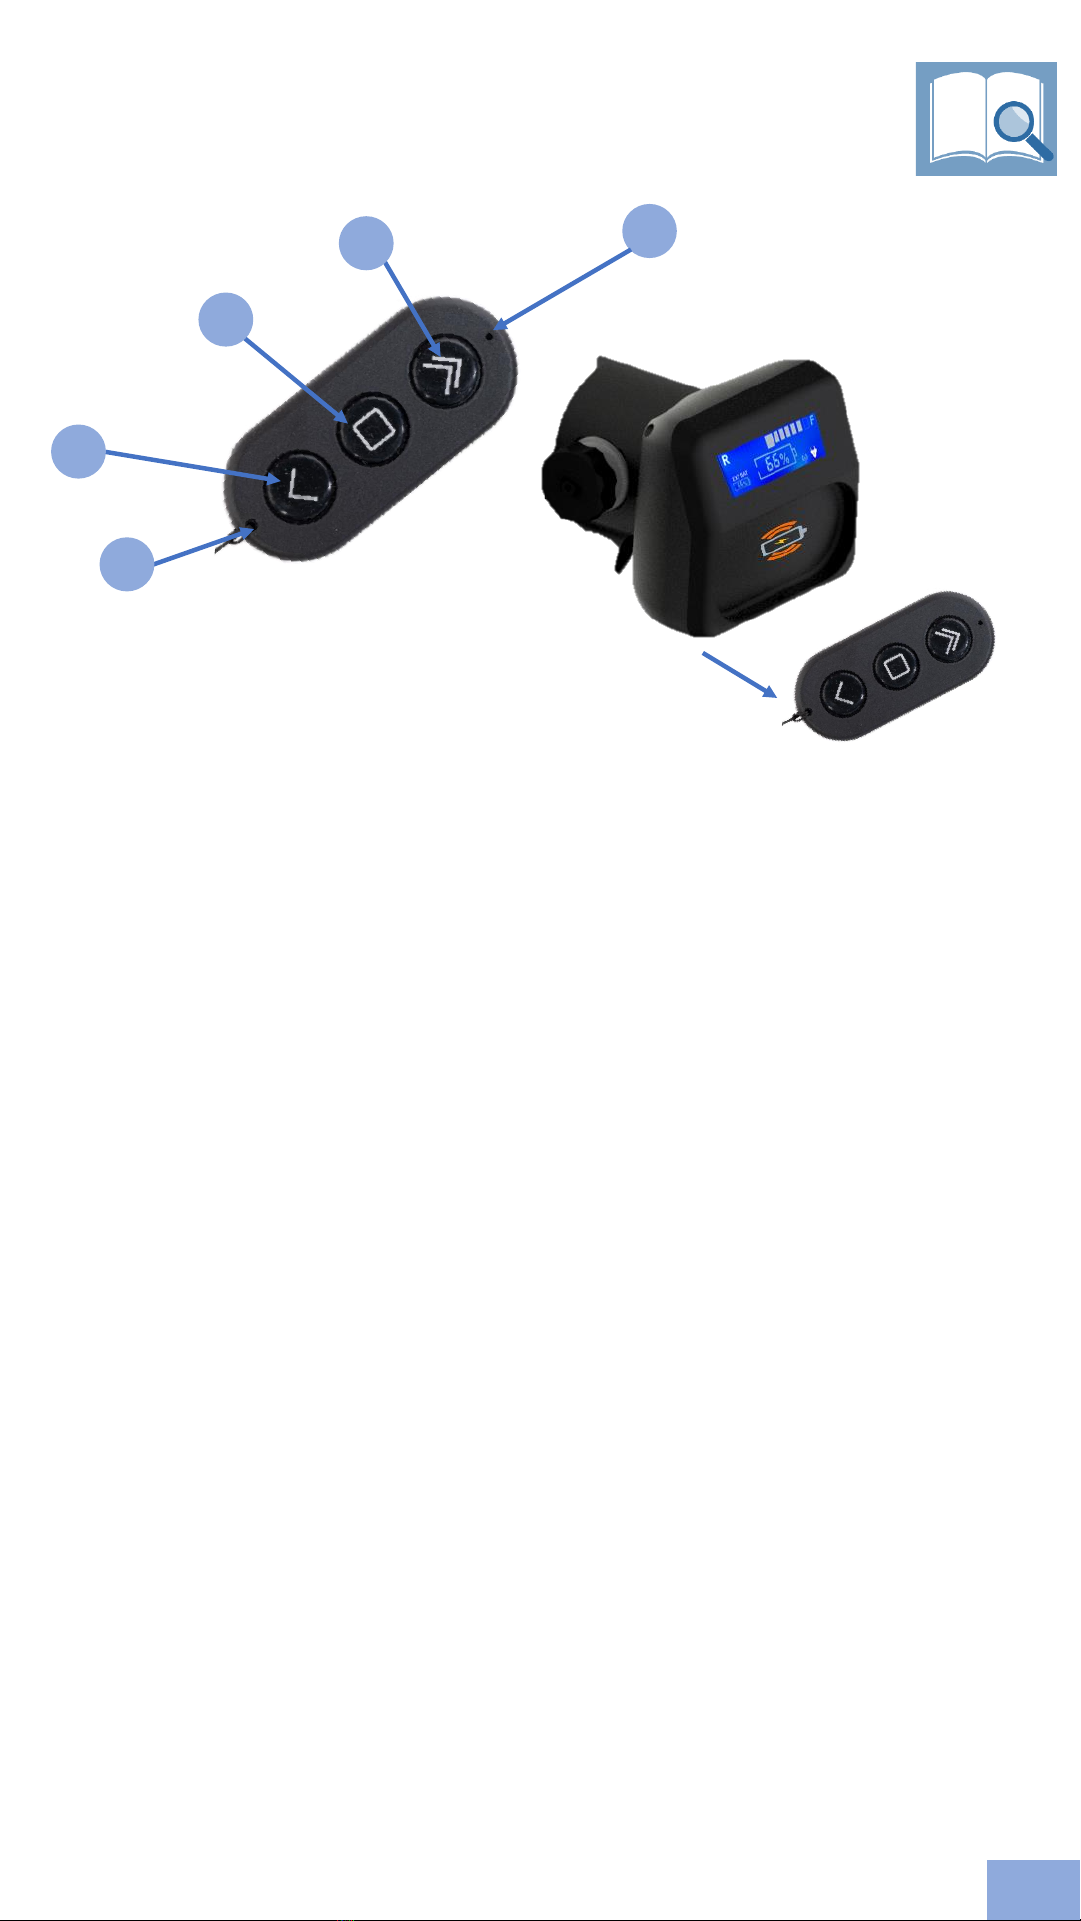
1. Hole for wrist band
2. Reverse thrust (one push = one step)
3. Stop
4. Forward thrust (one push = one step)
5. Charging and indicator light, pulses while charging
To change direction you always need to push the stop button first.
NOTE: The remote vibrates when a button is pushed
NOTE: Remote is equipped with 2,4 GHz system transmitting with only 1mV, so the
range is limited to approx. 75m.
REMOTE FUNCTIONS
When new, the remote is paired from the factory.
The remote has a unique address and only one remote can control one system. If
the remote is lost or not connected to the system,
pairing is needed. See instructions on next page.
EN
Remote (removable)
5
4
3
2
1
9

Press and hold reverse button after pressing the
button you feel the vibration from the remote
Press and HOLD the revers button for more than
5 seconds and continue holding the reverse for
the next step .
Continue to hold reverse.
press and hold forward button in more than 5
seconds and continue holding for next step
Release reverse button and continue holding the forward
button in more than 5 seconds
Wait until the blue light starts to flash, then release to
forward button. Release forward button.
Attach kill switch and the system will boot up
and display will now light up
The remote will pair automatically
Steady blue light after remote is paired and ready.
EN
REMOTE FUNCTIONS –PAIRING
Read through all steps before you start the paring mode
The system needs to be turned off for the
pairing mode (kill switch removed).
(Kill switch needs to be in easily accessible to be used in
the last part of the pairing mode.)
x
FOLLOW THE 5 STEPS TO START THE PARING MODE AFTER THE KILL SWITCH IS REMOVED
Forward button
Revers button
If the operation is not successful, please try again.
1
2
3
4
5
10
OPERATION INSTRUCTIONS
EN
Familiarize yourself with all the motor controls. For instance,
you should be able to stop the motor quickly if necessary.
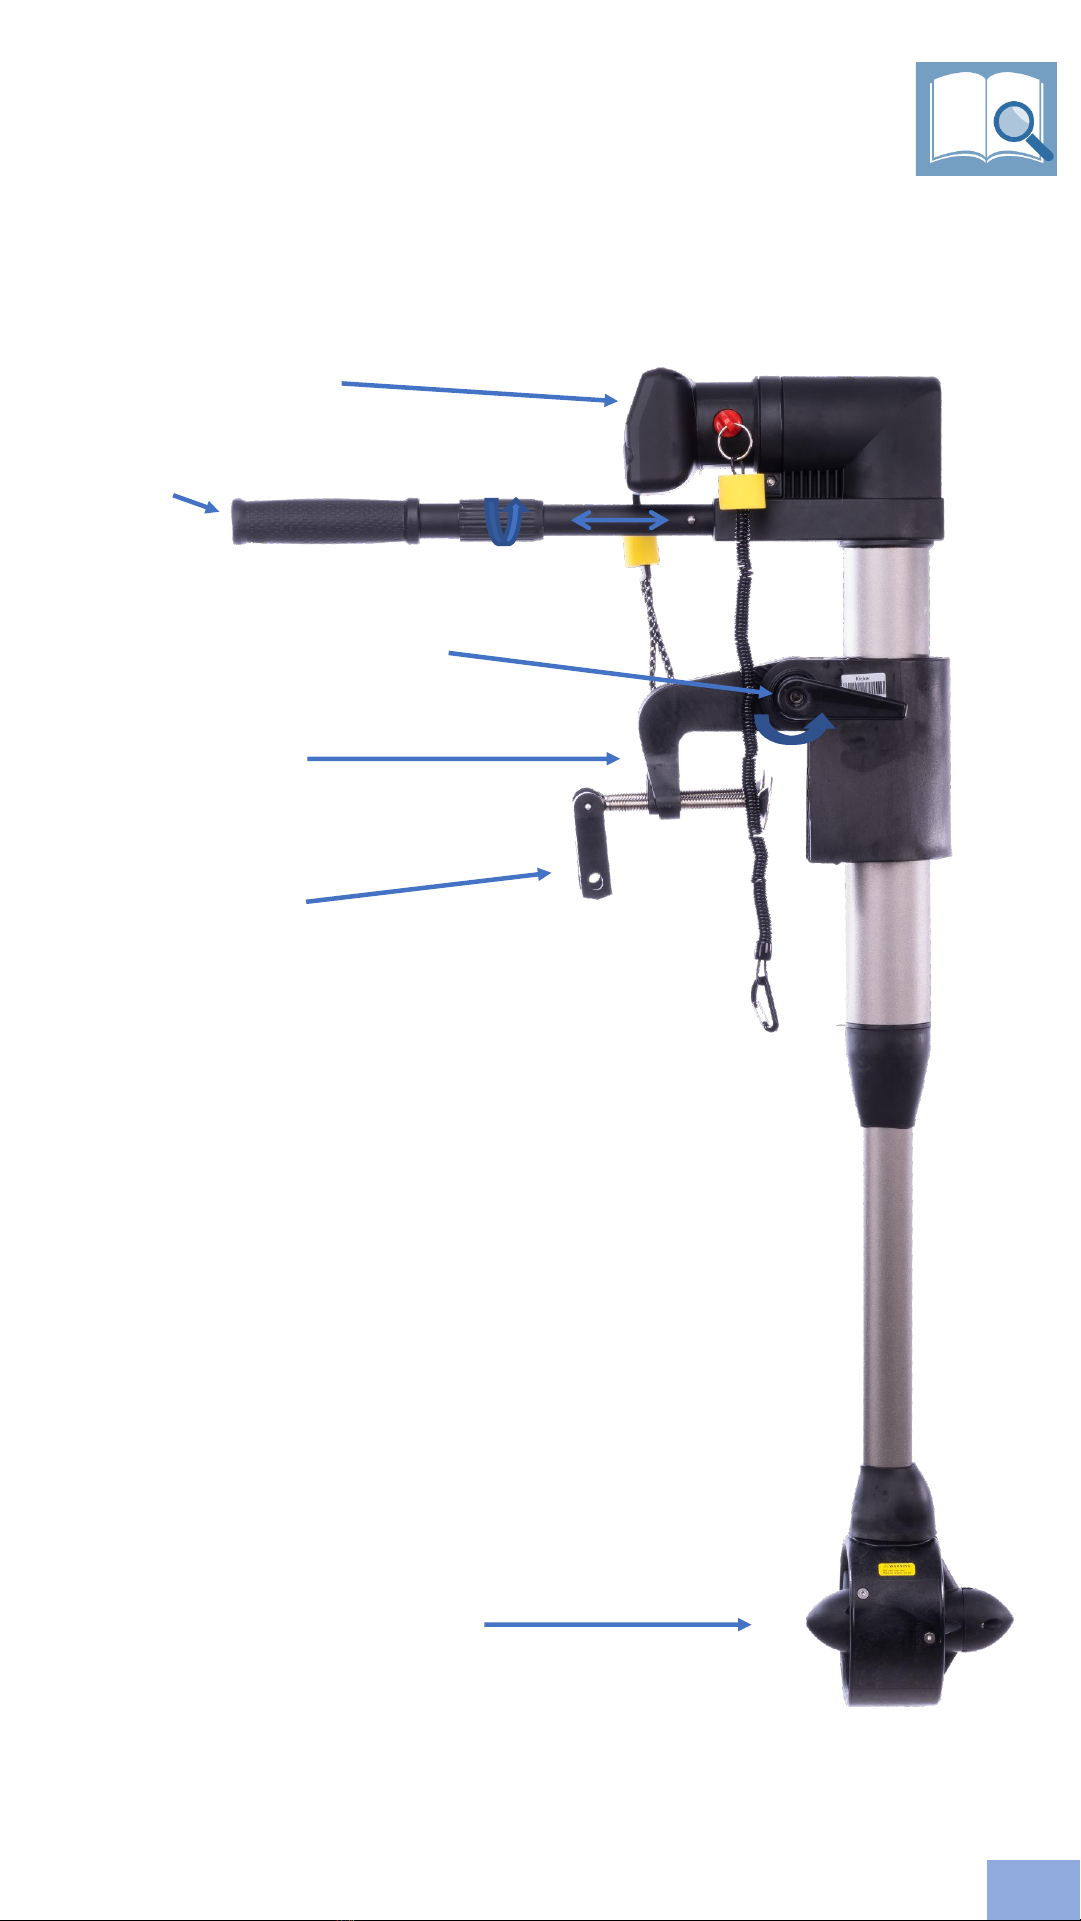
THRUSTER
Transom mount
Fastening Screw
Handle for tilt mechanism
Display & remote
Steering handle with adjustable
length Twist to fasten and loosen
11

OPERATION INSTRUCTIONS
EN
Attach the motor on the transom mount
Make sure that the fastening screws are fastened and
tightened before using the motor.
(After a few minutes of use, please re-tightening the screws)
Attach the safety band and connect it to the boat to prevent loosing
the motor in the water.
Fasten one end of the safety
cord to the Kicker and fasten
the other end to a secure
place at the boat.
12

Tilt mechanism
EN
Loosen
Fasten
Using the tilt mechanism, please open the handle for
tilt mechanism and adjust the motor for the desired
position. After adjustment fasten the handle to lock
the motor.
In shallow waters use the tilt mechanism to
adjust the motor.
The motor can be tilted fully up if necessary
13
EN
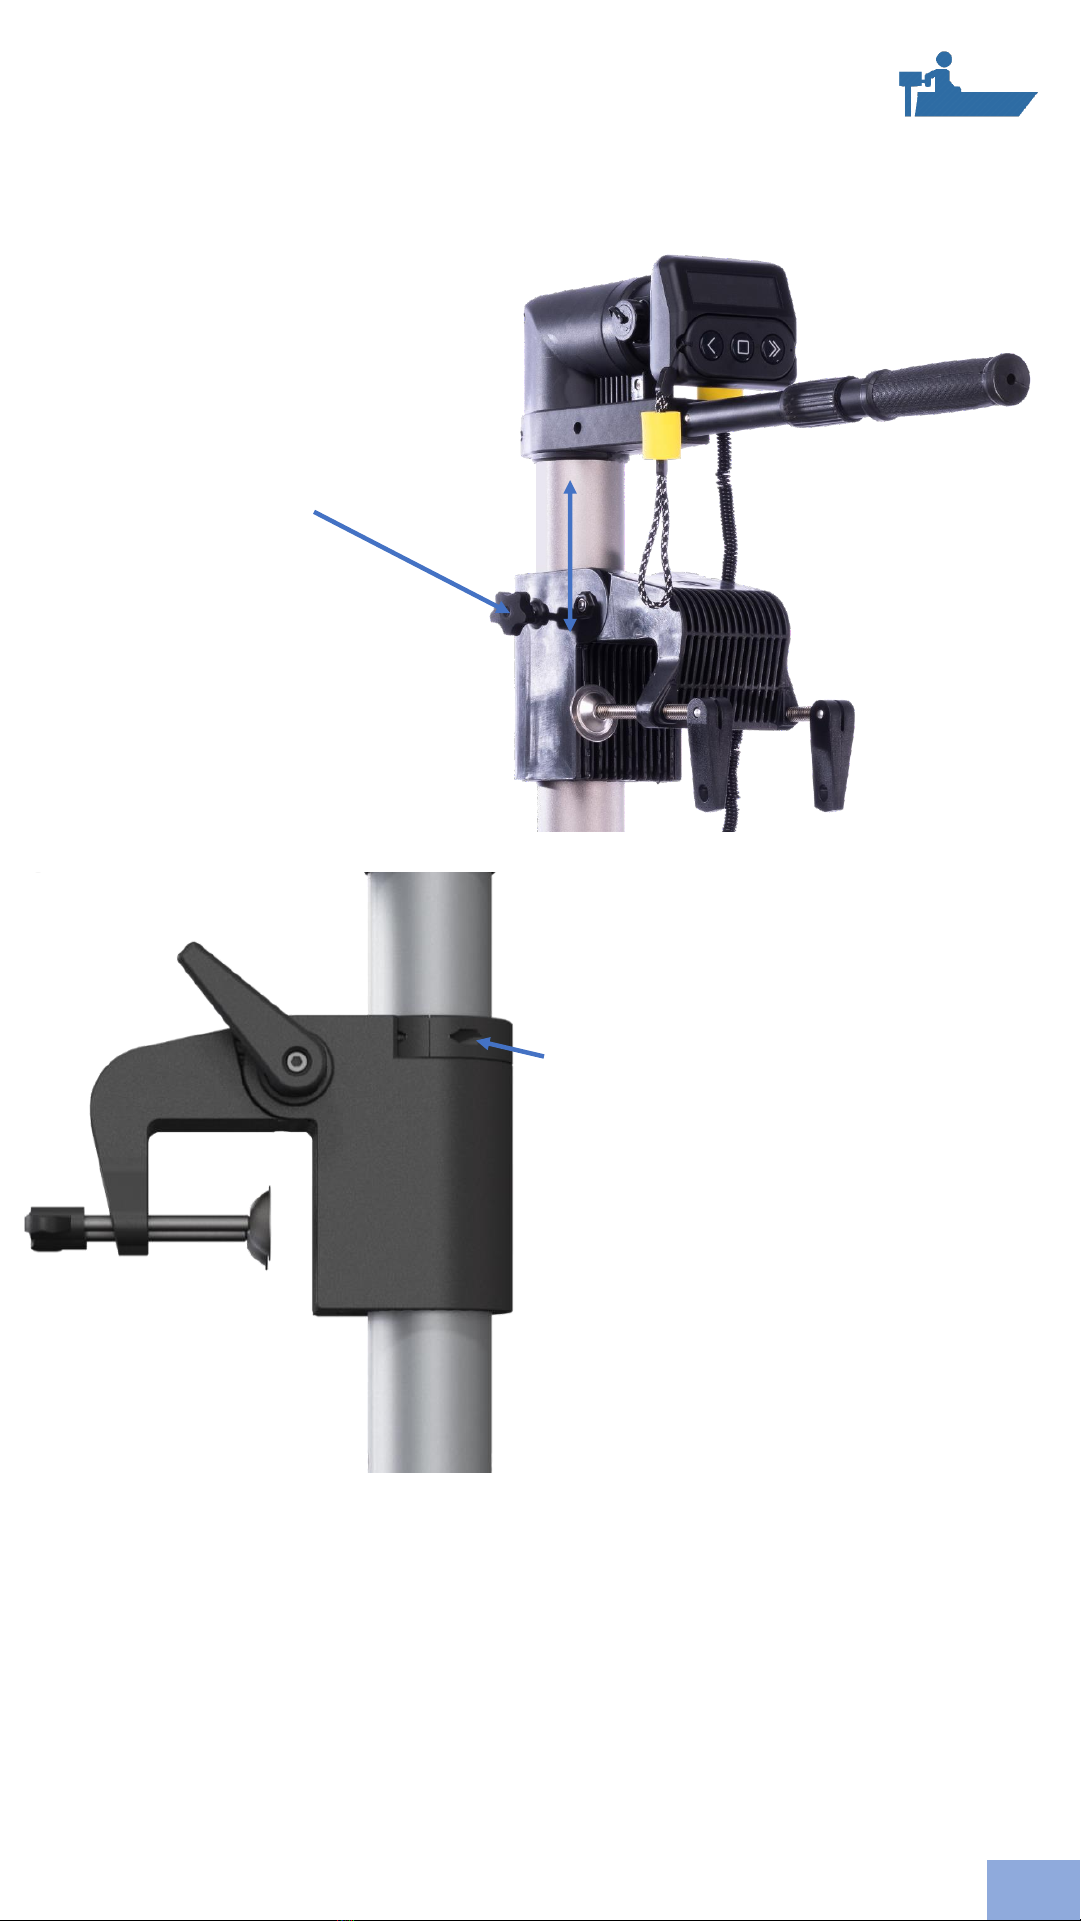
MOUNTING
Adjusting the length of the motor
Loosen the friction
screw. When this is
almost completely
unscrewed, you can
pull the motor up from
the transom mount
There are two screws
on the mounting ring.
These are loosened
and the ring is placed in
the desired place to get
the right length in
relation to the transom
of the boat. After you
have found the right
length, tightening these
two screws and put the
motor back in the
transom bracket.
Note: Remember to
tighten the friction
screw as desired.
14

CHARGING OF MAIN BATTERY AND REMOTE
Charging time 0-100%: Approx. 4 hours
Only use charger provided by THRUSTME. Other chargers may damage
the system or the battery.
Do not recharge the battery if the KICKER frame feels warm
and do not use the battery in temperatures above 40°C as excessive off-
gassing may occur. Keep the KICKER in the shadow when not in use and do
not store in areas with temperatures above 40°C
Recharge the battery after use within 24 hours and recharge the battery
at least every 2 months, this also applies to the remote control.
Charge light
Red light: Charging
Green light : Charging complete
Your KICKER works with a Li-Ion battery that needs to be handled with
care.
Always fully charge your battery before using your KICKER.
Always make sure the charging connectors are dry before use.
Always fasten the protection cap to the charging connector after
charging, water ingress may result in short circuit and damage of the
KICKER.
Charge and External battery
connector
Wireless remote charging dock
The KICKER remote is charged by wireless charging (induction).
Place the remote in the slot in the KICKER display and the remote will be charged.
Charging time: 0-100% approx. 30min
Note: Magnetic kill switch needs to be connected to charge the remote.
EN
NOTE : The remote control can also be charged on a
regular induction plate used on newer cell phones.
Remove the magnetic kill switch when charging the unit. This is to
prevent the engine from starting unintentionally. Note that the remote will
not charge without the Magnetic Kill Switch attached.

MAINTENANCE
THE KICKER is designed for minimum maintenance work, and we have made great
efforts to provide you with a product with a little maintenance as possible.
The product will last longer and give you a better experience if you do the following :
In the waters
You may experience that you get seaweed or other objects in the propeller while using
the KICKER.
If you experience change in sound or vibration, please do the following steps:
1. Remove the magnetic kill switch to stop the motor.
2. Verify that the display is off, and motor is NOT running.
3. Tilt the KICKER up in to rest position.
4. Remove seaweed or other objects from the propeller.
1
2
3
4
After use in seawater, run the thruster in a bucket with
freshwater for a short while, also clean all parts with fresh
water to prolong the life of the components.
EN
16

MAINTENANCE
If it should be necessary to remove / replace the propeller follow steps bellow:
1. Unscrew the 3 screws and.
2. Gently remove the front bracket on the thruster
3. Unscrew the 2 propeller screws.
4. Pull off the propeller and replace the propeller
For re-installation do the following steps in reverse order:
Removing/replacing propeller
4
1
2
3
Remember to replace all parts and make sure that everything is correct
assembled and tightened.
EN
17

If the propeller is seized/stuck, do not try to start or charge the engine.
Contact a service point and follow their guidelines. Do not attach the
magnetic kill switch.
Do not run the motor if not in water. The motor is water-cooled and may
be damaged if running without water.
Avoid seaweed or debris getting sucked into the thruster as this may
damage the motor and propeller. If this occurs, please see the
maintenance manual.
Always practice caution when you are working with electricity in water and
with the spinning blades of the propeller. Keep body parts away from the
thruster inlet and outlet to avoid injury. Never operate the motor if
someone is in the water close to the floating device.
THRUSTME has the right to refuse warranty claims in cases where the
object of purchase was in any way retrofitted, modified, or equipped with
other parts or accessories not expressively approved or recommended by
THRUSTME
WARNINGS
Please make sure that you have read and understood all the warnings
before you operate the KICKER
Do not attach the magnetic kill switch to any other objects than
yourself. The kill switch is for your own safety and must always be
attached to yourself during operation.
Do not use the KICKER as diving equipment or keep it submerged.
EN
Do not use the KICKER if you suspect damage to the system or if there
has been done modifications that has not been done by a certified
manufacturer.
Do not store or charge the KICKER in temperatures below +5°C or
above 40°C.
If used in saltwater, remember to run the thruster in freshwater to
prevent corrosion.
Always make sure that the magnetic killswitch works before use. Persons
with pacemakers is recommended to keep a distance of at least 15 cm. Do
not keep cards, etc. with magnetic strip to close, this might demagnetize
the card (credit/debit, etc.). The KICKER will also affect the compass if the
distance between them are too close.
18
The KICKER uses Li-Ion battery with 259 Wh capacity, and transport via
airplane is thereby not permitted.
It is your own responsibility to follow national laws and regulations.
Never use the KICKER under influence of alcohol or other drugs.
Always bring an oar in the vessel, especially if the KICKER is your only
means of transportation. Make sure the weather conditions are within the
margins for a safe ride, both present and future.
Never dry or charge the KICKER over an open fire or other heat sources
(heat gun, sun, heat cabinet, etc.…). Only charge it under adult supervision.
WARNINGS
Please make sure that you have read and understood all the warnings
before you operate the KICKER
Never use alcohol, gasoline, kerosene or another corrosive and
chemical solutions to clean the KICKER.
The KICKER shall never be used for diving.
Always turn OFF the KICKER when not in use (remove the magnetic
killswitch), this is to prevent the engine to start unintentionally, and
limiting the life span of the battery.
EN
The KICKER is limited to private use and the warranty will not apply if the
product is used commercially, even if this is just of a temporarily character.
The KICKER is not a toy and should never be used by
persons without reading and understanding the
operation manual.
Take the KICKER out of the water if the vessel is driven by other means
(f.eks oars, sail, towed by other boats).
19
Do not put fingers or other objects in the propeller while KICKER is switched
on (emergency kill switch magnet connected).

Make sure the KICKER is turned OFF before handling the unit out of water.
The magnetic kill switch is removed and the display is not lit. This is to
prevent an unintentional start-up.
Use suitable clothes. Do not use wide clothes, jewellery or other items
that may get caught up in moving parts, such as the propeller. Long hair
must be taken care of.
Do not use any form of tool to repair, do maintenance or to modify the
battery.
WARNINGS
Please make sure that you have read and understood all the warnings
before you operate the KICKER
EN
Prevent the battery from any contact with water or other liquids.
WARNING !
Lithium batteries can be hazardous!
•
Fire or high temperature in Lithium batteries can happen.
•
The battery can ventilate a lot of gas without warning.
•
The battery can self ignite without warning.
•
It can burn for much longer periods then more regular batteries.
•
High risk of spread to other materials.
•
Inhalation of poisonous smoke must be prevented.
•
High temperature (do not touch).
•
Small explosions in the battery cells might occur.
•
If possible, try to get the battery to a place where it causes least amount
of damage.
•
Even if the batteries are discharged, they represent a high risk of a short
circuit. Even if discharged, batteries should be handled as if they
working.
Large amount of freshwater can be used to put out small battery fires
(cooling effect).
Saltwater might cause the battery to explode.
Lithium fires can be hard to put out, use lots of fresh water or put the battery
in a container/bucket of freshwater.
Contact doctor to treat any injuries (inhaled gas or fire damage).
20
Other manuals for KICKER
2
Other THRUSTME Outboard Motor manuals


Popular Outboard Motor manuals by other brands

Yamaha
Yamaha 20D owner's manual

Yamaha
Yamaha FL200C owner's manual

Vetus
Vetus BOW55HM Operation manual and installation instructions

Sleipner
Sleipner E240/250TC-48V installation guide

Mercury
Mercury 75 Operation maintenance warranty installation manual

Vetus
Vetus BOW PRO B Series installation instructions


