Tibo SIA50 User manual

SIA50 - Smart Integrated Amplifier
Quick Start Guide

for purchasing the TIBO SIA50 - Smart Integrated Amplifier
- Part of the TIBO Ecosystem
We are confident that it will provide reliable,
high performance sound for many years to come.
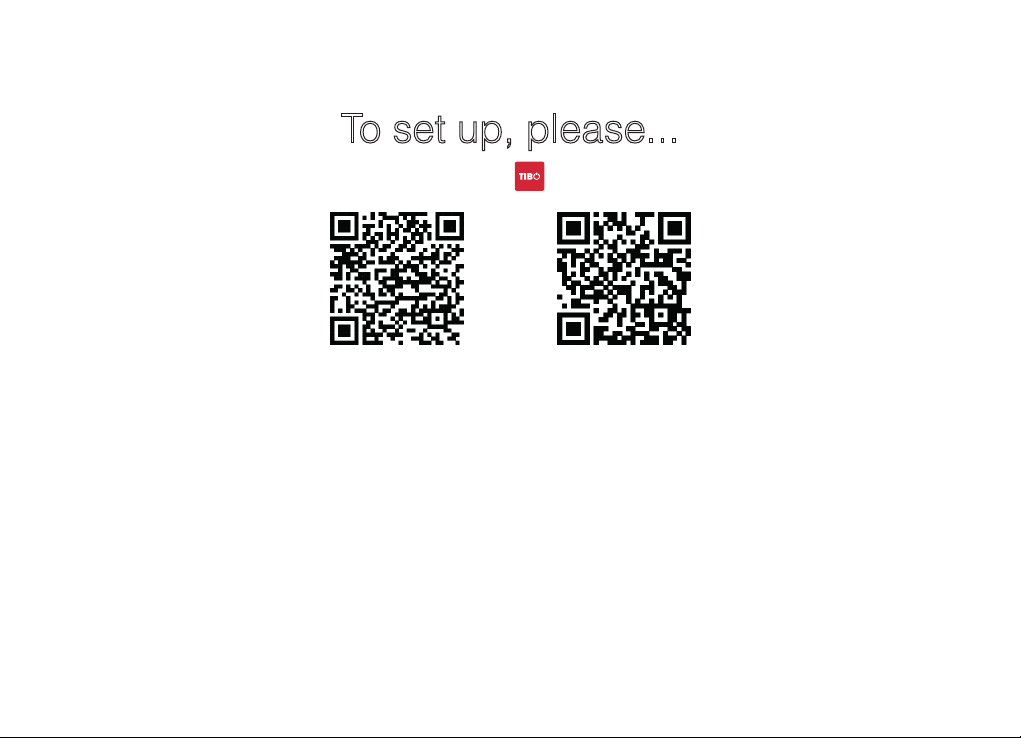
To set up, please...
Download the TIBO app:
Follow the instructions on screen
If you like our product, please leave a review on our TIBO website:
www.tibo-audio.com
If you have any questions or issues about the product,
please contact our customer support:
For full user manual, please check:
www.tibo-audio.com/support
iOS
Android

1
2
3

Front Panel
1. Direct Pre-sets: 1-5
2. On / Off / Mode / Volume
• Volume Up/Down: Turn clockwise / anti-clockwise
• Long Press: Turn on / Standby
• Short Press: Scroll to Wi-Fi / Line / Optical / Bluetooth inputs
3. IR Remote Control Sensor
Frontpanel
1. Faste programpladser 1-5
2. Drejeknap:
• Langt tryk: Tænd/Standby
• Kort tryk: Skifter mellem de forskellige tilstande
• Drej knappen mod venstre/højre: Indstiller lydstyrken
3. IR-modtager til fjernbetjening

Panneau avant
1. Préréglages directs 1-5
2. Molette centrale:
• Pression prolongée: mise en route/mise en veille
• Pression rapide: sélection entre les différents modes
• Rotation de la molette vers la gauche/droite: pour le contrôle du volume
3. Capteur IR de la télécommande
Vorderseite
1. Voreinstellungen 1 bis 5
2. Mittlerer Regler:
Langes Drücken: Einschalten/Standby
Kurzes Drücken: Wählen Sie zwischen jedem Modus
Drehregler nach links/rechts drehen: Für Lautstärkeregelung
3. IR-Fernbedienungssensor

Pannello anteriore
1. Preimpostazioni dirette 1-5
2. Manopola centrale:
• Lunga pressione: accensione/standby
• Breve pressione: scelta tra diverse modalità
• Ruotare la manopola verso sinistra/destra: controllo del volume
3. Sensore del telecomando a infrarossi
Panel delantero
1. Presintonías 1-5
2. Botón central:
• Pulsación larga: Encender/modo en espera
• Pulsación corta: elija entre los diferentes modos
• Gire el botón hacia la izquierda/derecha: para ajustar el volumen
3. Mando a distancia IR

1
2 3 4 5 6 7
8

Rear Panel
1. Bluetooth / Wi-Fi Aerial
2. WPS
3. Line In: RCA audio stereo input. Connect to external devices for playback
4. Sub Out: Connect to external subwoofer
5. Optical In: Connect to external devices for playback
6. Speaker Out Left / Right
7. Mains Cable
8. Power Switch
Bagpanel
1. Bluetooth-antenne / Wi-Fi-antenne
2. WPS-Knap
3. RCA linjeindgang: Venstre / højre
4. Sub-udgang
5. Optisk indgang
6. Venstre / højre højttalerudgange
7. Strømindtag
8. Hovedkontakt: Tænd / sluk

Panneau arrière
1. Antenne Bluetooth / Antenne Wi-Fi
2. Touche WPS
3. Entrée de ligne RCA: gauche / droite
4. Sortie Sub
5. Entrée optique
6. Bornes de liaison gauche / droite de l’enceinte
7. Entrée d’alimentation secteur
8. Bouton de mise en marche: marche / arrêt
Rückseite
1. Bluetooth-Antenne / Wi-Fi-Antenne
2. WPS-Taste
3. RCA Line-In Links / Rechts
4. Sub-Ausgang
5. Optischer Eingang
6. Ausgangspolklemmen linker / rechter Lautsprecher
7. Hauptstromeingang
8. Netzschalter: Ein / Aus

Pannello posteriore
1. Antenna Bluetooth / Antenna Wi-Fi
2. Tasto WPS
3. Line In RCA: sinistra / destra
4. Uscita Sub
5. Connettore ottico di ingresso
6. Morsetti uscita altoparlante sinistro / destro
7. Ingresso alimentazione di rete
8. Tasto di accensione: acceso / spento
Panel posterior
1. Antena Bluetooth / Antena Wi-Fi
2. Botón WPS
3. Entrada de línea RCA: izquierda / derecha
4. Salida para subwoofer
5. Entrada óptica
6. Bornes de conexión del altavoz derecho / izquierdo
7. Entrada de alimentación
8. Botón de encendido: encender / apagar
1 2
3 4
5
MODE
1
2
4
7
3
6
8
5

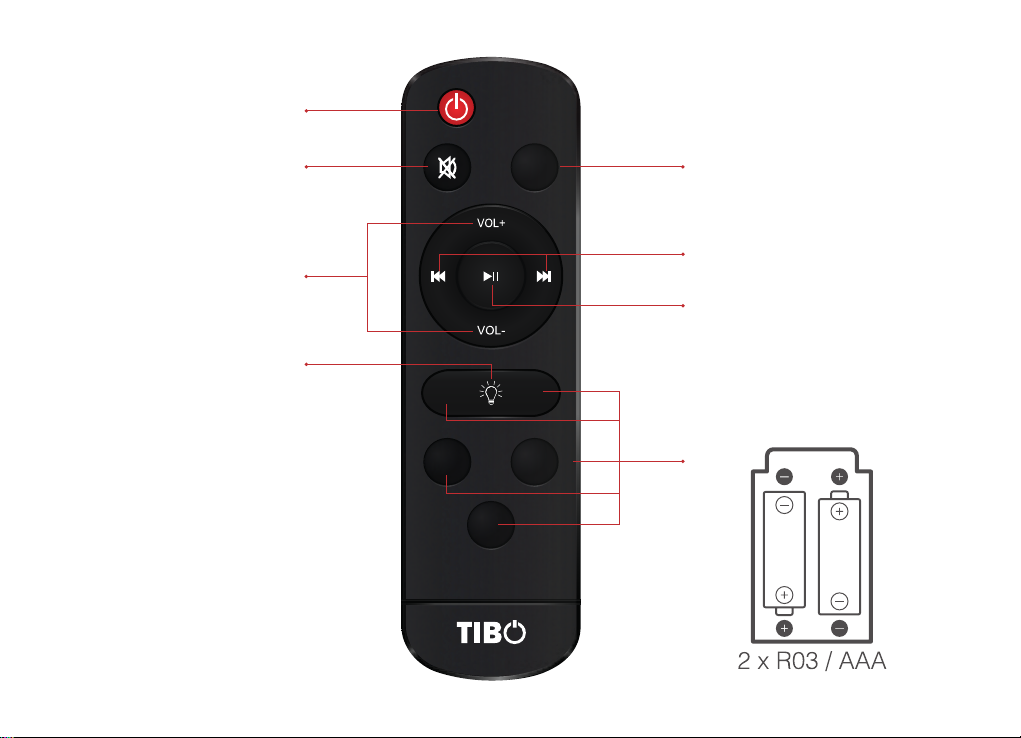
Remote Control
1. On / Standby
2. Mute
3. Mode: Wi-Fi / Line in / Optical / Bluetooth
4. Volume up (+) / Volume Down (-)
5. Track Forward / Backward
6. Play / Pause
7. Light Switch: Short press Red / Green / Blue
8. Direct Pre-sets: 1-5
Fjernbetjening
1. Tænd / Standby
2. Mute-knap
3. Mode-knap
4. Lydstyrke op/ned
5. Spring et musiknummer frem / tilbage
6. Afspil / Pauseknap
7. Lysknap: Ændrer farven på den ydre ring omkring drejeknappen
8. Faste programknapper 1-5

Télécommande
1. Allumer / Veille
2. Touche de mise en sourdine
3. Touche Mode
4. Augmentation / Diminution du volume
5. Saut de piste avant / arrière
6. Touche Lecture / Pause
7. Touche lumière: changement de la couleur de l’anneau extérieur entourant la molette centrale
8. Touches de préréglages 1-5
Fernbedienung
1. Einschalten / Bereitschaft
2. Stumm-Taste
3. Modus-Taste
4. Lautstärke hoch / runter
5. Titel vorwärts / rückwärts überspringen
6. Wiedergabe / Pause-Taste
7. Lichttaste: Zum Ändern der Farbe des äußeren Rings rund um den zentralen Drehregler
8. Voreinstellungstasten 1-5

Telecomando
1. Accensione / Standby
2. Tasto silenzioso
3. Tasto modalità
4. Volume su / giù
5. Salta traccia Avanti / indietro
6. Tasto Riproduci / Sospendi
7. Tasto Indicatore luminoso: consente di modificare il colore dell'anello esterno che
circonda la manopola centrale
8. Tasti preimpostazioni 1-5
Mando a distancia
1. Encender / modo de espera
2. Botón de silencio
3. Botón de modo
4. Subir / Bajar volumen
5. Ir a canción siguiente / anterior
6. Botón de reproducción / pausa
7. Botón de luz: cambie el color del anillo exterior que rodea el dial central
8. Botones de presintonías 1-5

R L

Wiring The Speakers
All SIA50 models use screw terminals. Unscrew the terminal and insert the bare end of the cable into the
hole at the base of the terminal. Tighten the screws securely and ensure that positive (+) and negative (–)
are matched with the amplifier / receiver.
Kabeltilslutning af højttalerne
Alle SIA50-højttalere anvender skrueterminaler. Løsn skruen på terminalen, sæt den strippede kabelende i
hullet i bunden af terminalen, og stram skruen fast til. Sørg for, at den positive (+) og negative (–) pol match-
er med forstærker/modtager.
Branchement des enceintes
Toutes les enceintes SIA50 sont équipées de borniers à vis. Dévissez le bornier, insérez l’extrémité
dénudée du câble dans le trou situé à la base du bornier, revissez fermement. Assurez-vous que les bornes
positives (+) et négatives (-) de l’enceinte/du récepteur sont correctement appariés.

Lautsprecher verkabeln
Alle SIA50-Lautsprecher haben Schraubklemmen. Schrauben Sie die Klemme auf, fügen Sie das freie
Ende des Kabels in das Loch an der Basis der Klemme und schrauben Sie die Klemme fest. Vergewissern
Sie sich das Positiv + und Negativ - mit dem Verstärker/Empfänger übereinstimmen.
Cablaggio degli altoparlanti
Tutti gli altoparlanti SIA50 utilizzano i morsetti a vite. Svitare il morsetto, inserire l'estremità nuda del cavo nel
foro della base del morsetto, quindi serrare saldamente. Assicurarsi che i poli positivo (+) e negativo (–)
siano abbinati all'amplificatore/al sintoamplificatore.
Realizar el cableado de los altavoces
Todos los altavoces SIA50 usan terminales de tornillos. Desatornille el terminal; inserte el extremo desnudo
del cable en el agujero situado en la base del terminal; apriételo con seguridad. Asegúrese de que el termi-
nal positivo + y el negativo – se correspondan con el amplificador/receptor.

2 x 50W RMS
20Hz - 20kHz
4ohms
Wi-Fi 802.11 b/g/n, 2.4 GHz
Bluetooth 4.0
1 x RCA Line in
1 x Optical in
1 x Sub out
1 x Speaker out binding posts
Product: 190 x 139 x 52
Remote: 135 x 48 x 10
N.W: 1.3 kg
G.W: 1.9 kg

www.tibo-audio.com
Other manuals for SIA50
1
Table of contents
Other Tibo Amplifier manuals


