Tidel TACC Service manual

TACC
Quick Reference
Manual
450-0339-001 Rev. H

Copyright © 2007 by TIDEL ENGINEERING, L.P.
All rights reserved. No part of this manual may be reproduced, stored
in a retrieval system, or transmitted in any form or by any means,
electronic, mechanical, photocopying, recording, or otherwise, except
as may be expressly permitted by the applicable copyright statutes or
in writing by Tidel Engineering, L.P.
For information, write:
Tidel Engineering
2025 W. Belt Line Rd, #114 Carrollton, TX 75006, (972)484-3358
Tidel would like to thank you for the purchase of your TACC Product.
To maintain proper working order, we recommend you read this
manual completely and perform the preventive maintenance routines
at the suggested intervals.
The Manufacturer’s Warranty is limited to defects in workmanship
and equipment hardware. Repairs due to lack of Preventive Mainte-
nance (and Preventive Maintenance itself), are not covered by the
Manufacturer’s Warranty.
ITEMS THAT REQUIRE PREVENTIVE MAINTENANCE
Bill Acceptors - Pages 22 -25
Clean with Cleaning Cards on a routine basis (dependent on
location’s volume of traffic) or manually at suggest intervals.
Screen Protectors - Page 28
Should be replaced when the Touchscreen response becomes
erratic.
Additional items not covered by warranty, but not limited to:
Abuse
Damage to cassettes due to mis-handling.
Coin/Tube Jams
Bill Jams
Screen protector damage or replacement
Damage due to spillage
Equipment resets
Phone fixable problems
User Programming problems
Equipment or software upgrades
Printer jams
Consumables - Paper, dispsticks, vend tubes, screen protectors, etc...

Contents
Component Location 2
External Printers 4
Built-In Printer 6
Touchscreen Layout/Entry 7
Main Screen Operations 8
Checking The Number Of Tubes 11
Adjusting The Tube Count 11
Opening A Vault 12
Securing All Vaults 12
Opening A Vault (Courier) 13
Closing A Vault (Courier) 13
Dumping Tubes 14
Clearing Bill Acceptor Totals 14
End Of Day/Shift 15
Stay Logged In 15
Printing Reports 16
Adjusting Vault Contents 17
Moving Vault Contents 18
Bill Acceptors (CashCode) 19
Bill Acceptors (MEI CashFlow) 23
Adding A Clerk 25
Programming The DataKey 26
Screen Protector Replacement 27
Troubleshooting 28
Paper Specifications 29
Manager Menu Maps 30
License Agreement 32
Warranty Policy 33

TACC-III Component Location
1) Tube Loading Gate Lock
2) Data Key Reader
3) Removable Bezel (for Screen Protector replacement)
4) Drop Chute Handles
5) Printer Paper Loading Door Release Button
6) Integrated Printer
7) Main Vault Door Handle
8) 3 Amp Slow Blow Fuse
9) Rest Button
10) Serial Number Sticker
11) Paper Feed Button
2
1 2 3
4
5
8
9
4
6
7
11
10

TACC-V Component Location
1) Tube Loading Gate Lock
2) Data Key Reader
3) Removable Bezel (for Screen Protector replacement)
4) Bill Acceptor Vault Door Handle
5) Bill Acceptor
6) Printer Paper Loading Door Release Button
7) Integrated Printer
8) Main Vault Door Handle
9) Drop Chute Handle
10) 3 Amp Slow-Blow Fuse
11) Reset Button
12) Serial Number Sticker
13) Paper Feed Button
3
7
9
11
1234
5
6
12
13
8
10
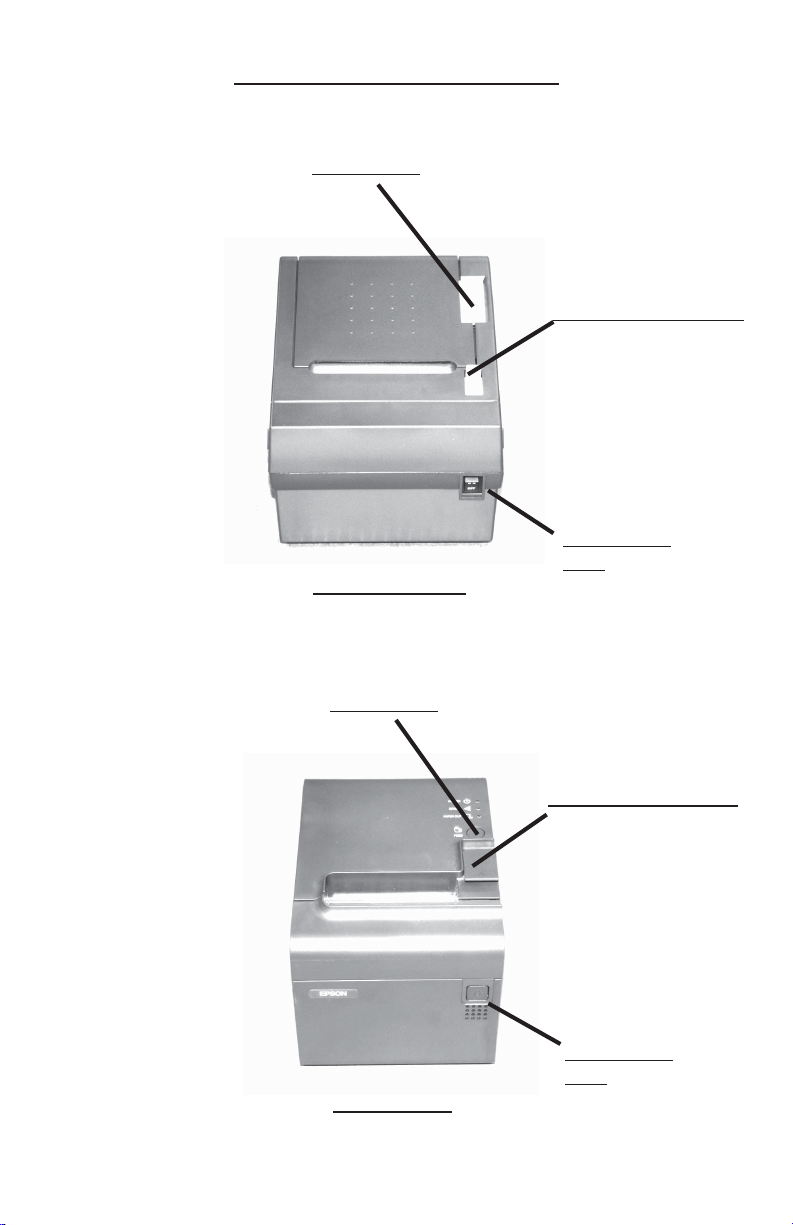
External Printers
Epson T-90
Paper Feed
Paper Door Release
4
Omni OM9300
Power ON/
OFF
Paper Feed
Paper Door Release
Power ON/
OFF
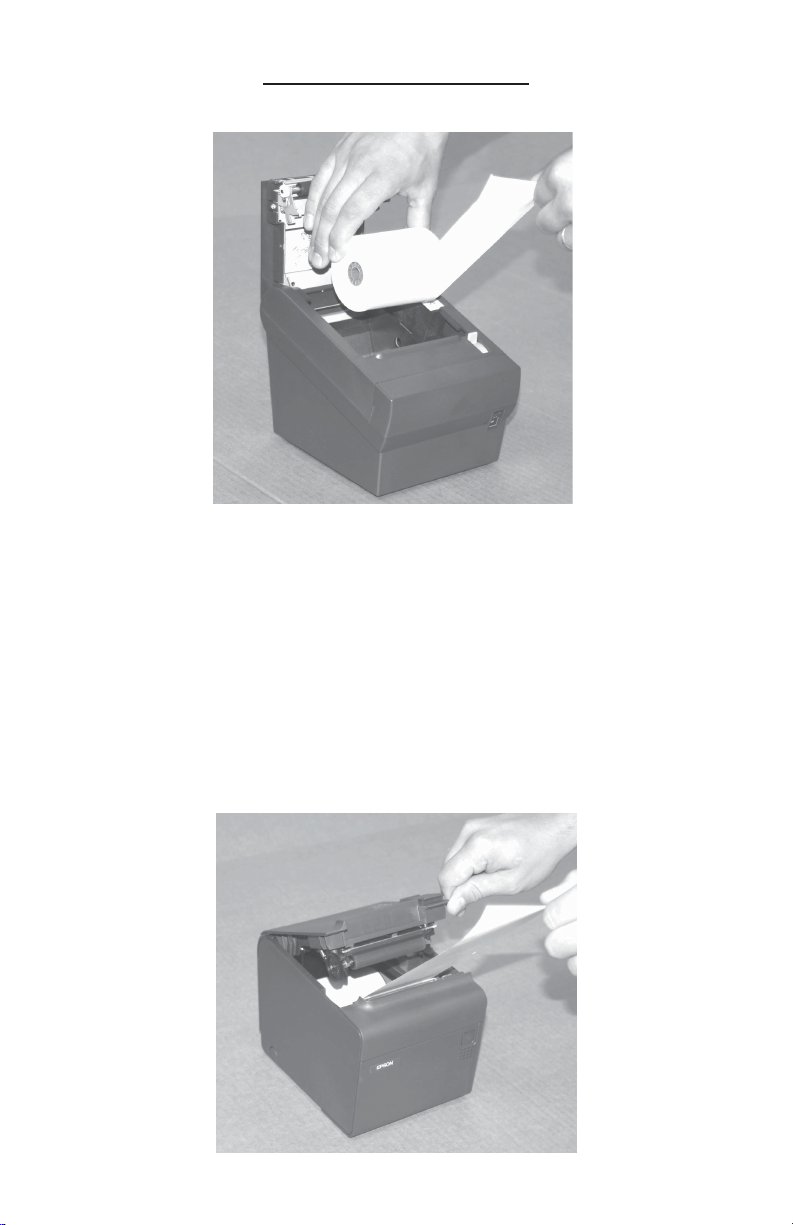
Loading Paper
External Printers
Step 1: Open the Paper Loading Door.
Step 2: Load the paper roll so that the paper comes off the bottom of
the roll.
Step 3: Pull the paper above the printer and close the Paper Load-
ing door on the paper.
Step 4: Tear off the excess paper and press the Feed Button to
insure paper feeds properly.
5
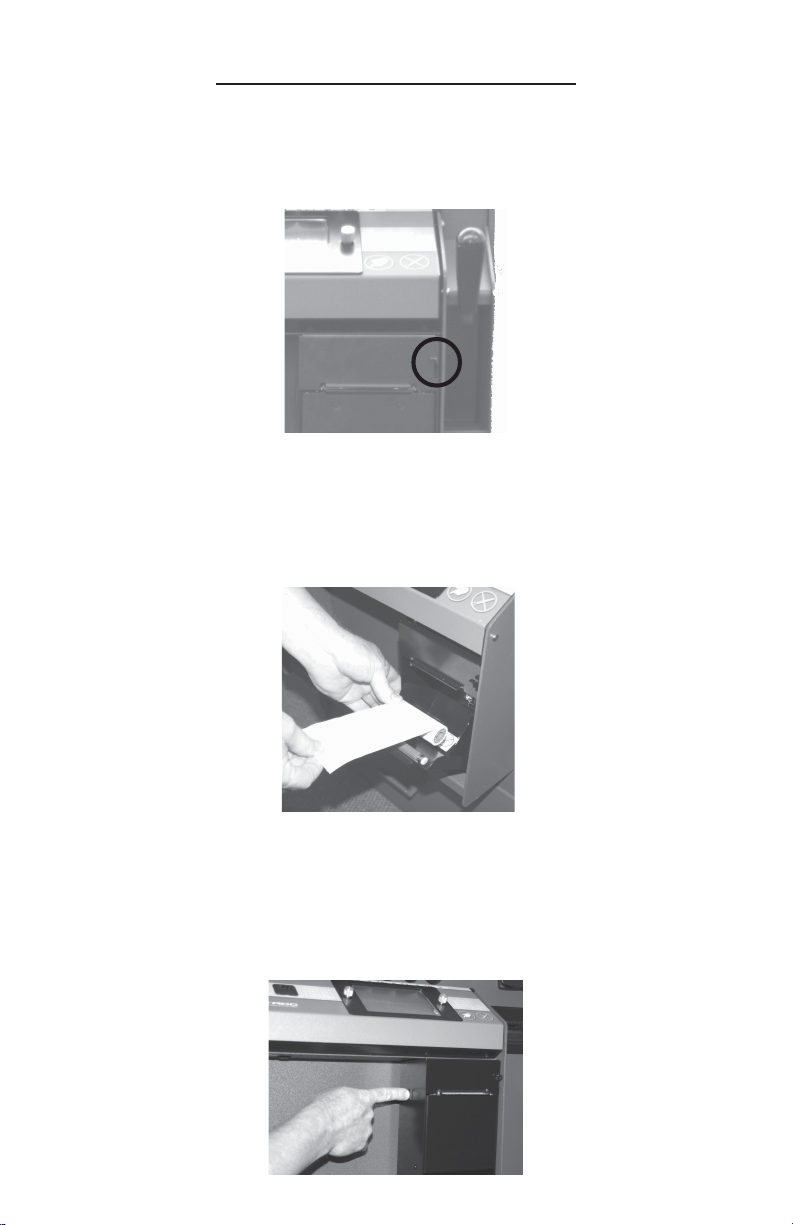
Integrated Printers
Step 1: Press down on the paper door release button to expose the
paper tray.
Step 2: Pull enough paper off the roll to extend out of the paper
tray and place the paper into the tray so the paper comes
off the top off the roll.
Step 3: Close the paper tray door and tear off the excess paper
extending out of tray.
Step 4: Press the paper feed button to insure paper feeds properly.
6

NOTE: The top line of the Display indicates the current screen and
entries made on the Touchscreen.
!Use your fingertips to “tap” in selections. Do not use sharp,
pointed objects to select entries.
To enter a character:
Tap the corresponding icon repeatedly until the desired
selection is displayed.
To advance to the next character:
Pause entry selection for 1-2 seconds, then continue with the
next character.
To backspace 1 character or clear an entry:
Select “Clear”.
To exit an Entry screen:
Select “Done”.
To exit a Menu screen:
Select “Go Back”.
To Enter a space:
Select the “789_” icon until an underscore “_” is displayed.
Touchscreen Layout/Entry
ABC DEF GHI
JKL
STU
123
Done
MNO
VWX
456
Clear
PQR
YZ0
789_
Go Back
Clerk1
7

!Selecting an icon on the Main Screen will prompt the User for
code entry.
Buy Change
This feature will require the user to insert bills into the Bill
Acceptor before tubes can be vended.
(Time delay does not apply to the vending process when this
feature is selected)
a) The Bill Acceptors will change to a “ready state”
b) As bills are inserted into the Acceptors, the “Deposit
Credit” amount will be displayed at the top of the screen.
c) As bills are inserted into the Acceptors, dispense selec-
tions equal to the “Deposit Credit” will appear on the
display.
d) As tubes are vended, dispense selections larger than the
“Deposit Credit” will be removed from the display.
e) Press Done to exit the Buy Change menu
Note: Any unused “Deposit Credit” cannot be carried over to the next
vending transaction.
Main Screen
Log In
Vault Drop
Load Tubes
Insert Bills
Vend Tube
TACC-V Main Screen version X.XX
8
Buy Change

Main Screen
(continued)
Insert Bills (TACC-V only)
After code entry:
The Bill Acceptor will become active (ready state). Bills can
be inserted into the Bill Acceptor.
The Bill Acceptor will become inactive (not ready state) 30
seconds after the last bill was inserted or when “Done” is
selected.
Loading Tubes
All coins placed in the tubes should be wrapped. If loose coins
are to be loaded into the tubes, end caps for the tubes can be
purchased from Tidel.
Do not place tape over the end of the tube. Glue from the tape
will eventually cause jams in the magazine.
Bills loaded into the tubes should be folded lengthwise and
inserted fully into the tubes.
Insure no bills extend out of the tube opening.
Load tubes, closed end first, to prevent coins from falling out of
the tube and into the magazine, causing jams.
Load Tubes (Clerk)
After the Clerk Code Entry:
The Clerk will be prompted to select the column and the
number of tubes to be loaded.
Load Tubes (by Manager)
After Manager code entry:
The prompt “Are you going to fill the columns?” will appear.
!!
!!
!YES - The tube count in all columns will be set
to 11.
!!
!!
!NO - Column selection will appear, allowing the
Manager to select columns and the number of
tubes inserted into the corresponding column.
If funds exist in the Reserve/Vault, the prompt “Is the
money for the tubes coming from the Vault?”
Selecting “YES” will deduct the total amount of the tubes
loaded from the Reserve Fund/Vault.
9

Log In The user will be prompted to enter a Clerk, Manager or Execu-
tive code to access the appropriate menus.
Vault Drop
The user may be prompted to select the assigned register (If
applicable).
The user may be prompted to select a Denomination type (If
applicable).
The user will be prompted to select the following:
!!
!!
!Amount of drop - enter the amount of the drop and
press “Enter”.
!!
!!
!Verify the amount of the drop - (Yes/No).
Vend Tube
The user will be prompted to select the column a tube will
dispense from (If applicable).
After a tube is vended, the VEND TUBE icon will display
“Report Problem”. Selecting this item will allow the User to
report one of the following conditions:
!!
!!
!Got the wrong stuff - The user will be prompted to
enter the amount that was actually in the tube.
!!
!!
!Nothing came out - No tube was dispensed.
!!
!!
!The tube was empty - Nothing was in the tube.
!!
!!
!The vend was OK - No problem will be reported.
The above reported problems will be noted on the Summary,
Shift and Transaction Reports.
Main Screen
(continued)
10

Adjusting The Tube Count
NOTE: This function is typically used when the number of tubes
shown on the report don’t match the dipstick reading.
Step 1: Navigate to the “Adjust Tube Counts” Menu.
Log In > (enter code) > Cash Control > Adjust Tube Counts
Step 2: The prompt to Add or Subtract will appear:
Add - Will increase the current tube count by the number
entered.
Subtract - Will decrease the current tube count by the
number entered.
Step 3: Select the column you wish to adjust.
Step 4: Enter the number of the adjustment and select “Enter”.
Step 5: Select “Go Back” to exit the “Adjust Tube Counts” menu.
Checking The Number Of Tubes
In The TACC
Step 1: Insert the dipstick into the tube loading hole with the
highest number first.
Step 2: The number at the bottom of tube loading hole is the
number of tubes in the magazine.
NOTE: Leaving the dipstick in the magazine may result in a jammed
vend mechanism.
11

12
Opening A Vault
Step 1: Navigate to the “Open Vault” Menu.
Log In > (enter code) > Open Vault
Step 2: Select the desired vault to open (Main Vault or Bill Acceptor
Vault).
Step 3: The Display will show “The vault will open in XX minutes”.
Step 4: After the door opening delay time has expired, the top line
of the Display will indicate “Vault Wait Complete”.
Step 5: Navigate to the “Open Vault” Menu.
Log In > (enter code) > Open Vault
Step 6: Select the desired vault to open (Main Vault or Bill Acceptor
Vault).
Step 7: Turn the handle to open the Vault.
Step 8: Select “Go Back” until the Main Screen is displayed.
Securing All Vaults
!Performing a “Secure All Vaults” will stop all door opening
procedures that are in progress.
Step 1: Navigate to the “Open Vault” Menu.
Log In > (enter code) > Open Vault
Step 2: Select “Secure All Vaults”.
Step 3: The Display will show “All vaults have been secured”.
Step 4: Press “Done” to return to Manager Screen 1.

13
Opening A Vault (Courier)
Step 1: The Courier must insert the DataKey into the DataKey
Reader and turn it (the DataKey can then be removed).
NOTE: If the Courier has access to both vaults, a prompt for vault
selection will appear. Select the desired vault.
NOTE: If the Door Policy requires a Manager or Employee to assist
with door opening, the prompt “Please ask a Manager/Em-
ployee to assist in opening the vault”. Select “Done” and enter
the appropriate code.
Step 2: The Vault solenoid will activate and the handle on the vault
door can be turned.
Closing A Vault (Courier)
When the vault is closed and locked, several prompts may appear,
depending on Policy settings:
!!
!!
!“I think the Courier was just here. Should I clear the Bill
Acceptor totals?”
Selecting “YES” will set the number of bills in the Bill
Acceptor to 0.
!!
!!
!“I think the Courier was just here. Did they leave anything
in the vault?”
This appears when the Main Vault was opened by the
Courier.
Selecting “YES” will prompt the user to enter the amount
left by the Courier.
!!
!!
!“Press done when you have removed the 1st receipt”
This appears when receipts are required after door clos-
ings.

14
Clearing Bill Acceptor Totals
(TACC-V only)
Step 1: Navigate to the “Cash Control” Menu.
Log In > (enter code) > Cash Control > Clear Acceptor
Step 2: The prompt “Are you sure the bill acceptor was emptied?”:
NO - Amounts shown in the bill acceptor will not be
cleared.
YES - Amounts shown in the bill acceptor will be cleared.
Step 3: Select “Go Back” to exit the “Cash Control ” menu.
Dumping Tubes
The Main Vault must be open to perform this function.
Step 1: Navigate to the “Open Vault ” Menu.
Log In > (enter code) > Open Vault > Main Vault
Step 2: The Display will show “The vault will open in XX minutes”.
Step 3: After the door opening delay time has expired, the top line
of the Display will indicate “Vault Wait Complete”.
Step 4: Navigate to the “Open Vault” Menu.
Log In > (enter code) > Open Vault > Main Vault
Step 5: Turn the handle to open the Vault. Manager Screen 1 will
be displayed.
Step 6: From Manager Screen 1, select “Dump Tubes”.
Step 7: Select the column you wish to dump tubes from.
NOTE: To stop the dumping process and return to the column selec-
tion screen, select “Cancel”.
To return to the Manager Screen 1, select “Go Back”.

15
End Of Day/Shift
!When an End of Day is performed, all transaction information
from the previous End of Day to the current End of Day, will
be stored in a file, which can be re-printed.
!Each time an End of Shift is performed, shift periods will be
divided on the reports.
Step 1: To prevent amounts being carried forward to the next
reporting period, perform the following before performing
the End Of Day:
Move Vault Contents
Adjust Vault Contents
Clear Acceptors
Step 2: Navigate to “End Of Day/Shift”.
Log In > (enter code) > End Of Day/Shift
Step 3: From the End Of Day/Shift screen, select “End Of Day” or
“End Of Shift”.
Step 4: Select “YES” when the display prompt, “Do you really want
to end the business day or shift” appears.
Stay Logged In
!When this function is selected, the user will not be required to
‘Log In” to performing transactions. All transaction will be
logged to that User’s account.
Step 2: Navigate to “Stay Logged In”.
Manager:
Log In > (enter Manager code) > More > Stay Logged In
Clerk:
Log In > (enter Clerk code) > Stay Logged In

16
Report Types
Accounts
All users names, PIN numbers and privileges for the account
type selected will be printed.
Clerk Accounts
Will print Clerk names, PIN numbers and privileges.
Current Content
Current Contents – Will list the contents in all vaults and
tubes loaded in the magazine at the time of printing.
Exception Report (Technician purposes only)
Reprint Courier Report
A copy of a “Courier Pick Up” report can be printed for the time
period selected.
Reprint Zero Balance
A copy of an END OF DAY report can be printed for the time
period selected.
Setup The programming parameters of the unit will be printed.
Shift Will print the activities (tubes loaded/vended, drops, door
openings and Bill Acceptor activity), by user, for the date
range selected.
Transaction
Transactions for the date range selected are printed.
Vault Drops
Totals for the contents of the drop vault by time, shift or
person will be printed for the time period selected.
Printing Reports
Step 1: Navigate to “Reports” Menu.
Log In > (enter code) > Reports
Step 2: From the Reports Menu, select the desired report from the
available choices.

17
Adjusting Vault Contents
!When actual amounts of vault contents don’t match the
reports, this function can be used to make corrections.
Step 1: Navigate to the “Adjust Vault Contents” Menu.
Log In > (enter code) > Cash Control > Adjust Vault Con-
tents
Step 2: The user will be prompted to select a currency type (if a
secondary currency is being used).
Step 3: The user will be prompted to select from one of the follow-
ing vaults:
!Drop - will add/subtract from the Vault Drop amounts.
!Vault (Main Vault/Reserve Change Fund) - will add/
subtract from the Main Vault/Reserve Change Fund
amounts.
!Courier Tray - will add/subtract from the Courier Tray
amounts.
Step 4: After selecting the currency type, the user will be prompted
to select the type of activity:
!Positive (Deposit)
!Negative (Withdrawal)
Step 5: The amount to be added or subtracted can be entered.
Step 6: Verify the amount of the adjustment.
Step 7: Select “Done” to return to the “Cash Control” menu.

18
Moving Vault Contents
!Performing this function will cause the reports to reflect funds
were moved FROM or TO a vault.
Step 1: Navigate to the “Move Vault Contents” Menu.
Log In > (enter code) > Cash Control > Move Vault Contents
Step 2: Select a currency type (if a secondary currency is being
used).
Step 3: Select from one of the following vaults to move the amount
FROM:
!Outside - Funds from an outside source are being put
into the unit.
!Drop - Amounts shown as Vault Drops on the reports
are being moved.
!Vault - Amounts shown as “Reserve Change Fund” ,
“Main Vault” or “Vault” on the reports are being moved.
!Courier Tray - Amounts shown in the Courier Tray are
being moved.
NOTE: If any of the above selections do not appear, the vault amount
is currently zero.
Step 4: Select where the amount will be moved TO:
!Outside – Reports will reflect the amount was removed
from the unit.
!Drop – Will add to the existing Vault Drop.
!Vault – Will add to the existing amounts for Main
Vault/Vault/Reserve Change Fund.
!Courier Tray - Will add to the existing Courier Tray
amounts.
Step 5: Select one of the following options:
!Everything - Will transfer the total amount reported in
the “move from” location to the “move to” location.
!Something Specific – Will prompt the user to select the
currency type and enter the amount to be transferred
to the “move to” location.
Step 6: Verify the amount of the move.
NO - Will exit the “Move Vault Contents”. Restart at step 4.
Table of contents
Other Tidel Cash Register manuals


