TIDI Zero-Gravity User manual

Preventative
Maintenance
Checklist
Zero-Gravity® Radiation Protection System
Preventative Maintenance Checklist
Original Translation Source is in English

Preventave Maintenance Checklist (81000)2
Zero-Gravity®Radiation Protection System Preventative Maintenance Checklist
Table of Contents
Important Information ....................................................................................................................... 4
Read this Manual Before Starting to Work! .........................................................................................4
Zero-Gravity Document List ................................................................................................................ 4
Preventative Maintenance Checklist ................................................................................................... 4
Maintenance ....................................................................................................................................... 4
ZG System Information ....................................................................................................................... 6
Intended Use ...................................................................................................................................... 6
Zero-Gravity®Radiation Protection System ..................................................................................... 6
Leaded Acrylic Shield ....................................................................................................................... 6
Safety Liability ..................................................................................................................................... 7
Safety Warning ................................................................................................................................... 7
Safety Symbols .................................................................................................................................... 8
Zero-Gravity System Preventative Maintenance Checklist: ................................................. 9
Zero-Gravity Accessory Preventative Maintenance Checklist: ........................................ 10
Cable Inspection (All Systems) ......................................................................................................... 11
Cable Replacement ........................................................................................................................ 11
Cable Inspection ............................................................................................................................ 11
(Body Shield Balancer Swivel) Body Shield Rotation Inspection (All Systems) ............................... 13
Body Shield Balancer Swivel Replacement ................................................................................... 13
Body Shield Balancer Swivel Inspection ......................................................................................... 13
Body Shield Vertical Travel Inspection (All Systems) ....................................................................... 14
Body Shield Vertical Drifting Inspection (All Systems) ...................................................................... 15
Adjusting the Body Shield Vertical Tension (All Systems) .................................................................15
Face Shield Inspection (All Systems) ............................................................................................... 16
Hinge Inspection (All Systems) ......................................................................................................... 16
Hinge Replacement ........................................................................................................................ 16
Hinge Inspection ............................................................................................................................ 16
Velcro Inspection (All Systems) ........................................................................................................ 17
End Stop Cap Hardware Inspection (All Systems) ........................................................................... 18
Magnetic Docking Station Inspection (All Systems) ......................................................................... 18
Body Shield Connector Hardware Inspection (All Systems) ............................................................. 19
System Specic Inspections ......................................................................................................... 20
Caster Inspection (ZGM-6-5H) ......................................................................................................... 20
Caster Replacement ...................................................................................................................... 20
Caster Inspection ........................................................................................................................... 20
Boom Arm Mounting Hardware Inspection (ZGM-6-5H) ................................................................... 20
Moving Parts Inspection (ZGM-6-5H) ............................................................................................... 21
Rotational / Translational Motion Parts Replacement .................................................................... 21
Rotational / Translational Motion Parts Inspection ......................................................................... 21
Moving Parts Inspection (ZGHSA | ZGCM-HSA | ZGCM-48 | ZGCM-66) ........................................ 22
Rotational / Translational Motion Parts Replacement .................................................................... 22
Rotational / Translational Motion Parts Inspection ......................................................................... 22
Collision Inspection (ZGHSA | ZGCM-HSA | ZGCM-48 | ZGCM-66) ................................................ 24
Boom Arm to Drop Tube Hardware Inspection (ZGCM-48 | ZGCM-66) ........................................... 24
Boom Arm to Drop Tube Hardware Inspection (ZGCM-HSA) ........................................................... 25
Toe Clamp Mounting Bolt and Cover Inspection (ZGCM-48 | ZGCM-66 | ZGCM-HSA) ................... 26
Drop Tube Carriage Mount Hardware Inspection (ZGCM-48 | ZGCM-66) ....................................... 27

Preventave Maintenance Checklist (81000) 3
Zero-Gravity®Radiation Protection System Preventative Maintenance Checklist
Translations available on the TIDI Products website: https://www.tidiproducts.com/ifu
Oversættelser kan ndes på TIDI Products' websted: https://www.tidiproducts.com/ifu
Vertalingen beschikbaar op de website van TIDI Products: https://www.tidiproducts.com/ifu
Traductions disponibles sur le site Web de TIDI Products : https://www.tidiproducts.com/ifu
Übersetzungen sind auf der Website von TIDI Products verfügbar: https://www.tidiproducts.com/ifu
Traduzioni disponibili sul sito web di TIDI Products: https://www.tidiproducts.com/ifu
Tłumaczenia są dostępne w witrynie internetowej rmy TIDI Products: https://www.tidiproducts.com/ifu
Traduções disponíveis no site dos Produtos TIDI: https://www.tidiproducts.com/ifu
Traducciones disponibles en el sitio web de TIDI Products: https://www.tidiproducts.com/ifu
Boom Arm Orientation Inspection (ZGCM-48 | ZGCM-66) ............................................................... 28
Drop Tube Carriage Mount Hardware Inspection (ZGCM-HSA) ....................................................... 29
Align Friction Brake & Adjust Bearing Tension (ZGHSA | ZGCM-HSA) ............................................ 30
Inspection Instructions for Leaded Acrylic Shield (ZGCMRS) .......................................... 32
Adjusting Ball Joint Tension .............................................................................................................. 32
Drop Tube Carriage Mount Hardware Inspection (ZGCM-HSA) ....................................................... 33
Leaded Acrylic Hardware Inspection ................................................................................................ 34
Swivel Arm Hardware Inspection ...................................................................................................... 35
Adjusting the Arm Assembly ............................................................................................................. 37
Leaded Acrylic Integrity Inspection ................................................................................................... 37
Moving Parts Inspection (ZGCMRS) ................................................................................................ 38
Rotational / Translational Motion Parts Replacement .................................................................... 38
Rotational / Translational Motion Parts Inspection ......................................................................... 38
System Description ........................................................................................................................... 39
Zero-Gravity Floor Unit (ZGM-6-5H) ................................................................................................. 39
Zero-Gravity Hinged Swing Arm Unit (ZGHSA) ................................................................................ 40
Zero-Gravity Monorail Hinged Swing Arm Unit (ZGCM-HSA) .......................................................... 40
Zero-Gravity Monorail Unit (ZGCM-48 or ZGCM-66) ....................................................................... 41
Body Shield Overview ..................................................................................................................... 42
System Overview .............................................................................................................................. 44
Body Shield Balancer Swivel Identication ....................................................................................... 55
Limited Warranty .............................................................................................................................. 56
Declarations of Conformity ........................................................................................................... 56

Preventave Maintenance Checklist (81000)4
Zero-Gravity®Radiation Protection System Preventative Maintenance Checklist
Important Information
Read this Manual Before Starting to Work!
This information is necessary for the safe and efcient operation of the equipment. The
activity provided in this document should only be performed by TIDI Products authorized
personnel. 84000 User Guide provides additional information for activity to be completed
prior to each time the system is used.
This document should be stored with, or in the immediate vicinity, of the unit.
Zero-Gravity Document List
●81000 – Preventative Maintenance Checklist
●82000 – Uncrating Guide
●83000 – Installation Guide
●84000 – User’s Guide
Preventative Maintenance Checklist
This document is intended to provide guidance for the proper check and inspection of
the Zero-Gravity systems and Leaded Acrylic Shield unit. All inspection activity should be
performed while the system is not in use.
Particularly helpful information is italicized.
●For additional information contact TIDI Products service at +1.920.751.4300.
Maintenance
The Zero-Gravity systems and Leaded Acrylic Shield unit require annual preventative
maintenance, inspection, and general cleaning throughout their life. Refer to the system
checklist sections of this document for preventative maintenance information.
Contact a TIDI Products authorized representative or TIDI service if
parts replacements are required.
Contact a TIDI Products authorized representative or TIDI service for
additional information regarding preventative maintenance.

Preventave Maintenance Checklist (81000) 5
Zero-Gravity®Radiation Protection System Preventative Maintenance Checklist
Zero-Gravity®Radiation Protection System is a registered trademark of TIDI Products.
United States Patents 7,973,299; 8,207,516; 8,558,204; 8,598,554 B2; 8,925,553;
8,933,426 For U.S. and Foreign Patent information, see //go.tidiproducts.com/patents
Additional Patents Pending
The contents of this publication may not be reproduced, copied, or translated in whole or in
part without prior consent from TIDI Products.
Pursuant to continuous product improvement, TIDI Products reserves the right to change
the equipment design and technology at any time.
All rights under the copyright laws are expressly reserved by TIDI Products.
Within the bounds of the legal requirements, the manufacturer is only responsible for
the technical safety characteristics of this apparatus if the maintenance, repairs, and
modications to this apparatus are performed by TIDI Products or an approved TIDI
Products representative.
The Zero-Gravity®Radiation Protection System can also be referred to as Zero-Gravity or
Zero-Gravity System.
Preventave Maintenance Checklist (81000)6
Zero-Gravity®Radiation Protection System Preventative Maintenance Checklist
ZG System Information
The preventative maintenance instructions in this document refer to the Zero-Gravity®
Radiation Protection System with the following identication:
●Manufactured for: TIDI Products, LLC
●Product name: Zero-Gravity® Radiation Protection System
●Type designation: Floor Unit (ZGM-6-5H), Hinged Swing Arm (ZGHSA), Monorail
Hinged Swing Arm (ZGCM- HSA), Monorail 48 (ZGCM-48) or 66 inches
(ZGCM-66)
●Serial Number: See Identication Tag (Figure 37, 38, 39, 40, & 41)
●Sterile covers manufactured by: TIDI Products
●Authorized representatives: See Declarations of Conformity.
●Manufacture date: See Identication Tag (Figure 37, 38, 39, 40, & 41)
● Conforms to Annex II, Personal Protective Equipment (EU) Regulation 2016/425
Category III, and as brought into UK law and amended.
Manufactured for:
TIDI Products, LLC
570 Enterprise Drive
Neenah, WI 54956 USA
Phone: 1.800.521.1314
+1.920.751.4300
www.tidiproducts.com
0086
NOTIFIED BODY APPROVED BODY
BSI Group The Netherlands B.V.
Say Building
1066 EP Amsterdam
The Netherlands
BSI Assurance UK Ltd
Kitemark Court,
Davy Avenue Knowlhill
Milton Keynes, MK5 8PP UK
Intended Use
Zero-Gravity®Radiation Protection System
See 84000 Users Guide for Intended Use
Leaded Acrylic Shield
See 32577 Installation and Users Guide for Intended Use

Preventave Maintenance Checklist (81000) 7
Zero-Gravity®Radiation Protection System Preventative Maintenance Checklist
Safety Liability
TIDI Products assumes no liability for the safe and reliable operation of Zero-Gravity®
Radiation Protection System where:
● Installation, modications, or repairs are not performed by TIDI Products
technicians or people authorized by TIDI Products.
●Authorized TIDI Products replacement parts are not used.
●Authorized TIDI Products sterility protection accessories are not used.
●The Zero-Gravity has not been installed or setup for a procedure in accordance
with the respective system Installation and User’s Guide, or this document.
●The Zero-Gravity is used in a manner other than its intended use as stated above.
Safety Warning
●Repairs may only be performed by TIDI Products authorized personnel.
●The weight of Body Shield assembly suspended on the Balancer must not be
altered in any way.
● A thorough inspection of equipment should be performed, after each service call,
prior to releasing the equipment for use.

Preventave Maintenance Checklist (81000)8
Zero-Gravity®Radiation Protection System Preventative Maintenance Checklist
Safety Symbols
Important information in this document is marked with symbols and keywords. Keywords
such as WARNING, CAUTION, Material Disposition Notice, or ATTENTION indicate the
level of risk involved. The symbols emphasize the message visually.
WARNING!
Indicates a potentially hazardous
situation, which could result in a
serious risk of injury or death to
patient or operator and or damage to
equipment or property.
CAUTION!
Indicates a potentially hazardous
situation, which could result in a minor
or moderate risk of injury to patient or
operator and or damage to equipment
or property.
ATTENTION!
(Without safety alert symbol)
Indicates a situation that may result in
damage to equipment or property.
Material Disposal Notice
Indicates the need to follow local
regulations for the proper disposal of
materials containing lead.
NOTE
Useful additional information and tips.

Preventave Maintenance Checklist (81000) 9
Zero-Gravity®Radiation Protection System Preventative Maintenance Checklist
Zero-Gravity System Preventative Maintenance
Checklist:
For use with ZGM-6-5H, ZGHSA, ZGCM-HSA, ZGCM-48, and ZGCM-66 systems.
Task Name
System Frequency
All ZGM-6-5H ZGHSA ZGCM-HSA ZGCM-48 ZGCM-66 Cered Tech
Annually
Cable Inspecon x x
Body Shield Rotaon Inspecon x x
Body Shield Vercal Travel Inspecon x x
Body Shield Vercal Driing Inspecon x x
Adjusng the Body Shield Vercal Tension (AR) x AR
Face Shield Inspecon x x
Hinge Inspecon x x
Velcro Inspecon x x
End Stop Cap Hardware Inspecon x x
Magnec Docking Staon Inspecon x x
Body Shield Connector Hardware Inspecon x x
Castor Inspecon x x
Boom Arm Mounng Hardware Inspecon x x
Moving Parts Inspecon - Floor System x x
Moving Parts Inspecon - Ceiling Systems x x x x x
Collision Inspecon x x x x x
Boom Arm to Drop Tube Hardware Inspecon x x x
Boom Arm to Drop Tube Hardware Inspecon x x
Toe Clamp Mounng Bolt and Cover Inspecon x x x x
Drop Tube Carriage Mount Hardware Inspecon x x x
Boom Arm Orientaon Inspecon x x x
Drop Tube Carriage Mount Hardware Inspecon x x
Align Fricon Brake and Adjust Bearing Tension x x x
*Larger version of table is available at the end of the document; copy as necessary for
records

Preventave Maintenance Checklist (81000)10
Zero-Gravity®Radiation Protection System Preventative Maintenance Checklist
Zero-Gravity Accessory Preventative
Maintenance Checklist:
For use with ZGCMRS accessories.
Task Name
System Frequency
All Cered Tech
Annually
Adjusng Ball Joint Tension X X
Adjusng the Arm Assembly X X
Leaded Acrylic Integrity Inspecon X X
Moving Parts Inspecon X X
Drop Tube Carriage Mount Hardware Inspecon X X
Leaded Acrylic Hardware Inspecon X X
Swivel Arm Hardware Inspecon X X
*Larger version of table is available at the end of the document; copy as necessary for
records
Preventave Maintenance Checklist (81000) 11
Zero-Gravity®Radiation Protection System Preventative Maintenance Checklist
Annual Inspections
Cable Inspection (All Systems)
Cable Replacement
1. The balancer cable used to suspend the body shield should be inspected once
annually by TIDI Products authorized personnel.
2. As a result of long-term use, the cable should be replaced after an extended
period of time to reduce the risk of fatigue failure. The replacement interval is
based on the design features of your system. Refer to the section titled System
Feature (Body Shield Balancer Swivel) on page 54 to determine if your system
is equipped with a body shield balancer swivel.
a. For systems that do not contain the body shield balancer
swivel feature, it is recommended to replace the cable once
every 4 years. Frequent use of the system and / or damage
may require more frequent replacement of the cable.
Cable Inspecon
WARNING! RADIATION HAZARD
The Body Shield must be handled with care to avoid damage to the Body
Shield protective lead material. If the Body Shield is damaged, it must
be inspected according to the Body Shield and Face Shield Fluoroscopy
Inspection section of the User’s Guide (TIDI Products document 84000).
WARNING! INJURY RISK-CABLE HAZARD
Excessive rotation of Body Shield may cause Balancer Cable to break.
The Body Shield must be lowered and allowed to unwind after each use, in
an unlocked position. Annual inspections must be performed on the cable.
Cables must be replaced if there are signs of wear.
1. While the system is not in use, remove the body shield from its xed position
inside the balancer. Lower the body shield until the bottom of the shield is
approximately 6 inches from the ground.
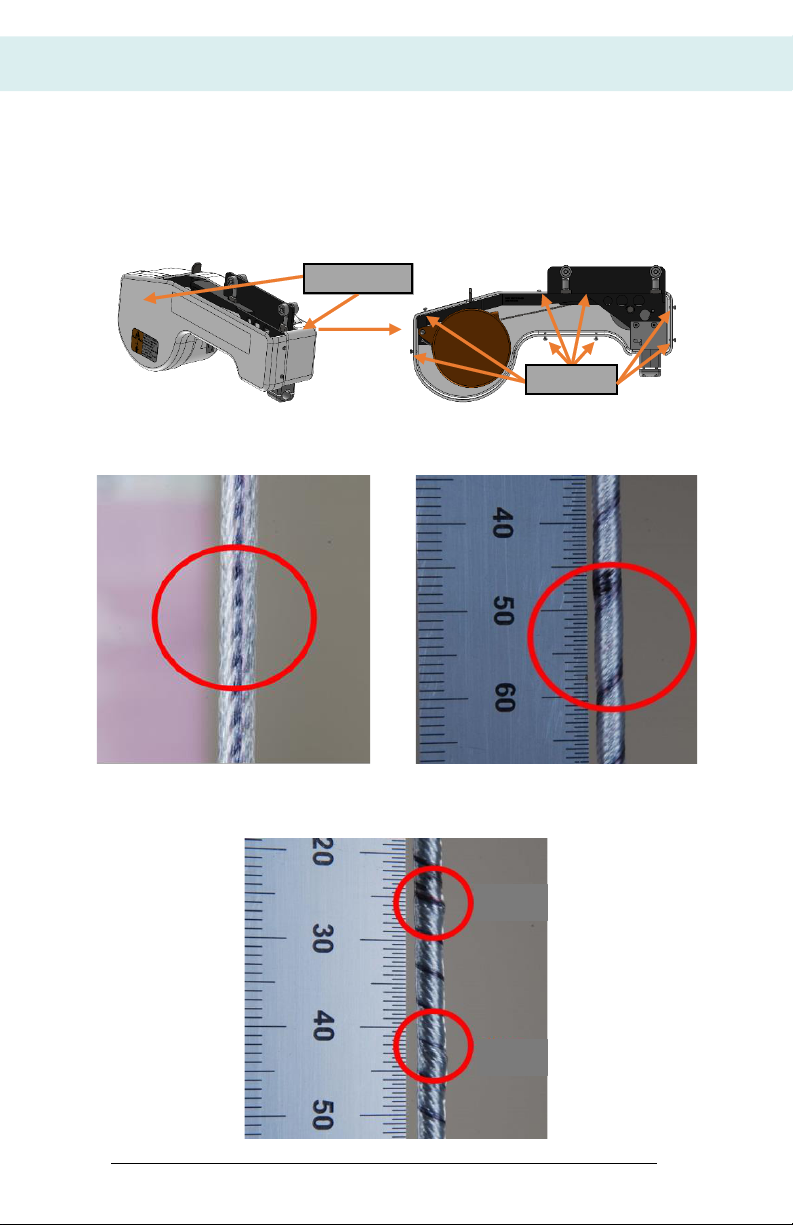
2. With the body shield lowered, use a Philips Screwdriver to remove the
(8) 10-32 .50 SS 18-8 panhead screws from the balancer cover removing both
cover pieces. (Figure 1)
3. Figure 2 is an example of a new cable for comparison.
4. Inspect the visible cable surfaces for any abnormalities. Abnormalities may
include:
a. Damage to the outer coating of the cable (Figure 3) (Figure 4)
(Figure 5)
b. Color variation from one part of the cable to the other (Figure
3)
c. Bulging areas (dimples and / or blisters) of the cable (visual or
by running ngers along the cable) (Figure 4) (Figure 5)
d. Stretched areas of the cable (visual or by running ngers along
the cable) (Figure 5)
5. Put the cover pieces back in place with the (8) screws after inspection.
Preventave Maintenance Checklist (81000)12
Zero-Gravity®Radiation Protection System Preventative Maintenance Checklist
6. If any abnormalities are observed, the cable should be replaced. Contact a TIDI
Products authorized representative or TIDI Products service for repairs and / or
replacement of components. Replacement and repairs may only be completed by
TIDI Products authorized personnel.
Figure 1
Cover (X2)
Screws
Figure 2: New Cable Figure 3: Damaged Cable
Figure 4: Damaged Cable (Dimple & Blister)
Dimple
Blister

Preventave Maintenance Checklist (81000) 13
Zero-Gravity®Radiation Protection System Preventative Maintenance Checklist
Figure 5: Damaged Cable
(Body Shield Balancer Swivel) Body Shield Rotation
Inspection (All Systems)
Body Shield Balancer Swivel Replacement
1. The body shield balancer swivel component used to connect the body shield to
the balancer cable should be inspected once annually.
2. Not all systems are equipped with a body shield balancer swivel. Refer to the
section titled System Feature (Body Shield Balancer Swivel) on page 54 to
determine if your system is equipped with a body shield balancer swivel.
3. As a result of long-term use, the body shield balancer swivel may require
replacement after an extended period of time. Complete inspection to determine
if replacement of this component is required.
Body Shield Balancer Swivel Inspecon
WARNING! RADIATION HAZARD
The Body Shield must be handled with care to avoid damage to the Body
Shield protective lead material. If the Body Shield is damaged, it must
be inspected according to the Body Shield and Face Shield Fluoroscopy
Inspection section of the User’s Guide (TIDI Products document 84000).
WARNING! INJURY RISK-CABLE HAZARD
Excessive rotation of Body Shield may cause Balancer Cable to break.
The Body Shield must be lowered and allowed to unwind after each use,
in an unlocked position. Annual inspections must be performed on the
cable. Cables must be replaced if there are signs of wear.
WARNING! INJURY RISK-CABLE DAMAGE
Body Shield Balancer Swivel Inspection may only be completed on units
containing the body shield balancer swivel assembly. Performing this
inspection on a system without the body shield swivel assembly could
cause irreparable damage to the balancer cable. Ensure your system
contains the body shield balancer swivel prior to executing this inspection.
Refer to the section titled System Feature (Body Shield Balancer
Swivel) on page 54 to determine if your system is equipped with a body
shield balancer swivel.

Preventave Maintenance Checklist (81000)14
Zero-Gravity®Radiation Protection System Preventative Maintenance Checklist
1. This inspection is to be performed only on units with a body shield connected to a
swivel assembly. Performing this inspection on a system without the body shield
swivel assembly could cause irreparable damage to the balancer cable. Ensure
your system contains the body shield balancer swivel prior to executing this
inspection.
2. While the system is not in use, remove the body shield from its xed position
inside the balancer. Lower the body shield until it is in a position where it is easily
maneuvered.
3. Rotate the body shield clockwise and counterclockwise for a minimum of three
(3) complete 360orotations in each direction.
4. The body shield should rotate smoothly with minimal resistance. A single point
of resistance through a full 360orotation is considered acceptable as long as
the resistance does not prevent full rotation. Replace the body shield balancer
connector assembly if any additional motion issues are detected. Contact a TIDI
Products authorized representative or TIDI Products service for repairs and / or
replacement of components. Replacement and repairs may only be completed by
TIDI Products authorized personnel.
5. Through each rotation, observe the cable to ensure the cable stays in a xed
position and does not rotate with the body shield. A mark or a piece of tape can
be placed on the cable to improve the visual observation indicating if the cable is
rotating with the body shield or remaining stationary.
6. If the balancer cable is observed rotating with the body shield, the cable should
be inspected for damage and the body shield connector xed / replaced by
authorized personnel. Replace the body shield balancer connector assembly if
the cable is rotating with the body shield. Contact a TIDI Products authorized
representative or TIDI Products service for repairs and / or replacement of
components. Replacement and repairs may only be completed by TIDI Products
authorized personnel.
Body Shield Vertical Travel Inspection (All Systems)
1. While the system is not in use, remove the body shield from its xed position
inside the balancer. Lower and raise the body shield to inspect for motion issues.
The body shield should move freely up and down.
2. Adjustments to the balancer cable tension may be necessary to address any
issues. Refer to Adjusting the Body Shield Vertical Tension on page 14 for
guidance on addressing the drifting of a body shield.
3. If additional support is needed, contact TIDI Technical Service using the provided
contact information.
WARNING! RADIATION HAZARD
The Body Shield must be handled with care to avoid damage to the Body
Shield protective lead material. If the Body Shield is damaged, it must
be inspected according to the Body Shield and Face Shield Fluoroscopy
Inspection section of the User’s Guide (TIDI Products document 84000).

Preventave Maintenance Checklist (81000) 15
Zero-Gravity®Radiation Protection System Preventative Maintenance Checklist
Body Shield Vertical Drifting Inspection (All Systems)
1. While the system is not in use, remove the body shield from its xed position
inside the balancer. Lower the body shield to the standard operating position and
release. Observe the body shield for any abnormal drifting up or down.
2. Refer to Adjusting the Body Shield Vertical Tension on page 14 for guidance
on addressing the drifting of a body shield.
3. If additional support is needed, contact TIDI Technical Service using the provided
contact information.
Adjusting the Body Shield Vertical Tension (All Systems)
CAUTION! EQUIPMENT DAMAGE RISK
Attempting to adjust the Balancer assembly while the cable locking screw
is locked will cause permanent internal damage to the Balancer and
inability to balance the Body Shield.
1. With body shield secured to balancer cable, pull shield down 6-8 inches (15 – 20
centimeters) and release to test the balance. If shield stays in position, no further
action is required.
2. Contact a TIDI Products authorized representative or TIDI Products service for
repairs and / or replacement of components. Replacement and repairs may only
be completed by TIDI Products authorized personnel.
3. With 17 millimeters socket, adjust balancer by turning nut clockwise (+) for more
lift and counterclockwise (-) for less lift (Figure 6).
4. Move Body Shield up and down several times allowing Balancer spring to adjust
to new settings.
5. If additional support is needed, contact TIDI Technical Service using the
provided contact information.
Figure 6
Preventave Maintenance Checklist (81000)16
Zero-Gravity®Radiation Protection System Preventative Maintenance Checklist
Face Shield Inspection (All Systems)
1. While the system is not in use, remove the body shield from its xed position
inside the balancer. Lower the body shield until the face shield is low enough
for visual inspection with the leaded apron off the ground. Use caution when
lowering the body shield to prevent damage to the leaded apron. A ladder may be
required for inspection to prevent risk of damage to the leaded apron.
2. Visually inspect each individual face shield panel for cracks, scratches, or other
surface imperfections that would cause loss of visibility or functionality of the
shields.
3. Visually inspect the interface between each of the shields to inspect for gaps.
4. Ensure the brackets holding the face shield panels together are in place and
secured. Ensure each of the 8-32 X .50 18-8 SS screws are in place and
secured.
5. Replace the leaded acrylic face shield panels if any of the abnormalities are
observed. Contact a TIDI Products authorized representative or TIDI Products
service for repairs and / or replacement of components. Replacement and repairs
may only be completed by TIDI Products authorized personnel.
6. If additional support is needed, contact TIDI Technical Service using the provided
contact information.
Material Disposal Notice: Lead
Follow local regulations on proper lead disposal.
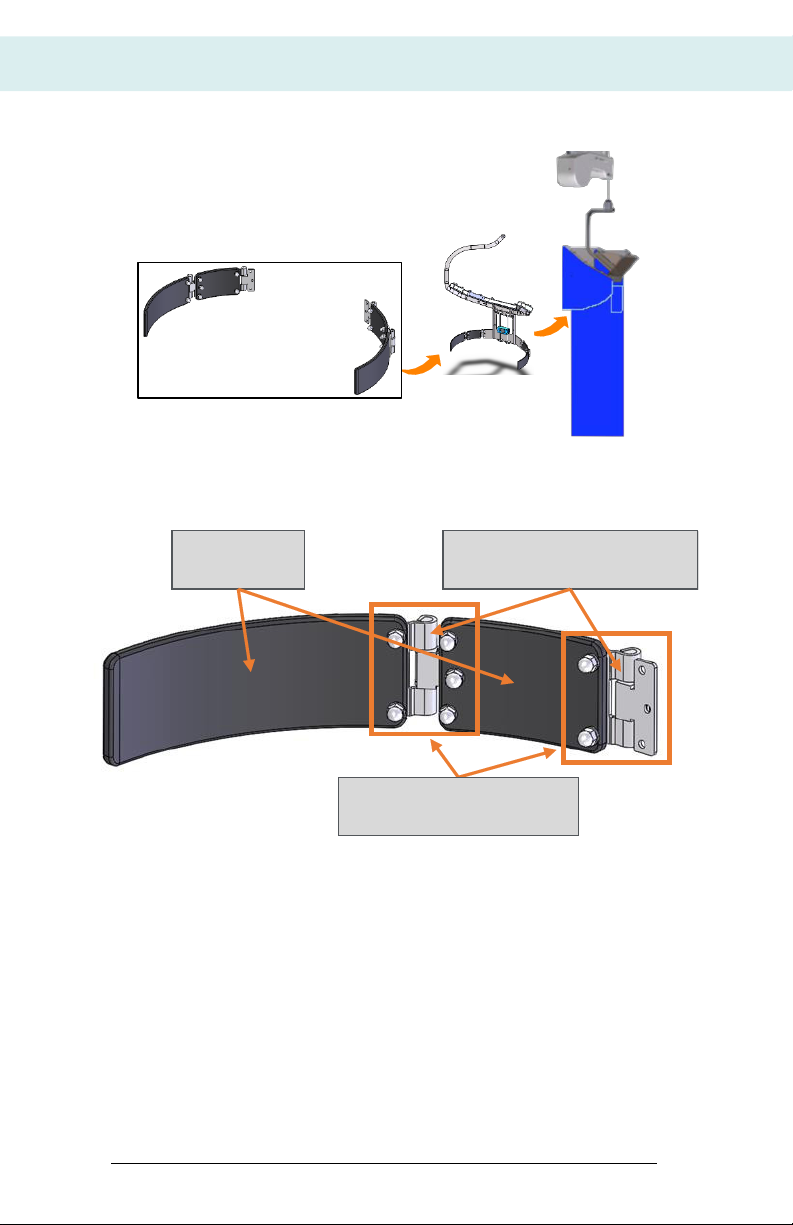
Hinge Inspection (All Systems)
Hinge Replacement
1. The Zero-Gravity system body shield contains hinges allowing for the proper
positioning of the leaded apron around the user. (Figure 7)
2. As a result of long-term use, the hinges may require replacement after an
extended period of time to ensure the system functions as intended. Complete
inspection to determine if replacement of either of the hinges is required.
Hinge Inspecon
1. While the system is not in use, locate the hinges carefully exposing the hinges for
inspection. (Figure 7)
2. Inspect each hinge and its components for any damage such as cracking or
broken components / hardware.
3. Rotate the components back and forth about the hinge axis to inspect for motion
obstructions or for damage. (Figure 8)
4. Replace the hinge if any damage or motion abnormalities are observed. Contact
a TIDI Products authorized representative or TIDI Products service for repairs
and / or replacement of components. Replacement and repairs may only be
completed by TIDI Products authorized personnel.
5. If additional support is needed, contact TIDI Technical Service using the provided
contact information.
Preventave Maintenance Checklist (81000) 17
Zero-Gravity®Radiation Protection System Preventative Maintenance Checklist
Figure 7
Figure 8
Inspect for
Damage
Inspect for Cracking
Through Hinge Point
Hardware and Rotation
Points
Velcro Inspection (All Systems)
1. While the system is not in use, remove the body shield from its xed position
inside the balancer. Lower the body shield until the top of the leaded apron is low
enough for visual inspection with the leaded apron off the ground. Use caution
when lowering the body shield to prevent damage to the leaded apron. A ladder
may be required for inspection to prevent risk of damage to the leaded apron.
2. Inspect each section of Velcro for damage, cleanliness, functionality, and
adherence to the body shield frame.
3. Replace any section of Velcro if abnormalities are observed following the
instructions provided within the Velcro replacement kit.
4. Contact a TIDI Products authorized representative or TIDI Products service for
repairs and / or replacement of components. Replacement and repairs may only
be completed by TIDI Products authorized personnel.

Preventave Maintenance Checklist (81000)18
Zero-Gravity®Radiation Protection System Preventative Maintenance Checklist
5. If additional support is needed, contact TIDI Technical Service using the provided
contact information.
End Stop Cap Hardware Inspection (All Systems)
1. Check each of the (2) 5/16-18 x 2-3/4 inches long End Stop Cap shoulder bolts
for each End Stop Cap equipped on your system to ensure they are installed and
tight. (Figure 9)
2. For ceiling mounted systems, the End Stop Caps are located at both ends of the
boom arm. The oor system contains only one End Stop Cap.
3. Contact a TIDI Products authorized representative or TIDI Products service for
repairs and / or replacement of components. Replacement and repairs may only
be completed by TIDI Products authorized personnel.
4. If additional support is needed, contact TIDI Technical Service using the provided
contact information.
Figure 9
Magnetic Docking Station Inspection (All Systems)
1. While the system is not in use, move the balancer along the boom away from the
magnetic docking station. (Figure 10)
2. Unlock the docking station. (Figure 10)
3. Move the docking station along the boom to inspect for motion issues. While
moving it along the boom, lock the docking station at several positions to ensure
the component is functioning as intended.
4. Move the docking station back to its original position locking it in place. Move the
body shield back to the docking station ensuring the balancer remains in place
against the docking station.
5. Prior to each use, move the docking station to the desired location and lock in
place inspecting for issues with the locking mechanism.
6. Contact a TIDI Products authorized representative or TIDI Products service for
repairs and / or replacement of components. Replacement and repairs may only
be completed by TIDI Products authorized personnel.
7. If additional support is needed, contact TIDI Technical Service using the provided
contact information.
Preventave Maintenance Checklist (81000) 19
Zero-Gravity®Radiation Protection System Preventative Maintenance Checklist
Figure 10
Magnetic
End Stop
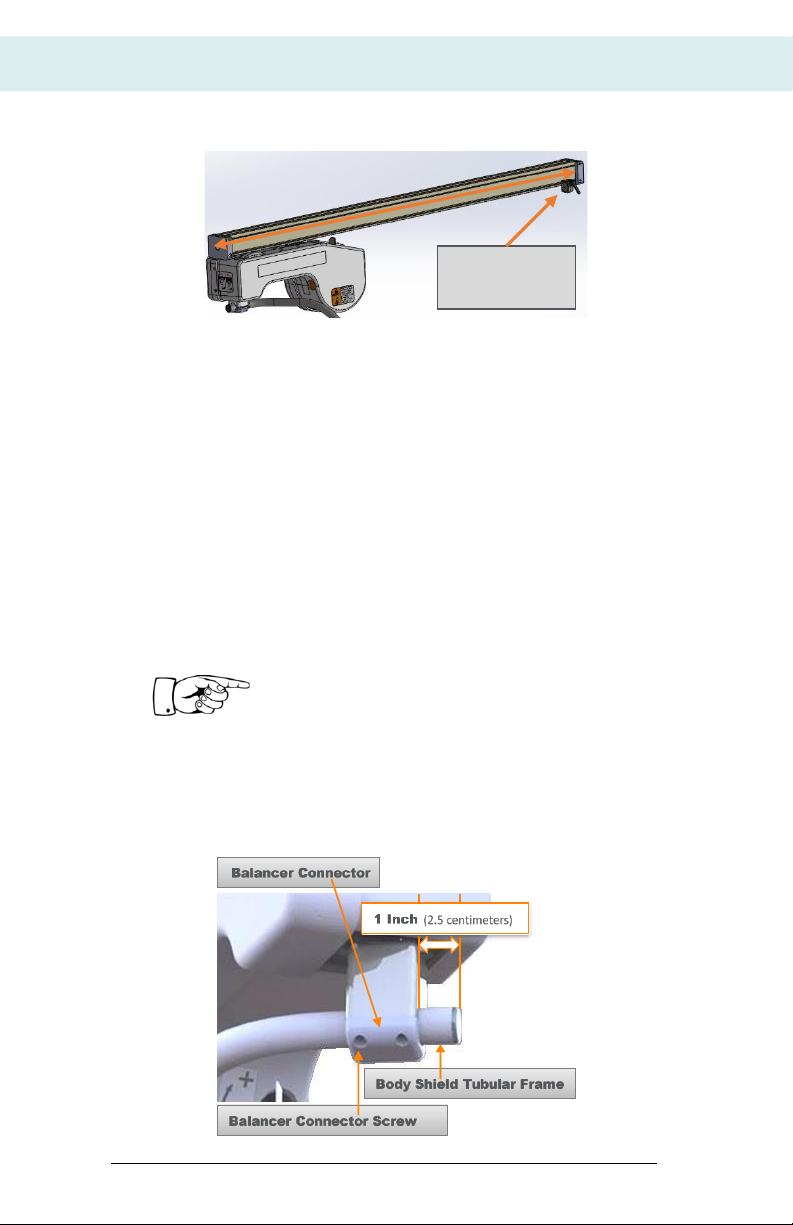
Body Shield Connector Hardware Inspection (All Systems)
1. While the system is not in use, check each of the (4) body shield connector
screws to ensure they are secured and torqued to 55 inch-pounds
(4.5 foot-pounds) (6.2 Newton- meters). (Figure 11)
2. Inspect the body shield to ensure the body shield is still hanging vertically and
not at an angle (tilted – Figure 12). To adjust the body shield positioning if tilted,
loosen the (4) body shield connector screws to adjust the body shield frame
positioning. While making adjustments, make sure the body shield is secured to
prevent detachment from the body shield connector. Torque to 55 inch-pounds
(4.5 foot-pounds) (6.2 Newton- meters).
3. Contact a TIDI Products authorized representative or TIDI Products service for
repairs and / or replacement of components. Replacement and repairs may only
be completed by TIDI Products authorized personnel.
4. If additional support is needed, contact TIDI Technical Service using the provided
contact information.
Tighten screws in opposite corners (one rotation each)
until tight.
ATTENTION!
Ensure Body Shield assembly is tightly secured in
balancer connector and Body Shield is hanging vertically
(not tilted).
Figure 11

Preventave Maintenance Checklist (81000)20
Zero-Gravity®Radiation Protection System Preventative Maintenance Checklist
Figure 12
System Specic Inspecons
Caster Inspection (ZGM-6-5H)
Caster Replacement
1. The Zero-Gravity oor system contains several casters (wheels) allowing for the
proper positioning of your system for use. The casters are also equipped with
brakes to lock the casters in place.
2. As a result of long-term use, the casters may require replacement after an
extended period of time to ensure the system functions as intended. Complete
inspection to determine if replacement of any of the casters is required.
Caster Inspecon
1. While the system is not in use, move the system to an open space where there
is ample room to manipulate the base of the system without risk of colliding with
other equipment.
2. Move the system in each direction to ensure the casters are functioning as
intended and rolling smoothly across a smooth surface.
3. Apply the lock for each caster equipped on the Zero-Gravity oor system.
4. With the brakes engaged, inspect each caster for debris.
5. Apply force to the ZG system in an attempt to move the system. Apply minimal
force to move the system in an effort to prevent unintended damage to the
casters and brakes.
6. Casters exhibiting issues with rolling or braking should be replaced.
7. Contact a TIDI Products authorized representative or TIDI Products service for
repairs and / or replacement of components. Replacement and repairs may only
be completed by TIDI Products authorized personnel.
8. If additional support is needed, contact TIDI Technical Service using the provided
contact information.
Boom Arm Mounting Hardware Inspection (ZGM-6-5H)
1. While the system is not in use, use a ladder to access the top of the Zero-Gravity
oor system directly above the vertical column.
2. Check each of the (3) 3/8-16 x 1-inch long screws connecting the boom arm to
the boom arm mount to ensure they are in place and tight. (Figure 13)
3. Contact a TIDI Products authorized representative or TIDI Products service for
repairs and / or replacement of components. Replacement and repairs may only
be completed by TIDI Products authorized personnel.
4. If additional support is needed, contact TIDI Technical Service using the provided
contact information.
This manual suits for next models
5
Table of contents
Other TIDI Medical Equipment manuals


Popular Medical Equipment manuals by other brands


LINET
LINET Multicare X Instructions for use and Technical description

Arjo
Arjo Enterprise 5000X Instructions for use
Teleflex
Teleflex Arrow EZ-IO Instructions for use

natus
natus Bio-logic AuDX PRO FLEX quick start guide

KaVo
KaVo 2052 CHC Instructions for use

BOCK
BOCK Nursing domiflex 3 Assembly and operating instructions