TIE DOWN 65049 User manual
404-344-0000 • www.tiedown.com
605 Stonehill Drive SW, Atlanta, GA 30336
Important – Please Read These Instructions Fully Before Starting Assembly
• Check you have all the components listed on the next page.
• Remove all parts from the plastic bags and separate them into their groups.
• Keep children and animals away from the work area, small parts could choke if swallowed.
• Make sure you have enough space to layout the parts before starting.
• Assemble on a hard level surface.
• Assembly of the axles/frame will be easier with 2 people.
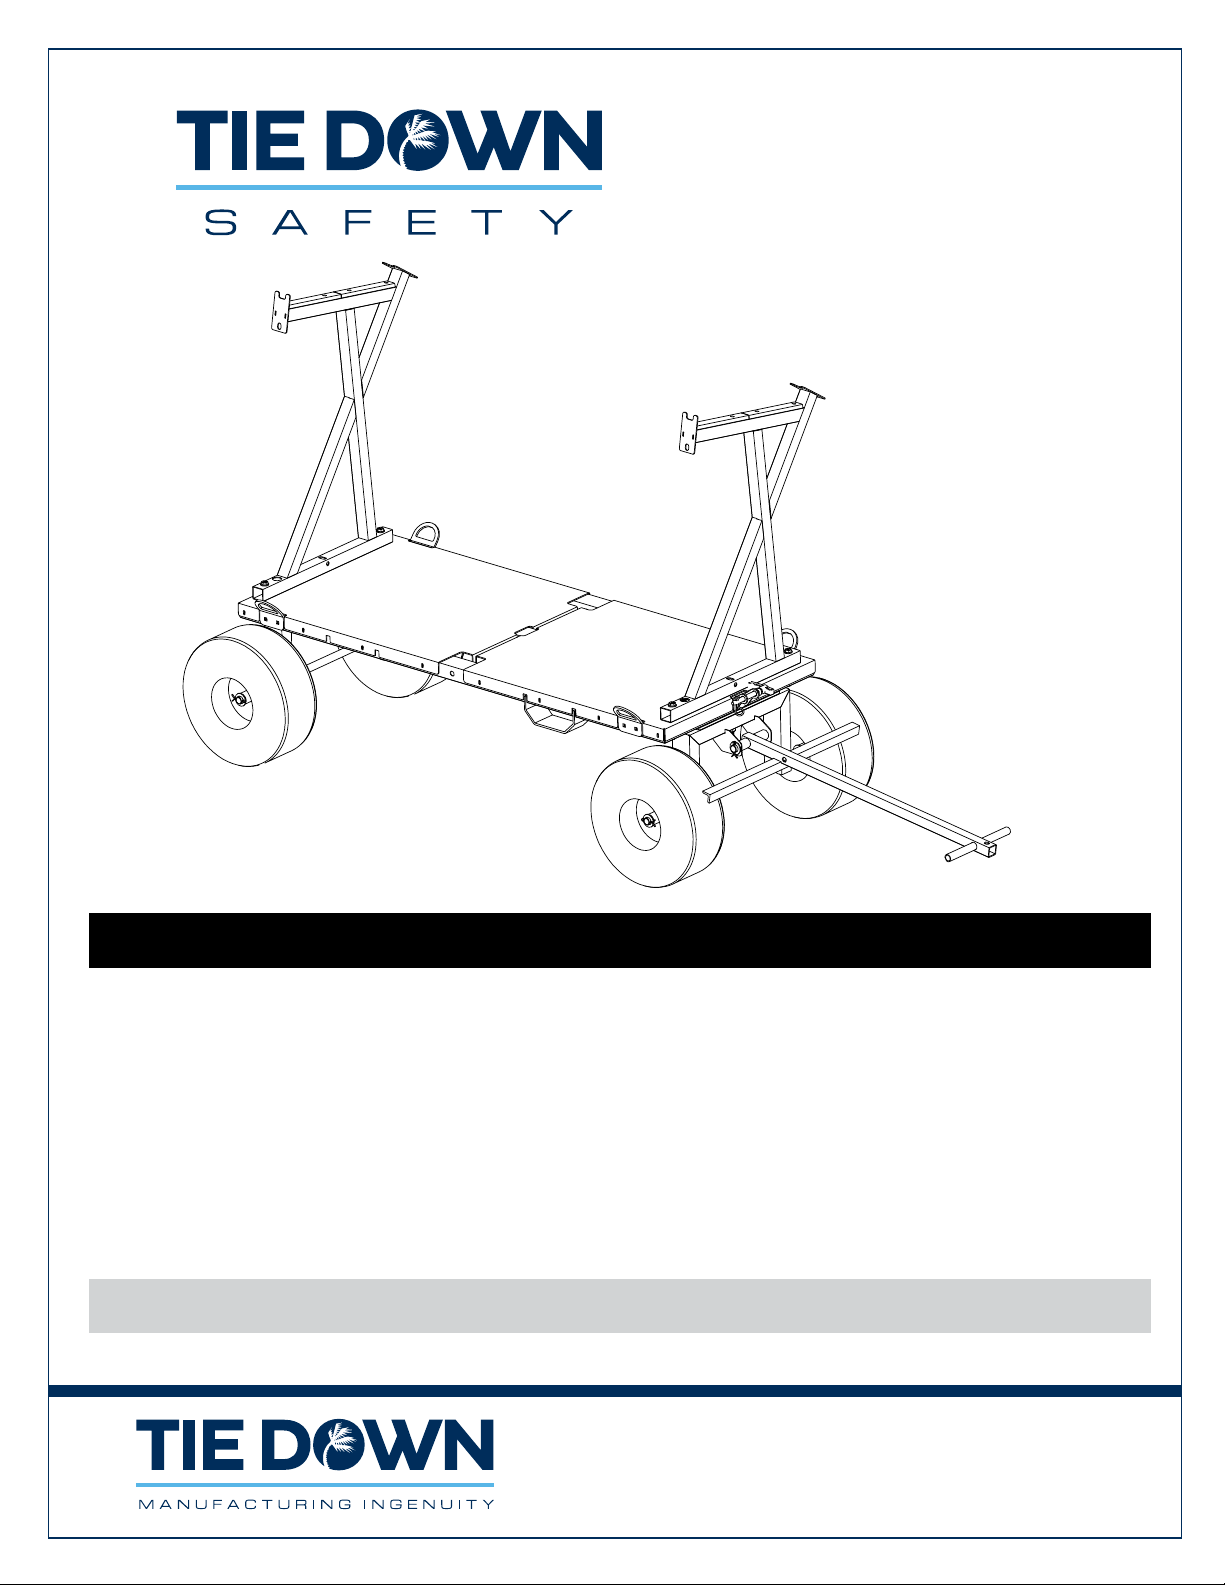
Guardrail Tranzcart
Assembly Instructions
Model 65049
If you have damaged or missing parts, call Customer Service: 404-344-0000
Instructions #08323 (E1683 - Rev. 1/10/20)
TIE DOWN Roong Products Division
800-241-1806 • 404-344-0000 • www.tiedown.com
2
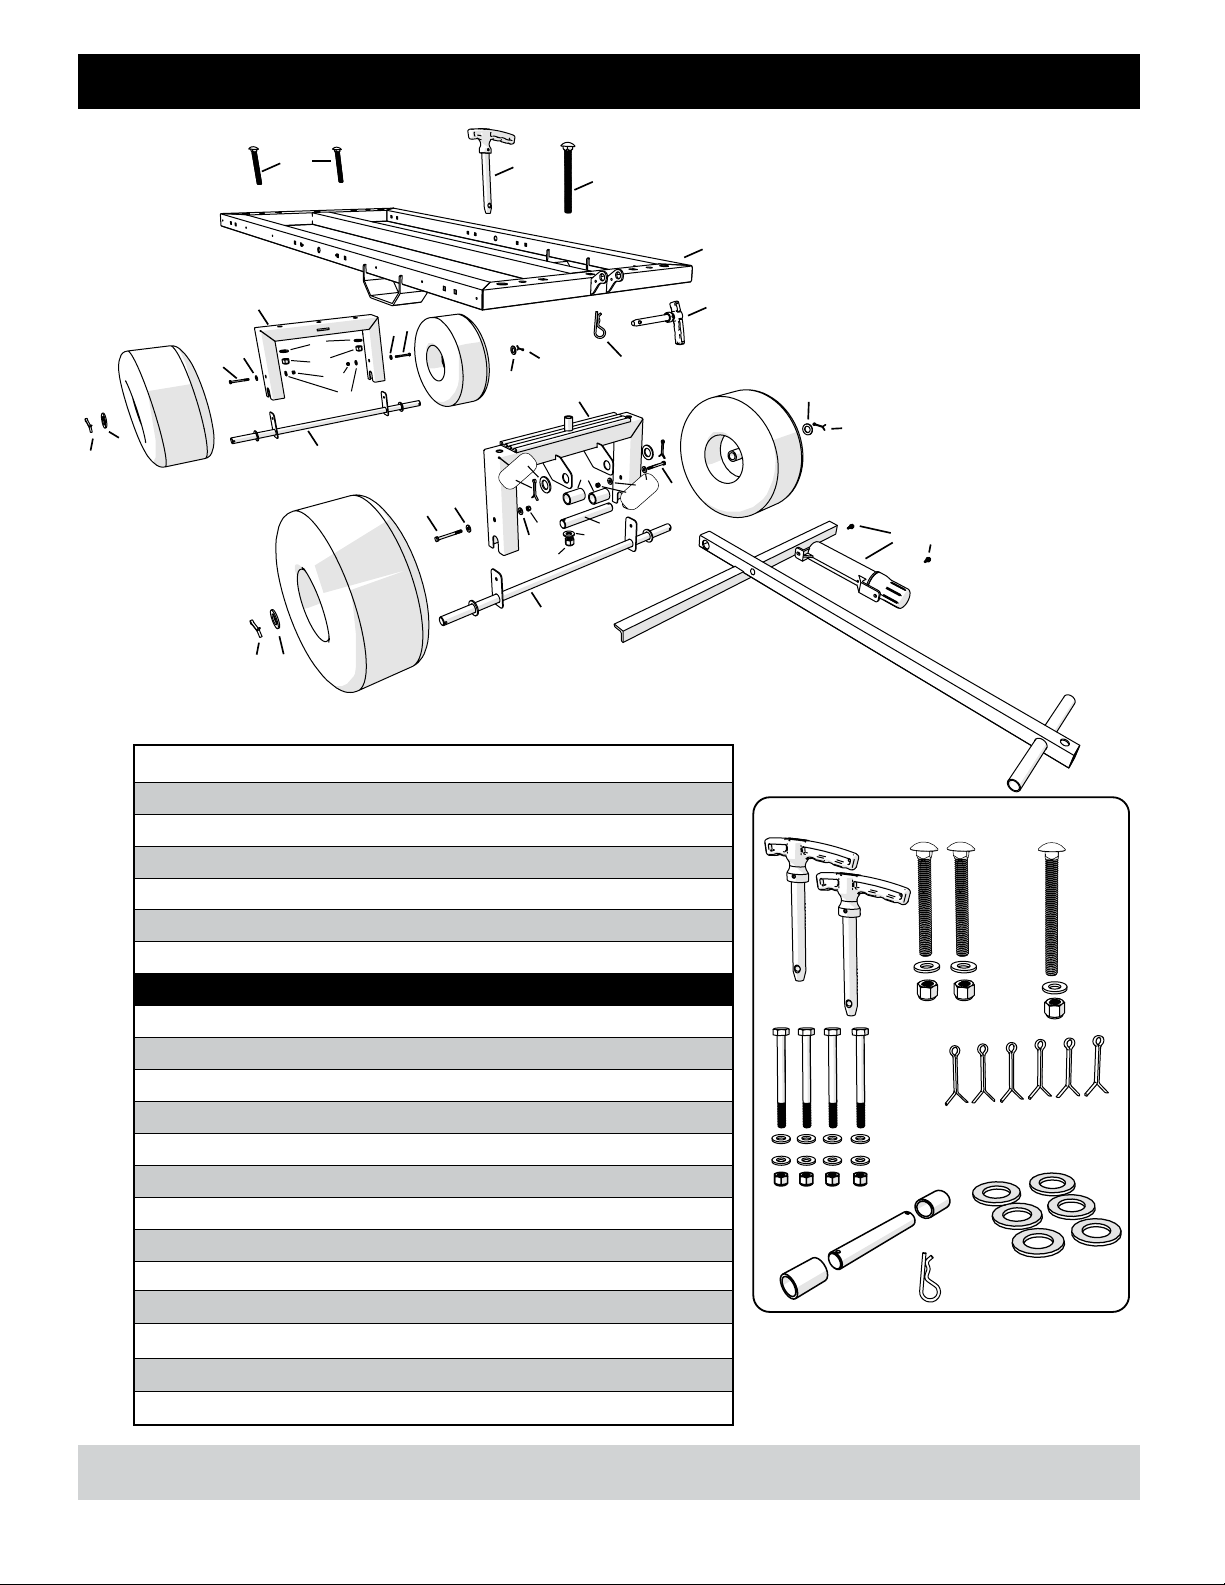
Roofing Cart (Box 1) - Parts List
1
3
12
13
14
6
7
8
4
5
9
9
11
910
11
11
911
10
10 13
11
7
8
11
12
17
16
2
18
15
15
19
See Note
46
6
6
7
8
87
87
# Part # Description Qty. ✔
1 65027-1 Penetrator Cart Frame 1
2 65027-6 Rear Axle Frame 1
3 65027-2A Front Axle Frame 1
4 65027-5 Axle Assembly 2
5 65027-3 Handle/Brake Assembly 1
6 13844 Flat Free Tire - 18” 4
Hardware Kit #65027-7 (In one box)
7 10520Z Flat Washer - 1” zinc 6
8 10691 Cotter Key - 3/16” x 2” 6
9 10461 Bolt - 1/4-20 x 2.75” Zinc 4
10 10027 Nylock Nut - 1/4”-20 4
11 10028 Washer - 1/4” 8
12 10628 Nyloc Nut - 5/8 -11 zinc Grade 2 3
13 10513Z Flat Washer - 5/8” Zinc 3
14 10455 Carriage Bolt - 5/8x11 x 5” 2
15 70509 Pull Pin - 5/8” x 3” 1
16 65027-3-3 Bushing - Cart Handle 2
17 65018-4-2Z Handle Pin - 1” 1
18 10456 Carriage Bolt - 5/8-11 x 6” 1
19 10604 Safety Pin 1
Hardware Kit #65027-7
15
14
13
12
9
11
10 8
7
16 17
16
19
18
13
12
Note: Instruction Tube is Preinstalled.
Replacement Parts:
Instruction Tube Part #MAX-WT100
Self Tapping Screws (2) Part #10495
If you have damaged or missing parts, call Customer Service: 404-344-0000
If you have damaged or missing parts, call
Customer Service: 404-344-0000
TIE DOWN Roong Products Division
800-241-1806 • 404-344-0000 • www.tiedown.com
3
If you have damaged or missing parts, call Customer Service: 404-344-0000
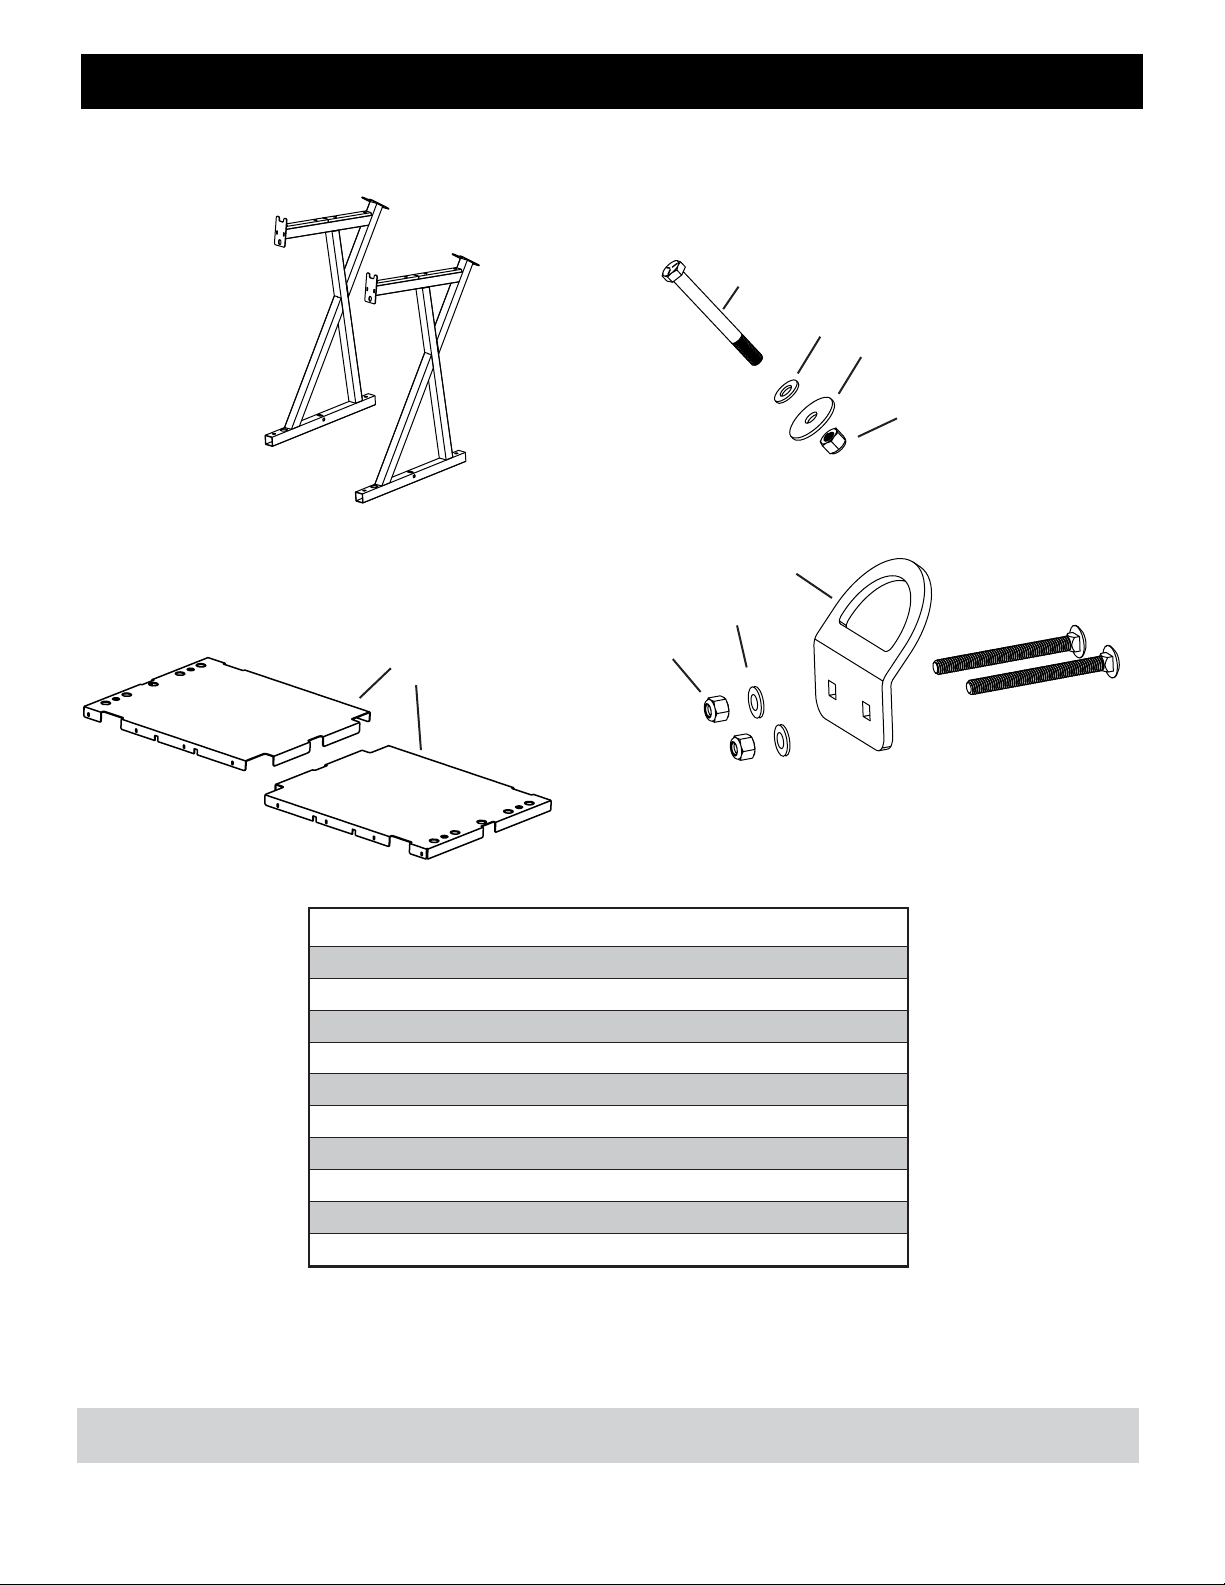
Tranzcart (Box 2) - Parts List
# Part # Description Qty. ✔
A 70834 Guardraill Brackets 2
B 13128 Hex Head Bolt 4
C 10527 Washer 4
D 70834-1-7 Washer 4
E CT-34-00361-15 Hex Head Nut 4
F 65031 Tread Bite Plates 2
G 10627 Nyloc Nuts 8
H 10841 Washers 8
I 65027-1-5 Lifting Ring 4
J 10454 Carriage Bolts 8
A
B
CD
E
FGH
I
J

TIE DOWN Roong Products Division
800-241-1806 • 404-344-0000 • www.tiedown.com
4
Axle Assembly (#4)
Rear Axle Frame
Carriage Bolt (#14)
Flat Washer (#13)
Nyloc Nut (12)
Front Axle Frame
Cart Assembly (#1)
Axle Assembly (#4)
1/4” Bolt
(#9) 1/4” Nyloc
(#9)
1/4” Washer
(#11)
Rear Axle Frame (#2)
Front Axle Frame (#3)
Carriage Bolt (#18)
Flat Washer (#13)
Instruction Tube
Self Tapping
Screws
Nyloc Nut (12)
1/4” Bolt
(#9)
1/4” Washer
(#11)
1/4” Washer
(#11)
1/4” Nyloc
(#9)
1/4” Washer
(#11)
Axle Assembly (#4)
Rear Axle Frame
Carriage Bolt (#14)
Flat Washer (#13)
Nyloc Nut (12)
Front Axle Frame
Cart Assembly (#1)
Axle Assembly (#4)
1/4” Bolt
(#9) 1/4” Nyloc
(#9)
1/4” Washer
(#11)
Rear Axle Frame (#2)
Front Axle Frame (#3)
Carriage Bolt (#18)
Flat Washer (#13)
Instruction Tube
Self Tapping
Screws
Nyloc Nut (12)
1/4” Bolt
(#9)
1/4” Washer
(#11)
1/4” Washer
(#11)
1/4” Nyloc
(#9)
1/4” Washer
(#11)
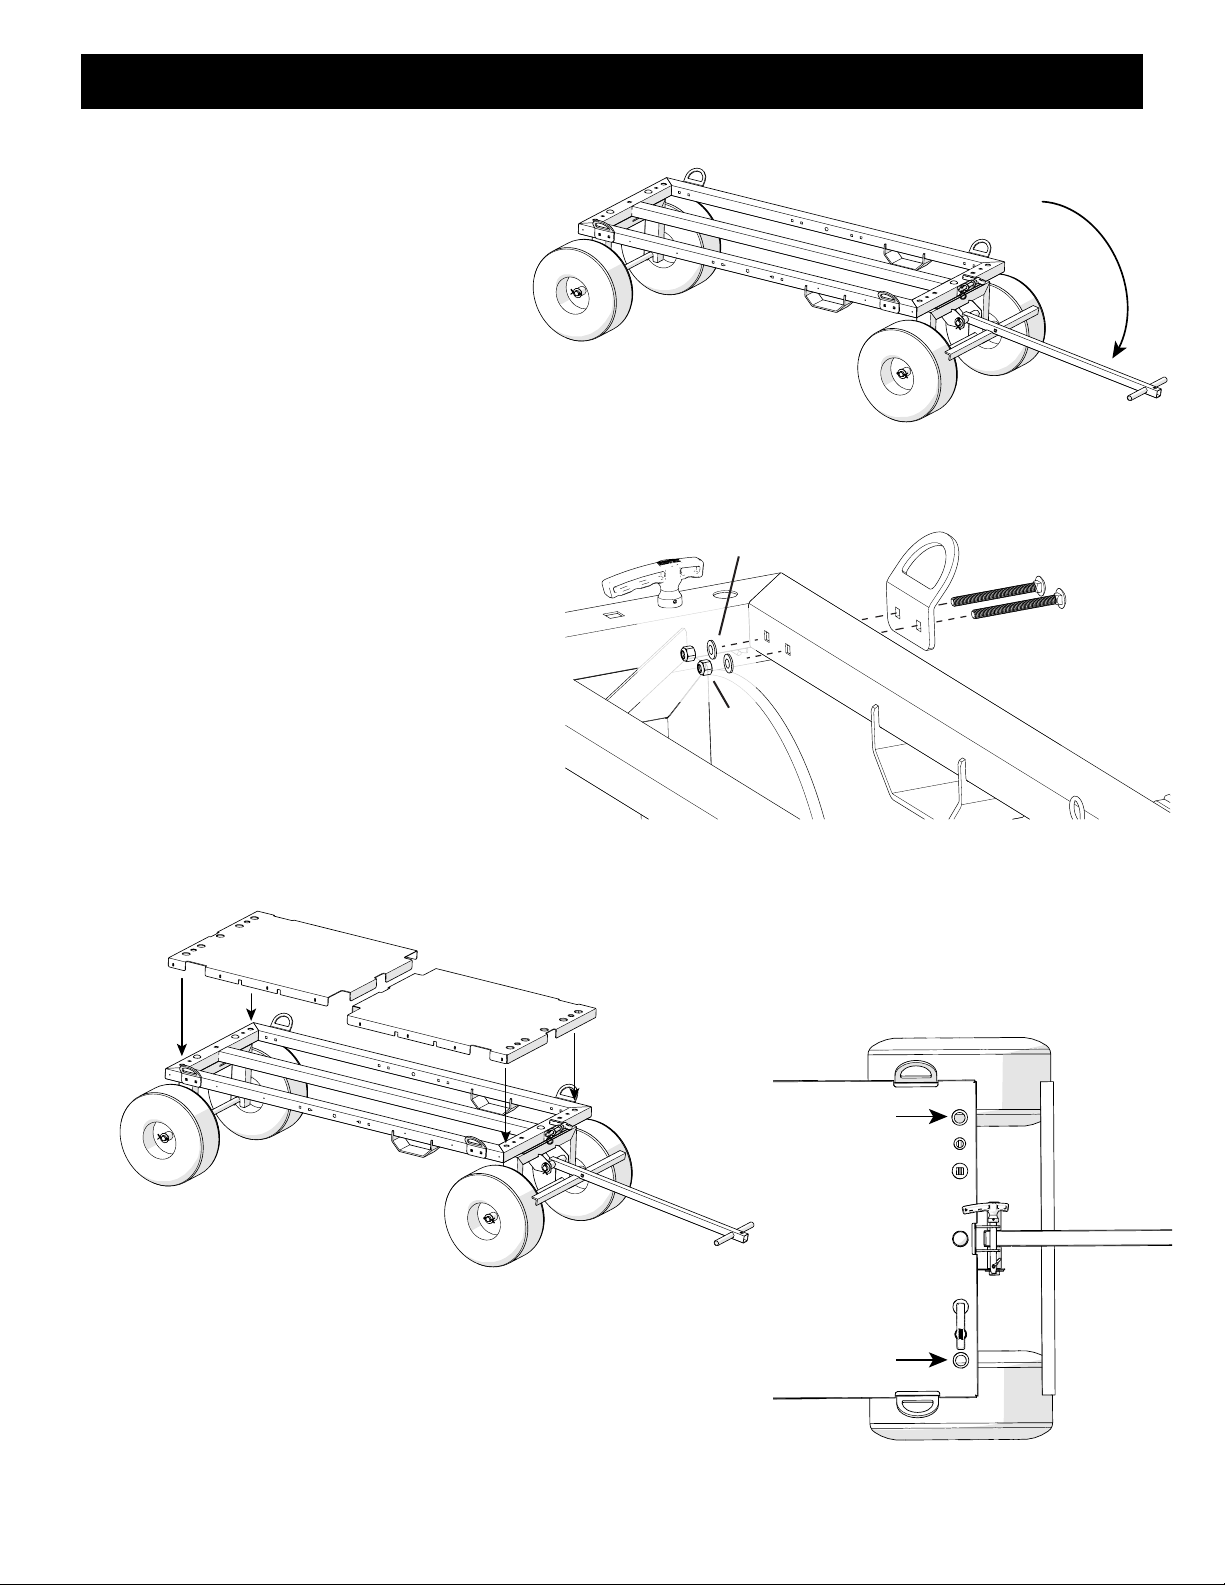
Step 3
Lift the rear cart frame (may require two people).
Align the mounting holes with the axle and cart frame.
Insert carriage bolts through cart frame and axle frame.
Attach with washers and nyloc nuts.
Use a 15/16”socket wrench to tighten the nuts/bolts.
Step 4
Lift the front cart frame (may require two people). Align the
center mounting hole with the axle and cart frame.
Insert carriage bolt through cart frame and axle frame,
attach with washer and nyloc nut.
Use a 15/16” socket wrench on the nut/bolt and tighten to
35 ft. lbs.
Counter rotate 1/4 turn. Rotate the axle frame making sure
that it turns freely.
Roof Cart Assembly
Axle Assembly (#4)
Rear Axle Frame
Carriage Bolt (#14)
Flat Washer (#13)
Nyloc Nut (12)
Front Axle Frame
Cart Assembly (#1)
Axle Assembly (#4)
1/4” Bolt
(#9) 1/4” Nyloc
(#9)
1/4” Washer
(#11)
Rear Axle Frame (#2)
Front Axle Frame (#3)
Carriage Bolt (#18)
Flat Washer (#13)
Instruction Tube
Self Tapping
Screws
Nyloc Nut (12)
1/4” Bolt
(#9)
1/4” Washer
(#11)
1/4” Washer
(#11)
1/4” Nyloc
(#9)
1/4” Washer
(#11)
Axle Assembly (#4)
Rear Axle Frame
Carriage Bolt (#14)
Flat Washer (#13)
Nyloc Nut (12)
Front Axle Frame
Cart Assembly (#1)
Axle Assembly (#4)
1/4” Bolt
(#9) 1/4” Nyloc
(#9)
1/4” Washer
(#11)
Rear Axle Frame (#2)
Front Axle Frame (#3)
Carriage Bolt (#18)
Flat Washer (#13)
Instruction Tube
Self Tapping
Screws
Nyloc Nut (12)
1/4” Bolt
(#9)
1/4” Washer
(#11)
1/4” Washer
(#11)
1/4” Nyloc
(#9)
1/4” Washer
(#11)
Step 1
Slide the axle assemblies onto the front/rear axle frames.
The axle brackets will be on the outside of the axle frames.
Attach the axle to the frame with 1/4” bolt, washer and
nyloc nut.
Step 2
Lay the cart frame flat on hard ground.
Position axle frames front and back
of the cart.
The axle frames will stand on their own.
TIE DOWN Roong Products Division
800-241-1806 • 404-344-0000 • www.tiedown.com
5
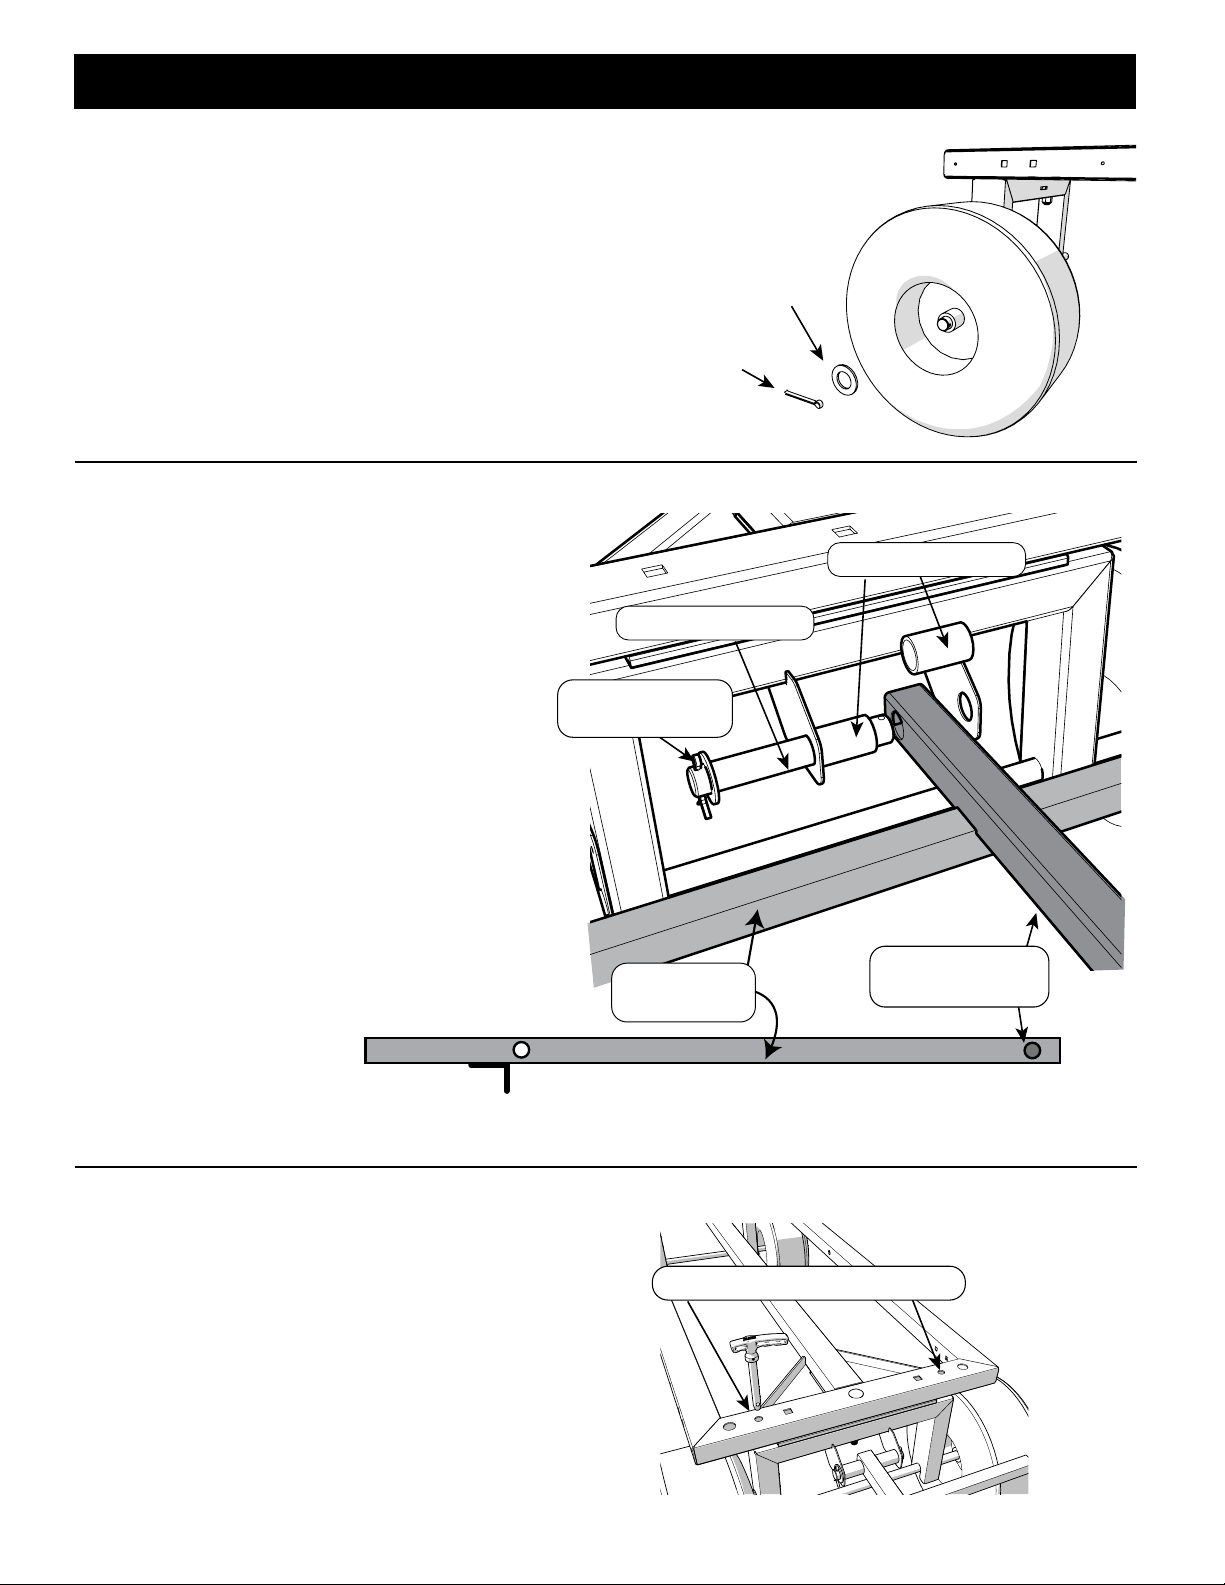
Roof Cart Assembly
Step 7
Flat Washer (#7)
Cotter Key
(#8)
Cotter Key &
Washer (#8/#7)
Handle/Brake
Assembly (#5)
IMPORTANT: Side view of the handle brake assembly with the wheel brake bar (on the bottom side).
Steering Lock Position Holes
Handle Pin (#17)
Bushings (#16)
Wheel Brake
Bar
Step 7
Flat Washer (#7)
Cotter Key
(#8)
Cotter Key &
Washer (#8/#7)
Handle/Brake
Assembly (#5)
IMPORTANT: Side view of the handle brake assembly with the wheel brake bar (on the bottom side).
Steering Lock Position Holes
Handle Pin (#17)
Bushings (#16)
Wheel Brake
Bar
Step 7
Flat Washer (#7)
Cotter Key
(#8)
Cotter Key &
Washer (#8/#7)
Handle/Brake
Assembly (#5)
IMPORTANT: Side view of the handle brake assembly with the wheel brake bar (on the bottom side).
Steering Lock Position Holes
Handle Pin (#17)
Bushings (#16)
Wheel Brake
Bar
Step 5
Lift the front or the rear cart (may require two people).
Slide the flat free tires onto the axle.
Install a washer over the axle shaft, insert cotter key
through the axle mounting hole.
Split the cotter key securing the tire to the axle frame.
Repeat for all four tires.
Step 6
Install and split open cotter key on ONE end of the
handle pin (#17), slide on ONE washer.
Insert the handle pin through the handle guide
bracket on the front axle. Slide one bushing over
the handle pin.
Position the handle assembly so the wheel brake
bar is located on the bottom.
Align the handle assembly with the handle pin/
bushing.
Slide the handle pin with bushing through the
handle assembly tube while aligning the second
bushing with the handle pin.
Once the handle pin is aligned with the second
bushing, slide the entire assembly through the
opposite handle guide bracket. Slide on a flat
washer, install and split open the cotter key.
Step 7
The Penetrator Roofing Cart has the option of locking the
steering with a pull pin (both sides).
To lock the front steering: place the pull pin into the smaller
inside round hole.
TIE DOWN Roong Products Division
800-241-1806 • 404-344-0000 • www.tiedown.com
6
Tranzcart Assembly
Carriage Bolts
(J)
Lifting Ring
(I)
Washers
(H)
Nyloc Nuts
(G)
Tread Plates
(F)
Tread Plates
(F)
Lower Steering
Handle
Tread Plates
(F)
Tread Plates
(F)
Lower Steering
Handle
Step 1
Lower the steering handle to apply brake.
The Tranzcart will not move when the
brake in applied.
Step 2
Install lifting ring and mounting bracket.
Using provided hardware, insert carriage bolts
through the lifting ring and the Tranzcart frame.
Place washers over the carriage bolts.
Tighten nyloc nuts to secure lifting rings
to the tranzcart.
Repeat for each lifting ring.
Step 3
Align and place tread plates over the Tranzcart
frame as shown right.
Make sure the mounting holes are it alignment.
TIE DOWN Roong Products Division
800-241-1806 • 404-344-0000 • www.tiedown.com
7
Tranzcart Assembly
Carriage Bolt
(B)
1/2” Washer
(C)
Wide Washer
(D)
Nyloc Nut
(E)
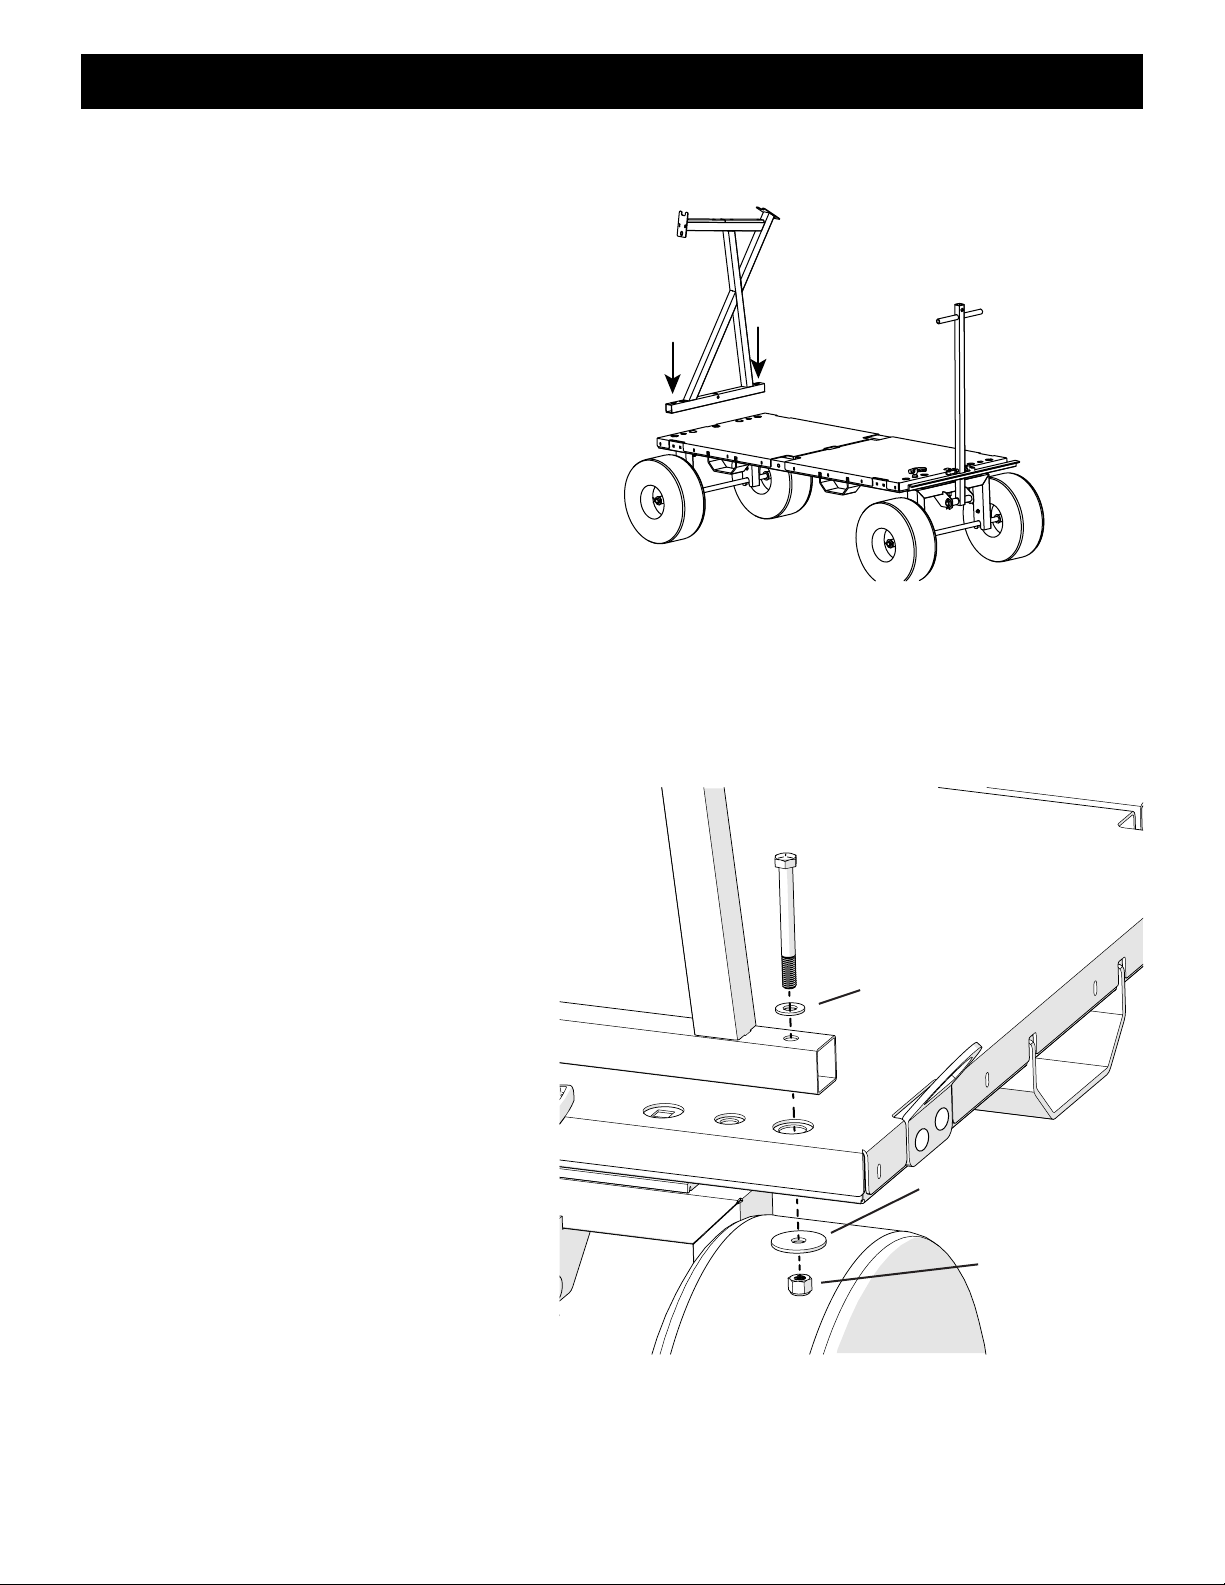
Step 4
Align the Guardrail Bracket with the mounting
holes. The holes will match up with the mounting
holes on the cart.
Step 5
Place the 1/2” washer over the 1/2” hex
head bolt.
Pass it through the Guardrail Bracket and
the roofing cart.
Place the larger washer over the bolt and
finish with the nyloc nut.
Do not tighten, leave it loose until the other
side bolt assembly is completed.

Roong Products Division
605 Stonehill Drive SW, Atlanta, Georgia 30336
800-241-1806 • 404-344-0000 • www.tiedown.com
ISO 9001:2015 Certication
Intellectual property of TIE DOWN Inc. ©2018 TIE DOWN, Inc.
Instruction #08323 (E1683 Rev. 1/10/20)
Step 6
Repeat Step 5 for the opposite side bolt
assembly. Once both bolts are installed,
tighten both nuts.
Step 7
Repeat Steps 5 & 6 for the remaining
guardrail bracket.
NOTE
When not in use, secure the handle in
in the up position. Use the pull pin to lock the
handle. Secure the pull pin with the safety clip.
Tranzcart Assembly
Pull Pin
Safety
Clip
Other TIE DOWN Outdoor Cart manuals

Popular Outdoor Cart manuals by other brands


Carts Vermont
Carts Vermont 20 manual

Westward
Westward 2CZY4 Operating instructions and parts manual

Numatic
Numatic EcoMatic EM-5 Assembly

Bosch
Bosch XL-Cart Operating/safety instructions

Tennsco
Tennsco Modular Cart Top Component Assembly Assembly Instructions/Parts Manual

Clam
Clam POLAR TRAILER HD MAX manual


