Tie National Speco NS Series User manual
Speco User Guide v.1.2 Tie National, LLC www.TieNational.com
1
Contact us at 630.301.7444 or Visit us on the web at www.TieNational.com
USER GUIDE
Attention to
Detail!
We understand the unique needs of our
customers and customize services to help
them to efciently and economically run
their business.
Other Audio/Visual services and
products include:
»SOUND MASKING
Reduce background noise and increase
privacy with small emitters that t in any
layout.
»DIGITAL SIGNAGE
A greener way to communicate and
entertain your customers or to deliver
event information to your employees.
»TIE’S SOUND SUITE
A packaged solution featuring Music on
Hold and Background Music, is easily
customized and programmed through TIE’s
online portal.
Call us today and let us design a
solution for your Audio/Visual
needs.
Contact Us
Page 1 Your Nationwide Technology Partner.
Overview of the NS Series NVR Unit
Page 2 NVR Unit
Network Access: Web-Browser Viewer
Page 2 Connect
Page 3 Main Screen (as shown in Live View)
Page 4 Single Camera View
Page 4 Search, Playback, and Export
Page 5 Password Reset
Network Access: Mobile Devices
Page 6 iPhone/iPad
Page 6 Android
Speco Technologies NVR
(featuring Speco’s NS series Network Video Recorder)
Table of Contents
(in order of appearance)
Please contact us if you have any questions.
Tie National, LLC
630.301.7444
www.TieNational.com
Contact Us
Your Nationwide Technology Partner.

Speco User Guide v.1.2 www.TieNational.com
Tie National, LLC
2
Overview of the NS Series NVR Unit
NVR Unit
Network Access: Web-Browser Viewer
• Your NVR unit has been programmed and installed
to match the needs of your location.
• Please do not make changes to the physical
connections of your unit without the guidance of a
Tie National, LLC (TIE) engineer.
Connect
Compatible with Internet Explorer, Chrome, Firefox and Safari.
1. In the address bar, enter the IP address provided at the time of installation followed by :6100 (gure 1.1). The browser
will automatically add /web_viewer2.html to the end upon hitting enter. To retrieve the IP address and port number at
anytime, contact TIE’s Help Desk at 630.301.7444.
If prompted, install associated add-ins using default settings and restart from Step 1.
2. Click the Connect button located on the upper left hand corner of the window
(gure 1.2).
3. Enter elds that appear to connect to the remote system (gure 1.3).
IP Address: (As provided by TIE)
Port No: 5445
The following User ID and Passwords have been setup by default on your
system. After entering, click OK and you will be connected to Live view.
Please visit our website at http://www.tienational.com/resources.html for additional training options.
gure 1.2
gure 1.3
ADMIN
(full administrative
and setup
authorization)
ID: admin
Password: 1234
OWNER
(playback
and recording
authorization)
ID: owner
Password: 1234
USER
(view only access)
ID: user
Password: 1234
Please note that TIE encourages that you change your passwords upon initial
login (see Password Reset) and keep them stored in a secure location. TIE
does not have access to your passwords. Charges may apply for retrieval and/
or or resetting of the Admin password should it be lost which will include the
price for returning the unit for manufacturer reset.
gure 1.1
Speco User Guide v.1.2 Tie National, LLC www.TieNational.com
3
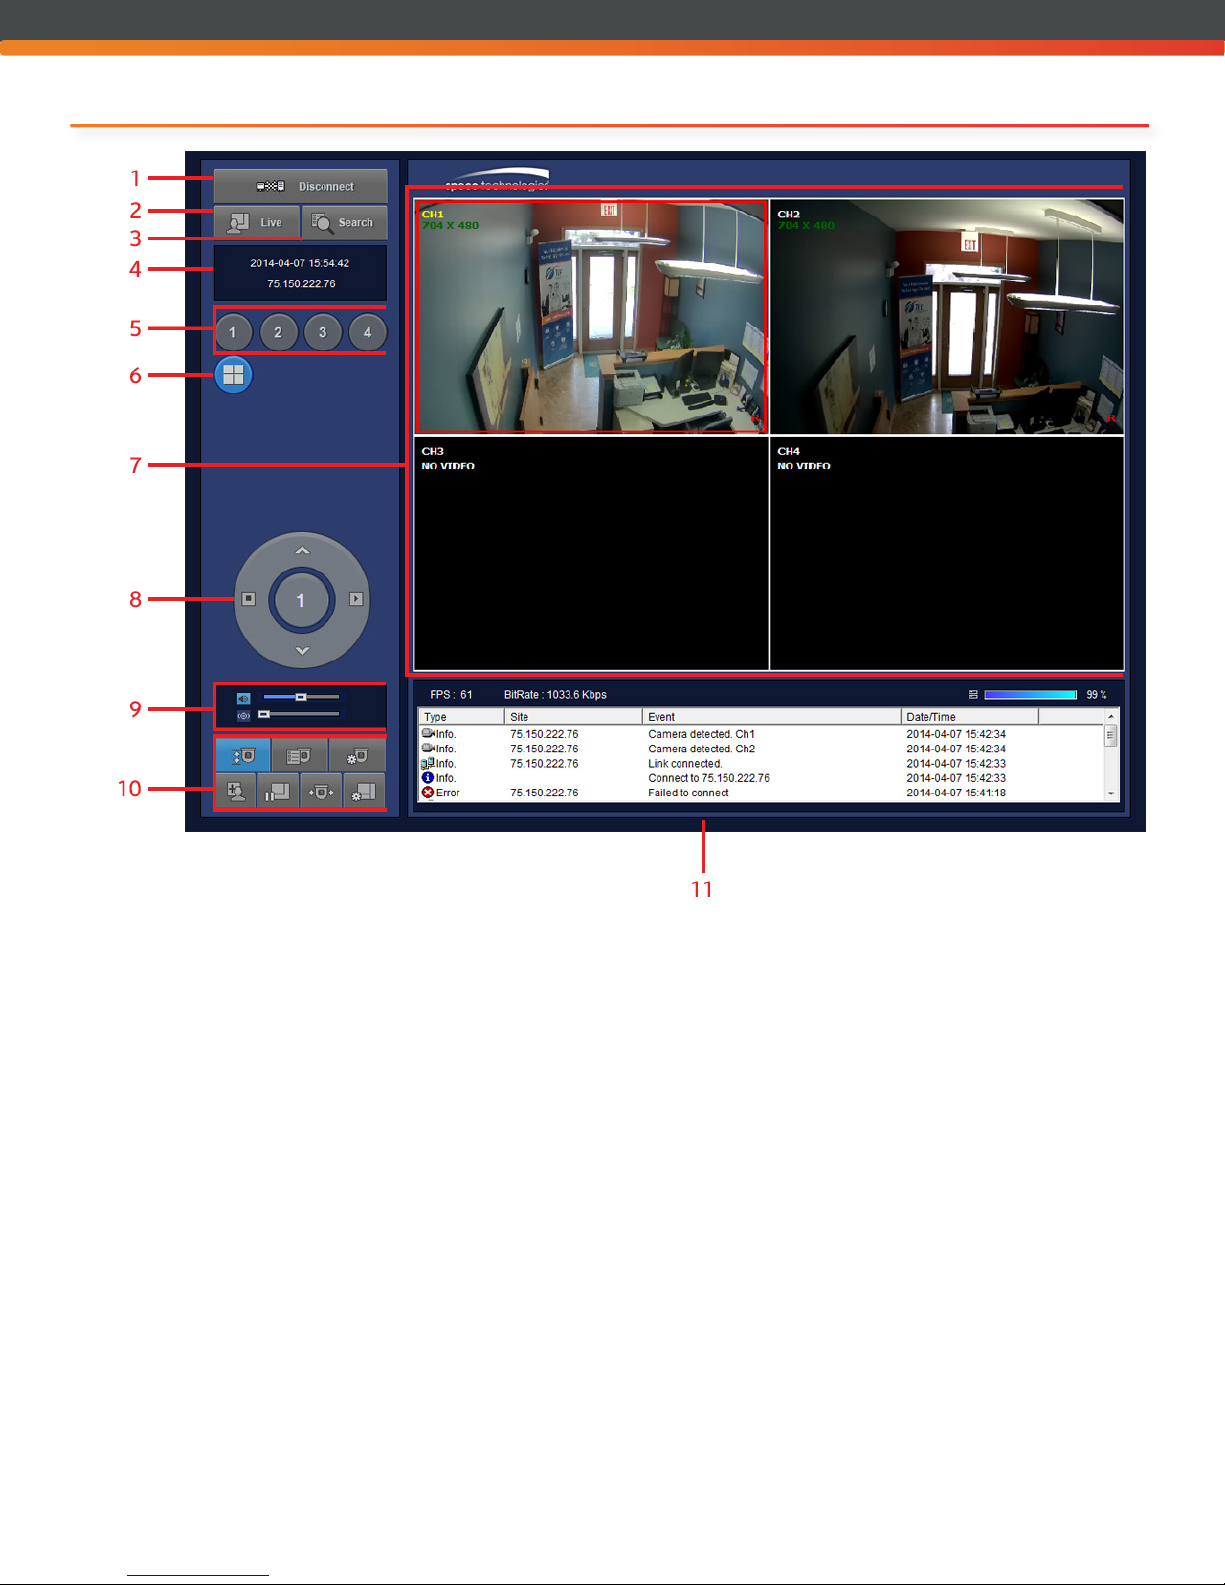
Main Screen (as shown in Live View)
gure 2.1
1. Connect/Disconnect - Connect/Disconnect the
Web-Browser Viewer based on current connection
status.
2. Live - Live viewing of connected surveillance cameras.
3. Search - Playback of recorded footage (see also
Search, Playback and Export).
4. Time/Date/IP - Displays the current date, time, and
connected IP address.
5. Single Camera View - Click to view Single Camera
View of a specic camera. (See also Single Camera
View)
6. Multi-Camera View - Displays multiple cameras at
once.
• From within Multi-Camera View double click any
frame to enter into Single Camera View.
7. Viewer Window - Displays Live and recorded footage
in selected camera view.
8. Selection Dial - Changes functions based on selected
Feature Options.
9. Audio Controls - Audio and volume control.
• Sound and Microphone are on if their
corresponding icons are highlighted.
• When on, move the slider to the left or right to
adjust the volume.
10. Feature Options -Options available based on camera
capabilities. Options (clockwise from top left):
• Auto-Scan
• Tour
• OSD Setup
• Setup (brings up a new window with login)
• Camera Preset
• Pause/Play
• Capture
11. Event Log - History of events since login.
• Click column headers to sort by ascending/
descending for that column.

Speco User Guide v.1.2 www.TieNational.com
Tie National, LLC
4
Single Camera View
Within Single Camera View:
1. To Zoom In/Out - click on the video image and scroll up or down.
2. To Move around while zoomed in - Click, hold and drag on the image to
move. A thumbnail view will appear with a red box highlighting the area
within view (gure 3.1).
gure 3.1
Search, Playback, and Export
1. Click the Search button located on the upper left hand corner of the window (gure 4.1).
2. Select the date to view footage from. Dates with recorded footage will be blue, the
selected date will be bold (gure 4.2).
3. Select from Single Camera View or Multi-Camera View (gure 4.3).
4. Press Play to view recorded footage (gure 4.4).
• To select from thumbnail preview of the start of each hour, click on EZSearch then double click on the thumbnail to
open and return to start of step 4.
5. To export a segment of recorded footage:
• Click on the starting point of the timeline then click on the right facing arrow icon, EZCopy Start located under the
calendar.
• Click on the ending point on the timeline followed by clicking on the left facing arrow icon, EZCopy End.
Both EZCopy icons will be highlighted and the
segmented timeline will turn green. (gure 4.5).
• To export, click on the AVI Backup icon (to the
left of the EZCopy Start icon), choose channel to
export and le path to save to then click OK.
gure 4.1
gure 4.2
gure 4.3
gure 4.4
gure 4.5

Speco User Guide v.1.2 Tie National, LLC www.TieNational.com
5
Password Reset
The Speco Web Setup portal is available using the Admin ID and Password.
1. Select Setup from the Feature Options (gure 2.1) and enter the Admin Password
when prompted (gure 5.1).
2. Click on User Management.
• Authority Setup will show all current users and their level of access (gure 5.2).
Default User IDs and Passwords are found in this User Guide within Network Access: Web-Browser Viewer>
Connect.
Please note that TIE encourages that you change your passwords for these User IDs upon initial login and keep
them stored in a secure location. TIE does not have access to your passwords. Please note that charges may
apply for retrieval and/or or resetting of the Admin password should it be lost which will include the price for
returning the unit for manufacturer reset.
3. Select the applicable User Name from within the drop-down for Password Setup (gure 5.2).
4. Select Change from the drop-down for the Change eld (gure 5.2).
5. Enter the desired new password into the elds for New Password and Conrm Password (gure 5.2).
6. Click Apply (gure 5.2).
Please contact our Help Desk at 630.301.7444 for further assistance within the Speco Web Setup portal.
gure 5.1
gure 5.2
Speco User Guide v.1.2 www.TieNational.com
Tie National, LLC
6
Network Access: Mobile Devices
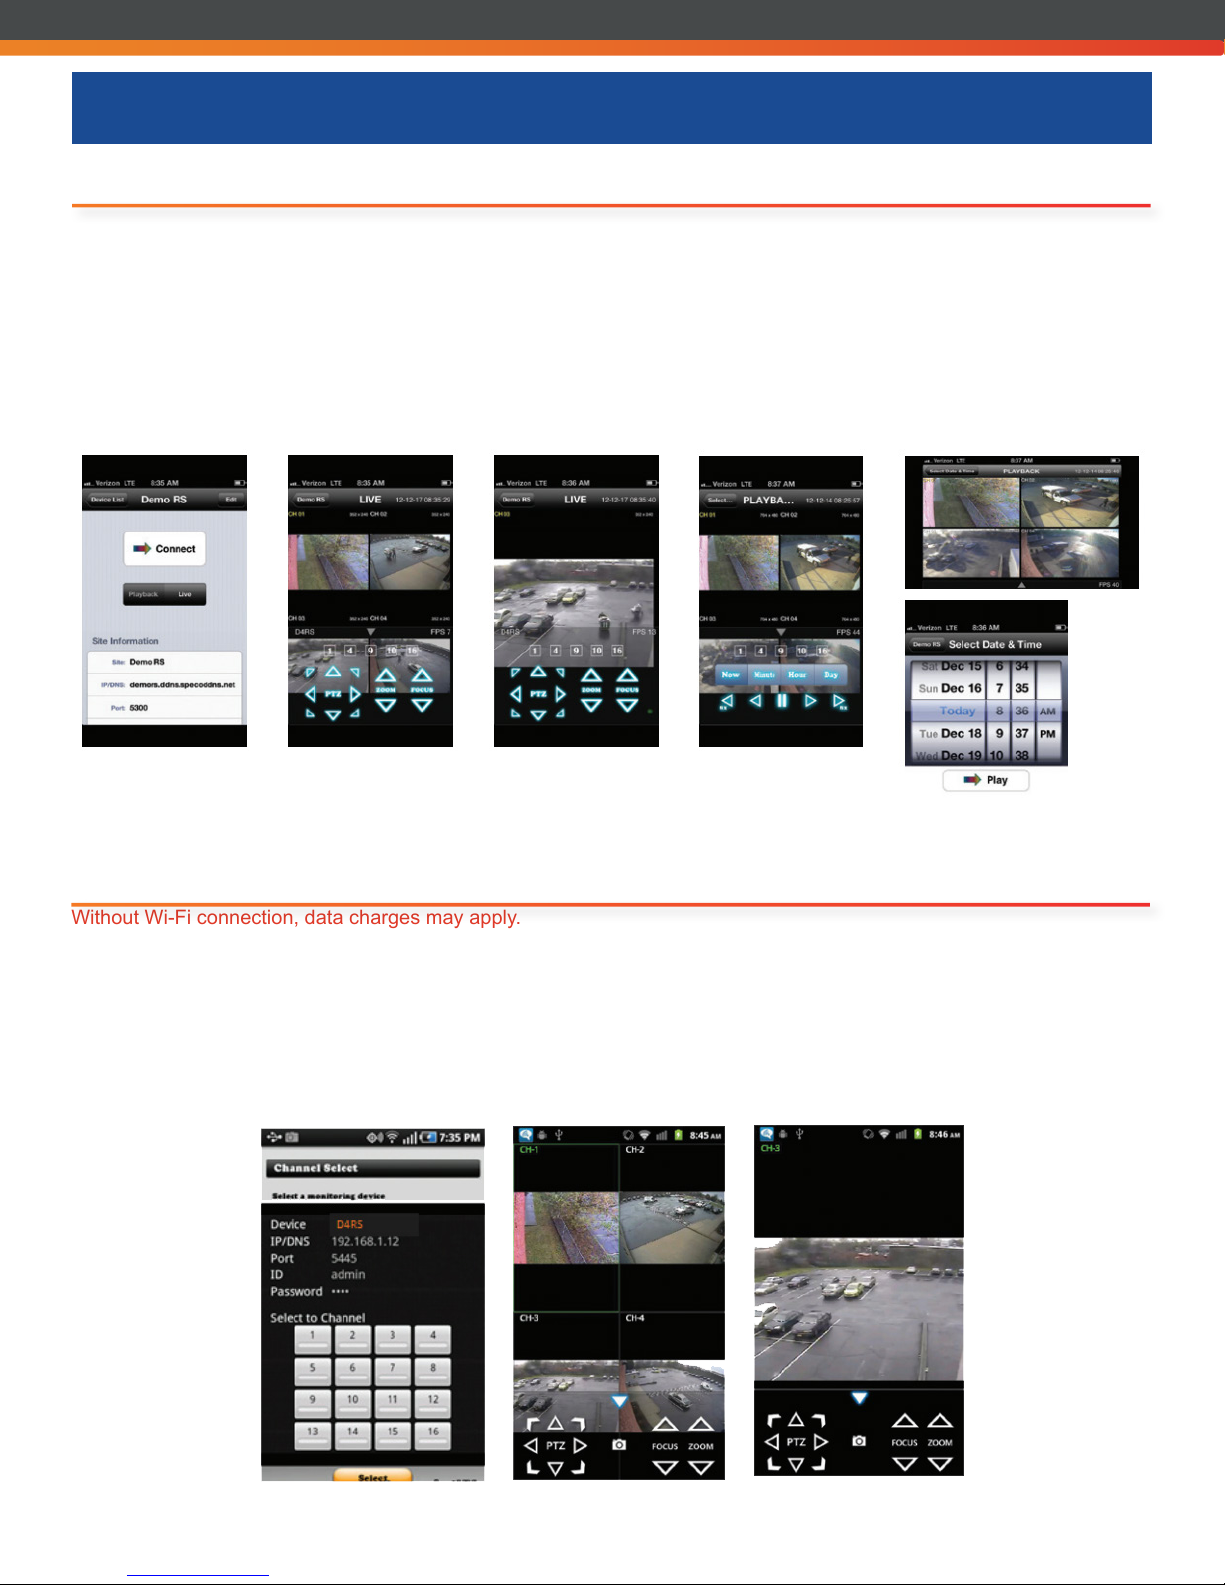
iPhone/iPad
Without Wi-Fi connection, data charges may apply.
1. Search for ‘Speco Player’ in the Apple iTunes Store and install the app.
2. Press (+) on the upper right and enter site information.
3. Click SAVE to save the site information.
4. Select the saved site from “Devices.”
5. Select a channel(s) to view.
6. Select Playback/Live then click CONNECT.
gure 6.1
Android
Without Wi-Fi connection, data charges may apply.
1. Search for ‘Speco Player’ in the Google Play Store and install the app.
2. Select the ADD menu and enter site information.
3. Click ADD to save the site information.
4. Select the saved site from “Devices” for network connection.
5. Select which channels to view and press Live View
6. The app will now display the live streaming video.
gure 6.2
Popular Security System manuals by other brands

Tecnoalarm
Tecnoalarm evolution EV SIREL BWL quick start guide

SMART
SMART TL-5116R Quick start instructions

Spectrum Industries
Spectrum Industries 55416 Assembly instructions

Response
Response CENTURION SCOUT owner's manual

Omni
Omni OMNI-624 Installation and setup guide

Elektrotechnik Schabus
Elektrotechnik Schabus GX-HS operating instructions


Concoa
Concoa 529 5310 Installation and operation instruction

Datakom
Datakom DKM-0224 user manual

Honeywell
Honeywell FBII OMNI 600 user guide

Lorex
Lorex LW2700 SERIES quick start guide

Whelen Engineering Company
Whelen Engineering Company IPS 400 product manual

Energeeks
Energeeks EG-AW004PROMO Quick installation guide