TiLite Anti-Tips User manual

OM_UFAT_0308RevA
USER
FRIENDLY
ANTI-TIPS
OWNERS MANUAL
DEALER/SUPPLIER:
THIS MANUAL MUST BE GIVEN TO THE USER OF THESE ANTI-TIPS.
USER:
BEFORE USING THESE ANTI-TIPS, YOU MUST READ THIS MANUAL IN ITS
ENTIRETY AND SAVE IT FOR FUTURE REFERENCE.
ATTENDANTS/ASSISTANTS:
BEFORE ASSISTING THE USER OF THESE ANTI-TIPS, YOU MUST READ
THIS MANUAL IN ITS ENTIRETY AND SAVE IT FOR FUTURE REFERENCE.

User Friendly Anti-Tip Owners Manual OM_UFAT_0308RevA
USER-FRIENDLY ANTI-TIPS
2
IWARNING - READ THIS MANUAL
DO NOT OPERATE THESE ANTI-TIPS WITHOUT FIRST READING AND UNDERSTANDING THIS OWNERS MANUAL.
IF YOU ARE UNABLE TO UNDERSTAND THE WARNINGS, CAUTIONS AND INSTRUCTIONS, CONTACT YOUR
TiLITE DEALER OR TiLITE CUSTOMER SUPPORT AT (800) 545-2266 BEFORE ATTEMPTING TO USE THESE ANTI-
TIPS. IF YOU IGNORE THIS WARNING, YOU MAY FALL, TIP OVER OR LOSE CONTROL OF THE WHEELCHAIR AND
SERIOUSLY INJURE YOURSELF OR OTHERS OR DAMAGE THE WHEELCHAIR.
IWARNING - WHEELCHAIR SELECTION
TILITE MANUFACTURES A WIDE VARIETY OF WHEELCHAIRS TO MEET THE VARIED NEEDS OF WHEELCHAIR
USERS. HOWEVER, TILITE IS NOT YOUR HEALTH CARE ADVISOR, AND WE KNOW NOTHING ABOUT YOUR
INDIVIDUAL CONDITION OR NEEDS. THEREFORE, THE FINAL SELECTION OF THE PARTICULAR MODEL, AND
HOW IT IS ADJUSTED, AND THE TYPE OF OPTIONS AND ACCESSORIES NECESSARY REST SOLELY WITH YOU,
THE WHEELCHAIR USER, AND THE HEALTH CARE PROFESSIONAL THAT IS ADVISING YOU. CHOOSING THE BEST
CHAIR AND SETUP FOR YOUR SAFETY DEPENDS ON SUCH THINGS AS:
1. YOUR DISABILITY, STRENGTH, BALANCE AND COORDINATION;
2. THE TYPES OF HAZARDS YOU MUST OVERCOME IN DAILY USE (WHERE YOU LIVE AND WORK
AND OTHER PLACES YOU ARE LIKELY TO USE YOUR CHAIR); AND
3. YOUR NEED FOR OPTIONS FOR YOUR SAFETY AND COMFORT (SUCH AS ANTI-TIPS,
POSITIONING BELTS OR SPECIAL SEATING SYSTEMS).
IF YOU IGNORE THIS WARNING, YOU MAY ENDANGER YOUR HEALTH.

OM_UFAT_0308RevA User Friendly Anti-Tip Owners Manual
USER-FRIENDLY ANTI-TIPS
3
IWARNING
Anti-Tips are an optional accessory that can help to prevent your chair from tipping over backward. However, even the use
of anti-tips will not guarantee that your chair will not tip over backward. Also, they will not prevent your chair from tipping
over sideways or forward.
TiLite strongly recommends you use anti-tips with your wheelchair. This is most especially true:
1. if you are a new wheelchair rider; or
2. even if you are an experienced rider but you are switching to a new wheelchair, regardless of whether the prior chair
was as lightweight as your TiLite; or
3. evenifyouareanexperiencedriderinyourTiLitechairbutyouhavemadeanymodicationsoradjustmentstothe
congurationofyourchair,suchaschangingthepositionofthefrontorrearwheels,changingtheseatheight,changing
thecamberorchangingtheseatorbackangle.Anymodicationorchangetoyourchaircanmakeiteasiertotipover
andyoushoulduseanti-tipsuntilyouhaveadaptedtothemodiedconguration;or
4. even if you are an experienced rider in your TiLite chair but your physical condition has changed.
In order to properly use your anti-tips, please follow the following rules:
1. Your anti-tips should be between 1-1/2 inches to 2 inches off the ground when they are locked in place in the “down”
position.
2. If your anti-tips are set too LOW, they may “catch” on obstacles that you can expect to encounter in normal wheelchair
use. If this happens, you may tip over and fall.
3. If your anti-tips are set too HIGH, their ability to prevent a backward tip-over will be limited and they may not prevent a
tip-over at all.
4. ALWAYS keep your anti-tips locked in place in the “down” position unless:
a. You have an attendant (but your attendant must rotate the anti-tips into the “down” position whenever he or she
leaves you unattended in your chair, even for a moment), or
b. You have to climb or descend a curb or step or overcome an obstacle. Even if this is the case, only unlock the anti-
tippers if you can safely climb or descend the curb or step or overcome the obstacle and make sure the anti-
tippers are locked in the “up” position.
IfyouignoretheseWarnings,youmayfall,tipoverorlosecontrolofthewheelchairandseriouslyinjureyourselforothersor
damage the wheelchair.
Note:Theinformationcontainedinthisdocumentissubjecttochangewithoutnotice.AnupdatedversionofthisOwners
Manual may be available at www.tilite.com
SAVE THIS MANUAL FOR FUTURE REFERENCE
User-Friendly Anti-Tips

User Friendly Anti-Tip Owners Manual OM_UFAT_0308RevA
USER-FRIENDLY ANTI-TIPS
4
Figure 1
User Friendly Anti-Tip Congurations
A. ZRA and Aero Z
B. TR, YR, TRA and YRA
C. ZR
D. TX
E. 2GX, Aero X, X, SX, Evo, YG and YGS
(ALL MODELS)
ThecongurationoftheUserFriendlyAnti-TipsvariesamongTiLitechair
models.ThevariouscongurationsareshowninFigure1.
AB
CD
E
OM_UFAT_0308RevA User Friendly Anti-Tip Owners Manual
USER-FRIENDLY ANTI-TIPS
5
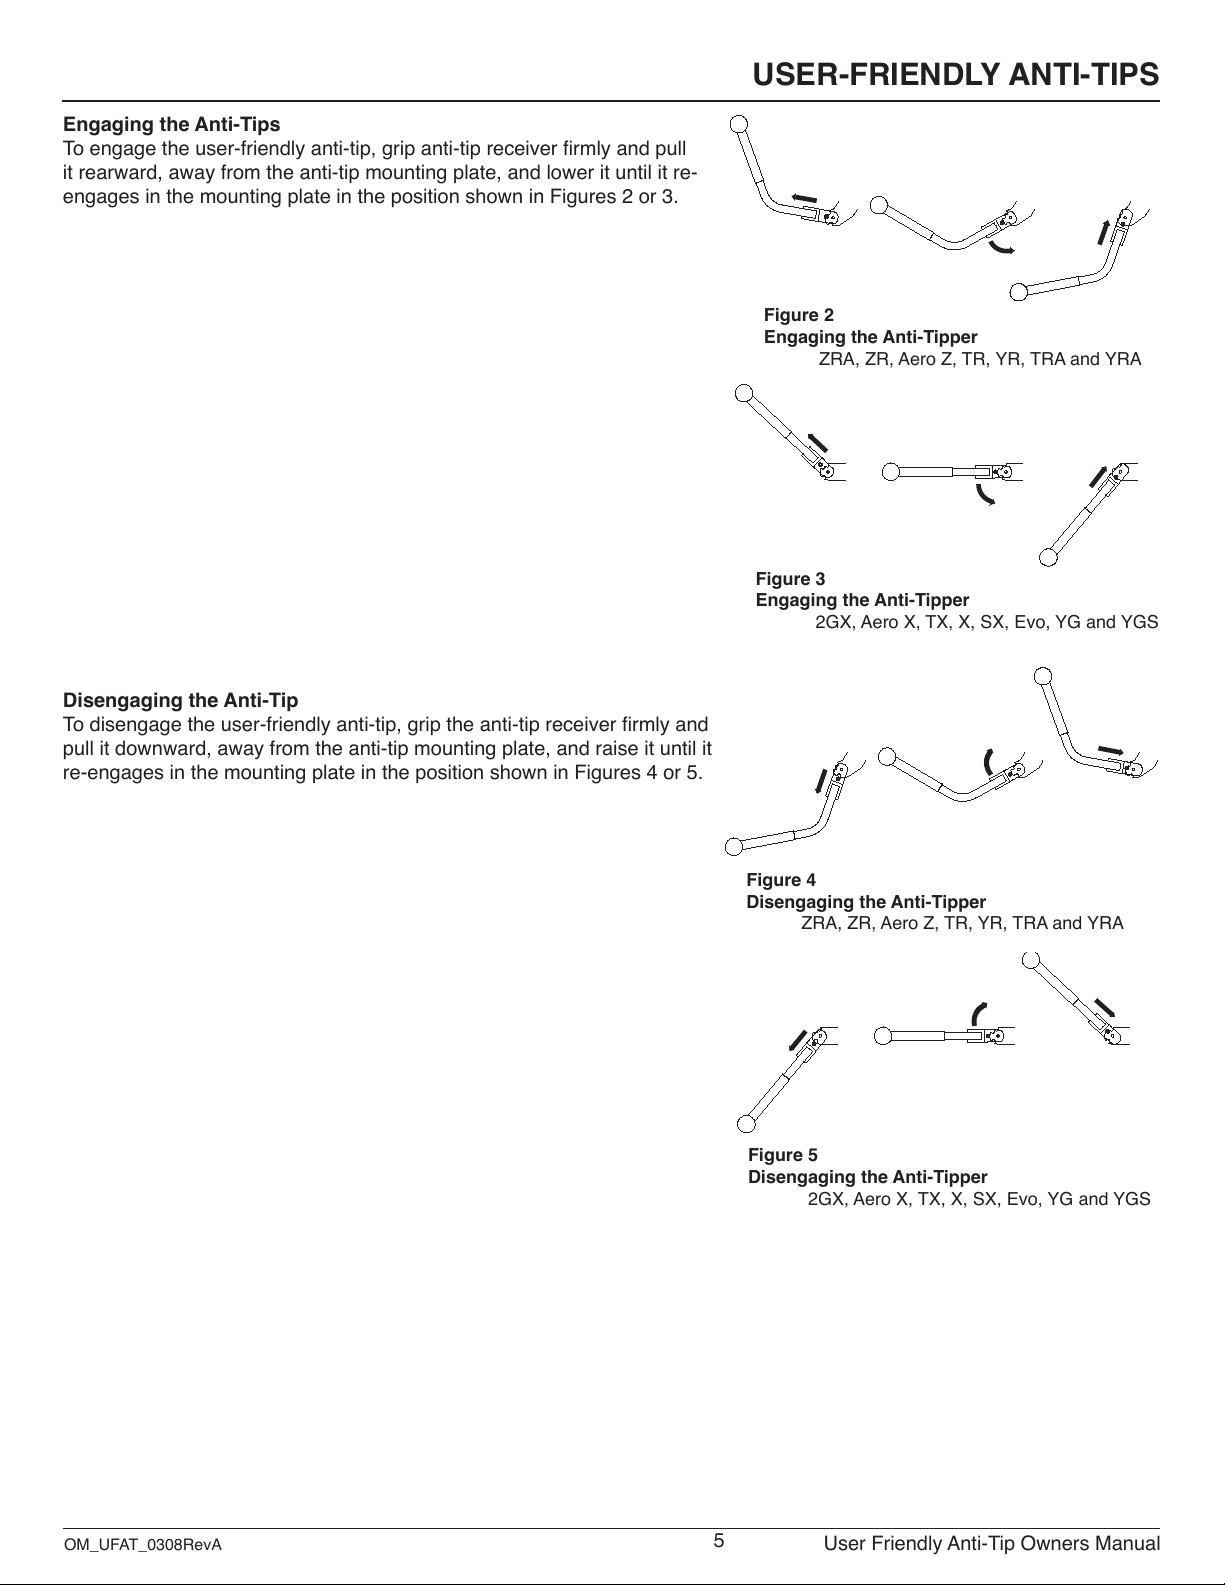
Engaging the Anti-Tips
Toengagetheuser-friendlyanti-tip,gripanti-tipreceiverrmlyandpull
it rearward, away from the anti-tip mounting plate, and lower it until it re-
engages in the mounting plate in the position shown in Figures 2 or 3.
Disengaging the Anti-Tip
Todisengagetheuser-friendlyanti-tip,griptheanti-tipreceiverrmlyand
pull it downward, away from the anti-tip mounting plate, and raise it until it
re-engages in the mounting plate in the position shown in Figures 4 or 5.
Figure 3
Engaging the Anti-Tipper
2GX, Aero X, TX, X, SX, Evo, YG and YGS
Figure 2
Engaging the Anti-Tipper
ZRA, ZR, Aero Z, TR, YR, TRA and YRA
Figure 5
Disengaging the Anti-Tipper
2GX, Aero X, TX, X, SX, Evo, YG and YGS
Figure 4
Disengaging the Anti-Tipper
ZRA, ZR, Aero Z, TR, YR, TRA and YRA

User Friendly Anti-Tip Owners Manual OM_UFAT_0308RevA
USER-FRIENDLY ANTI-TIPS
6
Figure 6
Adjusting the Height/Removing the Anti-Tip
Adjusting the Anti-Tip
Toadjusttheheightoftheuser-friendlyanti-tip,pressthetworelease
buttonsonthetelescopinglowertube,thenadjusttheheightofthelower
tube so that wheel is within 1-1/2” to 2” off the ground. See Figure 6.
Removing the Anti-Tip
To remove the user-friendly anti-tip extension tube, press the release
buttons on the anti-tip receiver and pull the upper extension tube out of
the anti-tip receiver. See Figure 6.
Anti-Tip Receiver
Upper Tube
Lower Tube
Release Buttons
Release Button
Anti-Tip Receiver
Upper Tube
Lower Tube
Release Buttons
Release Button

OM_UFAT_0308RevA User Friendly Anti-Tip Owners Manual
USER-FRIENDLY ANTI-TIPS
7
Mounting the User-Friendly Anti-Tip
(ZRA and Aero Z)
IWARNING
Mounting the user-friendly anti-tip receiver must be performed by
an authorized TiLite dealer or qualied technician.
If you ignore this
warning, you may fall, tip over or lose control of the wheelchair and
seriously injure yourself or others or damage the wheelchair.
IWARNING
Do not disassemble the anti-tip mounting assembly (see Figure 7).
If you ignore this warning, you may fall, tip over or lose control of
the wheelchair and seriously injure yourself or others or damage the
wheelchair.
Tools Needed:
•5/32”AllenWrench
•7/16”OpenEndWrench
1. Remove the rear wheels and place the frame on a level surface.
2.Loosen the Allen Screws that secure the camber tube to the camber
tube mounts and slide the camber tube out of one of the two camber tube
mounts. See Figure 7.
3. Without disassembling the anti-tip mounting plates from the anti-tip
receivers, slide the camber tube through the large hole in both anti-tip
mounting plates.
4. IWARNING: Make sure that the TiLite logo is visible on the
rearward side of the user-friendly anti-tip receivers as shown in
Figure 7 and that the white arrows are all aligned on the opposite
(forward) side of the anti-tip components as shown in Figure 7.
If
you ignore this warning, you may fall, tip over or lose control of the
wheelchair and seriously injure yourself or others or damage the
wheelchair.
5. Reinstall the camber tube. See “Standard Camber Tube—Replacing
the Camber Tube (ZRA and Aero Z)” on pages 55-56 of the TiLite Rigid
Owners Manual.
6. With the wheelchair standing upright on a level surface, engage the
anti-tip as described under “Engaging the Anti-Tip” above.
7. Align the holes and slots on the forward end of the anti-tip mounting
plate with the holes on camber tube mount and insert the two Allen
Screws through the camber tube mount and anti-tip mounting plate.
8. Securely tighten the Allen Screws and Nylock Nuts that secure the anti-
tip mounting plate to the camber tube mount.
9.Adjusttheheightoftheanti-tipasdescribedunder“AdjustingtheAnti-
Tip” above.
Figure 7
Mounting the Anti-Tip to the ZRA and Aero Z
Anti-Tip
Mounting Plate
Nylock Nuts
Camber Tube
Allen Screws
Camber Tube
Mount
User Friendly Anti-Tip Owners Manual OM_UFAT_0308RevA
USER-FRIENDLY ANTI-TIPS
8
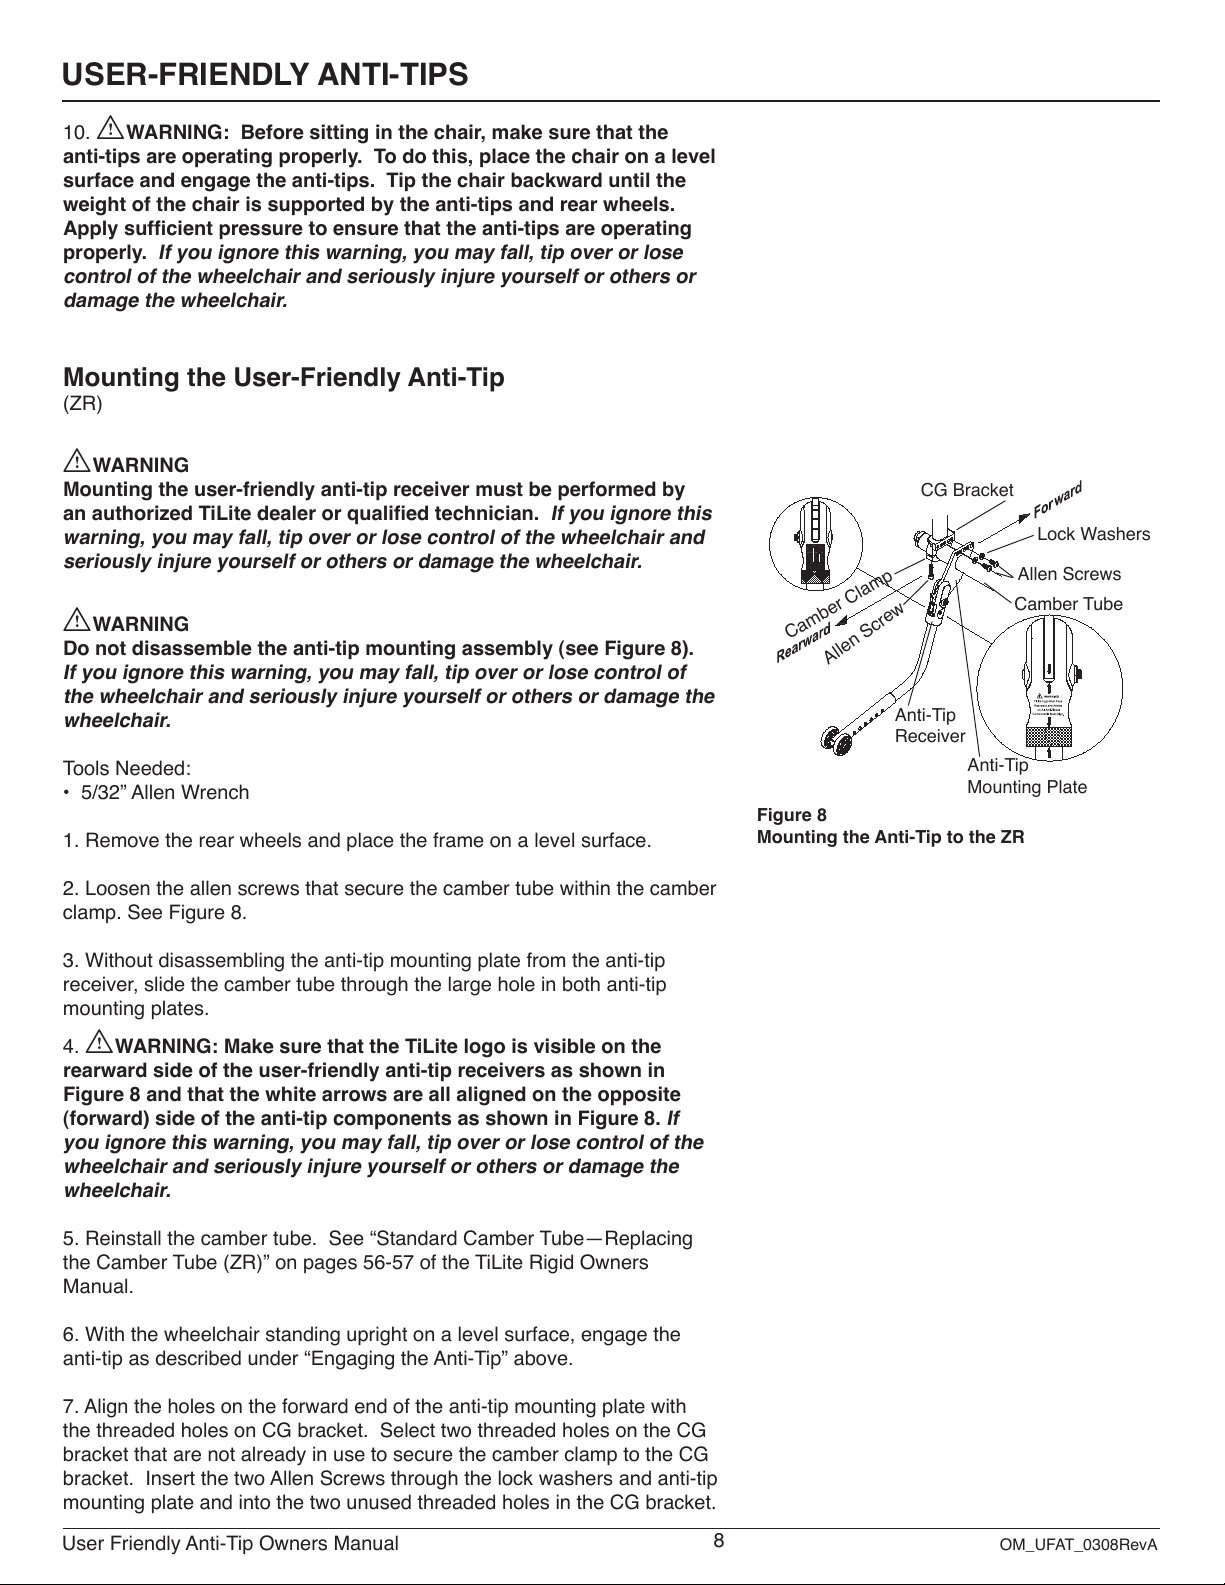
10. IWARNING: Before sitting in the chair, make sure that the
anti-tips are operating properly. To do this, place the chair on a level
surface and engage the anti-tips. Tip the chair backward until the
weight of the chair is supported by the anti-tips and rear wheels.
Apply sufcient pressure to ensure that the anti-tips are operating
properly.
If you ignore this warning, you may fall, tip over or lose
control of the wheelchair and seriously injure yourself or others or
damage the wheelchair.
Mounting the User-Friendly Anti-Tip
(ZR)
IWARNING
Mounting the user-friendly anti-tip receiver must be performed by
an authorized TiLite dealer or qualied technician.
If you ignore this
warning, you may fall, tip over or lose control of the wheelchair and
seriously injure yourself or others or damage the wheelchair.
IWARNING
Do not disassemble the anti-tip mounting assembly (see Figure 8).
If you ignore this warning, you may fall, tip over or lose control of
the wheelchair and seriously injure yourself or others or damage the
wheelchair.
Tools Needed:
•5/32”AllenWrench
1. Remove the rear wheels and place the frame on a level surface.
2. Loosen the allen screws that secure the camber tube within the camber
clamp. See Figure 8.
3. Without disassembling the anti-tip mounting plate from the anti-tip
receiver, slide the camber tube through the large hole in both anti-tip
mounting plates.
4. IWARNING: Make sure that the TiLite logo is visible on the
rearward side of the user-friendly anti-tip receivers as shown in
Figure 8 and that the white arrows are all aligned on the opposite
(forward) side of the anti-tip components as shown in Figure 8.
If
you ignore this warning, you may fall, tip over or lose control of the
wheelchair and seriously injure yourself or others or damage the
wheelchair.
5. Reinstall the camber tube. See “Standard Camber Tube—Replacing
the Camber Tube (ZR)” on pages 56-57 of the TiLite Rigid Owners
Manual.
6. With the wheelchair standing upright on a level surface, engage the
anti-tip as described under “Engaging the Anti-Tip” above.
7. Align the holes on the forward end of the anti-tip mounting plate with
the threaded holes on CG bracket. Select two threaded holes on the CG
bracket that are not already in use to secure the camber clamp to the CG
bracket. Insert the two Allen Screws through the lock washers and anti-tip
mounting plate and into the two unused threaded holes in the CG bracket.
Figure 8
Mounting the Anti-Tip to the ZR
Anti-Tip
Mounting Plate
Anti-Tip
Receiver
Lock Washers
Allen Screws
Camber Tube
CG Bracket
Allen Screw
Camber Clamp

OM_UFAT_0308RevA User Friendly Anti-Tip Owners Manual
USER-FRIENDLY ANTI-TIPS
9
8. Securely tighten the Allen Screws that secure the anti-tip mounting plate
to the CG bracket.
9.Adjusttheheightoftheanti-tipasdescribedunder“AdjustingtheAnti-
Tip” above.
10. IWARNING: Before sitting in the chair, make sure that the
anti-tips are operating properly. To do this, place the chair on a level
surface and engage the anti-tips. Tip the chair backward until the
weight of the chair is supported by the anti-tips and rear wheels.
Apply sufcient pressure to ensure that the anti-tips are operating
properly.
If you ignore this warning, you may fall, tip over or lose
control of the wheelchair and seriously injure yourself or others or
damage the wheelchair
Mounting the User-Friendly Anti-Tip
(TR and YR)
IWARNING
Mounting the user-friendly anti-tip receiver must be performed by
an authorized TiLite dealer or qualied technician.
If you ignore this
warning, you may fall, tip over or lose control of the wheelchair and
seriously injure yourself or others or damage the wheelchair.
IWARNING
Do not disassemble the anti-tip mounting assembly (see Figure 9).
If you ignore this warning, you may fall, tip over or lose control of
the wheelchair and seriously injure yourself or others or damage the
wheelchair.
NOTE: Unless you ordered user-friendly anti-tips when you originally
ordered your TiLite TR or YR, you will need to order replacement Allen
Screws, camber tube mounts and camber tube clamps when ordering
user-friendly anti-tips.
Tools Needed:
•3/16”AllenWrench
1. Remove the rear wheels and place the frame on a level surface.
2. Remove the Allen Screws that secure the camber tube clamps to the
camber mounts. See Figure 9.
3. Loosen the Allen Screws that secure the camber tube within the camber
tube clamps and slide the camber tube clamps off the camber tube.
4. Without disassembling the anti-tip mounting plate from the anti-tip
receiver, slide the camber tube through the large hole in both anti-tip
mounting plates.
5. Reinstall the camber tube clamps onto the camber tube but do not yet
tighten the clamps.
6. Reattach the camber tube clamps and the anti-tip mounting plates to the
camber mounts using the Allen Screws as shown in Figure 9.
Figure 9
Mounting the Anti-Tip to the TR and YR
Anti-Tip
Mounting Plate
Anti-Tip
Receiver
Camber Tube
Camber Mounts
Camber Tube Clamp
Allen Screws

User Friendly Anti-Tip Owners Manual OM_UFAT_0308RevA
USER-FRIENDLY ANTI-TIPS
10
7. IWARNING: Make sure that the TiLite logo is visible on the
rearward side of the user-friendly anti-tip receivers as shown in
Figure 9 and that the white arrows are all aligned on the opposite
(forward) side of the anti-tip components as shown in Figure 9.
If
you ignore this warning, you may fall, tip over or lose control of the
wheelchair and seriously injure yourself or others or damage the
wheelchair.
8. Securely tighten all Allen Screws.
9. Reinstall the rear wheels.
10. With the wheelchair standing upright on a level surface, engage the
anti-tip as described under “Engaging the Anti-tip” above.
11.Adjusttheheightoftheanti-tipasdescribedunder“AdjustingtheAnti-
Tip” above.
12. IWARNING: Before sitting in the chair, make sure that the
anti-tips are operating properly. To do this, place the chair on a level
surface and engage the anti-tips. Tip the chair backward until the
weight of the chair is supported by the anti-tips and rear wheels.
Apply sufcient pressure to ensure that the anti-tips are operating
properly.
If you ignore this warning, you may fall, tip over or lose
control of the wheelchair and seriously injure yourself or others or
damage the wheelchair.
13.Checkthetoe-in/toe-outandadjustasneeded.
Mounting the User-Friendly Anti-Tip
(TRA and YRA)
IWARNING:
Mounting the user-friendly anti-tip receiver must be performed by
an authorized TiLite dealer or qualied technician.
If you ignore this
warning, you may fall, tip over or lose control of the wheelchair and
seriously injure yourself or others or damage the wheelchair.
IWARNING:
Do not disassemble the anti-tip mounting assembly (see Figure 10).
If you ignore this warning, you may fall, tip over or lose control of
the wheelchair and seriously injure yourself or others or damage the
wheelchair.
NOTE: Unless you ordered user-friendly anti-tip when you originally
ordered your TiLite TRA or YRA, you will need to order replacement Allen
Screws when ordering user-friendly anti-tips.
Tools Needed:
•3/16”AllenWrench
1. Remove the rear wheels and place the frame on a level surface.
Figure 10
Mounting the Anti-Tip to the TRA and YRA
Anti-Tip
Mounting Plate
Anti-Tip
Receiver
Camber Tube
Camber Mounts
Camber Tube Clamp
Allen Screws
Axle Plate
OM_UFAT_0308RevA User Friendly Anti-Tip Owners Manual
USER-FRIENDLY ANTI-TIPS
11
2. Remove the Allen Screws that secure the camber tube clamps to the
axle plates and camber mounts. See Figure 10.
3. Loosen the Allen Screws that secure the camber tube within the
camber tube clamps and slide the camber tube clamps off the camber
tube.
4. Without disassembling the anti-tip mounting plate from the anti-tip
receiver, slide the camber tube through the large hole in both anti-tip
mounting plates.
5. Reinstall the camber tube clamps onto the camber tube but do not yet
tighten the clamps.
6. Reattach the camber tube clamps and the anti-tip mounting plates to
the axle plates and camber mounts using the Allen Screws as shown in
Figure 10.
7. IWARNING: Make sure that the TiLite logo is visible on the
rearward side of the user-friendly anti-tip receivers as shown in
Figure 10 and that the white arrows are all aligned on the opposite
(forward) side of the anti-tip components as shown in Figure 10.
If
you ignore this warning, you may fall, tip over or lose control of the
wheelchair and seriously injure yourself or others or damage the
wheelchair.
8. Securely tighten all Allen Screws.
9. Reinstall the rear wheels.
10. With the wheelchair standing upright on a level surface, engage the
anti-tip as described under “Engaging the Anti-Tip” above.
11.Adjusttheheightoftheanti-tipasdescribedunder“AdjustingtheAnti-
Tip” above.
12. IWARNING: Before sitting in the chair, make sure that the
anti-tips are operating properly. To do this, place the chair on a level
surface and engage the anti-tips. Tip the chair backward until the
weight of the chair is supported by the anti-tips and rear wheels.
Apply sufcient pressure to ensure that the anti-tips are operating
properly.
If you ignore this warning, you may fall, tip over or lose
control of the wheelchair and seriously injure yourself or others or
damage the wheelchair.
13.Checkthetoe-in/toe-outandadjustasneeded.
User Friendly Anti-Tip Owners Manual OM_UFAT_0308RevA
USER-FRIENDLY ANTI-TIPS
12
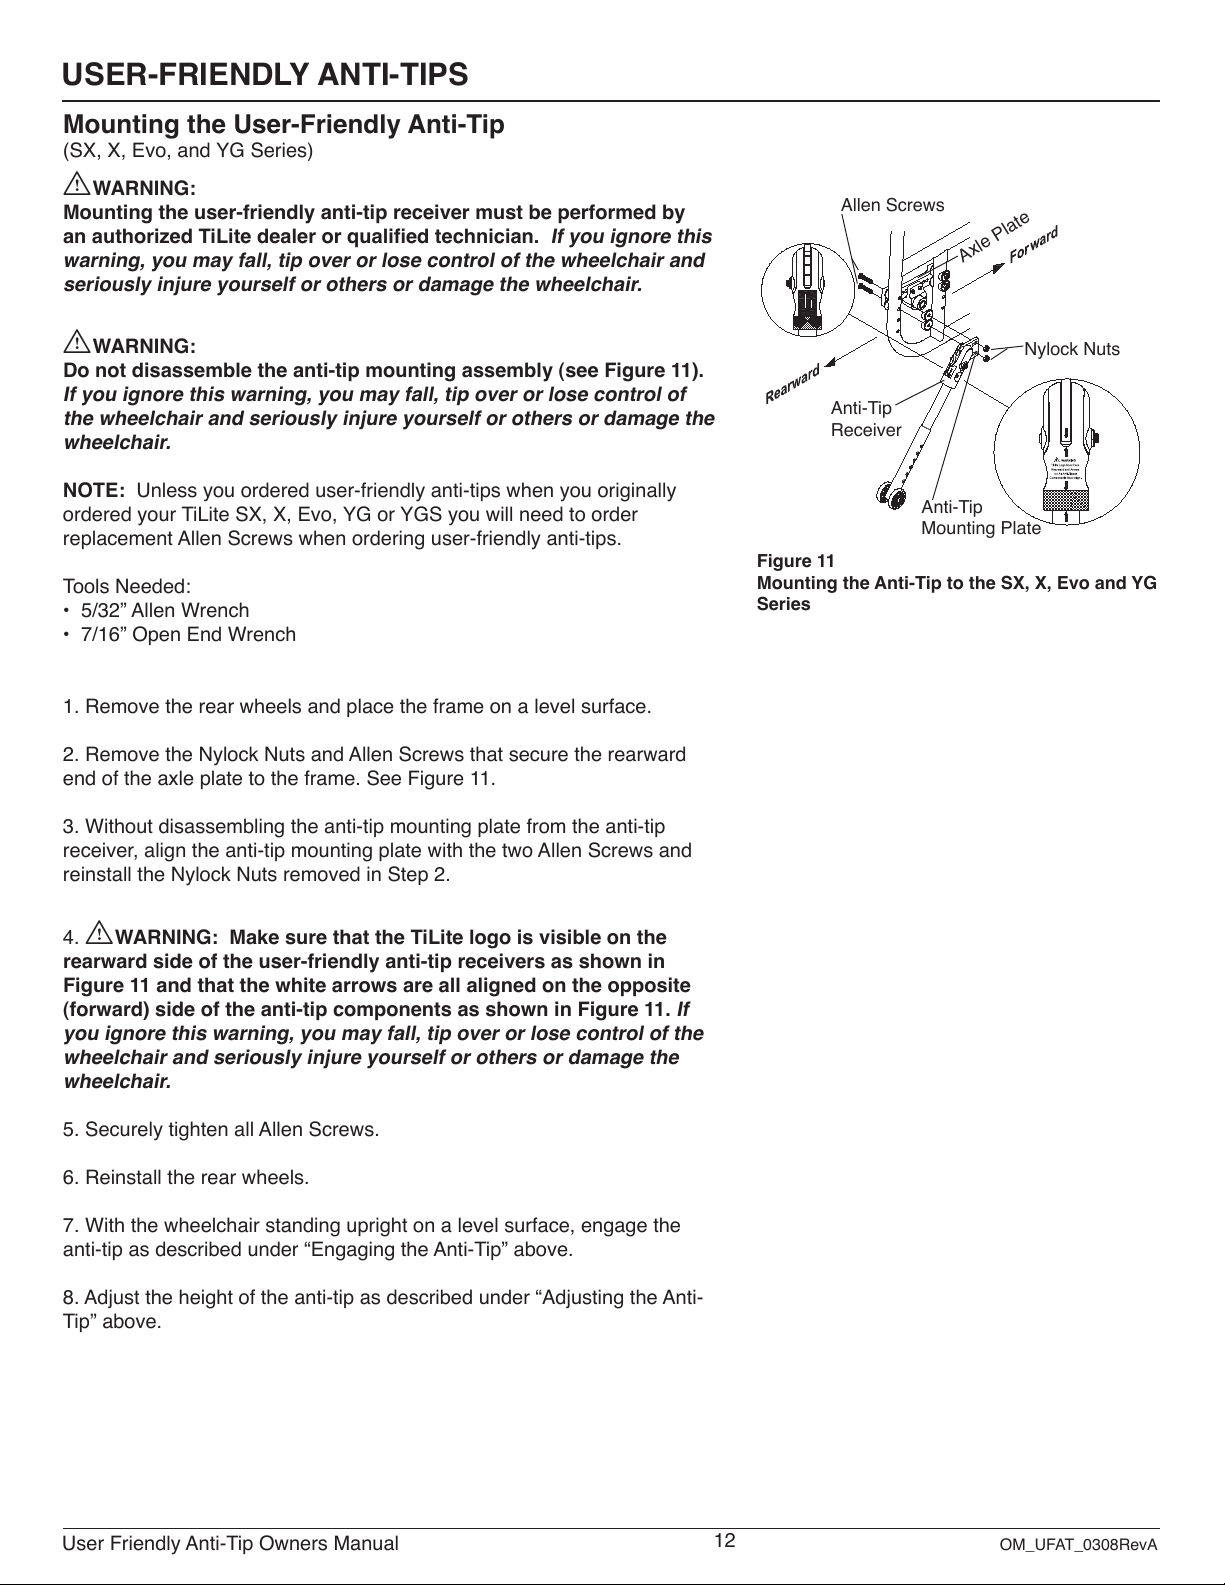
Mounting the User-Friendly Anti-Tip
(SX, X, Evo, and YG Series)
IWARNING:
Mounting the user-friendly anti-tip receiver must be performed by
an authorized TiLite dealer or qualied technician.
If you ignore this
warning, you may fall, tip over or lose control of the wheelchair and
seriously injure yourself or others or damage the wheelchair.
IWARNING:
Do not disassemble the anti-tip mounting assembly (see Figure 11).
If you ignore this warning, you may fall, tip over or lose control of
the wheelchair and seriously injure yourself or others or damage the
wheelchair.
NOTE: Unless you ordered user-friendly anti-tips when you originally
ordered your TiLite SX, X, Evo, YG or YGS you will need to order
replacement Allen Screws when ordering user-friendly anti-tips.
Tools Needed:
•5/32”AllenWrench
•7/16”OpenEndWrench
1. Remove the rear wheels and place the frame on a level surface.
2. Remove the Nylock Nuts and Allen Screws that secure the rearward
end of the axle plate to the frame. See Figure 11.
3. Without disassembling the anti-tip mounting plate from the anti-tip
receiver, align the anti-tip mounting plate with the two Allen Screws and
reinstall the Nylock Nuts removed in Step 2.
4. IWARNING: Make sure that the TiLite logo is visible on the
rearward side of the user-friendly anti-tip receivers as shown in
Figure 11 and that the white arrows are all aligned on the opposite
(forward) side of the anti-tip components as shown in Figure 11.
If
you ignore this warning, you may fall, tip over or lose control of the
wheelchair and seriously injure yourself or others or damage the
wheelchair.
5. Securely tighten all Allen Screws.
6. Reinstall the rear wheels.
7. With the wheelchair standing upright on a level surface, engage the
anti-tip as described under “Engaging the Anti-Tip” above.
8.Adjusttheheightoftheanti-tipasdescribedunder“AdjustingtheAnti-
Tip” above.
Figure 11
Mounting the Anti-Tip to the SX, X, Evo and YG
Series
Anti-Tip
Mounting Plate
Anti-Tip
Receiver
Nylock Nuts
Allen Screws
Axle Plate
OM_UFAT_0308RevA User Friendly Anti-Tip Owners Manual
USER-FRIENDLY ANTI-TIPS
13
9. IWARNING: Before sitting in the chair, make sure that the anti-
tips are operating properly. To do this, place the chair on a level
surface and engage the anti-tips. Tip the chair backward until the
weight of the chair is supported by the anti-tips and rear wheels.
Apply sufcient pressure to ensure that the anti-tips are operating
properly.
If you ignore this warning, you may fall, tip over or lose
control of the wheelchair and seriously injure yourself or others or
damage the wheelchair.
10.Checkthetoe-in/toe-outandadjustasneeded.
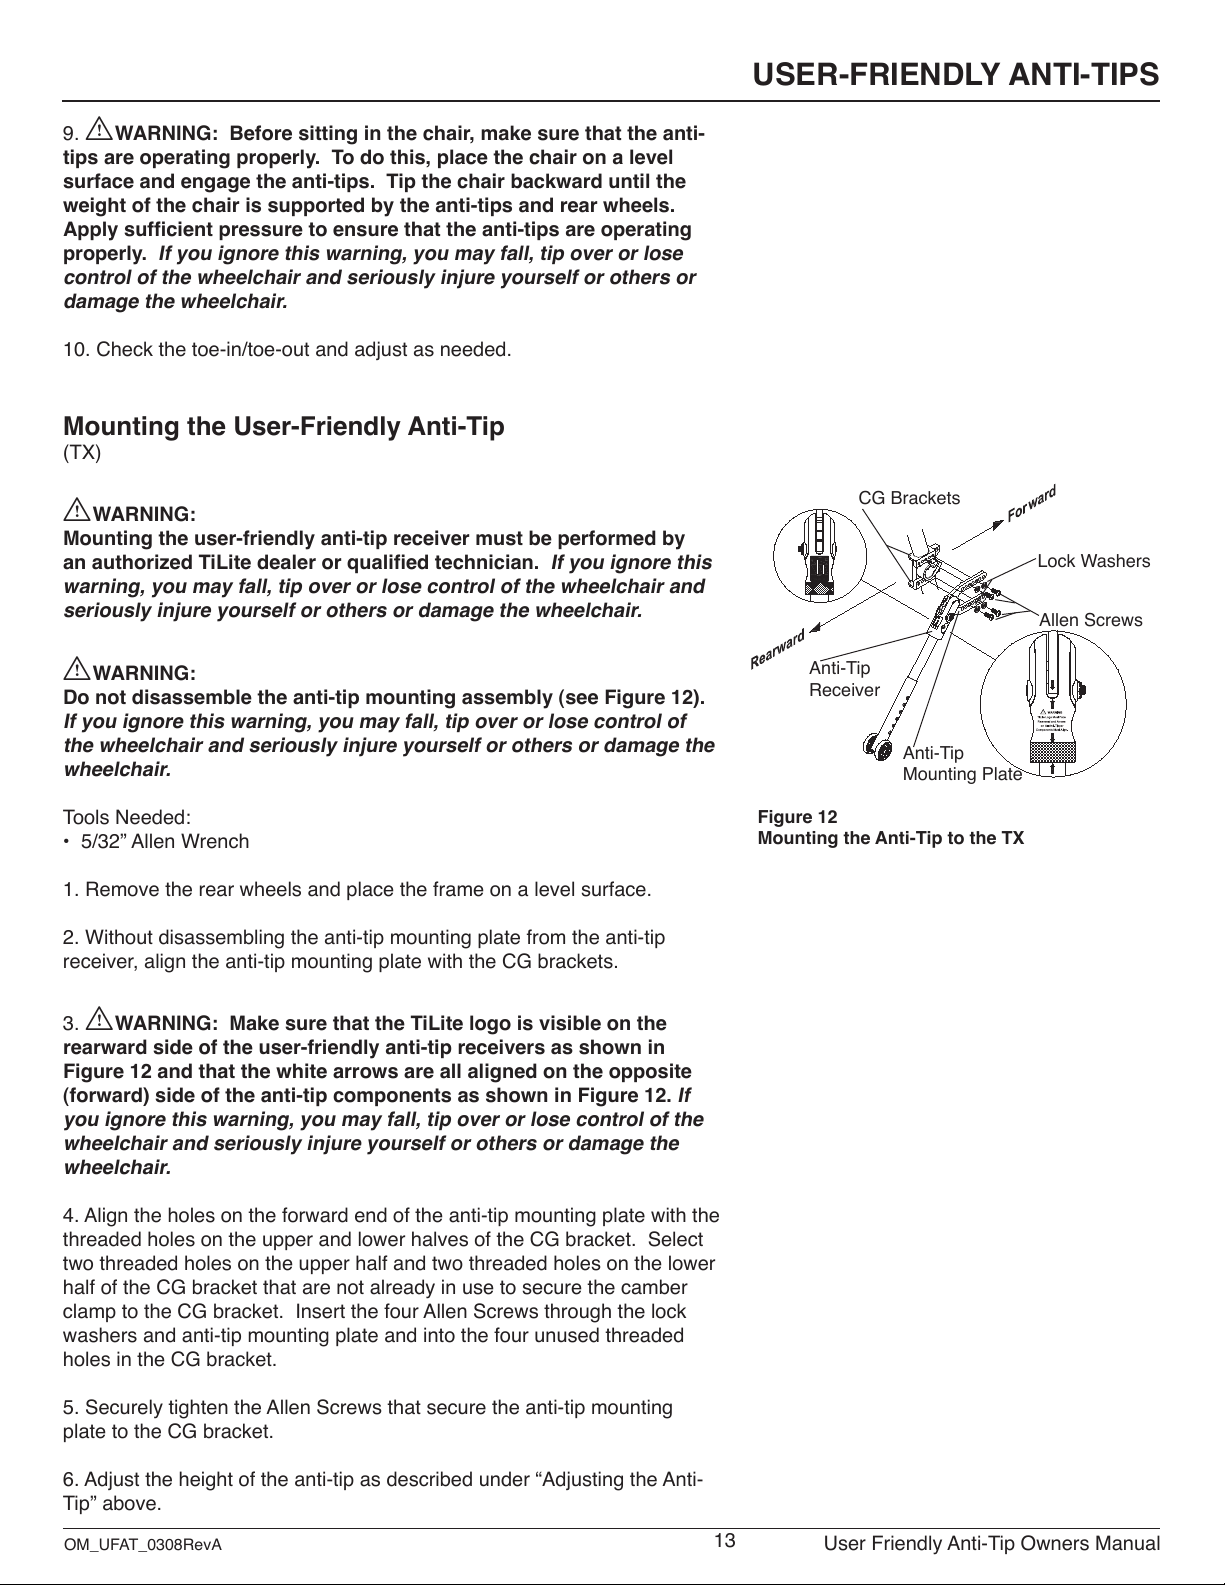
Mounting the User-Friendly Anti-Tip
(TX)
IWARNING:
Mounting the user-friendly anti-tip receiver must be performed by
an authorized TiLite dealer or qualied technician.
If you ignore this
warning, you may fall, tip over or lose control of the wheelchair and
seriously injure yourself or others or damage the wheelchair.
IWARNING:
Do not disassemble the anti-tip mounting assembly (see Figure 12).
If you ignore this warning, you may fall, tip over or lose control of
the wheelchair and seriously injure yourself or others or damage the
wheelchair.
Tools Needed:
•5/32”AllenWrench
1. Remove the rear wheels and place the frame on a level surface.
2. Without disassembling the anti-tip mounting plate from the anti-tip
receiver, align the anti-tip mounting plate with the CG brackets.
3. IWARNING: Make sure that the TiLite logo is visible on the
rearward side of the user-friendly anti-tip receivers as shown in
Figure 12 and that the white arrows are all aligned on the opposite
(forward) side of the anti-tip components as shown in Figure 12.
If
you ignore this warning, you may fall, tip over or lose control of the
wheelchair and seriously injure yourself or others or damage the
wheelchair.
4. Align the holes on the forward end of the anti-tip mounting plate with the
threaded holes on the upper and lower halves of the CG bracket. Select
two threaded holes on the upper half and two threaded holes on the lower
half of the CG bracket that are not already in use to secure the camber
clamp to the CG bracket. Insert the four Allen Screws through the lock
washers and anti-tip mounting plate and into the four unused threaded
holes in the CG bracket.
5. Securely tighten the Allen Screws that secure the anti-tip mounting
plate to the CG bracket.
6.Adjusttheheightoftheanti-tipasdescribedunder“AdjustingtheAnti-
Tip” above.
Figure 12
Mounting the Anti-Tip to the TX
Anti-Tip
Mounting Plate
Anti-Tip
Receiver
Lock Washers
Allen Screws
CG Brackets

User Friendly Anti-Tip Owners Manual OM_UFAT_0308RevA
USER-FRIENDLY ANTI-TIPS
14
7. IWARNING: Before sitting in the chair, make sure that the anti-
tips are operating properly. To do this, place the chair on a level
surface and engage the anti-tips. Tip the chair backward until the
weight of the chair is supported by the anti-tips and rear wheels.
Apply sufcient pressure to ensure that the anti-tips are operating
properly.
If you ignore this warning, you may fall, tip over or lose
control of the wheelchair and seriously injure yourself or others or
damage the wheelchair.
Mounting the User-Friendly Anti-Tip
(Aero X and 2GX)
IWARNING:
Mounting the user-friendly anti-tip receiver must be performed by
an authorized TiLite dealer or qualied technician.
If you ignore this
warning, you may fall, tip over or lose control of the wheelchair and
seriously injure yourself or others or damage the wheelchair.
IWARNING:
Do not disassemble the anti-tip mounting assembly (see Figure 13).
If you ignore this warning, you may fall, tip over or lose control of
the wheelchair and seriously injure yourself or others or damage the
wheelchair.
Tools Needed:
•5/32”AllenWrench
•7/16”OpenEndWrench
1. Remove the rear wheels and place the frame on a level surface.
2. Without disassembling the anti-tip mounting plate from the anti-tip
receiver, align the anti-tip mounting plate with two holes in the rear of the
frame and install the Allen Screws through the frame and plate as shown
in Figure 13.
3. IWARNING: Make sure that the TiLite logo is visible on the
rearward side of the user-friendly anti-tip receivers as shown in
Figure 13 and that the white arrows are all aligned on the opposite
(forward) side of the anti-tip components as shown in Figure 13.
If
you ignore this warning, you may fall, tip over or lose control of the
wheelchair and seriously injure yourself or others or damage the
wheelchair.
4. Securely tighten all Allen screws and nylock nuts.
5. Reinstall the rear wheels.
6. With the wheelchair standing upright on a level surface, engage the
anti-tip as described under “Engaging the Anti-Tip” above.
7.Adjusttheheightoftheanti-tipasdescribedunder“AdjustingtheAnti-
Tip” above.
Figure 13
Mounting the Anti-Tip to the Aero X and 2GX
Anti-Tip
Mounting Plate
Anti-Tip
Receiver
Nylock Nuts
Allen Screws
OM_UFAT_0308RevA User Friendly Anti-Tip Owners Manual
USER-FRIENDLY ANTI-TIPS
15
8. IWARNING: Before sitting in the chair, make sure that the anti-
tips are operating properly. To do this, place the chair on a level
surface and engage the anti-tips. Tip the chair backward until the
weight of the chair is supported by the anti-tips and rear wheels.
Apply sufcient pressure to ensure that the anti-tips are operating
properly.
If you ignore this warning, you may fall, tip over or lose
control of the wheelchair and seriously injure yourself or others or
damage the wheelchair.
9.Checkthetoe-in/toe-outandadjustasneeded.
Table of contents
Other TiLite Wheelchair manuals

TiLite
TiLite TR Series 1 User manual

TiLite
TiLite Twist User manual

TiLite
TiLite aero x User manual

TiLite
TiLite Aero R User manual

TiLite
TiLite Rigid TR Series User manual

TiLite
TiLite Z Series User manual

TiLite
TiLite ZR User manual

TiLite
TiLite ZR User manual

TiLite
TiLite Aero X User manual

TiLite
TiLite ZR User manual


