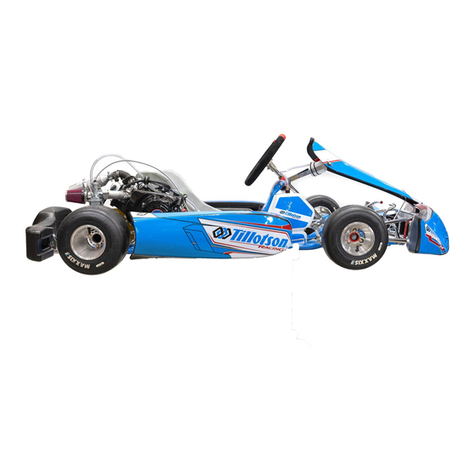
TILLOTSON T4 Instruction Manual

Congratulations on purchasing a Tillotson T4 Kart package! This document has been prepared
to provide the necessary information on how to assemble the Tillotson T4 Kart from the box
including what tools and equipment are required.
Items Required for T4 Kart Build:
Tillotson T4 Kart Package x 1
Kart Trolley x 1
Tools:
• Spanners / Wrench Sizes: 8mm, 10mm(x 2), 13mm(x 2), 15mm, 16mm, 17mm
• Socket Sizes: 8mm, 10mm, 13mm, 22mm
• Allen Key Set: 3mm, 4mm, 5mm, 6mm, 7mm
• Measuring Tape
• Snips
• Laser Alignment Tool / Tracking Discs: For front end tracking geometry
• Straight Edge Ruler / Laser Sprocket Aligner: For setting the position of sprocket so chain is
aligned
• Tyre Mounting Paste / Soap / WD-40: For Mounting Tyres
• Impact Gun / Spark Plug Stopper: For Mounting Clutch
• Compressed Air: For Popping Tyres onto Rim
• Flat section of timber / any material: For Seat fitting
• Fuel / Fuel Funnel
• Tie Wraps
• Loctite
Introduction

1. Take all items from the T4 packaging and identify each item supplied.
2. It is recommended to start by fitting the axle first. Slide the axle in from the right hand side,
fitting the Sprocket Carrier (with sprocket and chain) and Brake Disc in the correct position
and ensure the axle is fitted the correct orientation so the keyway lines up to the brake disc /
sprocket carrier and not in reverse.
Measure the Rear Axle so it is centered in the chassis and tighten the 3 x grub screws in the
Axle Bearing Carriers (2 of them). It is recommended to fit using Loctite as these grub screws
can come lose on a bumpy track. Centre the brake disc in the calliper and tighten.
Assembly

3. Set the position of the two Rear Hubs. Recommended Rear width with wheels mounted is
139-140cm.
4. Mount the seat: Cable Tie a flat section of Timber or another material to the underside of the
frame so the seat is resting on the timber. This makes the bottom of the seat flush and level
to the lower chassis rail. It is possible to mount it higher or slightly lower in extreme cases
however it is not likely to last long where there are large kerbs as the seat will drag along the
track easily.
Factory Recommendation for a driver sizes 5ft 6” – 6ft:
From Front Chassis Rail to Front of Seat RHS: 63/64cm
From Rear Axle to Crown of the Seat: 20cm

5. Mount the Steering Column, Steering Wheel and Nasseau Panel brackets.
6. Mount the Stub Axles (Central Position) and Steering Track Rods (Centre hole on the stub axle
and bottom hole on the steering column).
7. Track the front-end geometry.
8. Mount the front hubs and fit one large spacer on the inside as a starting position (10mm).

9. Mount the Brake Cable to Master Cylinder.
10. Mount the side and front rails followed by the KG bodywork using the bolts and springs provided.
11. Mount the rear Bumper Section using the bumper kit supplied.

12. Mount Tyres to Wheels and pump until Popped. Set Pressures in the recommended range
from 12-18Psi.
13. Engine Assembly:
Mount the exhaust by tightening the two 13mm Nuts first / then insert the bolt and spacer to
tighten the exhaust support arm. USE LOCTITE ON SUPPORT BOLT.
14. Mount Chain Guard with two fixing bolts is sufficient.
15. Mount Clutch using impact gun or with a 13mm socket with a spark plug stopper so to tighten
the clutch sufficiently.
16. Mount the inlet Manifold.

17. Mount Tillotson HW Carburettor: check Jet Settings using the Tillotson Quickjet tool.
L: 1T 45mins
H: 1T
18. Mount Air Filter
19. Mount the Engine Mount to the base of the 225RS engine.
20. Fill Engine with 500mL of Tillotson T4 Racing Oil
21. Engine Now Ready for Assembly to Kart:
Fit Engine and align the rear sprocket to the front sprocket using a Laser Alignment Tool or
straight edge ruler.
22. Lock the Rear Sprocket Carrier in Position and Mount the Chain.
23. Set the appropriate Chain Tension.

24. Fit the outer and inner throttle cable from the chassis to the carburettor – check that the
accelerator pedal is hitting the cable stop so it will not stress the throttle cable and confirm
you are reaching full throttle from the carburettor.
25. Fit the fuel line from the fuel tank (red connector on tank) to the carburettor. Also, it can
be advised to mount an option in-line fuel filter which are available such as the Tillotson
FS-1 filter.
26. Fit fuel pipe from the black connector on the tank to the overflow bottle. Ensure the overflow
bottle from the fuel tank has a hole drilled to vent the fuel tank.
27. Mount Tyres
28. Fit the Tillotson Racing Decals to the T4 Kart using heat gun if necessary to soften the material
29. Double check each nut and bolt is tight
30. Fill with Fuel
31. Proceed to Running-in Procedure for the Engine.

The running in procedure for the engine is a very important element in the engine life. If care is not
taken when running in the engine, then it can shorten the life of the engine dramatically.
1. Start the engine on the Kart Stand and warm up the engine for 3-5minutes but not revving the
engine to high rpms without load.
2. For the first 10 minutes, drive moderately at varying speeds up to 4,500-5,000rpm. It is
important to vary the RPM for proper camshaft, piston rings and component break in.
3. Stop and allow the engine to cool, check that there are no fuel or oil leaks.
4. For the second 10 minutes, drive moderately at varying speeds from 5,500-6,200rpm. Again,
stop and allow the engine to cool.
5. For the final 10 minutes it is necessary to drive at race speed so increase to the maximum
6,500rpm.
6. Once you have completed the running-in procedure it is important to change the oil. This is to
remove any metal particles which could arrive from the new components in the engine. Drain
the oil when hot so it can easily transport any particles.
7. Re-fill 500mL of Tillotson Racing oil into the engine and you are race ready.
Engine Running-In
Procedure:

For sales enquiries relating to the
Tillotson T4 Series please contact:
Tillotson Ltd Clash Indistrial Estate – Tralee – Ireland
+353.66.716.2500
I
www.facebook.com/tillotsonracing
I
www.tillotson.ie
Enquiries
Other manuals for T4
1
Other TILLOTSON Utility Vehicle manuals
Popular Utility Vehicle manuals by other brands

BRP
BRP can-am MAVERICK SPORT MAX 2003 Series Operator's guide
Etnyre
Etnyre BLACKHAWK RTN Series manual

CynkoMet
CynkoMet T-617 Instructions for Use and Operation

Etnyre
Etnyre M-752-02R1 manual
DETAIL K2
DETAIL K2 MFT4X8G owner's manual
Edscha Trailer Systems
Edscha Trailer Systems TipperRoof Repairing instructions

