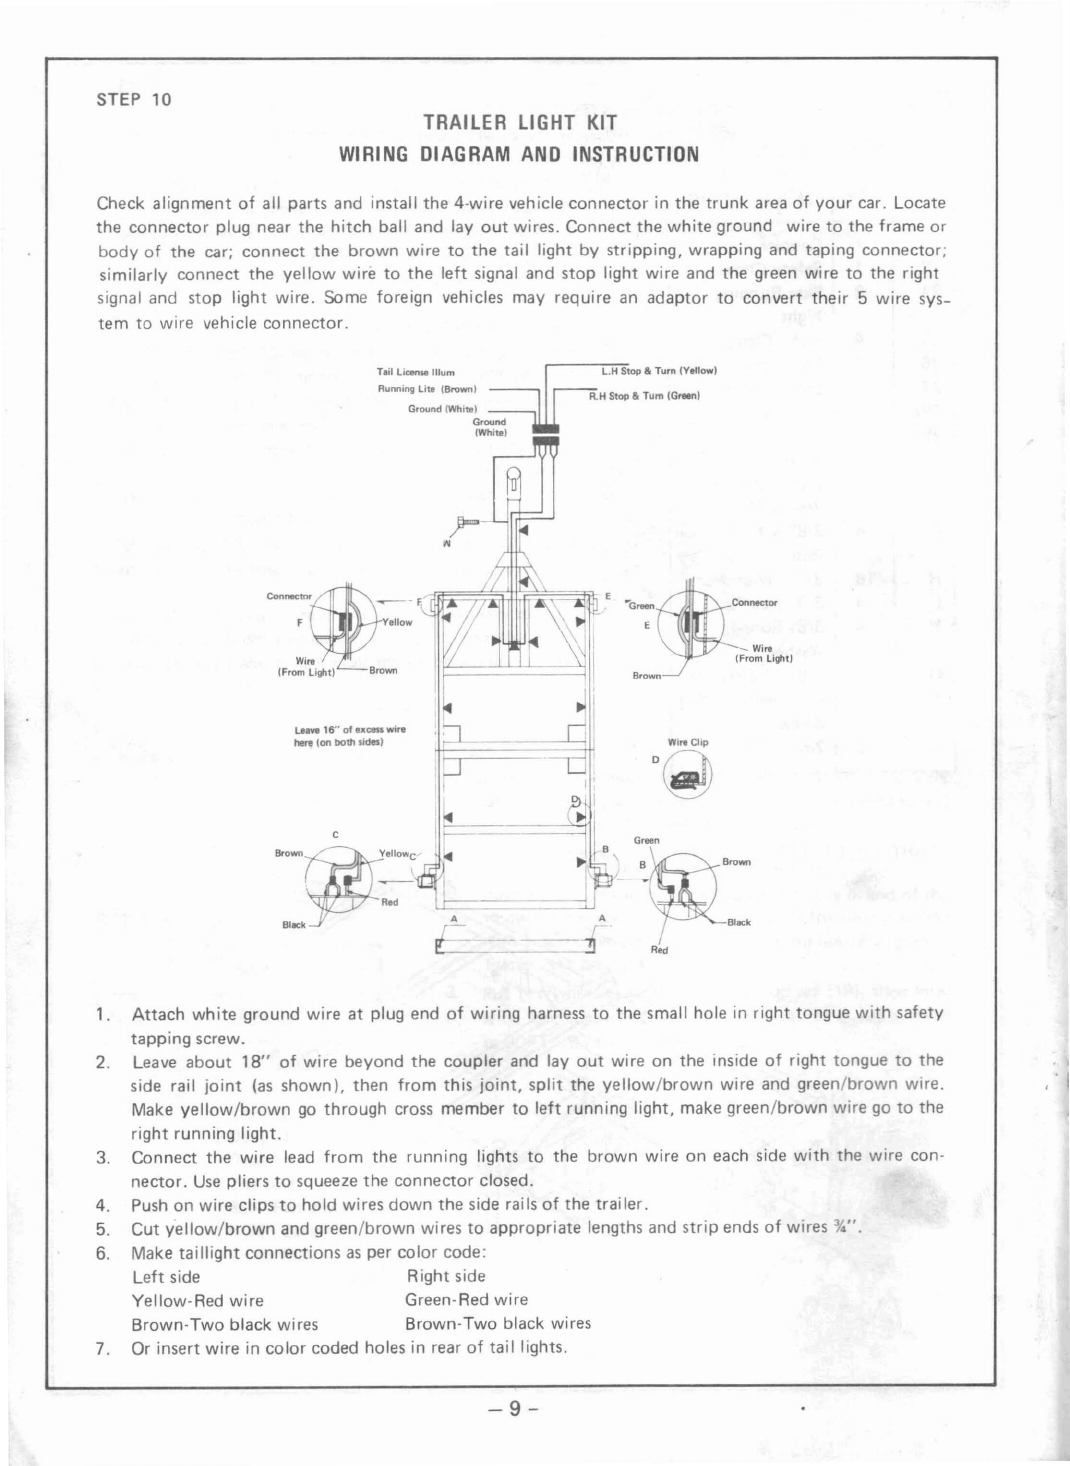
manuals.online logo
Brands
  1. Home
  2. •
  3. Brands
  4. •
  5. Long Chih Industries
  6. •
  7. Utility Vehicle
  8. •
  9. Long Chih Industries LCI-851T User manual

Long Chih Industries LCI-851T User manual

Popular Utility Vehicle manuals by other brands

Strautmann Giga-Trailer 1840 operating instructions

Strautmann

Strautmann Giga-Trailer 1840 operating instructions

FORS MW FARMA T 10 Instruction book

FORS MW

FORS MW FARMA T 10 Instruction book

pronovost PUMA-10000 Operator's manual

pronovost

pronovost PUMA-10000 Operator's manual

Polaris ACE 900 SP owner's manual

Polaris

Polaris ACE 900 SP owner's manual

TrailMax T-12-UR manual

TrailMax

TrailMax T-12-UR manual

Toro 07277 Workman 2110 Operator's manual

Toro

Toro 07277 Workman 2110 Operator's manual

Floe Cargo Max 9.5-73 Assembly instructions

Floe

Floe Cargo Max 9.5-73 Assembly instructions

Toro 07059TC Operator's manual

Toro

Toro 07059TC Operator's manual

Taylor-Dunn B0-050-00 Operation, t roubleshooting and replacement parts manual

Taylor-Dunn

Taylor-Dunn B0-050-00 Operation, t roubleshooting and replacement parts manual

Toro 133-7128 installation instructions

Toro

Toro 133-7128 installation instructions

Taylor-Dunn ET 3000 manual

Taylor-Dunn

Taylor-Dunn ET 3000 manual

Kayo S70 Assembly manual

Kayo

Kayo S70 Assembly manual

Cushman Turf Truckster 84069 Parts & maintenance manual

Cushman

Cushman Turf Truckster 84069 Parts & maintenance manual

Landoll 900D Series Operator's manual

Landoll

Landoll 900D Series Operator's manual

Westward Go-4 XTR Operator's manual

Westward

Westward Go-4 XTR Operator's manual

Club Car Carryall I 1999 owner's manual

Club Car

Club Car Carryall I 1999 owner's manual

Etnyre Street Flusher operation, maintenance, parts and safety manual

Etnyre

Etnyre Street Flusher operation, maintenance, parts and safety manual

Landoll 340 Operator's manual

Landoll

Landoll 340 Operator's manual

manuals.online logo
manuals.online logoBrands
  • About & Mission
  • Contact us
  • Privacy Policy
  • Terms and Conditions

Copyright 2025 Manuals.Online. All Rights Reserved.

OWNER'S
MANUAL
.'
DIY
TRAILER
KIT
SPECIFICATION:
Item
No.:LCI-85IT
Bed
frar:'e;' 4' x8'
Over length: 134/1
Shipping weight:
216
LBS
Max. load capacity:
990
LBS
Tire: 4.8-8
(8)
tubeless, 4
PR
Wheel: 4
bolt
demountable
Coupler capacity:
class
1, 2000 LBS. max
gross
load.
fit
for
1-7/8"
ball
GAWR: 1180 LBS
with
4.80-8 (B) tires 8 x 3.75 rims
at
60
PSI
cold
GVWR: 1180 LBS
Long Chih Industries
LCI-851T
TRAILER
PARTS LIST
PARTS NO.
QTY
DESCRIPTION
:PART
NO.
QTY
I
NO. DESCRIPTION
PART
NO. 30R 1Right Caster Base B1202
31
2
Grease
Fitting
B1301
lFL
1
Front
Left
Side Rail
AOll1
32
1Hex Handle 01201
lFR
1
Front
Right Side Rail
AOl12
lRL
1
Rear
Left
Side
Rail
A0113
lRR
1Rear Right Side Rail A0114
2 6
Cross
Member A0205
32Connecting Rail A0307
4 2 Fixing Metal
A0403
5 1 Towbar A0505
HARDWARE
61Connecting Plate
00203
7 1 Coupler C0101 A
51
3/8"
x
3/4"
Bolt 105EH
81Safety Chain C0201 B28
3/8"
xl"
Bo
It
107EH
91
Y2
"L"
Latch 00301 C1
3/8"
x 1
Y2"
Bolt
111
EH
10 2Rotation Plate 00401 04
3/8"
xl"
Carriage
Bolt
107EC
11
L1
Left
Rotation Plate
00402
F1
1/2"
x
4"
Bolt
123GH
11
R 1 Right Rotation Plate
00403
G4
9/16"
x
3'4"
Bolt 121HH
12L
1
Left
Spring Hanger B0103 H88
3/8"
Nylon
Nut
202E
12R 1Right Spring Hanger B0104 I5
3/8"
Hex
Nut
201E
13 4Caster
Bl101
J1
1/2"
Nylon
Nut
202G
14 2Spring Plate B0401 K4
9/16"
Nylon Nut 201H
15 2Spring B0301 L8Tire
Nut
205G
16 1Axle B0602 M2Castle
Nut
204J
17
4U
Bolt
B0501 N12
3/8"
Spring
Washer
302E
18 2Hub B0801 01
3/8"
Flat
Washer
301E
19 2
Tire/Rim
Assembly B0701 P2
3/4"
Flat
Washer
301J
20 2Bearing B0901 Q 2
5/32"
Cotter Pin
401
21
2Dust
Cap
Bl001
S13mm RPin
402Ft
22 2Fender
00502
T44mm Self Tapping Screw 50 1
23 2Fender
Seat
00601 U12mm RPin 40201
24 2Side Running Light 00701 W1
1/4"
Self Tapping Screw
502l
25 8Stake Clamp 00801 X1
3/8"
x
2"
Bolt
26 2Tail Light Bracket 00901
27
1License Plate Bracket
01002
28L
1
Left
Tail Light
01102
28R 1Right Tail Light 01101
29 1Safety Pin C0301
30L
1
Left
Caster Base B1201
-1-
851
T-
Hardware
%"
%"
%"x1"
D
B~~==}
%"x1"
F
%" x
4"
%"
M
-----',
J
%"
GK
Q
s
u
-2-
Read
the instructions carefully
and
follow
them step-by-step
for
easy
assembly. You'll find
acomplete parts list
on
the previous
page.
Average assembly time
is
approximately 5hrs.
You'll
need
the following tools
to
assemble
your
Folding Trailer Kit.
TOOLS NEEDED:
9/16"
box end wrench
9/16"
open end wrench
3/4"
socket or
lug
wrench
Electric
Drill
or hand
drill
(for
installing plywood
base)
Pliers
Channel lock pliers
Screwdriver
.;
NOTE:
1.
In
assembling trailer parts, they are identified by standing
at
rear
of
trailer
and looking
toward
tongue.
2.
Do
not
fully tighten bolts and nuts until the trailer
is
completely assembled.
Installing the
3/4/1
plywood
base, which you will have to supply,
is
the last
step
after
tightening
down
all
the nuts and bolts.
All
the nuts and bolts
should be checked periodically for tightness
....
and you should retighten the
lug
bolts on the wheels
after
the first
20
miles
of
use.
""
",~.
II)
ki
Cf"
..
-3-
STEP 1
PARTS
NEEDED
NO.
OTY
DESCRIPTION
1FL
1Front
left
side
rail j
1FR 1Front
right
side
rail
23
Cross
Member
10 2Rotation Plate
25 2Stake Clamp
A10
3/8"
x
3/4"
Bolt
B 4
3/8"
x
1"
Bolt
H14
3/8"
Nylon
Nut
STEP 2
PARTS
NEEDED
NO.
OTY
DESCRIPTION
32Connecting rail
42
Fixing
metal
A2
3/8"
x
3/4"
Bolt
B6
3/8"
x
1"
Bolt
H8
3/8"
Nylon
Nut
STEP 1
1.
Layout
front
side rails
(lFL,
1FR),
cross
member (2)
as
shown.
2.
Assemble
(1
FL, 1FR, 2), stake clamps (25),
rotation
plates (10) by using
3/8"
x
3/4"
bolts,
nylon
nuts
(A.H.),
3/8"
x
1"
bolts,
3/8"
nylon
nuts (B.H.).
NOTICE:
The
front
section
cross
member must
fit
in the rear holes
of
side rail
(1
FL, 1FR).
Use
bolt/nut
sets
(A.H.). and
(B.H.)
as
illustrated.
STEP 2
1. Parts
(4,4)
are
to
be
mounted on the
bottom
of
(2),
by
using
3/8"
x
1"
(B)
bolt
and
3/8"
nylon
nuts (H).
2. Assemble connecting rail (3, 3)
to
side rail
\lFL,
1FR)
by
using
3/8"
x
3/4"
bolts,
nylon
nuts (A.H.),
3/8"
x
1"
bolts,
3/8"
nylon
nuts (B.H.) as shown
in
diagram.
-4-
STEP 3
PARTS
NEEDED
NO.
OTY
DESCRIPTION
51Towbar
6 1 Connecting Plate
91 L Latch
B 4
3/8"
xl"
Bolt
F1
1/2"
x 4 Bolt
H4
3/8"
Nylon
Nut
J1
1/2"
Nylon
Nut
S1
3mm
RPin
32 1Hex Handle
STEP 4
PARTS
NEEDED
NO.
OTY
DESCRIPTION
lRL
1Rear
left
side
rail
1RR
1Rear
right
side
rail
2 3
Cross
Member
11
L 1
Left
Rotation
Plate
11
R1Right Rotation
Plate
25 2Stake Clamp
A12
3/8"
x
3/4"
Bolt
B4
3/8"
x
1"
Bolt
H16
3/8"
Nylon
Nut
STEP 3
1.
Assemble
towbar
(5)
to
fixing
metal (4L, 4R)
by
inserting
1/2"
x
4"
bolt
(F) through rear hole
of
towbar
(5). and
insert
"L"
latch (9) through
front
hole
of
fixing
metal
(4L,
4R)
then
fix
the
"L"
latch
(9)
by using item
(S)
"R"
pin.
2.
Put connecting plate (6) on
towbar
(5)
as
diagram shown
then screw
it
by using hex handle (32)
and
3/8
x 1
bolt,
3/8
nylon
nut
(B.H).
'.H
STEP 4
1.
Layout
rear side rail
(1RL,
lRRl.
cross
member (2)
as
shown.
2. Assemble
(1
RL, 1RR, 2) stake clamps (25).
rotation
plates (11)
by
'using
3/8"
x
3/4
~
!:>olts,
nylon
nuts (A.H.)
3/8"
x
1"
bolts,
3/8"
nylon
nuts (B.H.).
NOTICE:
The rear section
cross
member must
fit
in the rear holes
of
side rail
(1
RL, 1RR).
Use
bolt/nut
sets
(A.H.) and (B.H.)
as
illustrated.
-
5--
STEP 5
PARTS
NEEDED
NO.
OTY
DESCRIPTION
A2
3/8"
x
3/4"
Salt
H 2
3/8"
Nylon
Nut
STEP
5
1.
Assemble
front
portion
(step 3) and rear
portion
(step 4)
using
3/8"
x
3/4"
bolts,
3/8"
nylon
nuts (A.H.)
as
dia-
gram 1shown. Do
not
over tighten nuts.
2.
Fold trailer
as
shown in
illustration
2.
STEP 6
PARTS
NEEDED
NO.
OTY
DESCRIPTION
12L
1No.
12L
labelled
on part
12R 1No. 12R labelled
on part
13 4Caster
with
Hex
Nut
and Spring
Washer
30L
1
Left
Caster
Sase
30R 1Right Caster
Base
B10
3/8"
x
1"
Bolt
H10
3/8"
Nylon
Nut
B.H
~
STEP
6
1. Assemble (12L, 12R)
to
front
side rail
(1FL,
1FR)
by
using
3/8"
x
1"
bolt,
and
3/8"
nuts (S.H.)
as
shown.
2. Assemble caster
base
(30L,
30R)
to
spring hanger (12 L, 12
R)
by using
3/8"
x
1"
bolt,
nut
(S.H.)
3.
Fix
caster (13)
to
caster
base
(30L,
30R) by using
3/8"
hex
nut
and spring washer.
-n-
STEP
7.
1. Assemble fender seat (23)
to
caster
base
(12L,
12R)
by
using
3/8"
x
3/4"
bolts,
3/8"
n~ts
(A.H.)
then
fix
fender (22)
to
fender seat (23)
by
using
3/8"
x
3/4"
bolts,
3/8"
nylon
nuts (A.H.)
2. Tighten spring (15) to
caster
base (12L,12R) by using
9/16"x3-1/4"
bolt
(G)
and
9/16"
nylon
nut (K)
3.
Place
axle (16), on
top
of
spring (15). Put spring plates (14) under spring using
"U"
bolt
(17)
pass
through
axle (16). spring (15) and spring plates (14) then lock
with
3/8"
spring washer (N)
and
nylon
nuts (H).
STEP 7
PARTS
NEEDED
NO.
OTY
DESCRIPTION
14 2Spring Plate
15 2Spring
16
1
Axle
17 4U
Bolt
22 2Fender
23
2Fender Seat
A8
3/8"
x
3/4"
Bolt
G 4
9/16"
x3%"
Bolt
H
16
3/8"
Nylon
Nut
K4
9/16"
Nylon Nut
N 8
3/8"
Spring
Washer
STEP 8
PARTS
NEEDED
NO.
OTY
DESCRIPTION
18 2
Hub
19 2Tire
20 2Bearing
21
2Dus,
Cap
31
2
Grease
Fitting
L 8 Tire
Nut
P 2
3/4"
Flat Washer
02
5/32"
Cotter Pin
M2Castle
Nut
STEP
8
1.
Carefully slide hubs (18) over spindles at
each
end
of
axle
and push on
outer
bearings (20) and
3/4"
flat
washer (PI,
then castle nuts (M). tighten
them
snugly.
NOTE:
BACK
OFF
SLIGHTLY
A
LITTLE
BIT
SO
THAT
WHEEL
CAN
JUST
SPIN
FREELY.
2.
Push
a
5/32"
cotter
pin (Q) through the hole in end
of
the
spindles then spread
cotter
pin,
1/4
fill
the dust
cap
(21)
with
automotive
grease
then
press
it
onto
hub. Fix grease
fitting (31) on dust cap (21)
3.
Put tire/wheel assembly (19) on hub set (18). then lock
with
four
lug nuts (L) tighten
with
socket
or
lug wrench
to
90FT-LBS
(very
tight).
,@
21
I
...
13119~
-7-
STEP 9
PARTS
NEEDED
NO.
QTY
DESCRIPTION
7 1 Coupler
81Safety Chain
24
2Side Running
Light
25
4Stake Clamp
26
2Tail
Light
Bracket
27 1License Bracket
28L
1
Left
Tail
Light
28R
1Right TaiILight
29 1Safety Pin
A17
3/8"
x
3/4"
Bolt
C 1
3/8"
x 1'/2'
Bolt
D 4
3/8"
x
1"
Carriage
Bolt
H
18
3/8"
Nylon
Nut
I4
3/8"
Hex
Nut
N4
3/8"
Spring
Washer
01
3/8"
Flat Washer
T 4 4mm Self Tapping
Screw
U1
2mm
RPin
STEP 9
1.
"Extend
trailer
bed
to
full
length
by
lifting
upper section
1800towards rear
of
trai
ler."
2.
Bolt
coupler (7)
to
towbar
(5)
with
two
sets
of
3/8"
x
3/4"
bolt,
3/8"
nuts
(A.H.)
on each side.
Attach
safety
chain (8)
with
3/8"
x
1-1/2"
bolt
(C)
by
passing
tow
bar,
then
go
through
the center
link
of
the chain, lock
with
3/8"
flat
washer
(0)
and
3/8"
nut
(H).
3.
Insert safety pin (29)
through
the hole
of
coupler trigger
then
fix
it
by
using Rpin (U).
4.
Attach
each
2
sets
of
stake clamps (25)
to
front
and
rear
cross
members by using
two
sets
of
3/8"
x
3/4"
bolts.
5.
Attach
side running
light
(24) by taking the
lense
off
light,
then run wire
lead
through the center hole
of
side rail, then lock light
to
rail
with
two
self tapping
screws (T) on each side.
6.
Assemble taiI
light
bracket (26)
to·
rear end
of
side rai I
(1
RL, 1R
R)
by
using
3/8"
x
3/4"
bolt
and
3/8"
nut
(A.H.) then install license plate bracket (27)
and
left
tail
light
(28L)
(with
clear
lense
for
light)
with
nuts then
install right
taillight
(28R).
7. Tighten rear section frame
to
caster
base
(12 L, 12
R)
by
using
two
sets
of
3/8"
x
1"
carriage
bolt
(0),
3/8"
hex
nut
(1) and spring washer (N) on
each
side
(see
diagram).
1)'0
):"'l'
-8-
STEP 10
TRAILER
LIGHT
KIT
WIRING
DIAGRAM
AND
INSTRUCTION
Check
alignment
of
all parts and install the
4-wire
vehicle
connector
in the
trunk
area
of
your
car. Locate
the
connector
plug
near the
hitch
ball and
layout
wires.
Connect
the
white
ground
wire
to
the frame
or
body
of
the car;
connect
the
brown
wire
to
the
tail
light
by
stripping,
wrapping
and taping
connector;
similarly
connect the
yellow
wire
to
the
left
signal and stop
light
wire
and the green
wire
to
the
right
signal and stop
light
wire.
Some foreign vehicles
may
require
an
adaptor
to
convert
their
5
wire
sys-
tem
to
wire
vehicle
connector.
Tail
license
ilium
Running
lite
(Brown)
)l-
V<
Wire
(From
light)
Leave 16"
of
excess w;r.
here
(on
both
,idal
c
8<own
1]
L.H Stop &Turn (Vellow)
R.H
5t""
&Tum
(0_1
Brown
WireChp
o
Green
Red
_Wire
(From
light)
1.
Attach
white
ground
wire
at plug end
of
wiring
harness
to
the small hole in
right
tongue
with
safety
tapping
screw.
2. Leave
about
18"
of
wire
beyond
the
coupler
and
layout
wire
on the inside
of
right
tongue
to
the
side rail
joint
(as
shown),
then
from
this
joint,
split
the
yellow/brown
wire
and
green/brown
wire.
Make
yellow/brown
go
through
cross member
to
left
running
light,
make
green/brown wire
go
to
the
right
running
light.
3.
Connect the
wire
lead
from
the
running
lights
to
the
brown
wire
on
each side
with
the
wire
con-
nector.
Use
pliers
to
squeeze the
connector
closed.
4. Push
on
wire
clips
to
hold
wires
down
the side rails
of
the
trailer.
5.
Cut
yellow/brown
and
green/brown
wires
to
appropriate
lengths and
strip
ends
of
wires ,%".
6.
Make
taillight
connections
as
per
color
code:
Left
side
Right
side
Yellow-Red
wire
Green-Red
wire
Brown-Two
black wires
Brown-Two
black wires
7. Or insert
wire
in
color
coded holes
in
rear
of
taillights.
-
9-