TIME2TECHNOLOGY Ava User manual

Ava
Outdoor Camera
User Manual
Protect and monitor the things you
love and value

What you’ll need
Let’s get started
Installation
Wiring an existing doorbell
Live view
Motion alerts
Recording
Cloud storage
2
3
4
6
7
8
9
10
Cloud storage recordings
Managing your Clan home
Add a family member
Share Bella
Multi camera view
Web view
Adding the indoor chime
Safety Information
12
13
14
15
17
18
21
22
This user manual has all the information you need to make the most out of your
Ava Outdoor Camera. Please keep this manual for future reference and ensure you
have read all safety instructions carefully before use. The manual is subject to
change without notice. The updates will be added into the new version of the
manual.
Version 1.1

This is what you will need to set up your Ava Outdoor Camera
2
WiFi Broadband
A working internet connection on
a 2.4Ghz frequency channel
Clan at Home accont
Download the CLan at Home
app and register
Drill Bit
To install on surfaces such as
brick or concrete
Magnetic Wall Mount
To mount the camera on
to a wall/ceiling
Compatible Device
An Apple or Android
Smartphone
Phillips Bit
A power drill with Phillips driver bit
Screw pack (provided)
Required to install on to surfaces
such as brick or concrete
Adjustable Wall Mount
To mount the camera on
to a wall/ceiling

What do the flashing lights mean?
3
Add Ava to the Clan at Home App
If you need help with this, please refer to the
Quick Start Guide included with Ava or found on
our online support section.
Please complete set up before mounting the camera.
Connect Ava to the mains using the
power adapter and USB cable provided.
Allow at least 10 hours to fully charge the
camera.
Hold down the powert button until
Ava turns on.
The red LED will come on
at the front and Ava will
start to flash red before
it is ready to connect.
If you’re setting Ava up for the first time, you will
need to:
1. Download the Clan at Home app from the Google
Play Store or Apple App Store
2. Open the app and “register” to create an account
3. Create a Home
4. Add Ava
If you already have a Clan at Home account, simply press
the “+” icon on the top right corner and follow the on-screen
steps.
You will be asked to enter your Wi-Fi router password and
use Ava to scan the QR code created on your smartphone,
then Ava will connect to your Wi-Fi network.
Reset Button
Micro USB Port
Charging Indicator
Power Button
Solid Red
Starting up
Flashing Red
Ready to connect
Solid Blue
Connected

4
Installing Ava
Choose a good spot
Ava has a wide field of view so you can position it in
any direction you want.
We recommend that you mount Ava at around 3 metres
above the ground, this is the ideal position for Ava to
sense movement, see faces and talk through the speaker
and microphone.
Ensure that Ava is mounted in a position that allows you
to see over a large area of your home and surroundings
with an unblocked, clear view.
Test the Wi-Fi signal
Before mounting Ava we recommend that you test the
Wi-Fi strength in the area that you’d like to place it.
Hold Ava in the position that you
would like to mount it and check that
the live stream is working well in
the app.
Working well? Great, continue to the
next page.
Can’t see the live stream? Your Wi-Fi may not be strong
enough in that area, you may need to find another spot or
move your Wi-Fi router closer.

5
Installation using Magnetic Wall Mount
Step 1
Mark screw holes where
you would like to install
the magnetic wall mount
Step 2
Drill pilot holes.
Use the included wall
plugs if you’re drilling
into stone or hard material
Step 3
Install the wall mount on
to the wall using
the provided screws
Step 4
To attach Ava, simply slot it
on to the wall mount and
it will click into place
Ava is supplied with two wall mounting options. Here is how to install using the magnetic wall mount.

6
Installation using Screw Wall Mount
Step 1
Mark screw holes where
you would like to install
the magnetic wall mount
Step 2
Drill pilot holes.
Use the included wall
plugs if you’re drilling
into stone or hard material
Step 3
Install the wall mount on
to the wall using
the provided screws
Step 4
To attach Ava, simply screw
it on to the wall mount
Alternatively, here is how to install using the adjustable screw wall mount.

7
Once setup is complete, select Ava in the Clan at Home app
See your Wi-Fi Signal Strength See Full-Screen
See more Settings Turn the speaker
on or off
Save a screenshot on your
smartphone gallery
Select to speak into
the camera
Record live footage onto
your smartphone memory
See recorded footage
on the SD Card
See recorded footage
on the cloud
View saved screenshots

8
Motion Alerts
Step 1
Click the Settings icon
to bring up the camera
settings
Step 2
Select Detection
alert setting
Step 3
Turn the Human Body
Filtering switch on
When movement is
detected, Ava will send you
alerts straight to your
Smartphone or Tablet.
If your device is locked when
Ava detects something, you
will receive notifications on
your home screen as long as
you are signed in to the Clan
at Home app
Ava Ava

9
You can view what Ava has recorded on the Clan at Home app.

10
Cloud Storage for a single camera
Step 1
Click on Cloud storage Click on Purchase VAS
Step 2
Alternatively, Ava can record directly on to the cloud when movement has been detected.
You can choose to store the recorded footage for 7 days, 14 days or even 30 days.
Baby Monitor
Step 4
Choose which service you
would like.
You will be then directed
to make the payment
Click on Subscribe
Step 3
Ava Ava

11
Cloud Storage for multiple cameras
Clan also offers cloud storage packages for customers who own multiple cameras. This feature allows all the cameras to
record to the cloud whenever movement has been detected without having to pay for each camera individually.
Step 1
Click “Me”
Step 2
Click “More Services”
Step 3
Click “Cloud Storage
for cameras”
Hannah’s Home
Step 4
Click “Subscribe”
Step 5
Choose which service
you would like.
You will then be directed
to make the payment.
Ava

12
Cloud Storage Recordings
You can access the Cloud recordings from the Clan at Home App.
Turn speaker
on or off
Pause video
Choose a specific recording
when camera has detected
movement
Click to record
Select a date
Click to make a
snapshot manually
Scroll to choose
a specific time
See full screen
13
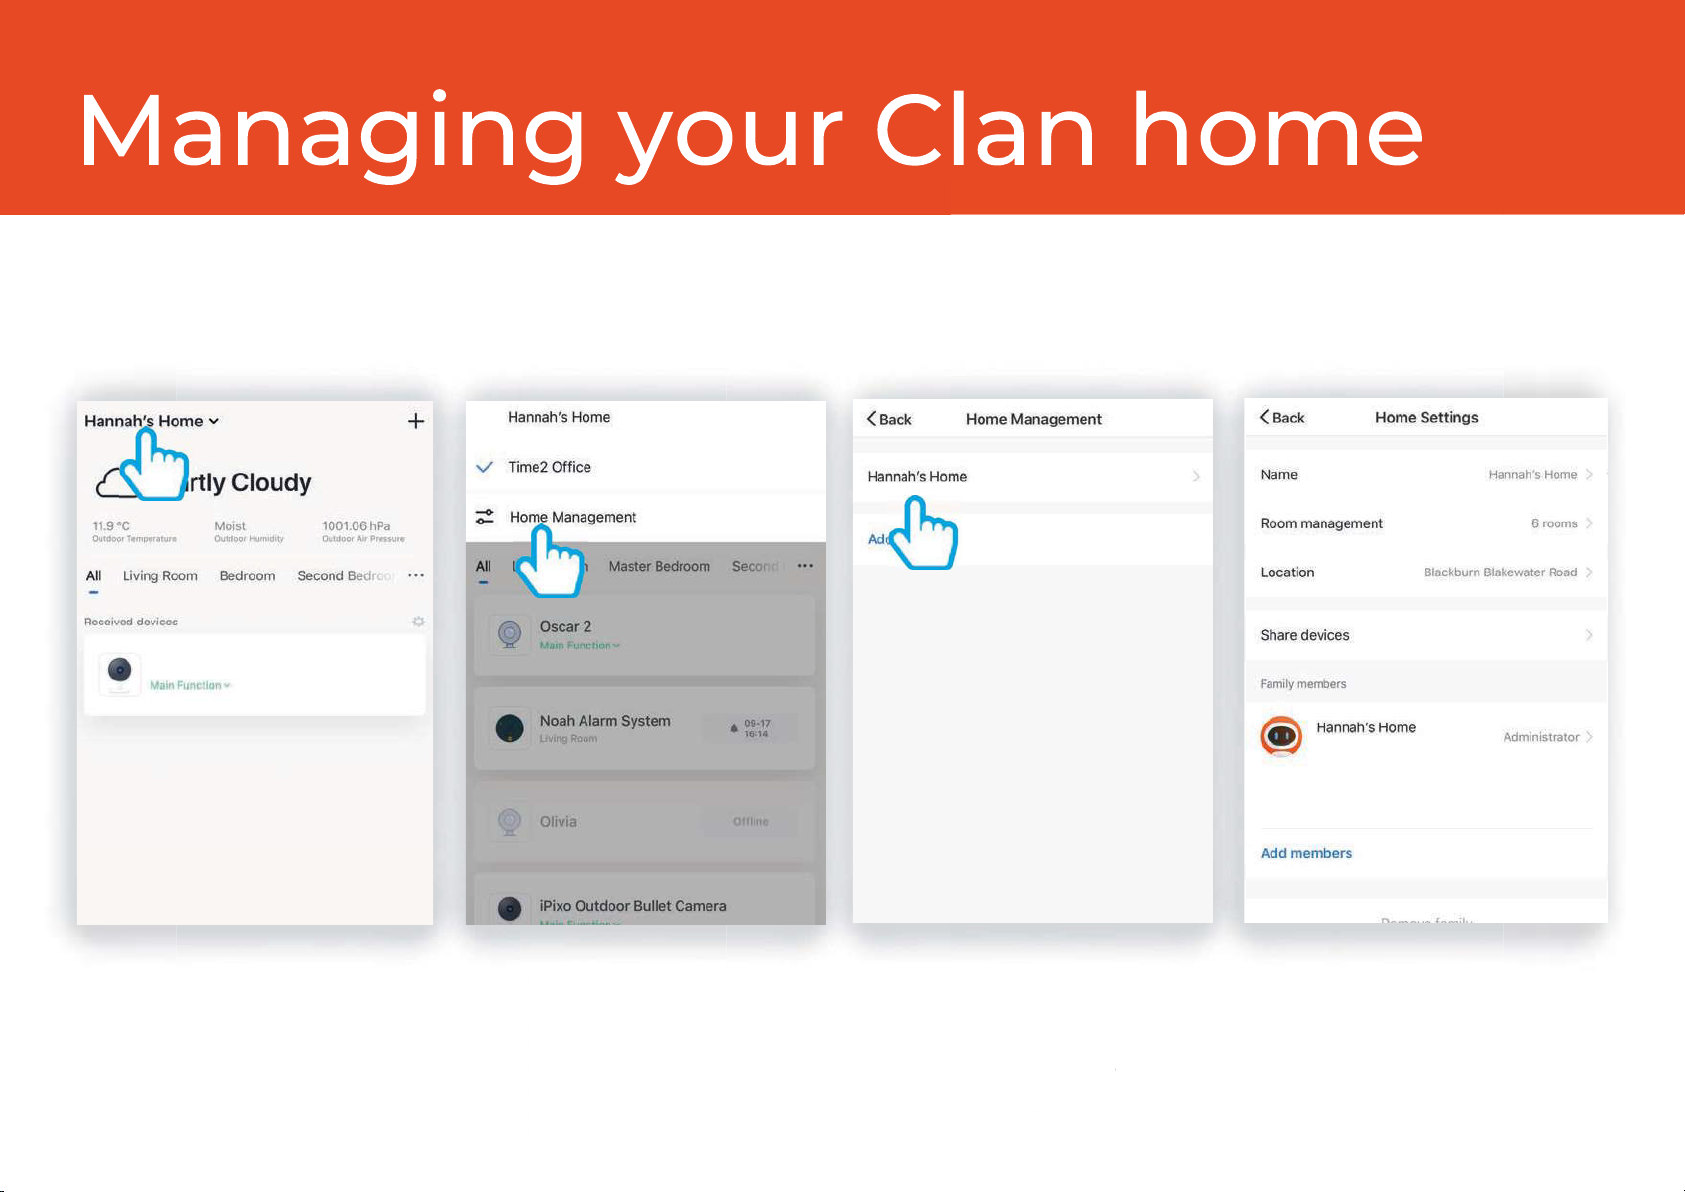
To create a home or manage your home settings, see steps below:
Ava
Step 1
Click on your Home name in
the top left corner
Select Home Management
Step 2 Step 4
Change settings, change
location or add a
family member
Click on your “Home”
You can also add a new Home
from this page
Step 3

14
Step 1
Click Add members Fill in the members name and Clan at
Home account details. Setting the
member as an administrator
gives them full access to device settings.
Step 2
The new family member will appear
under the list of Family members
Step 3
You are able to add Family Members to your home, this gives them access to all Clan devices in that home
automatically so you don’t have to share each device individually.

15
Mia
Ava
Share Ava
You are able to share Ava with your family and friends so they can also view the camera.
Sharing the device will only give them access to live-view, to give full access to Ava’s settings, please see “Add a Family
Member” on page 14.
Your family member must have a registered Clan at Home account.
Ava
Ava
Step 1
Click on Ava Click on the settings icon to
bring up the camera
settings
Step 2 Step 4
Click AddClick share devices
Step 3

16
Ava
Ava
Step 5
Enter email address
used to create an account
Click complete to share Ava
It will now appear as a
Shared device
Step 6 Step 8
Ava will now appear under
received devices
A notification will be received
on the phone that Ava
has been shared to
Step 7

17
Multi Camera View
The multi-view feature allows you to view up to four Clan cameras at the same time.
Step 1
Click on the camera in the
top right hand corner.
Hear whats happening
around your camera.
Save a screenshot on
your smartphone memory.
Select to speak into your camera.
Record live footage onto
your smartphone memory.
Full screen
Click on a screen to be
able to control it
Hannah Home
Bella
Ava

18
Web View
Once Ava is set up, you are able to view it on your PC or laptop.
Step 1
Go to https://www.time2technology.com/webview/
on your computer.
Please note: the web view is only supported on Google Chrome

19
Web View
Step 2
Click “Me” on the bottom right
hand corner
Step 3
Click on the square on the
top right hand corner.
Step 4
Using your phone
scan the QR code.
Ensure the QR code is
within the green square.
Hannah Home
Step 5
Click Confirm Login
Ava
Other manuals for Ava
1
Table of contents


