Tinplate Traditions 318E User manual

PLEASE READ BEFORE USE AND SAVE
Tinplate No. 318E
Electric Locomotive
www.mth-railking.com
Contemporary Version
Compatibility
This engine will operate on any traditional
42” STD Gauge track system, including
M.T.H.’s traditional tubular track. It is also
compatible with most standard AC
transformers. (See page 15 for a complete
list of compatible transformers and wiring
instructions.)
Freight Yard Sound
Passenger Station Announcement
OPERATOR’S MANUAL
(3V PS-2)

CAUTION: ELECTRICALLY OPERATED PRODUCT:
Not recommended for children under 10 years of age. M.T.H. recommends adult supervision with children ages 10 - 16.
As with all electric products, precautions should be observed during handling and use to reduce the risk of electric shock.
WARNING:Whenusingelectricalproducts, basicsafetyprecautionsshould beobserved,includingthe following:
Readthismanualthoroughly beforeusingthisdevice.
lM.T.H. recommends that all users and persons supervising use examine the hobby transformer and other electronic equipment
periodically for conditions that may result in the risk of fire, electric shock, or injury to persons, such as damage to the primary cord,
plug blades, housing, output jacks or other parts. In the event such conditions exist, the train set should not be used until properly
repaired.
lDonotoperateyour layoutunattended. Obstructedaccessoriesor stalledtrainsmayoverheat, resultingindamageto yourlayout.
lThistrainsetis intendedforindooruse. Do notuseif waterispresent. Seriousinjury orfatalitymayresult.
lDonotoperatethe hobbytransformerwithdamaged cord,plug,switches,buttons orcase.
lThe transformer was designed to operate on regular US household current (120 volt, 50-60 Hertz). Do not connect to any other
sourceofpower.
lToavoidthe riskofelectrical shock,donot disassemblethetransformer unit. Thereare nouser-serviceableparts inside. If theunit is
damagedcontactM.T.H.Servicefor instructions.
lThetransformeris equippedwith aninternal circuitprotector. If thecircuitprotectortrips,unplug thepower cordfrom theelectrical
wall outlet, check your layout for any short circuits. The circuit breaker will reset automatically when the short is removed from the
circuit.
lUnplugthetransformerfrom theelectricalwalloutlet whennotinuse.
lDonotusethis transformerforotherthan itsintendedpurpose.
Transformer Ratings:
Input: 120 VAC, 60 Hz Only, Output: Z-750: 21VAC 3.75A 78VA; Z-1000: 14VAC 80W or 18VAC 100W
Table of Contents
Set Up Checklist............................................................................................................ 3
Lubrication...................................................................................................... 3
Checking The Battery.................................................................................... 3
Basic Operation.............................................................................................................. 4
Activating Features......................................................................................... 4
Manual Volume Control............................................................................... 5
Proto-Sound® 2.0 Operating Instructions............................................................. 6
Activating Proto-Sound® 2.0 Conventional Mode Features.................. 6
Freight Yard Sounds(FYS)/Passenger Station Announcements (PSA). 6
Tips on using FYS/PSA............................................................................... 7
Speed Control................................................................................................. 7
Locking Locomotive Into A Direction....................................................... 8
Reset To Factory Default.............................................................................. 8
Automatic Sound Effects.............................................................................. 8
Maintenance.................................................................................................................... 9
Lubricating and Greasing Instructions....................................................... 9
Lubricating the Drive and Worm Gear....................................................... 9
Removing the Body........................................................................................ 10
Cleaning The Wheels, Tires and Track....................................................... 11
Headlight Replacement Instructions........................................................... 11
Self Charging Battery Back-Up.................................................................... 12
Troubleshooting Proto-Sound® 2.0 Problems......................................... 13
Transformer Compatibility and Wiring Chart........................................... 15
Additional Features Accessible Of DCS Remote Control System........ 16
Service & Warranty Information................................................................. 17
Limited One-Year Warranty.......................................................................... 17
This product may be protected by one or more of the following patents: 6,019,289; 6,280,278; 6,281,606; 6,291,263;
6,457,681; 6,491,263; 6,604,641; 6,619,594; 6,624,537; 6,655,640.
©2007, M.T.H. Electric Trains, Columbia, MD 21046

Set Up Checklist
Lubricate the locomotive
Check to see whether the battery needs to be charged for full sound effects
Apply power to run as described in the Basic Operating Section of this
manual
3
No. 318E Electric Locomotive
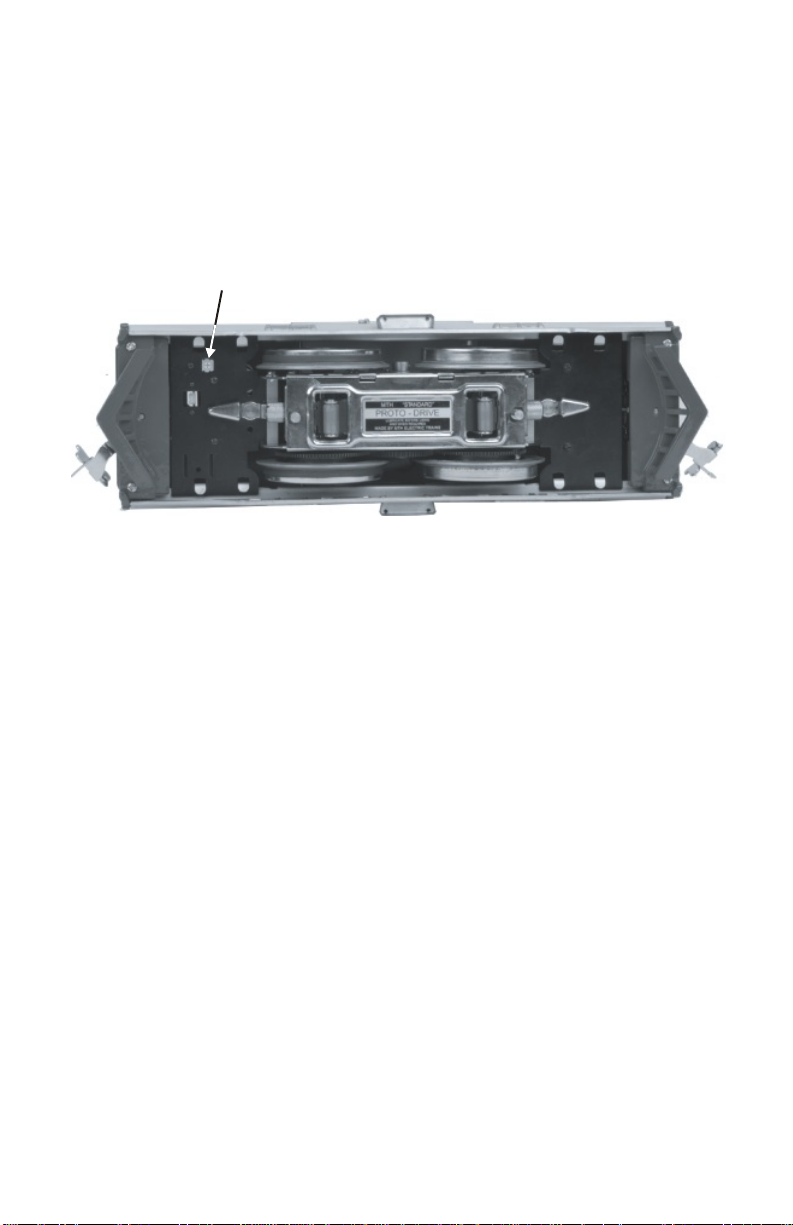
You should lubricate the engine to prevent it from squeaking. Use
light household oil and follow the lubrication points marked “L”
shown below. Do not over-oil. Use only a drop or two on each
pivot point.
Lubrication
p
p
p
DO NOT
OVER OIL
DO NOT
OVER OIL
DO NOT
OVER OIL
Lubrication Points on the Locomotive
Lubricate Pick Up Rollers (L)
Lubricate Wheel Axles (L)
Checking the Battery
You may find, if your locomotive was built several months before you set it up, that
the rechargeable battery has run down and needs to be charged before operating. If
you notice that the sounds are garbled, test and charge the engine as described in the
"Self-Charging Battery Back-Up" on page 12.

44 No. 318E Electric Locomotive
Basic Operation
The Throttle knob controls how fast your train will travel.
Turn the throttle knob up ½-way, until the engine headlight shines bright.
Put the engine into motion by pressing the Direction button on your transformer
once. (hold it for approximately 1 second)
If the engine does not begin to move as soon as you firmly press the Direction
button, you may not have sent enough voltage to the track to make the train move.
Turn the throttle up a bit higher until the train begins to move.
Activating Features
Throttle To increase or decrease track voltage, and therefore train speed, turn the
throttle control knob. Turning clockwise will increase voltage and speed, while
turning counterclockwise will decrease voltage and speed. The engine will maintain
the speed you set after you release the throttle until you turn it again to change the
voltage and speed.
Bell - To sound the bell, in an engine equipped with a bell firmly press and release
the Bell button. To turn the bell off, press and release the Bell button again. The
bell will continue to ring from the time you turn it on until you press and release
the button again to turn it off.
Horn/Whistle - To sound the whistle, firmly press the Horn/Whistle button. The
whistle will sound for as long as you continue to depress the button. It will stop
when you release the button.
Direction - Your train is programmed to start in neutral. The train will always
cycle neutral-forward-neutral-reverse with each press and release of the direction
button. The engine is programmed to restart in neutral each time the track voltage
is turned off for 25 seconds or more.
Cycle Phases
Neutral
Neutral ForwardReverse

5
No. 318E Electric Locomotive
Manual Volume Control
To adjust the volume of all sounds made by this engine, turn the master volume
control knob located under the tender clockwise to increase the volume and
counter-clockwise to decrease the volume.
Proto-Sound Manual Volume Adjustment
Proto-Sound 2.0
Volume Adjustment Knob

6No. 318E Electric Locomotive
Feature to Be Activated Button Code:
Freight Yard or Passenger Station Sounds
Fire the Rear Coupler
Fire the Front Coupler
Speed Control On/Off
Lock into a Direction
Reset to Factory Defaults
1 Bell, 2 Whistles
1 Bell, 3 Whistles
1 Bell, 4 Whistless
1 Whistle, 2 Bells (from Neutral only)
1 Whistle, 3 Bells
1 Whistle, 5 Bells (from Neutral only)
Timing Chart
Total Time Lapse: 1 Seconds½
Press
Whistle
Short &
Firm
½ Sec.
Pause ½ Sec.
Pause
Press
Bell
Short &
Firm
Press
Bell
Short &
Firm
Proto-Sound 2.0 Operating Instructions
This manual contains the operating instructions for Proto-Sound 2.0 in conventional
mode only. Instructions for accessing DCS command mode features accompany the
DCS Remote Control System equipment. SOLD SEPARATELY
Activating Proto-Sound 2.0 Conventional Mode Features
Proto-Sound 2.0 features are activated by sequences of Bell and Horn button pushes
described below. Please read the full descriptions of each feature before using it. To
use these buttons to activate features rather than to blow the horn or ring the bell,
you should tap the buttons very quickly with a ½-second pause between button
presses. You may need to practice your timing to make this work smoothly.
Freight Yard Sound(FYS)/
Passenger station announcements (PSA):
Your engine is equipped with a sound package of passenger station
announcements that you can play when you pull into a station. Each sequence
described below will play as long as it is left on, randomly generating
sounds, but be sure to allow approximately 30 seconds between the button
pushes described below to allow the FYS/PSA sufficient time to run
through each sequence.
!To cue the sound system to play the FYS/PSA, quickly but firmly tap the Bell
button once followed by 2 quick taps of the Horn button while the engine is
moving. Tap the buttons quickly but allow approximately ½ second between
each press.
!Press the Direction button once to stop the engine. This will trigger the first
sequence of FYS/PSA. The reverse unit is temporarily disabled so that the
train will not move as you use the Direction button to trigger the sounds, and
Proto-Sound 2.0 has disabled operator control over the Horn and Bell buttons
until the full FYS/PSA sequence is complete.

7
No. 318E Electric Locomotive
+
Sound System Cued to Play
Freight Yard or Passenger
Station Sounds (FYS)/(PSA)
Whistle Whistle
Bell
Direction
1st
Sequence
FYS/PSA
+
Direction
2nd
Sequence
FYS/PSA
+
Direction
3rd
Sequence
FYS/PSA
+
Direction
4th
Sequence
FYS/PSA
=Operator
Controls
When Bell
Turns Off
!After waiting about 30 seconds for that sequence to run, press the Direction button
again to trigger the second sequence of FYS/PSA.
!After about 30 seconds, press the Direction button again to trigger the third FYS/PSA
sequence.
!Again, after allowing about 30 seconds for that sequence to run, press the Direction
button one more time to trigger the fourth and final FYS/PSA sequence.
!The FYS/PSA will continue, and within a few seconds, the engine and bell will start
and move out on its own at the current throttle setting, in the same direction it was
traveling when you began the sequence. Once the bell turns off, the operator regains
control of the transformer's bell and Horn buttons and can ring the bell or blow the
Horn as usual.
Tips on Using FYS/PSA
!You can terminate FYS/PSA at any time by turning off power to the track for 15
seconds.
!You do not have to be in Forward to use FYS/PSA. At the conclusion of the
full sequence, the train will pull away from the station in whatever direction you
were going when you activated the feature.
!You can use FYS/PSA even if you are double-heading with another engine. If
the second engine is not equipped with Proto-Sound 2.0, you must remember
not to leave the throttle at a high voltage level once you have stopped the engine
to run the FYS/PSA. Otherwise, the engine without FYS/PSA will begin
vibrating on the track as its motors strain to move the train, since they cannot be
automatically disabled during the FYS/PSA cycle (or if an original Proto-Sound
engine, FYS/PSA are triggered differently and that engine's motor-disable
feature will not be active when you run FYS/PSA in Proto-Sound 2.0).
!FYS/PSA can be triggered from Neutral. It will operate the same as if triggered
while in motion except that, at the conclusion of the FYS/PSA, the engine will
depart in the next direction of travel, as opposed to the direction it was traveling
before entering Neutral.
Speed Control:
M.T.H. engines equipped with Proto-Sound 2.0 have speed control capabilities that allow the
engine to maintain a constant speed up and down grades and around curves, much like an
automobile cruise control. You can add or drop cars on the run, and the engine will maintain
the speed you set.
While the engine is programmed to start with the speed control feature activated, you can opt
to turn it off. This means the engine's speed will fall as it labors up a hill and increase as it
travels downward. It is also affected by the addition or releasing of cars while on the run.
Because the engine will run more slowly at a given throttle voltage when speed control is on
than when it is off, you should adjust the throttle to a lower power level for operation with
speed control off to avoid high-speed derailments. When speed control is off, the volume will
drop to allow for better low voltage operation.

8No. 318E Electric Locomotive
To turn speed control on and off, put the engine in neutral, then quickly tap the
transformer's Horn button one time then quickly tap the Bell button two times, allowing
approximately ½ second to lapse between each quick button press. Two horn blasts will
indicate that the engine has made the change. Repeat the 1 horn, 2 bells code to return it to
the other condition. You will want to do this during the initial neutral upon start-up if you
ever couple this engine to another engine that is not equipped with speed control to avoid
damaging the motors in either engine. Each time you shut down the engine completely, it
will automatically turn speed control on.
Lock into a Direction:
You can lock your engine into a direction (forward, neutral, or reverse) so that it will not
change directions. To do this, put the engine into the direction you want (or into neutral to
lock it into neutral), run it at a very slow crawl (as slowly as it will move without halting),
and quickly but firmly tap the Horn button once followed by three quick taps of the Bell
button, allowing approximately ½ second to lapse between each quick button press. Two
horn blasts will indicate that the engine has made the change. The engine will not change
direction (including going into neutral) until you repeat the 1 horn, 3 bells code to return
the engine to its normal condition, even if the engine is kept without power for extended
periods of time.
Reset to Factory Defaults:
To override the settings you currently have assigned to the engine and reset it to its factory
defaults, while in Neutral tap the Horn button quickly once, followed by five quick taps of
the Bell button, allowing approximately ½ second to lapse between each quick button press.
Two horn blasts will indicate that the engine has made the change.
Automatic Sounds
Certain Proto-Sound 2.0 sound effects automatically play in programmed conventional
mode conditions:
!Squealing Brakes play any time the engine's speed decreases rapidly.
!Cab Chatter plays at random intervals when the engine idles in neutral.
!Engine Start-up and Shut-down sounds play when the engine is initially powered on
or is powered off for five seconds or more
Horn
Place
Engine into
Neutral
Bell Bell
=
Horn
Place
Engine into
Desired
Direction
Horn
Bell Bell Bell
=
Speed Control
Two Horn Blasts
(indicates change is made)
Repeat to Return
to Normal Condition
Direction Lock
Two Horn Blasts
(indicates change is made)
Repeat to Return
to Normal Condition
Reset
Two Horn Blasts
(indicates change is made)
Repeat to Return
to Normal Condition
Horn
Place
Engine in
Neutral =
BellBellBellBellBell

9
No. 318E Electric Locomotive
Maintenance
Lubricating and Greasing Instructions
The engine should be oiled and greased in order to run properly.
Regularly lubricate all engine axles including pickup roller axles, to prevent
squeaking. Use light household oil, such as that found in M.T.H.'s maintenance kit. Do not
over oil. Use only a drop or two on each pivot point.
The locomotive's internal gearing was greased at the factory. Grease engine every 50 hours
of use or at least once yearly if engine is not run. Use a lithium based grease
and follow the greasing instructions.
Lubricating the Drive and Worm Gear
Remove the two Contact Plate mounting screws from the ends of the motor frame then
lift the Contact Plate off the motor frame.
DO NOT
OVER OIL
DO NOT
OVER OIL
DO NOT
OVER OIL
Drive Gear
Worm Gear Plunger Pin
Flat Contact Plate
Contact Plate
Mounting
Screw
Contact Plate
Mounting
Screw
Lubricate Pick Up
Rollers (L) Lubricate
Wheel Axles (L)
Idler Gears
Lubricate
Wheel Axles (L)
Lubricate the Drive Gear and Worm Gear with White Lithium Grease. Make sure when
replacing the Contact Plate that the Plunger Pin makes contact with the Flat Contact plate.

10 No. 318E Electric Locomotive
Removing the Body
Removing the body is easily accomplished by removing its mounting screws as
indicated in the figures below. Once the screws have been removed, gently lift the
body up and away from the chassis.
Mounting screw Mounting screw
Mounting screw

11
No. 318E Electric Locomotive
Cleaning The Wheels, Tires and Track
Periodically check the locomotive wheels and pickups for dirt and buildup, which can
cause poor electrical contact and traction as well as prematurely wear out the
neoprene traction tires.
Periodically check the locomotive wheels and pickups for dirt and buildup, which can
cause poor electrical contact and traction and prematurely wear out the neoprene
traction tires. Wheels and tires can be cleaned using denatured (not rubbing) alcohol
applied with a cotton swab.
To clean the track, use RailKing Track Cleaning
Fluid and a clean rag or denatured (not rubbing)
alcohol. Unplug the transformer and wipe the
rails of the track, turning the rag frequently to
ensure that you are using clean cloth on the rails.
Thereafter, keep an eye on the track and clean it
when it gets dirty to ensure good electrical
contact and to lengthen the life of the tires.
Headlight Replacement Instructions
The headlights are easy to remove by unscrewing them from their housings.
(Order
Phone: 410-381-2500, Mail: 7020 Columbia Gateway Drive, Columbia MD 21046-
1532, ).
Replacement light bulbs are available directly from the M.T.H. Parts Department.
Headlights

12 No. 318E Electric Locomotive
Self Charging Battery Back-Up
The special NiCad 2.4v self-charging battery recharges continuously during train operation and
should last for up to five years. The battery is a dry battery that should not leak or cause any
damage to your engine. Depending upon when your engine was built, it may need to be
charged right out of the box. If engine sounds seem distorted or garbled at low voltages or
become silent when power from the transformer is turned off, test the battery to determine
whether it should be recharged or replaced.
Test: Put the engine in
neutral and leave the track
voltage at 10-12 volts (high
enough for the lights to
shine brightly) for 15
minutes.
Recharge: If the sounds are improved at the end of the 15-minute test charge, the battery
charge has run down and can be recharged. There are a number of ways you can do this:
- Leave the engine in neutral with track voltage at 10-12 volts for 6-7 hours so
the battery can fully recharge (if your engine has a smoke unit, be sure it is turned
off).
-Use M.T.H.'s battery recharger (sold separately) that plugs into a wall outlet
and a special port under the engine to recharge the battery overnight without
leaving it on the track.
Replace: If the sounds are not improved at the end of the 15-minute test charge, it
is time to replace the battery. Available through M.T.H. Parts.
DO NOT substitute alkaline batteries for these NiCad batteries. Using alkaline
batteries in this system can result in damamge to the PS 2.0 circuit board and/or the
batteries.
**Do not use alkaline batteries for testing or checking purposes for the 3-Volt PS2
boards. Using alkaline batteries will damage the 3-Volt battery charging circuit.**
Lift Out Battery
Battery Location
Battery Charger Port

13
No. 318E Electric Locomotive
®
Troubleshooting Proto-Sound 2.0 Problems
Although Proto-Sound 2.0 has been designed and engineered for ease of use, you may have
some questions during initial operation. The following table should answer most questions.
If your problem cannot be resolved with this table, contact M.T.H. for assistance (e-mail:
Columbia Gateway Drive, Columbia MD 21046-1532).
Starting Up
Whistle
Bell
Remedy
Remedy
Remedy
When I first turn the power on, the engine
will not begin to run.
The engine will not start after I press the
Direction button.
My engine sounds are distorted and garbled.
I can't get the whistle to blow when I press
the whistle button.
I can't get the bell to ring when I press the
bell button.
You may be pressing the button too quickly. Try
pressing the Whistle button more slowly, taking
approximately one full second to fully depress the
button.
You may be pressing the button too quickly. Try
pressing the bell button more slowly, taking
approximately one full second to fully depress the
button.
This is normal behavior. To prevent accidental
high-speed start-ups, Proto-Sound 2.0 is
programmed to start up in neutral anytime track
power has been turned off for several seconds. See
the "Basic Operation" section for more details.
You may not be sending enough power to the track
to power the engine. Press the throttle up for a few
more seconds to increase track power.
The battery may have run down, especially if the
engine has been in storage for some time. See the
"Self-Charging Battery Back-Up" section of these
instructions for how to test, recharge, and (if
necessary) replace the battery.
Coupler Remedy
When I try to fire the coupler, FYS/PSA
starts.
The Proto-Coupler won't let the engine
uncouple on the fly.
The coupler does not fire or stay coupled.
You are waiting too long between whistle button
presses. See the timing instructions located at the
beginning of the "Proto-Sound 2.0 Operating
Instructions" section.
Try lubricating the coupler knuckle and rivet with
a dry graphite lubricant.
The coupler needs to be cleaned. Wipe with
denatured alcohol (not rubbing alcohol) and let
dry.
Cab Chatter Remedy
Sometimes the Cab Chatter sounds don't
play. Cab Chatter plays only in neutral at random
intervals.
Lock-out Remedy
I can't get the engine to run after I power up
the transformer. It sits still with the diesel
and compressor sounds running.
The engine won't lock into forward, neutral,
or reverse.
The engine maybe locked into the neutral
position. Follow the procedure in the "Lock into a
Direction" section to unlock the engine's direction.
Engine speed must be below 10 scale mph
(approx. 10 volts or less in conventional mode).

14 No. 318E Electric Locomotive
Volume Remedy
The sounds seem distorted, especially when
the whistle or bell is activated.
No Sound
Proto-Sound 2.0 volume is set too high. Turn the
volume control knob on the bottom of the tender
counter-clockwise to reduce the volume.
Volume is set too low, adjust volume control knob
on the bottom of the tender clockwise to increase
the volume or check connector to speaker.
Battery Remedy
The engine will not leave the initial neutral
setting.
I get no sounds when the engine shifts
between directions.
After I turn off my transformer, my engine
continues to make sounds before quitting.
Check to be sure the battery is installed and fully
charged. See the "Self-Charging Battery Back-
Up" section.
The battery may be dead or need to be charged.
See the "Self-Charging Battery Back-Up" section.
Proto-Sound 2.0 is designed to continue to sound
for a few seconds after power to the track has
been shut off to allow for a more realistic shut-
down.
FYS/PSA Remedy
The FYS/PSA sounds occasionally repeat
themselves. Proto-Sound 2.0 has a built-in random number
generator that randomly selects each sound clip to
play. Because there are a limited number of
sound clips available in each FYS/PSA sequence,
it is probable that some of these sound clips will
be repeated from time to time.
Once in FYS/PSA, the engine doesn’t go
into reverse.
When the FYS/PSA enters its last sequence
the bell automatically comes on
When FYS/PSA is enabled, pressing the
whistle and bell has no effect
I push the direction button but the next
sound clip in the sequence does not play or
the engine does not come out of FYS/PSA
after fourth press of the direction button.
So that FYS/PSA effects can be as realistic as
possible, Proto-Sound 2.0 disables the reversing
unit whenever FYS/PSA is enabled. This way the
engine remains still at its stop as the operator
cycles through the FYS/PSA sequences.
FYS/PSA is programmed to start ringing the bell
at that point. After approximately 12 seconds, it
will automatically turn off.
Because FYS/PSA must control various effects in
each sequence, Proto-Sound 2.0 takes control of
these sound effects until you exit FYS/PSA
Each FYS/PSA clip must play for aprox. 30
seconds before FYS/PSA will advance to the next
step in the FYS/PSA cycle. Wait at least 30
seconds in each FYS/PSA sound clip before
pressing the direction button.

15
No. 318E Electric Locomotive
Transformer Compatibility and Wiring Chart
Proto-Sound 2.0 is designed to work with most standard AC transformers.
The chart below lists the many compatible transformers. Note that many of the
operational commands described in these instructions require a bell button, so if
your transformer does not have its own bell button, you should consider adding
one to get the full benefit of the system. In addition, the chart details how the
terminals on these transformers should be attached to your layout.
Transformer
Model Center Rail Outside Rail Min/Max.
Voltage Power
Rating Transformer
Type
Lionel 1032 U A 5-16v 90-Watt Standard
Lionel 1032M U A 5-16v 90-Watt Standard
Lionel 1033 U A 5-16v 90-Watt Standard
Lionel 1043 U A 5-16v 90-Watt Standard
Lionel 1043M U A 5-16v 90-Watt Standard
Lionel 1044 U A 5-16v 90-Watt Standard
Lionel 1053 U A 8-17v 60-Watt Standard
Lionel 1063
Lionel LW
Powermaster
U
A
U
A
U
A
8-17v
8-18v
8-18v
60-Watt
75-Watt
135VA
Standard
Standard
Electronic
All-Trol Left Terminal Right Terminal 0-24v 300-Watt Electronic
Dallee Hostler Left Terminal Right Terminal Electronic
Lionel LW A U 8-18v 75-Watt Standard
Lionel KW A or B U 6-20v 190-Watt Standard
Lionel MW Outside Track
Terminal Inside Track
Terminal 5-16v 50V.A. Electronic
Lionel RS-1 Red Terminal Black Terminal 0-18v 50V.A. Electronic
Electronic
Lionel RW U A 9-19v 110-Watt Standard
Lionel SW U A Unknown 130-Watt Standard
Lionel TW U A 8-18v 175-Watt Standard
Lionel ZW
Lionel Post-War
Celebration
Series ZW
A,B,C or D
A,B,C or D
U
Common
8-20v
0-20v
275-Watt
135/190 Watt
Standard
MTH Z-500 Red Terminal Black Terminal 0-18v 50-Watt Electronic
MTH Z-750
MTH Z-1000
Red Terminal
Red Terminal
Black Terminal
Black Terminal
0-21v
0-21v
75-Watt
100-Watt
Electronic
Electronic
MTH Z-4000 Red Terminal Black Terminal 0-22v 390-Watt Electronic
* Conventional Mode Only
RECOMMENDED AC TRANSFORMERS

16 No. 318E Electric Locomotive
Additional FeaturesAccessible with the
DCS Remote Control System: (additional equipment required)
While conventional mode operation of a Proto-Sound 2.0 engine yields wonderfully
realistic sound and several train control features, command mode operation allows the
user to access a world of command functions never before accessible to O Gauge
railroaders. With the addition of the DCS Remote Control System (including a DCS
remote handheld and Track Interface Unit) users gain many advanced features, including:
!DCS Proto-Speed Control - Establishes desired locomotive speed in scale miles per
hour increments via a thumbwheel control and allows operator to set maximum
speed and acceleration/deceleration rates
®
!ProtoSmoke Variable Output Control - Controls how much smoke each engine
outputs and matches smoke to locomotive speed
!Locomotive Lighting Control - Controls locomotive headlights, marker and interior
lights, beacon lights, ditch lights, and MARS lights
!Emergency Stop-Single button push stops all Proto-Sound 2.0 trains but does not
turn off the power
!One Touch Global Mute/UnMute-Single button mutes or unmutes all DCS-
controlled locomotives' user-defined actions, including sound, lights, and smoke
!Proto-Dispatch Operation-Public Address-like feature allows users to speak through
locomotive speaker during operation
!Proto-Cast-Allows users to play audio recordings through locomotive speaker during
operation
!Proto-Doppler Sound Effects Set Up-Users can configure locomotive for Doppler
Operation, including setting distance points for Doppler start, repeat, and stop modes
!Independent Volume Control of Engine Sounds, Bell, Horn & Whistle for each
Locomotive
!Control up to 50 different DCS-Equipped Locomotives at one time with multiple
TIUs
!Proto-Effects™ Set Up-User can select individual Proto-Effects™ operations to be
active or inactive, including cab chatter, train wreck sounds, coupler sounds, and
wheel clickety-clack sounds
!Direction Control Set Up-User can set initial individual start-up direction (start in
forward or reverse) for double-heading operations
!Locomotive Consist Set-up-User can determine locomotive values for consist make-
ups, allowing multiple locomotives belonging to a consist to operate together
!Query Locomotive Information-User can query locomotive programming to learn
locomotive address and engine data information, including scale miles traveled
!User Can Query, Set and Operate Track and Accessory Interface Units for
Programming Digital Command Operations for up to 250 Accessories and 250
Individual Switches
!User Can Script, Record and Playback Train Routes
Operating instructions for all DCS Command features will accompany the DCS remote
control equipment.

17
No. 318E Electric Locomotive
Service & Warranty Information
How to Get Service Under the Terms of the Limited One-Year Warranty
When you suspect an item is defective, please check the operator's manual for standard operation and
trouble-shooting techniques that may correct the problem. Additional information may be found on the
M.T.H. Website. Should you still require service, follow the instructions below to obtain warranty service.
First, e-mail, write, call or fax a M.T.H. Authorized Service Center (ASC) in your area to obtain Repair
Authorization. You can find the list of ASCs on the M.T.H. Website, www.mth-railking.com. Authorized
Service Centers are required to make warranty repairs on items sold only from that store; all other repairs
may-- or may not be done at the store's own discretion. If you did not purchase the item directly from the
ASC, you will need to select a National Authorized Service Center (NASC). These centers are
compensated by M.T.H. to perform warranty service for any customer whose repair qualifies for warranty
service. A list of NASC retailers can be located on the M.T.H. Website or by calling 410-381-2580.
Should the warranty no longer apply, you may choose either an ASC or NASC retailer to service your
M.T.H. Product. A reasonable service fee will be charged.
CAUTION: Make sure the product is packed in its original factory packaging including its foam and
plastic wrapping material to prevent damage to the merchandise. There is no need to return the entire set
if only one of the components is in need of repair unless otherwise instructed by the Service Center. The
shipment must be prepaid and we recommend that it be insured. A cover letter including your
name, address, daytime phone number, e-mail address (if available), Return Authorization
number (if required by the service center, a copy of your sales receipt and a full description of
the problem must be included to facilitate the repairs. Please include the description regardless
of whether you discussed the problem with a service technician when contacting the Service
Center for your Return Authorization.
Please make sure you have followed the instructions carefully before returning any merchandise for
service. Authorized M.T.H. Service Centers are independently owned and operated and are not agents or
representatives of M.T.H. Electric Trains. M.T.H. assumes no responsibility, financial or otherwise, for
material left in their possession, or work done, by privately owned M.T.H. Authorized Service Centers.
Limited One-Year Warranty
All M.T.H. products purchased from an Authorized M.T.H. Train Merchant are covered by this
warranty.See our website at www.mth-railking.com or call 410-381-2580 to identify an Authorized
M.T.H. Train Merchant near you.
M.T.H. products are warrantied for one year from the date of purchase against defects in material or
workmanship, excluding wear items such as light bulbs, pick-up rollers, batteries, smoke unit wicks, and
traction tires. We will repair or replace (at our option) the defective part without charge for the parts or
labor, if the item is returned to an M.T.H. Authorized Service Center (ASC) or M.T.H. National
Authorized Service Center (NASC) within one year of the original date of purchase. This warranty does
not cover damages caused by improper care, handling, or use. Transportation costs incurred by the
customer are not covered under this warranty. Items sent for repair must be accompanied by a return
authorization number, a description of the problem, and a copy of the original sales receipt from an
Authorized M.T.H. Train Merchant, which gives the date of purchase. If you are sending this product
to an Authorized Service Center, contact that Center for their return authorization.
This warranty gives you specific legal rights, and you may have other rights that vary from state to state.
Specific questions regarding the warranty may be forwarded to M.T.H. Directly.
Service Department:
M.T.H. Electric Trains
7020 Columbia Gateway Drive
.Columbia MD 21046-1532
Table of contents
Other Tinplate Traditions Toy manuals
Popular Toy manuals by other brands

LaserPegs
LaserPegs dragonfly manual

MGA Entertainment
MGA Entertainment CRATE CREATURES SURPRISE KABOOM BOX CROAK... manual

Power Wheels
Power Wheels N7115 Owner's manual with assembly instructions

d-Red
d-Red smart icopter user guide

Compass
Compass Knight 50 instruction manual

LEGO
LEGO City 60083 Assembly guide

Value Hobby
Value Hobby LASER instruction manual

TILLIG BAHN
TILLIG BAHN 85532 manual

Hasbro
Hasbro NERF Power Moves Marvel Avengers Captain Marvel Photon... quick start guide

Lionel
Lionel BNSF Ice Cold Express owner's manual

Precision Aerobatics
Precision Aerobatics ADDICTION manual

Eduard
Eduard Zoom T-38A Talon interior quick start guide