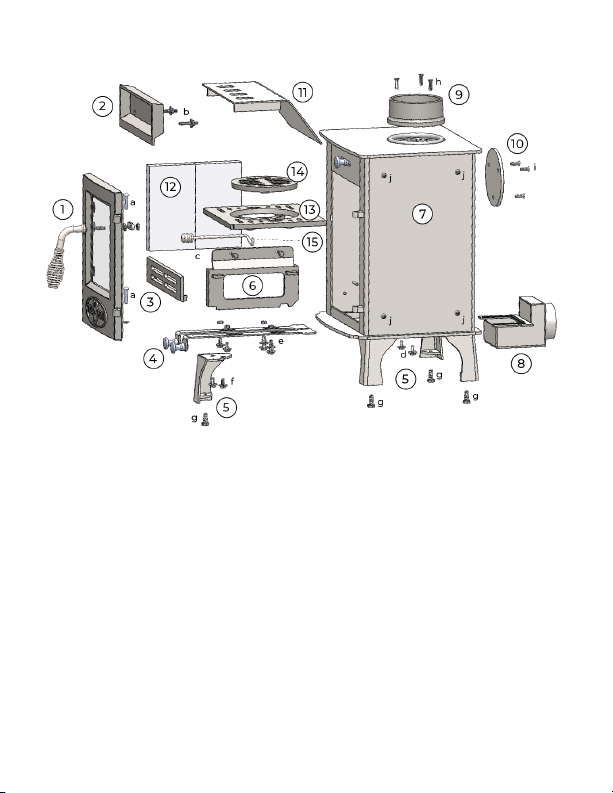
Tiny Wood Stove Dwarf 3kw LITE User manual

MANUAL
Installation, Use, & Maintenance
TINYWOODSTOVE.COM

We are excited that you chose
a Dwarf Stove for your space
and can’t wait to see it installed!
Before installing and using your
stove please take some time to
read this manual cover-to-cover.
It contains the most important
information you need to successfully
install and enjoy your new Dwarf
Stove. If you have questions about
your installation please get in touch!
Cheers!
- The Tiny Wood Stove Team
THANKS FOR YOUR PURCHASE!
TINY WOOD STOVE LLC
1329 Biztown Loop
Hayden, ID 83835
(208) 352-3417
support@tinywoodstove.com
Dwarf Stove Models:
Dwarf 3kW LITE
Dwarf 3kW Standard
Dwarf 4kW
Dwarf 5kW
SAFETY NOTICE: IF THIS STOVE IS NOT PROPERLY INSTALLED,
A HOUSE FIRE MAY RESULT. FOR YOUR SAFETY, FOLLOW THE
INSTALLATION DIRECTIONS. CONTACT LOCAL BUILDING OR
FIRE OFFICIALS ABOUT RESTRICTIONS AND INSTALLATION
INSPECTION REQUIREMENTS IN YOUR AREA.
© 2022 TinyWoodStove.com • V4 • All rights reserved.

THANKS FOR YOUR PURCHASE!
TABLE OF CONTENTS
Warning 4
Applications 5
Warranty 5
Diagram and Technical Data 6
Precautions 7
Receiving And Assembling Your Stove 8
Installing Your Stove 13
Dwarf Required Clearances 13
Heat Shields 14
Hearth 15
Flue Requirements 16
Operating Your Wood Stove 17
Lighting A Fire 17
Operation 18
Maintaining Stove and Flue Systems 21
Cleaning the Stove 21
Replacing Firebricks 22
Maintaining the Door Seal 22
Flue Inspection and Cleaning 23
Sourcing and Processing Firewood 24
Direct Air 26
Controlling Humidity 27
Chimney Fires 28
Troubleshooting 29
Notes 36

4
WARNINGS
Improper use or installation of a wood-burning stove can cause re, injury, or death. Use
only solid fuel rated stove pipe and chimney pipe, observe proper clearances, burn only
approved fuels in your stove, and maintain smoke and carbon monoxide alarms at all times.
Regularly inspect and clean the ue system to prevent blockages and creosote buildup.
Local laws and building codes vary, and applicable codes should be strictly followed if
they dier from the information included in this manual. If you are attempting a DIY
installation where installation by an unlicensed installer is permitted, an inspection of
the completed installation by a professional is highly recommended.
If you have any doubts about your small stove installation, please ask for help from a
professional installer!
⚠
Warning: California Proposition 65
Use of this product can expose you to chemicals including soot, creosote, wood
dust, and wood smoke containing carbon monoxide, which are known to the State
of California to cause cancer, birth defects, or other reproductive harm. For more
information, visit www.P65Warnings.ca.gov
⚠
Warning
e factory coating applied to your Dwarf stove is not food grade. When using your
stove for cooking, always place your food in appropriate cookware, and never directly
on the painted stovetop.
⚠
SAFETY NOTICE
IF THIS STOVE IS NOT PROPERLY INSTALLED, A HOUSE FIRE MAY
RESULT. FOR YOUR SAFETY, FOLLOW THE INSTALLATION DIRECTIONS.
CONTACT LOCAL BUILDING OR FIRE OFFICIALS ABOUT RESTRICTIONS
AND INSTALLATION INSPECTION REQUIREMENTS IN YOUR AREA.

5
APPLICATIONS
Our Dwarf stoves are designed specically for small recreational and temporary spaces
less than 500 square feet like tents, yurts, RVs, buses, vans, boats, and tiny homes on
wheels. e Dwarf stove is not certied (UL/CSA) or approved (EPA) for residential or
commercial heating and is intended for recreational, portable, or temporary use only.
U.S. ENVIRONMENTAL PROTECTION AGENCY
is unit is not a certied residential wood heater. For portable and temporary use only.
WARRANTY
We created the Dwarf stove with quality, eciency, and aordability in mind. With
proper operation and maintenance, your stove should give you many years of trouble-
free use. We stand behind our stove with a 5-year warranty on defective materials or
workmanship.
If you have any issues with the stove, or to make a warranty claim, please contact us at
For any defects covered under this warranty, we will, at our discretion, repair or
replace your item, or refund your money up to the full purchase price of the defective
item. is warranty does not cover malfunction due to misuse, abuse, or improper
installation or maintenance; does not cover wear and tear on consumables like gaskets,
rebricks, and glass; does not cover the cost of shipping; does not cover incidental,
consequential, or indirect damages; and is limited in value to the original purchase
price of the defective item.
Please note that shipping damage is not a warranty claim. If your stove was damaged in
shipping, please contact us right away so that we can repair or replace it. Please inspect
your stove for shipping damage immediately upon receipt. Claims for shipping
damage must be made within 30 days of the date your stove shipped.

6
DIAGRAM AND TECHNICAL DATA
Parts
1. Door Assembly (door handle may be
packed separately)
2. Air Wash Manifold / Tertiary Air Valve
3. Coal Bar
4. Primary and Secondary Air Valves
5. Legs
6. Fire Grate Support
7. Stove Body
8. Direct-Air Box (optional accessory)
9. Flue Flange
10. Cover Plate
11. Bae
12. Fire Bricks
13. Fire Grate
14. Riddling Grate
15. Riddling Grate Handle
Hardware
a. Door Pins (2)
b. Air Wash Manifold Mounting Bolt M6 (2)
c. Firebrick Support Bolt M6 (4)
d. Fire Grate Support Bolt M6 (2)
e. Air Valve Mounting Hardware - Bolt M6
(4) Washer (4) and Spring (2)
f. Leg Mounting Bolt M6 (8)
g. Stove Leveling Bolt M8 (4)
h. Flue Flange Bolt M6 (3)
i. Cover Plate Bolt M6 (3)
j. Accessory Mounting Bolt M6 (10)

7
PRECAUTIONS
• All parts of the stove are very hot during operation. Do not leave young children in
the room with the stove unsupervised. Do not allow ammable items like upholstery,
curtains, rewood baskets, etc. to violate clearances while the stove is in operation.
• e stove handle and air control knobs can get very hot during operation.
Take care when operating the spring handle, and use a tool or a heat-resistant
glove to operate your stove’s air controls.
• Keep a functioning smoke and carbon monoxide detector in the same room as
the stove, and test them at least once a month.
• Do not use exhaust fans in the same room as the stove while it is operating.
A powerful exhaust fan can pull combustion gases out of the stove into the living
space by changing ambient pressure. HRVs or ERVs (Heat/Energy Recovery
Ventilators used in super-ecient construction) that switch to “exhaust only”
mode in sub-freezing temperatures can cause draft problems in relatively airtight
spaces. Be sure to consult your operations manual if you are using an HRV or
ERV, and switch it o while the stove is operating if necessary.
• Never use liquid fuel to start or freshen a re in a wood stove. It could cause an
explosion inside the stove or the ue system.
• Never use water to put out a re in a wood stove. Water can explosively ash
to steam, which can cause severe scalding burns.
• Avoid overring or underring the stove. We recommend monitoring the ue
temperatures with a ue thermometer. Underring can cause excessive creosote
formation and increase the risk of a chimney re. Overring can cause damage to
the stove and surrounding materials. If any part of the stove or ue system starts
to glow red, close the air controls nearly all the way until the stove cools down.
• Your stove is designed to operate with the door closed. Don’t leave the door open
for longer than is necessary to stoke the re.
• Your stove requires regular maintenance to function properly. Failure to
adequately maintain your stove can result in poor stove performance or chimney
res. See the Maintaining Your Stove and Flue System section of this manual.

8
RECEIVING YOUR STOVE
Your stove is heavy. It’s best to have two people move and install your stove.
Once the stove is delivered, please unpack it right away. Claims for shipping damage
must be reported within 30 days of the ship date. If you nd any damage or blemishes
on your stove, please snap a few pictures and email them to us at
support@tinywoodstove.com.
ASSEMBLING YOUR STOVE
For a detailed stove unboxing video check out our videos page on our website:
www.tinywoodstove.com/videos/
Required tools: Phillips Screwdriver, 10mm Socket or Adjustable Wrench, Utility Knife
1. To unbox the stove, sit the stove crate upright on its legs and cut the outer straps.
Remove the 2 screws from each leg with a Phillips screwdriver. Some stoves may
have additional packing material that needs to be removed before you can access
both screws. Lift o the crate and the box. Cut the inner straps to release the stove.
Remove plastic and paper wrap.
2. Open the door, remove the air controls, coal bar, bae, wrapped ue ange, legs,
and ash pan from inside the rebox. Remove the bae last: lift up and forward
Figure 2.1: Procedure to Remove Bafe

9
until the bottom is free from the rear air plate. Allow the rear of the bae to drop
below the rear air plate, then lower the bae into the rebox. Remove the bae
from the rebox by turning it 90 degrees so it ts through the door. See gure 2.1.
NOTE: Due to shipping weight restrictions, the door glass, rebricks, bae, coal bar,
legs, ue ange, and air-controls ship in a separate box for the Dwarf 5kW.
3. INSTALL THE DOOR HANDLE (if not already installed): For some models,
the door handle is shipped inside of the stove to protect both the handle and the
door from damage in transit. Locate your door handle and remove the outer jam
nut, cam latch, inner jam nut, and lock washer. Open your stove’s door and insert
the threaded end of the spring handle through the door handle hole. First install
the lock washer and then the inner nut on the threaded end of the spring handle,
inside of the door. Tighten the inner jam nut fairly snug against the lock washer.
Turn the door handle back and forth to test the t of the jam nut. Operation
should be smooth with a bit of resistance, not wobbly.
Turn the spring handle to face straight down. Place the cam latch on the threaded
end of the handle inside of the door with the long end protruding past the left
edge of the door. en thread the outer nut against the cam latch. Grasp the door
handle with your right hand, and use your right thumb to press the cam latch
upward to prevent it from turning. Use a crescent wrench in your left hand to
tighten the outer jam nut rmly against the cam latch to lock the handle in place.
Close and latch your stove door to test its t. e door should feel snug against
your stove’s body, not wobbly, and your handle should operate smoothly and easily.
Test several points around your door gasket by closing a dollar bill between the
door and the stove. You should feel some resistance when you pull the bill out.
If the bill cannot be pulled out easily, your door is too tight. If the bill falls out
with no resistance, then your door is not tight enough. If your door needs to be
adjusted, remove the outer jam nut and the cam latch. Tighten the inner jam nut
to tighten the door against the stove body, or loosen it to loosen the door. Install
the cam latch and outer jam nut as before, and retest your door’s t.
If you’d like a video walkthrough, watch our Door Maintenance video at
tinywoodstove.com/videos
Close the door and gently set the stove on its back.

10
TIP: Use the cardboard that the stove arrived in to cover your oor and protect the stove’s
paint and your oor from being scratched as you ip the stove.
4. Verify that the two re grate support bolts are in place, one on each side between
the leg mounting holes.
5. INSTALL THE AIR CONTROLS: Unwrap & bolt on the (2) air controls to the
bottom of your stove (there is only 1 air control for the 3kW LITE model). Install
a washer on the short bolt, and install the spring and then a washer on the long
bolt. ere are two slots on each control arm. e slot toward the front of the stove
(closer to the handle) is secured with a short bolt and a washer. e rear slot (see
gure 2.2) is secured with the spring, the longer bolt, and a washer. Tighten these
bolts enough to hold the air valves against the stove body, but not so tightly that
they restrict the free movement of the air control. Open and close your air controls
a few times to verify that they move smoothly. Once you’re satised, open the
stove’s door, remove the ash pan, and install a nut on each of the air control bolts
protruding into the bottom of your stove to lock them into place. If you are using
the Direct-Air Intake Box, bolt this on next. Install the direct-air box over the
primary & secondary air gate valve on the rear underside of your stove, with the
round ange pointing to the wall behind your stove.
6. INSTALL THE LEGS: Unwrap the stove’s legs and use the provided bolts (M6)
and washers to secure the legs to the bottom of the stove. If you are installing the
Figure 2.2: Air Control Valve Installation

11
Figure 2.3: Installing the Baffle
Tall Legs or the Wood Storage Stand, install them instead of the stock short legs.
Carefully stand the stove up on its legs or storage stand.
7. INSTALL THE FLUE FLANGE: Using a Phillips screwdriver, install the ue
ange on either the top or rear exit of the stove, whichever you are planning on
using. Install the ue ange cover plate on whichever opening the ue ange is not
installed on.
8. REINSTALL THE BAFFLE: e bae must be turned sideways to t through
the stove door, then realigned horizontally once inside the stove. Position the holes
in the bae at the top front of the stove. Lift the bae up and pull it forward until
the top front of the bae hits the very top front of the stove, above the door. en,
swing the bottom of the bae up and back until it is above the rear air plate.
Finally, lower the bae straight down so the front rests on top of the air wash
manifold (#2 in the parts diagram, just above the door opening) and the rear rests
on top of the rear air plate (the shelf above the horizontal line of holes in the back
of the rebox). Properly installed, no amount of forward/backward or side-to-side
motion should allow the bae to fall.
e bae must be installed a certain way for it to t, and installing it can be
dicult until you’re familiar with the procedure. See the diagram above, or check
out the unboxing video at tinywoodstove.com/videos to watch a demonstration.

12
9. INSTALL / SECURE THE FIRE BRICKS: Fire bricks ship preinstalled in the
Dwarf 3kW and 4kW models. e Dwarf 5kW re bricks are shipped separately from
the stove in the parts box. To install re bricks in the stove, loosen the re brick support
bolts that are installed horizontally through the re grate support on either side of the
rebox (#6 on the parts diagram). Slide the re bricks downward into the channel to
the side of the re grate support. Fire bricks should be installed vertically, two bricks per
side. Tighten the re brick support bolt nger-tight. Overtightening the support bolt
can break the re brick.
NOTE: If it’s dicult to get the re brick to t in the channel, loosen the re grate
support mounting bolt, which is located on the underside of the stove between the legs.
Loosening the bolt will give some extra play in the re grate support, which should
allow room to slide the re brick in. Re-tighten the bolt when the bricks are in place.
NOTE: e Dwarf 3kW LITE model uses ceramic ber refractory panels instead of
re brick to save on weight. Since the panels are very lightweight, bolts are not needed
to hold them in place, and the re brick support bolts are omitted from this model. Do
not discard the lightweight ber panels inside of the rebox—they are part of the stove!
10. REINSTALL THE COAL BAR: e coal bar is placed across the front of the re
grate just inside the door to keep logs from rolling out of the stove.
11. INSTALL GLASS (if needed) Door glass may be shipped separately to protect it
from shipping damage. Hold the glass pane against the glass gasket on the interior
of the door. Pair each of the four metal retaining clips with a white pad. Place the
pad against the glass, place the clip against the pad, then use the provided screws
to secure the glass with each of the four metal retaining clips. e screws should be
just snug. Overtightening can cause the glass to break.
12. PERFORM OUTSIDE BURN: e high-temperature paint on your Dwarf stove
needs to be cured prior to use. e paint consists of two parts: an air dry resin that
cures at room temperature and burns away at 600-650 degrees F, and a silicone
resin that cures at 400-450 degrees F. e air dry resin produces some non-toxic
(but unpleasant smelling) smoke when it burns away, so this is best done outside
or in a well-ventilated area.
Once the stove is assembled, move it outside and insert 40-60” of pipe into the
ue ange for the initial burn.

13
NOTE: e stove will not draft properly without a ue system. You must place 40-
60” of vertical pipe on your stove during the outside burn or you will have diculty
bringing your stove up to temperature.
Gradual heating of your stove’s nish will produce the best results. Heating uncured
paint too quickly can “shock” the paint and cause premature failure.
First, make a small kindling re, and keep it burning for 10-15 minutes. Second,
add fuel to build a medium-sized re and bring the entire stove surface temperature
to 450 degrees F and keep it there for about 60 minutes. During this stage, the
silicone resin in the paint will soften and may even appear wet as the paint cures. Do
not touch the paint during this stage.
Finally, add fuel to bring the temperature up to 600-650 degrees F and keep it there
for another 60 minutes. At this stage, the air-dry resin is burning o and you will
likely notice some smoke and odor. After 60 minutes, there should be no more
smoke or odor produced, and your cure is complete. Allow the stove to cool to a safe
temperature before attempting to move it.
INSTALLING YOUR STOVE
Prior to installing the stove, build a safe zone for it. is zone consists of a hearth of
the proper size and thickness, proper clearances to combustible materials, and (in some
cases) heat shields.
DWARF STOVE MINIMUM REQUIRED CLEARANCES
Sides: 16” from combustibles
Rear: 18” from combustibles
Single Wall Stove Pipe: 18” from combustibles
Insulated Chimney Pipe: 2” from combustibles
Observing proper clearances is vital to the safety of your installation.
Clearance violations are one of the most common causes of wood stove related house
res. Combustible materials close to the stove can appear ne for years, but they
deteriorate as they are repeatedly heated, and the temperature required to ignite the
material drops. A re can start without warning or even a spark. Combustible materials
inside walls are especially common sources of house res with poorly installed stoves.

14
Materials hidden from view can still deteriorate to the point that they can ignite at
relatively low temperatures. Larger clearances are always acceptable.
HEAT SHIELDS
If the required clearances don’t work for your space, the use of heat shields can safely
reduce clearances by up to 66%. ere are several types of heat shields, and each
performs dierently. Find more detailed instructions for building heat shields at
tinywoodstove.com/how-to-build-heat-shields-for-wood-stoves
The Dwarf Heat Shield Kit
e Dwarf Heat Shield Kit is an optional accessory available for purchase at
tinywoodstove.com. e shield attaches to the sides and rear of the Dwarf 3kW
Standard, Dwarf 4kW, and Dwarf 5kW stoves. e Dwarf Heat Shield Kit reduces
required clearances to 9” at the back of the stove and 8” on the sides (½ reduction).
Air-Cooled Wall Shield
e most eective heat shield is made of 24 gauge (minimum) sheet metal with 1” air
space behind it, and 1” gap around the entire perimeter of the shield for air ow. e
shield is attached to the wall using ceramic or metal spacers. e “air wash” behind the
shield is very eective at minimizing the heat transferred to the combustible surface
behind the shield. Avoid placing spacers directly between the stove and the wall so that
they don’t conduct heat through the shield. A heat shield of this type can reduce wall
clearances by up to ⅔, or ceiling clearances by up to ½. is means 6” from the back of
the stove, 5 ⅓” from the sides of the stove, and 6” from single wall pipe.
Insulated Wall Shield
An alternate wall heat shield design is made of ½” thick cement board with 1” non-
combustible insulation behind it (Rockwool or ceramic berboard) and no air space. is
DWARF STOVE HEARTH PAD DIMENSIONS
Rear and Sides: Match clearances dictated by the type of heat shield used
Front: 12” (or 18” if building codes require)
ickness: ½” minimum noncombustible material if using standard legs.
24 gauge minimum as ember protection if using Tall Legs or Wood Storage
stand.

15
type of heat shield can reduce wall clearances by up to ½, or ceiling clearances by up to ⅓.
(9” from the back of the stove, 8” from the sides, 9” from single wall pipe).
Masonry Shield
Finally, a 3 ½” thick masonry wall can be used as a heat shield with no air space. is
type of heat shield can reduce wall clearance by up to ⅓. (12” from the back of the
stove, 10 ⅔” from the sides of the stove, 12” from the single wall pipe)
HEARTH
When using the standard 4” stove legs, use a hearth underneath with insulation and ember
protection. is can be achieved by placing a ½” thick layer of mineral ber board under a
non-combustible material (metal, glass, tile, stone, etc.) to shield combustible ooring from
any embers or coals that could potentially fall from the stove.
When using the optional Tall Legs or Wood Storage Stand, use a hearth with ember
protection. Additional insulation under the ember protection is unnecessary.
ANCHORING YOUR STOVE
Dwarf Stoves ship with balancing foot bolts for use in a stable structure that does not
move. When using the balancing feet instead of anchoring the stove to the oor, each
foot bolt can be adjusted so that the stove is level.
When installing a stove in a structure that moves, or for extra assurance that the stove
won’t shift, anchor the stove to the hearth.
To anchor your stove, remove and discard the balancing foot bolts and mark the
position of the center of the hole on the hearth. If you have access from below the
hearth, you can drill a hole at each of those points and thread a bolt through the hole
from below, adding a lock washer and a nut on top to secure the stove. e leveling feet
are threaded M8 1.25, or a ¼” bolt can t through the hole without mating with the
threads. If you do not have access to the area below the stove, install ¼” threaded rod
anchors at each of the marked points, then bolt the stove down to the anchors through
the holes in each leg.

16
FLUE REQUIREMENTS
Your Dwarf Stove must be connected to a Class A chimney system installed according
to the chimney manufacturer’s instructions. Stovepipe constructed of 24-gauge or
thicker steel may be used to connect the stove to the chimney system, but may not pass
through a combustible roof or wall. Proper ue components are available for purchase
at tinywoodstove.com. A wood stove must have its own dedicated ue system. Do not
attempt to share the ue system with another appliance.
For ideal draft with a roof exit, Dwarf stoves require a well-designed ue system with a
minimum 60” of chimney height measured from the stovetop to the chimney opening,
with the diameter of the pipe matching the stove’s ue ange. If using a wall exit,
Dwarf stoves require a minimum of 80” of vertical chimney height for ideal draft. In
some cases, a shorter chimney or the next larger ue size may draft adequately, but will
not perform as well. A pipe size smaller than the stove’s ue ange is not permitted.
Your Dwarf Stove requires a well-designed ue system to function properly. If you are
designing your own ue system, you can nd more detailed ue design resources at
tinywoodstove.com/learn. Personal assistance is also available to help with your project
ASSEMBLING THE FLUE COMPONENTS
Please follow the manufacturer’s instructions (and local building codes where
applicable) for installation of your ue components, including required clearances
around the pipe. Detailed ue installation instructions for various ue congurations
can be found at tinywoodstove.com/manuals-and-downloads/.
Fastening Joints Together
e rst section of the ue system should be inserted into the ue ange and sealed in
place with stove cement. Joints between ue pipes should be secured with either metal
locking clamps supplied by the stovepipe manufacturer or three heat-proof fasteners
(rivets or self-tapping sheet metal screws). Additional sealant in pipe joints is not
required or recommended.
All male/crimped ends of the single-wall pipe (and inner walls of the double-wall pipe)
should point downward toward the stove to keep any creosote, condensation, and dust
from leaking out of the stovepipe.

17
NOTE FOR VEHICLES AND HOMES ON WHEELS
Before attempting an installation, we recommend getting the structure perfectly level
front-to-back and side-to-side, then not moving it until the install is done. Doing this
will allow the use of a bubble level and a plumb bob while performing the installation.
OPERATING YOUR WOOD STOVE
Every wood stove installation is unique, so it will take some time to get acquainted with
your new Dwarf Stove. Whether you’re brand new to wood stoves, or you have heated
with wood your entire life, you should expect a learning curve with your new stove.
People with years of experience burning wood sometimes have a dicult time with a
new stove, especially a small stove, because it behaves dierently than they’re used to.
We highly recommend purchasing several packs of kiln dried hardwood fuel from
your local hardware store for your rst few burns. It’s not necessary to use “perfect”
fuel all the time, but it’s important to experience how your stove functions under
ideal conditions. en, you’ll be more successful in adjusting your technique and
maintenance frequency with varying quality fuel sources.
Proper performance of a wood stove, especially a small wood stove, requires a hot
chimney to create draft. When starting a re, your goal is to bring the ue up to
temperature (approximately 400 degrees F) as quickly as possible and create a strong
bed of coals for hot, ecient burns. e best way to accomplish this is by starting a re
with plenty of small, dry kindling, and gradually working up to larger log sizes as a bed
of coals grows. Putting too large of a log on a re before having a suciently large bed
of coals will cause a smoky, smoldering re.
An ecient burning re will have little or no visible smoke exiting the chimney. If large
clouds of dark smoke are coming from the chimney, the stove is smoldering and likely
producing creosote. Frequently burning smoldering res can create dangerous creosote
deposits. It’s important to burn the stove eciently and to inspect and clean the ue
system 1-3 times a month depending on wood type, burn temperatures, and ue size.
LIGHTING A FIRE
WARNING: Do not use any liquid fuels such as gasoline, gasoline-type lantern fuel,
kerosene, diesel, charcoal lighter uid, or similar liquids to start or ‘freshen up’ a re in this

18
appliance. Keep these ammable liquids well away from this appliance while it is in use.
1. Clean the re grate and glass from the previous re and empty the ash pan if
needed. Open the primary air (left lever) and secondary air (right lever) 100% by
pulling the valve toward you until it stops. Open the air wash (gate valve above the
door) 100% by sliding it completely to the right.
2. Using a Firestarter - Add kindling to the rebox in a log cabin or tipi conguration.
Light the restarter and add to kindling. Leave the door cracked open until the re
starter has caught the kindling on re. Add more kindling and close the door.
- OR -
Using Newspaper - Loosely crumple 2-3 pages of newspaper, enough to cover
the bottom of the rebox. Spread a small handful of kindling across the top of
the newspaper. Add a second small handful of kindling perpendicular to the rst.
Light the newspaper and leave the door cracked until the kindling has caught on
re. Add more kindling and close the door.
3. Add fuel to kindling. Once the previous batch of kindling is burning, add fuel in
batches. Start with small pieces and work up to logs as the stove heats up and the
coal bed is established. e goal is to create a progressively larger hot re on a bed
of hot coals. Opening the door before the previous batch of wood is fully lit can
cause some smoke to escape the stove. Keep the door closed as much as possible.
Leave the air control settings fully open until the rst logs burn down to hot,
glowing coals, or your ue temperature hits 400 degrees F.
OPERATION
After a hot coal bed is formed or new fuel is charred and ignited, you can adjust the
air controls to slow down the rate of burn if needed. It’s a good idea to use a ue
thermometer and adjust the air controls according to thermometer readings.
STOVE PIPE THERMOMETER
Placed on stovepipe 12”-18” above stovetop
Too Cool: <250 degrees F
Just Right: 250-500 degrees F
Too Hot: >500 degrees F

19
Going too far above or below these temperature readings can cause problems.
Temperatures that are too cool (except after the re has burned down to coals) can
indicate a cold chimney and incomplete burn, which can cause excessive creosote
buildup and chimney res. Temperatures that are too hot indicate inecient burning
(generating heat faster than the stove can release it into your space). Temperatures
approaching 900 degrees F and higher can cause permanent damage to your stove and
ue system.
NOTE: Smaller stoves (Dwarf 3kw & 4kw models) tend to have lower ue temps.
An optimal burn will likely be on the lower end of what a standard thermometer reads.
Additionally, you will have lower ue temps towards the end of a burn cycle when all
the fuel has burned down to coals.
*Stove Pipe ermometers are available for purchase at tinywoodstove.com
**If purchasing a thermometer from another vendor make sure it’s calibrated for stove pipe and not
the stove top. Stove top thermometers have a dierent temperature range than pipe thermometers.
To dampen the stove for a slower burn, a good starting point is to close the air intakes
by 50%. When the air supply to the re is restricted too soon or too much, there won’t
be enough air for thorough combustion (you’ll see dark smoke coming out of the
chimney and the ue temperature will be low) and you’ll have more creosote buildup.
Take some time to experiment with the air settings, and get a feel for how they aect
the re. Because the ue system, not the stove itself, is producing the draft, no two
installations will perform exactly the same.
Depending on the fuel you burn, you will use dierent air settings. Here is a summary
of what happens inside your rebox and how each of the air control aects the re.
PRIMARY AIR (Bottom Left Control)
e primary air enters the stove below the re grate, and blows directly on the hot
coals. is air supply is used when rst starting a re, when adding new fuel, or as the
primary air source for coal. Generally, using the primary air controls burns the re
quicker and less eciently.
After the surface of your fuel is blackened and on re, you can start shutting down the
primary air and feed your wood re with mostly secondary air for a more ecient burn.
e only exception to this is with a coal re. Anthracite coal res require oxygen to pass

20
through the coal bed from the bottom, so a coal re can be more easily sustained by
restricting secondary air, and feeding air primarily from the primary intake.
SECONDARY AIR (Bottom Right Control)
e secondary air enters the re box at the bottom of the rear air plate, and is preheated
as it rises to the holes near the top of the rebox. Burning wood releases ammable gases
that mix with oxygen at the top of the rebox for a complete, ecient burn.
Feeding a wood re with oxygen from the top makes for a slower and much more
ecient burn as the smoke/gases are more completely burned before leaving the stove,
and gases are released from the logs at a much slower rate.
Any unburned gases escaping the stove either end up as air pollution outdoors
or condense in the chimney and form creosote. Using lots of secondary air to more
completely burn your fuel makes your stove burn cleaner, more eciently, and require
less maintenance.
NOTE: on the Dwarf 3kW LITE model, both the primary and secondary air intakes
are controlled by one lever and cannot be adjusted independently.
TERTIARY AIR / AIRWASH (Top Control)
e tertiary air enters the stove just above the door through the air-wash manifold. is
air is preheated and washes down over the surface of the glass keeping the glass clean.
e tertiary air control is mainly designed to keep the stove glass clean, but it does
contribute some air to the bottom front (primary air) of the re.
RIDDLING GRATE
e lever on the bottom left of the stove is used to operate the mechanical riddling
grate. is feature was originally for coal use, but it’s handy for use with any fuel. Use
the riddling grate to shake ashes accumulating on the bottom of the rebox, or to settle
the fuel inside your stove without opening the door. With a tool or heat proof glove,
sharply pull and push the lever back and forth to shake the riddling grate.
Note that the Dwarf 3kW LITE model is not equipped with a riddling grate.
ASH DISPOSAL
e ash pan should be cleaned between res, or as needed. It’s important to note that
This manual suits for next models
3
Table of contents
Popular Stove manuals by other brands

Texsport
Texsport 14225 operating manual

Cumberland Stove Works
Cumberland Stove Works MF3500 Installation and operation manual

Solas-Nua
Solas-Nua FS-16N RV Installation & operation manual

Harrie Leenders
Harrie Leenders Pharos Manual and installation instructions

Jøtul
Jøtul PF 732 Installation, operation and maintenance manual

Drija
Drija BARI 60 user manual

Ashley
Ashley AP5780E Owner’s Instruction and Operation Manual

ARDES
ARDES AR1FG01 Instructions for use

Dimplex
Dimplex Opti-V 360 instruction manual

Leenders
Leenders STOR Installation

Hunter Stoves
Hunter Stoves Herald 6 CE VII Installation and servicing instructions

Breckwell
Breckwell SP6000 owner's manual