tio StealthStream 1 User manual
StealthStream®1: AZSS1
Installation Guide

Safety Information 3
First Time Setup 4
Introduction 5
Table of Contents
www.tiohome.com
2
Front-Panel 6
Back-Panel 7
Installation
Standard In-wall 8
Speaker Wiring Diagrams 8
Speaker Wire Connection 9
Power Wire Connection 9
Variable Output 10
Digital Audio Input Connection 10
System Overview 11
Audio Applications 12
Troubleshooting Guide 13
Warranty Information 14, 15
Technical 16
Product Registration 16
Contact Information 16
StealthStream®1 Installation Guide

1. Read all instructions. Read and understand all the
applicable instructions before installing or operating
the product.
2. Retain all instructions. Keep this manual in a convenient
place for reference.
3. Heed warnings. Be aware of all warnings on the product
and in the instructions.
4. Follow instructions. Install and use this product only as
described. Don’t try to use this product in ways for which
it wasn’t designed.
5. Use indoors only. Don’t expose this product to the weather
or harsh environmental conditions such as continuous
sunlight, excessive humidity, or moisture.
6. Keep product dry. Don’t use the product near water – for
example, near a bathtub, washbowl, kitchen sink, laundry
tub, in a wet basement, or near a swimming pool. Also, do
not handle the product when your hands are wet or damp.
7. Use the right power source. Don’t connect the product
directly to electrical line voltage. Use only an approved
power adapter.
8. Ground product properly. Make sure the product’s means
of grounding or polarization is not defeated.
9. Power cord protection. Power supply cords should be
routed so that they are not likely to be walked on or
pinched by items placed upon or against them, paying
particular attention to cords at plugs, receptacles, and
the point where they exit from the product.
10. Keep product clean. From time to time, wipe off the
exposed parts of the product with a clean, dry, soft cloth.
Don’t use abrasive materials, thinners, alcohol or other
chemical solvents or materials.
11. Avoid spills and foreign objects. Make sure liquids and
objects don’t get into the product enclosure through
any openings.
12. Get professional service. Have the product serviced
• Liquids spilled/objects have fallen into the product
• The product has been exposed to excess humidity
• The product doesn’t appear to operate normally
• The product is damaged
13. Don’t attempt to service the product yourself. Doing
so will void the warranty. If you have any questions, call
TiO Support at 833-TiO-HELP
or email us at support@tiohome.com
NOTE: This equipment has been tested and found to comply with the limits for a Class B digital device, pursuant to part 15 of the FCC rules.
These limits are designed to provide reasonable protection against harmful interference in a residential installation. This equipment generates,
uses and can radiate radio frequency energy and, if not installed and used in accordance with the instructions, may cause harmful interference
to radio communications. However, there is no guarantee that interference will not occur in a particular installation. If this equipment does cause
harmful interference to radio or television reception, which can be determined by turning the equipment off and on, the user is encouraged to
try to correct the interference by one of or more of the following measures: reorient or relocate the receiving antenna; increase the separation
between the equipment and receiver; connect the equipment into an outlet on a circuit different from that to which the receiver is connected,
or consult the dealer or an experienced radio/TV technician for help.
TiO Home
could void the user’s authority to operate this product.
This Class B digital apparatus complies with Canadian ICES-003. Cet appareil numérique de la classe B est conforme à la norme NMB-003
du Canada.
This device complies with Industry Canada licence- ‐exempt RSS standard(s). Operation is subject to the following two conditions: (1) this device
may not cause interference, and (2) this device must accept any interference, including interference that may
cause undesired operation of the device.
Le présent appareil est conforme aux CNR d’Industrie Canada applicables aux appareils radio exempts de licence. L’exploitation est autorisée
aux deux conditions suivantes: (1) l’appareil ne doit pas produire de brouillage, et (2) l’utilisateur de l’appareil doit accepter tout brouillage
radioélectrique subi, même si le brouillage est susceptible d’en compromettre le fonctionnement.
Safety Information
www.tiohome.com
3
StealthStream®1 Installation Guide

www.tiohome.com
4
STEP 1
STEP 2
First Time Setup
Plug the power supply unit into the StealthStream® 1. The indicator light on the front of the StealthStream® 1
should turn solid blue and then shut off within 15 seconds.
STEP 3
Once the initial boot and all updates have been completed, the light on the StealthStream® 1 should stay off. To
access your StealthStream® 1, download the TiO Music App via the Google Play or Apple App Store depending on
your device.
Note: The TiO Music App is a separate app intended for use on standalone music systems. If you attempt to
download and use the TiO Home App instead, you will receive an error message which reads “no system found”.
STEP 4
Ensure that phone or tablet you are using is connected to your routers home network and launch the app. All
currently connected StealthStream® 1’s should appear listed on your home screen.
Note: On first use all streamers will appear with a string of numbers in place of a device name. If setting up multiple
streamers, you will need to play or stream a music source to each in order to identify the location of the streamer
before giving them custom names below. If you do not see the connected devices, ensure that they are all currently
connected to your router and then drag down on the home screen of the TiO Music app to refresh your device list.
STEP 5
To connect to and use your StealthStream® 1 wirelessly, perform all of the steps above. Once you are in the TiO
Music app select the StealthStream® 1 you would like to use wirelessly. Accept the terms of service to proceed.
STEP 6
To name the device, navigate to the “settings” menu option. Select “Device Name” to enter a custom name for the
StealthStream® 1 and select “ok”. Restart the TiO Music app to apply changes.
STEP 7
To connect the device wirelessly, navigate to the “settings” menu option. Select “Wireless Setup” and select the
wireless method you would like to use to connect to the device. Please note that for manual connections you will
need to know both the SSID and Password for your wireless network. Remove the ethernet cable from the back of
your StealthStream® 1. The indicator light will repeat the process of flashing solid blue before turning off while it
connects to your router. Once the light on the front of the streamer remains off your device is now connected
wirelessly.
Wait a few more seconds and the indicator light should begin to flash blue, then proceed to turn solid green, and then
solid blue before turning off completely
Note: The indicator light may stay blue for several seconds or repeat the process a few times. This indicates that the
StealthStream®1 is downloading current updates. Allow the StealthStream®1 to repeat the process until the indicator
light remains off indefinitely.
StealthStream®1 Installation Guide
StealthStream® 1: AZSS1
Box Contents
nStealthStream®1
nMounting Hardware – In-wall mounting kit:
•Mounting Bracket
•Two (2) 6-32 large screws
•Two (2) 4-40 small screws
nSpeaker Connector – Male four (4) conductor
nPower Connector – Male two (2) conductor
nFour (4) adhesive backed rubber feet (for table top use)
Additional TiO Products (sold separately)
nAZPS1 – Remote Power Supply (supports one AZSS1)
nAZPC1 – Remote Power Coupler (an optional product,
used when needed for power over Cat5 installations)
Wireless Connectivity – Wi-Fi ®connectivity 802.11n
using WPS.
Wired Connectivity – 802.3 100Mbit/s wired Ethernet.
Bluetooth Support – Integrated Bluetooth support for
connecting Bluetooth devices supporting A2DP.
Network-based music – Stream music from any DLNA
compliant network device.
Optical Audio Input – Connect your TV, satellite, cable
box, CD player or any other digital source to your AZSS1
and listen in one room or throughout your home.
Auto-switching – Switches to the optical input when
your TV, CD player or cable box is turned on.
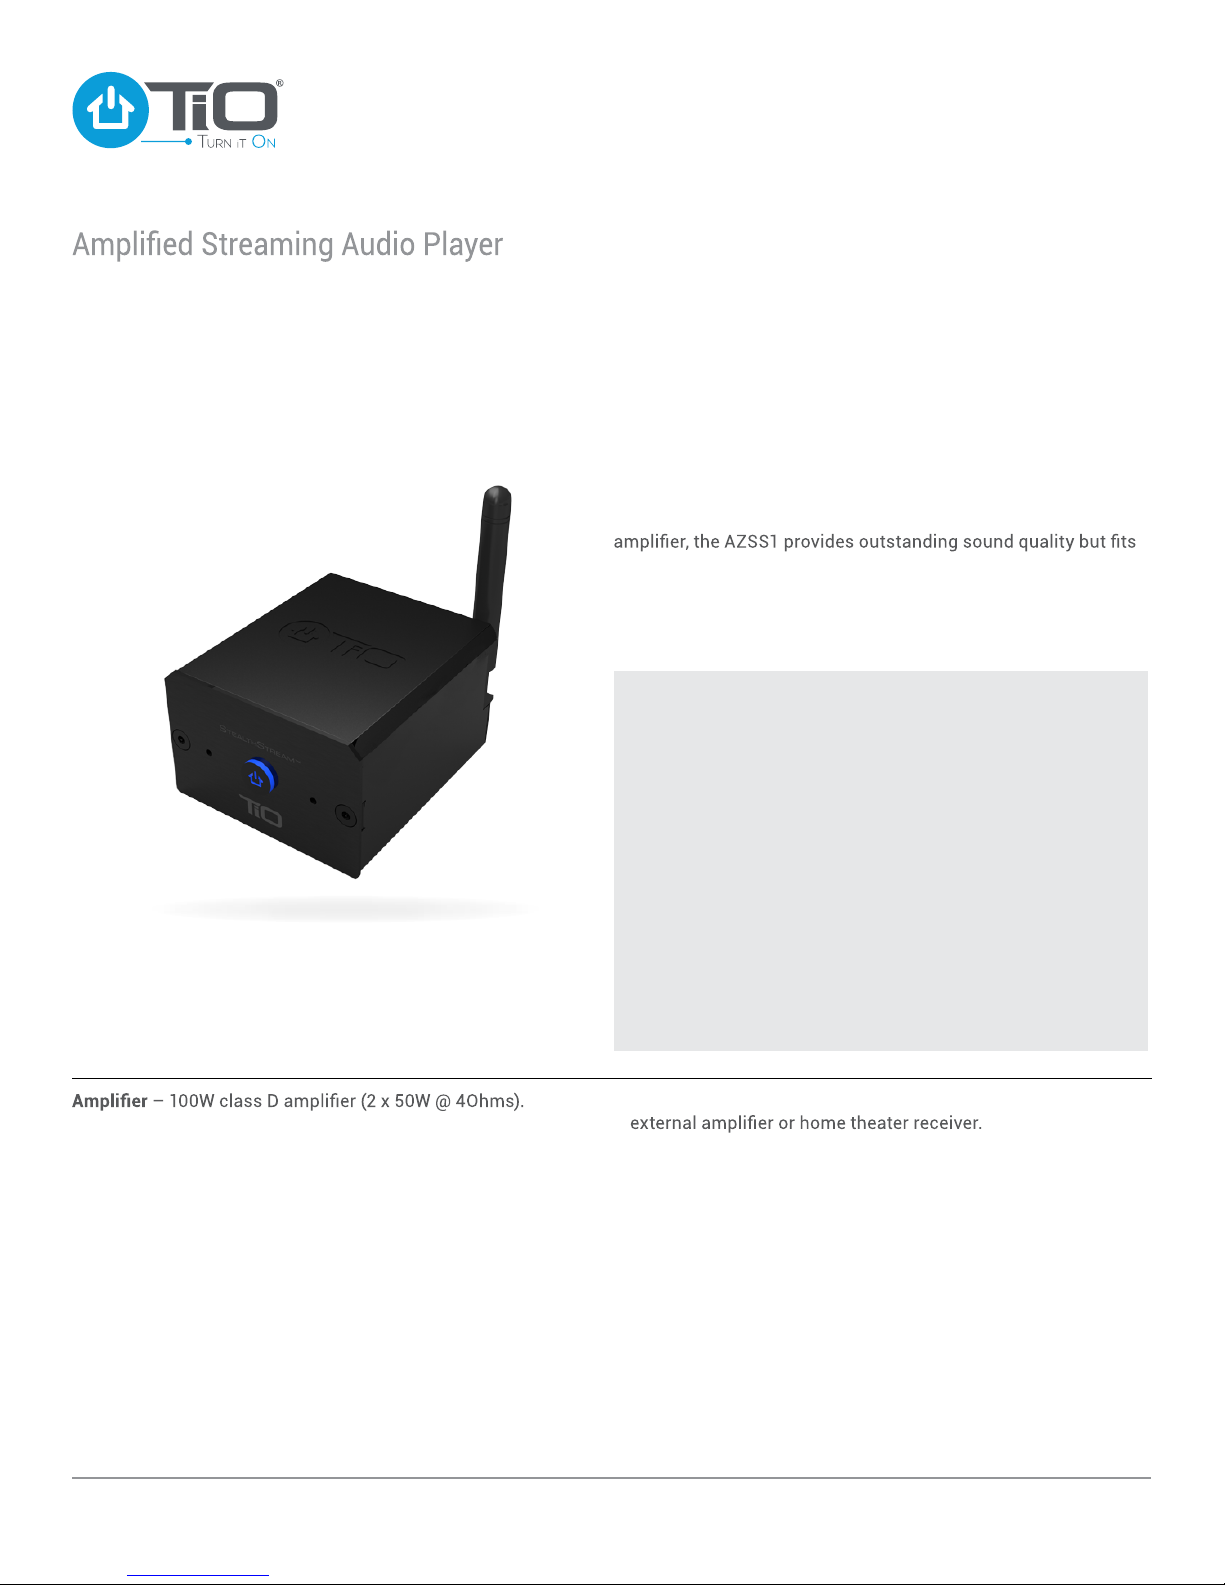
Analog Audio Output – Outsource your sound to an
Party Mode – TiO’s StreamShare™ feature can synchronize
and control up to 6 audio players.
Dedicated Streamer – Listen to the best audio content from
popular streaming services.
Mounting Options – Tabletop, surface mount or in-wall
options.
The TiO StealthStream®1 (AZSS1) is the most versatile
and powerful digital audio player on the market. The
StealthStream®1 connects to your home network and offers
access to all of today’s popular music services. If that’s not
enough, just connect any airplay/googlecast device and stream
your favorite audio music.
The AZSS1’s stealth design allows the robust player to be
hidden out of sight. Powered by an integrated 100 watt
in the palm of your hand! In fact, it’s so compact that it installs
into a standard, single-gang wall opening.
The StealthStream®1 can also be used as a stand-alone music
player and be directly controlled from the TiO Home mobile App.
Introduction
www.tiohome.com
5
StealthStream®1 Installation Guide
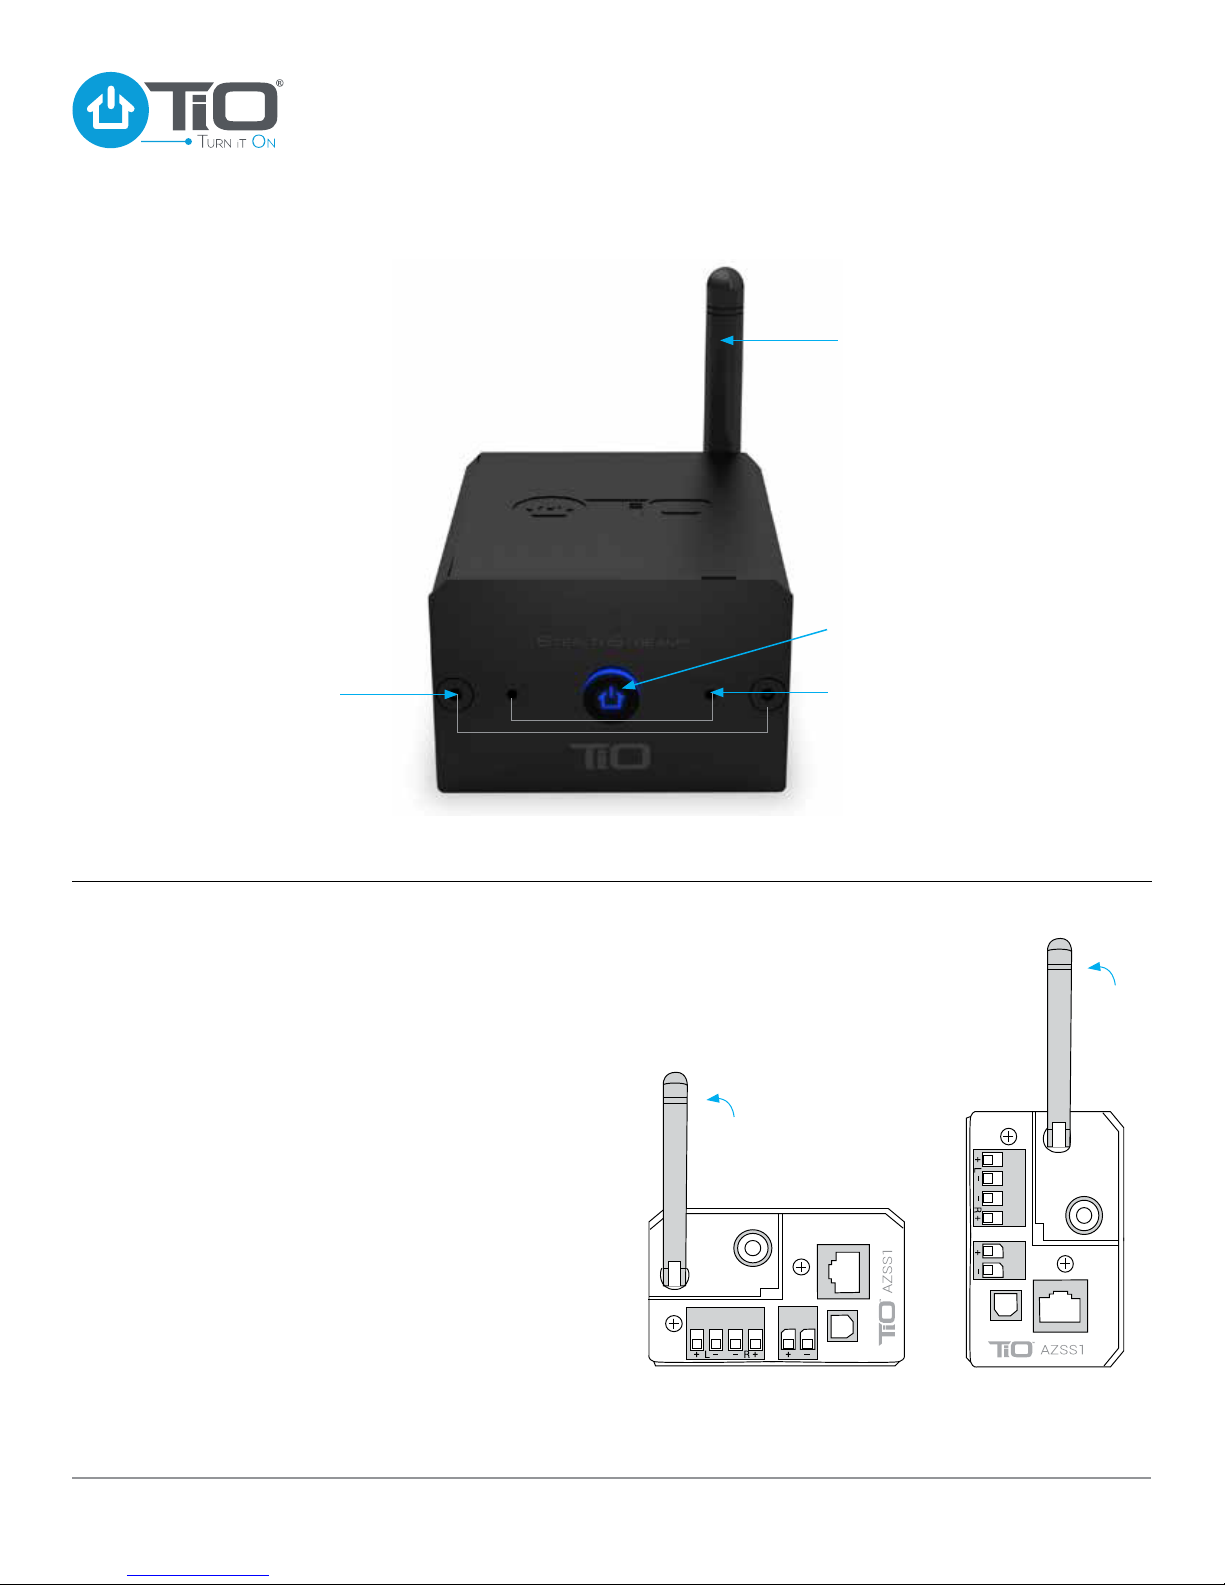
Front-Panel
Status Light
Indicator
Wireless
Antenna
Mounting
Bracket Holes
Screws
Wireless Antenna – For use with Wi-Fi ®, the antenna
should always be pointing straight up, in a vertical
position during normal usage. For instance, if you
plan to use it as a tabletop system turn the antenna
counter clockwise until the antenna is standing
upright. See Figure 1. When installed in a wall or a
cabinet, the antenna should be turned upright in the
vertical position. See Figure 2.
Status Light Indicator – Used for setting up
and troubleshooting your AZSS1. Refer to the
troubleshooting guide section of the manual.
Mounting Bracket Holes – Used for in-wall
installation with supplied mounting bracket and
screws. See page 7 for installation instructions.
Dimensions (overall) – 6.99W x 4.78H x 9.91D cm /
2.75W x 1.88H x 3.90D in.
Tabletop
Figure 1 Figure 2
In-wall
Dimensions (overall) – 6.99W x 4.78H x 9.91D cm /2.75W x 1.88H x 3.90D in
www.tiohome.com
6
StealthStream®1 Installation Guide
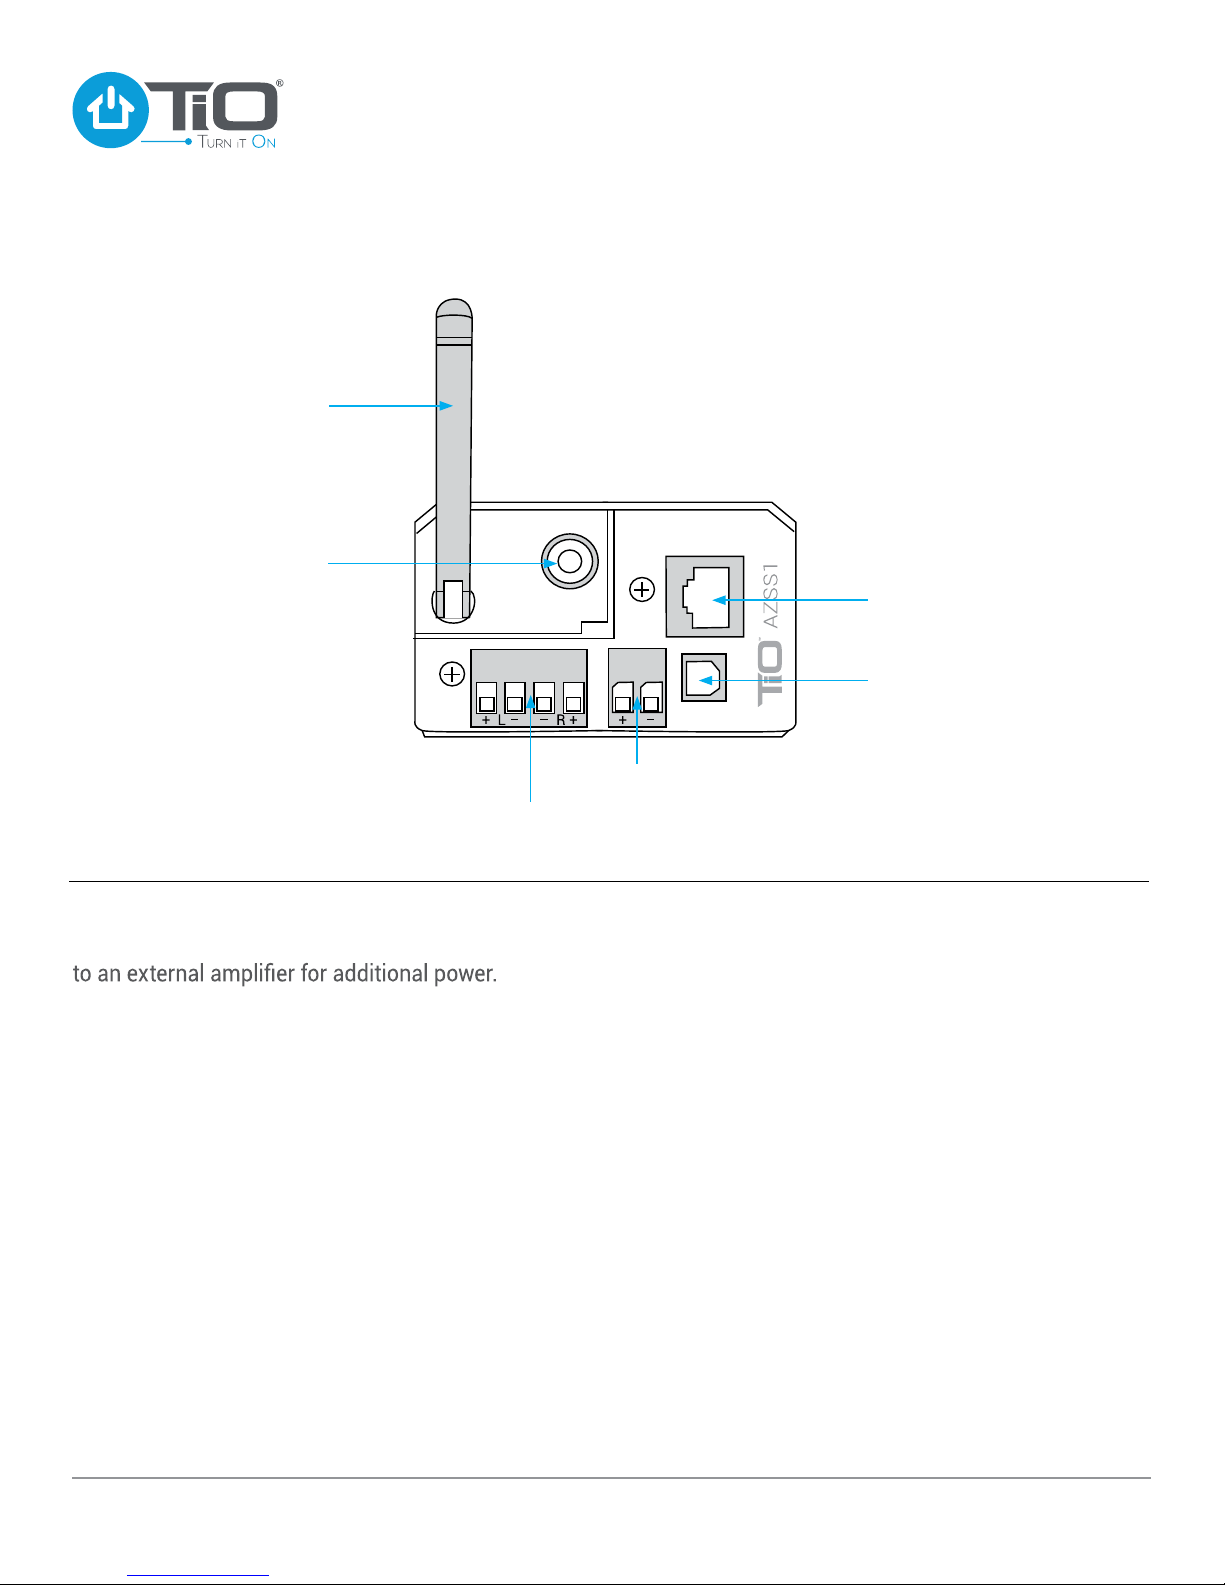
Back-Panel
Power Input
Speaker
Connector
Wired
Ethernet
Jack
Wireless
Antenna
Digital
Audio
Input
Variable
Line Level
Audio
Output
Variable Audio Output – 3.5mm stereo variable
analog audio output, used for connecting the AZSS1
Speaker Connector – 4 wire speaker connector
that can support up to 12 gauge speaker wire. TiO
recommends 16 gauge speaker wire for multi-space
audio installations.
Power Input – Removable 2 terminal power connector
can support up to 12 gauge wire.
Wired Ethernet Jack – Used for a hard wired network
connection. Also used when powering the AZSS1 with
TPoE (requires AZPC1 Power Coupler).
Digital Audio Input – Toslink connector accepts
a PCM audio input signal from any supported audio
device, such as a TV, AV Receiver, Blu-Ray or DVD
player.
www.tiohome.com
7
StealthStream®1 Installation Guide
WARNING: This product should not be mounted in any
box that also has electrical products such as light switches
or outlets installed. Electrical interference from a light
switch or outlet can create unwanted background noise
on your audio signal.
IMPORTANT:It is not recommended to mount multiple
AZSS1’s next to each other when connecting over Wi-Fi.
Installing multiple wireless AZSS1’s near each other could
effect their ability to connect wirelessly to the MC.
DANGER:Avoid all electrical wiring when cutting the rough
opening. Failure to do so may result in serious injury
or death.
STEP 1
Identify a place to install the AZSS1 in the wall.
STEP 2
Cut out a rough opening into the wall and install a single
gang low voltage ring and tighten it down.
STEP 3
Pull the power and other audio wires to the new audio location.
STEP 4
Locate the in-wall mounting bracket that came with the AZSS1.
Align the in-wall mounting bracket so that it lines up properly
with the front panel of the AZSS1. Locate the small screws from
the installation package. Secure the in-wall mounting bracket
to the front of the AZSS1.
STEP 5
Make all wiring connections as shown, then insert the AZSS1
with bracket into the single gang low-voltage ring.
STEP 6
With the AZSS1 securely mounted, plug the AZPS1 into an
outlet. The AZSS1 takes approximately one minute to complete
its power up cycle. The AZSS1 Installation is complete.
SPEAKER WIRING DIAGRAMS
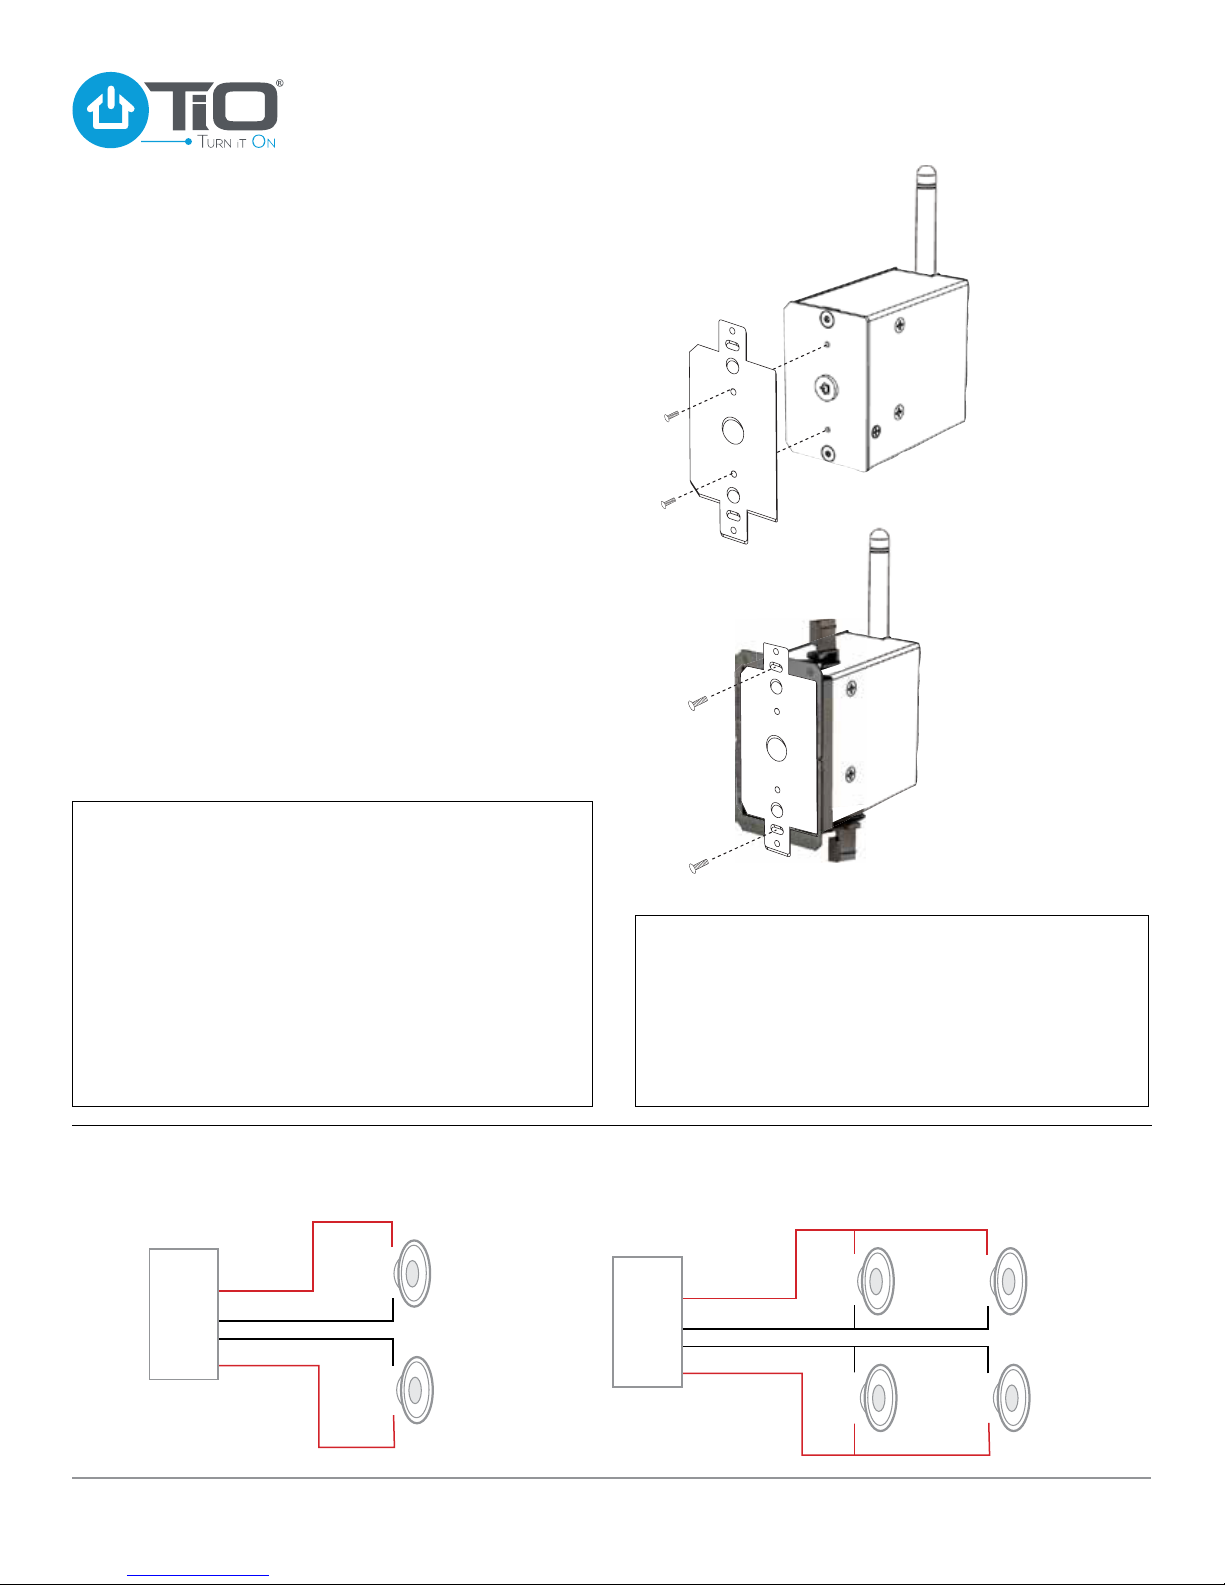
Installation - Standard In-wall
In-wall mounting bracket
attached with small screws
Attached to single gang
low-voltage ring
with large screws
Parallel Speaker Wire Diagram
+
–
+
–
+
–
+
–
Right
Left
4 Ohm
Load 8 Ohms
8 Ohms
8 Ohms
8 Ohms
+
–
+
–
Speaker Wire Diagram
+
–
+
–
Right
Left
4 Ohm
Load 4 Ohms
4 Ohms
+
–
+
–
The AZSS1 is designed to be installed as a replacement for
existing volume controls .
When installed as a VC replacement, the speakers are
connected to the AZSS1 the same way as they were to the
VC. The Power Supply is located at the speaker home run.
The existing speaker wires going to the home run deliver
power to the AZSS1.
www.tiohome.com
8
StealthStream®1 Installation Guide
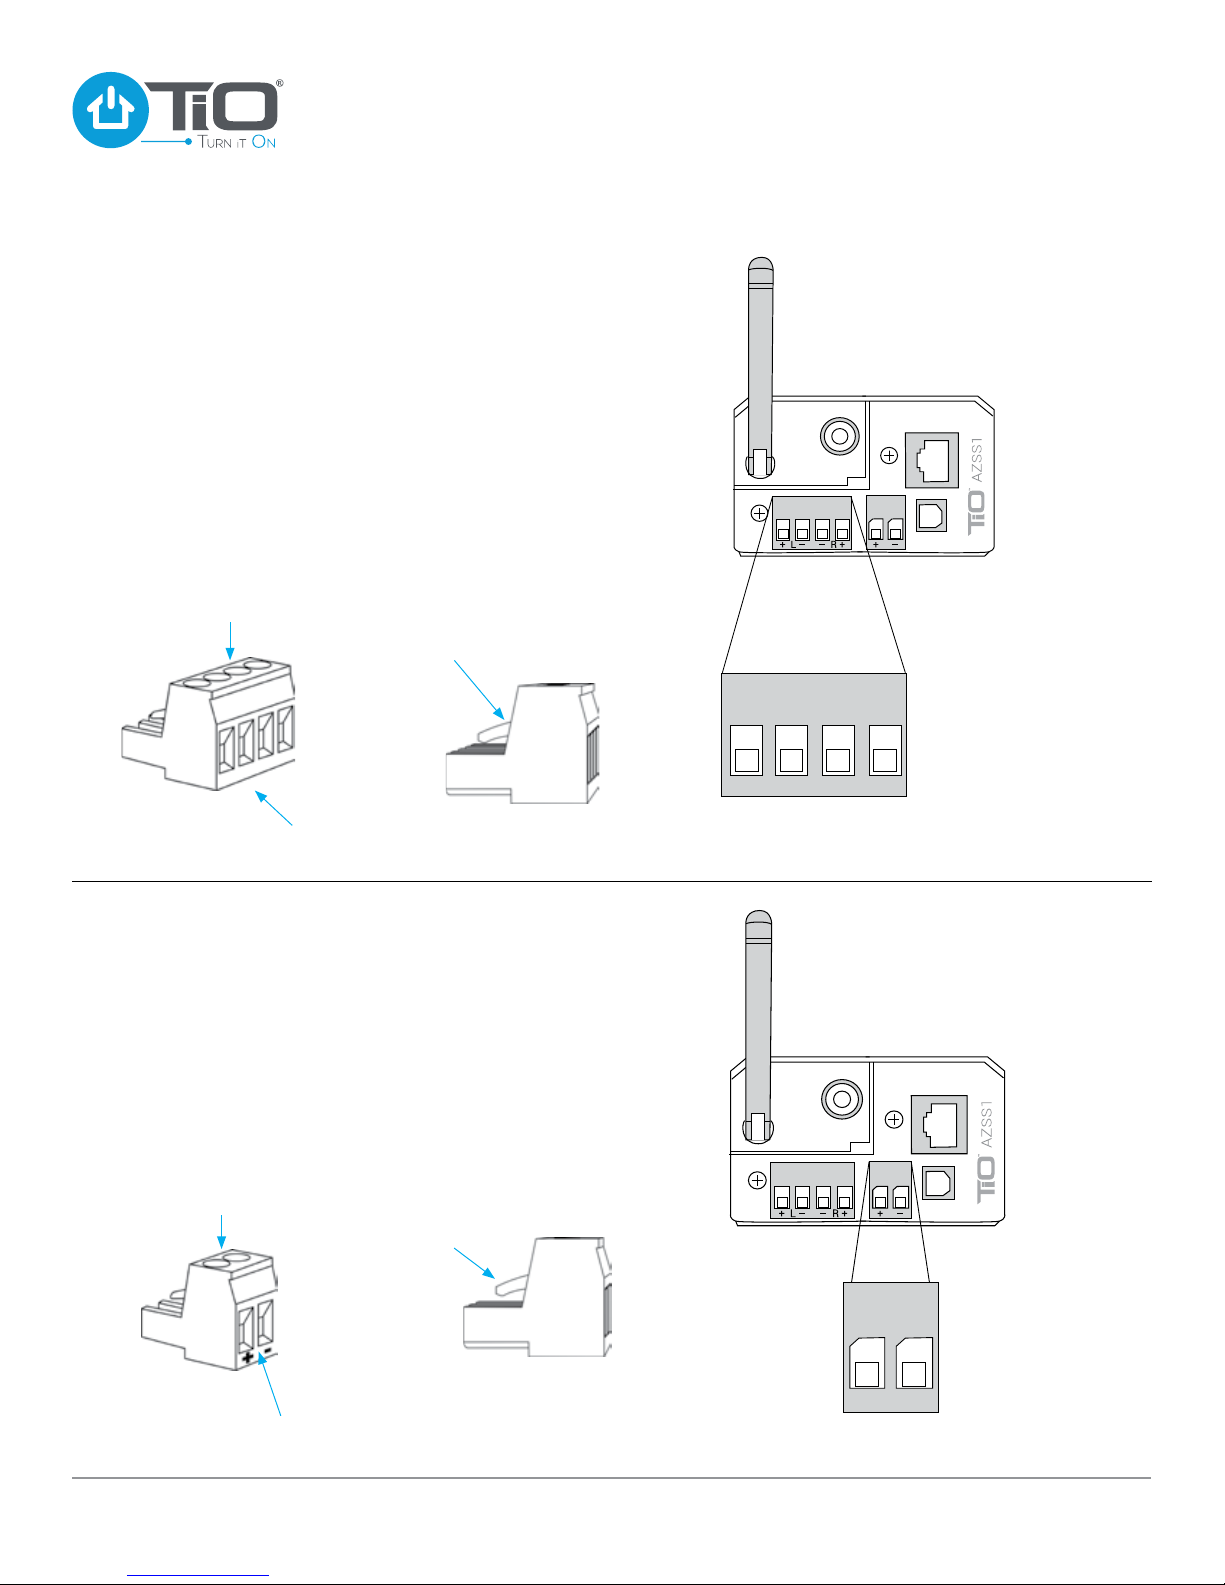
SPEAKER WIRE CONNECTION
Locate the Speaker Connector Block that came in the pack of
accessories with your AZSS1. Loosen the four screws before
attempting to connect the speaker wire. With your speaker wire
ends trimmed back 1/4” inch (.64 cm) insert each speaker wire
and tighten down each screw. Note the polarity: positive (+)
speaker wire on the outside terminal and negative (–) speaker
wire on the inside terminal. See diagrams below for wiring
speakers.
Note: Make sure locking tabs on mating side of Speaker
Connector locks over the top of the receiving connector on
the AZSS1.
+ L – – R +
Lock Tabs Over
Speaker Connector
Removable Speaker
Connector Block
+ L – – R +
WIRING
CONNECTIONS
POWER WIRE CONNECTION
Locate the AZPS1 power supply. To connect the power supply
to the AZSS1 you will need to locate the Power Connector
for the AZSS1. The power connector is located in the pack of
accessories in the AZSS1 package. With the Power Connector
in your hand, loosen the two screws, so that the two power
wires can be inserted, then tighten down each screw. Note the
polarity: Left positive (+), Right negative (–). Plug the Power
Connector into the the back of the AZSS1.
Note: Make sure locking tabs on mating side of the Power
Connector locks over the top of the receiving connector on
the AZSS1.
Removable
Power Connector
+ –
Lock Tabs Over
Power Connector
Loosen Screws
Insert Speaker
Wires
Insert Power
Wires
Loosen Screws
CAUTION
Be certain the
polarity is correct
CAUTION
Be certain the
polarity is correct
www.tiohome.com
9
StealthStream®1 Installation Guide
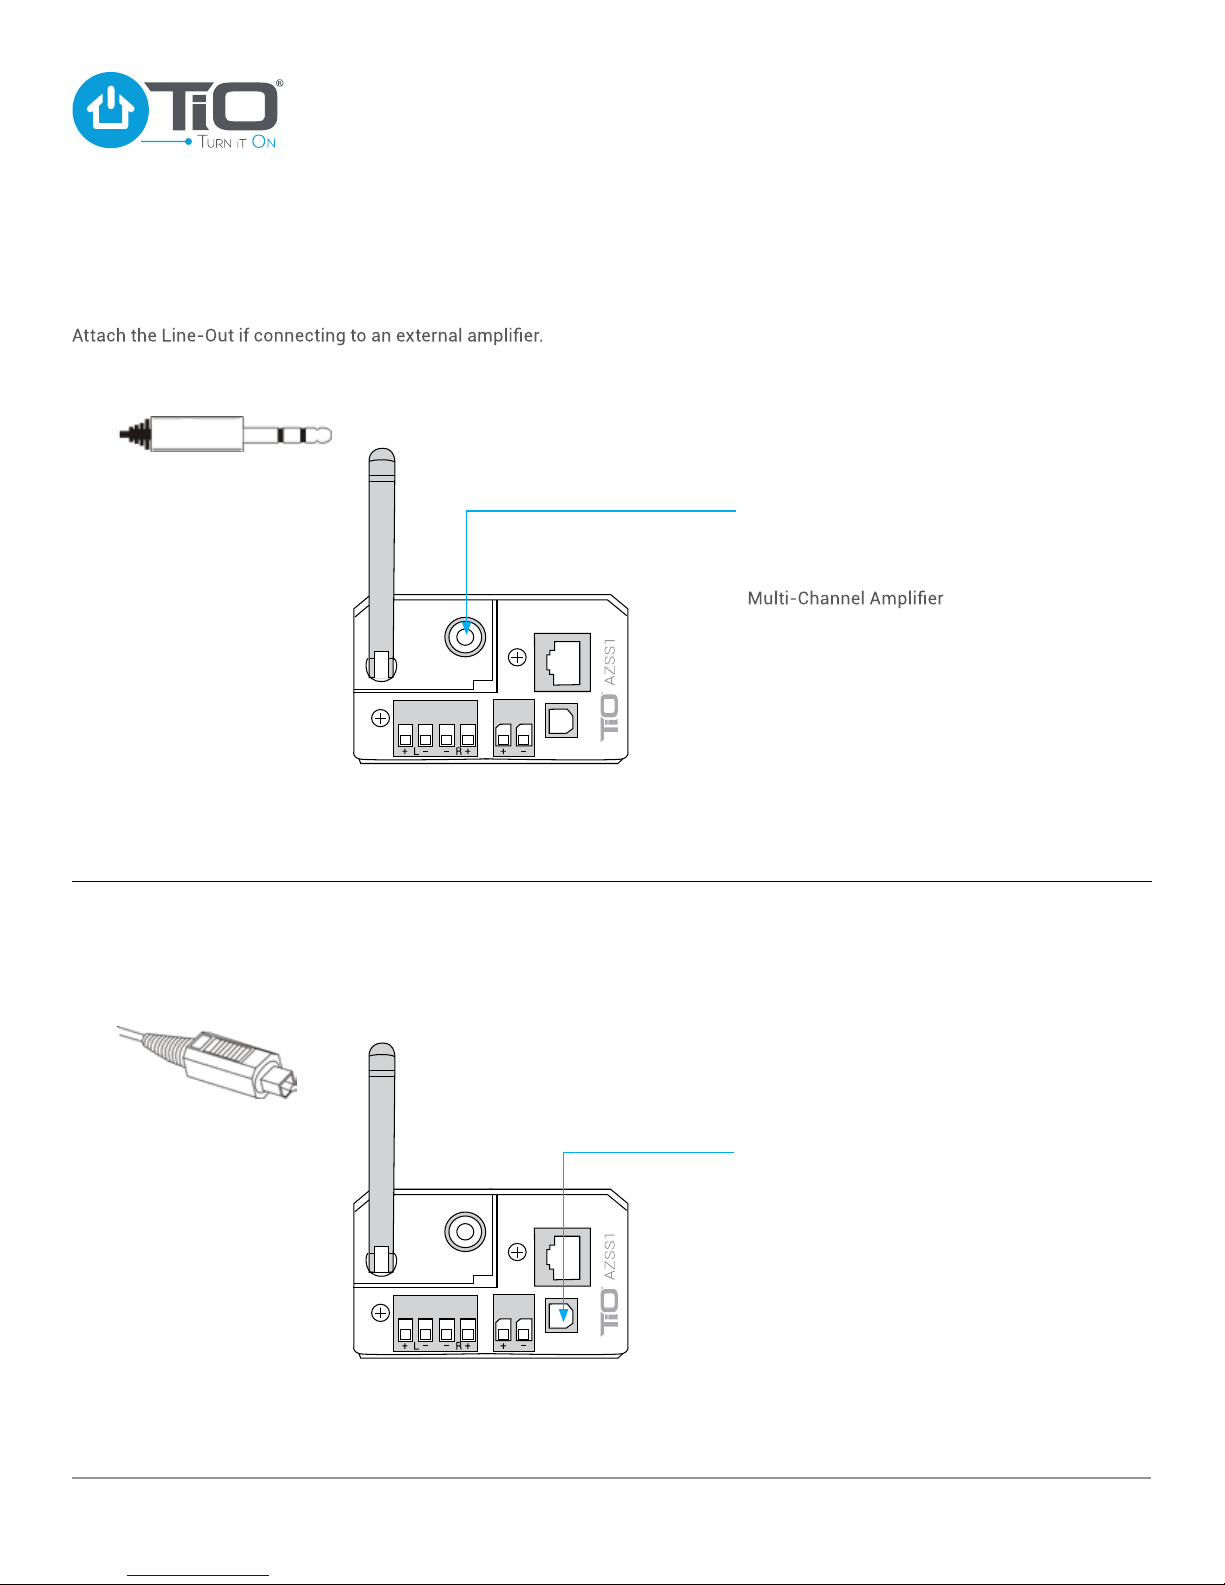
VARIABLE OUTPUT CONNECTION
Use a 3.5mm stereo mini plug (below) to connect the AZSS1
to an External Output Device.
DIGITAL AUDIO INPUT CONNECTION
Attach the optical Line-In if adding a digital input source.
Use a Toslink cable to connect the AZSS1 to any supported
External Audio Input Device.
External Output Devices
include:
Powered Subwoofer
A/V Receiver
External Audio Input Devices
include:
CD / DVD / Blu-Ray Players
TV’s
Cable TV Receiver
www.tiohome.com
10
StealthStream®1 Installation Guide

System Overview
StealthStream®1
Audio Elements
www.tiohome.com
11
StealthStream®1 Installation Guide
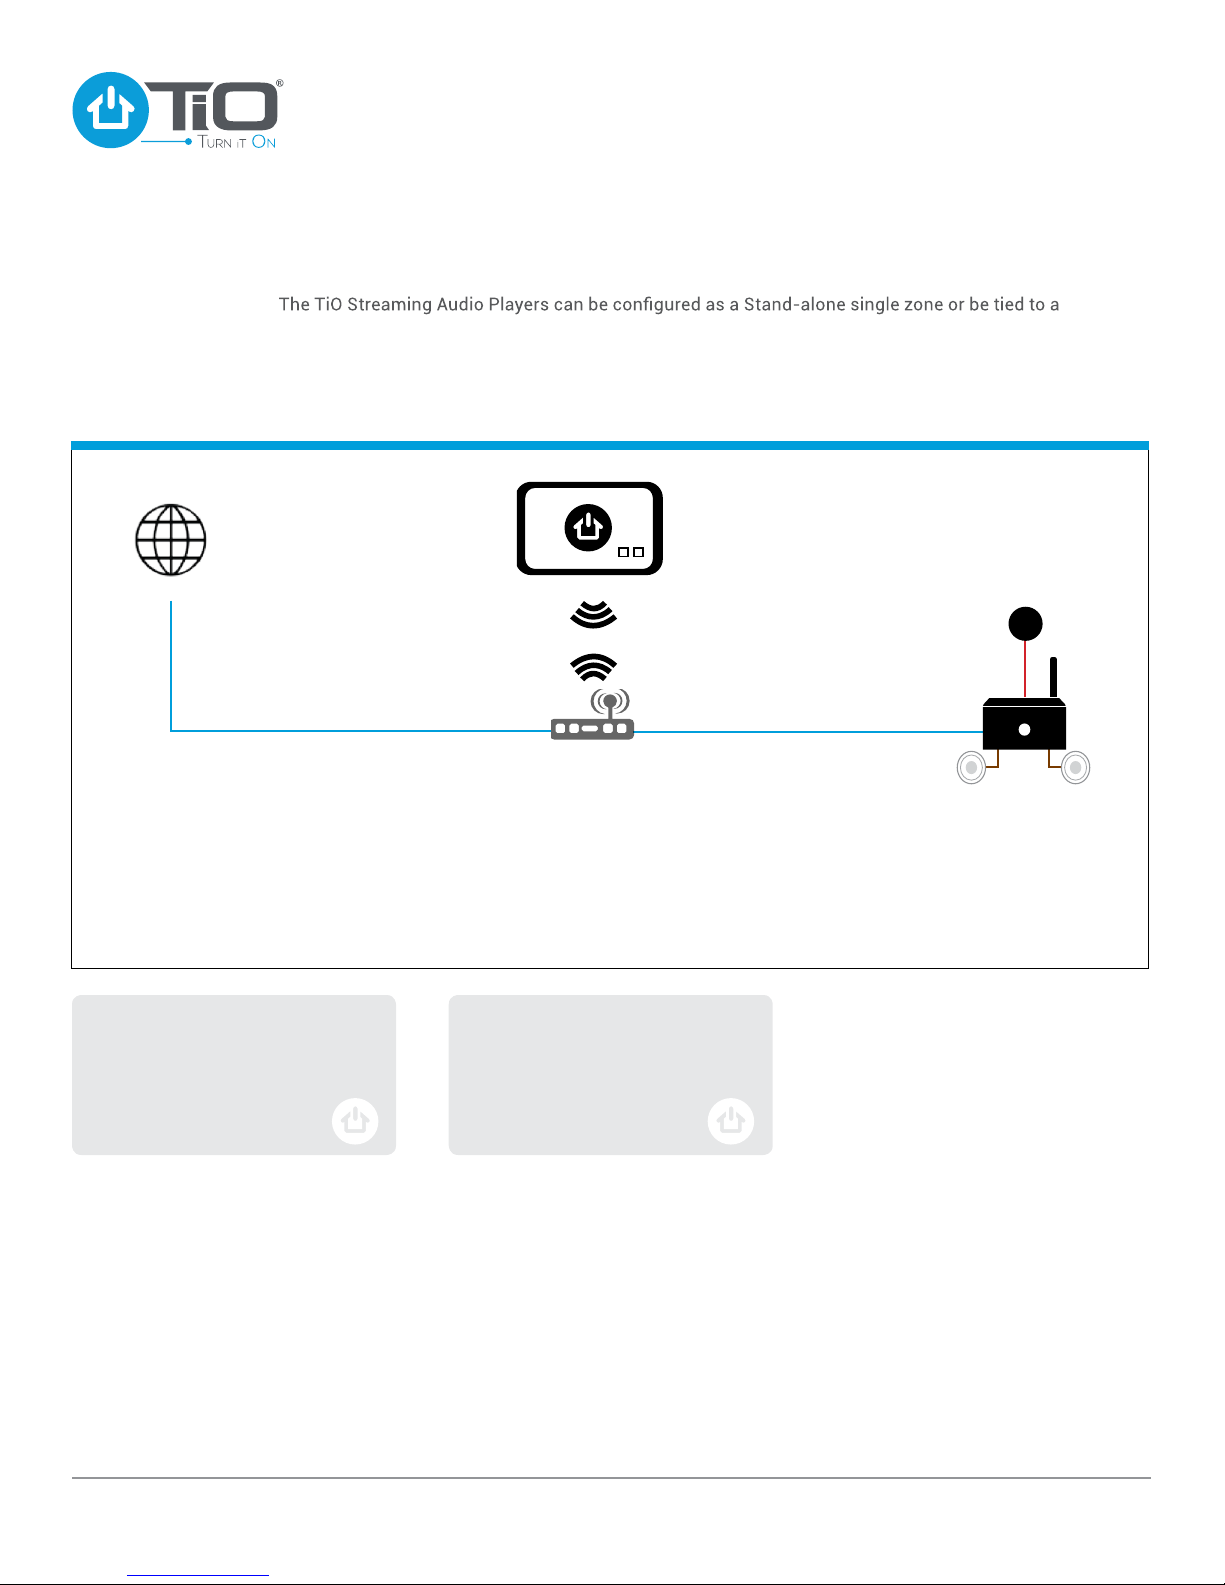
Audio Applications
When setting up a Stand-alone
application be sure the home network
router is Wi-Fi Protected Setup™
enabled.
All Audio zones feature wireless and
wired networking so that you can
choose which method will work the
best for your application.
Internet TiO App
Home Network
Router
Stand-alone
AZSS1
Stand-alone application:
PSPS
MasterCoordinator for true Multi-space applications (up to three in a single house). When installed as a single space, configuration
is still completed through the TiO Music App and it communicates directly to the Audio Player, through the home network with a
wired or wireless connection.
www.tiohome.com
12
StealthStream®1 Installation Guide

Troubleshooting Guide
Light Status Meaning Solution
Diagnostics/LED Functionality
NOTE:
www.tiohome.com
13
SOLID BLUE for 15 seconds,
then off for 15 seconds
BLINKING BLUE
Device is turning on
Device is connecting to
network
No additional steps
No additional steps
SOLID GREEN Successfully connected No additional steps
SOLID BLUE Device is updating Wait until the light turns off
NO LIGHT Connected and working
properly No additional steps
StealthStream®1 Installation Guide

Warranty Information
Limited Hardware Warranty
For consumers who are covered by consumer protection laws or regulations in their country of purchase or, if different, their country of residence, the benefits conferred by this
limited Warranty are in addition to all rights and remedies conveyed by such consumer protection laws and regulations.
WHO IS COVERED?
This Limited Warranty extends only to the first consumer purchaser of the Product, and is not transferable.
WHAT DOES THIS LIMITED WARRANTY COVER?
The warranty obligations of TiO Home, Inc. (“TiO”), are limited to the terms and conditions set forth in this Limited Warranty. Except for the items not covered, as
listed below, TIO warrants TiO branded products (“Products”) against defects in materials and workmanship, under normal consumer use, for a period of TWO (2) YEARS
from the date of retail purchase by the original consumer purchaser (“Warranty Period”).
Repairs made under this Limited Warranty are covered for the balance of the original Warranty Period, or ninety (90) days from the date of service, whichever is longer.
This Limited Warranty applies only to new Products which are: a) manufactured by or for TIO as identified by the “TiO” trademark, trade name, or logo legally
affixed to them; and b) purchased by consumers from an authorized dealer, reseller or distributor of TiO products.
WHAT WILL TiO DO?
If a covered defect or damage arises and a valid warranty claim is received within the applicable Warranty Period, TiO, at its sole option, unless otherwise required by
applicable law, will either: (i) repair, at no charge, the defect or damage using new, used or reconditioned/refurbished functionally equivalent replacement parts; or (ii)
exchange the Product with a replacement Product that is new or which has been reconditioned/refurbished or otherwise remanufactured from new or used parts and
is functionally equivalent to the original Product; or (iii) refund the purchase price of any Products covered by the terms and conditions of this Limited Warranty. TIO will not
provide, and will not be liable for, labor, costs of removal or reinstallation of product, disposal, freight, taxes, or other incidental charges.
Products, parts and supporting documentation provided to TIO as part of the warranty process, shall become the property of TIO, and may not be returned. When a
replacement or refund is given, the Product for which the replacement or refund is provided must be returned to TIO and shall become the property of TIO.
THIS LIMITED WARRANTY DOES NOT APPLY TO:
(a) Consumable parts, such as batteries or protective coatings designed to diminish over time unless failure has occurred due to a defect in materials or workmanship.
(b) Cosmetic damage, including but not limited to scratches, dents, cracks or other cosmetic damage.
(c) Damage caused by use with non-TIO products. Defects or damage that result from the use of non-TIO products, accessories or other peripheral equipment are
excluded from coverage.
(d) Damage caused by accident, abuse, misuse, liquid contact, fire, earthquake or other external causes. Such damage, including but not limited to: (i) improper
usage or operation, improper storage, abuse or neglect (e.g. broken/bent/missing clips/fasteners/connectors); (ii) impact damage (e.g. dropping the Product); (iii)
contact with liquids, water, rain, extreme humidity, or other moisture; sand, food, dirt or similar substances; or (iv) external causes or acts which are not the fault of TIO,
including but not limited to flood, fire, lightning, earthquake, tornado or other acts of God, is excluded from coverage.
(e) Unauthorized Service or Modification. Defects or damage resulting from service, testing, adjustment, maintenance, alteration, or modification in any way, including
but not limited to tampering with or altering the embedded software, by someone other than TIO, or its authorized service centers, are excluded from coverage.
(f) A product or part that has been modified in any manner without the written permission of TIO. Products that have been altered in any manner so as to prevent TIO
from determining whether such Products are covered under the terms of this Limited Warranty are excluded from coverage. The foregoing shall include, but not be limited
to, (i) serial numbers, date tags or other manufacturer coding that has been removed, altered or obliterated; (ii) mismatched or duplicated serial numbers; or (iii)
broken seals or other evidence of tampering.
DO NOT OPEN THE PRODUCT OR ATTEMPT TO REPAIR THE PRODUCT YOURSELF; SUCH CONDUCT MAY CAUSE DAMAGE THAT IS NOT COVERED BY THIS
WARRANTY.
(g) Normal wear and tear or damage otherwise due to the normal aging of the product.
(h) Defects, damages, or the failure of the Product due to any communication service or network you subscribe to or use with the Products.
(i) All software, including operating system software, third-party software, applications, and all other software of any kind. Software distributed by TIO is provided “AS-IS”
and “AS AVAILABLE,” “WITH ALL FAULTS” and without a warranty of any kind. The Limited Warranty does not apply to any non-TIO product or any software, even if
packaged or sold with the TIO hardware, unless otherwise required by applicable local law.
(j) Incidental or consequential damage resulting from installation or use with a covered Product. Some states/jurisdictions do not allow the exclusion of incidental or
consequential damages so this exclusion may not apply to you.
www.tiohome.com
14
StealthStream®1 Installation Guide

www.tiohome.com
(k) Products that have been refurbished, reconditioned, or remanufactured, except for Products repaired or replaced pursuant to the terms of this Limited Warranty. If
damage is outside the scope of warranty coverage, repair services may be available, but all costs associated with such out of warranty repair will be your responsibility.
HOW DOES STATE LAW AFFECT YOUR RIGHTS UNDER THIS WARRANTY? This Warranty gives you specific legal rights, and you may also have other rights which vary
from state to state and country to country.
WHAT OTHER LIMITATIONS ARE THERE?
To the extent permitted by applicable law, as determined by a court of competent jurisdiction, this limited Warranty and the remedies set forth herein are exclusive and
in lieu of all other warranties and remedies whether written or oral, statutory, expressed or implied. No oral or written representations made by TiO or any Seller, Reseller,
or distributor of the Products, including employees and agents thereof, shall create any additional warranty obligations, increase the scope, or otherwise modify in any manner
the terms of this limited Warranty. To the Extent permitted by applicable law, TiO specifically disclaims any and all statutory or implied warranties, including, without
limitation, warranties of merchantability, fitness for a particular purpose, non-infringement and all warranties against hidden or latent defects.
Where such statutory or implied warranties cannot lawfully be disclaimed, then to the extent permitted by law, all such warranties shall be limited in duration to the duration of
the express limited Warranty contained herein and the remedies of repair, replacement, or refund as determined by TiO in its sole discretion shall be the exclusive
remedy of the consumer.
To the extent permitted by applicable law, TiO does not warrant that the operation of any products or software covered under this limited Warranty will meet your
requirements, work in combination with any hardware or software applications or third party services, be uninterrupted, error-free, or without risk to, or loss of, any information,
data, software or applications contained therein, or that defects in the products or software will be corrected.
To the extent permitted by applicable law, in no event shall TiO be liable, whether in contract, tort, or other legal theory (including negligence), for damages in excess
of the purchase price of the Products, or for any indirect, incidental, special, or consequential damages of any kind, or loss of revenue or profits; loss of business; business
interruption; loss of opportunity; loss of goodwill; loss of reputation; loss of, damage to, or corruption of information, data, software or applications (including any costs
associated with recovering, programming, or reproducing any information, data, software, or applications stored on or used with TiO Products, or any failure to
maintain the confidentiality of any information or data stored on the Products); or other financial loss arising out of or in connection with the ability or inability to use the
products.
Some states or jurisdictions do not allow the limitation or exclusion of incidental or consequential damages, or the exclusion or limitation on the length of the
implied warranty, or the limitation or exclusion of damages for personal injuries caused by negligence, so the above limitations or exclusions may not apply to you.
Data Backup: All information, data, software or other applications will be erased during the repair process, and cannot be reinstalled by TiO. To avoid losing such information,
data, software or other applications please create a backup before you deliver your product for warranty service, remove any confidential, proprietary or personal information and
disable any security passwords. TiO and/or its authorized service centers are not responsible for the loss or misuse of any data, files, content, applications or programs
when the product is delivered for warranty service. Your product or a replacement product will be returned to you as your product was configured when originally
purchased subject to applicable software updates. TiO may install operating system software as part of warranty service that may prevent the product from
reverting to an earlier version of the operating system software. Third party applications installed on the product may not be compatible or work with the product as a result of
the operating system software update. TiO and its authorized service centers are not responsible for the loss of, or inability to use, such information, data, software or other
applications.
Warning against unlocking the boot loader or altering a Product’s operating system software: TiO strongly recommends against altering a Product’s operating system
which includes unlocking the boot loader, rooting a device or running any operating software other than the approved versions issued by TiO and its partners. Such alterations
may permanently damage your product, cause your product to be unsafe and/or cause your product to malfunction. In such cases, neither the Product nor any damage
resulting therefrom will be covered by this Warranty.
HOW DO YOU GET SERVICE?
Promptly notify your dealer or installation provider first. If that is not possible, contact TIO’s TiO Technical Support, within the Warranty period, by calling +1
321-8 02-2 298 or by emailing [email protected] and telling them that you believe the Product is defective. Technical Support will issue an RMA number if it is
appropriate to return the Product to TIO. The RMA number must be clearly marked on the outside of each box when shipping. The RMA is valid for a 30-day period. After
the 30-day period, the RMA will be cancelled. Any shipments received not consistent with the RMA or after the RMA is cancelled, will be refused. TIO is
not responsible for Products returned without a valid RMA number. Compliance with the requirements of this paragraph is a condition to coverage under
the Warranty.
© 2015 TiO Home Inc. TiO, Turn it On, and the TiO logos are trademarks of TiO Home, Inc., registered in the U.S. and other countries. All Rights Reserved
15
StealthStream®1 Installation Guide

http://tiohome.com/learnmore
http://goo.gl/tTvgnV
© 2017 TiO Home, Inc. ,TiO, Turn it On agined by you, and the TiO logos are trademarks of TiO Home.Im
All rights reserved. Not responsible for typographical errors – 25-1001-012
Contact Information
TiO Home, Inc.
7845 Ellis Road
West Melbourne, Florida 32904
Phone: 844-Want-TiO
Technical Support
833-TiO-Help
The Bluetooth®word mark and logos are registered trademarks owned by Bluetooth SIG, Inc., and any use of such marks by
TiO Home, Inc. is under license.
Other trademarks and trade names are those of their respective owners.
Dimensions (overall)
6.99W x 4.78H x 9.91D cm /
2.75W x 1.88H x 3.90D in
Weight
249g / .55lb
Connectivity
Wired or Wireless 802.11n
2.4GHz, Ethernet
Bluetooth version 3.0
Max Output -
100W @ 4 Ohms;
< 0.1% THD+N @ 1kHz
Frequency Response
20Hz to 20kHz
Digital In
DAC accepts 16 – 24 – 32 bit audio
Synchronized Audio
Total audio delay across
6 Synchronized spaces < 10ms
(available when using an MC)
Connectors
Speakers
4 wire removable connector
Power
2 wire removable connector
Digital Audio In
Toslink connector
Analog Audio Output
3.5mm stereo jack
Ethernet
RJ45 socket
Supplied Accessories
In-wall bracket with screws
The Spotify Software is subject to third party licenses found here: www.spotify.com/connect/third-party-licenses.
StealthStream®1 Installation Guide
www.tiohome.com
16
StealthStream®1 Specifications
Other manuals for StealthStream 1
1
This manual suits for next models
1
Table of contents
Other tio Media Player manuals


