tio TouchStream7 AZTS7 User manual

Got Questions?
TiO Technical Support
+1 (321) 802-2298
®
®
AZTS7 FG5026
TouchStream7TM
Amplified Digital Music
Player with 7” Touch Screen Install Guide
The TouchStream7 is an amplified digital streaming music player with a 7”
touch screen interface for full control of a TiO automation system.
Accessories
AZPC1 FG5062
TiO Proprietary Power over Category Wire
Adapter
1.Mount bracket to in-wall mounting ring with
supplied self-threading screws
4.Push panel into place.
CAUTION: Press gently but firmly on the
center of the screen until the Dual Lock clicks
into place.
3.Make all wiring connections
2.Attach adhesive backed rubber blocks in
marked locations (4 places)
Note: Only use these when mounting into a
retrofit ring that sits on the front surface of the
wall. Do NOT install when mounting into a ring
that is inside the wall.
5.Tighten bottom set screw
with supplied hex wrench to
secure panel in place.
Antenna should be oriented vertically for best
performance.
Hardware Installation
FCC ID#: 2AA08- AZSS1 IC: 11338A- AZSS1 24V 3.75A
AZTS7 FG 5026
T
ouchS
TREAM7
®
®
magined by YO U
Designed by TiO
Engineered byExperts
Assembledin the USA
Shipped with Gratitude
©AnuvaAutomation, Inc. StealthStream,TiO, Turn iT On,and theTiO logos are
registeredtrademarks of AnuvaAutomation, Inc. All rights reserved.
All other marks are the property of their respective owners.
Serial Number Label
Common Sense Automation that is Uncommonly Simple
•Read all instructions. Read and understand all the applicable instructions before installing or operating the product.
•Heed warnings. Be aware of the warnings regarding the product.
•Follow Instructions. Install and use this product only as described. Don’t try to use the product in ways it was not intended.
•Use Indoors only. Do not expose this product to the weather or harsh environmental conditions such as continuous
sunlight, excessive humidity or moisture.
•Keep product dry. Do not install the product near water.
•Do not disassemble the product. Doing so will void the warranty. If you have any questions, call TiO support at +1-321-802-
2298 or e-mail us at: suppor t@anuvaautomation.com
This device complies with Part 15 of the FCC Rules. Operation is subject to the following two conditions:
1. This device may not cause harmful interference.
2. This device must accept any interference received, including interference that may cause undesired operation.
This equipment has been tested and found to comply with the limits for a class B digital device, pursuant to part 15 of the FCC Rules. These
limits are designed to provide reasonable protection against harmful interference in a residential installation.
Box Contents
Each unit contains the following:
•AZTS7
•Four (4) Conductor Phoenix Connector (Speaker)
•Two (2) Conductor Phoenix Connector (power)
•AZTS7 Mounting Bracket with dual lock
•Two (2) self-thr eading mounting screws #6 x 1/2”
•Hex wrench - .050”
•Four (4) adhesive backed rubber blocks
•One AZPS1 Power Supply
•One NEMA Power Cord (For North American Versions Only)
•Three (3) Ferrite Core
•Two (2) Ring Type for Speaker and Power Cables
•One (1) Snap-on for Network Cable
•Copy of this Quick Start Guide
AUDIO
OUT
ETHERNET
AUDIO INAUDIO IN
POWERPOWER
SPEAKERSPEAKER + L - - R ++ L - - R +
CLASS 2
WIRING
(4ΩMINIMUM)
CLASS 2
WIRING
(4ΩMINIMUM)
+ -+ -
AZTS7 FG5026
TouchS TREAM7
®
® magined by YOU
Designed by TiO
Engineered by Experts
Assembled in the USA
Shipped with Gratitude
FCC ID#: 2AA08-AZSS1 IC: 11338A-AZSS1 24V 3.75A
© Anuva Automation, Inc. StealthStream, TiO, Turn iT On, and the TiO logos are
registered trademarks of Anuva Automation, Inc. All rights reserved.
All other marks are the property of their respective owners.
Protected by U.S. Patents 29/467,806
Serial Number Label
Ethernet
RJ45 Connector
Optional wired Ethernet when not using Wi-Fi.
Optional device power with AZPC1
Audio Output
Stereo line level audio
(1V peak)
3.5mm connector
Optical Audio Input (TOSLink)
Auto sensing with
Auto A/B switching
configured in TiO App
Speaker Output
Class 2 Wiring
Minimum of 4 ohms
50W RMS x 2 channels
Removable Connector
with screw terminals
Power Input
24VDC, 90W
Removable Connector with screw terminals
Connect LPS or Class 2 power supply only
Highly recommended to use TiO branded supplies
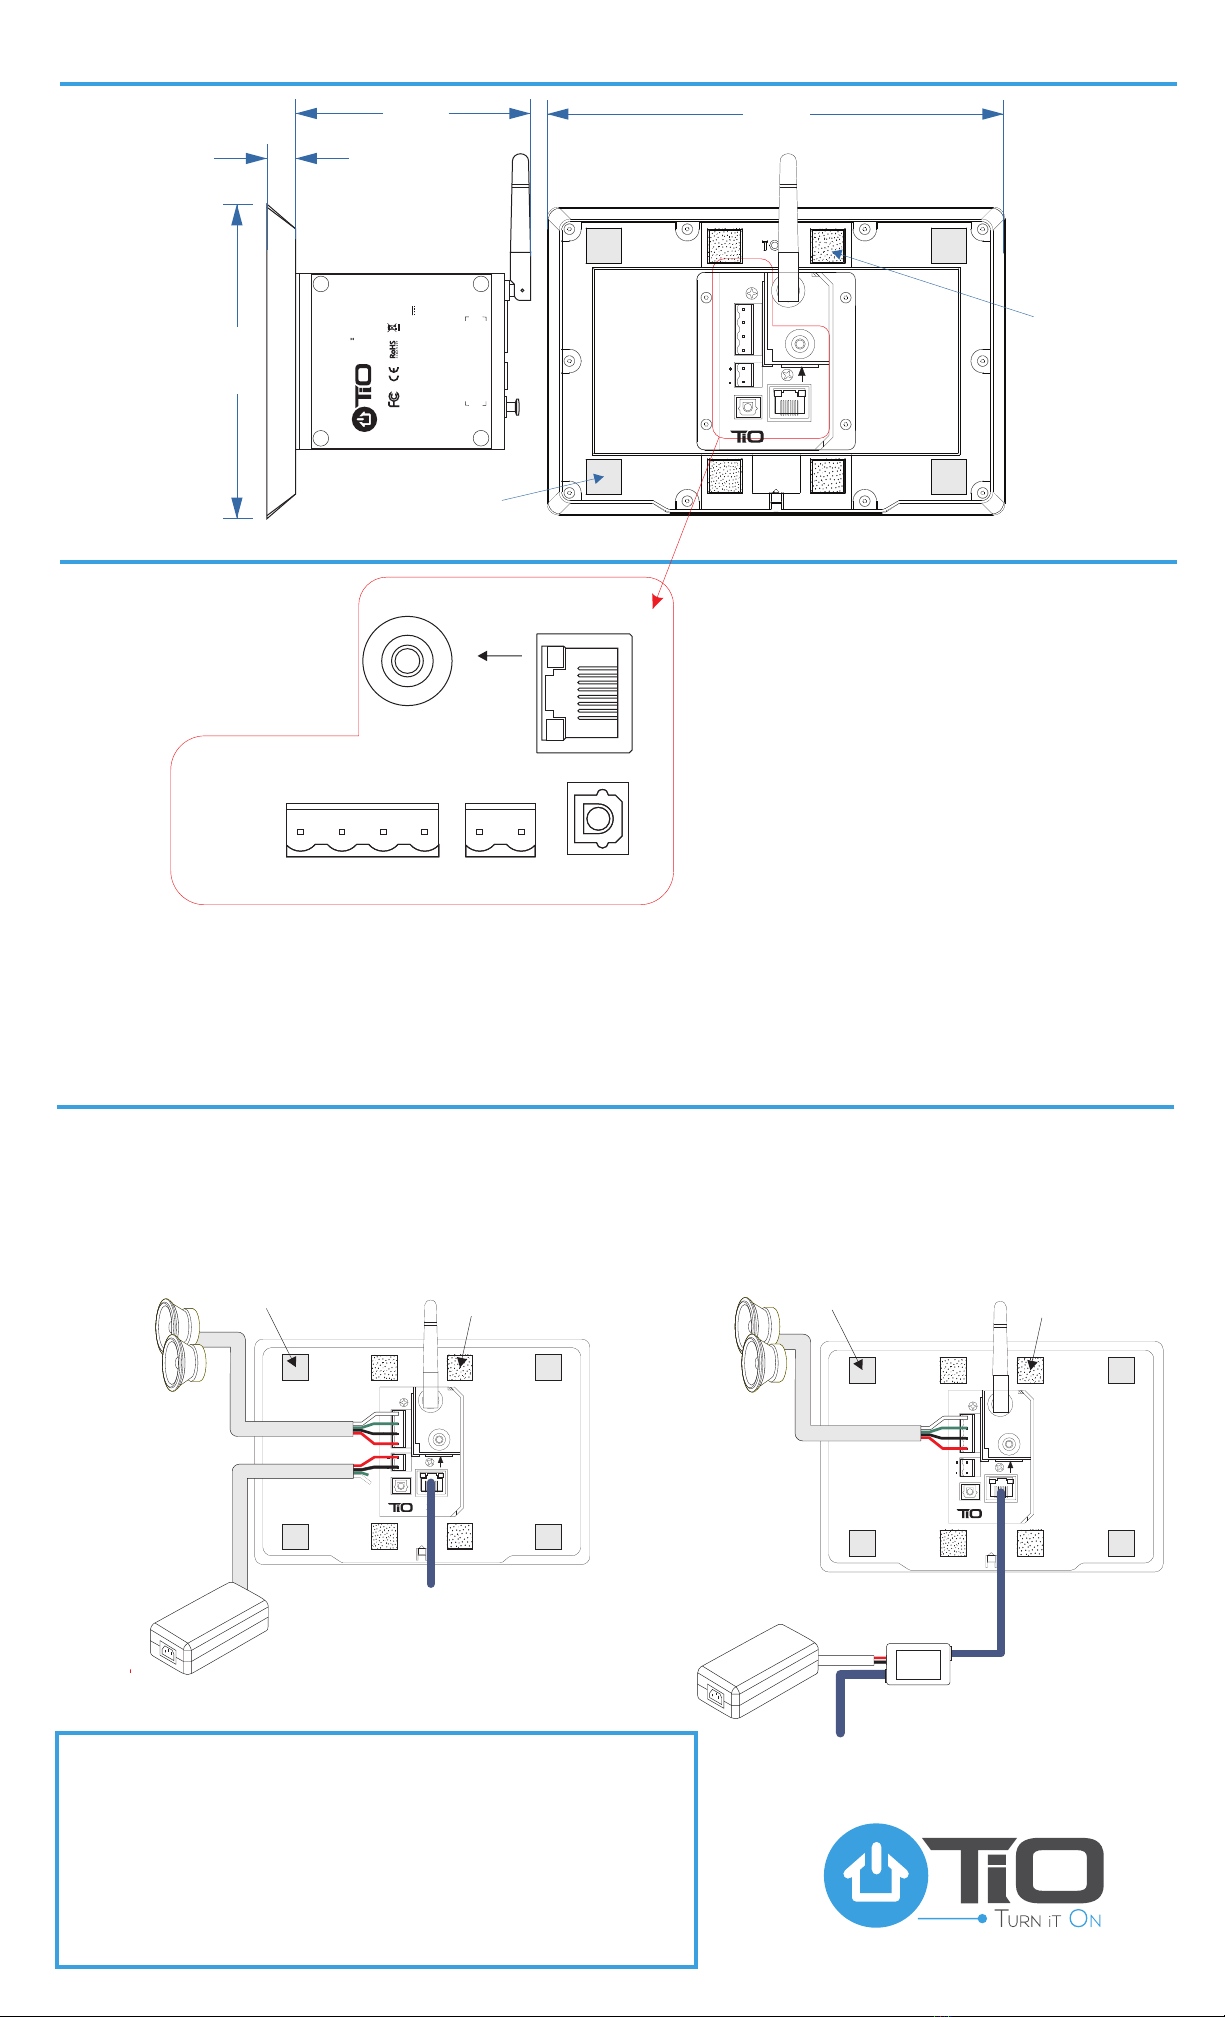
Connections
Dimensions
AZTS7 Install Guide
®
AUDIO
OUT
ETHERNET
AUDIO IN
POWER
SPEAKER + L - - R +
AZTS7
CLASS 2
WIRING
(4ΩMINIMUM)
7 1/4”
4 7/8”
1/2”
3 5/8”
Rubber Blocks (4)
Dual Lock (4)
Wiring Installation
© 2016 Anuva Automation, Inc. v031616
Direct Power Power over CAT5 cable.
WARNING: The AZTS7 must be powered only by a TiO power
supply designated as suitable for the AZTS7. Use of any
other power source may damage the AZTS7.
WARNING: DO NOT connect BOTH a directly connected power
supply and power over Cat 5. Power must come from one
source only. Powering from two sources at the same time will
damage the AZTS7 and void the warranty.
In Existing Buildings
(i.e. Volume Control
Replacement
situations), these
wires are pre-
existing.
To MC2 for Ethernet
(Not required if
connecting wirelessly)
AUDIO
OUT
ETHERNET
AUDIO IN
POWER
SPEAKER + L - - R +
AZTS7
CLASS 2
WIRING
(4ΩMINIMUM)
Rubber Blocks (4) Dual Lock (4)
To Speakers
AZPC1
inserted anywhere
along the Cat5 cable.
AZPS1NA or AZPS1INT
at Home Run
AZPS1NA or
AZPS1INT
at
Home Run
To MC2 for Ethernet
(Not required if
connecting wirelessly)
AUDIO
OUT
ETHERNET
AUDIO IN
POWER
SPEAKER + L - - R +
AZTS7
CLASS 2
WIRING
(4ΩMINIMUM)
To Home Run
Rubber Blocks (4) Dual Lock (4)
To Speakers
Ethernet Input:
6VDC, 10W MAX
LPS or Class 2,
Power Input:
24VDC, 90W
LPS or Class 2,
FERRITE INSTALL
Speaker wires - Prior to attaching the connector to the speaker wires, loop all four leads
through the solid core twice. Then attach the connector and plug into the AZTS7.
Power Cable - Prior to attaching the connector to the power cable, loop the cable
through the solid core twice. Then attach the connector and plug into the AZTS7.
Ethernet Cable - Open the split core and wrap the Ethernet cable around twice. Close
the split core and plug into the AZTS7.
This manual suits for next models
1
Table of contents
Other tio Media Player manuals


