Titan Attachments SCKLBAR60 User manual

FORAGE SICKLE BAR MOWER
SCKLBAR60, SCKLBAR75
191569, 191570
Operator’s Manual
Read the Operator’s Manual entirely. When you see this
symbol, the subsequent instructions and warnings are
serious follow without exception. Your life and the lives
of others depend on it!
2
FOREWORD
Thank you for choosing a high-quality SICKLE BAR, MOWER. We hope that the product you selected
will meet your requirements and serve you for a long time. Please read manual carefully before
operating the machine. The Inspection and maintenance measures listed in this manual are crucially
important for flawless machine operation and the validity of the warranty. All instructions, warning,
and prohibitions regarding the use of the machine must always be observed. They have issued to
ensure the safety of the user and durability of the machine.
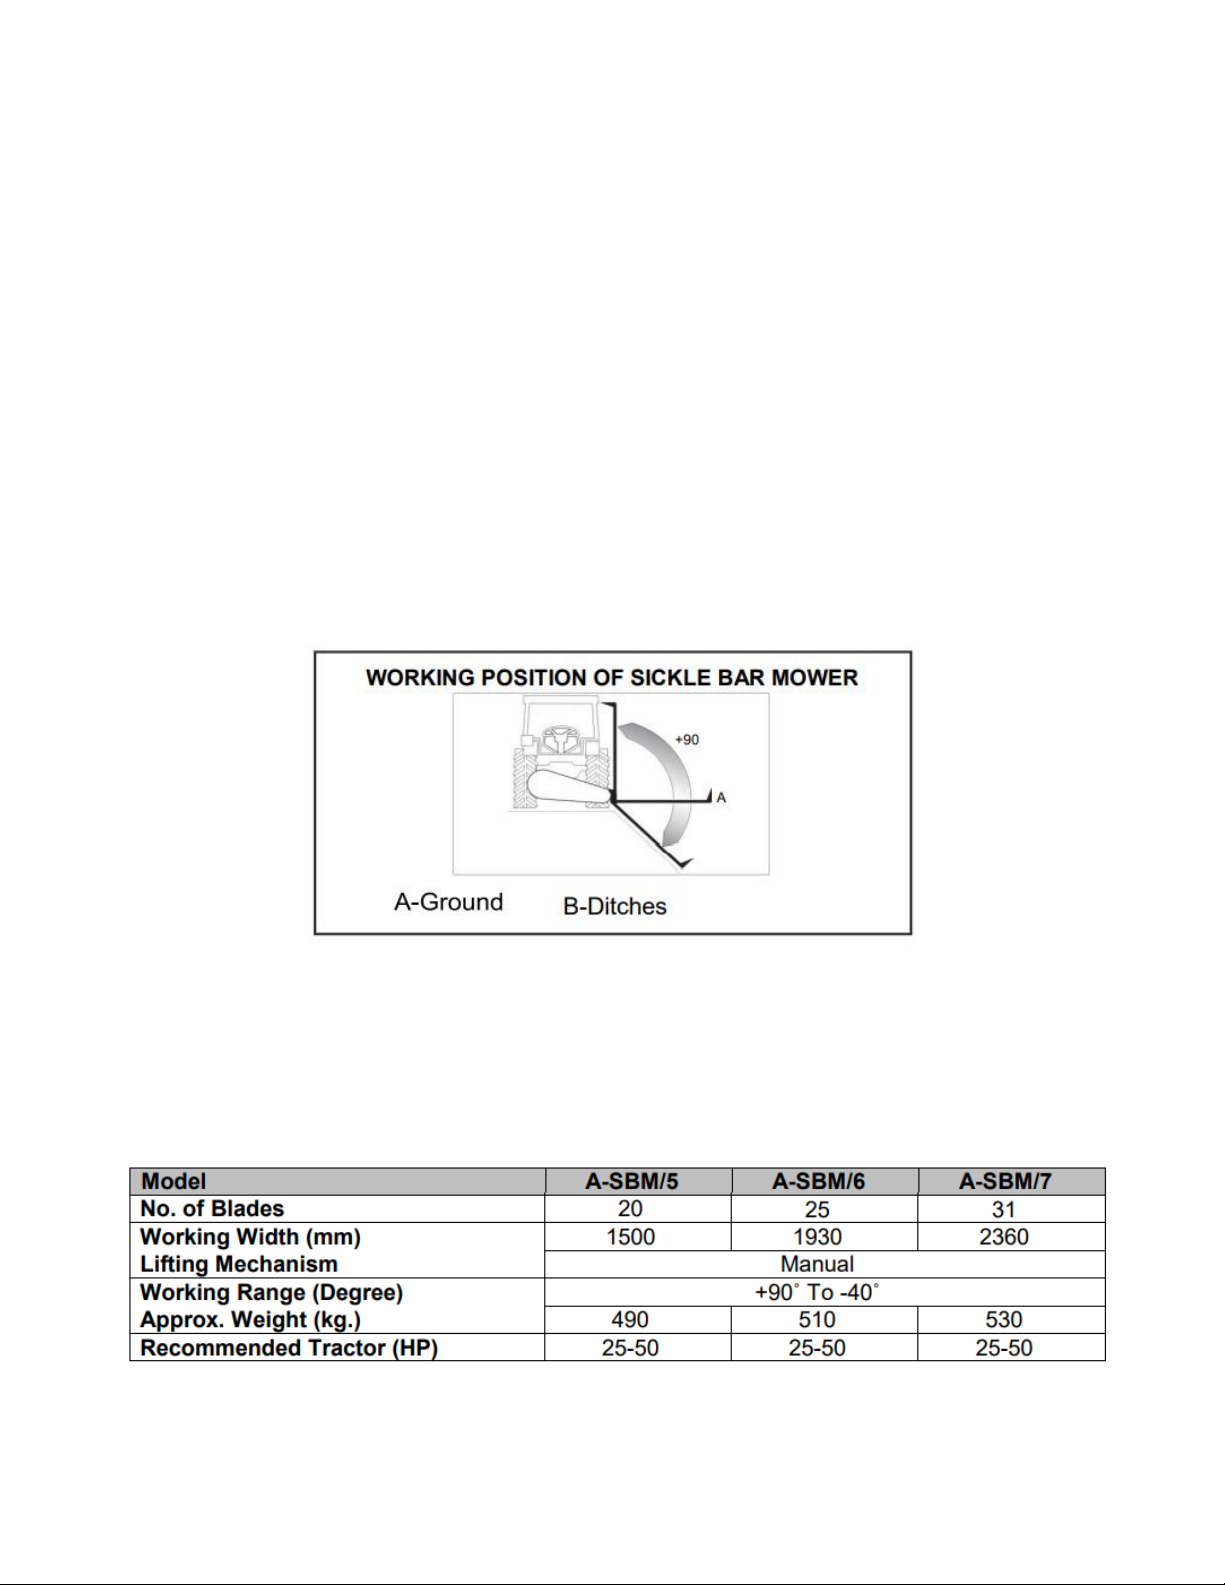
1.1 PURPOSE OF USE
The TITAN ATTACHMENTS SICKLE BAR MOWER is designed for the mowing of fields, ditches, canals,
and embankments. It can only operate by means of a cardan shaft applied to the PTO of an
agricultural tractor equipped with lift and universal three-point hitch. The mower works with a
reciprocation action, moving triangular blades back and forth between stationary guard fingers. Each
back-and-forth action shears off any grass or vegetation that is between the stationary fingers. There
are three way working position of sickle bar mower from the ground level. (Fig.1)
It is designed with capability of mowing +90˚ up and -40° down. The low horsepower requirements
make the sickle bars capable of handling jobs that are not recommended for conventional disc
mowers.
1.2 Technical Specification (with standard equipment)
Due to ongoing product development, product and specification discussed herein are subject to
change.

3
1.3 ASSEMBLY DRAWING
1. Main Frame
2. Lower 3 - Point Linkage
3. Upper 3 - Point Linkage
4. Safety Cover
5. Connecting rod
6. Mowing guide
7. Support
8. Teeth / Finger Guide
9. Blade
10. Parking stand
11. PTO
12. Identification Label

4
1.4 IDENTIFICATION LABEL
Each individual machine carries an identification label containing the information herein after. Write
down plate information in the field provided. When discussing with a seller / manufacturer, please
state the model and serial number of the machine. This will help to prevent unnecessary delays and
misunderstandings.
Fields in the identification label:
1) Mark and address
2) Model of machine
3) Mass of machine with standard equipment, in kilograms
4) Item number of machine
5) Year of manufacture
6) Size or capacity of machine.
7) Serial number of machine (registration number)
1.5 HANDLING
During handling operations, use suitable personal protective devices.
If the machine is handled, it must be lifted by hooking onto the appropriate hook-up points
identified by the “hook” symbol (Fig. 2) with a suitable winch or crane of sufficient capacity. Because
of the danger involved, this operation should be carried out by trained and responsible personnel.
The mass of the machine is on the identification label. Stretch the rope to keep the machine level.
During handling operations make sure the implement has the required safety devices and guards.

5
2 USAGE INSTRUCTION
Carefully read all the instructions before using the machine.
2.1 Before Use & Adjustments
Before mounting the Sickle Bar Mower make sure that all blades, nuts & bolts are properly secured.
This implement is to be used with tractor with PTO at 540 RPM and clockwise rotation.
Also determine Operate the implement up and down steep slopes, not across slopes, to prevent the
tractor from tipping. Avoid sudden stops and starts; slow down before changing directions on a
slope. Before starting a mowing session, adjust the machine so that the best working setup is
obtained. Correct machine setup guarantees excellent mowing, allows for the best machine-tractor
performance, and remarkably reduces wear of the cutting blades.
CAUTION: Always ensure that the coupling of the implement with the tractor is done at the same
PTO speed and direction of rotation. Do not operate this implement at a PTO speed or direction of
rotation other than that shown on the implement. Serious damage can occur to the machine
and/or the operator.
CAUTION: Right hand and left-hand sides of the implement are determined by facing in the
direction the implement will travel when going forward.
1. CAUTION: Avoid injury. Proper ballasting is required for safe operation of your sickle bar
mower.
2. Place the mower duly leveled on the flat piece of land.
3. Reverse the tractor to the mower (Do not drag mower up the tractor).
4. Attached the lift are of the tractor to the mower first.
5. Reverse the tractor to the mower (Do not drag mower up the tractor). Attached the lift are of
the tractor to the mower first.
6. After attaching the tractor, lift it and adjust the control arm parallel to the grovel. When you
look from both rear & sideways, all the cutting arm of the mower should be parallel to the
ground.

6
2.3 OPERATION ON UNEVEN TERRAIN
DANGER: Be careful of rollover when operating tractor and implement over uneven ground.
The following precautions should always be observed when working on uneven terrain:
1. In extremely uneven terrain rear wheel weights, front tractor weights, and/or tire ballast
should be used to improve stability.
2. Observe the type of terrain and develop a safe working pattern.
3. Whenever traction or stability is doubtful, first test drive over the terrain with the PTO
disengaged.
4. Operate the implement up and down steep slopes, not across slopes, to prevent the tractor
from tipping. Avoid sudden stops and starts, slow down before changing directions on a
slope.
5. Pass diagonally through sharp dips and avoid sharp drops to prevent hanging up the tractor
and implement.
6. Slow down on sharp turns and slopes to prevent tipping or loss of control.
7. Watch for holes, roots, or other hidden objects. Do not operate near the edge of a gully,
ditch, or stream bank.
NOTE: When mowing over uneven terrain keep cylinder stop lock in raised position.
2.4 ATTACHING PTO SHAFT
PTO SHAFT ADAPTATION
The PTO shaft, supplied with the machine, is of standard length. Therefore, it might be necessary to
adapt the PTO shaft. In that case, before doing anything, consult the Manufacturer for the eventual
adaptation.
CAUTION
•When the PTO shaft is fully extended, the two tubes must overlap by at least 6 inches (S Fig.
3). When fully inserted, the minimum play must be 137/64inches (T Fig. 3).
•If the implement is used on another tractor, always check the above and that the guards
completely cover the rotating parts of the PTO shaft.
ATTENTION
•Comply with the manufacturer’s instructions when transporting the mowing machine.
•The equipment installed can only be controlled by means of the PTO shaft complete with the
necessary overload safety (i.e., clutch) devices and guards fastened with the appropriate
chain.
•Only the PTO shaft supplied by the Manufacturer must be used.
•The engine must not be running when installing and removing the PTO shaft.
•Care must be taken regarding the safety and correct assembly of the PTO shaft.
•Use the chain provided to stop the PTO shaft from rotating.
•Always check carefully that the PTO shaft guard is always in position, both during
transportation and operation.
•Frequently and set intervals check the PTO shaft guard, it must always be in excellent
condition.
•Before engaging the PTO, check that the set rpm corresponds to that indicated by the sticker
on the equipment.

7
•Before inserting the PTO, make sure that there are no people or animals nearby and that the
rpm selected corresponds to that permitted. Never exceed the maximum admissible speed.
•Watch out for the rotating universal joint.
•Do not insert the PTO with the engine off or synchronized with the wheels.
•Always disconnect the PTO when the cardan shaft is at too wide an angle (never more than
10°, Fig. 4) and when it is not being used.
•Only clean and grease the PTO shaft when the power take-off is disconnected, the engine is
off, the hand brake pulled, and the key removed.
•When not in use, place the PTO shaft on the support provided for it.
PARKING INSTRUCTIONS
•Stop vehicle on a level surface, not on a slope.
•Disengage PTO.
•Engage the park brake.
•STOP the engine.
•Remove the key.
•Before you leave the operator’s
seat, wait for engine and all
moving parts to STOP.
Stay clear of rotating drivelines
Entanglement in rotating driveline can
cause serious injury or death:
•Wear close fitting clothing.
•STOP the engine and be sure PTO
driveline is stopped before
getting near it
2.5 SETTING OF CUTTING ANGLES

8
It is designed with capability of cutting Angle +12˚ up and -5° down. The low horsepower
requirements make the sickle bars capable of handling jobs that are not recommended for
conventional disc mowers.
Before cutting the sickle bar mower make sure the set cutting angle through the bolt support. It can
easily set angle through a single person with manual ways.
3 BASIC SAFETY RULES
Operator must read the instruction manual before operating the mower. Do not allow anyone to
operate this equipment who has not fully read and comprehended this manual and who has not
been properly trained for the safe operation of the equipment.
3.1 Warning Labels
On your machine warning labels, the words DANGER, WARNING, and CAUTION are used with a
safety symbol. DANGER identifies the most serious hazards. The word CAUTION and its symbol call
attention to safety messages.

9

10
a. Danger and Indicator Signals
The signs described are reproduced on the machine. Keep them clean and replace them if they
come off or become illegible. Read and recognize safety information. Be alert to the potential for
personal injury when you see this safety-alert label.
NEVER ALLOW ANY PERSON TO RIDE THE MACHINE DURING WORK OR
TRANSPORT.
GENERAL NORMS
1. Be mindful of to the danger signs in the manual and on the machine.
2. The labels with the instructions attached to the machine give abbreviated advice for avoiding
accidents.
3. Strictly observe, with the help of the instructions, the safety and accident prevention
regulations.
4. Any work on and adjustment to the machine must always be done with the engine switched
off and the tractor blocked.
5. It is strictly prohibited to drive the tractor, or allow it to be drive the tractor, or allow it to be
driven, with the equipment attached by persons not in possession of a driver’s license,
inexpert or in poor conditions of health.
6. Before starting the tractor and the equipment, check that all safety devices for transport and

11
use are in perfect working order.
7. Before starting up the equipment, check the area surrounding the machine to ensure that
there are no people, nearly (especially children or pets) and ensure that you have excellent
visibility.
8. Use suitable clothing. Avoid loose clothing or garments with parts that could in any way get
caught in the rotating or moving parts of the machine.
9. Only start working with the equipment if all the protective devices are in perfect condition,
installed and in the safe position.
10. 10)It is absolutely prohibited to stand within the machine’s radius of action where there are
moving parts. 11)Before starting work, familiarize yourself with the control devices and their
functions.
11. 12)The driver’s seat must never be left when the tractor engine is running.
12. 13)It is absolutely forbidden to use the equipment without the guards and container covers.
13. 14)Before leaving the tractor, lower the equipment hooked to the lifting unit, stop the
engine, pull the hand brake, and remove the key from the dashboard, make sure that the
chemical substances should be out of reach. 15)Before starting the equipment, check that
the supporting feet have been removed from under the machine; check that the machine has
been correctly assembled and regulated: check that the machine is in perfect working order,
and that all the parts subject to wear and tear are in good condition.
14. 16)Before releasing the equipment from the third point attachment, put the hoist command
lever into the locked position and lower the support feet.
15. 17)All operations must be carried out by expert personnel, equipped with protective gloves,
in a clean and dust-free environment.
TRACTOR HITCH
1. Hook the equipment to a suitable, sufficiently powered tractor by means of the appropriate
device (lifter), in conformity with applicable standards.
2. The class of the equipment attachment pins must be the same as that of the lifter
attachment.
3. Take care when working within the range of the lifting arms as this is a very dangerous area.
4. Be very careful when hooking and unhooking the equipment.
5. It is absolutely forbidden to stand in the space between the tractor and the equipment with
the engine running. It is possible to work between the tractor and the equipment only after
the parking brake has been applied and a suitably sized blocking wedge or stone has been
placed under the wheels.
6. The attaching- of additional equipment onto the tractor brings about a different distribution
of weight on the axles. Check the compatibility of the tractor performance with the weight
that the machine transfers onto the three - point linkage.
7. Comply with the maximum admissible weight for the axle, the total mobile weight, transport
regulations and the Highway Code.

12
TRANSPORT ON ROAD
1. When driving on public roads, be sure to follow the highway code of the country involved.
2. Any transport accessories must be provided with suitable signs and guards.
3. It is very important to remember that road holding capacity as well as direction and braking
capacity can be influenced, sometimes considerably by equipment being either carried or
towed.
4. When negotiating curves, be aware of the variation in centrifugal force exerted in a position
other than that of the center of gravity, with and without the equipment in tow. Also pay
greater attention on sloping roads or ground.
5. For transport, adjust and fasten the lateral lifting arm chains of the tractor; lock the hydraulic
listing control lever.
6. For displacements beyond the work area. The equipment must be placed in the
transportation position.
7. Upon request the Manufacturer will supply supports and tables for signaling of dimensions.
8. When the dimensions of carried or partially carried equipment conceal the tractor's signaling
and lighting devices, these must also be installed on the equipment itself, in conformity with
regulations of the highway code of the country involved. When in operation make sure that
the lighting system is in perfect working order.
SERVICE AND MAINTENANCE
b. Operation, Care & Maintenance of Sickle Bar Mower
1. Good maintenance is your responsibility.
2. Keep service area clean and dry. Be sure electrical outlets and tools are properly grounded.
Use adequate light for the job at hand.
3. Make sure there is plenty of ventilation. Never operate the engine of the towing vehicle in a
closed building. The exhaust fumes may cause asphyxiation.
4. Make no repair or adjustments with the tractor engine running. Before working on the
machine, disengage the PTO, shut off the engine, set the brakes, and remove the ignition key.
5. Be certain all moving parts on attachment have come to a complete stop before attempting
to perform maintenance.
6. Never work under equipment unless it is blocked securely.
7. Always use personal protection devices such as eye, hand and hearing protectors, when
performing any service or maintenance.
8. Frequently check mower blades. They should be sharp, free of nicks and cracks and securely
fastened.
9. Periodically tighten all bolts, nuts and screws and check that all cotter pins are properly
installed to ensure unit is in a safe condition.
10. When completing a maintenance or service function, make sure all safety shields and devices
are installed before placing unit in service.

13
c. Storage of Sickle Bar Mower after Work
After seasonal use it is important to perform the following for prolonged storage:
1. Wash the implement carefully.
2. Replace safety shield on cutting bar.
3. Tighten all hardware.
4. Grease all areas indicated under Maintenance.
5. When placing machine in storage, lower the support stand and secure it with the lock pin
before lowering the unit to the ground.
6. Cover the implement from the elements in order to have it in perfect condition for the start
of the next season.
WARNING: Be sure to store the implement on a hard level surface, with the safety shield installed on
the cutting bar, away from people especially children.
TROUBLESHOOTING
14
PARTS DIAGRAM / EXPLODED VIEW
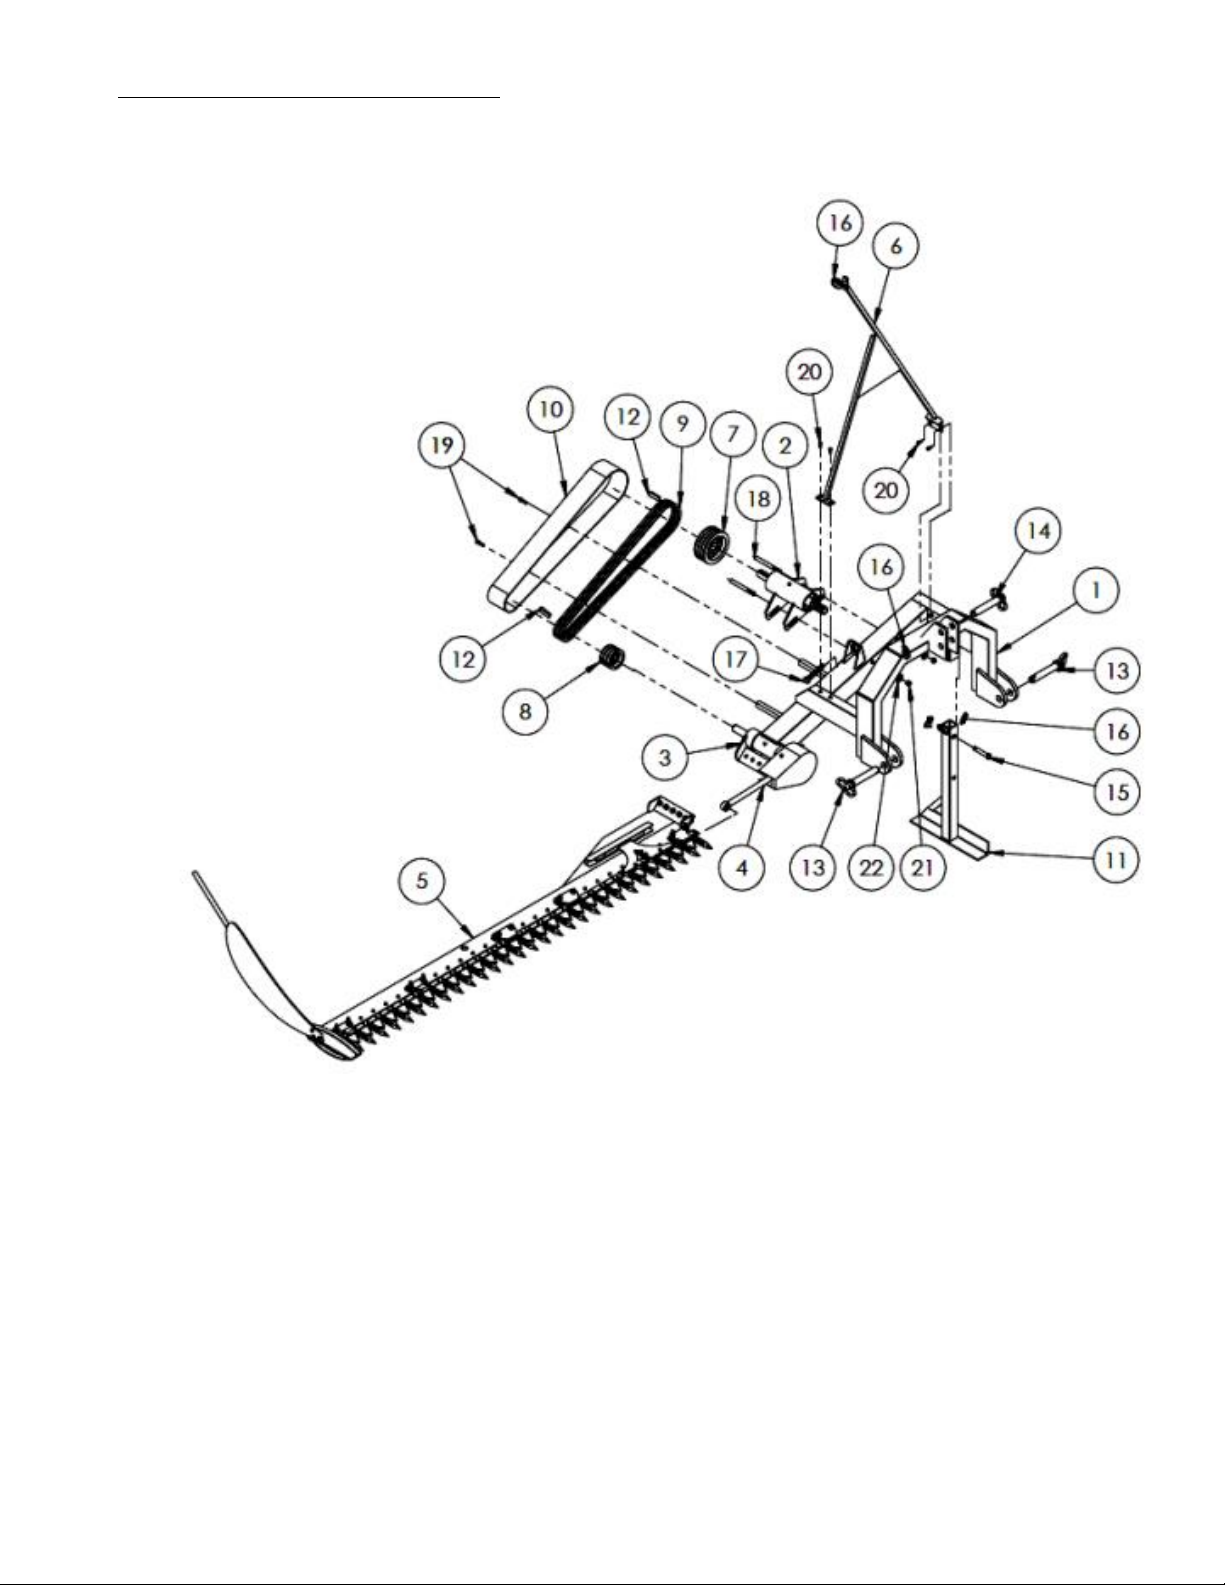
6.1 SICKLE BAR MOWER 3-POINT FRAME ASSEMBLY

15

16
6.2 SICKLE BAR MOWER 3-POINT FRAME & CONNECTING ROD ASSEMBLY
17
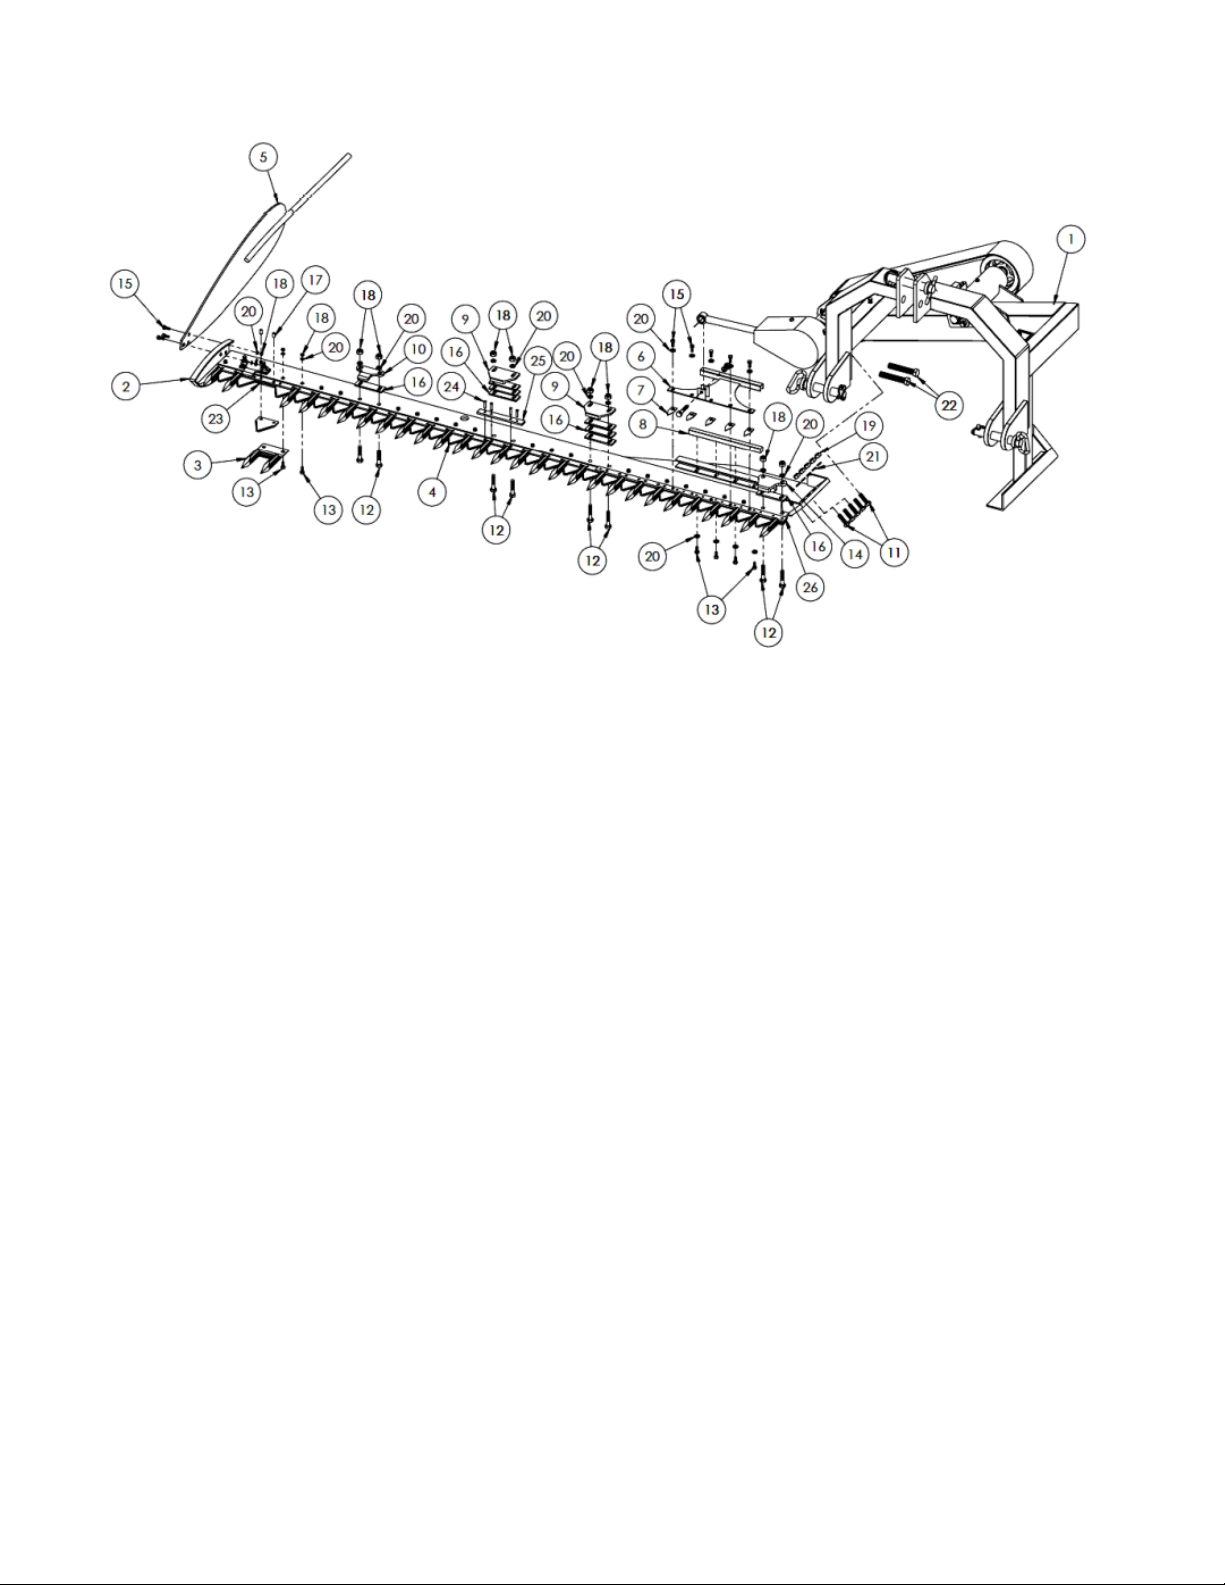
6.3 SICKLE BAR MOWER 3-POINT FRAME & CUTTING BAR ASSEMBLY

18

19
6.4 POWER INPUT HUB ASSEMBLY
20
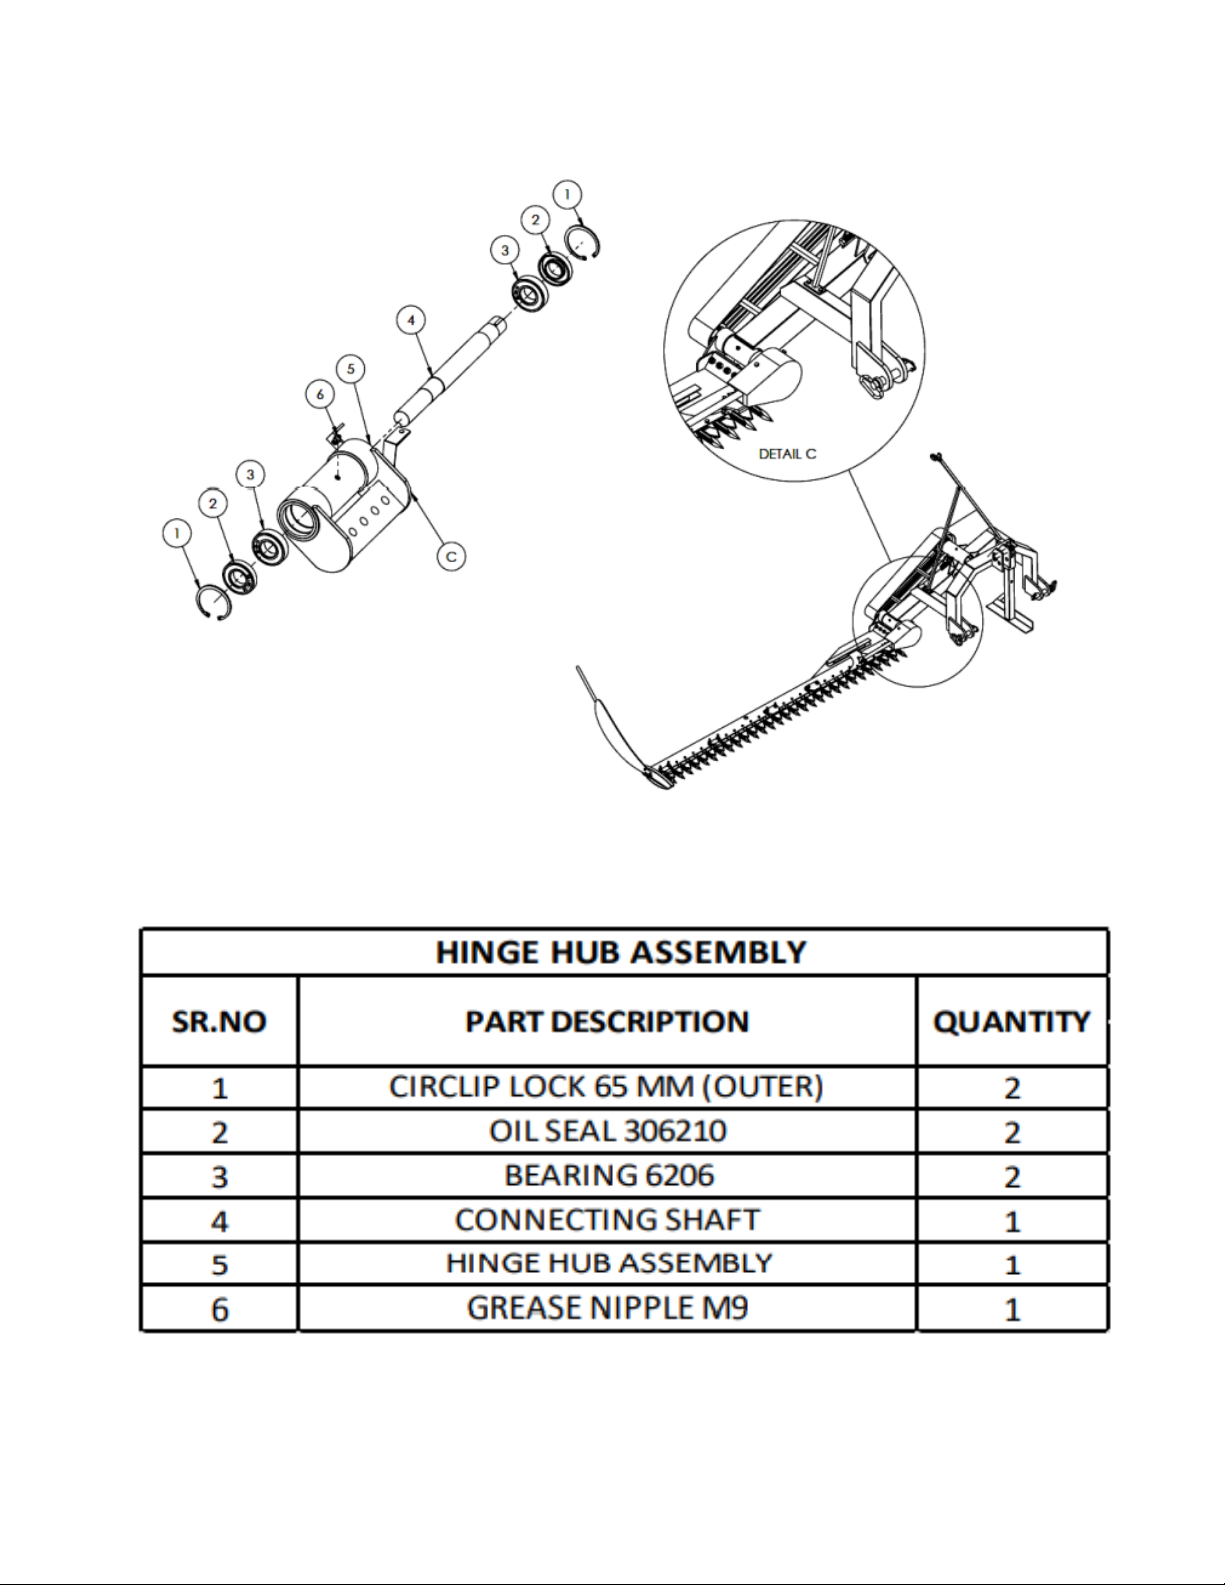
6.5 HINGE HUB ASSEMBLY
This manual suits for next models
3
Table of contents
Other Titan Attachments Lawn Mower manuals


