TitanTec XT-BC508-1 User manual

XT-BC508-1

1. Parts location
------------------------------------------------------------------------------------------------------
1. Trimmer Head
2. Protection shield
3. Handle bracket
4. Left Handle
5. Right Handle
6. Throttle Trigger
7. Throttle lever
8. Switch
9. Harness Hanger
10. Primer Pump
11. Choke lever
12. Recoil starter
13. Fuel Tank
2. Specifications
-----------------------------------------------------------------------------------------------------
Sound pressure level, LPA
Model no
Engine type 1E43F-B,air-cooled, 2-stroke Engine
displacement 50.8 cm³
Maximum engine power 1.7kW
Max rotational frequency of the spindle 7600/min
Engine idling speed range 3000 min-1
Fuel Mixture Gasoline 25 : Oil 1
Volume of fuel tank
850 cm³
Starter Recoil
Spark plug BM6A&L8RTF
Weight(without harness and petrol) 8.55 kg
Brush cutter: 97,89 dB(A) K=3 dB(A);
Grass trimmer: 98,61 dB(A) K=3 dB(A)
XT-BC508-1

Sound power level, Lwa
Guaranteed sound power level, LWA
LWA: 117 dB(A), k=3 dB(A)
Vibration level
Brush cutter: 6,736 m/s²
Grass trimmer: 9,185 m/s²
K=1,5 m/s²
Overall size(LxWxH)
1900x650x260 mm
Metal blade
2T: 305mm*1,6 mm
3T, 4T, 8T: 255mm*1,6mm
Cutting line diameter
2.5 mm
3. Symbols on the machine
------------------------------------------------------------------------------------------------------
For safe operation and maintenance, symbols are carved in relief on the machine. According to these
indications, please be careful not to make a mistake.
CHOKE OPERATION
Starting mode when the engine is hot (choke off ).
Position: AIR CLEANER COVER
Starting mode when the engine is cold (choke on).
Position: AIR CLEANER COVER
4. Warning labels on the machine
------------------------------------------------------------------------------------------------------
Warning / Attention
Danger: Risk of fire or
explosion
Read the instruction
manual completely and
carefully before using the
tool.
Top speed of trimmer head is
6600 min-1
Brush cutter: 113,16 dB(A) K=3 dB(A);
Grass trimmer: 113,99 dB(A) K=3 dB(A)

Wear head, eye and ear
protection.
Top speed of blade is 7100
min-1
Wear protective gloves.
Keep all children, bystanders
and helpers 15 meters away
from the brush cutter
Wear safety footwear
The guaranteed noise level
Danger: Toughing the
rotating blade is
forbidden.
With this symbol the
manufacturer confirms that
this tool is in accordance with
applicable European
directives.
Beware of thrown objects.
Keep away from fire
Hot surface: Risk of burn.
5. For safe operation
Proper safety precautions must be observed. This unit must be handled carefully. DO NOT EXPOSE
YOURSELF OR OTHERS TO DANGER.
Follow these general rules. Do not permit others to use this machine unless they are thoroughly
responsible and have read, and understand the machine manual and are trained in its operation.
• For machines with a clutch, routines for checking that the cutting attachment stops turning when
the engine idles
•Always wear safety goggles for eye protection. Dress properly; do not wear loose clothing or
jewellery that could become caught in moving parts of the unit. Safe, sturdy, non-skid footwear should
always be worn. Long hair should be tied back. It is recommended that legs and feet be covered to
protect from flying debris during operation.
•Inspect the entire machine for loose parts (nuts, bolts, screws, etc.) and any damage. Repair or
Do not use saw blades
BEWARE OF THROWN OBJECTS HIT
BY CUTTING ATTACHMENTS. NEVER
USE WITHOUT PROPERLY MOUNTED
BLADE GUARD.BEWARE OF BLADE
THRUST
Keep bystanders away.
Never work while people,
especially children or pets are
nearby.

replace as necessary before using the machine. DO NOT USE any attachment with this power head
other than the ones recommended by our company. Serious injury to the operator or bystanders could
result as well as damage to the machine.
•Keep the handles free from oil and fuel.
•Always use proper handles and shoulder strap when cutting.
•Do not smoke while mixing fuel or filling tank.
•Do not mix fuel in an enclosed room or near open flames. Assure adequate ventilation.
•Always mix and store the fuel in a properly marked container that is approved by local codes and
ordinances for such usage.
•Never remove the fuel tank cap while the engine is running.
•Never start or run the engage inside a closed room or building. Fumes from the exhaust contain
dangerous carbon monoxide.
•Never attempt to make engine adjustments while the unit is running and strapped to the operator.
Always make engine adjustments with the unit resting on a flat, clear surface.
•Do not use the unit if it is damaged or poorly adjusted. Never remove the machine’s guard. Serious
injury to the operator or bystanders could result as well as damage to the machine.
•Inspect the area to be cut and remove all debris that could become entangled in the nylon cutting
head. Also remove any objects that the unit may throw during cutting.
•Keep children away. Onlookers should be kept at a safe distance from the work area, at least 15
meters.
•Never leave the machine unattended.
•Do not use this unit for any job other than those for which it is intended as described in this
manual.
•Do not overreach. Keep proper footing and balance at all times. Do not run the unit while standing
on a ladder or on any other unstable footing location.
•Keep hands and feet clear of the nylon cutting head or blade while unit is in use.
•Do not use this type of machine for sweeping away debris.
•Do not use the unit when you are tired, ill or under the influence of medication, drugs or alcohol.
•Use nylon cutting head which is free of damage. If a stone or any other obstacle is hit, stop the
engine and check the nylon cutting head. A broken or unbalanced nylon cutting head must never be
used.
•Do not store in a closed area where fuel vapors can reach an open flame from hot water heaters,
furnaces, etc. Store the tool in a locked, well-ventilated area only.
•Ensure safe and proper performance of your product. These parts are available from your dealer.
The use of any other accessories or attachments may cause a potential hazard or injury to the user,
damage to the machine and void this warranty.
•Clean the machine completely, especially, the fuel tank, its surroundings, and the air cleaner.
•When refueling, be sure to stop the engine and confirm that it is cooled down. Never refuel when
the engine is running or hot. When gasoline spills, be sure to wipe it up completely dispose of those
materials before starting the engine.
•Stay clear of other workers or bystanders by at least 15 meters.
•Whenever approaching an operator of the machine, carefully call his attention and confirm that
the operator stop the engine. Be careful not to startle or distract the operator which can cause an
unsafe situation.
•Never touch the nylon cutting head or blade whenever the engine is running. If it is necessary to
replace the protector or cutting attachment, be sure to stop the engine and confirm that the cutting
device has stopped running.
•The engine should be turned off when the machine is moved between work areas
•Be careful not to hit the nylon cutting head against stones, or the ground.
•Unreasonable rough operation will shorten the life of the machine as well as create an unsafe
environment for yourself and those around you.

•Pay attention to loosening and overheating of parts. If there is any abnormality of the machine,
stop operation immediately and check the machine carefully. If necessary, have the machine serviced by
an authorized dealer. Never continue to operate a machine which may be malfunctioning.
•In start-up or during operation of the engine, never touch hot parts such as the muffler, the high
voltage wire or the spark plug.
•After the engine has stopped, the muffler is still hot. Never place the machine in any places where
there are flammable materials (dry grass, etc.), combustible gasses or combustible liquids.
•Pay special attention to operation in the rain or just after the rain as the ground may be slippery.
•If you slip or fall to the ground or into a hole, release the throttle lever immediately.
•Be careful not to drop the machine or hit it against obstacles.
•Before proceeding to adjust or repair the machine, be sure to stop the engine and detach the spark
plug.
•When the machine is placed in storage for a long time, drain fuel from the fuel tank and carburetor,
clean the parts, move the machine to a safe place and confirm that the engine is cooled down.
•Make periodic inspections to assure safe and efficient operation. For a thorough inspection of your
machine, please contact a dealer.
•Keep the machine away from fire or sparks.
•It is believed that a condition called Raynaud’s phenomenon, which affects the fingers of certain
individuals, may be brought about by exposure to vibration and cold. Loss of color and numbness in the
fingers. The following precautions are strongly recommended because the minimum exposure which
might trigger the ailment is unknown.
•Keep your body warm, especially the head, neck, feet, ankles, hands and wrists.
•Maintain good blood circulation by performing vigorous arm exercises during frequent work breaks
and also by not smoking.
•Limit the hours of operation. Try to fill each day with jobs where operating the brush cutter or
other hand-held power equipment is not required.
•If you experience discomfort, redness and swelling of the fingers followed by whitening and loss of
feeling, consult your physician before further exposing yourself to cold and vibration.
•Always wear ear protection, loud noise for long time can make hearing debase even lost hearing.
•Total face and head protection must be wearing to prevent damage from plummet or branch.
•Wear no-slip heavy duty work gloves to improve your grip on the brush cutter handle. Gloves also
reduce the transmission of machine vibration to your hands.
•WARNING: The cutter area is still dangerous while the machine is coasting to a stop.
•When transport, this unit must be handled carefully. Do not expose yourself or others to danger.
•Envelop the blade before storage. Keep children away from it.
•Never remove the machine’s guard.
•Never place the machine in any places where there are flammable materials (dry grass, etc.),
combustible gasses or combustible liquids.
•When the machine is placed in storage for a long time, drain fuel from the fuel tank and carburetor,
clean the parts, move the machine to a safe place and confirm that the engine is cooled down.
•Warning –the tool emits dangerous exhaust gases. Do inhale them and stay away from these
gases.
•National regulation can restrict the use of the machine.
•Never modify a trimmer or cutter in any way.
•Improper use of the machine can cause SERIOUS OR FATAL PERSONAL INJURY.
•The engine exhaust form this product contains chemicals to cause cancer, birth defects, of other
reproductive harm.
•Checking regularly that the cutting attachment stops turning when the engine idles.
•Use recommended cutting attachments and appropriate. Contact your dealer or our service agent
to know which cutting attachment can be used with this tool. There are possible safety consequences
from using other cutting attachments, e.g. metal multi-piece pivoting chains and flail blades.

•Check each time before and after use, after a fall or other impacts to identify any significant
damage.
Do not use the tool in case of damage. Bring it to a qualified service agent for inspection and
reparation.
•Risks and problems may occur during the operation, follow the instructions in this manual to
reduce these risks.
•If the machine or cutting attachment needs to be unlocked, stop using the tool, remove the spark
plug. Wear safety protection to unlock the tool.
•Do not work prolonged with the tool, take regular breaks during the operation.
•Always keep a correct posture, do not use the tool in a position that could create accidents.
Secure the machine during transport to prevent loss of fuel, damage or injury. Always put the
protection devices on the blades. Always transport the tool upright.
Put the protection on the blade when storing the tool.
Hazards which could be encountered while using the machine (bump a foreign object, blockage of
the cutting attachment, etc.). In order to avoid hazards, inspect thoroughly the working area;
remove all hazardous material and object which may be present.
Kickback and Related Warnings
- Kickback is a sudden reaction to a pinched or snagged rotating wheel, backing pad, brush or any
other accessory. Pinching or snagging causes rapid stalling of the rotating accessory which in turn
causes the uncontrolled power tool to be forced in the direction opposite of the accessory’s rotation at
the point of the binding.
- For example, if an abrasive wheel is snagged or pinched by the workpiece, the edge of the wheel
that is entering into the pinch point can dig into the surface of the material causing the wheel to climb
out or kick out. The wheel may either jump toward or away from the operator, depending on direction
of the wheel’s movement at the point of pinching. Abrasive wheels may also break under these
conditions.
- Kickback is the result of power tool misuse and/or incorrect operating procedures or conditions
and can be avoided by taking proper precautions as given below:
o Never place your hand near the rotating accessory. Accessory may kickback over your hand.
o Do not position your body in the area where power tool will move if kickback occurs. Kickback will
propel the tool in direction opposite to the wheel’s movement at the point of snagging.
o Use special care when working corners, sharp edges etc. Avoid bouncing and snagging the
accessory. Corners, sharp edges or bouncing have a tendency to snag the rotating accessory and cause
loss of control or kickback.
Residual risks
Even if you use this tool correctly, there are always residual risks. The following hazards may arise in
connection with the structure and manufacture of this power tool:
- Hearing impairment if no suitable hearing protection is worn.
- Cuts if no suitable protective clothing is worn.
- Health damage resulting from vibration in the hands and arms if the device is used for a long
period of time or is not handled and maintained properly.
- Inhalation of particles
- Inhalation of exhaust gases
- Skin contact with oil / gasoline
- Inhalation of gasoline / oil vapors
- Contact with projected objects
- Burns when touching with hot surfaces
- Prolonged use of this product exposes the operator to vibration and can produce so-called "white
finger" disease. To reduce the risk, wear gloves and keep your hands warm.
- If any of the symptoms of "white finger syndrome" occur, seek immediate medical attention.
Symptoms of the "white finger" include numbness, loss of sensitivity, tingling, pain, loss of strength,
color changes or skin condition. These symptoms usually appear on the fingers, hands or wrists. Risk
increases at low temperatures.
Intended use
This machine can be used with the cutting wire as a trimmer for cutting grass and weeds of small
thickness and in small quantity and with the cutting blade as a brush cutter for cutting denser
vegetation. This machine must not be used for cutting or other cutting operations where the cutting
tool must be lifted above the ground. This machine is only authorized for private use. Any other use or
modification of this machine is prohibited and involves high risks.
5. Set up
------------------------------------------------------------------------------------------------------
Warning –Be careful of sharp edges when assembly. Wear protective gloves.
01 02
03 04

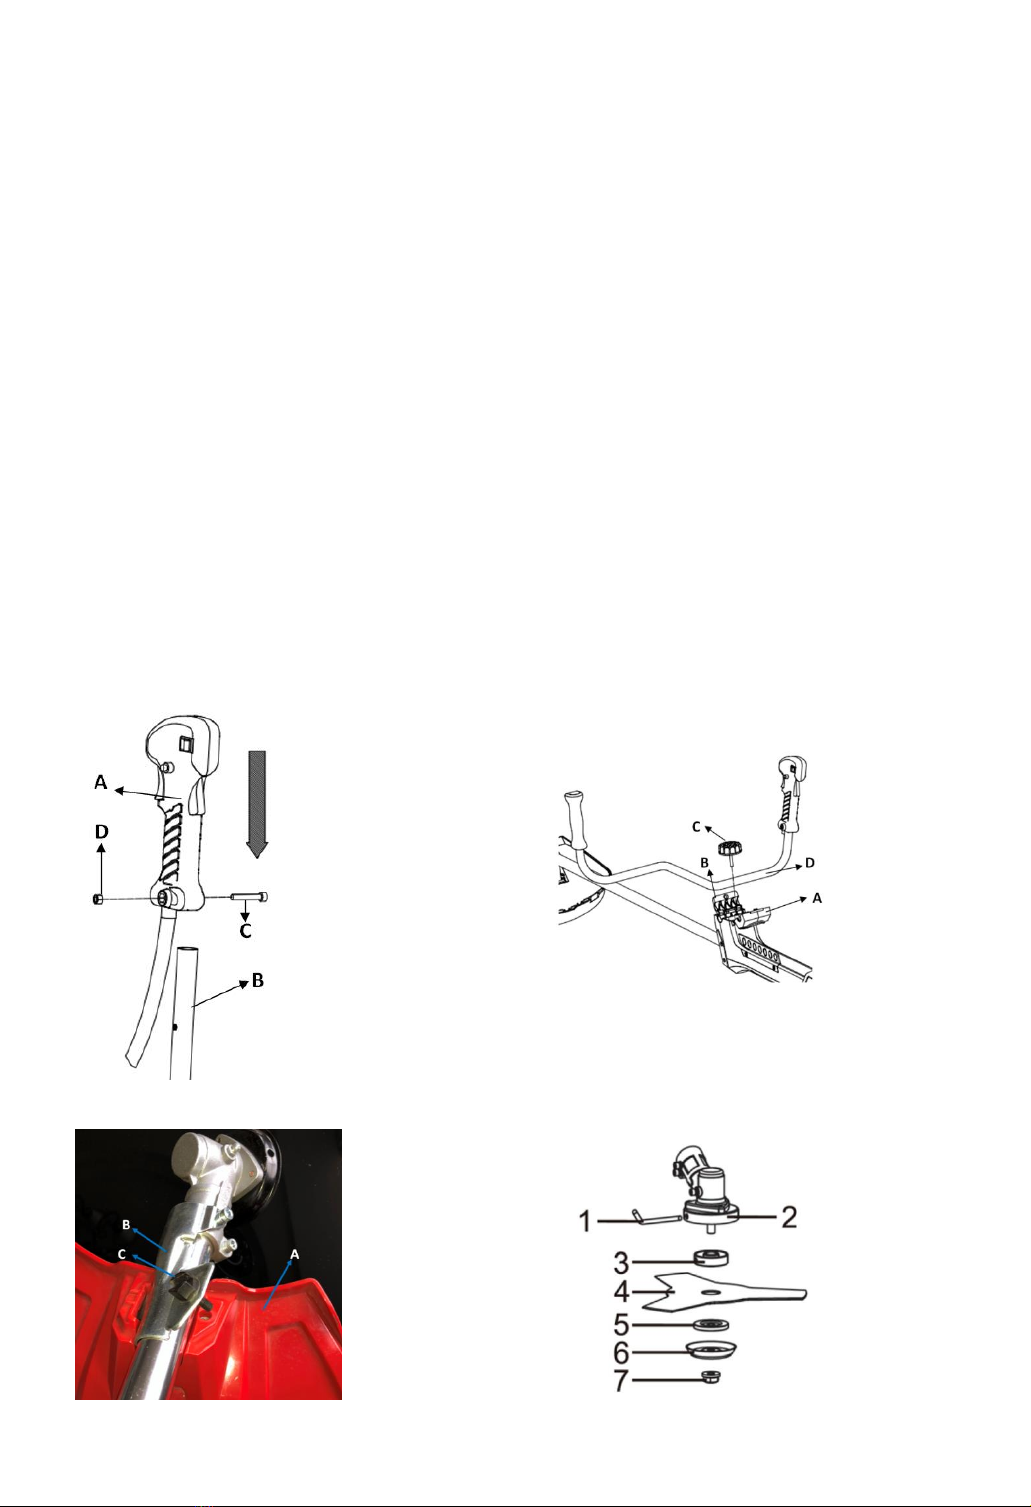
■INSTALLING RIGHT AND LEFT HANDLE (01)
1. Loose the bolt C and nut D from the right handle.
2. Insert the handle pipe B into right handle A, lock the bolt C and nut A securely.
■INSTALLING HANDLE (02)
1. Press to open the handle bracket cap A and loosen the fixing knob C on the handle bracket B.
2. Put the handle assembly D into the bracket B and put the cap A over it. Tighten the cap A securely.
■INSTALLING PROTECTION SHIELD (03)
1. Put the left side of plate B inside the protection shield A.
2. Attach the plate B to protection shield A with bolt C. Make sure the bolt is tightened securely.
■INSTALLING CUTTING BLADE (04)
1. Put the angled bar (1) into the side holes of the gear case (2) and the plate (3) so as to fasten the axle.
2. Mount the blade (4) and the washer (5) onto the axle.
3. Mount the washer (6) and the nut (7). Fasten tightly anti-clockwise.
NOTE
For different kind of blade, you can install in the same way.
------------------------------------------------------------------------------------------------------
05 06
■INSTALLING CUTTING HEAD (05)
1. Put the angled bar (1) into the side holes of the gear case (2) and the plate (3) so as to fasten the
axle.
6.Set up

2. Mount the trimmer head (8) on the axle. Fasten tightly anti-clockwise.
NOTE (06)
Before using the trimmer head, mount the trimmer knife (E) to protection shield (F) with 3 screws.
When the machines is running, tap the trimmer head on the ground, and trimmer line will come out
automatically. The trimmer knife will cut and keep the trimmer line in the correct length.
■HARNESS
WARNING
•ALWAYS WEAR THE PROVIDED HARNESS WHEN USING THE MACHINE!
•Always make sure the machine is hooked securely to the harness. If you don't, you will be unable
to control the machine safely. This can result in injury to yourself or others.
•Never use a harness with a defective quick release or any other damage.
HOW TO WEAR
1. Wear the provided harness without twisted bands, with the hanger (1) on your right side.
■BALANCE THE UNIT
1. Hook your machine to the hanger.
2. Adjust the bands of the harness to have the blade parallel to the ground when standing in your
normal working position to provide you most effectiveness and comfort on operating the machine.
3. In order to prevent the hanger position to change during operation, turn up the extra part of the
band from the buckle.
4. When correctly adjusted, check the correct working of the harnesses' QUICK RELEASE.
Mixing ratios:
When using commercially available 2-cycle oil (FB grade): 25 : 1
7.Fuel
------------------------------------------------------------------------------------------------------

WARNING
• Gasoline is very flammable. Avoid smoking or bringing any flame or sparks near fuel.
• Wipe up all spills before starting the engine.
• Make sure to stop the engine and allow it cool before refueling the unit.
• Keep open flames away from the area where fuel is handled or stored.
IMPORTANT
• Never use oil for 4 cycle engine use or water cooled 2-cycle engine.
• Never use "FUEL WITH NO OIL (RAW GASOLINE)".
• Never use fuel laced with water.
• Mixed fuels which have been left unused for a period of one month or more may clog the carburetor
or result in the engine failing to operate properly. Put remained fuel into an air-tight container and keep
it in the dark and cool room.
• Please ask for “mixed gasoline for air-cooled 2-cycle engines” at your nearest gas station, or use fuel
made by putting unleaded gasoline for automobiles and air-cooled 2-cycle engine oil into a mixing
container in accordance with the following ratios and then shaking to mix well.
■HOW TO MIX FUEL
1. Measure out the quantities of petrol and oil to be mixed.
2. Put some of the petrol into the clean, approved fuel container supplied.
3. Pour in the oil and agitate well.
4. Be careful that, if the agitation is insufficient, there is an increased danger of early piston seizing due
to abnormally lean mixture.
■FUELING THE UNIT
1. Untwist and remove the fuel cap. Rest the cap on a dustless place.
2. Pour fuel into the fuel tank to 80% of the full capacity.
3. Fasten the fuel cap securely and wipe up any fuel spillage around the unit.
WARNING
1. Select bare ground for fueling.
2. Move at least 10ft (3m) away from the fueling point before starting the engine.
3. Stop the engine before refueling the unit. At that time, be sure to sufficiently agitate the mixed petrol
in the container.
4. In the case of storing the product for a long period of time, clean the fuel tank after rendering it
empty. Next, activate the engine and empty the carburetor of the composite fuel.
■STARTING ENGINE
WARNING
The cutting head will start rotating upon the engine starts.
1. Feed fuel into the fuel tank and tighten the cap securely.
2. Rest the unit on a flat, firm place. Keep the cutting head off the ground and clear of surrounding
objects as it will start rotating upon starting of the engine.
3. Push the primer pump several times until overflown fuel flows out in the return tube.
8.Operation
------------------------------------------------------------------------------------------------------

3. Move the choke lever to the closed position.
Closed position
Open position
4. Set the ignition switch to the “start” position. While pulling the throttle lever, push the throttle set
button, and release the throttle, then the throttle lever is into the “Start position.
Stop position Start position
5. While holding the unit firmly, pull out the starter rope quickly until engine fires.

IMPORTANT
• Avoid pulling the rope to its end or returning it by releasing the knob. Such actions can cause
starter failures.
6. Move the choke lever to the open position. And pull out the starter rope quickly to restart engine.
8. Operation
------------------------------------------------------------------------------------------------------
7. Allow the engine to warm up for several minutes before starting operation.
NOTE
1. When restarting the engine immediately after stopping it, leave the choke open and push the
primer pump several times.
2. Overchoking can make the engine hard to start due to excess fuel. When the engine failed to start
after several attempts, open the choke and repeat pulling the rope, or remove the spark plug and dry it.
■STOPPING ENGINE
1. Release the throttle lever and run the engine for a half minute.
2. Shift the ignition switch to the STOP position.
NOTE
• Except for an emergency, avoid stopping the engine while pulling the throttle lever.
■ADJUSTING IDLING SPEED (OP5)
1. When the engine tends stop frequently at idling mode, turn the adjusting screw clockwise.
2. When the cutting head keeps rotating after releasing the trigger, turn the adjusting screw

(1) Idle speed adjuster
NOTE
• Warm up the engine before adjusting the idling speed.
■TRIMMER HEAD USAGE
WARNING
1. Always wear eye protection such as safety goggles. Never lean over the rotating cutting head.
Rocks or other debris could be thrown into eyes and face and cause serious personal injury.
2. Keep the debris guard attached in place at all times when the unit is operated.
TRIMMING GRASS AND WEEDS
• Always remember that the TIP of the line does cutting. You will achieve better results by not
crowding the line into the cutting area. Allow the unit to trim at its own pace.
1. Hold the unit so the head is off the ground and is tilted about 20 degrees toward the sweep direction.
2. You can avoid thrown debris by sweeping from your right to the left.
3. Use a slow, deliberate action to cut heavy growth. The rate of cutting motion will depend on the
material being cut. Heavy growth will require slower action than will light growth.
4. Never swing the unit as hard as you are in danger of losing your balance or control of the unit.
5. Try to control the cutting motion with the hip rather than placing the full workload on the arm and
hands.
6. Take precautions to avoid wire, grass and dead, dry, long-stem weeds from wrapping around the head
shaft. Such materials can stall the head and cause the clutch to slip, resulting in damage to the clutch
system.
8. Operation
-----------------------------------------------------------------------------------------------------
ADJUSTING THE LINE LENGTH
• Your brushcutter is equipped with a semi- auto type nylon line head that allows the operator to
advance the line without stopping the engine. When the line becomes short, lightly tap the head on the
ground while running the engine at full throttle.
• Each time the head is bumped, the line advance about 1 inch (25.4 mm). For better effect, tap the
head on bear ground or hard soil. Avoid bumping in thick, tall grass as the engine may stall by overload.
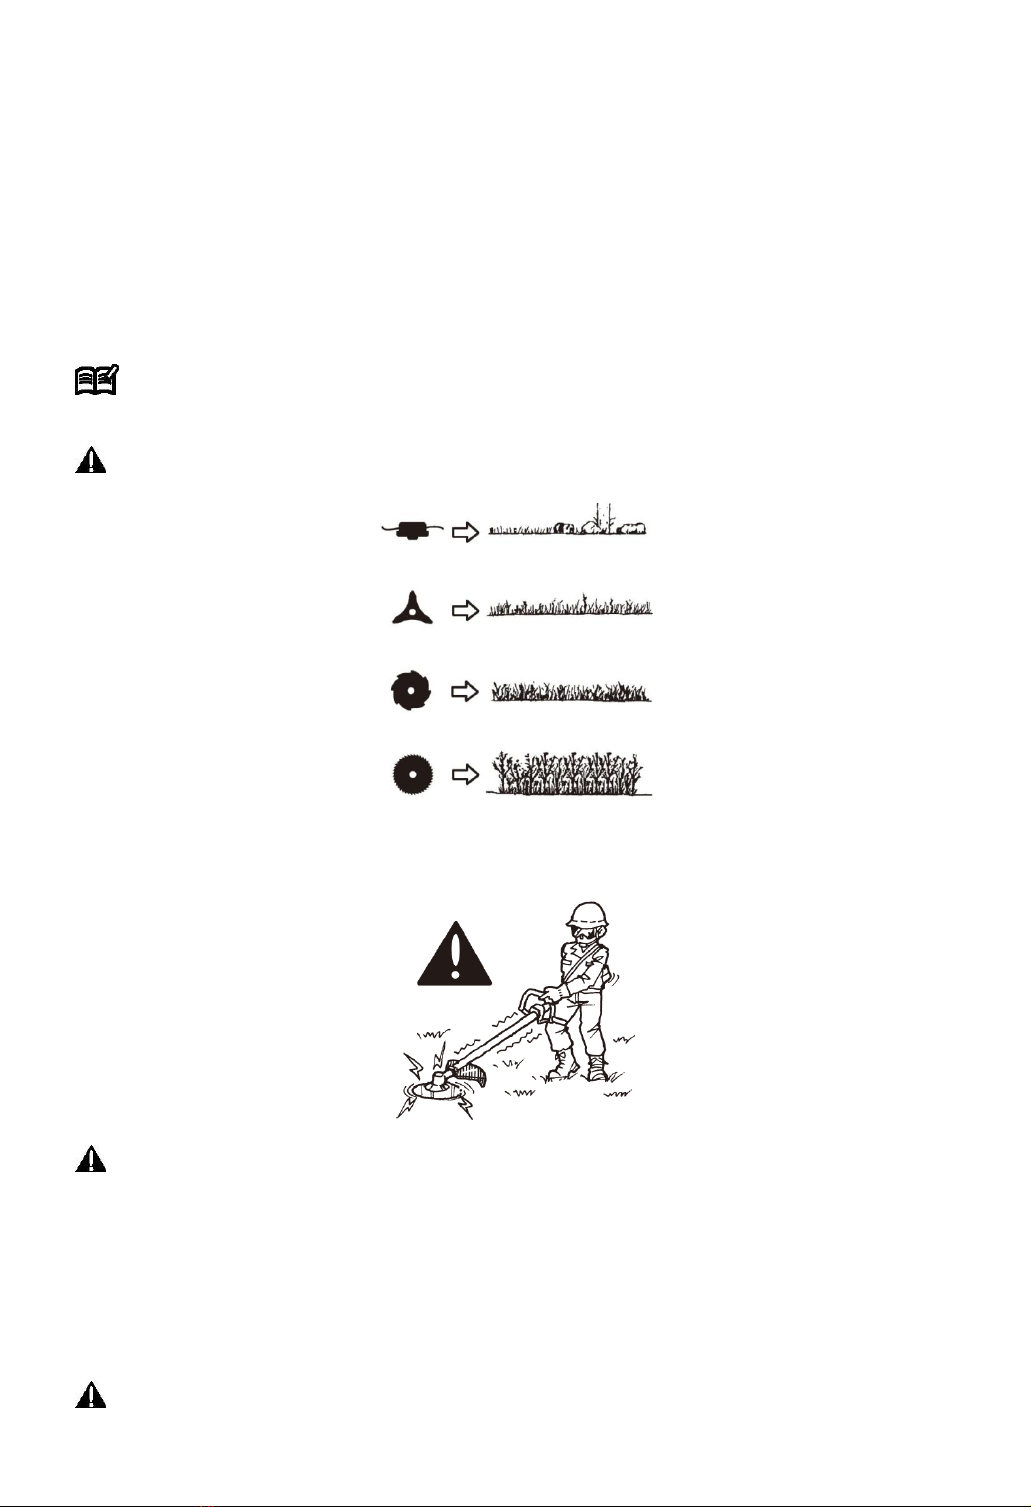
■METAL BLADE USAGE
NOTE
Choose a suitable recommended cutting attachment according to the object to be cut.
WARNING
• When sharpening, removing, or reattaching the blade, be sure to wear thick, sturdy gloves.
1. Check the bolt to fasten the blade and be sure the bolt has no fault, and no abrasion.
2. Be sure that the blade and the holder have been fastened according to instruction and the blade
turns smoothly without abnormal noise.
WARNING
• The rotating parts fastened incorrectly may cause serious accident to the operator.
• Make sure that the blade is not bent, warped, cracked, broken or damaged.
• If you find any error to the blade, discard it and change new one.
• By using the harness, hang the unit on your right side. Adjust the harness length so that the cutting
head may become parallel to the ground.
WARNING

• Make sure to use harness and cutting attachment guard. If not, it is very dangerous since you slip or
lose your balance.
■CUTTING METHOD
(a) Use the front left side cutting.
(b) Guide the blade from your right to left with it tilted slightly to your left.
(c) When mowing a wide area, start working from your left end to avoid interference of cut grass.
(d) The blade may be seized by weeds if the engine speed is too low, or the blade cuts too deep into
weeds. Adjust the engine speed and cutting depth according to the condition of object.
WARNING
• If the grass or other object gets caught in the blade, or if the unit starts to shake or vibrate, turn off
the engine and check the whole unit. Change the blade if it has been damaged.
9. Maintenance
-----------------------------------------------------------------------------------------------------
Always provide maintenance of the tool before storage. Maintenance must be regularly provided. Lack
of maintenance or improper maintenance will reduce the lifetime of the tool, and can provide bad
operation result and potential accidents and injuries.
After each operation, inspect the tool; check for loose fasteners, fuel leaks and damaged parts, such as
cracks in the cutting attachment. In case of any default, do not use the tool and bring to a qualified
service agent for inspection and reparation.
WARNING
• Always be sure to stop the engine before inspecting the brush cutter for problems or performing
maintenance.
• Never alter the brush cutter or take the engine apart.
Always clean and grind the blade, check whether the blade is firmly installed before use, and check
whether the blade is damaged if it encounters obstacles. If it is not used for a long time, clean the blade
surface and apply lubricant to avoid rust.

■REFILLING TRIMMING LINE
1. When the trimmer line is about to run out, you need to reload a new one. For replacement line, use a
diameter of 2.4mm (.095in). The spool is capable for a line up to 4m. Avoid using a larger line as it may
cut down the trimming performance.
2. Line up the arrow marks on knob and body of the head. Pull out the trimmer line from one side.
3. Insert new trimmer line through one of the eyelets to the other side.
4. Extend both ends of the line until their length matches.
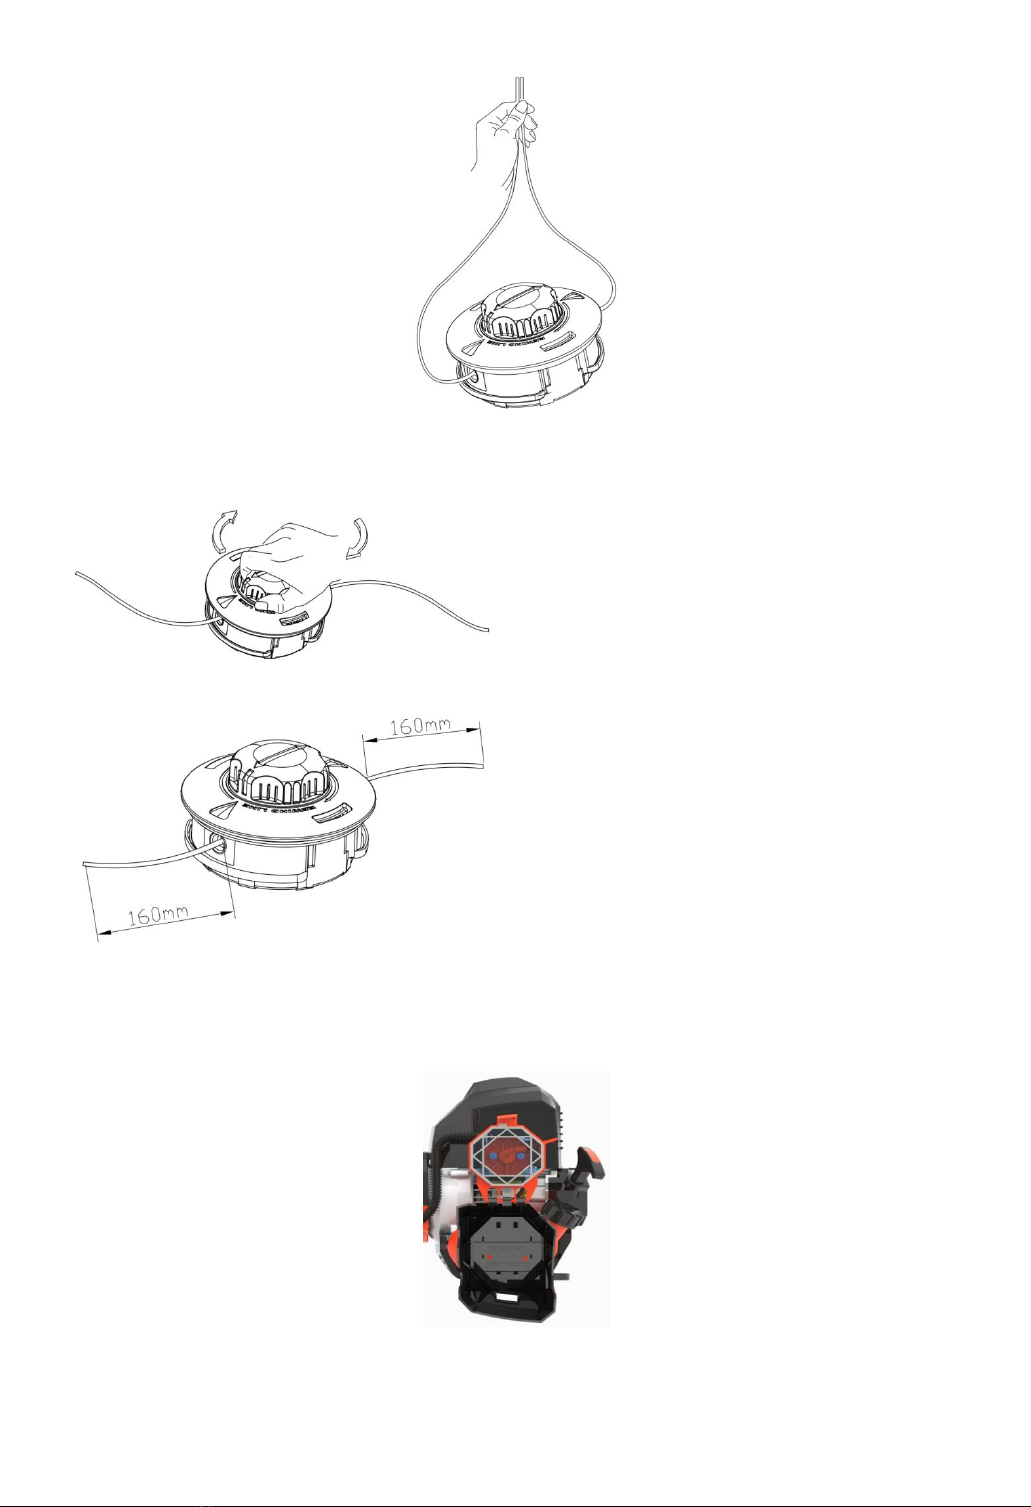
9. Maintenance
-----------------------------------------------------------------------------------------------------
5. Wind up the line in the correct direction as indicated on the spool.
6. Leave the trimmer line around 160mm. Assembly is finished.
■AIR FILTER
• The air filter, if clogged, will reduce the engine performance. Monthly check and clean the filter
element in warm, soapy water as required. Dry completely before installing. If the element is broken or
shrunk, replace with a new one.
■FUEL FILTER
• When the engine runs short of fuel supply, check the fuel cap and the fuel filter for blockage.
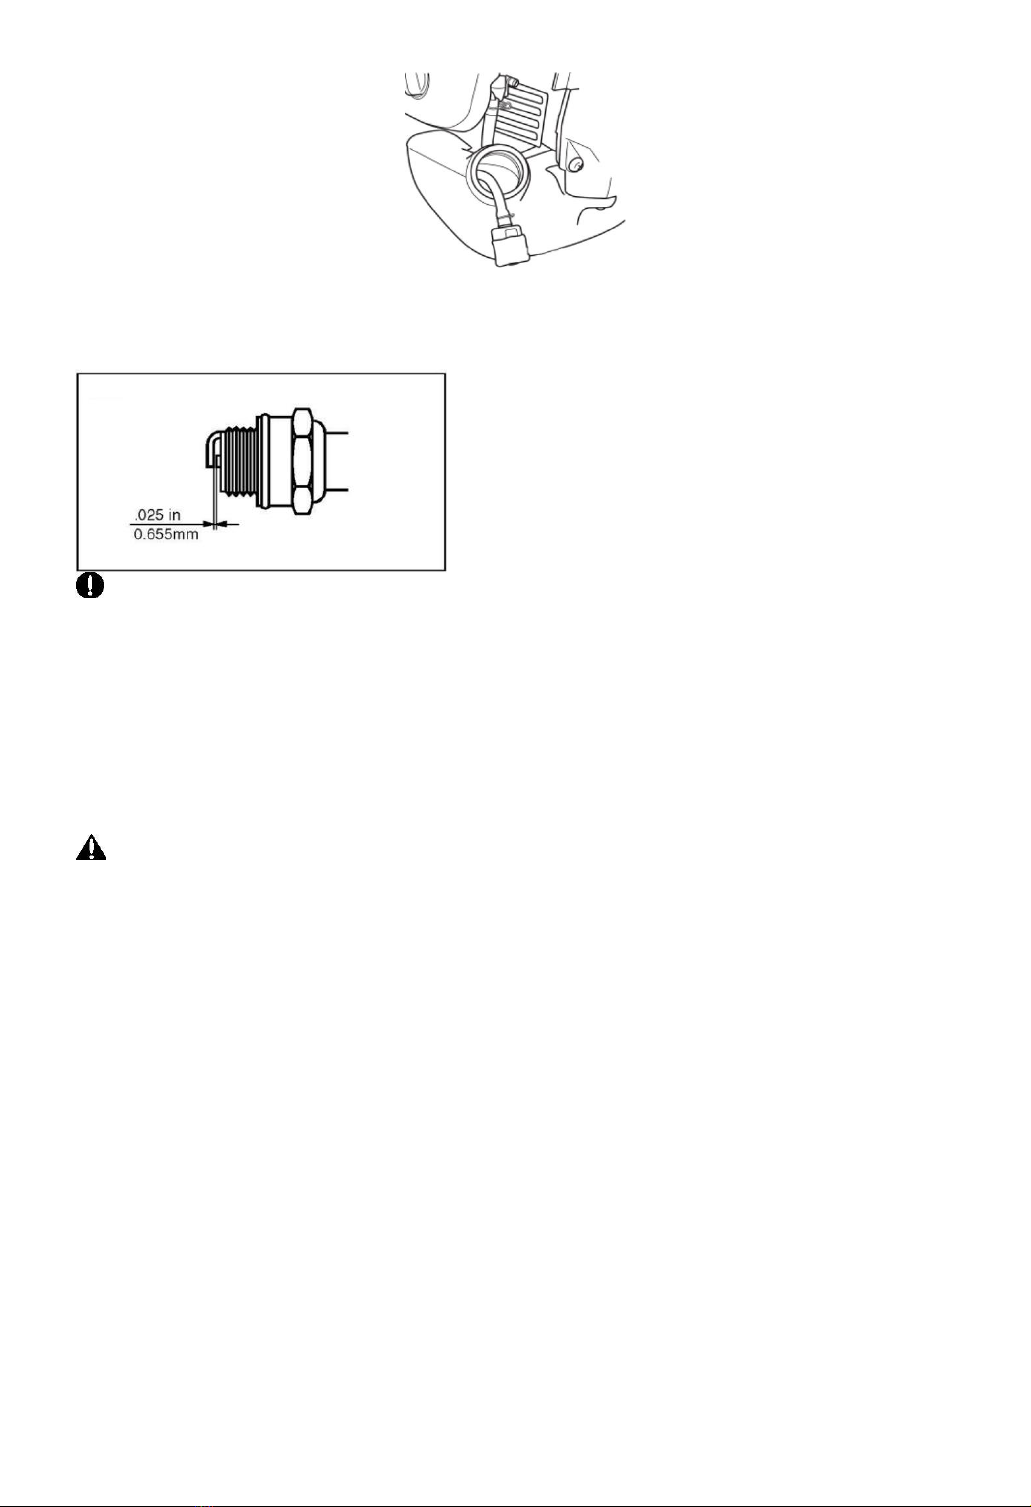
■SPARK PLUG
• Starting failure and misfiring are often caused by a fouled spark plug. Clean the spark plug and check
that the plug gap is in the correct range. For a replacement plug, use the correct type
• Periodically clean the spark plug and check that the spark gap is in the correct range.
IMPORTANT
• Note that using any spark plugs other than those designated may result in the engine failing to
operate properly or in the engine becoming overheated and damaged.
• To install the spark plug, first turn the plug until it is finger tight, then tighten it a quarter turn more
with a socket wrench.
TIGHTENING TORQUE: 9.8~11.8 N.m
■MUFFLER
WARNING
• Inspect periodically, the muffler for loose fasteners, any damage or corrosion. If any sign of
exhaust leakage is found, do not use the brush cutter and have it repaired immediately.
• Note that failing to do so may result in the engine catching on fire.
10.Storage
-----------------------------------------------------------------------------------------------------
Aged fuel is one of major causes of engine starting failure. Before storing the unit, empty the fuel tank
and run the engine until it uses all the fuel left in the fuel line and the carburetor. Store the unit indoor
taking necessary measures for rust prevention.
11.Transportation
-----------------------------------------------------------------------------------------------------
1. When hand-carrying the product, cover over the cutting part if necessary, lift up the product and
carry it paying attention to the blade.
2. Never transport the product over rough roads over long distances by vehicle without removing all
fuel from the fuel tank. If doing so, fuel might leak from the tank during transport.

12.Troubleshooting guide
-----------------------------------------------------------------------------------------------------
Starting failure
-----------------------------------------------------------------------------------------------------------------------------------------
CHECK PROBABLE CAUSES ACTION
-----------------------------------------------------------------------------------------------------------------------------------------
Fuel tank ➞incorrect fuel ➞drain it and with correct fuel
Fuel filter ➞fuel filter is clogged ➞clean
Carburetor adjustment screw ➞out of normal range ➞adjust to normal range
Sparking (no spark) ➞spark plug is fouled/wet ➞clean/dry
Plug gap ➞plug gap is incorrect ➞correct (GAP: 0.6~0.7mm)
Spark plug ➞disconnected ➞retighten
-----------------------------------------------------------------------------------------------------------------------------------------
Engine starts but does not keep running/Hard re-starting.
-----------------------------------------------------------------------------------------------------------------------------------------
CHECK PROBABLE CAUSES ACTION
Fuel tank ➞incorrect fuel or staled fuel ➞drain it and with correct fuel
Carburetor adjustment screw ➞out of normal range ➞adjust to normal range
Muffler, cylinder (exhaust port) ➞carbon is built-up ➞wipe away
Air cleaner ➞clogged with dust ➞wash
Cylinder fin, fan cover ➞clogged with dust ➞clean
-----------------------------------------------------------------------------------------------------------------------------------------
When your unit seems to need further service, please consult our service agent.
Table of contents
Other TitanTec Lawn Mower manuals


Popular Lawn Mower manuals by other brands

Dixon
Dixon 312 Technical data

Scag Power Equipment
Scag Power Equipment FREEDOM Z SFZ-48H-24KT Operator's manual

Bush-whacker
Bush-whacker RDF 48 manual

Bad Boy
Bad Boy OUTLAW XP Owner's, service & parts manual

Oleo-Mac
Oleo-Mac MAX 48 Operators instruction book

Yard Works
Yard Works 060-1900-8 instruction manual


