Tiviar Alpha Plus User manual

Full HD - Triple Tuner Hybrid PVR
Discover Your Smart Life
User's Manual
Tiviar α+


3
INDEX
Precautions............................................................................................................................................5
1. Important Safety Instructions......................................................................................................5
2. Notice .........................................................................................................................................5
3. Copyright....................................................................................................................................6
4. Disclaimer...................................................................................................................................6
5. Trademarks ................................................................................................................................6
Before You Begin ..................................................................................................................................7
1. Main Features ............................................................................................................................7
2. Accessories................................................................................................................................8
Hardware Description...........................................................................................................................9
1. Front Panel Configuration ..........................................................................................................9
2. VFD (Vacuum Fluorescent Display)...........................................................................................9
3. Rear Panel Configuration.........................................................................................................10
4. Remote Control Unit.................................................................................................................12
5. Multi-Brand IR Remote Controller Setting................................................................................15
Connecting diagram ...........................................................................................................................16
1. Receiver to A/C power..............................................................................................................16
2. Receiver to TV with Digital A/V Output.....................................................................................16
3. Receiver to TV with Analog A/V Output....................................................................................17
4. Connecting to Antenna Cable ..................................................................................................18
4.1 In case of S2 (Satellite + Satellite) tuners ........................................................................18
4.2 In case of S2 + T(T2) (Satellite + Terrestrial) tuners ........................................................18
4.3 In case of S2 + C (Satellite + Cable) tuners.....................................................................18
Installation ...........................................................................................................................................19

4
Guide of Function ...............................................................................................................................21
1. Selecting a service ...................................................................................................................21
2. Information Window..................................................................................................................21
3. Multi-picture display..................................................................................................................21
4. PVR..........................................................................................................................................21
4.1 Recording............................................................................................................................21
4.2 Time shift.............................................................................................................................22
4.3 playback..............................................................................................................................23
5. Playlist......................................................................................................................................23
6. TV Portal+ ................................................................................................................................23
7. HbbTV ......................................................................................................................................24
Shortcut Menu.....................................................................................................................................25
1. By pressing [Menu] Key shortcut menu appears . ...................................................................25
1.1 System Tools.......................................................................................................................25
1.2 Configuration.......................................................................................................................25
1.3 Installation...........................................................................................................................27
1.4 Utilities.................................................................................................................................28
2. It is possible to save maximum 10 favorite Menus in the shortcut menu.................................30
3. Extended Menu will display when pressing the key.................................................................31
Troubleshooting..................................................................................................................................35
Specifications......................................................................................................................................36
Code Table for Universal Remote Control Unit................................................................................39
1. Key Table..................................................................................................................................39
2. TV Brands ................................................................................................................................41

5
Precautions
1. Important Safety Instructions
Read these instructions.
Keep these instructions.
Heed all warnings.
Follow all instructions.
Do not use this apparatus near water.
Clean only with dry cloth.
Do not block any ventilation openings. Install in accordance with the manufacturer’s instructions.
Do not install near any heat sources such as radiators, heat registers, stoves, or other apparatus
(including amplifiers) that produce heat.
Do not reverse the safety purpose of the polarized or grounding-type plug. A polarized plug has two
blades with one wider than the other. A grounding type plug has two blades and a third grounding
prong. The wide blade or third prong is provided for your safety. If the provided plug does not fit into
your outlet, consult an electrician for replacement of the obsolete outlet.
Protect the power cord from being walked on or pinched particularly at plugs, convenience
receptacles, and the point where they exit from the apparatus.
Only use attachments/accessories specified by the manufacturer.
Use only with the cart, stand, tripod, bracket, or table specified by the manufacturer, or sold with the
apparatus. When a cart is used, use caution when moving the cart/apparatus combination to avoid
injury from tip-over.
Unplug this apparatus during lightning storms or when unused for long periods of time.
Refer all servicing to qualified service personnel. Servicing is required when the apparatus has been
damaged in any way, such as power-supply cord or plug is damaged, liquid has been spilled or objects
have fallen into the apparatus, the apparatus has been exposed to rain or moisture, does not operate
normally, or has been dropped.
WARNING : To Prevent fire or shock hazard do not expose the set to rain or moisture.
2. Notice
These servicing instructions are for use by qualified service personnel only. To reduce the risk of
electric shock, do not perform any servicing other than that contained in the operating instructions
unless you are qualified to do so.
The apparatus shall not be exposed to dripping or splashing and that no objects filled with liquids,
such as vases, shall be placed on the apparatus.
The mains plug is used as the disconnect device. The disconnect device shall remain readily operable.

6
To reduce the risk of electric shock, do not remove
the cover (or back).
No user serviceable parts are inside.
Refer servicing to qualified service personnel.
The Lightning Flash with arrowhead symbol
within an equilateral triangle, is intended to
alert the user to the presence of un-insulated
"dangerous voltage" within the product
enclosure that may be of sufficient magnitude
to constitute a risk of shock to persons
The exclamation point within an
equilateral triangle is intended to alert
the user to the presence of important
operating and maintenance
(servicing) instructions in the
literature accompanying the product
3. Copyright
This manual is protected by copyright laws.
Copy, use and reproduction of this manual in part or whole without Manufacturer’s prior written
approval are prohibited.
4. Disclaimer
The manufacturers, distributors and agents are not liable to any kind of damage caused by the
use of the information contained in this manual.
The instruction and descriptions which this manual contains are based on the time of this
manual's production.
The manufacturer constantly updates it with new functions and technology.
All the specifications are subject to change without prior notice.
5. Trademarks
HDMI, the HDMI logo and High-Definition Multimedia Interface are
trademarks or registered trademarks of HDMI Licensing LLC
Manufactured under license from Dolby Laboratories.
Dolby and the double-D symbol are trademarks of Dolby Laboratories.

7
Before You Begin
1. Main Features
For the use of DVB-S/S2, Satellite tuner only
Supports MPEG4 /MPEG2 - HD/SD and Fully DVB-S2 /DVB-S Compliant
Intelligent Blind Scan for both SD and HD TV & Multi-Satellite Search
Multi-LNB Controlled by DiSEqC Control Version 1.0, 1.1, 1.2 and USALS
For the use of DVB-C, Cable tuner only
Supports MPEG4 /MPEG2 - HD/SD and Fully DVB-C Compliant
For the use of DVB-T, Terrestrial tuner only
Supports MPEG4 /MPEG2 - HD/SD and Fully DVB-T Compliant
For the use of DVB-T2, Terrestrial tuner only
Supports MPEG4 /MPEG2 - HD/SD and Fully DVB-T2 Compliant
Common features of this DVB receiver
HDTV PVR Receiver with Triple Tuners (H.264/ MPEG4 HD/MPEG2 SD)
Embedded Linux OS
Time Shifting, Recording & Playback with Internal HDD (SATA) / External HDD (E-SATA or USB 2.0)
Simultaneously Records 3 Services and allows Watching 2 others (PIP)
Powerful Extended EPG support with Event Recording
Three USB 2.0 host ports (for MP3 Player & JPEG Viewer)
XviD file play back supported
Ethernet port for network connection
Premium quality 12-digit VFD display in white color
Premium quality Universal remote control unit
Graphic User Interface with Full Color & Resolution
Favorite Group support
Powerful Service List Manager for Favorites, Lock, Skip, Move, Edit and Delete
Service Sorting by Alphabet, Transponder and CAS
User Friendly & Multi-language Supported (OSD & Menu)
Teletext / Subtitle Supported
Maximum 10,000 Services(TV & Radio) Programmable
Picture-in-Picture (PIP) & Multi-picture Display
Parental Lock / System Lock / Installation Lock
HDMI Video & Audio Output (576i, 576p, 720p, 1080i, 1080p)
Supports Y/Pb/Pr(component) Output in HD
CVBS(composite) Video & Audio Output via RCA
CVBS, RGB, Y/C Video & Audio Output via TV SCART
Optical Output for Digital Audio(SPDIF)
Software & Service channel data upgrade via USB & RS-232C port
2 Common Interface Slots and 2 smart card reader
Under 1W Stand-by Power Consumption

8
2. Accessories
NOTE : If any accessories listed above are missing, contact the sales representative where you
purchased this device.
User's Manual
AAA size Batteries x2
Remote Control
Loop through Cable
USB WiFi
AC Power Cord
HDMI Cable
9
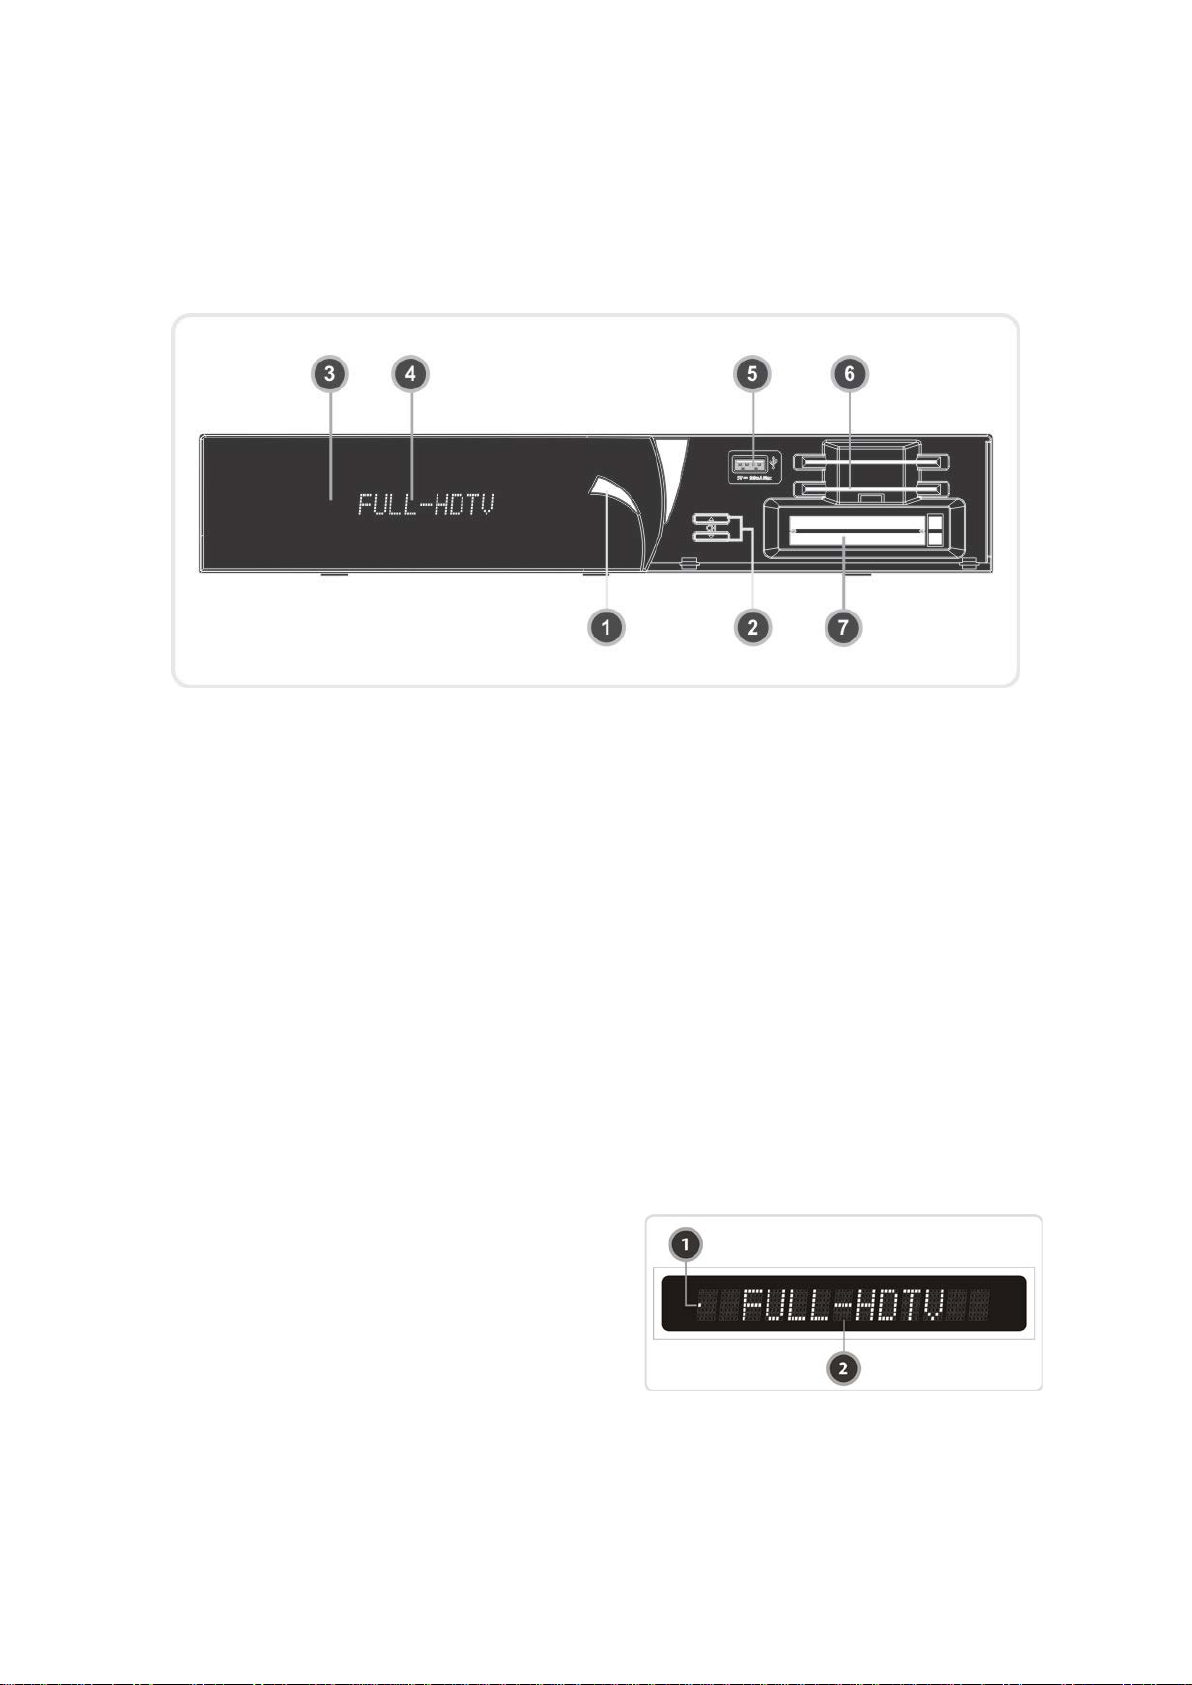
Hardware Description
1. Front Panel Configuration
1. POWER Button : Press to switch between STANDBY and POWER ON modes.
2. CH Up/Down Button :Press to change services in normal mode, or to move highlighted-bar in
menu mode.
3. Remote IR Sensor : Receives IR(Infrared) signal from remote controller.
4. VFD Display : The VFD consists of 12-digit letter. These letters display the current status of receiver
such as service name, service information and so on.
5. USB port (Front) : Use it when connecting to external USB storage device.
6. SMART CARD READER : Insert smart card for encrypted service. (Conax)
7. Common Interface slot (PCMCIA): To receive other pay-tv service you need a CA-Module
(Viaccess, Irdeto, Nagravision, etc.) and also a smart card from those service provider.
2. VFD (Vacuum Fluorescent Display)
1. Remote control Indication light : A Dot in VFD will
be lighted to indicate the Remote control signal
reception.
2. Information : Display information including service
name and other information.

10
3. Rear Panel Configuration
1. RS-232C : Serial port for firmware update and data transfer.
2. SPDIF : Connects to the audio system using a S/PDIF cable. (digital audio)
3. VIDEO : Connects to the TV or VCR using a RCA cable. (Composite video output / Yellow)
4. AUDIO L/R : Connects to the TV or VCR using a RCA cable. (Stereo audio output / White, Red)
5. TV SCART : Connects to the TV input using a TV SCART cable.
6. Component : Connects to the TV or VCR using a component cable. ( YPbPr)
7. HDMI : Connects to the TV by using a HDMI cable for the best quality picture and audio.
8. e-SATA : Connects to the external HDD via e-SATA cable.
9. USB : Use it when connecting to external USB storage device.
10. Ethernet : Local area network port for direct computer connection.
11. A/C Switch : Power switch
12. A/C power cable socket : Connects to A/C power cord.
The 3rd tuner can be installed in different combination as
follows.
For the professional installation of these tuners, please
ask your local agent or dealers for further assistance.

11
In case of T(T2)
1. ANT IN
Terrestrial broadcasting signal input socket for the first
tuner (TUNER 1). Connects an aerial antenna.
2. LOOP OUT
Terrestrial broadcasting signal output socket through the
first tuner (TUNER 1). Connects to second tuner for loop-
through.
In case of C
1. CABLE IN
Cable broadcasting signal input socket for the first tuner
(TUNER 1). Connects a cable antenna.
2. CABLE OUT
Cable broadcasting signal output socket through the first
tuner (TUNER 1). Connects to second tuner for loop-
through.
Notice about the ‘Pre-installed 3rd Tuner’(Important)
If there was a 3rd tuner already installed with your receiver, this 3rd tuner should be capable of
receiving all the Cable and Terrestrial (DVB-T&T2) signals with this One tuner.
Therefore, you can connect either Cable or Terrestrial signal to this 3rd tuner.
For more information and exact installation, please contact your local agent or dealer where you
have purchased this receiver.

12
4. Remote Control Unit
1. POWER : Turns the STB On/Off.
2. TV : Press this TV button first, to control your TV set with this remote control unit.
3. STB :Press this STB button first, to control your STB with this remote Control unit.
4. Numeric keys : Controls the numerical operation and service numbers directly.
5. Subtitle : To show multilingual subtitle.
6. Tele-text : To show the digital tele-text service.

13
7. Information : Shows the information box of the current program. If you press one more time, a detail
information box will be shown.
8. Recall : Moves to previous service.
9. ARROW Buttons
Up & Down Key : To change the value of a selected item with preprogrammed values in menu.
Left & Right Buttons : To move the cursor left and right in menu.
10. OK or Service List : Show the service list in non-menu mode and select an item or confirm in menu
mode.
11. Menu : To enter the main menu or to move to the previous menu.
12. EXIT : Exit from the menu or pop-up window.
13. Favorite : To display the satellites programmed into the receiver and the favorite groups
14. Play List : To show the file list in the SATA HDD or USB Storage Device.
15. EPG(Electronic Program Guide) : Show the TV/Radio program guide.
16. Volume Up & Down : To change the Volume.
17. Channel Up & Down: To change the TV or Radio service channel
18. MUTE : Turns the sound On/Off.

14
19.Color Buttons
RED : Used for special function in menu. RED key is used to sort lists in service list or go to previous
day search in EPG or make/delete the current position as a bookmark.
GREEN : Used for special function in menu. GREEN key is used to set favorites setting in service list
or go to the next bookmark position.
YELLOW : Used for special function in menu. YELLOW key is used to find service in service list or
change the audio track.
BLUE : Used for special function in menu. BLUE key is used to set service list option in service list or
display Multi-Picture.
20. Playback Control Buttons
Rewind : Rewinds at high speed. Each time you press this button the rewind speed is increased.
Play / Time shift : Display the progress bar of playback when no progress bar is displayed. Start
playback with normal speed. Return to normal speed from trick mode.
Pause : This key is used to pause the video. Press once more to resume the video.
Fast Forward : Fasts forward at high speed. Each time you press this button the speed is increased.
Previous File : To play the previous MP3 file in MP3 play mode. This button is also used to jump
back to beginning of recording during a playback.
STOP :To stop time shifting, play back or recording.
Recording : To start Recording.
Next File : To play the next file. This button is also used to jump to end of recording during a
playback.
21. Page Up& Down : Move to the next or previous page if more than one page is available. This button
also is change the location of sub picture in PIP.
22. TV/RADIO : Switches between TV and Radio.
23. Resolution : To select the resolution format. Each time you press the Resolution button, the
resolution changes in the following sequence: 576i > 576p > 720p > 1080i > 1080p.
24. Repetition (*):This key is used to play back a recording repeatedly.
25. PIP Buttons
PIP(Picture in Picture) : To open the PIP window.
PIP Swap : Switching between main-picture and sub-picture
PIP(Picture in Picture) Service List : To shown the sub-picture service list.
NOTE : (*) This button(Repetition) will be in use, with the new s/w version after upgrading.
Please refer to your local dealer / distributor.

15
5. Multi-Brand IR Remote Controller Setting
NOTE : When there is no input during about 10 seconds from set mode, set mode is
canceled.
Direct Code Entry
Step 1 : Turn on the DEVICE what you want to set up(TV / DVD / VCR)
Step 2 : Press DEVICE and OK button during about 2 seconds at the same time.
DEVICE LED will blink twice.
Step 3 : Input the 3 digit code numbers.
(Refer to ‘Code Table for Universal Remote Control Unit’ in the rear section of this manual)
DEVICE LED will blink twice and the DEVICE turns off.
If you enter a wrong DEVICE code, DEVICE will blink once
Step 4 : If your DEVICE turns off, press OK button.
DEVICE LED will blink twice.
Auto Code Search
Step 1 : Turn on the DEVICE what you want to set up(TV, DVD)
Step 2 : Press DEVICE and OK buttons during about 2 seconds at the same time.
DEVICE LED will blink twice.
Step 3 : Press UP or Down button within 10 seconds to enter the Search mode.
Step 4 : Press UP or Down button until the DEVICE turns off, one and one.
Step 5 : If your DEVICE turns off, press OK button.
DEVICE LED will blink twice.
Code No. Checking (Number Call)
Step 1 : Press DEVICE and OK buttons during about 2 seconds at the same time.
DEVICE LED will blink twice.
Step 2 : Press INFO button within 3 seconds.
LED will blink according to inputted mode number on the device.
( Case of digit '0', it blinks 10 times.)

16
Connecting diagram
1. Receiver to A/C power
Connect the A/C power cord between A/C power cord socket of receiver and A/C outlet.
2. Receiver to TV with Digital A/V Output
Connect the HDMI Cable to the HDMI Connector of the TV.
Connect SPDIF to Digital audio input of the equipment(Digital Audio)
NOTE : Depending on the A/V equipment you own, there are various ways you can connect
the STB. To choose the best connection option, please refer to the manual of the
equipment you would like to connect to. To get High Definition playback of High
Definition content, we recommend that you connect your high definition display
with a HDMI cable. HDMI supports standard, enhanced or high-definition video
and multichannel audio in a single cable.

17
3. Receiver to TV with Analog A/V Output
Connect the TV SCART to the SCART input of the TV.
Connect the Component to the Component input of the TV.
Connect the RCA to the RCA input of the TV.
NOTE : The component connection(YPbPr) is recommended for Digital TV.
The SCART cable connection is recommended for analogue TV or VCR
The composite connection(RCA cable) is recommended for analogue TV
You cannot view high definition video with the SCART and the composite video
connector.

18
4. Connecting to Antenna Cable
4.1 In case of S2 (Satellite + Satellite) tuners
Connecting one dish to both tuners by Loop through
4.2 In case of S2 + T(T2) (Satellite + Terrestrial) tuners
Connecting dish antenna to LNB IN of the tuner
Connecting aerial antenna to ANT IN of the Tuner
4.3 In case of S2 + C (Satellite + Cable) tuners
Connecting dish antenna to LNB IN of the tuner
Connecting broadcasting cable to CABLE IN of the Tuner

19
Installation
This is for setting language, time and search functions for the first time you turned on the STB.
Please follow the sequence: Settings->Installation->System restore to factory reset. Go back to
Installation after you selected Reset configuration data.
Step1. Choose the language of your choice.
Step2. Choose one of the following Network (DHCP, Static IP,
Wifi, or 3G). You can see " Connected" on the screen when it
is properly connected.
Note. It's only selectable if there is Wifi or 3G.
Step3. Install Freetv , Internettv, Internetradio, and addon in
the Download Server.
Step4-1. Choose your region's GMT. You can see the
changed GMT on the bottom of the screen.

20
Step4-2. Select the Daylight Saving region. You can see the
changed Daylight on the bottom of the screen.
Step5. First, select the searchable type list then, select the
Search Mode. Now you can start searching.
page00 Hardware Description->4. Refer to Connecting to Antenna
Cable.
· Satellite Search: Select an Antenna( DiSEqC, motor and etc) in
the Dish Setting. Then select one mode( Auto, Manual, Blind
and Advanced) to start searching.
-Cable Search: Select Auto or Manual for searching. You could
add and correct the frequency under the Manual function.
-Terrestrial Search: On the 5V function, select "On" and choose
one between Auto and Manual.
Other manuals for Alpha Plus
2
Table of contents
Popular Receiver manuals by other brands


SingularXYZ
SingularXYZ SV100 user manual

Sony
Sony SB-V40 - AV Selector - Dark operating instructions

Connect Tech
Connect Tech M.2 GPS user guide

Flying Industry Development
Flying Industry Development S2UW-DC-ANT3 user manual

Integra
Integra DTR-7.6/6.6 instruction manual

Harman Kardon
Harman Kardon AVR1550 owner's manual