TKO 522NWG User manual

2
Owner’s Manual
MULTI-STATION WORKOUT
SYSTEM W/ BAGS
Model 522NWG
www.tko.com
V2.0—06.2012

3
THIS PAGE INTENTIONALLY LEFT BLANK

4
Safety
3
Read this owner’s manual carefully before assembling or using TKO equipment.
WARNING: Serious injury could occur if these safety precautions are not observed
Safety Precautions
•Before beginning any exercise program, consult your personal physician. Evaluate
your present fitness level and determine the exercise program that is most
appropriate for your particular age and condition.
•If you experience any pain or tightness in your chest, irregular heartbeats, shortness
of breath, faintness or other unusual discomfort while exercising, stop and consult
your physician before continuing.
•Make sure that the equipment(s) are set up and operated on a solid level surface.
DO NOT install or use the equipment on an uneven surface.
•Exercise equipment has moving parts. In the interest of safety, keep others,
especially children, at a safe distance while exercising.
•Make sure there are enough room for access and operate the equipment(s) safely.
•Inspect and maintain the equipment(s) regularly.
•Replace the worn or damaged parts / components immediately to ensure safety.
•Use a spotter.
•Back support cushion may drop when knob is pulled. Hold the back support cushion
when adjusting it.
•Make sure the pull pin is fully engaged before use.
•Lower the back support cushion to the lowest position when not in use.
•Warm up 5 to 10 minutes before each workout and cool down 5 to 10 minutes
afterward. Never hold your breath while exercising.
•Remove all jewelry, including rings, chains and pins before commencing exercise.
•Always wear suitable clothing and footwear during exercise. Do NOT wear loose
fitting clothing that could become entangled with the moving parts of your exercise
machine.
•Rest adequately between workouts. Muscles tone and develop during these rest
periods.
•Most exercise equipment is not recommended for small children. Children should
not use the machine unless they are under adult supervision.
If you have any question or need assistance please contact us at,
Customer Service: 866-856-3488 or 713-895-9270
Hours: Monday-Friday 8:30am to 4:30pm CT
©Copyright 2011, TKO Sports Group USA Limited. All rights reserved.
TKO Sports Group USA Limited. 4660 Pine Timbers, Suite 198, Houston, TX 77041
Phone + 713-895-9270 Fax + 713-934-8495
www.tko.com
✚Safety

5
Safety
IMPORTANT SAFETY INSTRUCTIONS
Thank you for purchasing the 502NWG MULTI-FUNCTION WORKOUT GYM.
TKO Fitness products are designed and manufactured to the highest standards in order to
provide you with years of great workouts. We proudly stand behind all our products with the
best customer service in the fitness industry. If you have any question or need assistance
please contact us at:
Toll free: 866-856-3488 or 713-895-9270
Monday-Friday 8:00am to 5:00pm CT
•This machine is intended for household use only. It is not designed for commercial use.
•This manual is designed to help you to assemble, adjust, maintain and to use. Please
read this manual carefully and follow it before you use your machine.
•Inspect your machine prior to exercise to ensure that all nuts and bolts are fully tightened.
•Most exercise equipment is not recommended for small children. Children should not use
the machine unless they are under adult supervision.
•Exercise equipment has moving parts. In the interest of safety, keep others, especially
children, at a safe distance while exercising.
•Warm up 5 to 10 minutes before each workout and cool down 5 to 10 minutes afterward.
Never hold your breath while exercising.
•Rest adequately between workouts. Muscles tone and develop during these rest periods.
Beginners should work out twice a week and increase gradually to 4 to 5 times per week.
•Remove all jewelry, including rings, chains and pins before commencing exercise.
•Always wear suitable clothing and footwear during exercise. Do NOT wear loose fitting
clothing that could become entangled with the moving parts of your exercise machine.
MEDICAL WARNING
•Before beginning any exercise program, consult your personal physician. Evaluate your
present fitness level and determine the exercise program that is most appropriate for your
particular age and condition.
•If you experience any pain or tightness in your chest, irregular heartbeats, shortness of
breath, faintness or other unusual discomfort while exercising, stop and consult your
physician before continuing.
2
MAXIMUM WEIGHT CAPACITY
The maximum recommended weight capacities for your 502NWG are as follows.
Maximum recommended exercise weights not to exceed:
Pull Up station
400 pounds
Dip Station
300 pounds
MAINTENANCE
The 502NWG is a high quality machine and is built to last. Simple routine cleaning and
preventive maintenance go a long way extending the life of your machine.
Inspect and Tighten all nuts and bolts each time you use the machine.
Replace the worn parts immediately.
5

6
Safety
OVERVIEW OF AN EXERCISE PROGRAM
The guidelines below represent the basic components of safe and effective exercise program.
Warm Up
3 to 5 minutes of low intensity aerobic or calisthenics type activity (sit up, push up, jumping
jacks...etc) 3 to 5 minutes of static stretching.
Aerobic Training
Perform a minimum of 20 to 30 minutes of cardiovascular exercise, 3 to 5 days per week.
Strength Training
Perform a total of 8 to 12 exercises, using all the major muscle groups, 2 to 3 times per week.
A minimum of 1 set of 8 to 12 repetitions for each exercise should be performed to near
muscle fatigue. Weight resistance should be increased by 5% to 10% when 12 repetitions
can be completed in proper form at a given weight/resistance for desired number of sets.
Rest a minimum of 48 hours, but not more than 96 hours, between strength training sessions
that use the same muscle groups.
4

7
Product Diagram
12 In One Multi-Function
Workout Gym
Model # 502 NWG
8
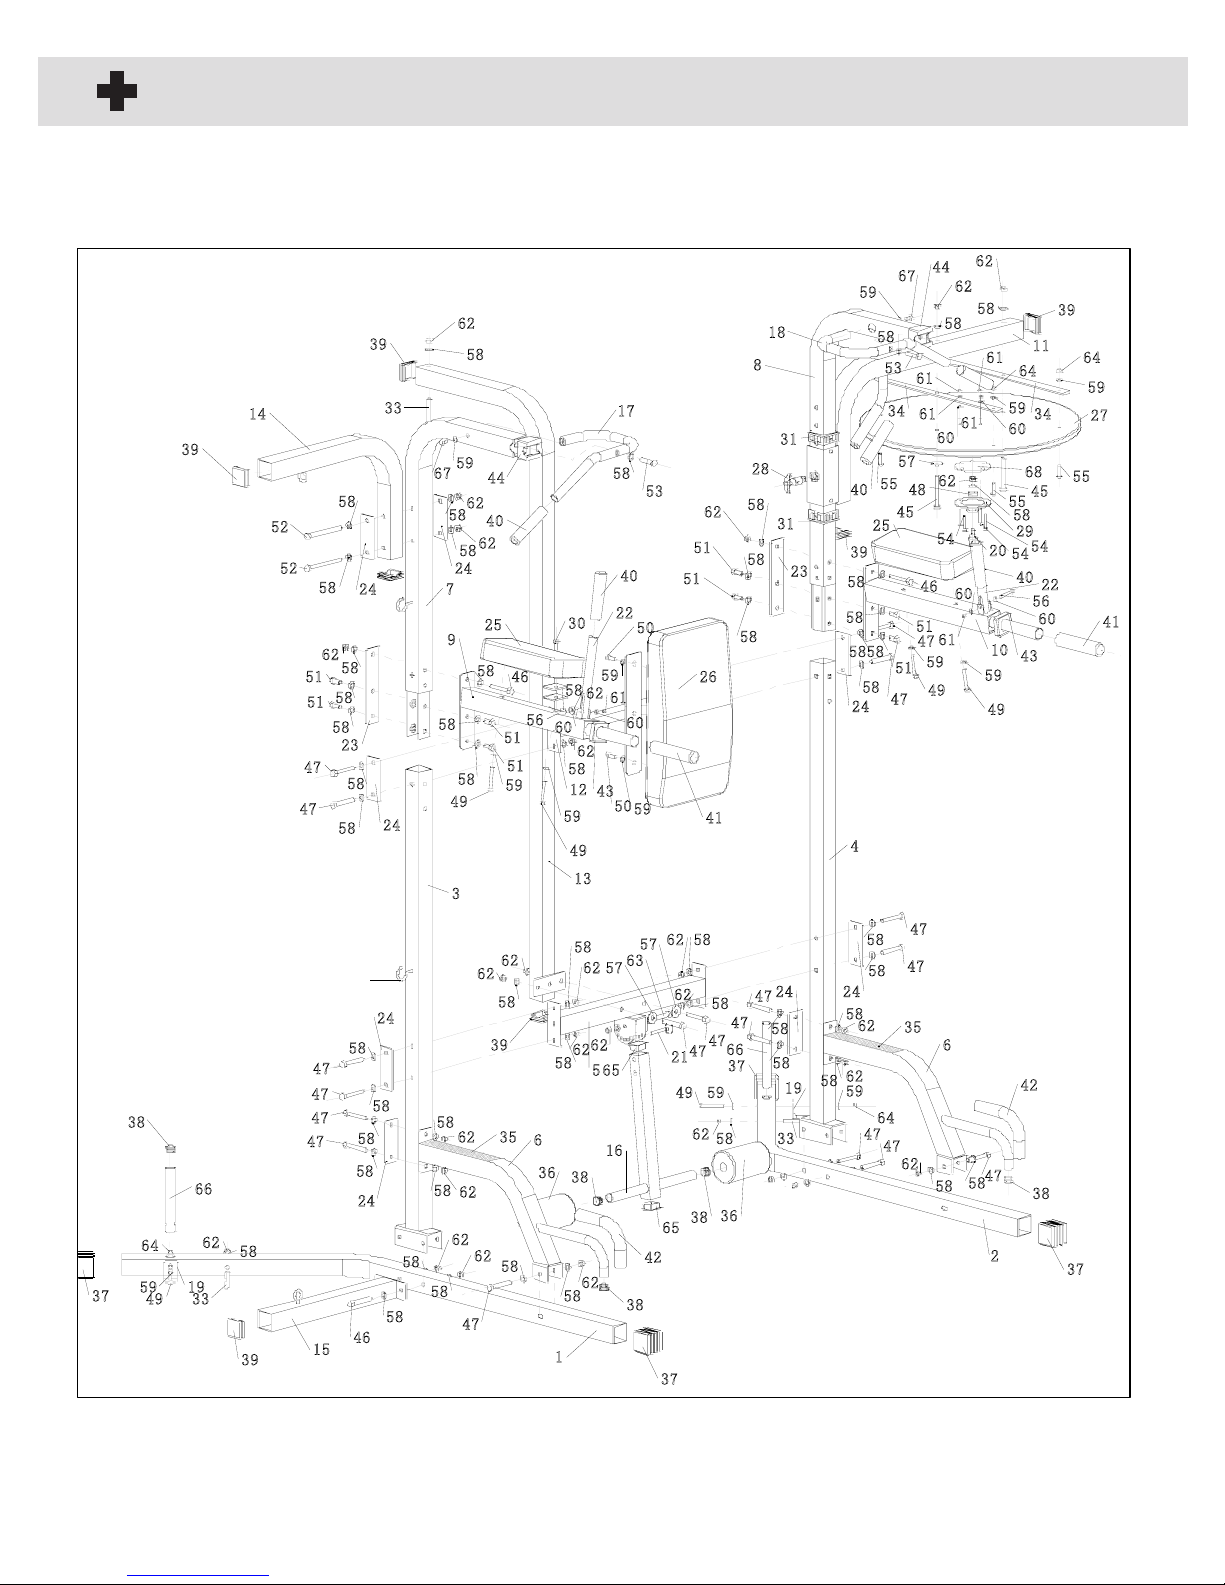
Exploded Diagram
OVERVIEW DRAWING
24
59
47
54
62
18
38
38
25
59
51
1
6
3
39
11
59
26
6
42 2
57
24
36
30
58
37
16
4
43
36
41
38
33
31
25
22
22
21
67
59
37
65
38
65
57
41
24
24
48
17
29
27
34
34
60
10
62
23
39
7
68
39
58
46
37
37
39
33
33
38
54
40
40
40
58
58 28
31
39
24
49
49
49
49
61
66
49
56
59 59
14
59
59
59
59
59
12
20
59
50
58
58
58 58
58
58 58
58
58
58
47
58
58
62
58
58
58
58
58
58
58
58
58
58
58
59
58
58
58
58
58
58
9
58
58
58
45
58
58
58
58
62
40
54
58
58
58
58
58
58
58
58
62
62
62
62
62
62
62
62
47
62
58
62
58
62
62
62
62
62
62
62
61
62
49
62
62
62
47
61
61
58
61
61
60
60
24
19
60
60
60
52 23
56
39
57
62
66
67 55
55
55
53
53
58
47
52
51
8
51
51
51
51
51
51
50
13
47
47
47
47
58
47
47
47
47
47
47
19
24
62 47
47
5
58
46
46
42
45
43
44
44
35
35
63
64
64
64
64
24
15
47
32
7

9
Parts List
PARTS LIST
6
Part Numbers & Description
1. Base frame – Left 1
2. Base frame – Right 1
3. Left upright 1
4. Right upright 1
5. Upright cross frame 1
6. Angle support frame 2
7. L shaped upright – Left 1
8. L shaped upright – Right 1
9. VKR arm rest frame – Left 1
10.VKR arm rest frame – Right 1
11.Speed bag support frame 1
12.Back pad support frame 1
13.Heavy bag support frame 1
14.Bag support frame 1
15.Base stabilizer 1
16.Foam roller support frame 1
17.Left pull up handlebar 1
18.Right pull up handlebar 1
19.Weight plate storage bar 2
20.Swivel hook 1
21.Lock pin (foam roller support frame ) 1
22.VKR handlebar 2
23.Large metal plate (VKR) 2
24.Metal plate (upright) 8
25.Arm rest pad 2
26.Back pad 1
27.Speed bag wood platform 1
28.T shaped Knob 1
29.Swivel kit 1
30.Hex bolt M10x2-3/4” 1
31.Plastic bushing (60mm/50mm) (Speed
bag support frame) 2
32.Hang hook 2
33.Hanging bolt 3
34.Wooden platform support plate 2
35.Non-slip sand paper 2
36.Foam roller 2
37.End cap (Base frame)(2” x2”) 4
38.End cap (25mmdia.) 6
39.End cap (2” x2”) 7
40.PVC hand grip 5
41.PVC hand grip (VKR arm rest frame) 2
42.Foam grip 2
43.Plastic bushing (50mm/34mm) (VKR
arm rest frame) 2
44.End cap (L shaped upright) 2
45.Allen bolt M10x3-3/8”(wood platform) 2
46.Hex bolt M10x3 4
47.Hex bolt M10x2-3/4” 18
48.Swivel bearing 1
49.Hex bolt M8x2-9/16” 4
50.Hex bolt M8x13/16” (Back pad) 2
51.Hex bolt M10x13/16” 8
52.Hex bolt M10x4-3/4” (bag support
frame) 2
53.Hex bolt M10x1-3/4” 2
(Pull up handlebar)
54.Pan head Philips screw M6x1-3/16”mm
(Swivel kit) 4
55.Allen bolt M8x1-3/16” 4
56.Hex bolt M6x1-9/16” 2
57.Washer 25mmdia for M10 bolt 4
58.Washer 20mmdia for M10 bolt 65
59.Washer 16mmdia for M8 bolt 16
60.Washer 12mmdia for M6 bolt 8
61.Lock nut for M6 bolt 6
62.Lock nut for M10 bolt 31
63.Hex bolt M10x2-3/8” 1
64.Lock nut for M8 bolt 6
65.Plastic end cap 2
66.Weight plate storage bar 2
67.Hex bolt M8x5/8” 2

10
Assembly
ASSEMBLY STEPS
STEP 1
Install the Weight plate storage bar (66) onto the Base frame (1 & 2) using one Hex
bolt (49), two Washer (59), and one Lock nut (64) for each. Tighten these 2 bolts
with wrench securely.
Attach one Hanging bolt (33) to each Base frame (1&2) using one Washer (58) and
one Lock nut (62).
STEP 2
Install the Left upright (3) and the Base stabilizer (15) to the Left Base frame (1) using
2 bolts (46), 4 washers (58) and 2 lock nuts (62). Tighten these bolts loosely.
Install the Right upright (4) to the Right base frame (2) using 2 bolts (47), 4 washers
(58) and 2 lock nuts (62). Hand tighten it. Do not use wrench at this time.
STEP 3
Install the Angle support frame (6) to the Uprights (3&4), using 2 bolts (47), 4
washers (58), 2 Metal plates (24) and 2 lock nuts (62) for each. Hand tight it.
Connect the Angle support frames (6) to the Base frames (1&2) with one Hex bolt
(47), 2 Washers (58) and one Lock nut (62) for each. Hand tighten it.
8
1
6
3
6
42
2
4
15
38
33
24
24
37
37
37
37
39
33
38
38
49
42
49
59
59 59
58
58
58 58
58
58 58
58
58
58
58
58
58 58
58
62
58
62
62
58
62
62
62 62
62
62
62
47
47
47 47
47
47
47
47
46
35
35
64
64
19
19
66
66
62
62 5858
Step 3
Step 2
Step 1
11
Assembly
ASSEMBLY STEPS
STEP 4
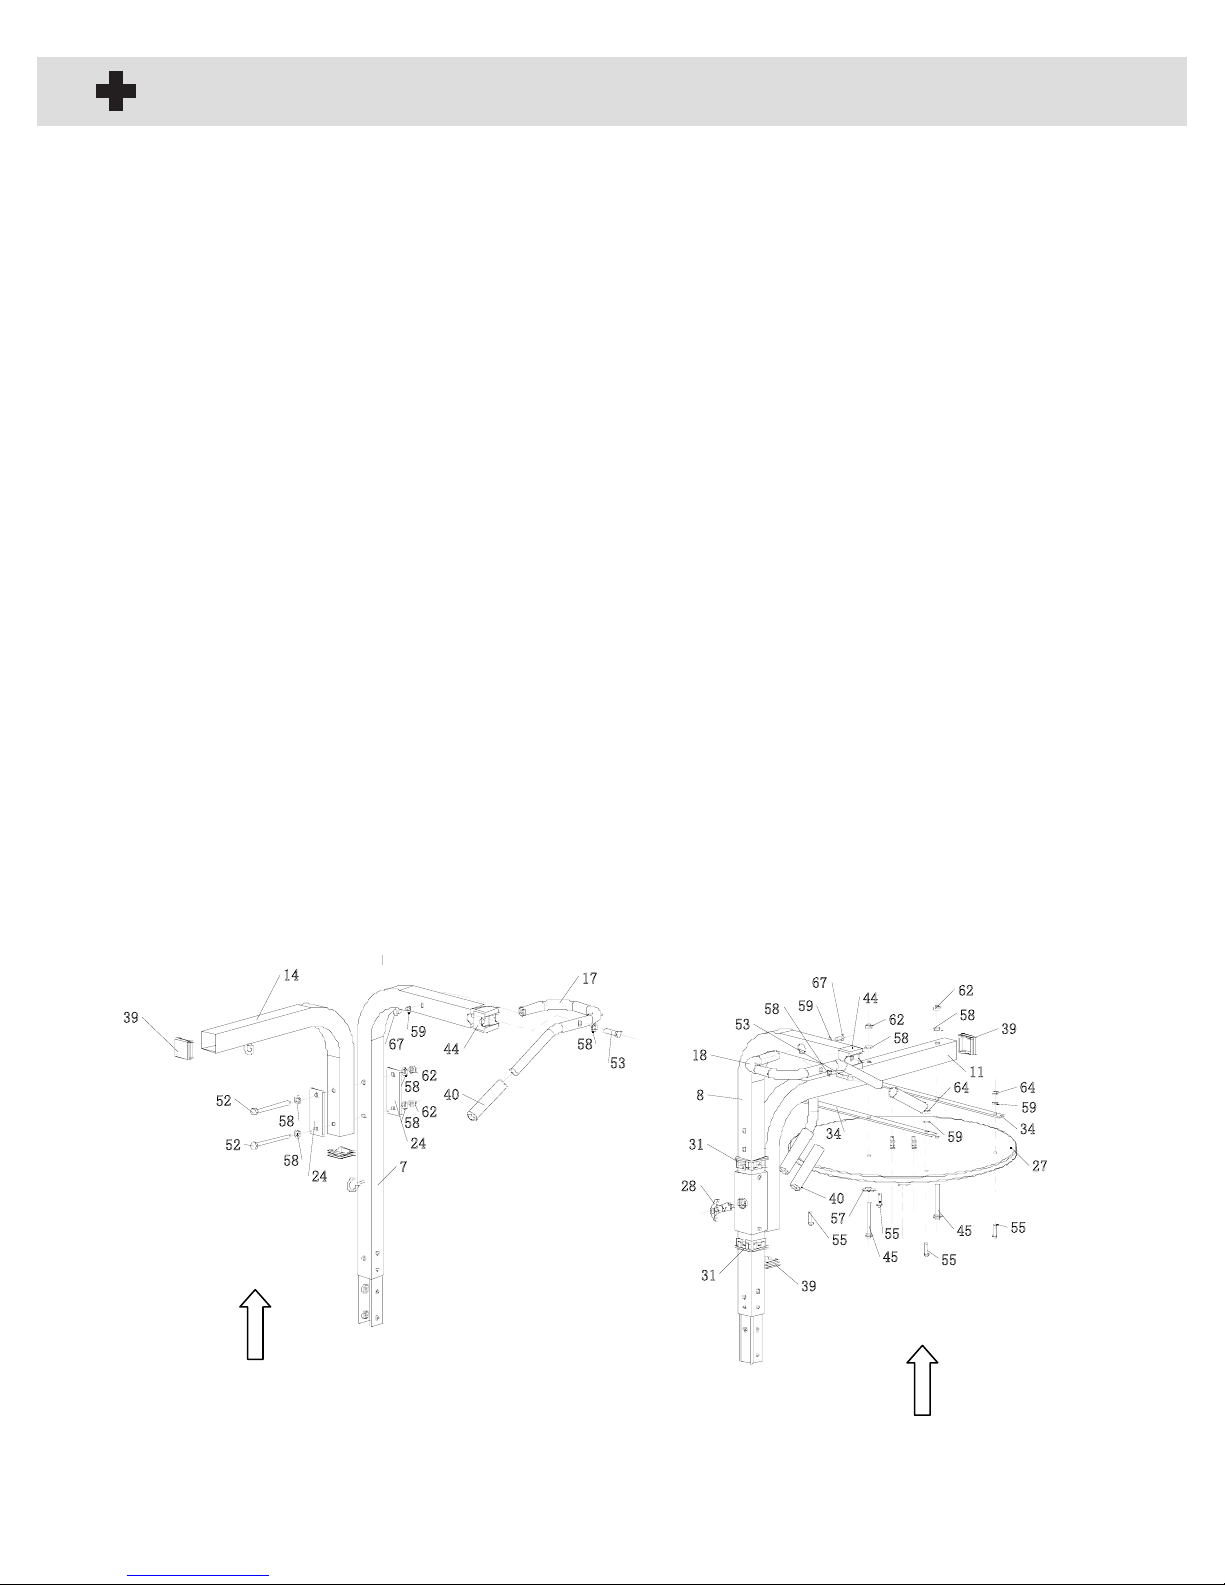
Install the Left pull up handlebar (17) to the Left L shaped upright (7) using one Hex
bolt (67), one Washer (59). Lock it in place with one Hex bolt (53) and one Washer
(58) from the front side. Tighten all three nuts and bolts with wrench.
Repeat the same procedure for the Right L shaped upright (8) and the Right pull up
handlebar (18).
Make sure the Pull up handles are facing out toward floor.
Connect the Bag support frame (14) to the Left L shaped upright (7) with 2 Hex bolts
(52), 4 Washers (58), 2 Metal plates (24) and 2 Lock nuts (62). Tighten it securely.
STEP 5
Install the two plates (34) to the Speed bag wood platform (27) using 4 Allen bolts (55)
from the bottom upward, secure it with 4 Lock nuts (64) and 4 washers (59). Make
sure the head of the carriage bolt (55) is fitted inside the groove in the backside of the
wood platform (27) before tightening it. Tighten 4 Allen bolts (55) securely.
Install the Speed bag wood platform assembly to the Speed bag support frame (11)
using 2 Allen bolts (45), 2 Washers (57) from the bottom upward, secure it with 2
Washers (58) and 2 Lock nuts (62). Tighten it securely with wrench.
44
14
7
24
17
39
40
59
58
58 58
58
58
62
62
52
52
67
53
24
57
44
28
55
45
18
34 34
27
62
39
55
58
31
53
55
45
62
864
59
11
40
59
31
58
59
39
67
64
58
55
Step 4
Step 5
9

12
Assembly
ASSEMBLY STEPS
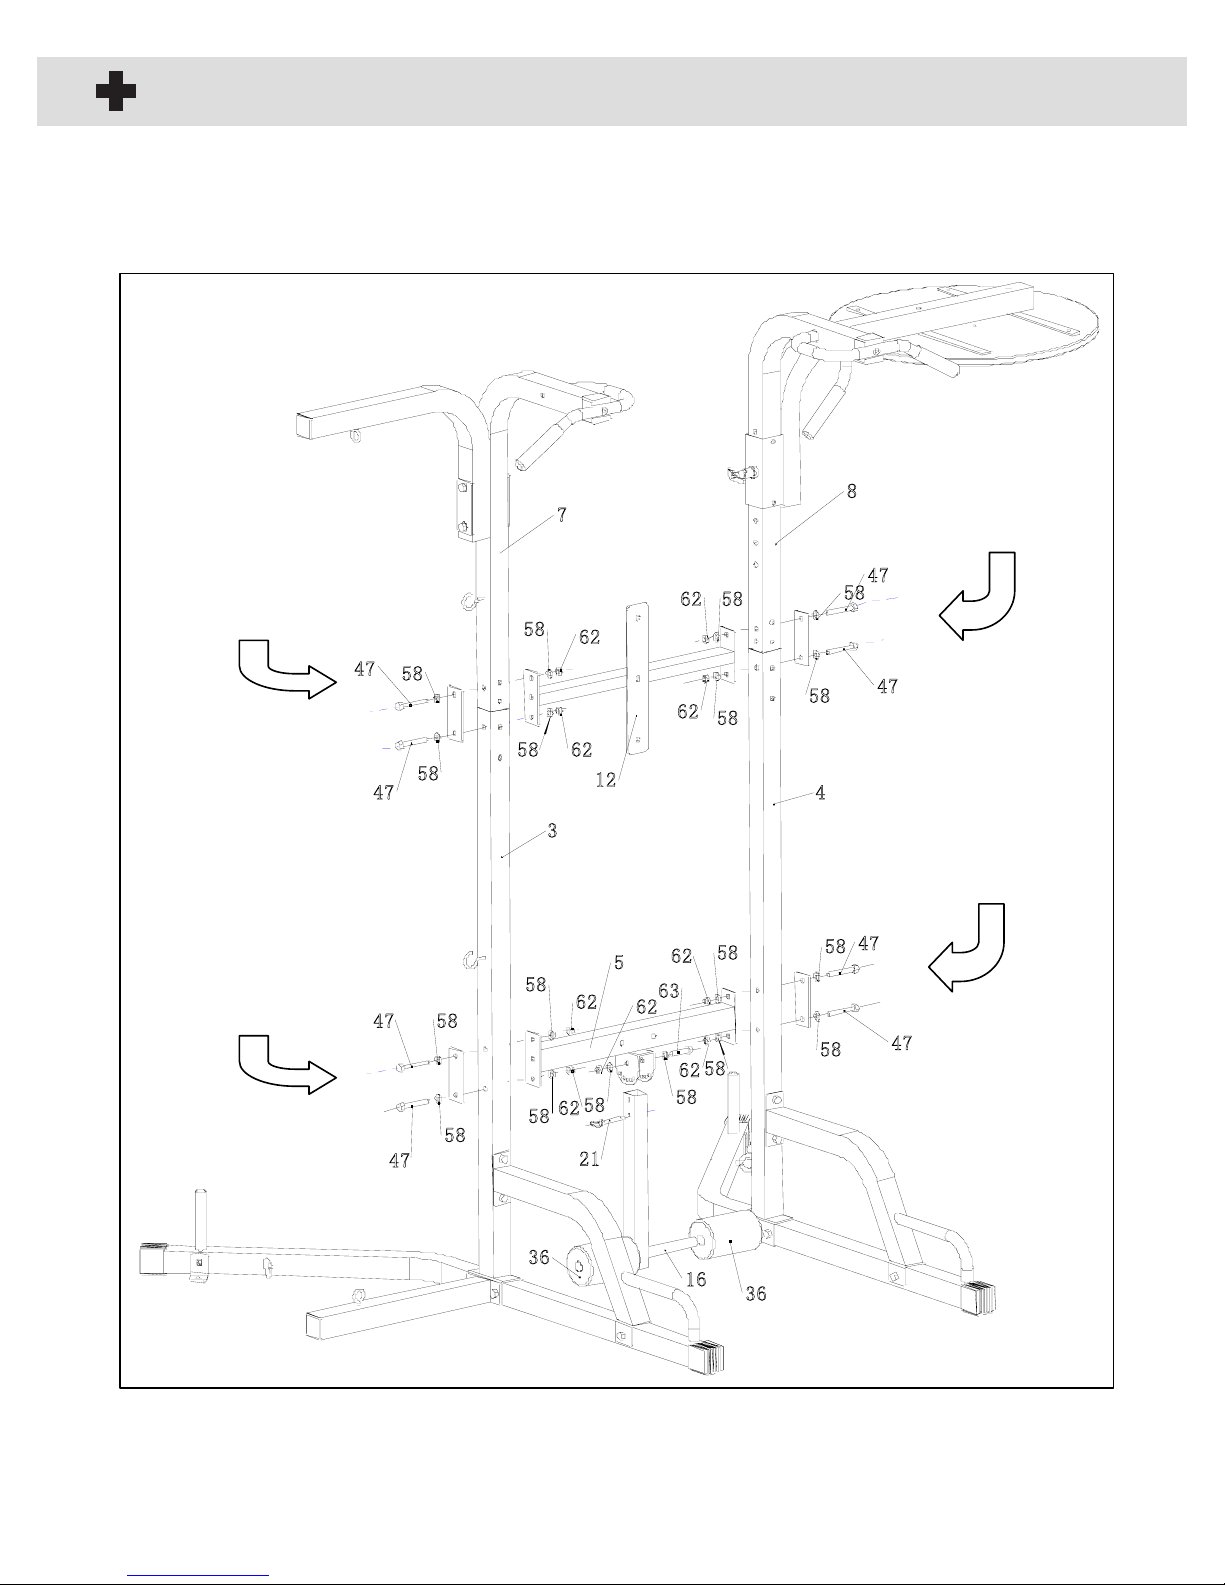
STEP 6
Connect the Left upright assembly (3) to the Right upright assembly (4) with the
Upright cross frame (5), using 4 Hex bolts (47), 8 Washers (58), 2 Metal plates (24)
and 4 Lock nuts (62). Do not use wrench at this time.
STEP 7
Attach the Foam roller support frame (16) to the bracket welded under the Upright
cross frame (5), using one Hex bolt (63), 2 Washers (58) and one Lock nut (62). Do
not over tighten it. Secure it in place with a Pin (21).
The foam roller cross bar can be adjusted to different height by locking the pin in
different hole on the bracket.
Slide one foam roller (36) over each end of the foam roller cross bar (16).
STEP 8
Slide the Left L shaped upright assembly (7) into the Left upright (3) and the Right L
shaped upright assembly (8) to the Right upright (4).
Connect the upright assembly (3,4,7&8) together with the Back pad support frame
(12) using 4 Hex bolts (47), 8 Washers (58), 2 Metal plates (24) and 4 Lock nuts (62).
Do not use wrench at this time.
10
SEE PAGE 13 FOR DIAGRAM
13
Assembly
ASSEMBLY STEPS
47
47
47
47
58
47
47
47
58
58
58
58
58
5
58
58
58
58
58
58
58
58
58
58
63
62
62
62
62
62
62
62
62
62 58
58
21
36
36
16
3
4
7
8
12
47
Step 8
Step 8
Step 7 Step 6
Step 6
11

14
Assembly
ASSEMBLY STEPS
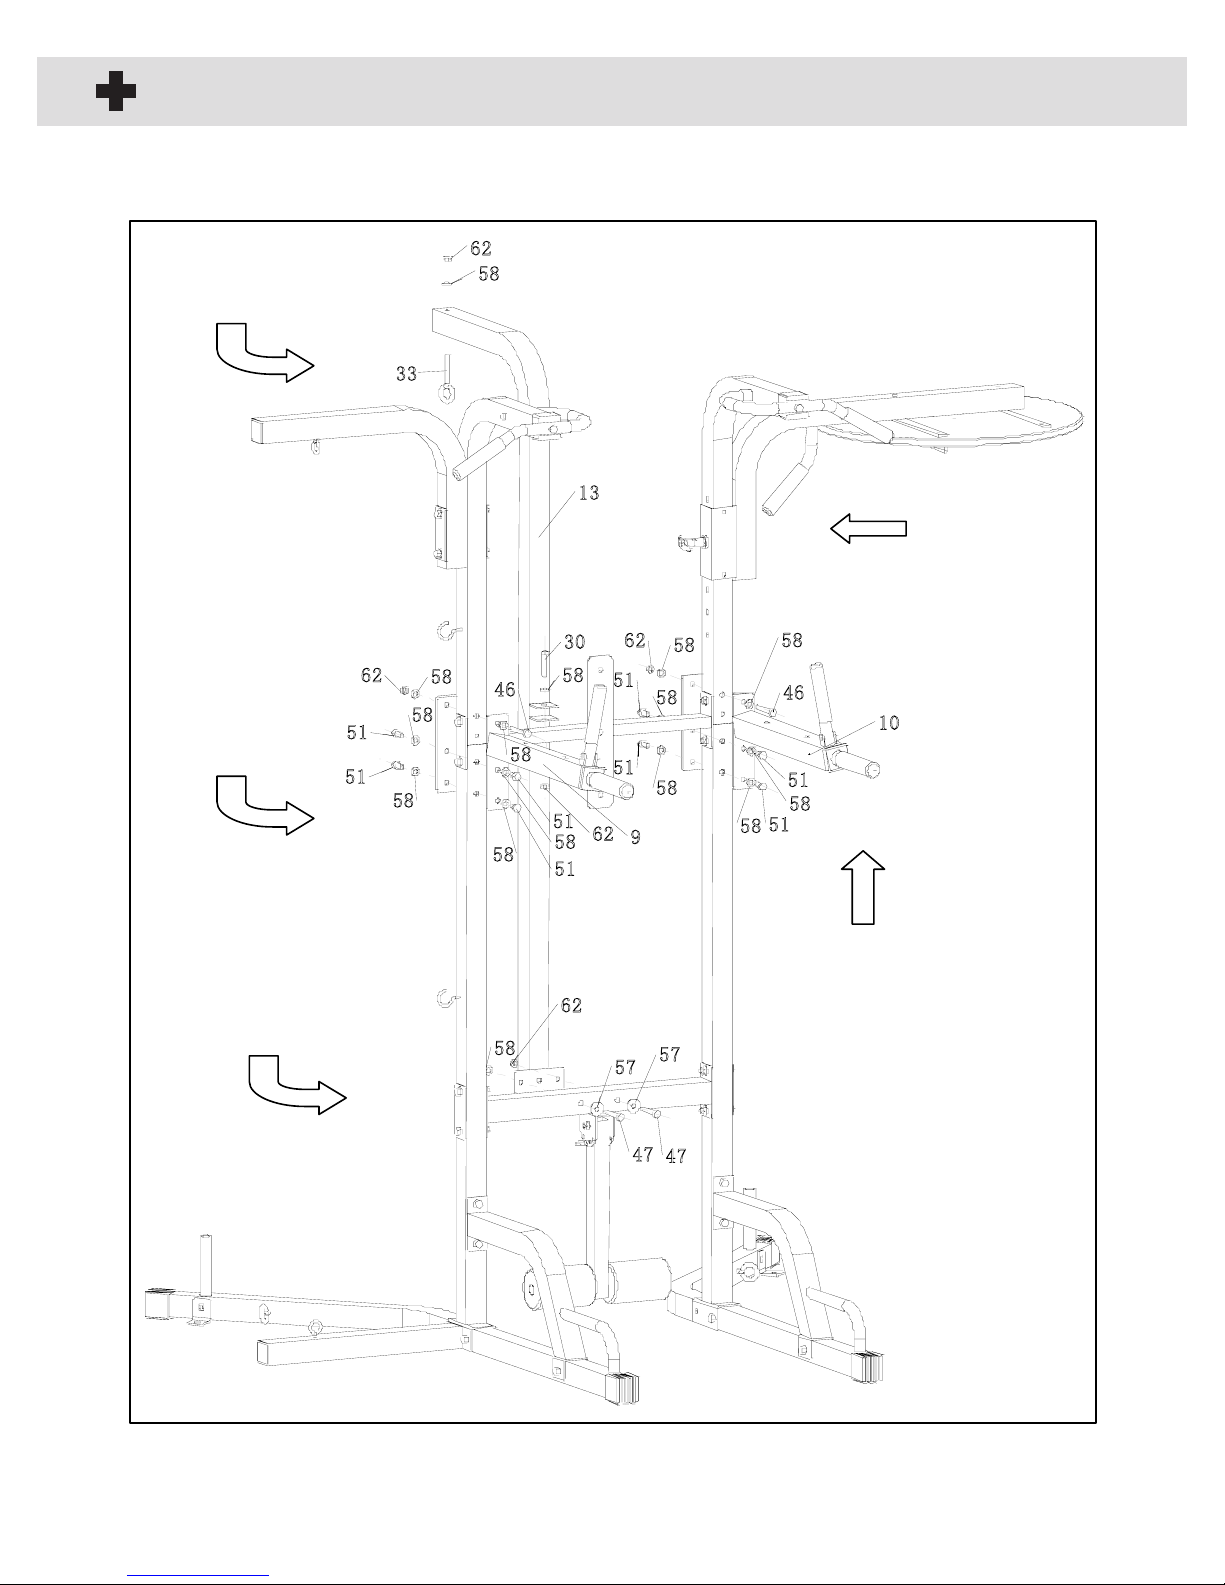
STEP 9
Install the Speed bag support frame assembly (11) to the Right L shaped upright (8).
Attach the T shaped Knob (28) onto the Right L shaped upright (8), Slide the speed
bag support frame (11) thru the tube welded on the Right L shaped upright (8) and
release the Knob until the lock pin is engaged in one hole on the Speed bag support
frame (11). Tighten it securely.
Note. There are 5 holes punched in the Heavy bag support frame (11) for height
adjustments
STEP 10
Install the Left VKR arm rest frame (9) to the Left upright assembly (3&7), using 1
Hex bolts (46), 4 Hex bolts (51), 6 Washers (58), one Large metal plate (23) and 1
Lock nuts (62). Do not use wrench at this time.
Repeat the same procedure for the Right arm rest frame (10) and the Right upright
assembly (4&8).
STEP 11
Attach one Hanging bolt (33) to the Heavy bag support frame (13) using one Washer
(58) and one Lock nut (62).
Install the Heavy bag support frame (13) to the Back pad support frame (12) using
one Hex bolt (30), 2 Washers (58) and one lock nut (62).
Connect the Heavy bag support frame (13) to the Upright cross frame (5) using 2 Hex
bolts (47), 2 Washers (58), 2 Washers (57) and 2 Lock nuts (62).
Tighten the three bolts and nuts used in this step.
Tighten all nuts and bolts securely with wrenches (from step 1 to step9).
12
SEE PAGE 15 FOR DIAGRAM
15
Assembly
ASSEMBLY STEPS
47 47
33
46
58
58
58
58
58
58
58
58 58
58
58
58
58
51
51
51
51
51
51
51
51
58
62
62
62
62
62
57
57
13
58
30
10
9
46
Step 11
Step 11
Step 10
Step 10
Step 9
13
16
Assembly
ASSEMBLY STEPS
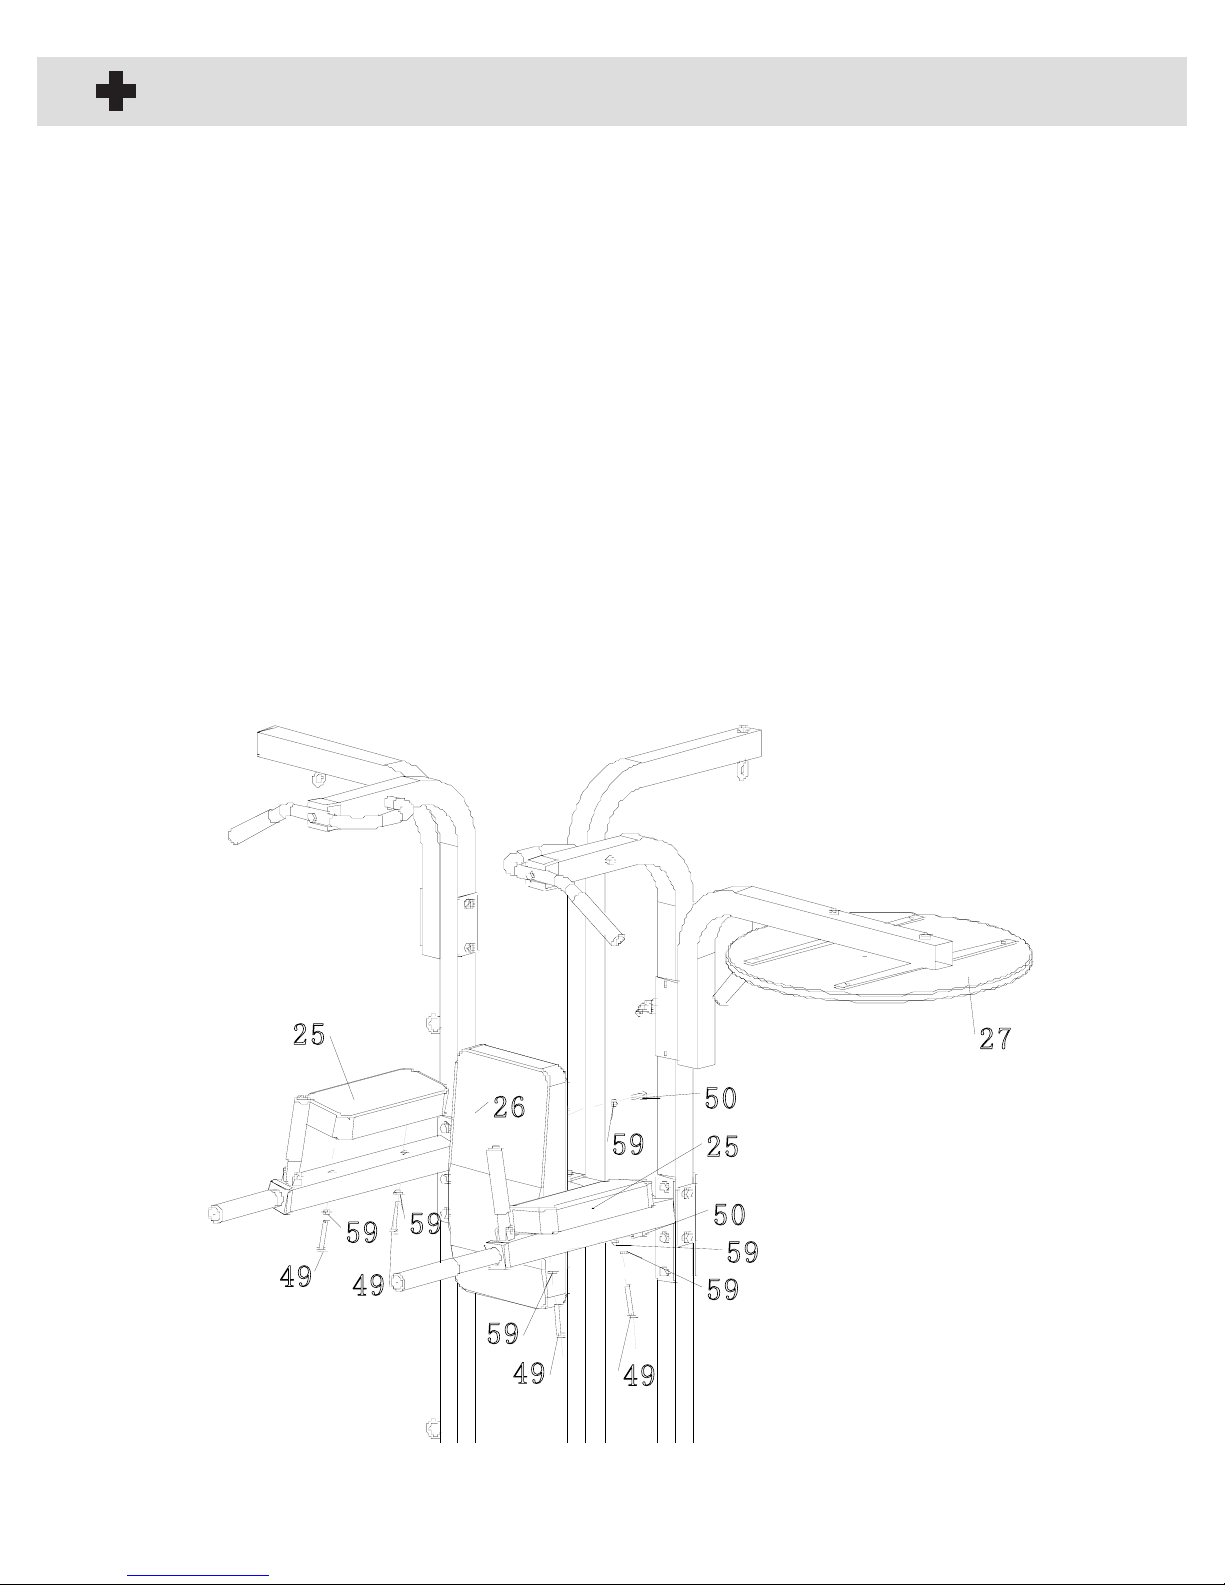
STEP 12
Attach the Arm rest pads (25) to the Arm rest frame (9 & 10) using 4 bolts (49)
and 4 washers (59). Tighten it securely.
Install the Back pad (26) to the Back pad support frame (10), using 2 bolts (50)
and 2 washers (59). Tighten it securely.
Note: The VKR handlebar can be folded down for Pull up station.
Make sure all the nuts and bolts are tightened.
14
25
50
49
49
49 49
59 59
59
59
59
59
26 50
25
27
Table of contents
Other TKO Home Gym manuals


Popular Home Gym manuals by other brands


Merrithew Health & Fitness
Merrithew Health & Fitness Vinyasa Triangle owner's manual

CYBEX
CYBEX VR1 13111 owner's manual

Weider
Weider Muscle 131wtw/ owner's manual

Master
Master MAS4A087 owner's manual

Impex
Impex IGS-8859 owner's manual

Top Sports
Top Sports Christopeit Sport Profi Center Assembly and exercise instructions