TMG TMG-GAC40 User manual

40Gallon Two-Stage Air Compressor
Models:TMG-GAC40
Please read the product manual completely before assembly
Check against the parts list to make sure all parts are received
Wear proper safety goggles or other protective gears while in assembly
Missing parts or questions on assembly?
Please call: 1-877-761-2819 or email: cs@tmgindustrial.com
Do not return the product to dealer, they are not equipped to handle your requests
PRODUCT MANUAL
WWW.TMGINDUSTRIAL.COM TOLL FREE:1-877-761-2819
V2021.05.12

CO Poisoning: Exhaust from engine contains carbon monoxide, a poisonous gas that can cause carbon
monoxide poisoning and possible death if inhaled. ONLY run air compressor OUTDOORS and at least 20 feet
from the home, away from windows, vents and air intakes, to allow proper ventilation. If you start to feel sick,
dizzy, or weak while using the air compressor, shut off the engine and get to fresh air RIGHT AWAY.
Injection Injury: High-pressure air stream can pierce skin and underlying tissues, leading to serious injury
and possible amputation. Such an injection injury can result in blood poisoning and/or severe tissue damage.
Flying Debris: High-pressure air stream can cause flying debris and possible surface damage.
Electric shock: Operating equipment in wet conditions or near water can cause electric shock.
Not For Breathing Air: compressors are NOT designed, intended, or approved for supplying breathing air. No
compressed air should be used for breathing unless air is treated in accordance with applicablestandards.
Fire/Explosion: Sparks from air powered tool heads or attachments can ignite fuel or other flammable liquids
or vapors in the vicinity. Exceeding the maximum pressure for air tools or attachments could cause them to
explode.
Burns: Compressor pump, engine and discharge tubing are hot surfaces that can cause
burn injuries. Detailed safety information about these hazards appears throughout this manual.
WARNING: SPECIAL HAZARDS
Gasoline Stationary Air Compressor
(For Outdoor Use only)
This belt-driven compressor has a 2-stage 2-cylinder pump, an engine with cast iron cylinders
for long life, and a compact design rated for 175 maximum PSI. Its continuous-duty rating
ensures long-lasting performance, and its cast iron pump head ensures superior heat
dissipation. Lift eyes are provided for lifting or tying down.
Read and understand this Owner’s Manual completely before using and keep this manual for
review. Failure to properly set up, operate, and maintain this compressor in accordance to this
manual could result in injury or death to operator or bystanders.
Equipment Protection Quick Facts
Inspect Upon Delivery: FIRST! Inspect for missing or damaged components. See “Initial Set-
Up” section for where to report missing or damaged parts.
Add Engine Oil: Engine is shipped without oil. See engine manual for instructions on
capacity and viscosity recommendations.
Check Pump Oil: Pump is shipped with oil. Check the pump oil level before starting. See
“Preparing for Operation”
section of this Owner’s Manual for capacity and viscosity.
Use Mechanical Lifting Equipment: Compressor is shipped on a pallet and is too heavy to
handle manually. Use proper lifting equipment for unloading and moving to installation site.
Lifting eyes are provided.
Run Pump Unloaded for Break-in Period: Before initial use, open ball valve and run
compressor for 20 minutes to break in pump parts.
Follow Maintenance Schedule: Engine, pump, air filter, and tank require periodic inspection
and servicing to keep compressor functioning efficiently. See “Maintenance Schedule
Summary” for frequency of servicing.
WWW.TMGINDUSTRIAL.COM P02/27 Toll Free:1-877-761-2819

EQUIPMENT PROTECTION QUICK FACTS...............................................................................2
TABLE OF CONTENTS................................................................................................................3
ABOUT YOUR AIR COMPRESSOR.............................................................................................5
SPECIFICATIONS.........................................................................................................................6
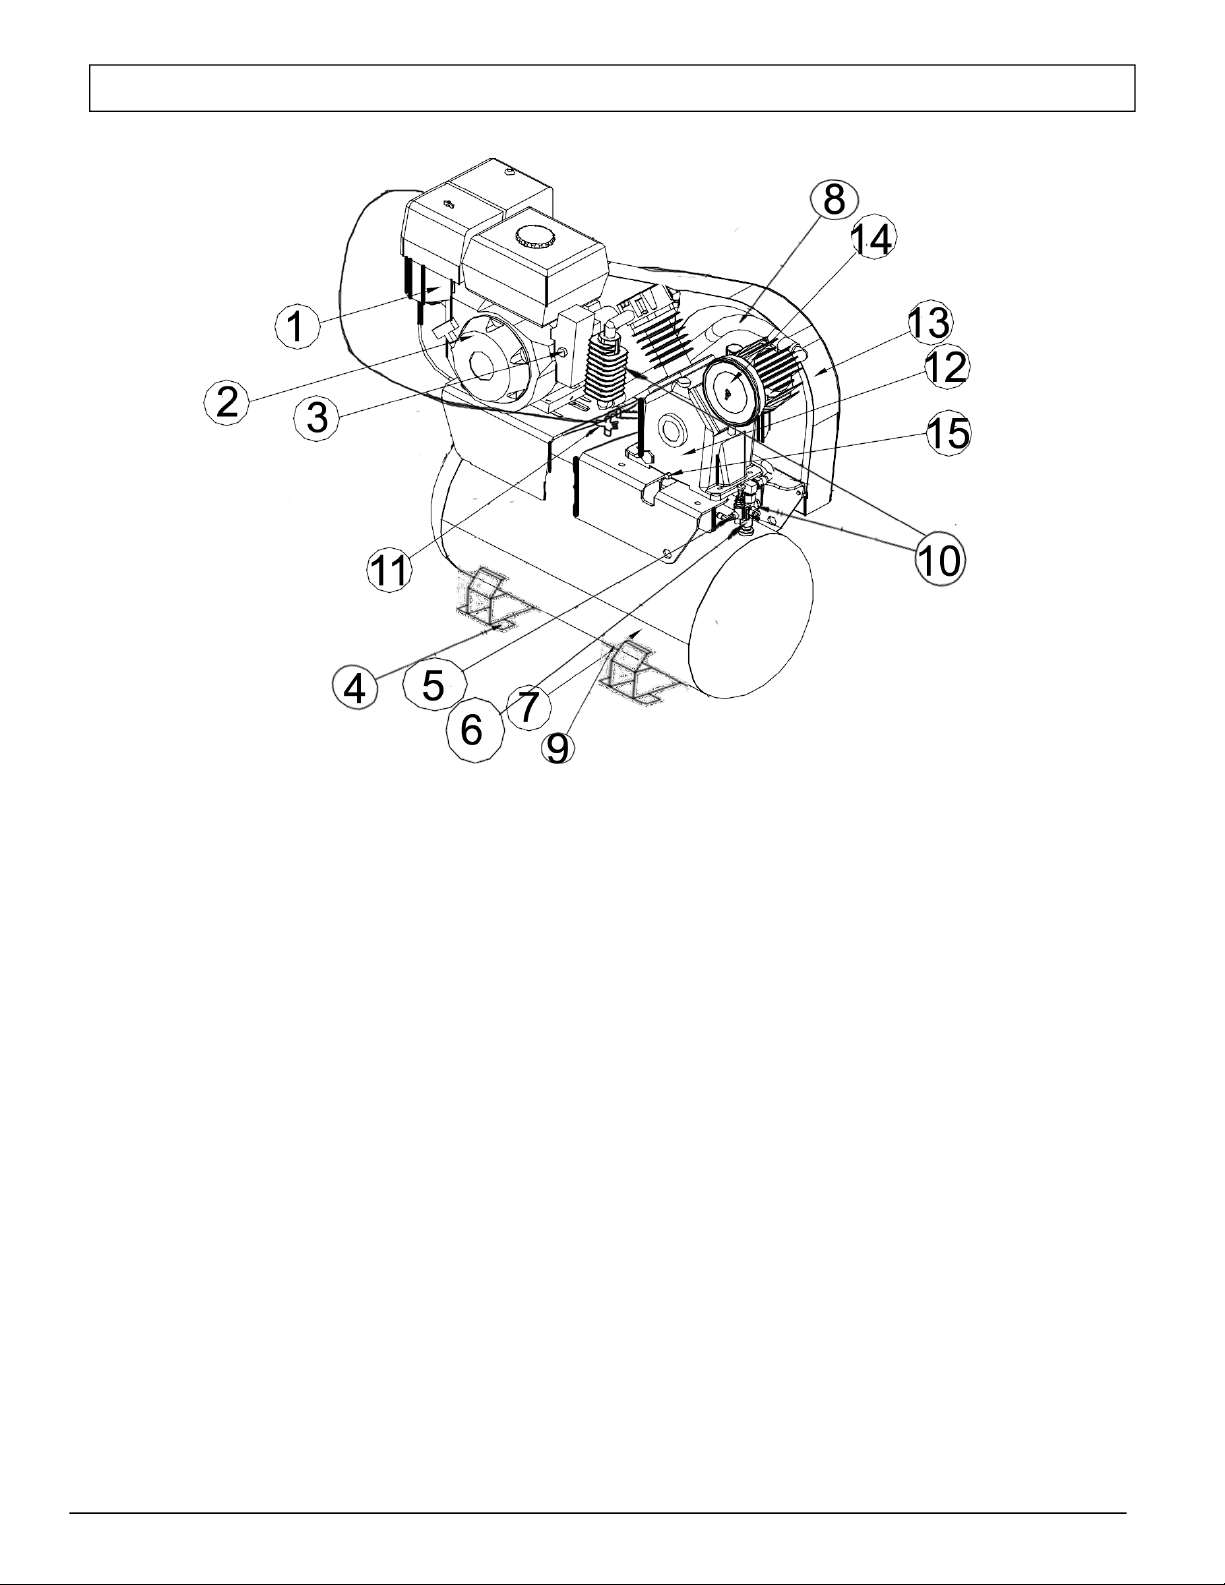
COMPONENT IDENTIFICATION..................................................................................................7
SAFETY.........................................................................................................................................8
Hazard Signal Word Definitions........................................................................................................8
SAFETY LABELING......................................................................................................................9
Safety Decal Locations.....................................................................................................................9
Safety Decals..............................................................................................................................................10
INITIAL SET-UP...........................................................................................................................11
Step 1. Inspect & Unpack....................................................................................................................11
Step 2. Select Suitable Location.........................................................................................................11
Outdoor Use Only...........................................................................................................................11
Step 3. Mounting..................................................................................................................................12
Mounting on Service Vehicle..........................................................................................................12
Installing Discharge Piping..............................................................................................................12
Step 4. Electrical Starting: Battery Procedure..................................................................................12
Battery Connection.........................................................................................................................12
Battery Disconnection.....................................................................................................................13
Install Spark Arrestor(if Required)...................................................................................................13
OPERATION................................................................................................................................14
Follow Safety Rules for Operation.....................................................................................................14
Preparing for Operation.......................................................................................................................14
Check/Add Oil to the Engine and Pump..........................................................................................14
Check and Fill Gasoline Tank.........................................................................................................15
Inspect Fuel System/Check for Leaks.............................................................................................15
Start-Up Procedures............................................................................................................................15
Air Hose and Tool Use.........................................................................................................................16
Attaching Air Hose and Tools.........................................................................................................16
Using Compressor for Spraying.........................................................................................................17
Moisture in Compressed Air............................................................................................................17
Shutdown Procedures.........................................................................................................................17
STORAGE....................................................................................................................................18
Between-Use Storage..........................................................................................................................18
Table of Contents
WWW.TMGINDUSTRIAL.COM P03/27 Toll Free:1-877-761-2819

Drain air receiver tank.....................................................................................................................18
Choose a storage location..............................................................................................................18
Long term storage preparation...........................................................................................................18
MAINTENANCE & REPAIR.........................................................................................................19
MAINTENANCE SCHEDULE SUMMARY...................................................................................19
DETAILED INSTRUCTIONS – MAINTENANCE & REPAIR.......................................................19
Inspect Safety/Relief Valve.............................................................................................................19
Inspect Air Filter..............................................................................................................................19
Inspect Compressor for Air Leaks...................................................................................................19
Engine Maintenance.......................................................................................................................20
Change Pump Oil............................................................................................................................20
Drain Receiver Tank and Inspect Tank...........................................................................................20
Check Drive Belt for Tension and Alignment...................................................................20
Inspect & Clean Spark Arrestor (if Equipped)..........................................................................21
Keep Compressor Clean.................................................................................................................21
TROUBLESHOOTING.................................................................................................................22
PARTS EXPLOSION....................................................................................................................23
PARTS LIST.................................................................................................................................24
PUMP EXPLOSION.....................................................................................................................25
PUMP PARTS LIST.....................................................................................................................26
PNEUMATIC SCHEMATIC..........................................................................................................27
WWW.TMGINDUSTRIAL.COM P04/27 Toll Free:1-877-761-2819

Thank you for purchasing a air compressor! It
is designed for long life, dependability, and
top performance.
Intended Use. It provides compressed air
primarily used for operating air tools and
pressurizing other non- tool objects such as
tires.Special precautions are necessary when
used for cleaning. It is not to be used to
supply breathing air.
Note: Do not use for other purposes, as
unforeseen hazards or equipment
damage may result.
Power Source. The air compressor is
powered by a gasoline engine.
Supplies Required. Normal operation will
require you to supply:
Compressor pump oil
Gasoline
Engine oil
Personal Protection Equipment
See “Specifications”section of this
manual for more detail.
Site Location. Intended for outdoor use only.
Personal Protection. Wear safety apparel
during operation, including safety glasses
with side and top protection. Ear protection
is also recommended if working near any
operating engine.
Adult control only. Only trained adults
should set up and operate the air
compressor. Do not let children operate.
Under The Influence. Never operate, or let
anyone else operate, the air compressor while
fatigued or under the influence of alcohol,
drugs, or medication.
Keep this manual for reference and review.
ATTENTION: Rental Companies
and Private Owners who loan this
equipment to others!
All persons to whom you rent/loan this air
compressor must have access to and read this
manual. Keep this owner’s manual with the air
compressor at all times and advise all persons
who will operate the machine to read it. You must
also provide personal instruction on how to safely
set-up and operate the air compressor and remain
available to answer any questions a
renter/borrower might have.
About Your Air Compressor
WWW.TMGINDUSTRIAL.COM P05/27 Toll Free:1-877-761-2819

Specifications
MODEL
Model #
TMG-GAC40
FLOW OUTPUT
Max. Pressure Rating
175 PSI
Volume Rating
@ 90 PSI
24.4 CFM
Receiver Capacity
40 gal.
ENGINE
Engine
LONCIN G300EA
Engine Displacement
(cc)
302 cc
DIMENSIONS / COMPONENTS
Length
41”
Width
18”
Height
40”
Weight
420 lbs.
Mounting Hole
Diameter
0.5”
Suggested Mounting
Bolt Diameter
7/16”
SUPPLIES REQUIRED (not included)
Engine Oil
Refer to engine owner’s manual
Pump Oil
(shipped with oil, but
refills required)
SAE 30 non-detergent pump oil
Pump Oil Capacity
38 oz.
WWW.TMGINDUSTRIAL.COM P06/27 Toll Free:1-877-761-2819

Component Identification
1. Engine Controls: Location of choke, engine
speed and fuel valve.
2. Engine: NOT shipped with oil. Refer to engine
Owner’s Manual for proper oil and
capacity.
3. Engine On/Off/Start Switch: Turn switch to
“ON” when using recoil to start engine. Turn
switch to “START” when using electric start.
CAUTION: Unit is not equipped with high
temperature “auto shutoff”.Do NOT allow to
overheat.
4. Lifting Eyes: May also be used as tie
down locations.
5. Ball Valve: 1/2” NPT air supply outlet.
Compressed air supply point. A pressure
regulator and/or quick connect fittings can
attach here.
6. Pressure Gauge: Liquid filled gauge.
Shows pressure in receiver tank.
7. Air Receiver / Storage Tank: 40 gallon
tank.
8. Discharge Tube: Carries compressed air from
pump to safety/check valve, and then to the
storage tank. It becomes very hot during use
and can cause severe burns. Never touch.
9. Tank Drain Valve: Used to remove moisture
from air after compressor is shut off and air
emptied from tank. Drain moisture daily after
each use.
10. ASME Safety/Check Valve: Automatically
releases air if tank exceeds preset pressure max.
of 180 PSI. A check valve is a pressure release
port. Pull valve pin to relieve pressure from
receiver tank.
11. Unloader: Vents discharge air to
atmosphere in start/stop operation.
12. Air Compressor Pump: Shipped with oil.
13. Belt Guard: Covers belt, engine pulley and
flywheel. NEVER operate compressor without
belt guard in place.
14. Compressor Air Filter: Keep clean and particle
free. See “Pump Explosion and Pump Parts
List” for replacement part number.
15. Magnetic Oil Drain Plug: Removals allows for
drainage of oil from pump. Attracts metal
particles that could damage pump.
WWW.TMGINDUSTRIAL.COM P07/27 Toll Free:1-877-761-2819

Safety
Hazard Signal Word Definitions
This is the safety alert symbol. It is used to alert you to
potential personal injury hazards. Obey all safety messages
that follow this symbol to avoid possible injury or death.
DANGER (red) indicates a hazardous situation, which if
not avoided, will result in death or serious injury.
WARNING (orange) indicates a hazardous situation, which
if not avoided, could result in death or serious injury.
CAUTION (yellow), used with the safety alert symbol,
indicates a hazardous situation, which if not avoided, could
result in minor or moderate injury.
CAUTION (yellow), without the safety alert symbol, is
used to address practices not related to personal injury.
NOTICE is used to address practices not related to personal injury.
WWW.TMGINDUSTRIAL.COM P08/27 Toll Free:1-877-761-2819
DANGER
WARNING
CAUTION
CAUTION
NOTICE

ALWAYS make sure safety labels are in place and in good condition.
WARNING:
Safety Labeling
Safety Decal Locations
On-Product Warning
Labels
Location
Description
1
Air Compressor Instructions
2
Poisonous Gas
3
Burn Hazard, Hot Muffler
4
Fuel Fire Explosion Hazard
5
Engine Electric Start – Battery Hazard
6
Air Compressor Safety
WWW.TMGINDUSTRIAL.COM P09/27 Toll Free:1-877-761-2819

Safety Decals
6
1
2
3
5
4
WWW.TMGINDUSTRIAL.COM P10/27 Toll Free:1-877-761-2819

WARNING: Location hazards
WWW.TMGINDUSTRIAL.COM P11/27 Toll Free:1-877-761-2819
Initial Set-Up
Step 1. Inspect & Unpack
Upon receipt, inspect air compressor for missing or
damaged parts. Verify that it is the air compressor
you ordered.
See “Component Identification” section of this
manual for a diagram of the compressor and its
components.
Step 2. Select Suitable Location
Airflow:
The location should allow for adequate,
unobstructed airflow for cooling and
combustion air.
Do not allow debris to accumulate or
block airflow.
Do not operate with a tarp, blanket, or
cover surrounding the machine.
Do not place any objects against or on top of
the unit.
Exhaust:
WARNING: Exhaust modification
hazard
Outdoor Use Only
Select a suitable outdoor location:
Where it will NOT be exposed to rain, snow,
or direct sunlight.
Where no flammable vapors, dusts, and
gases are present.
At least 7 feet away from combustible materials
At least 20 feet from the home, away from
windows, vents and air intakes, to allow
proper ventilation.
Away from other heat-generating equipment.
Away from dusty/dirty conditions.
Positioning:
The compressor should be mounted on a dry,
firm, and level surface. It must sit level and
be stabilized so it will not slide or shift during
operation.
Situate so there is adequate pulling room for
starting the engine using the recoil starter.
Attempting to pull at an odd angle could rip off
grip cord and/or cause muscular injuries to the
operator.
Place the unit so that the exhaust fumes will not
be directed towards people or building air intakes.
Keep a fire extinguisher rated “ABC” nearby
which is properly charged. Be familiar with its use.
Provide battery-operated or battery back-up type
carbon monoxide alarms in any structure that is
in close proximity to the running compressor.
Do not install in small, enclosed areas without
an ample circulation of supply air.
Exhaust fumes from the engine contain carbon
monoxide (CO), a poisonous gas you cannot see,
smell, or taste. The CO generated by the engine can
rapidly accumulate, even in areas that appear to be
well ventilated, resulting in dangerous and fatal
concentrations within minutes. NEVER run air
compressor inside any enclosed or semi-enclosed
spaces, including homes, garages, basements,
sheds, boxes, pick-up truck beds, RVs, or boats.
These spaces can trap poisonous gases, EVEN if you
run a fan or open windows. If you start to feel sick,
dizzy, or weak while using the air compressor, shut
off the engine and get to fresh air RIGHT AWAY. See
a doctor. You may have carbon monoxide poisoning.
DANGER: Carbon monoxide hazard
Ideal operating temperatures:
40and 100F (4and 37C).
Operating Limitations:
15F (-9C) or above 125F (52C).
If temperatures consistently drop below 32F (0C),
store inside a heated building. If this is not possible,
protect the safety/relief and drain valves from freezing.
The compressor is heavy. Ensure that proper
lifting equipment is available to unload and move
compressor to installation site.
WARNING: Lifting hazard
Choose a suitable site for operating your
compressor to prevent possible death from carbon
monoxide poisoning or injury from fire/explosion,
hot surfaces or equipment tip-over.
Never attempt to attach ductwork to the muffler
system to allow for installation inside an enclosure.
This could cause heat build-up and increased
exhaust back- pressure, resulting in possible
exhaust leakage or damage to the compressor.

WWW.TMGINDUSTRIAL.COM P12/27 Toll Free:1-877-761-2819
Note: In frequently humid areas, moisture may
form in the pump and produce sludge in the oil,
causing parts to wear out prematurely.
Excessive moisture is likely to occur if unit is
stored in an unheated area subject to large
temperature changes.
Two signs of excessive humidity are external
condensation on the pump when it cools down and
a “milky” appearance in pump oil.
Step 3. Mounting
1. Lift and remove the compressor from the
pallet using a hoist and lifting eyes provided.
2. Situate unit in chosen location and bolt in place.
Bolt it in place to prevent unit from vibrating
excessively. Use metal shims under the “short”
feet if necessary.
3. A rubber isolation mat or pads may be used
under each mounting foot to reduce vibration.
Mounting on Service Vehicle
If installing unit on a service vehicle you must:
• Locate unit in an open-air environment, away from
driver and passengers.
• Fasten unit securely without applying excessive
stress on the receiver/storage tank. Truck beds
have a tendency to flex and could cause damage to
the receiver tank if fastened directly to the truck bed.
It is the user’s responsibility to provide an adequate
means of fastening the unit in these applications.
• Direct exhaust and other hot parts of compressor
away from the cab or flammable equipment. Make
sure the exhaust clears the side of the bed.
• Securely close (and preferably drain) gas tank to
prevent fuel leakage during transportation.
Installing Discharge Piping
If installing discharge piping you must:
• Adhere to all local building codes.
• Use discharge piping of the same diameter as the
compressor discharge connection.
• Use pipe, tube, hose, or distribution components rated
for use with compressed air and maximum pressure
of this compressor.
• Use a properly rated flexible connection between the
tank and discharge piping.
Do not use plastic (PVC) pipe, rubber hose,
copper, or lead-tin soldered joints anywhere in the
compressed air system.
WARNING: Burst hazard
Step 4. Electrical Starting: Battery Procedure
In addition to the recoil starter, the engine is capable of
electric starting which, if used, will require the purchaser
to provide a hook-up to an external 12-volt size battery .
Battery should have a minimum rating of 18 amp-hour.
You may also choose to use a “jump” from a service
vehicle’s battery or an external battery set on the
ground.
See engine Owner’s Manual for more information
regarding battery cable size and length
recommendations.
Follow instructions below for connecting and
disconnecting the battery. After starting engine,
a battery is not required, but can remain
connected without damaging the compressor.
Battery Connection
Always connect the cables in the following sequence to
avoid possible shock.
1.Connect one end of the red (+) cable to
compressor engine’s starter solenoid terminal.
Note: Access to the solenoid terminal is from the top
may require reaching between the gasoline tank and
shroud covering the compressor’s cooling fan.
2.Connect one end of the black (-) cable to
compressor engine’s mounting bolt, frame bolt, or
other good engine ground connection.
3.Connect other end of the red (+) cable to battery
positive (+) terminal.
4.Connect other end of the black (-) cable to
battery negative (-) terminal as shown.
5.Coat terminals and cable ends with grease if they are
to remain permanently connected .
CAUTION: Battery connection
hazard
Be careful not to connect the battery in reverse
polarity, as this will short circuit the battery
charging system.
Since the engine has not yet been grounded to
the battery ground, your uninsulated tool handles
can cause a short circuit if they also touch a
grounded part while tightening the positive
battery cable end.
Batteries contain caustic acid, can emit explosive
gases, and can cause electric shock. Caution
must be exercised when making connections to
a battery to avoid shock, contact with acid, and
prevent any sparking that could lead to an
explosion.
Eye/skin protection. Always wear eye
protection and protective clothing when
connecting or disconnecting battery.
Electric shock Prevention. Never touch both
battery terminals at the same time with your
hand or any non- insulated tools.
Acid/skin contact. If battery acid contacts skin
or clothing, flush immediately with water and
neutralize with baking soda.
WARNING: Battery hazards

WWW.TMGINDUSTRIAL.COM P13/27 Toll Free:1-877-761-2819
Battery Disconnection
Once operating, the compressor will continue
to run whether the battery is connected or not.
It can be disconnected while the compressor
is running. The battery should be
disconnected from the engine when the
compressor is not going to be used for a long
period of time. Always disconnect cables in
this reverse sequence to the above
connection sequence .
1. First, disconnect the black (-) cable
from the battery negative (-) terminal.
2. Next, disconnect the red cable from
the battery positive (+) terminal.
3. Disconnect the black (-) cable from the
grounding connection.
4. Disconnect the red (+) cable from
the starter solenoid terminal.
Install Spark Arrestor (if Required)
Equip engine with spark arrestor if machine will
be used near any ignitable forest, brush, or
grassy land. (See engine Owner’s Manual
provided to determine if the engine is already
equipped.) Make sure you comply with
applicable local, state, and federal codes.

Never operate compressor with inadequate
lubricant. This will cause overheating and severe
damage to the engine and pump.
WWW.TMGINDUSTRIAL.COM P14/27 Toll Free:1-877-761-2819
Operation
Follow Safety Rules for Operation
Before starting the compressor, review the safety
rules found below and throughout the manual.
6.Ensure belt guards and covers are
securely in place.
Failure to follow safety rules may result in serious
injury or death to the operator or bystanders.
WARNING
Instruct operators. Owner must instruct all
operators in safe set-up and operation. Do not
allow anyone to operate the compressor who has
not read the Owner’s Manual and been instructed
on its safe use.
Safety equipment/controls. Always operate with
all safety covers, guards, and barriers in place and
in good working order, and all controls properly
adjusted for safe operation.
Moving parts. Keep hands, feet, hair and apparel
away from moving parts. Air vents may cover
moving parts and should be avoided as well.
Never remove any guards while the unit is
operating.
Ear Protection. Hearing can be damaged from
prolonged, close-range exposure to the type of
noise produced by this compressor. The use of
ear plugs or other hearing protection device is
recommended for persons working within 15-20
feet of the running compressor for an extended
period of time.
Eye Protection. Wear ANSI/OSHA required
“Z87.1” safety glasses when operating or
servicing the compressor. Pressurized air
spray from this unit can cause severe injury to
the eyes. Small objects can become airborne
as the air spray contacts them.
Respirator. Always wear a respirator when
spraying and spray in a well-ventilated area to
prevent health and fire hazards.
Preparing for Operation
Make sure that any regular maintenance has
been performed as prescribed in
“Maintenance & Repair” section.
1.Refer to the engine Owner’s Manual for
engine maintenance instructions.
2.Drain receiver tank of any moisture.
3.Inspect for oil leaks.
4.Check for any unusual noise/vibration.
5.Ensure the area around compressor is free
from rags, tools, debris and flammable or
explosive materials.
Check/Add Oil to the Engine and Pump
Check the oil levels in the engine and pump.
Use dipstick for engine oil level and sight glass
for pump oil level. Add oil as needed. A low oil
shutdown feature prevents the engine from
starting without sufficient oil.
Engine: See engine Owner’s Manual for capacity
and recommended oil type for your expected
ambient conditions.
Never open oil port while compressor is running.
Hot oil can spray over face and body.
WARNING: Burn hazard
Pump: The compressor pump capacity is 38 oz.
Use SAE 30 non-detergent pump oil prior to
break-in. You may use synthetic lubricants after
50 hour break-in. See “Appendix A: Lubricants
and Compatibility” for a list of suitable and
alternative lubricants.
CAUTION: Inadequate lubrication
hazard
Breather
Cap
Oil Cap
Sight
Glass
Do NOT operate with protective covers or guards
removed. Doing so could expose high speed
moving components which could allow for the
operator or bystanders to become entangled.
Entanglement in this equipment may result in
serious injury, amputation or death.
Figure 1
Magnetic
Drain
Plug
WARNING: Entanglement hazard

CAUTION: Break-in period
Engine Start
Engine Run
WWW.TMGINDUSTRIAL.COM P15/27 Toll Free:1-877-761-2819
If you will be using a synthetic lubricant, all
downstream piping material and system
components must be compatible.
Check and Fill Gasoline Tank
Check the gasoline level in the engine’s tank.
Fill tank outdoors with fresh unleaded
gasoline from a portable container.
Never pump fuel directly into engine at gas
station. Static charge can build and ignite fuel.
Use a UL approved fuel container to transfer
gas to the engine.
Always place container on ground to be filled.
Keep nozzle in contact with container while
adding fuel.
Gasoline is highly flammable and explosive.
Heat, sparks, and flames can ignite gasoline
vapors, which can become widespread during
fueling. A flash fire and/or explosion could result
and cause serious injury or death. Use extreme
care when handling gasoline. Carefully follow all
the instructions in this section to avoid the
following conditions which could result in
gasoline ignition:
gas vapor collection inside enclosures
static electric sparks
sparks from electric wiring, batteries, or
running engines
sources of heat (such as a hot engine or
exhaust)
open flames, including pilot lights
smoking
WARNING: Fire/Explosion hazard
To Fill Gas Tank:
1. Before removing fuel cap, make sure
compressor has been off and allowed to cool
for at least 2 minutes.
If gas is spilled on your skin or clothes,
change clothes and wash skin immediately.
6. Store extra gas in a cool, dry place in a
UL- approved, tightly sealed container.
Inspect Fuel System/Check for Leaks
Inspect fuel system for leaks BEFORE
starting compressor. Look for:
Signs of leaks or deterioration
Chafed or spongy fuel hose
Loose connections
Loose or missing fuel hose clamps
Damaged gasoline tank
Selective gasoline shut-off valve
Do not start compressor until all needed repairs
have been completed.
Start-Up Procedures
WARNING: Hot engine hazard
2. Remove fuel cap.
3. Add gas through the fill opening. Do not overfill.
Allow at least ½” of empty space below fill neck
to allow for gas expansion.
4. Replace fuel cap securely before starting engine.
5. Clean up fuel spills/splashes immediately.
If possible, move machine away from
spilled gas on the ground.
Wipe up spilled gas and wait 5 minutes
for excess gas to evaporate before
starting engine.
Gas-soaked rags are flammable and
should be disposed of properly.
1. Before Starting:
Drain storage tank and close drain valve.
2. Turn the unloader to the engine START position.
(Figure 2)
Figure2
A running engine is hot enough to ignite fuel.
Never add fuel or remove gas cap if engine is
running or still hot. Let cool at least 2 minutes.
Before initial use, open the ball valve and
run the compressor for 20 minutes to
break-in pump parts.
CAUTION: Synthetic lubrication hazard

CAUTION: Air tools hazard
WWW.TMGINDUSTRIAL.COM P16/27 Toll Free:1-877-761-2819
3. Starting engine. (See the engine manual
for more details.)
a. Move fuel valve lever to the ON position.
b. For a cold engine, move choke lever to
the CLOSED position. For a warm
engine, leave in OPEN position.
c. Turn engine switch to ON position.
d. Grab the recoil starter grip and rapidly
pull out the starter cord. Allow starter
cord to return slowly.
4. When engine starts, gradually move choke
lever to OPEN position.
5. After engine has started, move the
unloader to the engine RUN position.
6. The compressor is now ready to use.
7. The unloader will maintain pressure in the
tank between 145 to 175 PSI.
8. Under long, continuous-run
operating conditions, be
prepared to:
Check and refuel on a regular basis.
See engine Owner’s Manual for
more detail.
Check engine oil level each time you
refuel.
NEVER over-pressurize the receiver tank or air tools
beyond nameplate capacity. Do not operate the unit at
pressures, temperatures or rotational speeds in
excess of manufacturer’s recommendations. Be sure
all accessory equipment and system components
meets or exceeds the pressures and temperatures
developed by the unit. Exceeding the pressure rating
could cause them to explode or fly apart.
WARNING
Compressor and any tools must be sized
properly- consider the maximum pressure
requirements and air volume of each.
(Maximum operating pressure of your
compressor and volume rating is listed in
“Specifications” section of this manual.)
Inspect hoses for holes or rupture points.
Ensure the switch is in the OFF position and
tank pressure gauge reads zero before
changing air tools or disconnecting hose
from air outlet. Failure to do so could result
in personal injury.
NEVER use air tools or attachments
without first determining the maximum
pressure recommended for that equipment.
WARNING: Overheating
Do not operate this unit with any components
rated less than the maximum operating
pressure of the unit (175 PSI) unless a
regulator limiting pressure is used.
Note: Many tools are rated for only 90 PSI. It is
acceptable to use a tool rated for 90 PSI when
max. pressure of compressor is 175 ONLY if a
regulator is used and the regulated pressure is
90 PSI or less.
When using high-pressure tools, make sure
the tool is properly coupled, user is wearing
protective equipment, and there are no
persons nearby.
Attaching Air Hose and Tools
Air Hose and Tool Use
Pressure control related devices. Never remove,
adjust, bypass, change, modify or make
substitutions for safety/relief valves, pressure
switches or other pressure control related devices.
Over-pressurization of the compressor could
result and cause explosion.
1. Connect air hose to ball valve outlet.
2. Connect tool to other end of the hose.
3. Keep fingers off trigger of tool until ready
to use. A tool has power when compressor
has air.
4. Ensure connections are tight/secure. Firmly
grasp hose in hand when connecting or
disconnecting to prevent hose whip. An
improperly seated coupler can blow off the
machine when started.
This compressor is not equipped with “auto shut
off”. Do not allow to overheat. Failure to allow
adequate ventilation or restrict the air flow may
cause the machine to overheat.
Never use compressor to inflate small low-
pressure objects, i.e., balloons/inflatables, small
or low volume PSI tires. It is easy to over-
pressurize them, causing them to rupture. Use a
gauge to check the pressure regularly. Observe
the inflation capacity of the object prior to
filling with air.
CAUTION: Incompatable
component hazard
WARNING: Inflatables/Low PSI tire
WARNING: Bursting hazard
Do not attach air tools to open end of the hose until
start-up is completed and the unit checks out OK.
Too much air pressure causes a hazardous risk of
bursting. Check the manufacturer’s maximum
pressure rating for air tools and accessories. The
outlet pressure must never exceed the maximum
pressure rating.

Do not leave an operating machine unattended.
Always shut the machine OFF and relieve the
pressure before leaving the machine. NEVER
disconnect the high- pressure hose from the unit
while the tank and air line is pressurized.
WWW.TMGINDUSTRIAL.COM P17/27 Toll Free:1-877-761-2819
Never direct air stream at people or animals. A
high- pressure stream produced by this
compressor could pierce the skin and
underlying tissues, leading to a serious injury or
amputation. DO NOT TREAT AN INJECTION
INJURY AS A SIMPLE CUT! In case of
skin injection, see a physician immediately.
WARNING: High pressure stream
hazard
Note: To change tools or attachments,
change out the tools on the end of the hose.
There is a check valve built into the hose
coupler so that air does not escape when
tools are removed.
Never disconnect threaded joints with pressure in
the tank. Removing threaded connections with
pressure in the tank may cause the removed
component to become a projectile.
WARNING: Projectile hazard
Do not string hoses across floors or aisles
where they are liable to cause personnel to
trip and fall. Suspend air supply hoses
overhead, or otherwise locate to provide
sufficient access and protection against
damage.
Using Compressor for Spraying
Spraying flammable materials. Always
follow precautions on container labels or
MSDS’ before spraying flammable
materials such as paint.
Moisture in Compressed Air
Moisture in compressed air will form into droplets
as it leaves air compressor pump. When humidity
is high or when a compressor is in continuous use
for an extended period of time, this moisture will
collect in the tank.
When using a paint spray or sandblast gun, this
water will be carried from the tank through the
hose, and out of the gun as droplets mixed with
the spray material. If this is not acceptable for your
application, an external air dryer must be added to
the system.
Shutdown Procedures
Normal Shutdown
1. Move the pressure switch lever to OFF and
close the ball valve to stop/shut off air flow.
2. Turn engine switch to OFF position.
3. Turn fuel valve lever to OFF position.
4. Drain air from the tank by releasing
pressure. Disconnect hoses and open the
ball valve or pull the ring on the safety relief
valve.
Note: Lifting the unloader knob will not
release pressure from the tank.
5. Once the air tank pressure gauge registers
under 10 PSI, open the drain valve on the
foot ring of the tank to drain any moisture.
6. Remove spark plug to prevent accidental
starting of engine.
7. Cool engine at least 5 minutes before
storing. A hot engine is a fire hazard. (See
“Storage” section for more information.)
Malfunction during operation.
Immediately turn off the compressor if any
of the following conditions arise during
operation:
Excessive change in motor speed, slow or fast
Overheating
Excessive vibration
Unusual noise
Flame or smoke
Air leakage
To stop the compressor in an emergency:
1.Move the pressure switch lever to OFF and
close the ball valve to stop/shut off air flow.
2.Turn engine switch to OFF position.
3.Turn fuel valve lever to OFF position.
4.Pull the safety relief valve to quickly
release pressure from the tank.
5.Remove spark plug to prevent accidental
starting of engine.
6. Ensure compressor will not be re-started
until problem is remedied.
WARNING: Shutdown hazards

WWW.TMGINDUSTRIAL.COM P18/27 Toll Free:1-877-761-2819
Storage
When you are finished using the compressor, you
must:
Make sure the compressor is shut down and
all tools are disconnected. (See “Shutdown”
section.)
Drain air receiver tank.
Store the compressor properly.
Detailed instructions are provided
below.
Between-Use Storage
Before storing, let engine cool for at least 5
minutes, as a hot engine is a fire hazard. When
machine is not in use, remove spark plug to
prevent unintentional starting or operation by
untrained persons.
Drain air receiver tank
Drain air receiver tank daily or after each use to
prevent moisture buildup in the air tank. Serious
injury or death may occur from a tank explosion if
air tanks are not properly maintained.
WARNING: Risk of bursting
To prevent tank corrosion, drain the receiver
tank after each days use.
Draining the tank will:
Dry out any moisture that has accumulated
in the tank. Leftover moisture can cause
tank corrosion and premature failure.
Ensure that the unit is operating properly
should it be needed in an emergency.
To drain the tank:
1. Reduce tank pressure below 10 PSI by
disconnecting the hoses and opening the
ball valve, or pulling the ring on the safety
relief valve.
Note: Lifting the unloader knob
will NOT release pressure from
the tank.
2. Drain moisture from tank by opening the
drain valve located at the bottom of the
tank.
Choose a storage location
An appropriate storage location is:
Clean and dry
Away from sources of heat, open flames,
sparks, or pilot lights, even if gas tank is
empty. Residual gasoline could ignite.
Away from extreme high or low temperatures.
Long term storage preparation
Prepare engine for long-term storage if you will
not be using machine again for more than 30 days.
Fuel can become stale when stored over 30 days.
Stale fuel causes acid and gum deposits to form in
the fuel system which can cause engine
malfunction. You have two options:
a. Remove all gasoline from the tank and carburetor
OR
b. Add fuel stabilizer to the gasoline following
manufacturer’s instructions:
1. Ensure gas tank is full.
2. Add fuel stabilizer to fuel tank.
3. Run engine outdoors at least 10 minutes
after adding stabilizer to allow it to enter
the fuel system.
4. Shut off engine.
5. Disconnect spark plug wire and remove
spark plug.
6. Add one teaspoon of oil through spark plug hole.
7. Place rag over spark plug hole and pull the
recoil a few times to lubricate the
combustion chamber.
8. Replace spark plug, but do not
reconnect the spark plug wire.
9. Pull the recoil slowly until resistance is felt
and the notch on the recoil aligns with the
hole at the top of the recoil starter cover.
This will close the valves so moisture
cannot enter the engine cylinder. Return
the recoil gently.

Detailed Instructions – Maintenance &
Repair
WWW.TMGINDUSTRIAL.COM P19/27 Toll Free:1-877-761-2819
Maintenance & Repair
Maintenance Schedule Summary
Item
Frequency
Inspect safety/relief valves
Weekly
Check pump oil level
Weekly
Inspect air filter
Weekly
Replace every 12 months or 1000
hours of use
Inspect for air leaks
Monthly
Engine maintenance
See engine Owner’s Manual
Change oil: after first 20 hours of use
Every 100 hours of use after that
Change pump oil/ Clean magnetic drain plug
After first 50 hours of use
Every 3 months or 500 hours of use
after that
Inspect & drain receiver tank
Daily
Check drive belt tension and alignment
Monthly
Inspect & clean spark arrestor (if equipped)
See manufacturer’s instructions
Dust/debris removal
Monthly
See detailed instructions for each maintenance item below.
If the safety/relief valve does not work properly,
over- pressurization may occur causing air tank
rupture or explosion. Occasionally pull the ring on
the safety valve to make sure the safety valve
operates freely. If the valve is stuck or does not
operate smoothly, it must be replaced with a valve
having the same pressure rating.
WARNING: Safety/Relief valve
hazards
No modifications. Never modify or alter the
compressor in any way. Modifications can
create serious safety hazards and will also void
the warranty.
Inspect Safety/Relief Valve
This valve should be inspected on a weekly
basis if used regularly or the first time it is being
used after a prolonged period of storage. The
safety valve automatically releases air if the tank
pressure exceeds the preset maximum.
Check the safety/relief valve by pulling the
rings.
Replace safety/relief valve that do not
operate freely.
Inspect Air Filter
Inspect the compressor’s air filter element on a
weekly basis if used regularly or the first time it is
being used after a prolonged period of no use. A
dirty air filter will not allow the air compressor to
operate at full capacity.
Clean air filter when necessary.
Every 12 months or 1000 hours, replace
the air filter.
Note: Keep the air filter clean. Do not
operate with the air filter removed.
Inspect Compressor for Air Leaks
Inspect system for air leaks on a monthly
basis, or again, at the first use after a
prolonged period of storage.
NOTICE
Dispose of used motor and pump oil in a manner that
is compatible with the environment and in accordance
with local, state, and federal laws and regulations.
Take used oil in a sealed container to your local
recycling center or service station for reclamation.
Do not throw it in the trash, pour it on the ground, or
pour it down a drain.
ALWAYS shut off the engine, disconnect the spark plug wire from spark plug and release air pressure from the receiver tank
before cleaning, adjusting, or servicing the compressor. Make sure all guards and shields are replaced before re-starting.
WARNING: Maintenance hazards

WWW.TMGINDUSTRIAL.COM P20/27 Toll Free:1-877-761-2819
Squirt soapy water around joints during
compressor operation and watch for
bubbles. Developing bubbles indicate a
leak is present.
Tighten fittings if necessary.
Engine Maintenance
Perform engine maintenance as specified in the
engine Owner’s Manual. Items include:
Change oil after the first 20 operating hours,
and at least every 100 operating hours
thereafter and oil filter, as directed in
engine Owner’s Manual.
Failure to replace a rusted air receiver tank could
result in tank rupture or explosion, which could
cause substantial property damage, severe
personal injury, or death. Never modify or repair a
tank.
WARNING: Air tank hazards
Check Drive Belt for Tension and Alignment
WARNING: Burn hazard
Air filter check/replacement
Spark plug cleaning/replacement
Fuel filter check/replacement
Fuel tank cleaning
Change Pump Oil
After the first 50 hours of use then every 3
months or 500 hours, change pump oil while
crankcase is still warm. (See “Appendix A:
Lubricants” for suitable alternatives.)
1. Remove the oil fill and drain plugs. Collect
the oil in a suitable container.
2. Replace the oil drain plug and refill
compressor crankcase with clean oil.
3. Replace the oil fill plug.
4. Start the unit and run for several minutes.
Shut down the air compressor and
recheck the oil level. If necessary, add
more oil. (Figure 3)
Fill line
Figure 3
Drain Receiver Tank and Inspect Tank
Drain water from the receiver tank daily. Water left
in the tank can cause the tank to weaken and
corrode, increasing the risk of tank rupture. Badly
rested receiver tanks must be replaced.
Recommends a tank inspection after every 2
years of service. See “Inspection of Unfired
Pressure Vessels,” volumes 2-9, August 2001, Bill
McStraw (available on-line at NTIS).”
To align and adjust drive belt tension:
1. Remove the belt guard cover.
2. Loosen the four fasteners holding the
engine to the compressor.
3. Shift the engine in the proper direction
The belt must be properly aligned when
adjustment is made.
4. To align belt, lay a straight edge against
the face of the flywheel touching the rim at
two places. (Figure 4)
Figure 4
5. Adjust flywheel or engine pulley so that
the belt runs parallel to the straight edge.
6. If necessary, use a gear puller to move the
pulley on the motor shaft. Tighten set screw
after pulley is positioned.
7. Check for proper belt tension. (Figure 5)
Figure 5
8. Tighten the four fasteners holding the
engine to the top plate while tension and
alignment is maintained.
Improper pulley/sheave alignment and belt tension
can result in motor overload, excessive vibration,
and premature belt and/or bearing failure. To
prevent this from happening, check the
pulley/sheave alignmentand belt tension on a
regular basis.
CAUTION: Pulley/sheave hazard
Never open oil port while engine is running. Hot
oil can spray over face and body.
Belts will stretch from normal use. When properly
ajdusted, a 5 lb. force applied to the belt between
the engine pulley and the pump will deflect the
about 1/2”.
Table of contents
Other TMG Air Compressor manuals
Popular Air Compressor manuals by other brands

Parkside
Parkside PKO 270 A3 Operation and safety notes

Iwata
Iwata NINJA JET IS35 DE Operating instructions manual

L&W
L&W SC-180 ES operating instructions

Polair Systems
Polair Systems FC2002 owner's manual

Boss Industries
Boss Industries 36 BHP PISTON Service and maintenance user manual

ALDI
ALDI Ferrex CQB180D-1 Original user manual