TNG Swiss Watches User manual

USER MANUAL TNG SWISS WATCHES
INTERNATIONAL GUARANTEE


INTRODUCTION
1
Congratulations with the purchase of this watch! The designers of these
watches are very competitive sailors who have successful sailing resu-
mes, acquired in national, international and Olympic regattas. We are
therefore confident that this sophisticated watch, made in Switzerland,
will be of excellent service to you for years to come and will be eminently
suited to support you in achieving superior results.
www.tngwatches.comwww.tngwatches.com

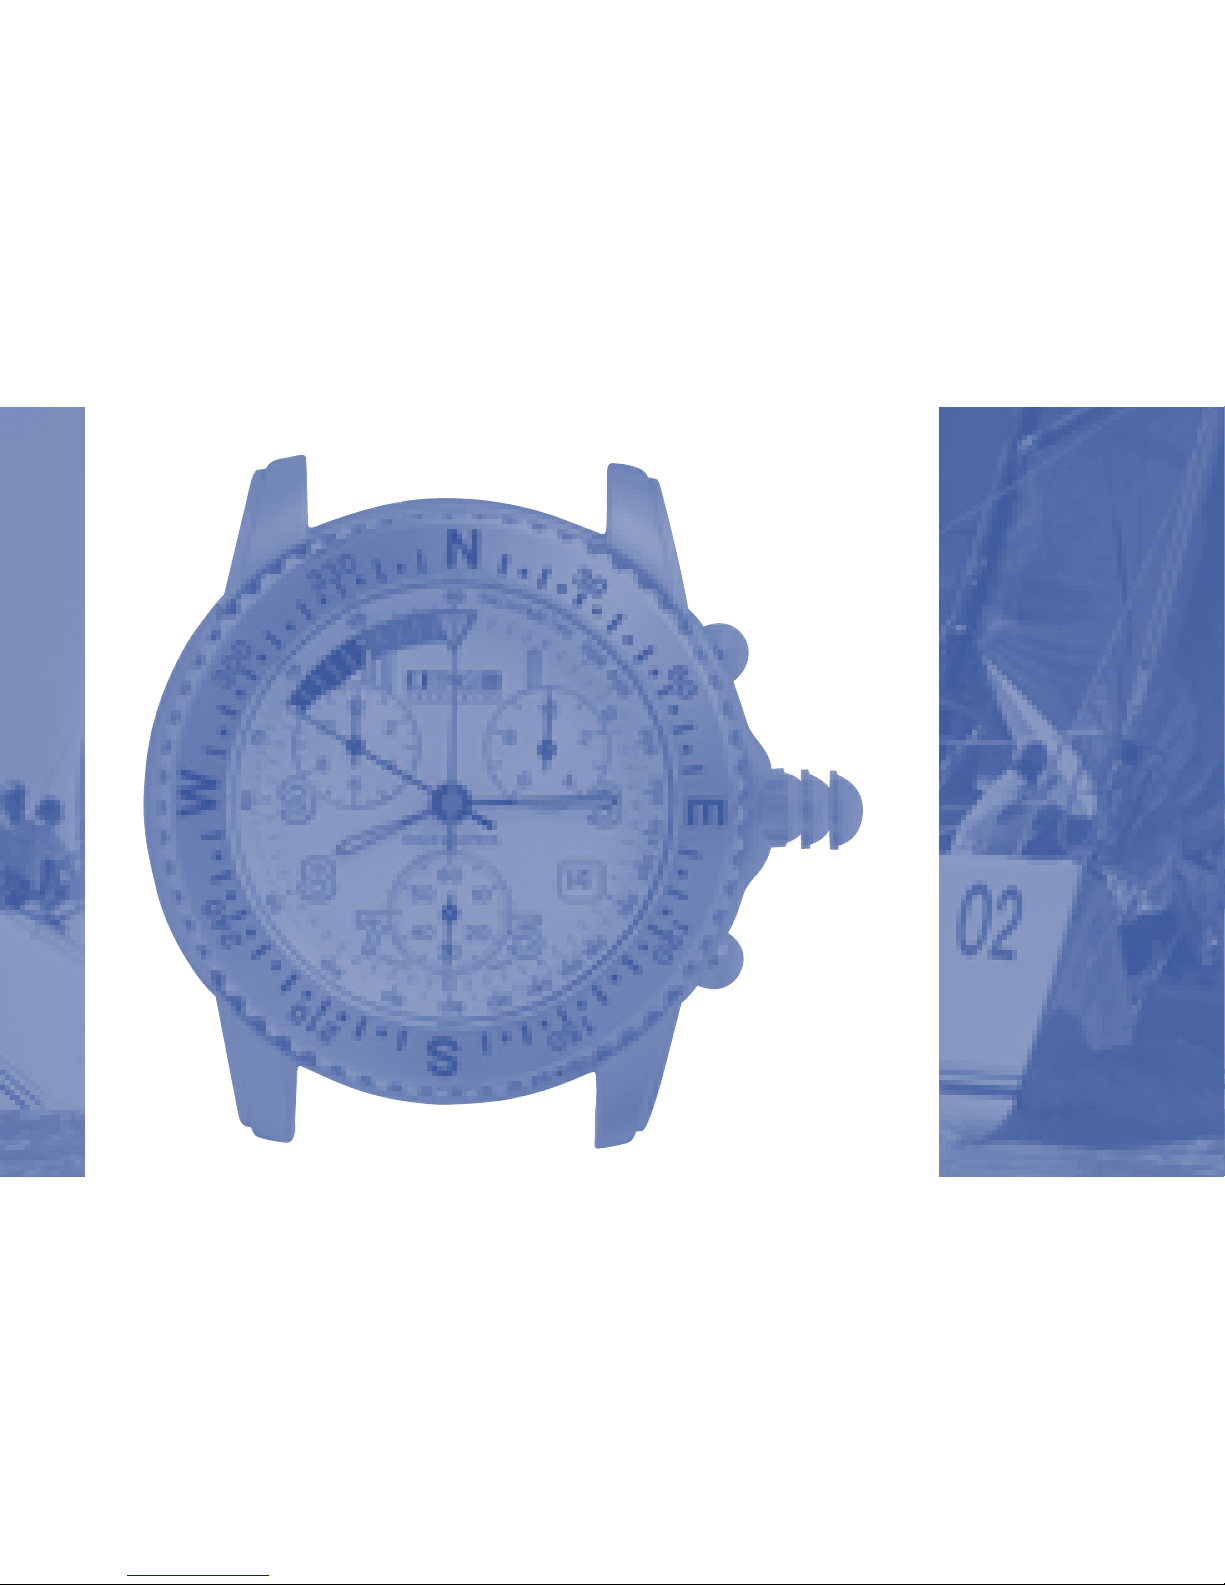
GENERAL CHARACTERISTICS
3
Nautical or dive bezelNautical or dive bezel
All TNG watches are fitted with a nautical or dive bezel. The nautical
bezel helps regatta sailors to find the favourite position on the starting
line, considering the wind angle. See how it works in the tactical planner
paragraph.
The uni-rotating dive bezel helps you in planning your dive and decom-
pression times. Before going down set the bezel with its 0 marking at the
position of the minutes hand. In this way you can always tell how long you
have been under water and when it is ready to get back to the surface.
GENERAL CHARACTERISTICS
4
Tactical plannerTactical planner
Some TNG models (Sailmaster, GMT, Oceanracer) are equipped with a
tactical planner. This planner supports the regatta sailor in making his or
her tactical decision. It can help in two ways:
Starting
To find the favourite starting position on the starting line, use the compass
bezel as follow:
• check the wind direction on your compass
• set the compass bezel with the wind direction course at 12H
• sail from the starting ship to the pin-end mark of the starting line and
read this course on your compass.
• Check this course on the compass bezel of your watch. If this course
is positioned between 9H and 12H, starting at pin-end is favourite. If

GENERAL CHARACTERISTICS
5
this course is positioned between 6H and 9H, starting at the start-ship
end of the line is favourite. (on the Sailmaster, GMT and Oceanracer, a
starting line is visible on the watch. A ‘+’ and ‘-‘ indicate a favourite or
un-favourite pin-end starting position.)
Tactical planner
Once the wind direction is set on the watch’ compass bezel, it will show
you the tacking, reaching and running angles and the reaching angle to
the spreader mark.
This information will allow you to see, before the start:
• if a spinnaker can be set on the reach to the spreader mark
• in an offshore race, what courses in the race allow the use of a spin-
naker and on which side of the boat it needs to be prepared.

GENERAL CHARACTERISTICS
6
During the race, the tactical planner can be used to see:
• wind direction shifts
• tacking angles, to see what course will be sailed when tacked.
• reaching angles, to see what course will be sailed when gybed.
Manual windingManual winding
All mechanical models can also be wound by hand. Pull the crown to
position 1 and rotate the crown clockwise.
MaintenanceMaintenance
Tack & Gybe has designed their watches to withstand pressures equiva-
lent to a depth of 100 meters / 330 feet (Deco-Dive 200 meters / 660 feet)
under water, providing that the crown is correctly screw-locked in place!
GENERAL CHARACTERISTICS
7
Important note: the chronograph push pieces must not be activated while Important note: the chronograph push pieces must not be activated while
the timepiece is under water.the timepiece is under water.
Remember always to rinse your watch and its bracelet in fresh water
after exposure to seawater, to prevent ageing prematurely.
Any repair or other operation carried out on your Tack & Gybe wristwatch
must be effected by an official Tack & Gybe service center or an authori-
zed Tack & Gybe dealer. Should any repair be needed while the Warranty
is in force, you must present the Tack & Gybe International Warranty Card
duly dated and signed by the vendor at the time of purchase.
NL
Batterij niet weggooien,
maar inleveren als KCA

Push Piece A
Push Piece B
crown
position
1 2 3
BALTIC CUP, BALTIC CUP LADY AND
RACEMASTER LADY MODELS
9
ADJUSTING THE DATE-TIME SETTINGADJUSTING THE DATE-TIME SETTING
1 Loosen the watertight, screw-locked crown by unscrewing it counter
clockwise.
2 Pull the crown out to position 2 and rotate the crown anti-clockwise to
set the date.
3 Pull the crown out to position 3 and set the hour and minute hands to
the correct time.
4 Push the crown to position 1 and apply a slight, regular pressure on
the crown as you rotate it rightward, i.e. clockwise, screwing it tight
until you feel resistance.

BALTIC CUP, BALTIC CUP LADY AND
RACEMASTER LADY MODELS
10
REPOSITIONING THE CHRONOGRAPH HANDS AND POINTERSREPOSITIONING THE CHRONOGRAPH HANDS AND POINTERS
Should a chronograph hand or pointer fail to return to zero normally,
after a battery change for example or because of inappropriate handling,
proceed as follows:
1 Minute totalizer: pull the crown out to position 3 (Lady models 2) and
press repeatedly on push piece A (Lady models B) until the pointer
returns to its initial position.
2 Seconds totalizer: pull the crown out to position 2 (Lady models 3)
and press repeatedly on push piece B (Lady models A) until the hand
returns to its initial position.
3 Tenth-of-a-second totalizer: pull the crown out to position 2 (Lady
models 3) and press repeatedly on push piece A (Lady models B) until
the hand returns to its initial position.

BALTIC CUP, BALTIC CUP LADY AND
RACEMASTER LADY MODELS
4 Push the crown to position 1 and apply a slight, regular pressure on
the crown as you rotate it rightward, i.e. clockwise, screwing it tight
until you feel resistance.
USING THE COUNTDOWN AND CHRONOGRAPHUSING THE COUNTDOWN AND CHRONOGRAPH
1 Press push piece A to start the chronograph.
2 Split time can be measured by pushing push piece B. The countdown
will continue, but elapsed time can be noticed in minutes, seconds
and 1/10th of a second. To return to countdown, press push piece B.
3 To stop the chronograph, press push piece A again. Elapsed time is
measured in minutes (30 minutes sub-dial), seconds (large orange/
black hand) and 1/10ths of a second (1/10th sub-dial).
4 To return the chronograph to zero, press push piece B.
11
Push Piece A
Push Piece B
crown
position
1 2 3
RACEMASTER MODELS
ADJUSTING THE DATE-TIME SETTINGADJUSTING THE DATE-TIME SETTING
1 Loosen the watertight, screw-locked crown by unscrewing it counter
clockwise.
2 Pull the crown out to position 2 and rotate the crown clockwise to set
the date by rotating the hour hand.
3 Pull the crown out to position 3 and set the hour and minute hands to
the correct time.
4 Push the crown to position 1 and apply a slight, regular pressure on
the crown as you rotate it rightward, i.e. clockwise, screwing it tight
until you feel resistance.
13

REPOSITIONING THE CHRONOGRAPH HANDS AND POINTERSREPOSITIONING THE CHRONOGRAPH HANDS AND POINTERS
Should a chronograph hand or pointer fail to return to zero normally,
after a battery change for example or because of inappropriate handling,
proceed as follows:
1 Hour totalizer: pull the crown out to position 2 and press repeatedly on
push piece A until the pointer returns to zero.
2 Minute totalizer: pull the crown out to position 2 and press repeatedly
on push piece B until the pointer returns to its initial position.
3 Seconds totalizer: pull the crown out to position 3 and press repea-
tedly on push piece A until the hand returns to its initial position.
4 Tenth-of-a-second totalizer: pull the crown out to position 3 and press
repeatedly on push piece B until the hand returns to its initial position.
RACEMASTER MODELS
14

5 Push the crown to position 1 and apply a slight, regular pressure on
the crown as you rotate it rightward, i.e. clockwise, screwing it tight
until you feel resistance.
USING THE COUNTDOWN AND CHRONOGRAPHUSING THE COUNTDOWN AND CHRONOGRAPH
1 Press push piece A to start the chronograph.
2 Split time can be measured by pushing push piece B. The countdown
will continue, but elapsed time can be noticed in minutes, seconds
and 1/10th of a second. To return to countdown, press push piece B.
3 To stop the chronograph, press push piece A again. Elapsed time is
measured in minutes (30 minutes sub-dial), seconds (large orange/
black hand) and 1/10ths of a second (1/10th sub-dial).
4 To return the chronograph to zero, press push piece B.
RACEMASTER MODELS
15

crown
position
1 2 3

ADJUSTING THE DATE-TIME SETTINGADJUSTING THE DATE-TIME SETTING
1 Loosen the watertight, screw-locked crown by unscrewing it counter
clockwise.
2 Pull the crown out to position 2 and rotate it clockwise to adjust the
date.
3 Pull the crown out to position 2 and rotate it anti clockwise to adjust
the second time zone (only Deco-Dive).
4 Pull the crown out to position 3 and rotate it clockwise to set the hour
and minute hands to the correct time.
5 Push the crown to position 1 and apply a slight, regular pressure on
the crown as you rotate it rightward, i.e. clockwise, screwing it tight
until you feel resistance.
17
MATCHRACER, DECO-PRO
AND DECO-DIVE MODELS

Push Piece A
Push Piece B
crown
position
1 2 3
Table of contents
Popular Watch manuals by other brands


Bell & Ross
Bell & Ross BR01-92 Technical notes

Tsovet
Tsovet SMT DW42 GMT HYBRID KINEMATIC instruction manual

KIENZLE
KIENZLE HYPERBAR EXTREME instruction manual

infantry
infantry FS-016 operation instruction

Rip curl
Rip curl FUNCTION. 3 HAND, SECONDS SUBDIAL manual

La Crosse Technology
La Crosse Technology 513-1311OTN instruction manual