Casio WTP-150 User manual

Basic Operations
This section provides an overview of the watch
and its operations.
Note
●In this manual, the expression “time
signal” refers to a time calibration
signal. Time signals include time
information.
●Note that the watch illustrations in
this manual are intended for
reference only. The actual watch
may appear somewhat different
than depicted in the illustrations.
General Guide
30
③① ②
⑦
④
⑤⑧
⑨
⑥
AHour hand
BSecond hand
CMinute hand
DMode hand
ESmall hour hand
FSmall minute hand
GSmall 24-hour hand
HDay indicator
ICrown
MA1605-EB © 2015 CASIO COMPUTER CO., LTD.
Watch Face Items
③
①
②⑤
④
⑥
Aam/pm
BTime signal reception result
CDay of the week
DTime signal reception in progress
EStopwatch Mode
FSummer time setting
Navigating Between Modes
This watch has a Timekeeping Mode and a
Stopwatch Mode.
You tell which mode the watch is currently in
by checking the position of the mode hand.
●Timekeeping Mode (normal timekeeping):
Current day of the week
●Stopwatch Mode: ST (STW)
30
30
C
Stopwatch Mode
Timekeeping Mode
Use the (C) button to navigate between
modes.
●Hold down (C) for at least two seconds to
return to the Timekeeping Mode.
Mode Overview
Timekeeping Mode
The main hour, minute, and second hands
indicate the current time.
The small hour and minute hands indicate the
current World Time.
30
② ③
⑤
①
④
Current location time/
World Time swapping
(Hold down about 3
seconds.)
ACurrent location day of the week
BWorld Time hour (24-hour time)
CCurrent location day
DWorld Time minute
EWorld Time hour
Stopwatch Mode
The main hour and minute hands indicate the
current time.
The second hand, and the small hour and
minute hands indicate the elapsed stopwatch
time.
30
② ③
①
④
Start/
Stop
Reset
AStopwatch seconds
BStopwatch hours (24-hour time)*
CStopwatch hours
DStopwatch minutes
* The A-side of the dial indicates hours 0
through 12, while the P-side indicates hours
12 through 24.
Operation Guide 5453
1

Using the Crown
Depending on the operation you want to
perform, pull out the crown to the first or
second click and then rotate it.
Normal position
Second click
First click
Crown
Important!
●To prevent loss of water resistance
and/or damage due to impact, be
sure to push the crown in to its
normal position after you are
finished using it.
●When pushing the crown back in,
take care not to apply too much
force.
●Fast Forward/Fast Reverse
After pulling out the crown to the first or second
click, rotating it quickly in succession in either
direction will start a fast forward or fast reverse
operation. While a fast forward operation is in
progress, quickly rotating the crown in
succession again will increase the speed even
further.
●The fast reverse operation speed is fixed
and cannot be changed.
●Stopping Fast Forward/Fast Reverse
Rotate the crown in the direction opposite that
of the ongoing operation or press any button.
Note
●If you do not perform any operation
for about two minutes after pulling
out the crown, crown operations will
automatically become disabled. If
that happens, push the crown back
in and then pull it out again.
Changing Hand and the Day
Indicator Settings
30
Day indicator
Mode
hand
●Mode Hand and Day Indicator
Movement
Changing the day setting of the watch will also
cause the mode hand to move.
●Day
●It can take anywhere from about 90 seconds
to three minutes for the day indicator to
change after timekeeping reaches
midnight. The mode hand moves as the day
indicator changes.
●The day may not be indicated correctly while
the watch’s crown is pulled out.
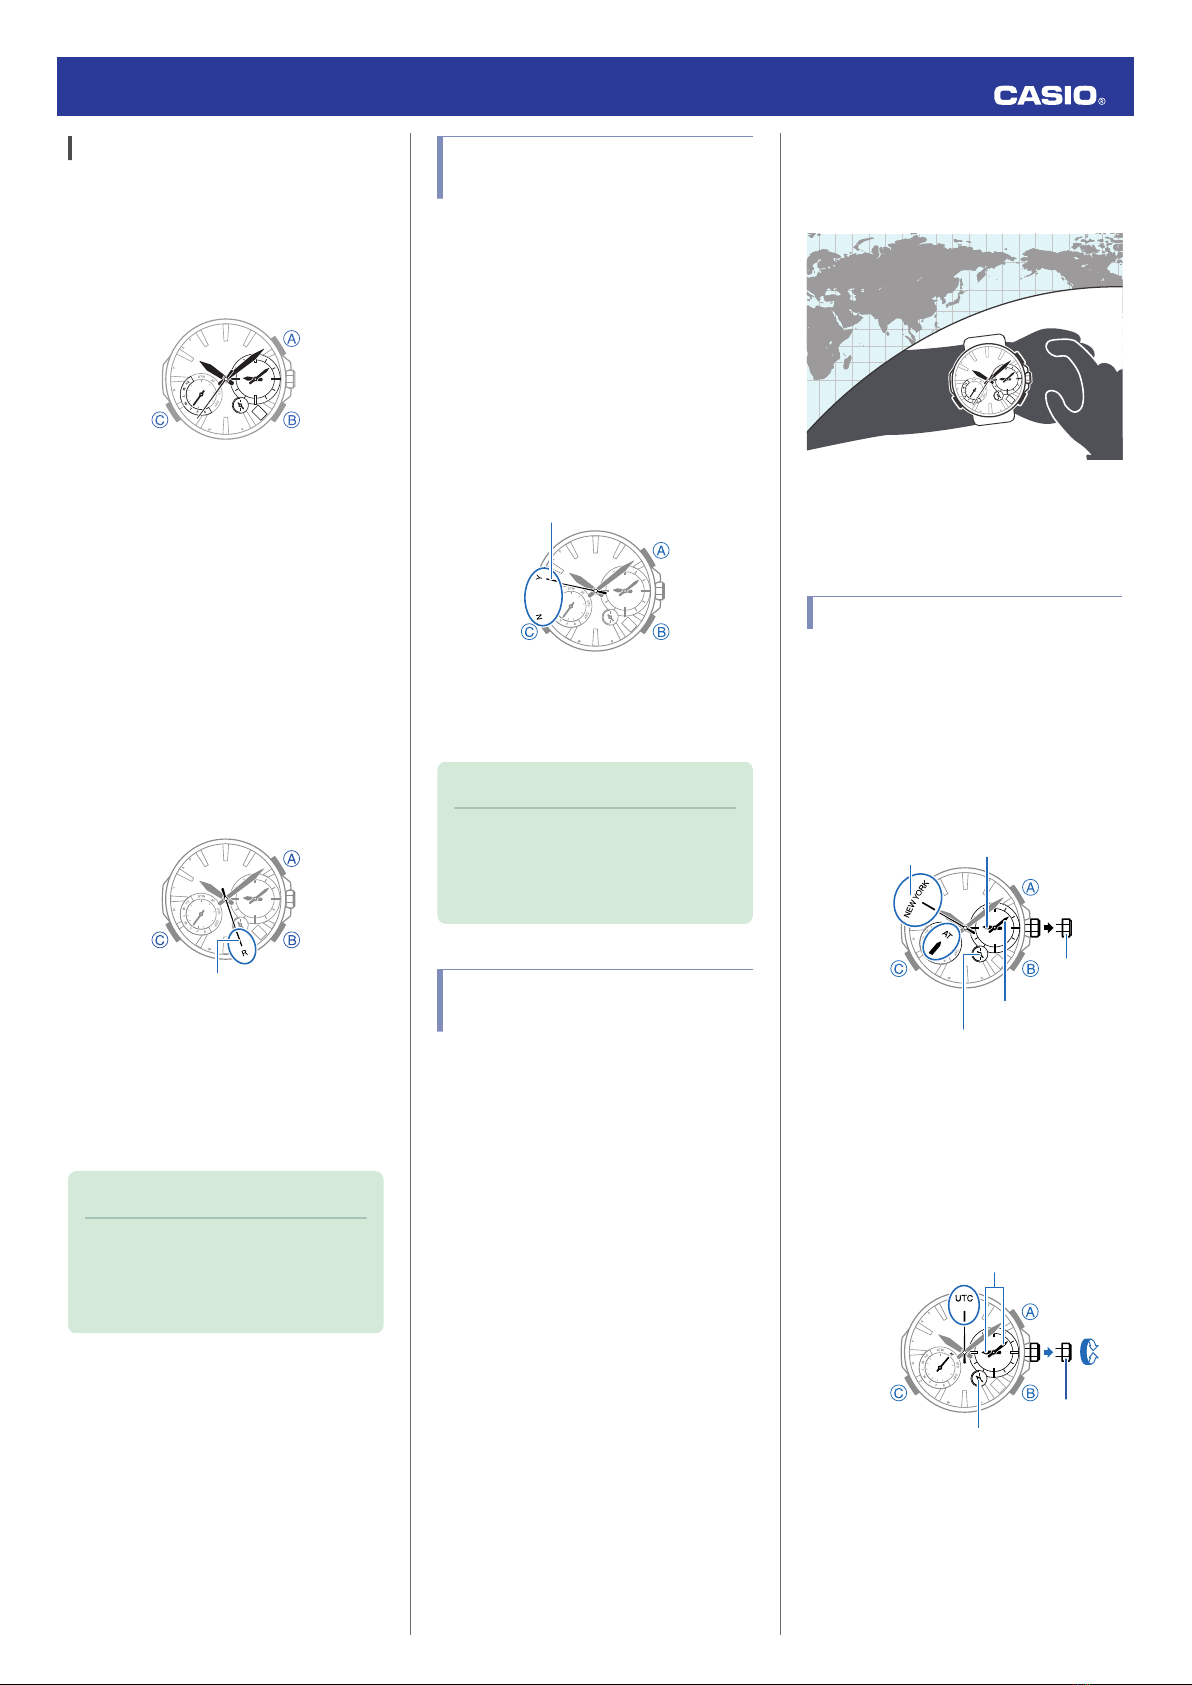
Solar Charging
What is solar charging?
This watch runs on power supplied from a
rechargeable (secondary) battery that is
charged by a solar panel. The solar panel is
integrated into the face of the watch, and
power is generated whenever the face is
exposed to light.
Charging the Watch
When you are not wearing the watch, put it in
a location where it is exposed to bright light.
While you are wearing the watch, make sure
that its face (solar panel) is not blocked from
the light by the sleeve of your clothing. Power
generation efficiency is reduced even when
the face of the watch is blocked only partially.
NOYES
Important!
●Depending on light intensity and
local conditions, the watch may
become hot to the touch when
exposed to light for charging. Take
care to avoid burn injury after
charging. Also, avoid charging the
watch under high-temperature
conditions like the ones described
below.
ーOn the dashboard of a vehicle
parked in the sun
ーNear an incandescent light bulb or
other source of heat
ーUnder direct sunlight or in other
hot areas for long periods
Charging Time Guidelines
The table below shows guidelines for
approximate charging times.
Required Charging Time for 1-day Use
Light Intensity Approximate Charging Time
High
p
Low
A8 minutes
B30 minutes
C48 minutes
D8 hours
Time Required to Achieve Next Charge
Level
Light Intensity
Approximate Charging Time
Charge Level
1
Charge Level
2
High
p
Low
A2 hours 24 hours
B6 hours 89 hours
C9 hours 144 hours
D99 hours -
Light Intensity
ASunny day, outdoors (50,000 lux)
BSunny day, near a window (10,000 lux)
COvercast day, near a window (5,000 lux)
DIndoor fluorescent lighting (500 lux)
Charge Level 1:
Time from dead battery until hand movement
starts
Charge Level 2:
Time from hand movement starts until a full
charge
Note
●Actual charging time depends on the
local charging environment.
Operation Guide 5453
2

Remaining Charge and Dead
Battery
The charge level is indicated by watch hand
movement. Functions become disabled as
battery power goes low.
Important!
●Should battery go low or go dead,
expose the face (solar panel) to light
as soon as possible.
Note
●Exposing the watch face to light after
the battery goes dead will cause the
second hand to revolve
counterclockwise until it stops at
second 57. This indicates charging
has started.
●Low Battery Power
The second hand jumps at two-second
intervals.
Second hand
●Dead Battery
All hands are stopped.
1
Power Saving Function
Leaving the watch in a dark location for about
one hour between the hours of 10 p.m. and 6
a.m. will cause the second hand to stop, and
the watch will enter Level 1 power saving. If
the watch is left in this condition for six or
seven days, all hands will stop and the watch
will enter Level 2 power saving.
Level 1:
Second hand stops to save power.
Level 2:
All hand movement is stopped to save power
(day continues operating).
Note
●Note that the watch also may enter
the power saving state if its face is
blocked from light by your sleeve
while you are wearing it.
●The watch will enter power saving
from the Timekeeping Mode only.
●Recovering from Power Saving
Operation
Press any button or place the watch in a well-
lit area to recover from power saving.
Auto Time Adjustment
The watch’s time and day settings can be
configured in accordance with a received time
signal.
Important!
●To receive a time signal, one of the
cities shown under “Time Signal
Cities” needs to be set as your Home
City.
●Whenever you are in an area where
a time signal cannot be received or
if your Home City does not support
time signal reception, you will need
to configure time and date settings
manually.
Receiving a Time Signal
Time Signal Cities
City code
City Name Offset Second Hand
Position
TOKYO (TYO)
Tokyo +9 28 seconds
Receivable Time Signal: Japan Time
Calibration Signal (JJY)
City code
City Name Offset Second Hand
Position
HONG KONG (HKG)
Hong Kong +8 26 seconds
Receivable Time Signal: China Time
Calibration Signal (BPC)
City code
City Name Offset Second Hand
Position
NEW YORK (NYC)
New York -5 50 seconds
CHICAGO (CHI)
Chicago -6 48 seconds
DENVER (DEN)
Denver -7 46 seconds
LOS ANGELES (LAX)
Los Angeles -8 44 seconds
ANCHORAGE (ANC)
Anchorage -9 42 seconds
HONOLULU (HNL)
Honolulu -10 40 seconds
Receivable Time Signal: U.S. Time
Calibration Signal (WWVB)
City code
City Name Offset Second Hand
Position
LONDON (LON)
London 0 2 seconds
PARIS (PAR)
Paris +1 4 seconds
ATHENS (ATH)
Athens +2 6 seconds
Receivable Time Signal: U.K. (MSF) and
German (DCF77) Time Calibration Signals
Time Signal Reception Ranges
Time signal reception is supported in the
areas shown below.
●Japan Time Calibration Signal (JJY)
500 kilometers
500 kilometers
1,000 kilometers
1,000 kilometers To k y o
Fukushima
Fukuoka/
Saga
●
Chinese Time Calibration Signal (BPC)
500 kilometers
1,500 kilometers
Chengdu
Shangqiu
Hong Kong
Shanghai
Beijing
Changchun
Operation Guide 5453
3

●U.S. Time Calibration Signal (WWVB)
600 miles
(1,000 kilometers)
2,000 miles (3,000 kilometers)
Los Angeles
Denver
Fort Collins
Chicago
New York
●U.K. (MSF) and German (DCF77) Time
Calibration Signal
The Anthorn signal is receivable within this area.
500 kilometers
1,500 kilometers
Mainflingen
Anthorn
Note
●Even if you are within the normal
reception range of a time signal,
reception may be made impossible
by the following factors: geographic
contours, weather, the season, the
time of day, wireless noise.
Signals become weaker outside of
the smaller circles indicated by
dashed lines in the maps above, so
the above factors have greater effect
on signal reception.
Though the Honolulu and
Anchorage areas (time zones) are
outside of the time signal reception
range of the watch, reception may be
possible when reception conditions
are good.
●With the AT (AUTO) summer time
setting, the watch may not indicate
correct time if you are using it in a
country or region that is different
from the country or region where the
time calibration signal transmitter is
located. This is due to differences in
adoption of summer time rules,
differences in summer time periods,
etc. If this happens, change the city
and/or summer time setting so the
correct time is displayed.
l Setting a Home Time City
Setting a Home Time City
Use the procedure in this section to select a
city to use as your Home City. If you are in an
area that observes summer time, you can also
enable or disable summer time.
Important!
●World Time times will not be correct
if you select the wrong city as your
Home City.
Note
●The initial factory default summer
time setting for all cities (time zones)
is “AT (AUTO)”.
●Your watch has 29 built-in cities that
you can select as a Home Time City.
If you are using the watch in a
location that is not among the built-
in cities, use the built-in city that is in
the same time zone as your location.
For available city settings, see “City
(Time Zone) List”.
●You can check the current Home
City setting by pressing (A) in the
Timekeeping Mode. This will cause
the second hand to move to the
currently selected Home City time
zone.
l Navigating Between Modes
1. Pull out the crown to the second click.
The second hand will move to the
currently selected city code.
30
City code
Crown
2. Rotate the crown to move the second
hand to the city you want to set.
3. To change the summer time setting, press
(A).
●While the mode hand is pointed at “AT
(AUTO)”, “STD”, or “DST”, you can hold
down (A) for about one second to cycle
the summer time setting in the
sequence below.
“AT (AUTO)”n“STD”n“DST”
30
●“AT (AUTO)”
The watch switches between standard
time and summer time automatically.
l Summer Time Table
●“STD”
The watch always indicates standard
time.
●“DST”
The watch always indicates summer
time.
4. Push the crown back in to its normal
position.
Operation Guide 5453
4

Summer Time
Summer time, which is also known as Daylight
Saving Time (DST), advances the time setting
one hour, 30 minutes, or some other amount
of time from standard time (STD) during the
summer months. Whether or not and how
summer time is used depends on your country
or local area. Summer time is not used in some
countries and local areas.
Appropriate Signal Reception
Location
A time calibration signal can be received while
the watch is near a window.
●Keep metal objects away from the watch.
●Do not move the watch.
●Do not perform any operation on the watch.
6 o’clock position
Note
●You may experience time signal
reception problems in the areas
described below.
ーAmong or near buildings
ーWhile riding in a vehicle
ーNear household appliances,
office machines, mobile phones,
etc.
ーOn a construction site, in an
airport, or any other location
where radio wave interference
occurs
ーNear high-voltage lines
ーIn mountainous areas or behind a
mountain
Auto Time Signal Receive
An automatic time signal receive operation is
performed and the time and day settings are
adjusted between midnight and 5:00 a.m.
Once a signal receive operation is successful,
no more auto receive operations are
performed that day.
The receive operation is performed only while
the watch is in the Timekeeping Mode.
lNavigating Between Modes
30
Place the watch near a window or some other
location appropriate for signal reception.
●When the receive operation is successful,
the time and day settings will be adjusted
automatically.
Note
●Reception takes anywhere from
about two minutes to about 10
minutes. It can take as long as 20
minutes.
●Using Auto Receive
Before going to bed at night, put the watch into
the Timekeeping Mode (whose settings
should be configured correctly), and leave it
near a window.
Enabling/Disabling Auto Receive
Use the procedure below to enable or disable
Auto Receive.
Getting ready
Enter the Timekeeping Mode.
lNavigating Between Modes
30
1. Press (B).
This causes the last receive operation
result to be indicated by the second hand.
2. Within 10 seconds after the last receive
result is indicated, pull out the crown to the
first click.
The second hand will move to the current
auto receive setting.
“Y (YES)”: Auto receive on
“N (NO)”: Auto receive off
30
Second hand
3. Rotate the crown to select either “Y
(YES)” or “N (NO)”.
4. Push the crown back in to complete the
setting operation.
Operation Guide 5453
5
Table of contents
Other Casio Watch manuals
Popular Watch manuals by other brands

Piaget
Piaget 560P Instructions for use

Armitron
Armitron pro sport MD0346 instruction manual

West Marine
West Marine BlackTip 13411293 Instruction Booklet and Care Guide

Jaeger-leCoultre
Jaeger-leCoultre HYBRIS MECHANICA CALIBRE 184 manual

FOREVER
FOREVER iGO PRO JW-200 user manual

Relic
Relic OS10 quick start guide