TNICER T4 User manual

HELMET BLUETOOTH HEADSET
TNICER T4
Bluetooth

Product Introduction
Product Introduction Diagram
Thank you for choosing the TNICER T4 Mesh & Bluetooth helmet
headset, which is designed for motorcycle riders to meet the needs of
people in the process of riding, such as talking, answering phone calls,
listening to music, listening to FM radio and receiving GPS navigation
voice prompts.Provide you with a clear, safe and comfortable experi-
ence during the ride.
TNICER T4 has the latest version 5.2 Bluetooth and Mesh, stable
system operation, dual intelligent noise cancellation, low power
consumption, with 40MM high quality speakers and intelligent pickup
microphone, support 8 devices connected to achieve multiple people
communication. The T4 is a high-tech Bluetoot and Mesh headset that
combines light weight, energy saving and humanized design.
Signal amplifier
Intercom
button
Mesh indicator Audio port
Charging port
Multi-function button
Bluetooth indicator
Mesh button
Volume button

Function Description
•Qualcomm 5.2 Bluetooth chip; Mesh 1.0
•Intelligent DSP audio processing, the 12th generation of CVC
noise reduction processing, 16K voice bandwidth transmission rate
•Support 24 riders talking at the same time, 1000m talking distance
•High pairing speed
•Mesh+Bluetooth connection
•Unlimited number of connections
•Talking with no delay
•Automatic restoration of connection
•IP67 waterproof
•CVC noise reduction
•Voice assistant
•Automatic answer, support last dialed number redial
•Intelligent microphone
•Support voice communication at 120 km/h speed
•40mm tuning speaker, wonderful sound experience
•IP67 level waterproof
•Support pairing with other brands headsets

Button Functions and Operations
Power on/off
Answering Function
Power on: Press and hold the [multi-function
button + intercom button] for 3 seconds, the
power-on prompt will sound, the blue and
green light will be on.
Answer incoming calls: When there is an
incoming call, short press [multi-function
button] to answer the call.
Auto-answer: In the device standby state,
long press [intercom button] and push the
[volume button] in the direction of the minus
sign for 3 seconds to turn on auto-answer.
Cancel auto-answer: If you don't need the
auto-answer function, you can long press
[intercom button]and push the [volume
button] in the direction of the minus sign
for 3 seconds to cancel the auto answer.
Reject: Press and hold [multi-function button] for 2 seconds to reject the call
when you hear an incoming call ringing.
Last redial: In standby mode, quickly double-click [multi-function button] to
automatically dial the last number dialed.
End call: During a call, short press [multi-function button] to end the call.
Power on: Press and hold the [multi-function
button + intercom button] for 3 seconds, the
power off prompt sounds, and the red light is on.
Reset: In the device power-on state, long press the [multi-function button]
and push the [volume button] in the direction of the plus sign for 3
seconds,the red and blue lights are on at the same time means it has been
reset.

Music Control
Ambient sound mode
FM Radio
Attention
Volume Adjustment
①Play/Pause: Intercom Bluetooth connection state, short press [multi-func-
tion button] to play music, short press [multi-function button] again to
pause the music.
②Next song: Long press the [volume down button] for 2 seconds to select
the next song.
③Previous song: Long press the [volume up button] for 2 seconds to select
the previous song.
① Turn on the radio: in standby mode, short press the [multi-functionbut-
ton+volume down button] to start the FM radio.
②After turning on the FM radio, every time you long press the volume up or
volume down button for 3 seconds, you can tune and select channels (Note:
short press the volume up/down key to enter the volume adjustment mode, you
can increase the volume or decrease the volume at this time).
③ Turn off the radio: short press the [multi-function button+volume down
button], FM off.
①Ambient sound on: In standby mode,
short press [Mode button] 2 times to turn
on the ambient sound.
②Ambient sound off: In standby mode,
short press [Mode button] 2 times to turn off
the ambient sound.
Short press the [volume up button] to increase the volume, short press the
[volume down button] to decrease the volume.
1.When the indoor signal is weak, in order to make the FM radio work best, you
can try to turn on the FM radio near the window or outdoors.
2.In radio mode, when there is an incoming call, the headset will automatically
disconnect the radio and answer the phone. Or enter the backlink intercom voice
and automatically revert to the radio function when the call ends.
Pairing Operation
Bluetooth Name
Tnicer-T4
Bluetooth pairing with cell phone
Attention:
1. Turn on Bluetooth: In the power-on state, press and hold the
[multi-function button] for 3 seconds, until the red and blue lights flash
alternately.At this time has entered the Bluetooth waiting to connect state.
If you have connected to other devices, the blue light will flash
slowly.Please reset and turn on the device again.
2. Search cell phone Bluetooth: In the state of red and blue lights
alternately flashing, open the cell phone Bluetooth settings, search for
nearby Bluetooth devices, select "Tnicer-T4" for connection pairing, after
successful connection there will be a voice prompt "device is connected",
then the Bluetooth pairing success.
1. If you have connected to other phones, the blue light will flash slowly, please
reset and turn on the device again.
2. Search for cell phone Bluetooth, select "Tnicer-T4" connection pairing, click
to connect.When the pairing is successful, it will be accompanied by the voice
prompt "device is connected", and the Bluetooth connection is successful. If
the connection fails, you can click "Forget this device" in the Bluetooth list on
your phone and search for the connection again.
Settings
Bluetooth Search
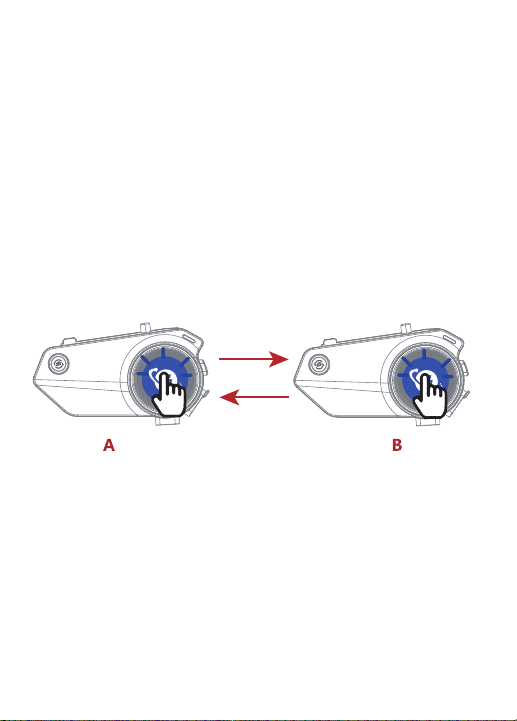
Pairing and intercom between headsets
1. Pairing and intercom between two
Bluetooth intercoms (A,B)
1) Turn on the two Bluetooth intercoms (A,B), press and hold the A,B intercom
[multi-function button] for 3 seconds.At this time, red and blue lights
alternately flashing, passive pairing mode on.
2) Short press the [intercom button] of A, red and blue lights alternately slow
flashing, into the active pairing mode.When you hear the "searching" prompt
voice, active pairing is on.
3) voice prompt "device connected", the two intercoms connected successfully,
the blue light flashes slowly.
Attention:
1. After the intercom pairing is successful, when intercom, if there is a cell
phone call, the device will automatically cut off intercom. After the call is over,
it will automatically connect back to the intercom state.
2. In the process of intercom, because of distance or environmental factors
such as disconnection, you can manually short press the [intercom button]
once, manually back to connect.
3. When the device is in standby mode, short press the [intercom button] to
talking; short press the [intercom button] to turn off the talking in the talking
state. Short press the volume up/down button to adjust the talking volume.
Active/passive pairing operation:

Multiple Intercom Pairing Procedure
Automatic pairing steps (as 6 intercoms for example)
Attention:
1) Turn on all intercoms (123456), long press all intercoms [multi-function
button] for 3 seconds to turn on the passive pairing mode, until the red and
blue lights alternately flashing.
2) Choose any one intercom and short press [multi-function button] of it , the
red and blue lights will flash alternately slowly, at this time this intercom enter
the automatic pairing mode, there will be a voice prompt "searching".
3) At this point, just wait for the other intercoms to pair automatically one by
one, and the device will voice prompt "device is connected" one by one.When
the blue light on the multi-function buttons and intercom buttons of all
intercoms flashing slowly, it means that all six intercoms have been successfully
connected.
Due to the use of different environments and external interference factors, it is
recommended that the effective distance within 1000 meters, the longer the
distance to bring more interference factors will affect the experience.

Attention:
1) In the Mesh connection successfully, each T4 can connect with other
Bluetooth intercoms at the same time.
2) In Mesh on state, when encountering a group of Mesh intercoms that have
been paired before, the device will automatically connect with it and join the
group.
3) When T4 has no Mesh connection record, the device will automatically
search for a nearby mesh network after turning on Mesh, and join the group
automatically after searching.
Creating Mesh Intercom Groups
1) All devices on, long press the [Mesh button] for 3 seconds of them, voice
prompts " Mesh on", green light flashing quickly.
3) After connection succeeded, the green light flashes slowly, and the voice
prompts "Mesh connected".
2) Select any one device, long press its [Mesh button + intercom button] for 3
seconds, voice prompts " start the Mesh network ", enter the automatic
connecting state, green light on.
1.MESH multi-person pairing
Active/passive pairing steps:

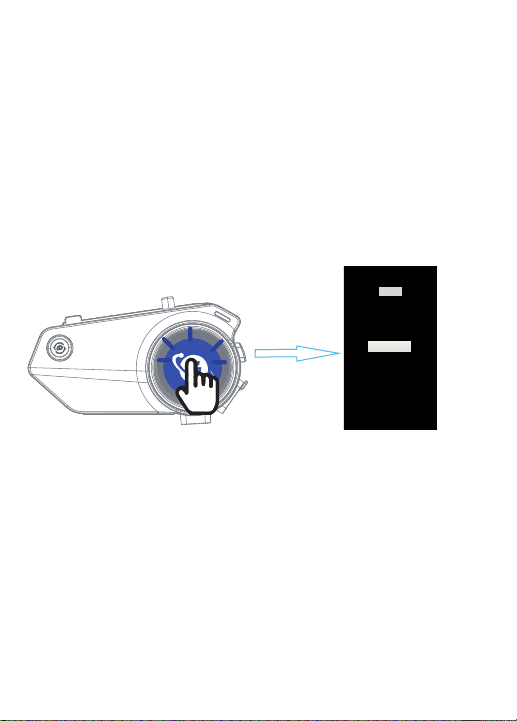
In standby state, short press [Mesh button] to enter the voice assistant
function.At this time, the blue light flashes slowly.
Voice assistant
In standby mode, short press [multi-function button] twice to redial the last
number. At this time, the blue light flashes quickly.
Last number redial
When the device is in standby mode, long press [multi-function button] and
push the [volume button] in the direction of the plus sign for 3 seconds and
push the [volume button] in the direction of the plus sign for 3 seconds,voice
prompt "reset Bluetooth pairing records".
Clear Bluetooth pairing records
In standby mode, long press [Mesh button+ multi-function button] for 3
seconds, the voice will announce the battery level of the device.When the
battery level is too low, there will also be a low battery reminder.
Battery level reminder
In the Mesh on state, long press [Mesh button] and push the [volume button]
in the direction of the plus sign for 3 seconds,voice prompt "Mesh connection
memory clear".
Clear Mesh connection records
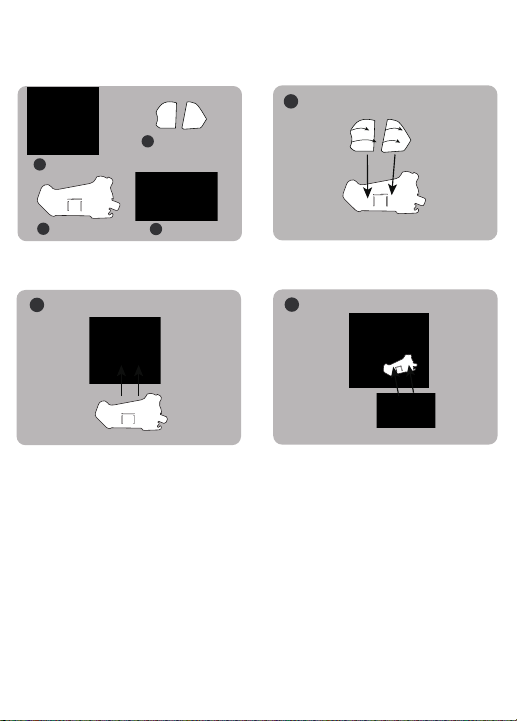
1Helmet
2Double-sided
silicone pad
3Mounting bracket 4Intercom
1Put the double-sided adhesive pad
on the mounting bracket
2Put the mounting bracket with
double-sided tape on the helmet 3Snap the intercom into the mounting
bracket, the installation is complete
Installation
Method 1: Use double-sided adhesive tape
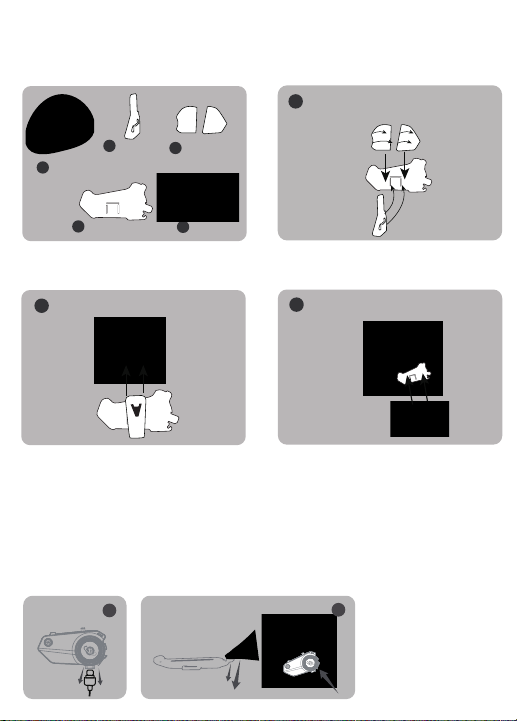
Quickly remove the Bluetooth headset from the helmet
1helmet
3Single-sided
silicone pad
2Metal clip
4Mounting bracket 5Intercom
1Adhere the single-sided adhesive to the
mounting bracket, and then snap the metal
clip into the mounting bracket
2Put the metal clip into the helmet 3Snap the intercom into the mounting
bracket, the installation is complete
Installation
Method 2: Use metal clip
First unplug the audio cable, then one hand fixed intercom, use your fingers to
press down hard on the fixed clips on the mounting bracket, you can hear the
sound of loose equipment to smoothly remove the headset from the helmet.
12
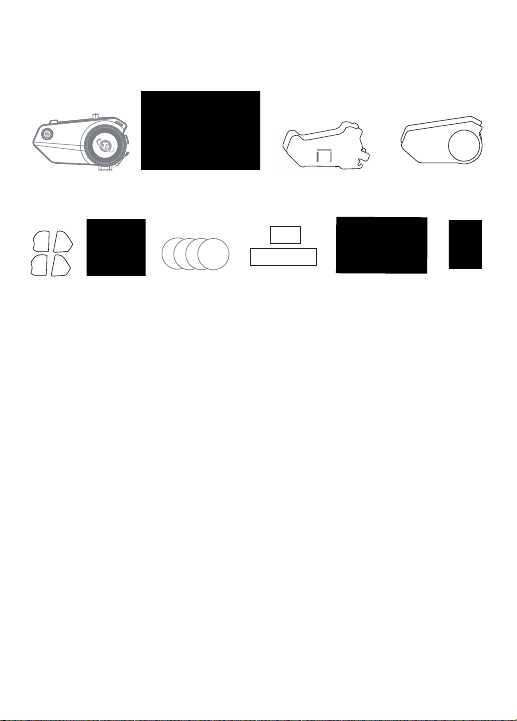
1.IntercomX1 7.Metal clipX1
2.Speaker & microphoneX2 8.Speaker velcroX2
3.Mounting bracketX2 9.Booster PadsX2
5.Single-sided silicone padX2 11.Charging cableX1
4.Trim piecesX2 10.Square velcroX2
6.Double-sided silicone padX2 12.ManualX1
Intercom Speaker & microphone Mounting bracket Trim pieces
Single-sided
silicone pad
Double-sided
silicone pad
Metal clip Speaker velcro Square velcro Manual
T4 Package List
Charging cable
Charging Instructions:
1. Before using the Bluetooth intercom, please use the attached special
charging cable tocharge the intercom. The TYPE-C connector on the charging
cable connects to the charging port of the Bluetooth intercom, and the USB
connector on the charging cable connects to the following charging port for
power supply.
A. USB port of the computer
B. Mobile power supply with DC 5V output
C. The output is DC 5V USB power adapter
2. When charging, the red LED light is stays on. When fully charged, the red
light is off and the blue light is on. It takes about 1.5 hours from low battery to
full charge.

Product Parameters
Caution
① If you do not use the device for a month or more, in order to protect the
device lithium battery, please charge the device every two months.
②Do not expose the product to open flame to avoid explosion.
③ Device can not be opened by themselves, so as not to short circuit the main
board or battery damage, affecting the normal use, be sure to pay attention.
Working distance: 8-way intercom, 1000m working distance between 2 riders
Working frequency: 2.4GHz
Bluetooth version: Bluetooth 5.2
Support Bluetooth protocol: HSP/HFP/A2DP/AVRCP
Battery type: 1000mAh rechargeable lithium polymer
Standby time: 350 hours
Talking time: 15 hours of cell phone talk/intercom
Charging time: about 2 hours
Power adapter: DC 5V 1A (optional)
Charging interface: TYPE-C interface
Operating temperature: 0℃-50℃


Table of contents
Other TNICER Headset manuals


Popular Headset manuals by other brands


autocom
autocom HS5-U1 Instruction manual and warranty

Alpha Communications
Alpha Communications TTU-WHS-D Installation & operating instructions

TwinCom
TwinCom EM2140DC-S User information

Plantronics
Plantronics Savi W740-M user guide

Niceboy
Niceboy ORYX X500 SHADOW user manual

Honeywell
Honeywell A700 Hardware reference guide


