Tobii Glasses User manual

Tobii®Technology
Tobii Glasses
Eye Tracker
User
Manual
www.tobii.com

2
User
Manual
On Safety
All Tobii Eye Trackers are CE-marked, indicating conformity with the
essential health and safety requirements set out in European Directives.
Declaration of Conformity
This equipment has been tested and found to comply with the limits for a Class B digital device, pursuant to section
15 of the FCC Rules and EMC directive 2004/108/EG. The product also conforms with directive 2006/95/EC for
low voltage and environmental directive RoHS 2002/95/EC.
These limits are designed to provide reasonable protection against harmful interference in a residential installation.
This equipment generates, uses and can radiate radio frequency energy, and if not installed and used in accordance
with the instructions, may cause harmful interference to radio communications. However, there is no guarantee that
interference will not occur in a particular installation. If this equipment does cause harmful interference to radio or
television reception, which can be determined by turning the equipment off and on, the user is encouraged to try to
correct the interference by one or more of the following measures:
• Re-orient or relocate the receiving antenna.
• Increase the separation between the equipment and receiver.
• Connect the equipment into an outlet on a circuit different from that to which the receiver is connected.
• Consult the dealer or an experienced radio/TV technician for help.
Read this manual carefully before connecting and using the eye tracker
The Tobii Glasses Eye Tracker is designed only for indoor use. Avoid any exposure to direct sunlight as this will affect
eye tracking quality.
Do not open the eye tracker
Non-compliance will result in loss of Warranty. There are no user serviceable components inside and the risk of
electric shock is high due to the presence of Dangerous High Voltages. Contact Tobii Support if your eye tracker is
not working properly.

3
Tobii Glasses Eye Tracker
This document contains information proprietary to Tobii Technology AB . The contents are confidential and any disclosure to
persons other than officers, employees, agents, or subcontractors of the owner or licensee of this document, without the prior
written consent of Tobii Technology AB, is strictly prohibited. No part of this publication may be reproduced, stored in retrieval
systems, or transmitted in any form or by any means, electronic or mechanical, including photocopying and recording, without
the prior consent of the copyright holder.
Document revision - December 2012
Tobii Technology AB reserves the right to change the content of this manual without prior notice. Changes due to
typographical errors, inaccuracies, or modifications in programs and/or equipment ma be implemented at any time. Please
check the Tobii web site www.tobii.com for updated versions of this document.
All rights reserved.
© Tobii Technology AB
Tobii Glasses Eye Tracker
Tobii®Technology
User Manual

4
User
Manual
1 Product Care . . . . . . . . . . . . . . . . . . . . . . . . . . . . . . . . . . . . . . . . . . . . . . . . . . . . . . . . . . . . . . . . . . . . . . . . . . . . . . . . . 5
2 Tobii Glasses at a Glance ......................................................................6
• Package Contents........................................................................................6
• Glasses ..................................................................................................7
• Recording Assistant ......................................................................................7
• Tobii Glasses introduction.................................................................................8
• IR Markers ...............................................................................................8
3 How to Use this User Manual ..................................................................9
4 Preparation..................................................................................10
• Glasses .................................................................................................10
• Recording Assistant .....................................................................................12
• IR Markers ..............................................................................................17
• First Time Use...........................................................................................19
• Firmware................................................................................................19
5 Recording with Tobii Glasses..................................................................22
• Checking the Status .....................................................................................22
• Sessions ................................................................................................23
• Recording...............................................................................................24
• Calibrating ..............................................................................................25
6 Pilot Study ..................................................................................29
7 Tobii Glasses Workflow .......................................................................31
• Tobii Glasses Checklist ..................................................................................31
• Importing Recordings ....................................................................................32
• Replaying Recordings ...................................................................................35
• Glasses Data Viewer.....................................................................................37
• Parallax Correction Tool..................................................................................38
• Manual Coding ..........................................................................................40
8 Tobii Glasses Smart IR Workflow ..............................................................44
• Tobii Glasses Smart IR Checklist .........................................................................44
• Area of Analysis (AOA) ..................................................................................45
• Using IR Markers........................................................................................46
• Snapshots ..............................................................................................50
• Importing Recordings ....................................................................................51
• Replaying Recordings ...................................................................................54
• Glasses Data Viewer.....................................................................................56
• Parallax Correction Tool..................................................................................57
• Manual Coding ..........................................................................................59
• Visualizations, AOI’s, and Statistics from Snapshots .......................................................62
• Snapshot IR Marker Coverage ...........................................................................64
Appendix I: Technical Specifications . . . . . . . . . . . . . . . . . . . . . . . . . . . . . . . . . . . . . . . . . . . . . . . . . . . . . . . . . . . . . .66
Appendix II: Parallax Explained...................................................................69
Table of Contents

5
Tobii Glasses Eye Tracker
1 Product Care
Temperature and humidity
Do not place the eye tracker or IR Markers in places subject to extreme temperatures and humidity, such as on top
and or near a heating element, or in a damp room.
Storage temperature: -10°C to +60°C / 15°F to 140°F
Usage temperature: 0°C to +35°C / 32°F to 95°F
Ingress protection
IP class 20. No protection against objects smaller than 5mm.
Keep the eye tracker in a clean and dust-free environment. When using the equipment temporarily in an outdoor
location, take adequate precautions against dust and dirt.
Do not use the eye tracker near water. The eye tracker is not water resistant.
Mechanical shock
Do not drop, knock, or shake the device, in order to avoid breaking or damaging the internal electronic circuits. Eye
tracking quality or accuracy can be seriously affected if the Tobii Glasses or Recording Assistant have been dropped.
If the eye tracker is exposed to mechanical shock, for example, when dropped, do not try to connect it to a power
source.
Contact Tobii Support for instructions (contact information can be found on the back of this manual).
Power
It is recommended that you connect the power cable of the chargers to an outlet with a protective earth/ground
connection.
Use an accessible outlet and make sure that the cables are properly placed to avoid a possible trip hazard.
Transportation
Always use the supplied casing and packaging material to transport the eye tracking equipment and provide added
protection.
Cleaning
Before cleaning any part of the Tobii Glasses eye tracking equipment, unplug the power cord from the outlet and
make sure the device is turned off. Both Tobii Glasses and the Recording Assistant have surface coatings that
require special care. Only use the supplied micro-fiber cleaning cloth or similar products specially intended for
cleaning screens or glass with a special coating. Avoid touching or scratching the glass of the Tobii Glasses and
keep the surface clean. If the coating is affected or damaged, eye tracking quality may be degraded. Rubber parts
such as the temple arms and the nosepiece can be cleaned with water or disinfectant applied on a piece of soft
cloth. Avoid contact with any other parts such as the glass or illuminators.
Accessories
Use only provided or approved Tobii Glasses accessories.
Disposal of the eye tracker
Do not dispose of the eye tracker in general household or office waste. Follow your local regulations for disposal of
electrical and electronic equipment.
Sunlight
Do not expose the eye tracker to direct sunlight. Sunlight affects eye tracking performance severely and can
overheat the eye tracker with longer exposure. The eye tracker is not designed for outdoor use or exposure to
(direct) sunlight. Eye tracking generally does not work in direct sunlight. Shielding the eye tracker adequately from
the sun may prevent sunlight from interfering with the eye tracking.
Liquids
Do not use the eye tracker near water. The eye tracker is not water resistant.
Avoid dripping liquids into any openings of the Tobii Glasses eye tracking equipment.

6
User
Manual
Package Contents
A
B
C
D
E G
H
IJK
W
W
W
Y & Z
X
T U V
Y & Z
Y & Z
L
F
2 Tobii Glasses at a Glance
IR Marker Case
T. AC power cable
U. Power cable splitter
V. Mounting tape
W. IR Marker Holders (3x10)
X. AC adapter (powers IR Marker chargers)
Y. IR Markers (3x10)
Z. IR Marker chargers (3x)
• IR Marker charger
• AC adapter
• AC power cable (grounded)
Tobii Glasses Case
A. Glasses (including removable nosepiece)
B. IR Markers - for calibration (2x)
C. Memory cards - 4GB (3x)
D. Memory card reader
E. Battery charger power cables (2x)
F. Glasses head strap
G. Additional power outlet adapters (2x)
H. Recording Assistant extra batteries (3x)
I. Recording Assistant (with 1 battery inside)
J. Micro-fiber cloth
K. Battery chargers (2x)
L. AC adapter (powers Recording Assistant)
M. Wall socket adapter (for AC adapter)
N. Extra storage space
Inside the case pocket:
• Tobii Glasses User Manual
• Tobii Glasses Field Guide or Tobii Glasses
Smart IR Field Guide
B
M
K
N
Also included in Smart IR Package
Also included in Base Package
Included in Base Package and Smart IR Package

7
Tobii Glasses Eye Tracker
Headband
attachment
ON/OFF button
NEW session button
REC/
button
CALIBRATE button
Scroll bar
Left selection key
Right selection key
Front display & controls
Top connections
Glasses port Memory card slot
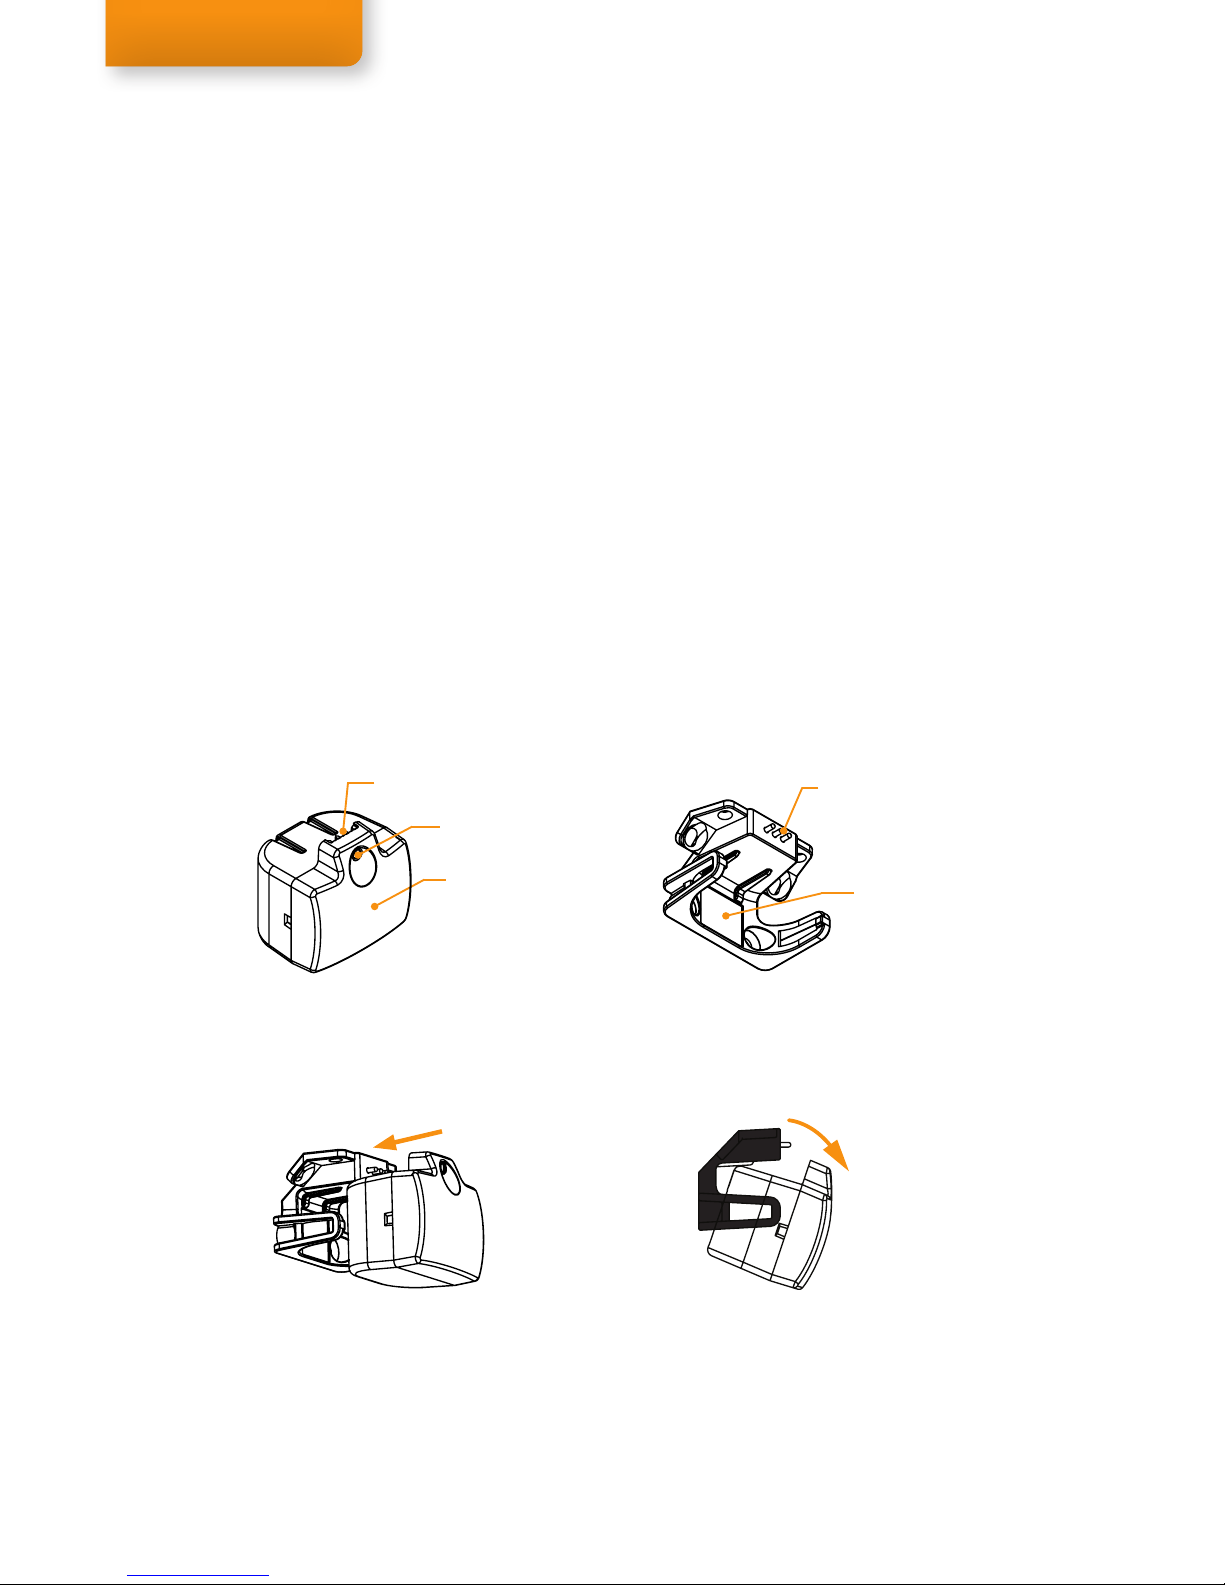
Clip
Recording Assistant
Eye tracking sensor
IR reflective
glass
Scene camera
Microphone
Function buttons
IR Marker
sensor
Illuminators
Bottom connections
AC Adapter connector
Belt Unit 091110
Graphic overlay gradient
Illuminators
Glasses
Rubber temple arm
View of front
View of right side
8
User
Manual
IR Marker Holder
IR Marker front
LED indicator
IR Marker
IR Marker Connection points
IR Marker ID
Placing the IR Marker in the IR Marker Holder.
The IR Markers are small devices that, when connected to a IR Marker Holder, communicate their exact location
to Tobii Glasses using infrared light. Each IR Marker Holder has a unique ID number. Tobii can supply up to 120
unique IDs for the IR Marker Holders. When the IR Markers are connected to an IR Marker Holder they are used to
define different areas on a scene that can later be used for analysis called Areas Of Analysis (AOA). The glasses
will receive and transmit the exact locations and position of these AOAs to the Recording Assistant. The collected
IR Marker location information is used by the Tobii Studio analysis software to map the gaze data of multiple
participants on a single picture of the AOA.
A single IR Marker, without an IR Marker Holder, is used during the calibration procedure as a flexible manually
moved calibration point.
IR Marker connection points
Removing the IR Marker from the IR Marker Holder.
IR Markers (InfraRed Markers)
Tobii Glasses introduction
The Tobii Glasses is a mobile eye tracking system with the option to use IR Markers to define so called Areas Of
Analysis (AOA´s) for automated data aggregation. AOA´s make it possible to obtain visualizations and statistics
from the collected eye tracking data. The Recording Assistant records the eye tracking data from the glasses
together with the video of the scene camera, sound from the build-in microphone and IR Marker position information
(captured by the integrated IR Marker sensor) to a memory card. The collected eye movement data can be overlaid
and aggregated for multiple participants using the Tobii Studio analysis software by defining a picture or “Snapshot”
of the AOA. Using the captured IR Marker position information the eye tracking data for multiple participants can be
mapped on this single Snapshot.

9
Tobii Glasses Eye Tracker
Tobii Glasses Smart IR Workflow
Tobii Glasses Workflow
Workflows (Pages 31-43 Pages 44-65)
This manual contains two workflows. At the start of each workflow is a checklist of the entire workflow from setup
to analysis. Make sure you have read the Preparation chapter and the Recording with Tobii Glasses chapter before
proceeding to a specific Workflow.
The first workflow - Tobii Glasses Workflow - Includes all information needed to conduct a study using the Tobii
Glasses without using IR Markers. This workflow also includes information on how to manually code recordings to
obtain statistics from the eye tracking data without the use of IR Markers.
The second workflow - Tobii Glasses Smart IR Workflow - Explains how to conduct a study using IR Markers and
how to conduct the analysis and create visualizations using Tobii Studio.
3 How to Use this User Manual
Tobii Glasses
Workflow (Pages 31-43)
Using Tobii Glasses without IR Markers
including Analysis with Tobii Studio
Belt Unit 091110
Graphic overlay gradient
Belt Unit 091110
Graphic overlay gradient
Belt Unit 091110
Graphic overlay gradient
Belt Unit 091110
Graphic overlay gradient
AOA
AOA
Recording with Tobii Glasses (Pages 22-26)
This chapter explains the basic operations required when making a recording and performing a calibration.
Tobii Glasses Smart IR
Workflow (Pages 44-65)
Using Tobii Glasses with IR Markers
including Analysis with Tobii Studio
This user manual is set up to accommodate all users of Tobii Glasses, including both users with and without the
Smart IR Markers. Both types of users should read the Preparation chapter and the Recording with Tobii Glasses
chapter. Once done with those, each type of user should follow the appropriate workflow. Users without IR Markers
should follow the Tobii Glasses Workflow and users with IR Markers should follow the Tobii Glasses Smart IR
Workflow. The workflows are differentiated by the orange tab on the right hand side of the page.
Preparation (Pages 10-21)
Start by making yourself familiar with the preparation procedures. The Preparation chapter will guide you through the
different components, features, and functions needed to use the Tobii Glasses correctly.
Visualizations and Statistics can generally not be generated in Tobii Studio when using the glasses without IR
Markers (unless the glasses are in a fixed position for all participants, which would allow the use of Scenes).
Pilot Study (Page 29)
This chapter explains the steps needed to conduct a successful Pilot Study.

10
User
Manual
Wearing the glasses
Put the glasses on like you would normal glasses. As the glasses do not have hinges, if necessary, carefully bend
the black rubber temple arms to put the glasses on. Avoid touching the glass and the sensors. As the glasses should
not move around on the head, tighten the strap to a secure but comfortable fit. The glasses should not be removed
during a participant’s recording and before the calibration has been conducted.
The eye of the participant is tracked best when positioned in the center of the frame and ideally 2.75cm (1.1 inches)
away from the glass, but are very tolerable of other distances and positions. If necessary, adjust the headband and
the nose pad. Squeeze or pull apart the wings of the nose pad to position the glasses higher or lower on the nose
of the participant. Do not let hair get in between the eye and the glass, or in the way of the eye tracking sensors or
camera.
4 Preparation
Glasses

11
Tobii Glasses Eye Tracker
Check if the nose pad is mounted correctly and if it fits the participant comfortably.
Push the nose pad into the slot in the bottom of the nose bridge of the glasses until it clips in place.
To remove the nose pad clip, pull the clip straight out and downward.
Nose pad
The included nose pad should fit most participants and can easily be adjusted by squeezing or pulling the nose
wings together or apart. The nosepiece can also be replaced. For faces with a less pronounced nose (such as Asian
facial structures), an optional nose pad clip is available that has a more protruding nose pad.
Nose pad clip
12
User
Manual
Recording Assistant
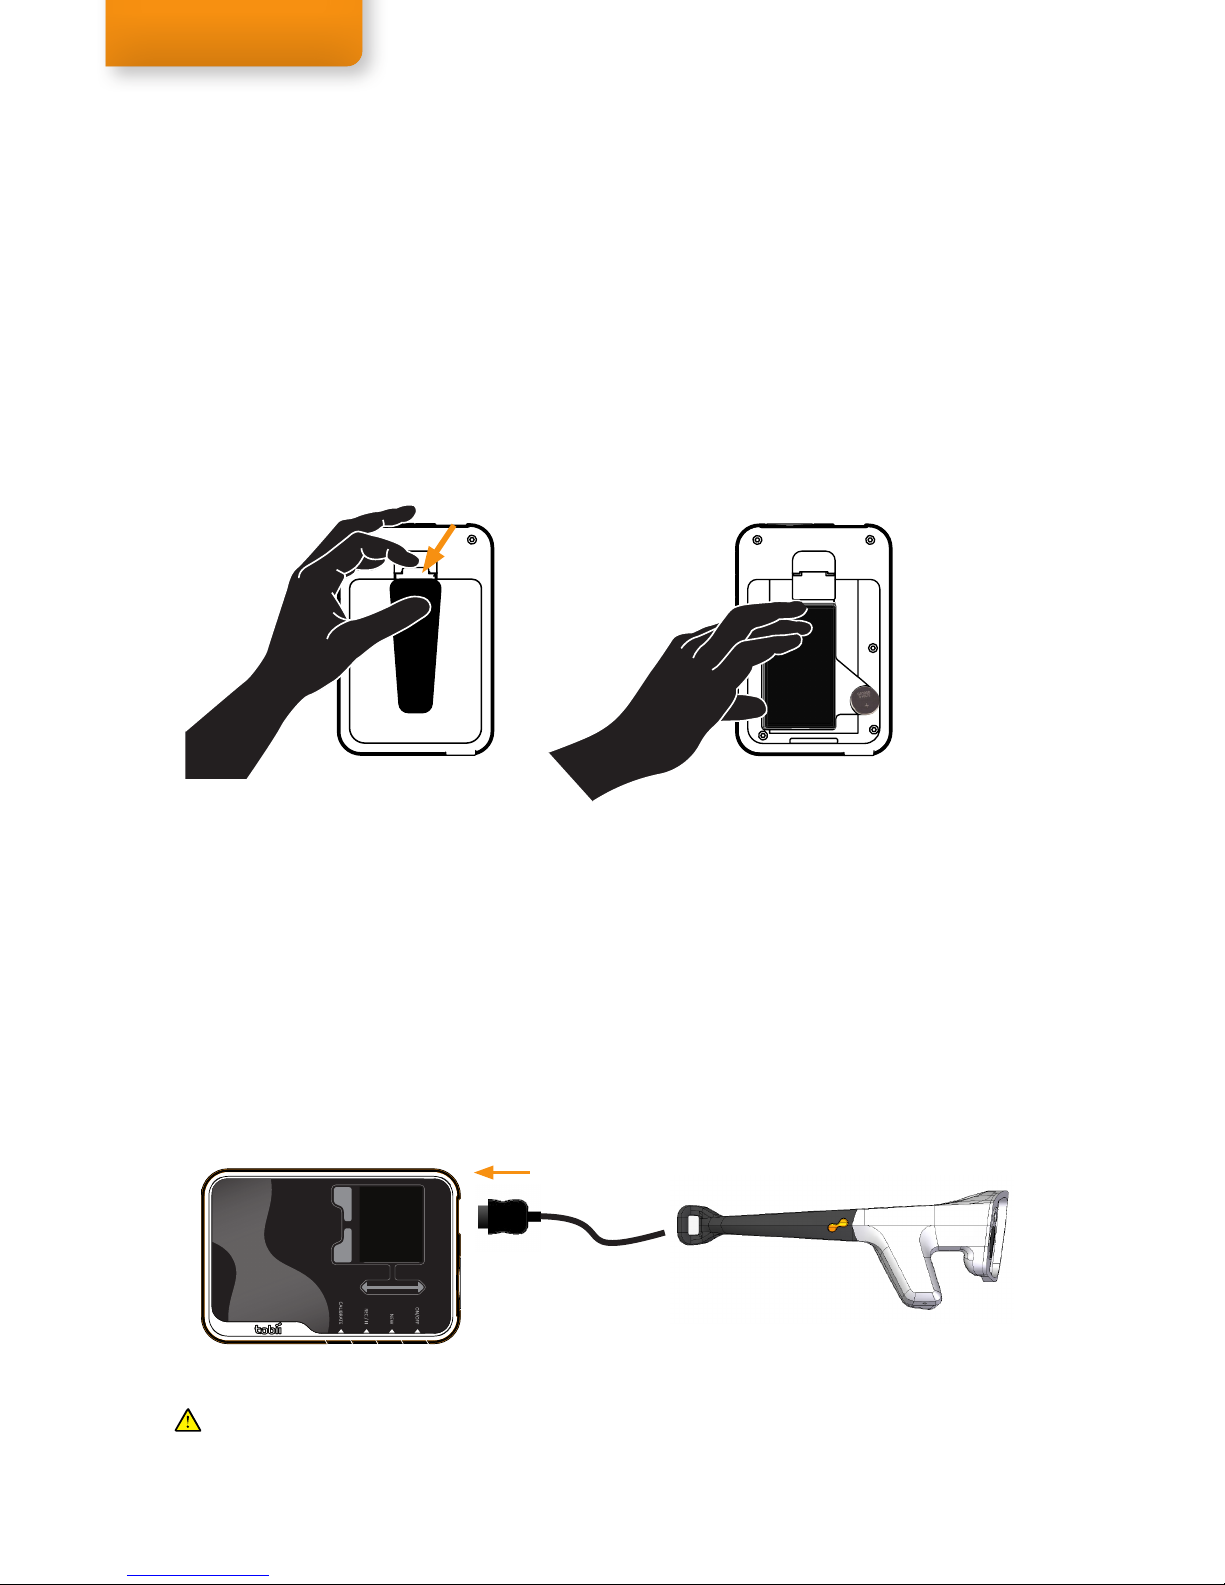
Recording Assistant battery
The battery compartment of the Recording Assistant is located on the back of the unit. Only use the batteries
provided with the Tobii Glasses (Varta EasyPack XL, 3.7 V). Battery life is dependent on usage and can last for up to
70 minutes of use. Read about Battery life on the next page.
To remove the battery:
1. Make sure the Recording Assistant is turned off before removing the battery.
2. Hold the unit with the front display facing the palm of your hand.
3. Open the battery compartment by pressing the bracket on the top of the cover down and pulling it out.
4. Pull the battery out.
Read about Hot Swapping the battery on page 16.
To insert the battery:
1. With the label facing down and the connection points towards the bottom of the Recording Assistant insert
the battery in the compartment at an angle starting at the bottom of the unit, press into place.
2. Place it in the housing so it sits flush with the casing. It might appear as a loose fit, but the battery cover will
secure it in place once closed.
3. Align the battery cover with the housing and insert the cover at an angle starting at the bottom of the unit.
4. Close the cover until it snaps into place.
Connecting the glasses
Connect the glasses before turning on the Recording Assistant. Plug the glasses connector (on the end of the
cable connected to the glasses) to the glasses port located on top of the Recording Assistant (see page 7). With
the display of the Recording Assistant facing up, the small arrows on the connector should be facing up as well. The
connector should easily snap into place.
Connecting the glasses
connector to the glasses port on
the Recording Assistant
Belt Unit 091110
Graphic overlay gradient
Belt Unit 091110
Graphic overlay gradient
The glasses should always be connected before turning on the Recording Assistant!

13
Tobii Glasses Eye Tracker
Charging the Recording Assistant battery
Connect the charger’s power cable to the back of to the charger and connect the other end to a power outlet. The
LED indicator should turn green. Place the battery with the label facing the LED indicator of the charger. The LED
indicator will now show the charging status of your battery: Blinking orange for the initial charge and solid orange
for the remaining charging period, the LED will turn green during the last phase of charging (95-100% charged),
indicating a fully charged battery.
Charging the Recording Assistant battery will take a maximum of 3 hours to reach a full charge using the supplied
charger. However, depending on the residual charge left in the battery it may take less time.
Label
Connection points
A battery placed in the Recording Assistant will also charge when the AC adapter is connected to the Recording
Assistant. To connect the AC adapter, simply twist the Power Socket Adapter that came with your Tobii Glasses
clockwise on the AC adapter and plug it into the power socket before connecting it to the Recording Assistant.
Charging using the AC adapter will, however, take considerably more time than charging using the supplied
dedicated battery chargers. To store the AC adapter again, press the button on the Power Socket Adapter and twist
counterclockwise to release it.
Battery Battery charger
LED indicator
Power Socket AdapterAC Adapter
Battery life
Battery life is dependent on usage. A fully charged battery can provide up to 70 minutes of use. When Tobii Glasses
are not recording, the battery will consume only slightly less energy. It is recommended that you keep the Recording
Assistant connected to the AC adapter. Keeping the AC adapter connected will also (slowly) charge the battery,
effectively extending the battery life during a study. A low battery warning will be shown on the screen when the
battery reaches the final 10-20% of residual charge. Replace the battery as soon as possible or connect the AC
adapter as soon as possible. The Recording will close any ongoing recording and automatically shut down the
Recording Assistant when the battery is critically low.
Expected battery life will increase after a few charging cycles (empty to full). Tobii optimizes the shipped batteries
beforehand, although some additional charging cycles may still be needed to reach full capacity.
Charging the Recording Assistant battery while in the unit

14
User
Manual
Memory card
The memory card slot is located on top of the unit (see page 7). Only use the memory card provided with the Tobii
Glasses or the same type and brand with the exact same specifications: max. 4GB, High Speed Memory (Transcend
TS4GSDHC150 or Lexar 133X only). When using a card for the first time it is recommended that you format it in
the Recording Assistant. Read about Formatting the memory card on page 22.
Belt Unit 091110
Graphic overlay gradient
Belt Unit 091110
Graphic overlay gradient
Do not insert or remove the memory card when the Recording Assistant is still powered on. Doing so may
result in corrupted or lost data and could cause damage to the memory card.
Belt Unit 091110
Graphic overlay gradient
Belt Unit 091110
Graphic overlay gradient
To remove the memory card:
1. First, make sure the Recording Assistant is off. Turn the unit off by holding the ON/OFF button.
2. Hold the Recording Assistant with the display facing you. Make sure the unit is turned off.
3. Press on the memory card so it clicks and becomes unfastened.
4. The memory card can then be pulled out of the memory card slot.
Memory and recording size
Maximum supported memory card size: 4GB
Maximum file size per recording: 2GB
Average file size of a 30 min. recording: 900MB
Maximum recording time per recording: approx. 70 min.
To insert the memory card in the unit:
1. First, make sure the Recording Assistant is off. Turn the unit off by holding the ON/OFF button.
2. Hold the Recording Assistant with the display facing you. Make sure the unit is turned off.
3. Insert the memory card in the memory card slot, as illustrated below.
4. Press it into the slot until it clicks into place.
Other memory cards than those provided by Tobii should never be used, as performance may be seriously
affected.
Changing the Memory card or formatting the Memory card keeps the numbering of the recording sessions
continuously.
15
Tobii Glasses Eye Tracker
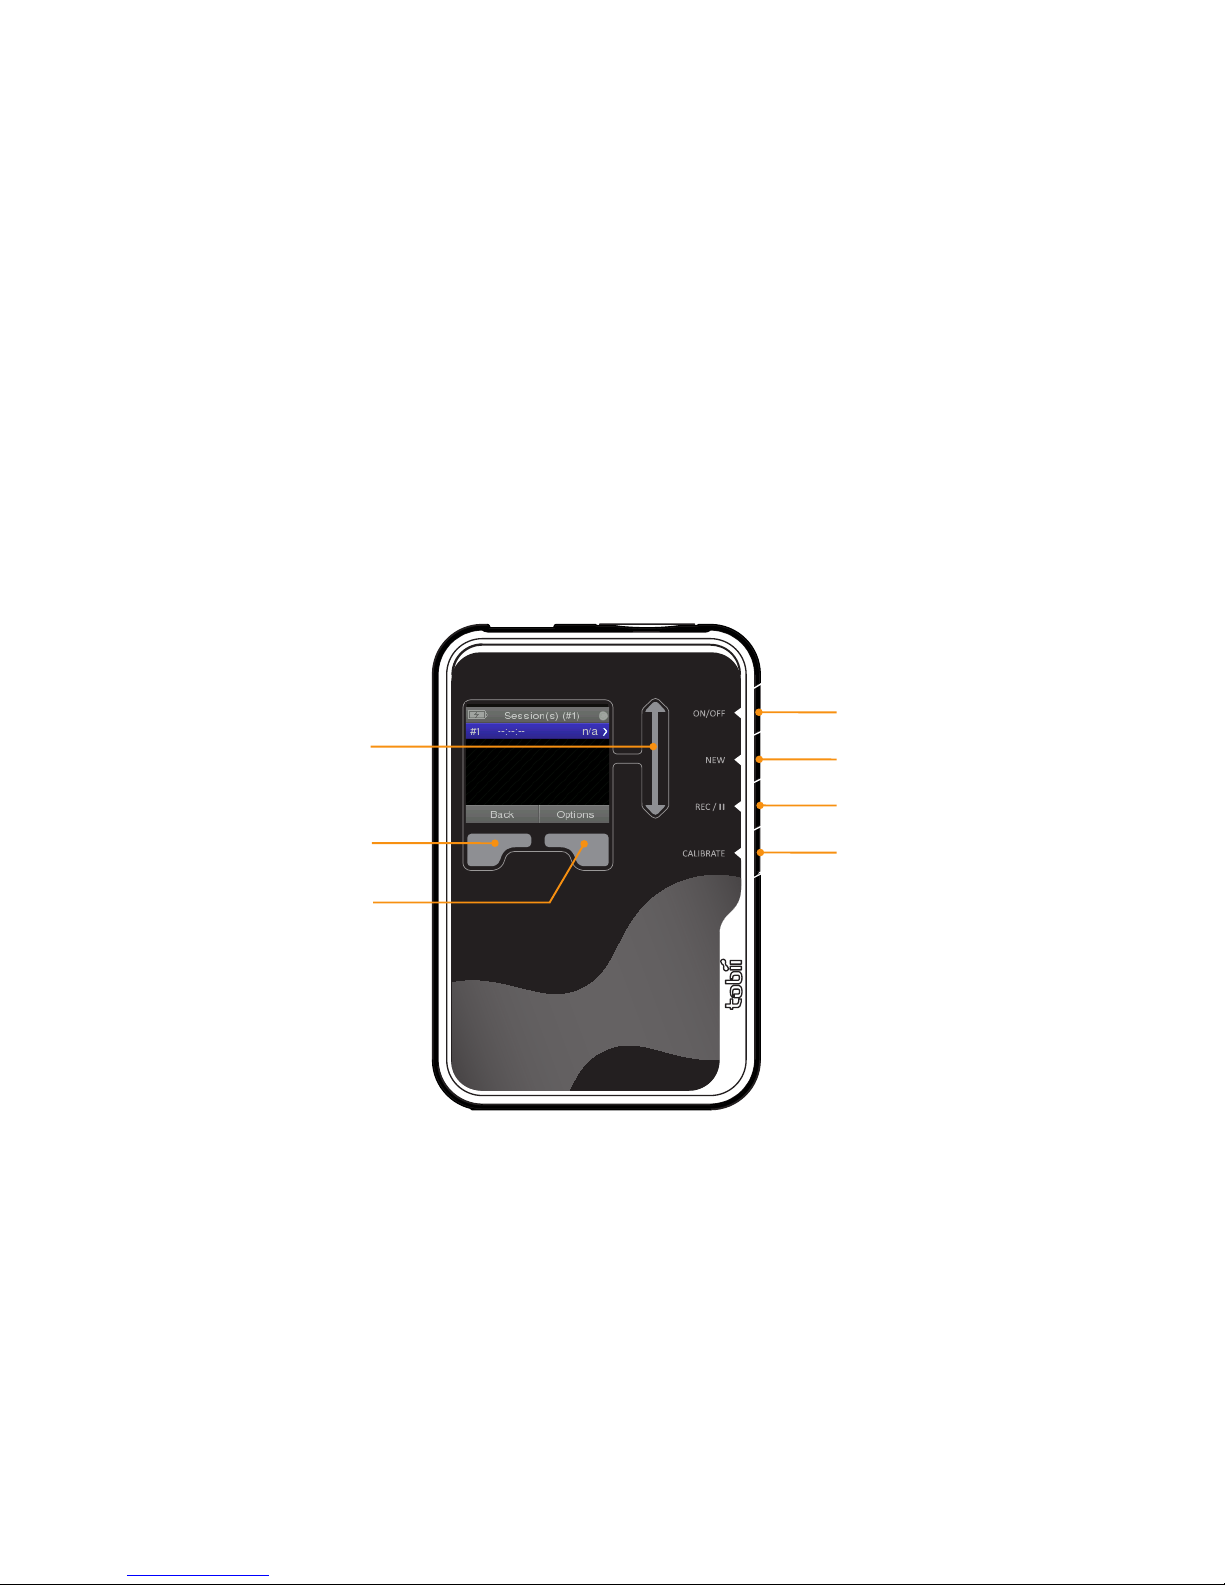
Using the controls on the Recording Assistant
The controls of the Tobii Glasses Recording Assistant are easy to find and use.
Function buttons
Press and hold the ON/OFF button to turn the unit on or off.
Press the REC/
button while viewing any menu on the Recording Assistant to start and pause a recording.
Press the CALIBRATE button to add a calibration to the session, either before or after the recording.
To create a new session at any point, press the NEW button. A New session cannot be created when an empty
session is already available.
Scroll bar and selection keys
Use the scroll bar and the selection keys to navigate through the on-screen menus. These touch buttons respond to
the slight touch of a finger. Move your finger lightly over the scroll bar to scroll through the items in the menu. The
current item is highlighted in blue. Touch the selection key to make your selection. The text above the respective
selection key corresponds with its action when touched.
ON/OFF button
NEW session button
REC/
button
CALIBRATE button
Scroll bar
Front display & controls
Function buttons
Turn the Recording Assistant on by holding the ON/OFF button and releasing once the startup screen is shown
(Tobii logo). The device will then check the SD card and start up. If there is no SD card found the device will turn off.
The startup procedure may take up to a minute to complete.
The Session menu is always the first menu displayed after turning on the unit. The name of the menu currently being
viewed can be found at the top of the display in the top menu bar. Read about Sessions on page 23.
Turn the Recording Assistant off by holding the ON/OFF button until a new prompt screen is presented, this prompt
will say: “Quit?”, select Yes by touching the Right selection key. The Recording Assistant will now power down. If you
do not want to turn off the device, select No by touching the Left selection key.
Belt Unit 091110
Graphic overlay gradient
Left selection key
Right selection key

16
User
Manual
Replacing the Recording Assistant battery and memory card between recordings
Using the AC adapter with Tobii Glasses
The Tobii Glasses can also be used with the supplied AC adapter to avoid using the battery when power is available.
1. Connect the AC adapter (with appropriate wall socket adapter) to a power outlet and plug it into the
Recording Assistant.
2. Turn the Recording Assistant on by holding the ON/OFF button. Confirm that the charging signal is shown in
the top left corner of the Recording Assistant display, indicating the AC adapter is connected.
3. It is recommended to always leave a battery in the Recording Assistant. Only remove the battery whenever
the Recording Assistant is completely turned off.
The Memory card cannot be Hot-swapped!
To remove or replace the memory card:
1. First, make sure the Recording Assistant is off. Turn the unit off by holding the ON/OFF button.
2. Remove the memory card and insert a new memory card.
3. Use the ON/OFF button to turn the device back on and continue recording.
Changing the Memory card or formatting the Memory card keeps the numbering of the recording sessions
continuously.
To replace the clock battery:
1. Make sure the Recording Assistant is turned off before continuing with the next step.
2. Hold the unit with the front display facing the palm of your hand.
3. Open the battery compartment by pressing down the bracket on top of the cover and pulling the cover off.
4. Remove the old battery from the battery compartment (remove the main battery first to create more space).
5. Place the new battery (CR1220, 3V cell battery), with the positive side facing upwards, between the two
contacts in the compartment.
6. Replace the main battery and the battery cover, making sure it snaps firmly into place.
Clock battery
compartment
Clock battery
The clock battery powers the Recording Assistant´s internal clock, saving the time and date settings even when the
main battery is removed. The clock battery should last for at least a month on its own (without any battery or power
connected). When storing the Tobii Glasses for a longer period of time, place a fully charged battery in the Recording
Assistant to prevent the clock battery from draining. The battery that powers the unit’s internal clock is located in the
back of the unit in the main battery compartment (see figures below).
The Recording Assistant battery and memory card should not be removed while the Recording Assistant
is recording. Loss of power to the Recording Assistant for even a moment during a recording will shut the
Recording Assistant down and can result in lost recording data or could cause damage to the Recording
Assistant and/or the memory card.

17
Tobii Glasses Eye Tracker
Charging the IR Markers
Included in the package is one or more (depending on package) IR Marker Chargers that can each charge up to 10
IR Markers at a time. When more than 1 charger is supplied the package will include a splitter to split the power of a
single adapter over three different power outputs, one for each supplied charger.
Power LED indicator
Power supply
The LED indicator
indicates the different
stages of the charging
cycle.
IR Marker front
LED indicator
IR Marker
IR Marker connection points
To place an IR Marker in the charger:
1. Connect the power adapter to the charger. The charger’s Power LED indicator should turn green.
2. Hold the marker with the IR Marker front facing upwards.
3. With the connection points towards the center of the charger, insert the IR Marker in a free slot.
4. Press the IR Marker firmly into place, it should snap in its holder.
5. The LED indicator of the IR Marker will turn blue, indicating that it started charging. Remove and firmly
reinsert any IR Markers that don’t connect, e.g. when the LED does not light up.
6. The IR marker is fully charged when the LED indicator turns green. Read about the LED indicator on the next
page.
IR Markers
To remove an IR Marker from the charger, tilt it outwards and pull it up, this is similar to removal from an IR Marker
Holder.
Battery life of IR Markers
The battery life of the IR Markers is dependent on usage. When a pair of Tobii Glasses (turned on) is detected IR
Markers will be activated. IR Markers never turn off but instead go into a standby mode, both while in and out of a
Holder. If stored or not being activated by a pair of Tobii Glasses that are in range, their battery will last for about 14
days. It is recommended to keep the markers charged in a powered IR Marker charger until starting a test. Always
check if the battery status is still sufficient before using them again after a few days.
Battery life of the IR Markers when constantly activated by a pair of Tobii Glasses is approximately 4 hours. However,
in most cases the duration will be longer since the markers will preserve battery power by switching to standby mode
whenever the glasses are out of range.
Charging the IR Marker completely can take up to 7 hours. Depending on the residual charge in the IR Marker this
may require considerably less time. An empty IR Marker will charge from 0% to 50% in about 1.5 hours. To reach a
100% charge, it will take an additional 5-6 hours of charging.
IR Marker Charger

18
User
Manual
Green blinks 5x-1x
100-50% Charge
Orange blinks 2x
Less then 40% charge
Red blinks 1x
Less then 20% charge
Battery Status
(when placing the IR Marker in a Holder)
Calibration mode
(without a Holder, pair of active glasses detected)
Solid Green
IR Marker
IR Marker Holder mode
(connected to an IR Marker Holder)
No LED indication
IR Marker Holder mode active
Short blink every few seconds
Less than 20% charge
Solid Blue
0-50% charge
Fast charging
Solid Lighter Blue
50%-100% charged
Trickle charging
Solid Green
100% Charged
Trickle cycle completed
Charging status in the IR Marker Charger
If a pair of active glasses is present, the mode will not switch when placing or removing an IR Marker from a
Holder. To make an IR Marker switch to a different mode, cover the IR Marker or the IR Marker Sensor on the
glasses for a few seconds to allow the IR Marker to reconnect. The battery status is then displayed.
LED indicator
The LED indicator on an IR Marker indicates the state of the IR Marker. There are two IR Marker modes: Calibration
mode and IR Marker Holder mode.
Calibration mode
Calibration mode occurs when the IR Marker is not placed in an IR Marker Holder and a pair of active glasses
is within range. This mode is used to conduct a calibration. A solid green light indicates the glasses have been
recognized and a calibration signal is being transmitted by the IR Marker.
Green blinks 5x-1x
100-50% Charge
Orange blinks 2x
Less then 40% charge
Red blinks 1x
Less then 20% charge
Battery Status
(when placing the IR Marker in a Holder)
Calibration mode
(without a Holder, pair of active glasses detected)
Solid Green
IR Marker
IR Marker Holder mode
(connected to an IR Marker Holder)
No LED indication
IR Marker Holder mode active
Short blink every few seconds
Less than 20% charge
Solid Blue
0-50% charge
Fast charging
Solid Lighter Blue
50%-100% charged
Trickle charging
Solid Green
100% Charged
Trickle cycle completed
Charging status in the IR Marker Charger
If a pair of active glasses is present, the mode will not switch when placing or removing an IR Marker from a
Holder. To make an IR Marker switch to a different mode, cover the IR Marker or the IR Marker Sensor on the
glasses for a few seconds to allow the IR Marker to reconnect. The battery status is then displayed.
Battery Status
To check the battery status of an IR Marker, just connect it to a Holder and observe the LED indicator. It will briefly
show the battery status with colored blinks before going into the IR Marker Holder mode. For example, 5 green
blinks indicates the IR Marker is fully charged and 3 blinks shows it has about 75% battery left. When the LED
shows an Orange or Red light you should consider charging it before starting a study.
Charging Status
When the IR Markers have been placed in a charger, the LED will indicate the charging status. Trickle Charging is a
slow battery-preserving charging cycle that will always take about 5-6 hours, even when the IR Marker are already
charged when placing them in the charger. When this cycle is completed the IR Markers will show a full green light.
Green blinks 5x-1x
100-50% Charge
Orange blinks 2x
Less then 40% charge
Red blinks 1x
Less then 20% charge
Battery Status
(when placing the IR Marker in a Holder)
Calibration mode
(without a Holder, pair of active glasses detected)
Solid Green
IR Marker
IR Marker Holder mode
(connected to an IR Marker Holder)
No LED indication
IR Marker Holder mode active
Short blink every few seconds
Less than 20% charge
Solid Blue
0-50% charge
Fast charging
Solid Lighter Blue
50%-100% charged
Trickle charging
Solid Green
100% Charged
Trickle cycle completed
Charging status in the IR Marker Charger
If a pair of active glasses is present, the mode will not switch when placing or removing an IR Marker from a
Holder. To make an IR Marker switch to a different mode, cover the IR Marker or the IR Marker Sensor on the
glasses for a few seconds to allow the IR Marker to reconnect. The battery status is then displayed.
IR Marker Holder mode
IR Marker Holder mode occurs when the IR Marker is connected to an IR Marker Holder. The IR Marker transmits
the unique ID of the IR Marker Holder to the glasses, used to define Areas Of Analysis. The LED indicator is off in
order to remain unobtrusive during a test. The LED will blink red shortly when the battery is low (<20% charge).
If a pair of active glasses is present, the mode will not switch when placing or removing an IR Marker from a
Holder. To make an IR Marker switch to a different mode, cover the IR Marker or the IR Marker Sensor on the
glasses for a few seconds to allow the IR Marker to switch between modes. The battery status will show first.

19
Tobii Glasses Eye Tracker
Before using the Tobii Glasses for the first time, please read this information carefully:
Some notes and warnings when using Glasses:
Never remove the battery or memory card without first turning the device completely off.
Always keep the lenses clean. The IR reflective glass is very sensitive to smudges, dirt and scratches. Eye tracking
quality could decrease significantly when the lenses are not clean.
Only use the supplied micro-fiber cloth to clean the glasses.
The touch buttons on the Recording Assistant are only meant to respond to the touch of human skin. These buttons
will not respond when touching them when, for example, wearing gloves. However, they may still function when they
are covered by, for example, a thin layer of plastic such as a protective foil.
It is recommended to always keep a charged battery in the Recording Assistant to avoid draining the clock battery.
When using IR Markers:
Switching modes between Calibration mode and IR Marker Holder mode (and vice versa) will not take place after
placing or removing an IR Marker from an IR Marker Holder if a pair of active glasses is present (switched on and in
range of the IR Markers). To make an IR Marker switch to a different mode while active glasses are present, cover
the IR Marker or the IR Marker Sensor on the glasses for a few seconds to allow the IR Marker to switch between
modes. Cover the IR Marker sensor or store the glasses in their case in between recordings when conducting a
study with the IR Markers mounted close to your setup for receiving and preparing participants.
Firmware
Tobii Glasses are always shipped with the most current firmware (essential software installed on the Recording
Assistant) at the time of shipping, but new versions may be available when using the Tobii Glasses for the first time.
Firmware updates can add new features, fix newly found bugs or improve performance.
To make sure you know what firmware you are using, on the Recording Assistant go to Main Menu>About to check
your firmware version.
To upgrade to a new firmware you have received or downloaded:
1. Turn the Recording Assistant off.
2. Copy the new firmware to the memory card using your PC (using the supplied card reader or any internal SD
card reader).
3. Connect the power adapter to the Recording Assistant and insert the memory card.
4. Turn the Recording Assistant on and wait for the upgrade to start and complete. Do not interrupt this process!
5. Before continuing, format the memory card on the Recording Assistant or remove the firmware from the
memory card using a PC. Read about Formatting the memory card on page 22.
First time use

20
User
Manual
To set the Date, Time, and Date Format on the Recording Assistant:
1. Make sure the Recording Assistant unit is on. Hold the ON/OFF
button to turn the Recording Assistant on.
2. Select Menu until you reach the Main menu (indicated in the top
menu bar).
3. Scroll through the Main menu items until you reach Settings and
then push Select to open the Settings menu.
4. Date and time should be highlighted. Push Select to open the
Date and time menu.
5. Scroll through the Date and time menu items until you reach the
setting you wish to change. Then select Enter. (See below for
instructions for the respective settings.)
Step 2
Step 4
Step 5
Setting the Date
To set the Date:
6. Follow steps 1-5 above choosing Date in step 5.
7. Use the scroll bar to select the year and push Next to move on to
the month.
8. Use the scroll bar to select the month and push Next to move on
to the day.
9. Use the scroll bar to select the day and select Save to save the
new Date. (Or select Previous (once or twice) and then select
Cancel to keep the old date.)
Step 7
Step 9
Step 3
Setting the Date, Time, and Date Format
Other manuals for Glasses
1
This manual suits for next models
1
Table of contents
Other Tobii 3D Glasses manuals


