Tobii Glasses User manual
AOA
AOA
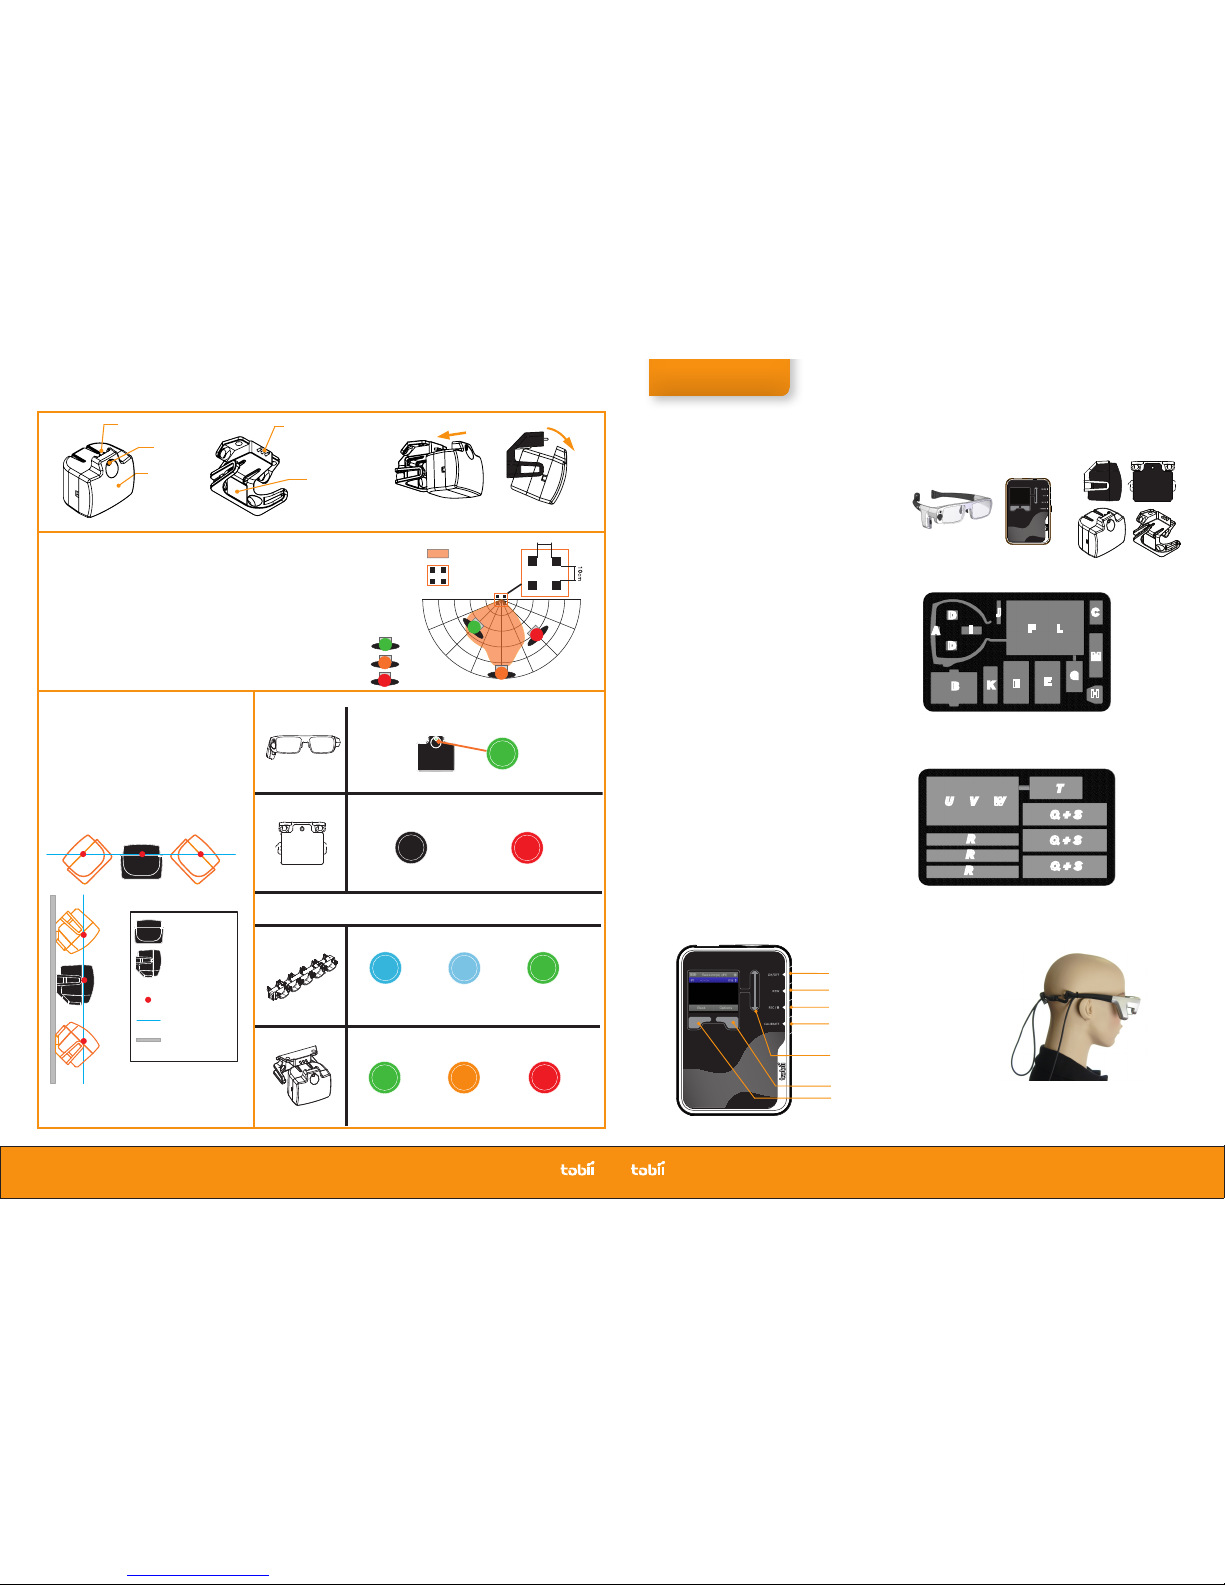
IR Marker reference point
IR Marker/AOA plane
IR Marker top view
IR Marker side view
Mounting surface
IR Markers can be placed in almost every position
(e.g. upside down, sideways, angled), as long as
the front is facing the participant and the IR Marker
reference points (measured from the IR illumina-
tor) stay on the same plane (see the image below).
Place the IR Markers at an angle pointing towards
the glasses worn by a participant, to improve the
tracking of IR Markers by Tobii Glasses.
Mounting IR Markers
Read the User Manual for the complete
Workflow with IR Markers and Studio
analysis: Pages 24-35
Hold to turn on or off
Press to create a new Session
Press to start and pause a Recording
Press to start Calibration
Scroll bar
Left selection key
Right selection key
Recording Assistant
Front display & controls
Function keys
Belt Unit 091110
Graphic overlay gradient
Green blinks 5x-1x
100-50% Charge
Orange blinks 2x
Less then 40% charge
Red blinks 1x
Less then 20% charge
Battery Status
(when placing the IR Marker in a Holder)
Calibration mode
(without a Holder, pair of active glasses detected)
Solid Green
IR Marker
IR Marker Holder mode
(connected to an IR Marker Holder)
No LED indication
IR Marker Holder mode active
Short blink every few seconds
Less than 20% charge
Solid Blue
0-50% charge
Fast charging
Solid Lighter Blue
50%-100% charged
Trickle charging
Solid Green
100% Charged
Trickle cycle completed
Charging status in the IR Marker Charger
If a pair of active glasses is present, the mode will not switch when placing or removing an IR Marker from a
Holder. To make an IR Marker switch to a different mode, cover the IR Marker or the IR Marker Sensor on the
glasses for a few seconds to allow the IR Marker to reconnect. The battery status is then displayed.
LED indicator
Detailed information IR Markers
LEADING EYE TRACKING TECHNOLOGY ©TOBII®Trademark is the property of Tobii Technology
SWEDEN/GLOBAL SUPPORT
+46 8 522 950 10 Phone
www.tobii.com
Suppor t hours: 9 am - 5 pm
(C entral E u r o p ean Ti m e , G MT+1)
GERMANY SUPPORT
+49 69 2475 03 4 -27 P hone
www.tobii.com
Suppor t hours: 9 am - 5 pm
(C entral E u r o p ean Ti m e , G MT+1)
NORTH AMERICA SUPPORT
+1 70 3 738 1320 P hone
www.tobii.com
Suppor t hours: 8 am - 5 pm
(US Ea s t e r n Standa r d T ime, G M T-6)
JAPAN SUPPORT
+81-3-5793-3316 Phone
www.tobii.co.jp
Suppor t hours: 9 am - 5. 3 0 pm
(G M T+9)
IR Marker Holder
IR Marker front
LED indicator
IR Marker
IR Marker Connection pins
IR Marker ID
Placing and removing the IR Marker from the Holder
IR Marker connection points
1m
1.5m
2m 0.5m
2.5m
0 deg
22.5 deg
45 deg
67.5 deg
10cm
1 2
3 4
AOA
IR Marker
Detection range
Set of 4
IR Markers
Participant
with Tobii Glasses
In range
Edge of range
Out of range
Distance guidelines for IR Marker detection:
Maximum distance: 2,5 meter (at a 0 degree angle)
Minimum distance: 60 centimeter (at least 4 IR Markers should be within view of the IR
sensor or Scene camera)
The smallest IR Marker detection range (using the minimum size AOA: 4 IR Markers, at
10cm apart) is shown in the image. This minimum detection range can be widened by
adding pairs of IR Markers next to, above or below the current AOA.
Add a set of at least 4 extra IR Markers pointing outwards (not in one line) to increase
the angle of detection. The maximum range distance will still remain 2,5 meters.
IR Marker range
www.tobii.com www.tobii.com
Tobii Glasses Case
A. Glasses
B. Recording Assistant (with 1 battery)
C. Recording Assistant batteries (3)
D. IR Markers (for calibration) (2)
E. Battery chargers (2)
F. Battery charger cables (2)
G. AC power supply
H. Power outlet adapter
I. Memory cards - 4GB (3)
J. Memory card reader
K. Nose pads (4)
L. Headband
M. Microfiber cloth
Version1.0, October 2010
BeltUnit 091110
Graphic overlay gradient
BeltUnit 091110
Graphic overlay gradient
IR Marker Case
Q. IR Markers (30)
R. IR Marker Holders (30)
S. IR Marker chargers (3)
T. AC power supply
U. AC power cable
V. AC power splitter
W. Mounting tape
R
R
R
Q + S
T
U V W
Q + S
Q + S
A
B
C
D
E
EG
H
I
J
K
L
F
M
D
Inside the case pocket:
Tobii Glasses User Manual•
Tobii Glasses Field Guide•
Smart IR / Total Pack Field Guide•
Field
Guide
Tobii Glasses Field Guide
Smart IR Pack Tobii Glasses, Recording
Assistant, & IR Markers
Make sure the glasses do not move
around on the head and are not removed
during testing & calibration.
Always use the supplied headband
to get accurate results.

An AOA is any area visible within the frame of the scene camera that contains at
least 4 IR Markers. For analysis of distances between 1-2 meters/3.3-6.6feet
from the AOA (optimal range for IR Markers), it’s recommended to mount IR
Markers anywhere within the AOA at minimum 20 centimeters apart. When a
participant will get closer (<1meter/3.3feet), IR Markers might drop from view of
the IR sensor and scene camera. To avoid losing IR Marker Coverage during a
test: Make sure to have at least 4 extra markers closer together around the center
of your AOA with a mutual distance of minimum 10 centimeters.
Do not move the IR Marker Holders during a study!
Make individual snapshots of the different distances at which IR Markers will
show, including at least 4 IR Markers in each snapshot or use a single snapshot
12
34
56
78
910AOA
1-2 meter
3.3-6.6 feet
<1 meter
<3.3 feet
IR Marker
#=IR Marker ID
#
Field of view
Scene camera
AOA
(A) How to define an Area Of Analysis
Before the recording
Follow these Steps:
(see the User Manual for more detailed
instructions)
1. Charge the Batteries
2. Charge the IR Markers
3. Define an Area of Analysis (A)
• Note down the position and ID number of
each IR Marker Holder on the AOA
Optional: Make a Snapshot of the AOA´s
with a digital camera, or choose to do
this with the built in scene cam later.
4. Insert Battery
5. Insert Memory card
6. Mount the appropriate nose pad to the
glasses
7. Turn the Recording Assistant on
8. Check the battery and memory
9. Make a Snapshot of the AOA´s with the
Tobii Glasses scene camera (B)
• On the Recording Assistant, open the
scene camera: Main menu>Camera
• Make a Snapshot, including the whole
AOA with at least 4 IR Markers
• Save the Snapshot and make additional
snapshots for each AOA in the test
10. Use the glasses with the supplied
headband
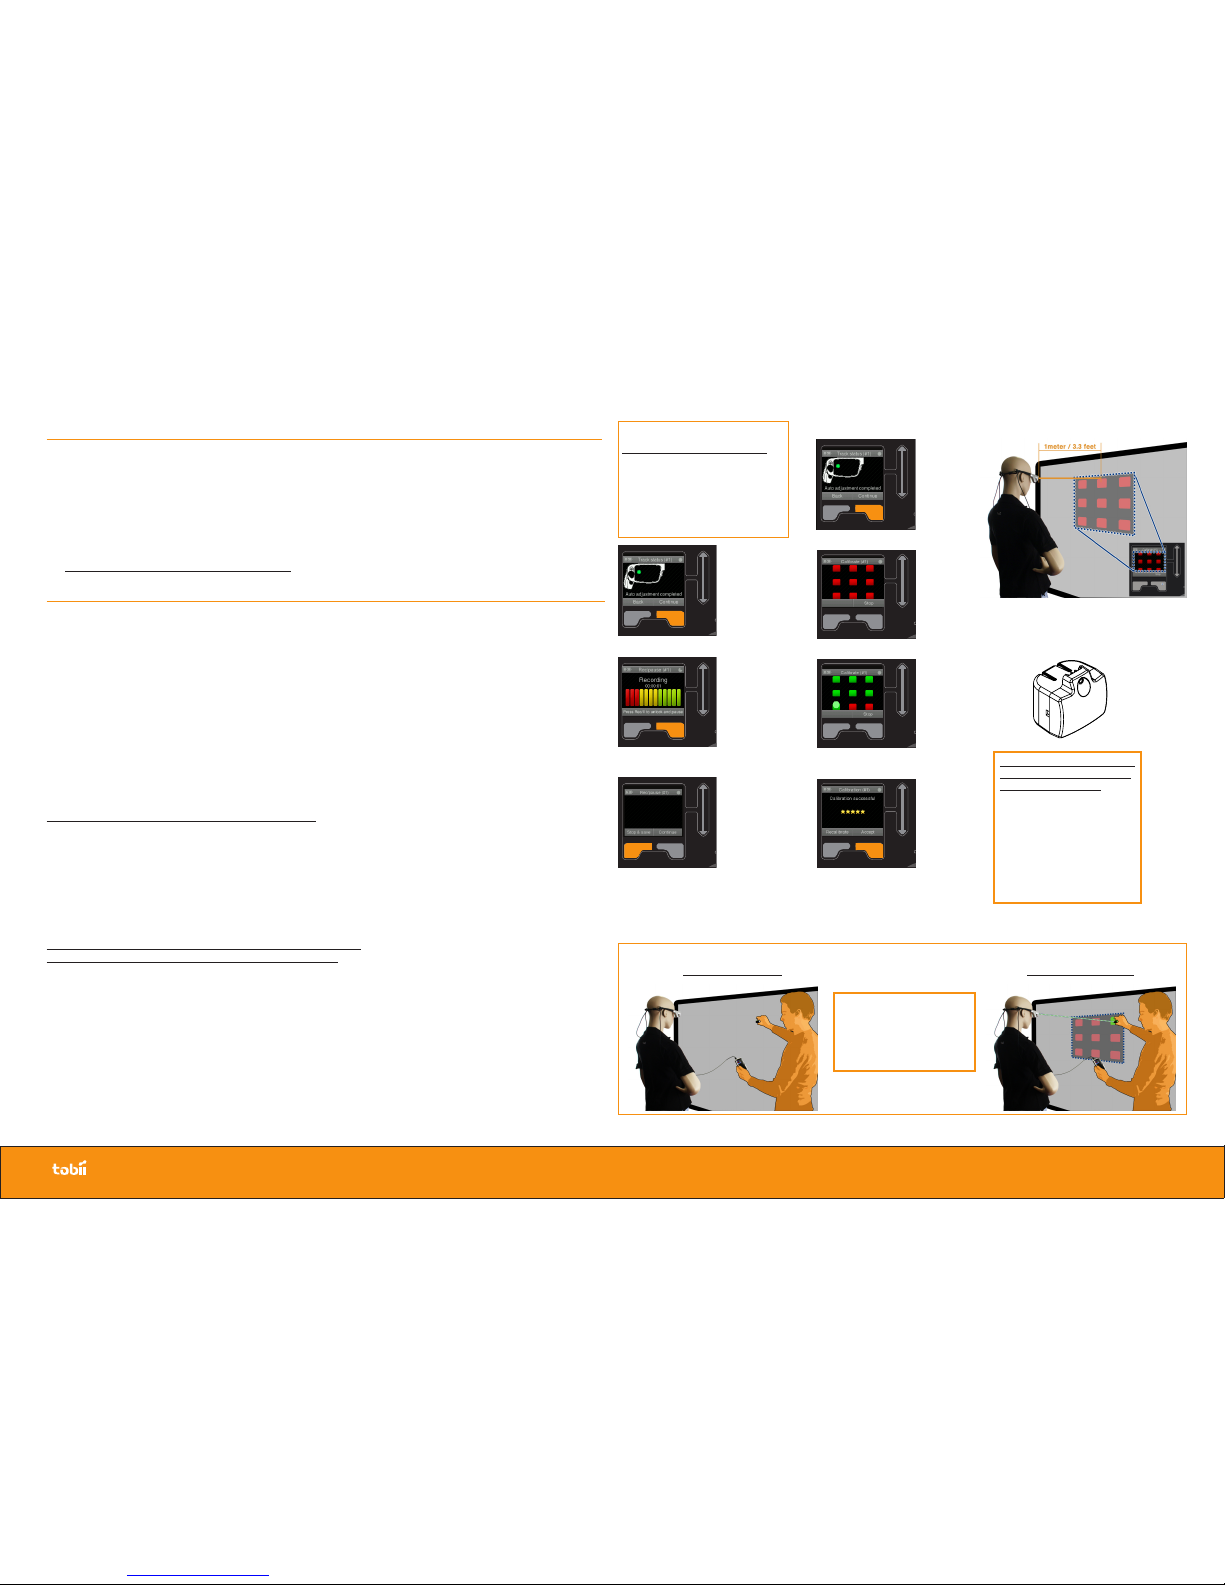
Use an IR Marker without a holder, the LED should turn green during the calibration procedure.
Hold the IR Marker at 1 meter distance against a flat surface.
The front of the IR Marker should face the glasses and should not be covered!
Ask the participant to follow the IR Marker with his/her eyes whilst keeping his/her head still during
the entire procedure.
What you see in reality:
What Tobii Glasses see:
(virtual calibration plane)
(E) How to perform a calibration
Move the IR Marker over a flat surface
to move the dot on the Recording
Assistant display over the different
calibration points of the virtual calibra-
tion plane, stop on each point until it
turns green.
Making the recording(s)
Follow these Steps:
Create a new session for each participant or
different task, for easy analysis of the data.
First recording? Make a trial recording first!1.
Log participant data and related session2.
information (e.g. session number, duration)
in a Research Log
Optional: Calibrate (instead of after a recording)
Do not take the glasses off between recording
and calibration
3. Record (C)
• Track Status
• Recording
• Pausing and continuing with a recording
• Stop&Save recording
4. Calibrate (before or after recording) (D)
• Track Status
• Calibration (E)
• Accept calibration
5. Repeat step 1-5 for additional recordings
• Check the battery status & memory card sta-
tus in between recordings. Replace in time!
• Replace IR Markers that indicate a low battery!
Optional: Hot swapping the battery
Hot Swapping will save time and power, since
no reboot is required.
• Connect the power adapter before swapping
the battery!
Optional: Changing the Memory card between
recordings
• Turn off the Recording Assistant
• Change the Memory card and store it safely
Belt Unit 091110
Graphic overlay gradient
Belt Unit 091110
Graphic overlay gradient
(C) Recording
Track Status
(before recording & calibration)
Wait until the pupil is found
automatically. a dot represents a
found pupil (this should be within
the red border), the color of this
dot and the score on the right
both indicate the tracking quality,
a green dot and a score from 3-5
(5 being a perfect fix on the pupil)
indicates the pupil is found, you
can then select Continue (Right
selection key) to start recording.
Track Status
Recording
Pause>Continue
Belt Unit 091110
Graphic overlay gradient
Belt Unit 091110
Graphic overlay gradient
Pause>Stop&Save
to end Recording
(D) Calibrating a session
before or after a recording
Belt Unit 091110
Graphic overlay gradient
Belt Unit 091110
Graphic overlay gradient
Belt Unit 091110
Graphic overlay gradient
Belt Unit 091110
Graphic overlay gradient
Belt Unit 091110
Graphic overlay gradient
Belt Unit 091110
Graphic overlay gradient
Track Status
Calibration grid
Move IR Marker
to calibrate
Successful
calibration
Belt Unit 091110
Graphic overlay gradient
Belt Unit 091110
Graphic overlay gradient
Belt Unit 091110
Graphic overlay gradient
Belt Unit 091110
Graphic overlay gradient
(B) How to make a snapshot with Tobii Glasses
IR Marker
BeltUnit 091110
Graphic overlay gradient
BeltUnit 091110
Graphic overlay gradient
AOA
Glasses or
Digital Camera
Recording Assistant
Main Menu>Camera>Snapshot>Save
Belt Unit 091110
Graphic overlay gradient
Belt Unit 091110
Graphic overlay gradient
Belt Unit 091110
Graphic overlay gradient
Belt Unit 091110
Graphic overlay gradient
Belt Unit 091110
Graphic overlay gradient
Belt Unit 091110
Graphic overlay gradient
Read the User Manual for a complete
Workflow with IR Markers and Tobii
Studio analysis: Pages 24-35
Tobii Glasses & Recording Assistant
IR Marker Holder
IR Marker front
LED indicator
IR Marker
IR Marker Connection pins
IR Marker ID
Placing and removing the IR Marker from the Holder
IR Marker connection points
Green blinks 5x-1x
100-50% Charge
Orange blinks 2x
Less then 40% charge
Red blinks 1x
Less then 20% charge
Battery Status
(when placing the IR Marker in a Holder)
Calibration mode
(without a Holder, pair of active glasses detected)
Solid Green
IR Marker
IR Marker Holder mode
(connected to an IR Marker Holder)
No LED indication
IR Marker Holder mode active
Short blink every few seconds
Less than 20% charge
Solid Blue
0-50% charge
Fast charging
Solid Lighter Blue
50%-100% charged
Trickle charging
Solid Green
100% Charged
Trickle cycle completed
Charging status in the IR Marker Charger
If a pair of active glasses is present, the mode will not switch when placing or removing an IR Marker from a
Holder. To make an IR Marker switch to a different mode, cover the IR Marker or the IR Marker Sensor on the
glasses for a few seconds to allow the IR Marker to reconnect. The battery status is then displayed.
LED indicator
Information about IR Markers
LEADING EYE TRACKING TECHNOLOGY ©TOBII®Trademark is the property of Tobii Technology
SWEDEN/GLOBAL SUPPORT
+46 8 522 950 10 Phone
www.tobii.com
Suppor t hours: 9 am - 5 pm
(C entral E u r o p ean Ti m e , G MT+1)
GERMANY SUPPORT
+49 69 2475 03 4 -27 P hone
www.tobii.com
Suppor t hours: 9 am - 5 pm
(C entral E u r o p ean Ti m e , G MT+1)
NORTH AMERICA SUPPORT
+1 70 3 738 1320 P hone
www.tobii.com
Suppor t hours: 8 am - 5 pm
(US Ea s t e r n Standa r d T ime, G M T-6)
JAPAN SUPPORT
+81-3-5793-3316 Phone
www.tobii.co.jp
Suppor t hours: 9 am - 5. 3 0 pm
(G M T+9)
www.tobii.com www.tobii.com
A
B
C
D
E
EG
H
I
J
K
L
F
M
D
Tobii Glasses Case
A. Glasses
B. Recording Assistant (with 1 battery)
C. Recording Assistant batteries (3)
D. IR Markers (for calibration) (2)
E. Battery chargers (2)
F. Battery charger cables (2)
G. AC power supply
H. Power outlet adapter
I. Memory cards - 4GB (3)
J. Memory card reader
K. Nose pads (4)
L. Headband
M. Microfiber cloth
Inside the case pocket:
Tobii Glasses User Manual•
Tobii Glasses Field Guide•
Version1.0, October 2010
Hold to turn on or off
Press to create a new Session
Press to start and pause a Recording
Press to start Calibration
Scroll bar
Left selection key
Right selection key
Recording Assistant
Front display & controls
Function keys
Belt Unit 091110
Graphic overlay gradient
Field
Guide
Tobii Glasses Field Guide
Make sure the glasses do not move
around on the head and are not removed
during testing & calibration.
Always use the supplied headband
to get accurate results.
Follow these Steps:
Before the recording
Follow these Steps:
(see the User Manual for more detailed instructions)
1. Charge the Batteries
2. Charge the IR Markers
3. Insert Battery
4. Insert Memory card
5. Mount the appropriate nose pad to the glasses
6. Turn the Recording Assistant on
7. Check the battery and memory
8. Always use the glasses with the supplied headband
Making the recording(s)
Follow these Steps:
1. Create a new session for each participant
2. First recording? Make a trial recording first!
3. Log participant data and related session information
(e.g. session number, duration) in a Research Log
Optional: Calibrate (instead of doing this after a recording)
4. Record (A)
• Track Status
• Recording
• Pausing and continuing with a recording
• Stop&Save recording
Do not take the glasses off between recording and calibration
5. Calibrate (before or after recording) (B)
• Track Status
• Calibration (C+D)
• Accept calibration
6. Repeat step 1-5 to make additional recordings
• Check the battery status & memory card status in between recordings!
• Replace Battery or Memory card in time to any avoid loss of data!
Optional: Hot swapping the battery
Hot Swapping will save time and power, since no reboot is required.
• Connect the power adapter before swapping the battery!
Optional: Changing the Memory card between recordings
• Turn off the Recording Assistant
• Change the Memory card and store it safely
Use an IR Marker without a holder,
the LED should turn green during
the calibration procedure.
Hold the IR Marker at 1 meter
distance against a flat surface.
The front of the IR Marker
should face the glasses and
should not be covered!
Ask the participant to follow the
IR Marker with his/her eyes
whilst keeping his/her head still
during the entire procedure.
What you see in reality What Tobii Glasses see:
(virtual calibration plane)
(C) How to perform a calibration
Move the IR Marker over a flat
surface to move the dot on the
Recording Assistant display over
the different calibration points of
the virtual calibration plane, stop
on each point until it turns green.
IR Marker
Virtual calibration plane at 1 meter from the
glasses, represented on the display of the
Recording Assistant as a 9-point grid
LEADING EYE TRACKING TECHNOLOGY ©TOBII®Trademark is the property of Tobii Technology
www.tobii.com
Belt Unit 091110
Graphic overlay gradient
Belt Unit 091110
Graphic overlay gradient
(A) Recording
Track Status
(before recording & calibration)
Wait until the pupil is found automatically.
a dot represents a found pupil (this should
be within the red border), the color of this
dot and the score on the right both indicate
the tracking quality, a green dot and a score
from 3-5 (5 being a perfect fix on the pupil)
indicates the pupil is found, you can then
select Continue (Right selection key) to start
recording.
Track Status
Recording
Pause>Continue
Belt Unit 091110
Graphic overlay gradient
Belt Unit 091110
Graphic overlay gradient
Pause>Stop&Save
to end Recording
(B) Calibrating a session
before or after a recording
Belt Unit 091110
Graphic overlay gradient
Belt Unit 091110
Graphic overlay gradient
Belt Unit 091110
Graphic overlay gradient
Belt Unit 091110
Graphic overlay gradient
Belt Unit 091110
Graphic overlay gradient
Belt Unit 091110
Graphic overlay gradient
Track Status
Calibration grid
Move IR Marker
to calibrate
Successful
calibration
(D) During Calibration
Belt Unit 091110
Graphic overlay gradient
Belt Unit 091110
Graphic overlay gradient
Belt Unit 091110
Graphic overlay gradient
Belt Unit 091110
Graphic overlay gradient
Other manuals for Glasses
1
This manual suits for next models
1
Other Tobii 3D Glasses manuals


