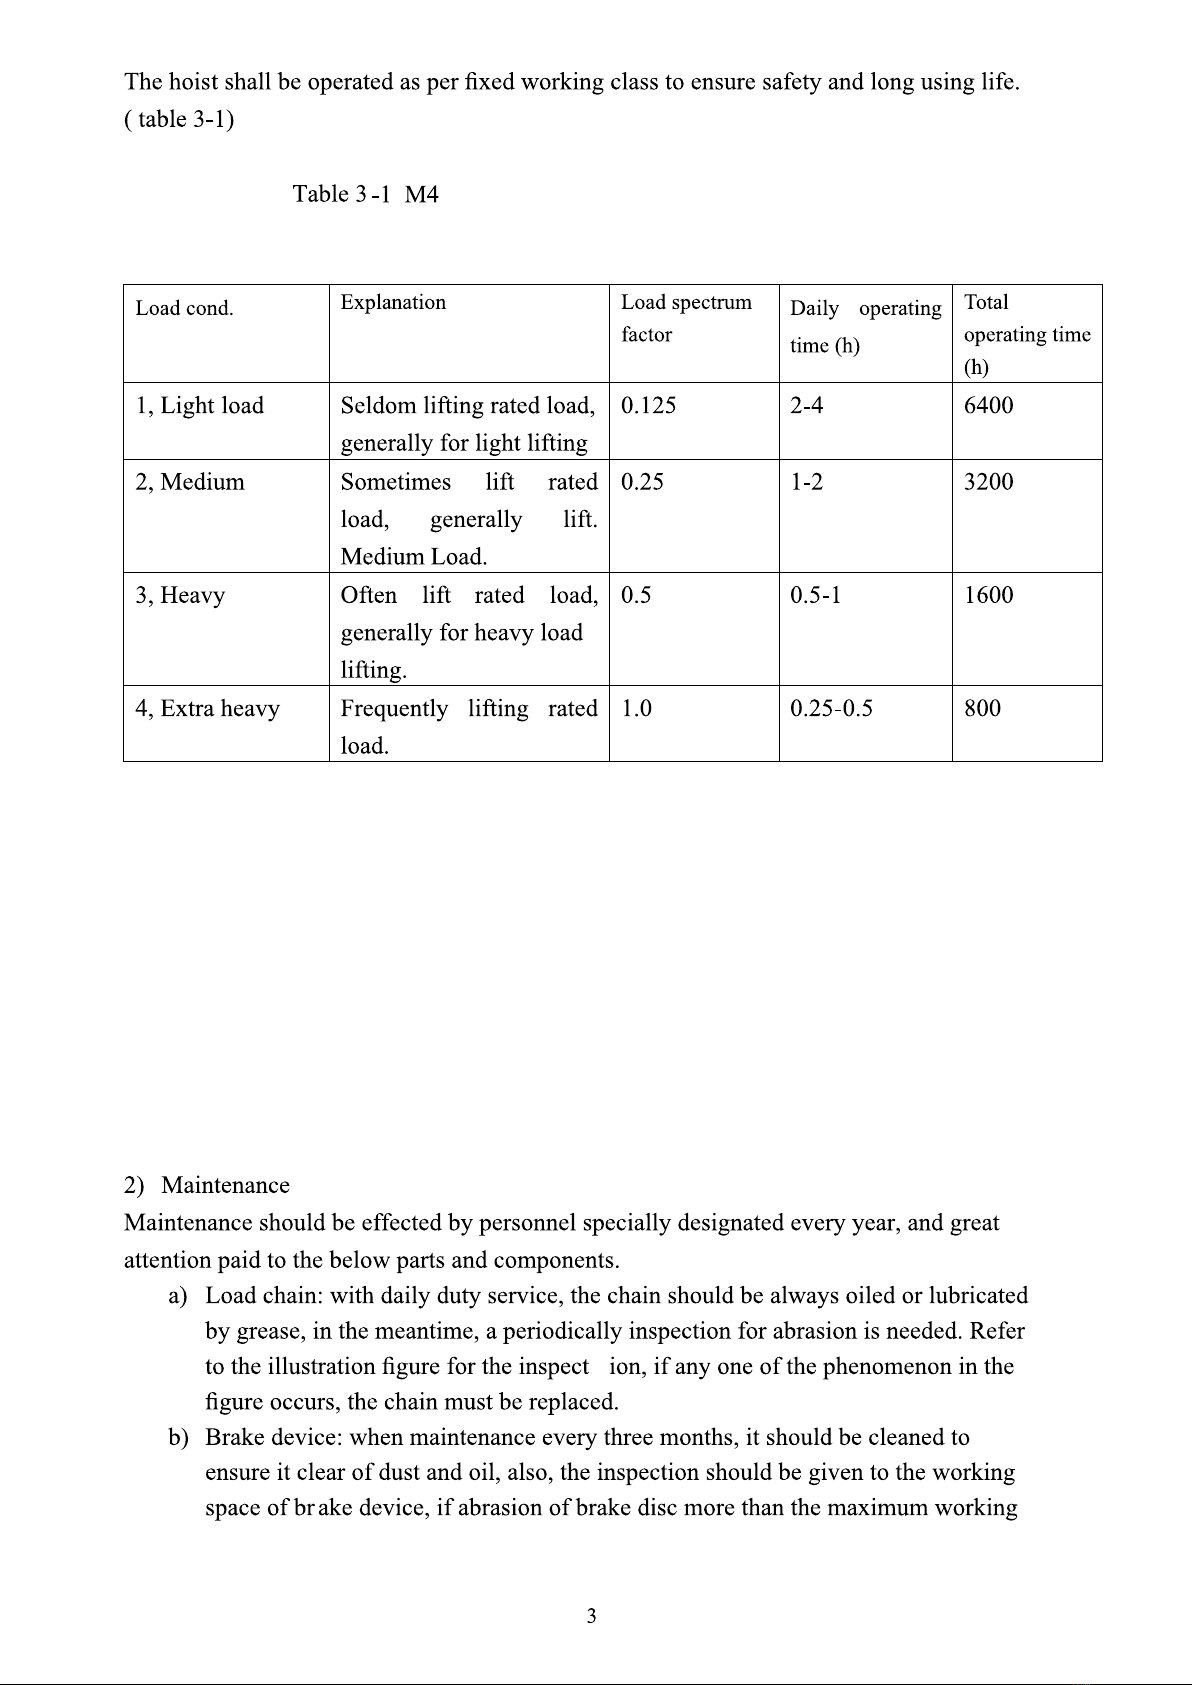
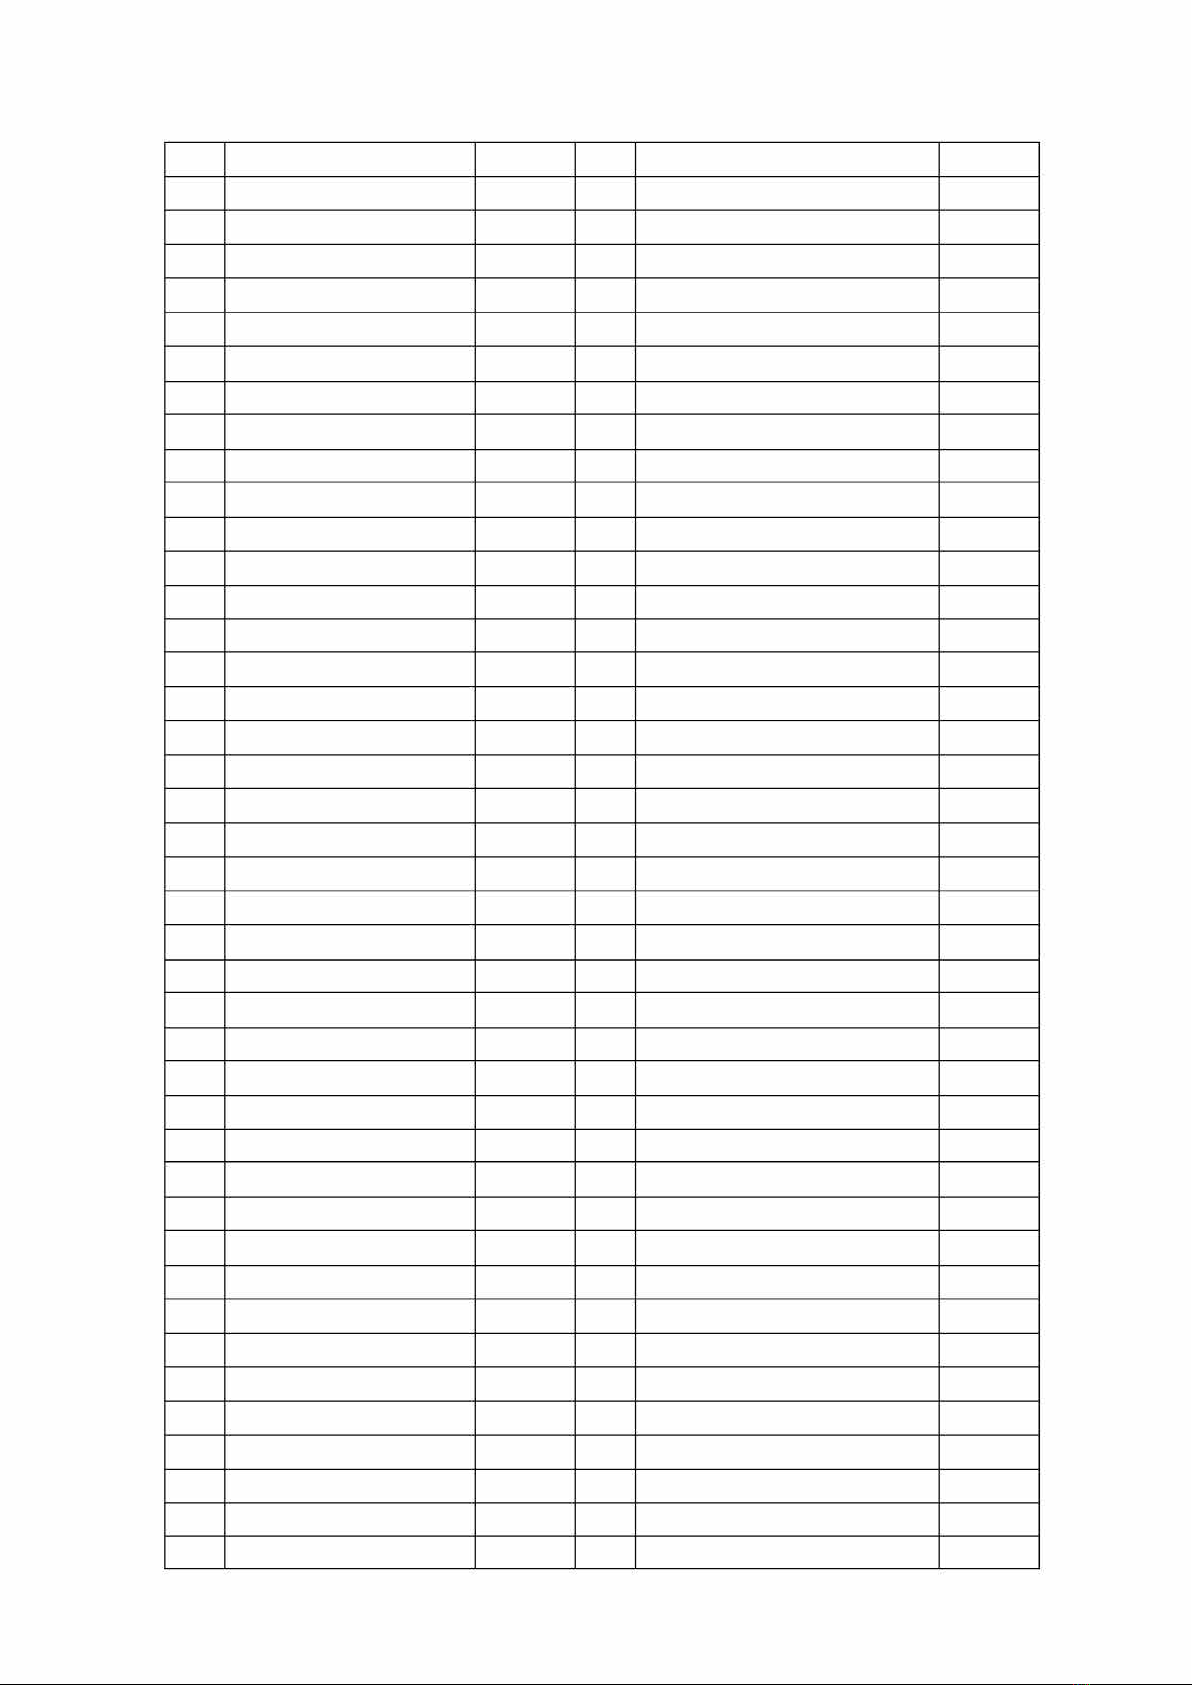
TOHO B Series User manual

ELECTRIC CHAIN HOIST
B Series Single Phase
0.25t to 3t
USER MANUAL
WARNING

1. Warning
2. Application
based on Japanese and
Geany technology
3. Features
1

1.1
210
210
116
104
262
500
°°

7. Installation instruction
1) Installation and test operating
a) When BSeries is applied to use, install the hoist to a support structure, switch on it as
the nameplate indicated, and push the button to watch the running direction of load
hook, if its moving follow the button direction, it means the wires are rightly connected
to power supply, otherwise, the connection failure, please correct it by exchanging
any
two wires connection.
b) Before operating a new hoist for its first lifting, it should be operated without load
for 15 minutes to ensure the running is ok, same procedure should be given to a hoist
which has been out of usage for a long time.
’

space (1mm), then the working space should be adjusted over again, and if
abrasion of friction disc near to the aluminum core, the brake disc should be
replace in time, otherwise, the brake device can be damaged.
c) Gearing: cleaned and grease lubricated (i.e.no.1) every year.
d) Bearing: cleaned and grease lubricated (i.e.no.1) every year.
e) Hooks: to be checked periodically for the deformation and abrasion measurement,
if the wear or deformation measures up 10% of the standard sizes (ref to illustrated
figure), please change the hooks.
f) Hooks: to be checked periodically for the deformation and abrasion measurement,
if the wear or deformation measures up 10% of the standard sizes (ref to illustrated
figure), please change the hooks
3) Repairing warning
Once the hoist damaged or can not be operated normally, shall consult with local supplier
or the designated maintenance, users are not allowed to open or repair the hoist by
themselves.
4) Illustration figure for chain inspection
If chain is abraded over the limit value, which must be replaced with a new one.
5) Illustration figure for hook inspection
If the size
one.
“b” and “c” is smaller than the 90% of the standard size, please replace with new
Dia. of chain
(d)
Wearing Limit value
(d) Measure links standard
value (p)
Wearing Limit
value (p)
5mm 4.5mm 5 75.5mm 77.8mm
7.1mm 6.4mm 5 106mm 109.2mm
4
B (mm) C (mm)
capacity (t) Normal Size Abnormal Size Normal Size Abnormal Size
0.5 19 17 26 23.4
1 19.5 17.5 27 24.3
2 22 19.8 32 28.8
3 24 21.6 35 31.5
8 Malfunctions and settlement
NO. Malfunctions Causes Settlements
Wires unconnected or
loose result power off
Check and fasten all the
wire connection points.
1
The hoist refuse to
operate under switch on
Electrical parts damaged Replace the damaged part
2
Hoist refuse to
operate, and the
braking parts has
wuwu bee noise.
Voltage is too low. Operate under rated
voltage.
Dust or oil on brake disc Clean the disc
3
After switch off, the
load drop while
braked Severe abrasion of disc Replace the disc
4
Hoist still operate
while the control
button released
The conductor damaged Replace conductor
The chain no lubricated
properly
Lubricate chain by oil or
grease
5Chain run with
strange noise The chain or sprocket
wheel worn Change with new ones.
The earth connection is
not ok
Ensure good earth
connection
High humidity in the air Improve the environment
6
Leakage of
electricity
Dust on the electrical
parts Keep the parts clear to dust
5
.

space (1mm), then the working space should be adjusted over again, and if
abrasion of friction disc near to the aluminum core, the brake disc should be
replace in time, otherwise, the brake device can be damaged.
c) Gearing: cleaned and grease lubricated (i.e.no.1) every year.
d) Bearing: cleaned and grease lubricated (i.e.no.1) every year.
e) Hooks: to be checked periodically for the deformation and abrasion measurement,
if the wear or deformation measures up 10% of the standard sizes (ref to illustrated
figure), please change the hooks.
f) Hooks: to be checked periodically for the deformation and abrasion measurement,
if the wear or deformation measures up 10% of the standard sizes (ref to illustrated
figure), please change the hooks
3) Repairing warning
Once the hoist damaged or can not be operated normally, shall consult with local supplier
or the designated maintenance, users are not allowed to open or repair the hoist by
themselves.
4) Illustration figure for chain inspection
If chain is abraded over the limit value, which must be replaced with a new one.
5) Illustration figure for hook inspection
If the size
one.
“b” and “c” is smaller than the 90% of the standard size, please replace with new
Dia. of chain
(d)
Wearing Limit value
(d) Measure links standard
value (p)
Wearing Limit
value (p)
5mm 4.5mm 575.5mm 77.8mm
7.1mm 6.4mm 5106mm 109.2mm
4
B (mm)
C (mm)
capacity (t) Normal Size Abnormal Size
Normal Size
Abnormal Size
0.5 19
17
26
23.4
1
19.5
17.5
27
24.3
2
22
19.8
32
28.8
3
24
21.6
35
31.5
8 Malfunctions and settlement
NO.
Malfunctions
Causes
Settlements
Wires unconnected or
loose result power off
Check and fasten all the
wire connection points.
1
The hoist refuse to
operate under switch on
Electrical parts damaged
Replace the damaged part
2
Hoist refuse to
operate, and the
braking parts has
wuwu bee noise.
Voltage is too low. Operate under rated
voltage.
Dust or oil on brake disc Clean the disc
3
After switch off, the
load drop while
braked Severe abrasion of disc Replace the disc
4
Hoist still operate
while the control
button released
The conductor damaged Replace conductor
The chain no lubricated
properly
Lubricate chain by oil or
grease
5
Chain run with
strange noise
The chain or sprocket
wheel worn
Change with new ones.
The earth connection is
not ok
Ensure good earth
connection
High humidity in the air Improve the environment
6
Leakage of
electricity
Dust on the electrical
parts
Keep the parts clear to dust
5
.

7. Installation instruction
1) Installation and test operating
a) When BSeries is applied to use, install the hoist to a support structure, switch on it as
the nameplate indicated, and push the button to watch the running direction of load
hook, if its moving follow the button direction, it means the wires are rightly connected
topower supply, otherwise, the connection failure, please correct it by exchanging
any
two wires connection.
b) Before operating a new hoist for its first lifting, it should be operated without load
for 15 minutes to ensure the running is ok, same procedure should be given to a hoist
which has been out of usage for a long time.
’

10. Parts List
NO. Part name Quantity NO. Part name Quantity
10
11 10
13
72
77
7

11. ELECTRICAL DRAWING
STOP
SB1 I
SQ1
UP
SB2
SBJ FR e
DN SQ2
Push-butt switch
KM1 KM2 XKJ
KM2 KM1 KMO
PE� 24V/AC
GND
KM1
KM2
�
YC
T4
'" 1
c1
c2
XT
L Tl
6 7
8


This manual suits for next models
5
Table of contents
Other TOHO Chain Hoist manuals
Popular Chain Hoist manuals by other brands

Comeup
Comeup GTD-650 manual

HADEF
HADEF 28/06 AP-EX Installation, operating and maintenance instructions

HADEF
HADEF 29/06AP-EX Installation, operating and maintenance instructions

Tractel
Tractel tralift 19709 Operation, maintenance and parts manual

Columbus McKinnon
Columbus McKinnon Yale YFS-01 operating instructions

Columbus McKinnon
Columbus McKinnon Compact operating instructions