TOI Canarias Series User manual
1
Desde/Since 1962
Pol. Ind. C/ Buitrera, s/n
Apdo. de correos, 10
46180 Benaguacil/Valencia
Tel. +34.96.273.01.36
e-mail:
www.piscinas-toi.es

2
READ CAREFULLY THESE INSTRUCTIONS BEFORE PROCEEDING TO ASSEMBLE YOUR SWIMMING POOL.
REMIND ALL POOL USERS THAT THESE SAFETY INSTRUCTIONS MUST ALWAYS BE FOLLOWED-UP. KEEP
THESE INSTRUCTIONS FOR FUTURE CONSULTATIONS.
SAFETY GUIDELINES
-Remember that safety is the most important factor when installing the swimming pool. Safety must
be given priority over any decorative aspect. Do not lean, jump, sit, stand or walk on profiles. They
have not been designed to that effect.
-Do not dive or jump headfirst in you swimming pool; do not jump from a ladder or elsewhere. This
pool is not deep enough to dive without risk of accident. The self-adhesive sign “Unsupervised, your
child is in danger” must be placed close to or on your pool. For replacement adhesives, please
contact our factory.
-Do not use your swimming pool when being under the effects of alcohol, medicines or drugs.
-To avoid drowning and injuries, do not leave tables, chairs or other objects near the swimming pool
to prevent children from climbing into the pool.
-Do not install a slide on your swimming pool.
-To avoid electrocution risk, do not manipulate electrical equipment near to your swimming pool or
with a wet body. Make sure that all electrical equipments are protected by a grounded switch.
-When bathing, never use metallic or punching footwear.
-If your pool has a cover on, do not allow anybody, and especially small children, to walk or play on it.
-Assign one entrance and exit for your swimming pool. This area must be kept totally clean. Remove
all objects that could hurt barefooted people.
-Do not make holes in your swimming pool wall to install lights or any other devices. It could result in
serious injuries, inundation, electrocution or property damage.
-For more security, we recommend to install a 122cm high fence or wall around your swimming pool
made of a resistant material. All access doors/gates should have a lock installed at least at 122 cm
high in order to prevent small children from opening them. If doors, windows and garden gates make
part of the fence, make sure that they can be closed with a key or bolt.
-Do not use your swimming pool at night or when visibility is not good. The water of your swimming
pool should be kept clean always in order to see the bottom and appreciate its depth. Users should
be capable to see that the pool is not deep enough to dive. If you decide not to take into account this
safety instruction, then it is your responsibility to provide users the appropriate instructions on the
correct use of this product and supply sufficient light. For lightning recommendations, consult your
local licensed electrical contractor on the appropriate light so as to fulfil all local and national norms
of electricity and other security requirements.
-If your swimming pool is equipped with a ladder, than follow-up all safety guidelines and assembly
instructions indicated in the manual.
-A ladder must be used to get in and out of the swimming pool. When not in use, the ladder should
always be removed and kept in an inaccessible place.
-In order to maintain its stability, the ladder should be placed on a solid, leveled base at all times.
Only one person at the time should be on the ladder
-Install the ladder where the entrance/exit of your swimming pool will be.
-Never use your ladder for other aims. The pool ladder has not been developed for other applications.
-If your swimming pool is equipped with a filter, make sure that the swimming pool is filled with water
and your filter correctly connected as indicated in the manual,
-During the bathing season, the filter must work every day, long enough to renew all the water at least
one time.

3
-Verify all parts of your pool on a frequent basis in order to detect possible failures and make sure all
components are installed correctly. Always replace components with original TOI spare parts.
-This swimming pool has been designed for private use only. Do not use for commercial activities.
-Your children’s safety depends on you! Risk is high when children’s age is under 5 years! Accidents
not only happen to other people! Avoid accidents and be prepared to react in case they occur!
WARNING: Every filter systems are up to the installation standard NF C15-100, which stipulate that
every electrical appliance located less than 3,50m from the pool and easily accessible, have to be fed
with very low voltage 12V. Every electrical appliance fed in 220 V, has to be located at least at 3,50m
from the edge of the pool. Ask the manufacturer advice for any modification of one or several
elements of the filter system.
Supervise and act:
- never leave a child alone and unsupervised
- assign one person to be responsible for the users’ safety.
- increase supervision according to the number of pool users.
- supply inflatables to those who do not know how to swim
- teach your children how to swim as early as possible.
- wet your neck, arms and legs before going inside the water.
- learn first aid techniques, especially those of application to children.
- do not allow diving and jumping.
- do not allow sprints or violent games near or inside your swimming pool.
- children that cannot swim should not be allowed to enter the swimming pool without life
jacket and without the company of an expert swimmer.
- do not leave toys inside or near the swimming pool.
- keep water clean and healthy permanently.
- store chemicals for water treatment out of children’s reach;
Keep: - your telephone close to the swimming pool in order not to interrupt supervision.
- inflatables and pole near the pool.
In addition, we recommend following equipment:
- manual or automatic cover, correctly installed.
- electronic device detecting passers-by and persons falling in the swimming pool.
under no circumstances, these additional equipment will substitute constant supervision.
In case of accident:
- take child out of the water as quickly as possible.
- call for help immediately and follow the instructions given.
- replace wet garments by hot and dry ones.
Memorize and keep first aid telephone number close to the pool:
- fire brigade
- ambulance, doctor, …
Non-compliance with the safety guidelines and maintenance procedure can be harmful to
health, especially for children.
4
PART LIST
Ø
350x120
Ø
460x120
Ø
550x120
L
1 1 1
CH
1 1 1
TO
31 31 31
AR
31 31 31
TU
31 31 31
PU1
10 10 12
PU2
10 10 12
PL
11 15 17
PCS
10 10 12
PCA
10 10 12
HOR
10 10 12
VER
10 10 12
EMB
10 10 12
TO2
90 90 108
SK
1
1
1
RECOMMENDATIONS FOR THE ASSEMBLY OF YOUR SWIMMING POOL
1) Take your time and read the instructions carefully before starting to install the swimming pool. Follow all
the instructions.
2) This swimming pool has been designed to be easily installed. Final results will depend on your care and
attention while installing the pool. The effort and care that you put into the preparation of the
foundations can make a great difference in the life span of your swimming pool and its liner.
3) Check local laws and, if necessary, obtain the construction permits. Check local electrical and
construction laws concerning the installation of swimming pools above ground level.
4) Do not forget that your swimming pool is like a big tank. If the pool is too full, pressure may originate a
breach in the wall and cause inundation and important damages and injuries to people near the pool.
5) Check local laws and, if necessary, obtain the construction permits. Check local electrical and
construction laws concerning the installation of swimming pools above ground levelThis swimming pool
contains a large amount of water and a big weight. Take special care to avoid accidents. To calculate
the approximate weight of your pool, convert the capacity of liters of water, based on the equivalent of 1
kilo=1 liter.
6) Gather and check the tools and materials you will need to install the swimming pool.
7) We recommend that at least two adults assemble the pool.
8) Approximate time for assembly of the pool (ground leveling and filling with water excluded) is 3 hours.
5
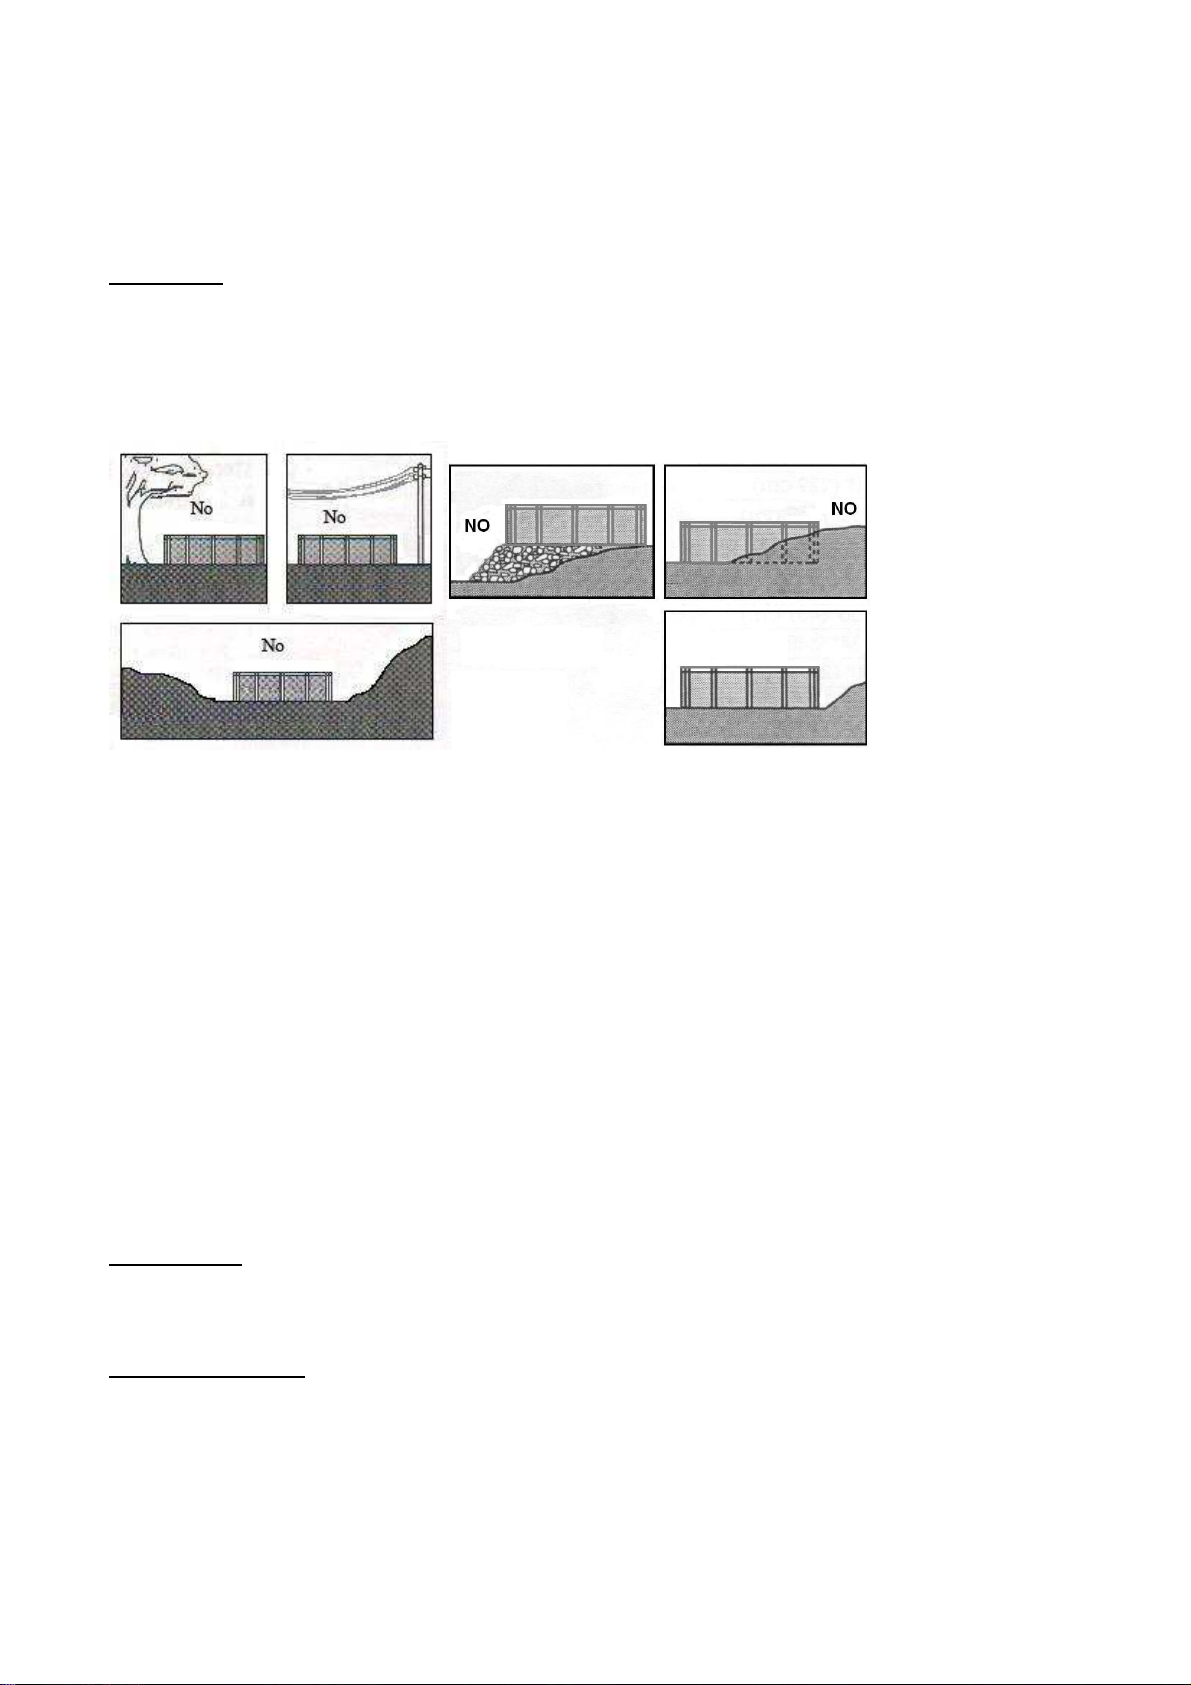
DETERMINING THE INSTALLATION SITE FOR THE SWIMMING POOL
Take a look at your property to decide the ideal and the best site for the swimming pool.
The ground:
A large area is ideal. However, if a flat area, large enough for the swimming pool is not available, then
choose an area where minimum digging is required.
Under no circumstances, the swimming pool must be installed below ground level. This swimming pool must
only be installed above ground and on a hard, solid ground. The swimming pool must be installed near a
drain or sewage system to avoid flooding in case of breakage / leakage.
The swimming pool must be installed on a 100% plain and flat surface. Failure to observe this important
safety measure can cause damage and deformation to the liner and / or the metal sheet, resulting in injuries
to those who are near the swimming pool.
Never install this swimming pool inside a garage, or on a balcony, roof, terrace or any other surface that is
not completely flat and solid. The maximum weight that the installation site can support must be taken into
consideration.
Remove roots, grass and stones in the selected area, including those under the ground. The weight of the
water will compress these elements between the liner and the earth under the swimming pool, resulting in
damages. Grass left underneath the pool liner will rot and give of an unpleasant odor and stones and roots
will damage the pool liner.
Avoid installing your swimming pool on fertilized ground or on any ground that has recently been treated with
oil-based weed killers, chemicals or fertilizers. Avoid those areas where grass grows; it could go through the
liner of your swimming pool.
Do not install your swimming pool on: marshland, tar, gravel and wood.
A foundation made of leveled, solid
and very compact soil / earth is the best base for your swimming pool. Do not install your swimming pool on
a fragile earth or on a site that will not support the weight of the pool
Do not install your pool to close to your house, but in order to ensure maximum safety, install it where it can
be readily seen and watched from the house.
Electric wires:
The swimming pool must be installed at a minimum distance of 6 meters from any electrical socket. To
ensure maximum safety, it should never be installed directly below high voltage or medium voltage overhead
electricity wires. In some communities, it is illegal to do so.
Underground cables:
Check for any buried electrical, telephone cables, or gas pipes at the site before you start digging to level the
surface.
Yes

6
Trees:
Overhanging trees and their tenants (birds, insects, …) are not the swimming pools’ best friends. The resin
and falling leaves and twigs can cause problems in maintaining your swimming pool’s water clean. If there is
a filtering system, it will have to be used more often. Install the swimming pool away from the trees.
Grounded sockets:
In the case where the swimming pool has or uses a water filter or any other electrical device, and there is no
grounded socket nearby, you must have one installed by an authorized electrical technician.
TOOLS
1. A measuring tape
2. A metal saw
3. A rake
4. A peg
5. A hammer
6. A marker (felt pen)
8. A shovel
9. A pair of pliers
10. Clothespins
11. A screwdriver
12. A spirit level
13. A wrench
14. Adhesive tap
15. String
16. Gloves
17. A straight wooden board
INSTALLATION
Do not install the swimming pool on a windy day. It is extremely difficult to keep the swimming pool wall
upright and it would probably fall, resulting in injuries.
Always place a protective sheet under the liner in order to avoid wear and tear caused by rubbing against the
ground and the weight of the water.
It is possible to level the ground in two ways:
1
st
possibility: Prepare a concrete platform. The platform should have the same size as the pool diameter
plus 30cm.
2
nd
possibility: Level the ground yourself:
a) Hammer a peg into the ground in the center of the area where you want your pool. Tie a string
equal to the length of the radius of the swimming pool to the peg and mark a circle (fig. 1).
b) Level the ground in the marked area. The entire area of the swimming pool must be leveled and
free of stones and twigs. Locate the lowest point within the circle. Using a leveling tool and a
straight wooden board, level the surface down to the level of the lowest point. Do not fill in the
holes; dig away higher areas (fig. 2, 3 and 4). Scatter a fine layer of sifted sand over the levelled
surface and level again.
c) Expand a thin layer of sifted sand about 5cm high on the surface of the pool base. Level again.
Instead of sand you can also use sheets of polyethylene between 25 and 28mm thick.
In all cases, we recommend you place on the floor a ground floor

7
a) Concrete patio stones may be placed at the base of each vertical column of your pool. This is optional, but
makes a better foundation for the pool wall. You will need one patio stone of 30 cm for each base plate.
b) Temporarily lay out the base rails (PCA) and base plates (PU2) around the circle (fig. 7). Each base plate will
show the location for a patio stone. Make a mark in the ground at each base plate.
c) Remove the base rails and base plates and lay out the patio stones around the circle where the base plates were
(fig. 8).
d) The patio stones must be sunk into the ground so the tops are flush with the soil around them (fig. 9). Use the
carpenter’s level to make sure the patio stones are perfectly level and flush with the ground and with each other.
e) Place the base plates equally spaced around the perimeter of your foundation. If you are using the optional patio
stones, place one base plate on each stone (fig. 8).
f) Slide the curved bottom rails (fig. 11) inside the base plates. Leave a 13 mm gap (12mm) between the ends of
the bottom rails (fig. 12).
g) In order to maintain the distance between base rails (PCA), place a piece of +/- 12mm in between them (foto 1).
Take care to leave enough space for the pool wall. This piece will be taken away again when installing the
verticals.
DO NOT FILL THIS AREA
TAKE OUT SOIL
TO LEVEL OUT
8
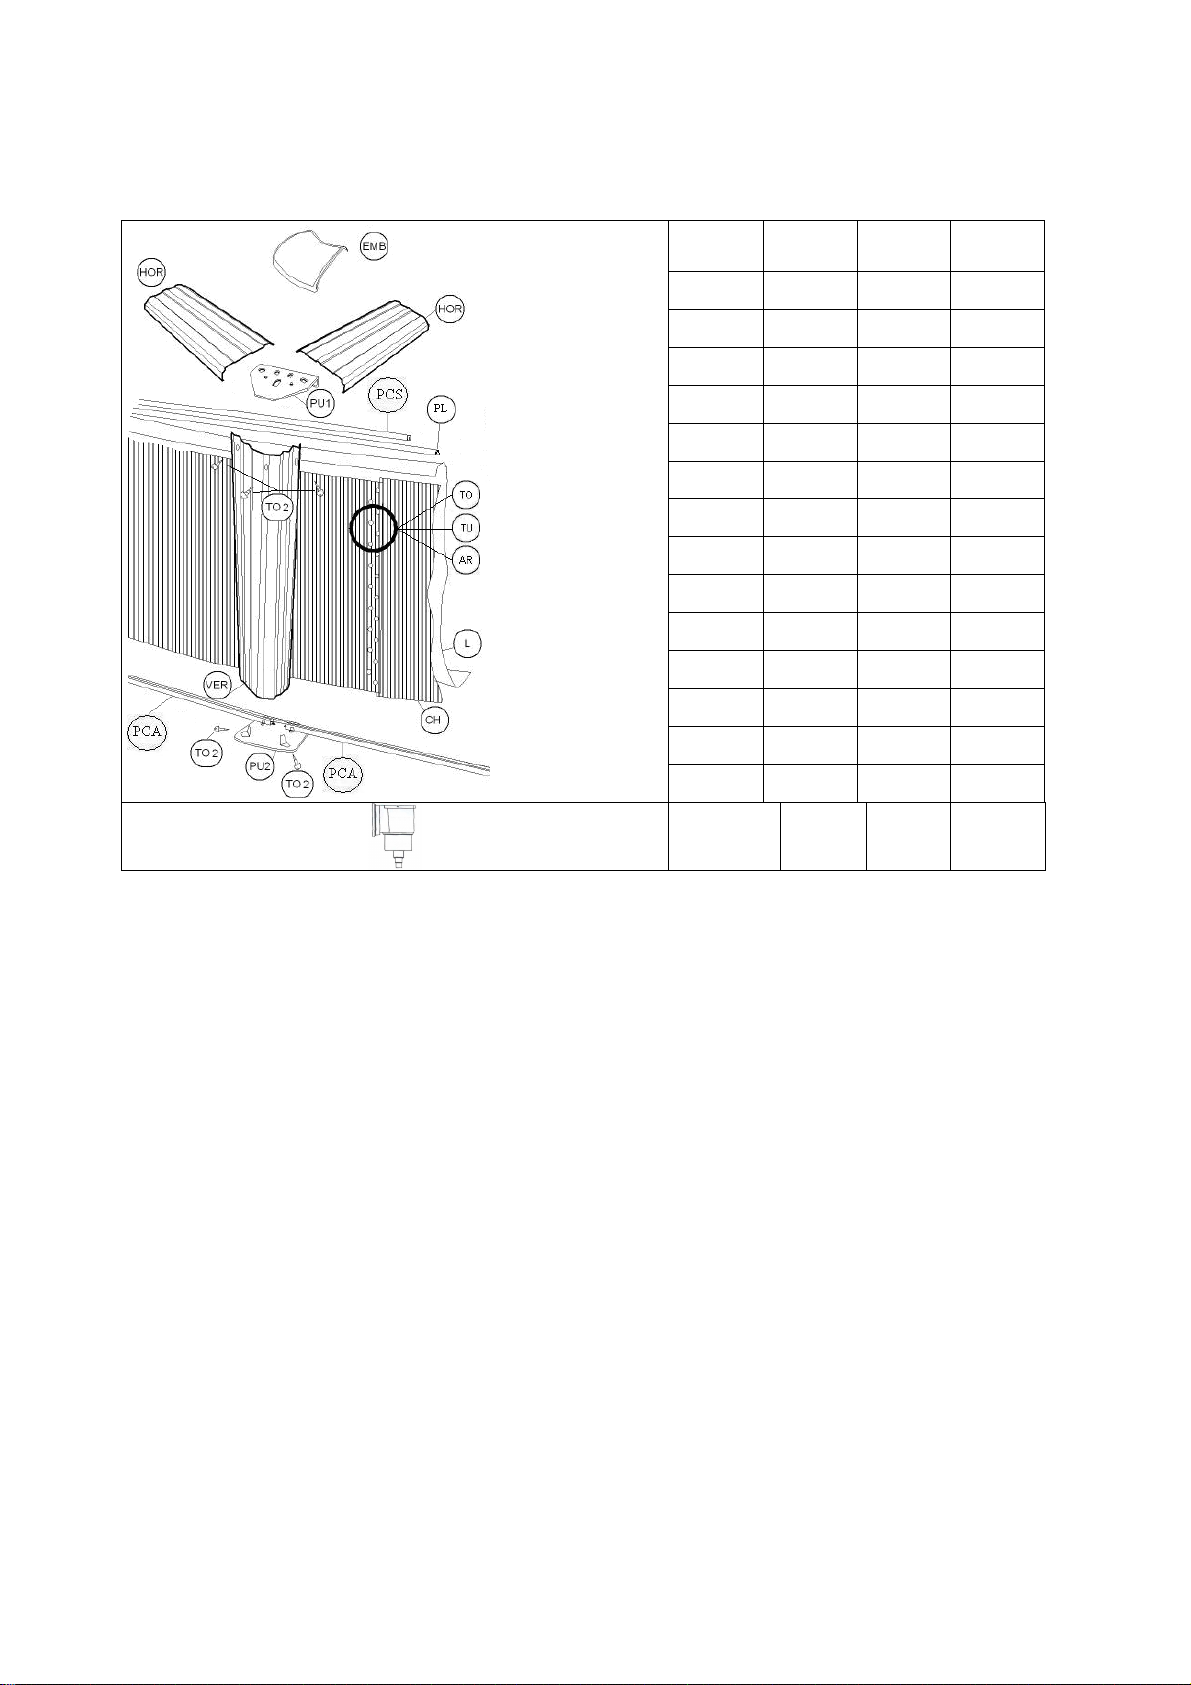
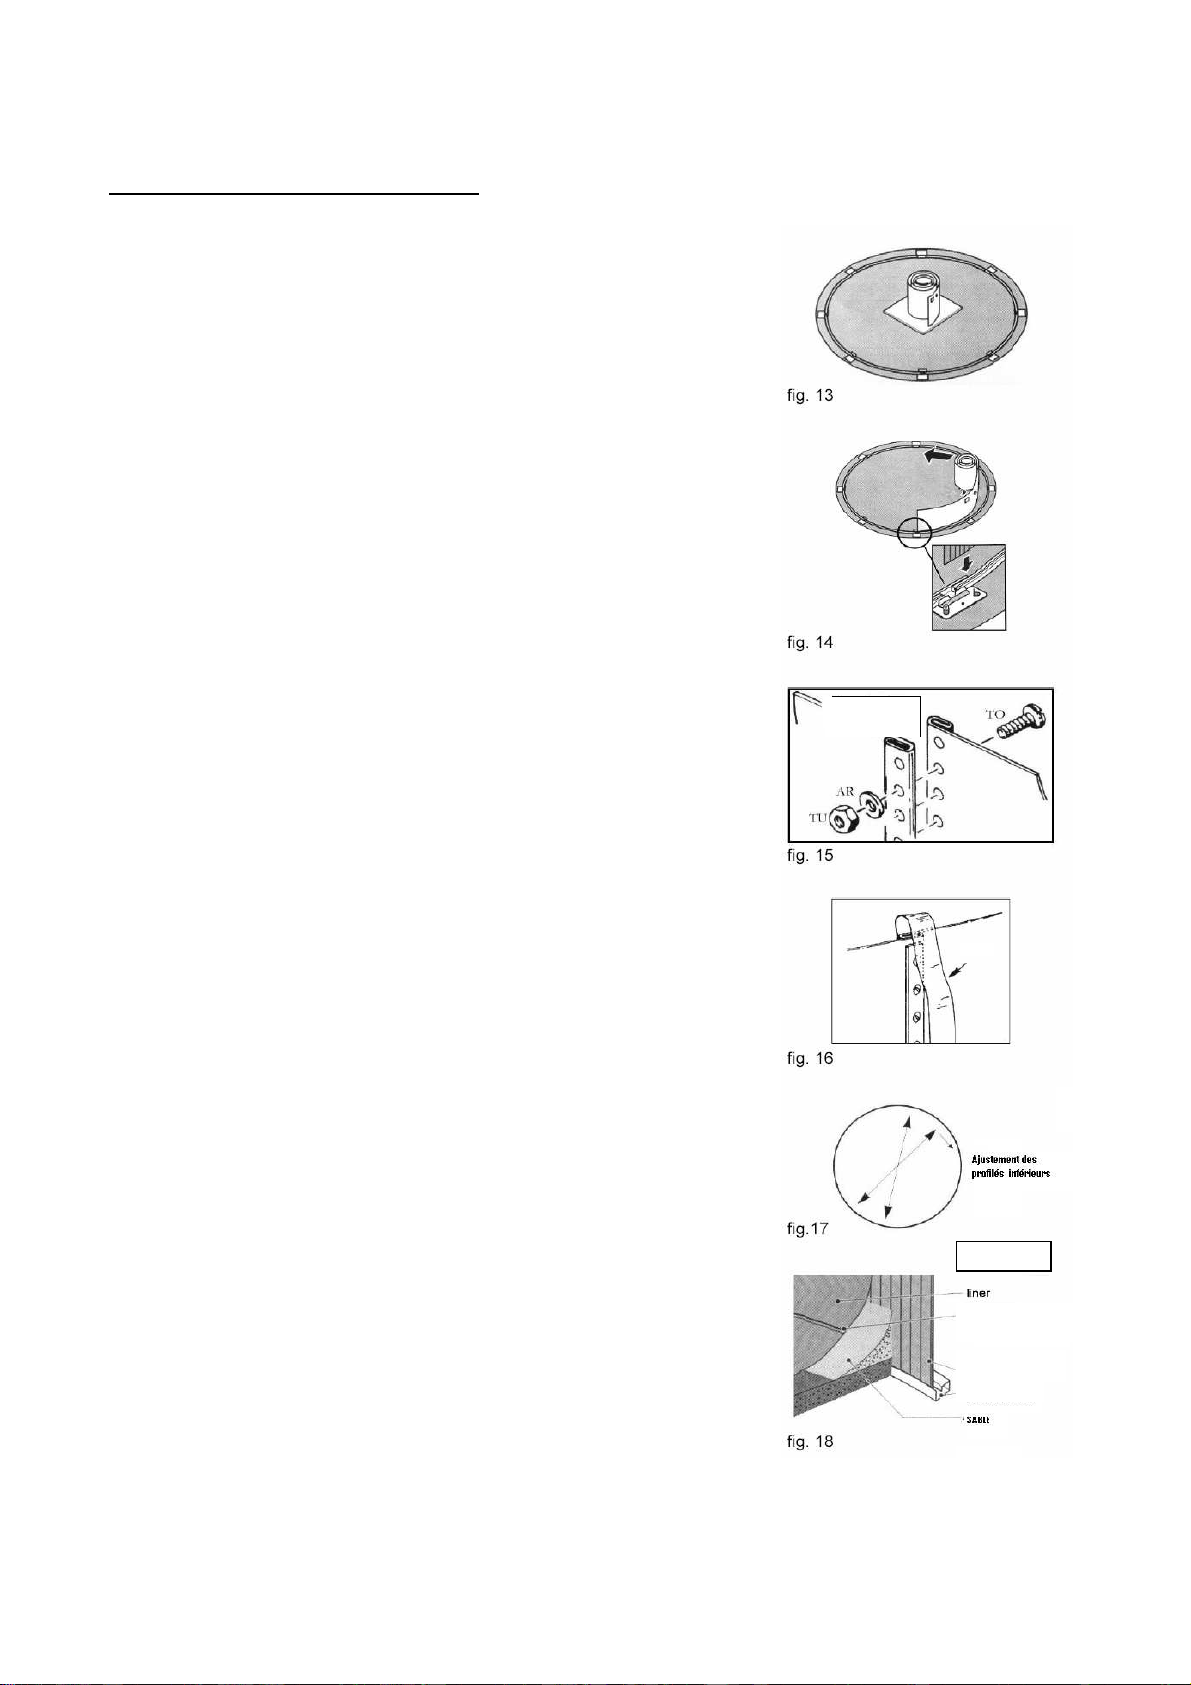
ASSEMBLY OF YOUR POOL WALL (CH):
VERY IMPORTANT: To ensure maximum safety, gloves must be worn during the assembly of the metal
sheet. Some edges might be sharp. If so, eliminate them with a file.
Do not bend or wrinkle the metal sheet during the assembly; unroll it carefully.
Place a cardboard under the metal sheet to unroll it easily and make sure it
does not get scratched by rubbing against the ground. Any scratches would
cause the sheet to rust.
Do not bend or break the upper and lower sections during the installation.
a) Install the swimming pool on a shiny and not windy day. Do
not try to assemble the pool with wind.
b) Unpack the coiled pool wall and place it vertically on a
cardboard at the center of the pool circle (fig. 13). The cut-out
for the skimmer should be towards the top of the wall.
c) The starting end of the wall where the holes for screws are
located must be installed in the center of the base plate (PU2)
(fig. 14) where the pump and filter will be positioned.
d) Working in clockwise direction, start uncoiling the wall, guiding
the bottom edge into the curved bottom rail (fig. 14 – 15). The
starting end of the wall must be positioned over a base plate,
and the holes for the filter hoses should be positioned where
the pump and filter will be.
e) Install the wall around the whole circumference until the wall is
completely unrolled.
f) Complete the circle, line up the holes in the two ends of the
pool wall and join the ends with a bolt and nut through each
head. The head of the bolts must be on the inner surface of
the wall, and the washers and the nuts on the outer surface
(fig. 15). There are two lines of holes on the wall. It is
important that each hole has a screw (except the last one).
g) Start installing the screws from the bottom, except for the last
hole. Tighten well with the screwdriver.
h) Using a strip of PVC, cover the bolt heads on the inside of the
pool wall to protect the liner from rubbing against objects,
which is the main cause of tears in the liner (fig. 16). Stick the
strip with glue for PVC to insure that for instance the screws
are completely covered.
i) Make sure that the swimming pool is completely circular (fig.
17). Adjusting the pool to the proper shape may cause the
base rails and plates to slip out of alignment a little. Recheck
all of the base plates to make sure each one are centered
where the base rails meet.
j) If you have decided to use sheets of polyethylene (see bottom
of page 6), install them now. If not, cover the inside bottom
border of the circle using clean thin sifted sand free of any
stones or foreign objects. Press the sand into a vertical
triangular shaped layer that covers the sections and the inside
part of the metal wall.
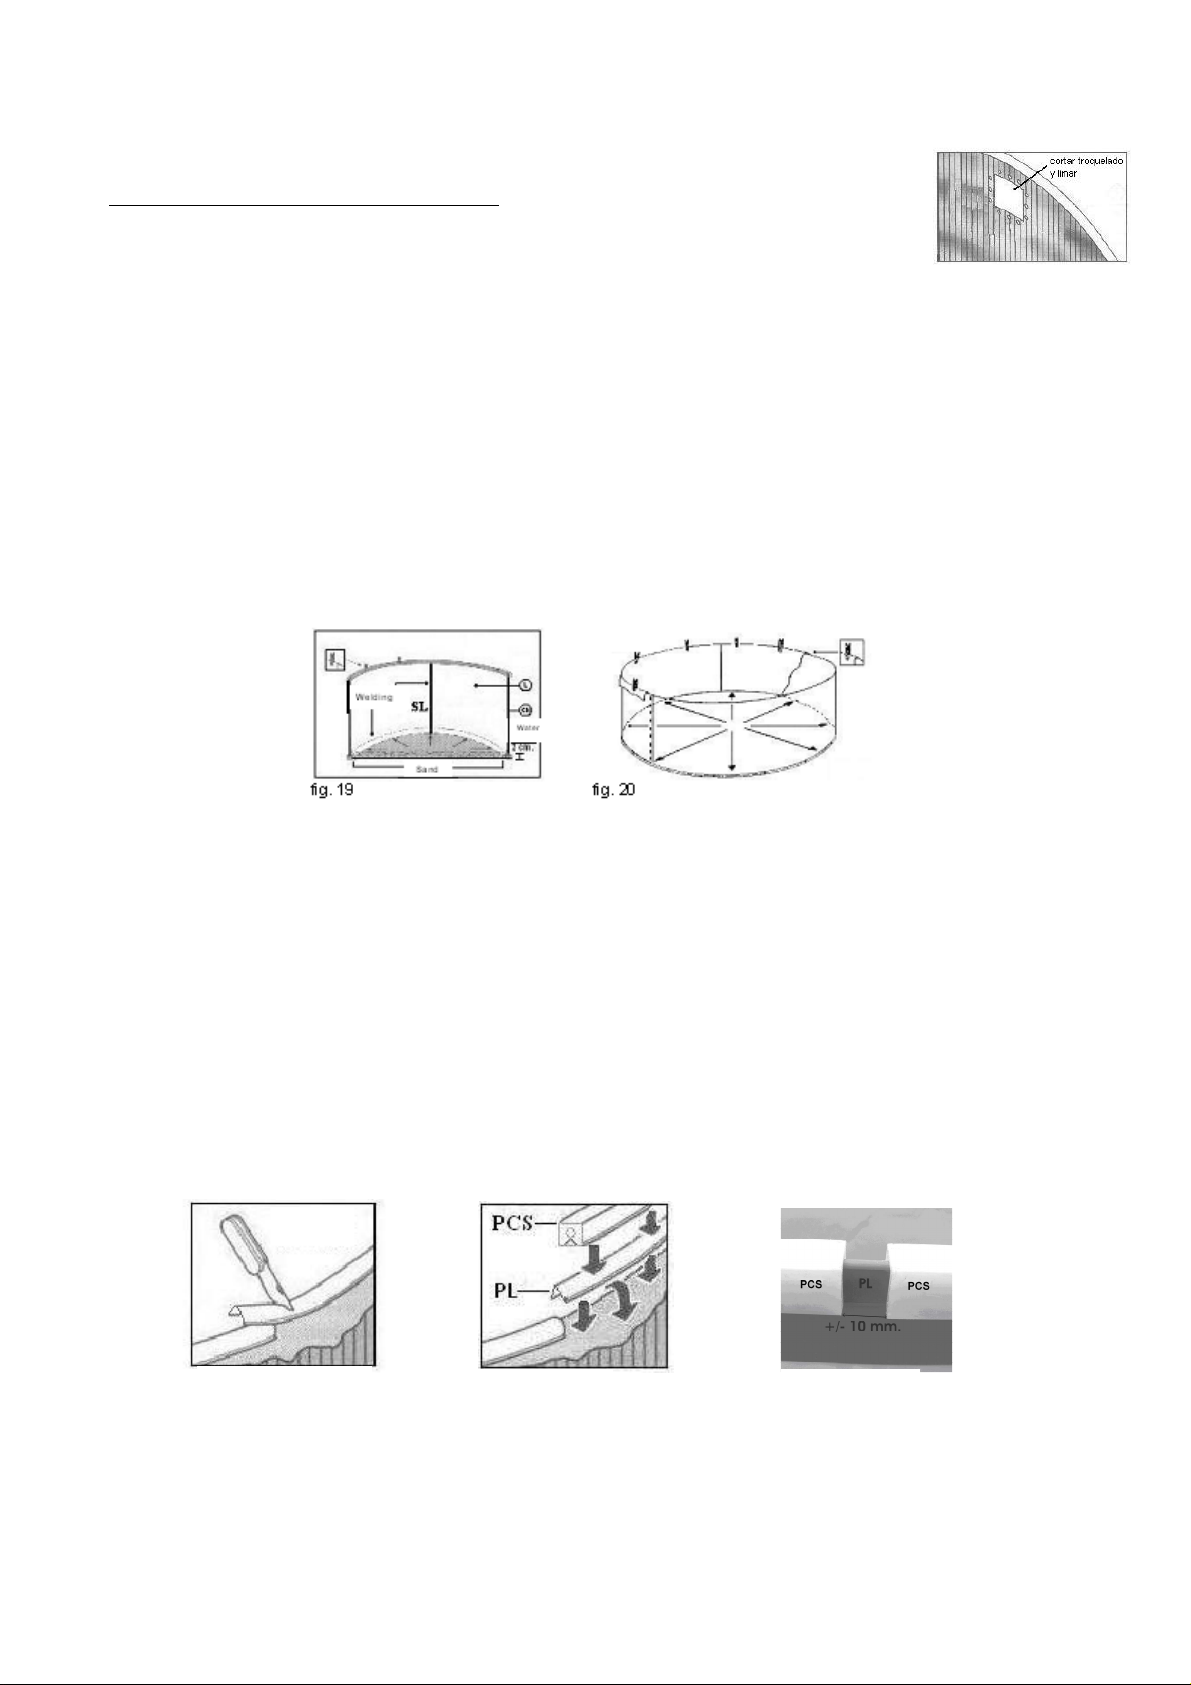
The height of this triangular layer must be around 20 cm. (fig. 18).
In this way, you will prevent the liner from sliding under the
metal wall and being damaged due to the pressure and the
weight of the water.
Leave
free
the firs
t
hole
Sand
Base rail
In
stall in middle of
the welded seam
Steel wall
9
INSTALLATION OF YOUR POOL LINER (L):
IMPORTANT: Before installing the liner, cut the skimmer hole die of the steel wall with a
metal saw or scissor. File all burrs or possible die excess.
The liner used has been developed to withstand exposure to heat and ultraviolet rays for a long period of
time. Therefore, under certain climates and conditions of use, the liner quality can vary slightly.
Never walk on the liner with your shoes on.
The liner is the most important and delicate part of the swimming pool. Do not use knives or any sharp
objects to open the swimming pool bag/container. Carefully separate the liner from the rest of the parts and
keep it in a safe place to avoid undesired holes or damages that could be caused by the tools or the metal
wall.
Install the liner on a sunny day, minimum 20º C, so that it can easily stretch during the installation. It is made
of a highly flexible vinyl material.
a) Place the liner (L) in the center of the swimming pool and unfold it towards the sides. Place the
rough side towards the inside of the pool. The welded part that joins the base of the liner with the
side must perfectly match the lower sections and the wall, all around the inside perimeter at the
bottom of the swimming pool.
b) Locate the side welding so that it is perfectly right and perpendicular on the ground. This will help you
to place the liner without folds. Pull away softly all the excess of the liner. Do not pull too hard. The
liner must be centered, well extended and not wrinkled.
c) Lift the side of the liner that covers the upper edges of the swimming pool and fasten it to the top of
the wall with clothespins. Remove the wrinkles by pulling smoothly outwards and adjust the liner.
Flatten the pool liner with your hands. Start filling the pool with water, but not more than 2 cm. Make
sure the pool wall is level. If the level is off by more than 25 mm across the diameter of the pool,
empty the pool, take the wall apart and level the foundations again.
d) Add 25 cm of water and work out all the wrinkles and smooth the liner to the wall.
e) Fasten the liner with the plastic copings PL and withdraw at the same time the clothespins. Let the
liner hang slack for now. Remove the plastic coping around the top edge of the wall one piece at the
time and adjust the liner.
f) When all copings PL are installed, mark with felt pen the overlapping part, remove the coping and
trim the extra length so there is no overlap. Install the last plastic coping again.
g) Then install the white profiles (PCS) on the plastic copings (PL).
Clothes
pins
Cut extra length
fig. 21 fig. 22 foto. 2

10
INSTALLING THE TOP PROFILES, VERTICALS & TOP CONNECTORS
Continue filling the pool with water to 5 cm under de return valve’s hole and meanwhile install the verticals.
Installation of verticals (VER):
a) Line up the bottom of one vertical (fig. 23) with the two small tabs on one base plate. The tabs must
be on the inside of the vertical.
b) Line up the screw holes and fasten with one self-tapping screw (TO2) on each side (fig 23).
c) Hook a top plate (PU1) (fig. 24) over the top edge of the pool wall. Place the top plate down over the
top of the vertical with the tabs on the inside of the column. Make sure the vertical is straight up and
down.
d) Line up the screw holes and fasten with one self-tapping screw on each side and one on the front
(fig. 24).
e) Repeat the last four steps for each of the vertical around the pool wall (fig. 23and 24).
f) The double screw line of the steel wall will remain hidden under one of the verticals. Put the stoppers
on the ends of the top screws.
Installation of top profiles (HOR):
a) Place a top profile (fig. 25-26) with one end on top of the top plate. The side of the top profile facing
the centre of the pool should be close to the pool liner and pool wall. The side of the top profile
facing the outside of the pool will form a large overhang.
b) Line up the holes as shown. Fasten through the two oval holes to the top plate below with two self-
tapping screws (fig. 26). Do not tighten the screws yet. Leave the screws slightly loose until all the
top profiles are in place.
c) Repeat the last two steps for the other end of the top profiles.
d) Repeat previous steps to install the rest of the top profiles around the top of the pool wall.
e) Make the pool settle into a perfect circle by pushing the top of the pool wall vigorously inward at each
vertical (this will help make the bottom of the pool wall shift into a perfect circle).
f) Adjust all the top profiles on line up evenly with each other and tighten all the screws.

11
Installation of the top connectors (EMB):
a) Line up a one-piece top connector above the ends of two
top profiles.
b) Hook the top connector under the inside edges of the top
profiles (fig. 28).
c) Bring the top connector down into place and pull out the
front tabs to hook it under the outside edges of the top
profiles.
d) Repeat the last three steps for the rest of the top
connectors.
12
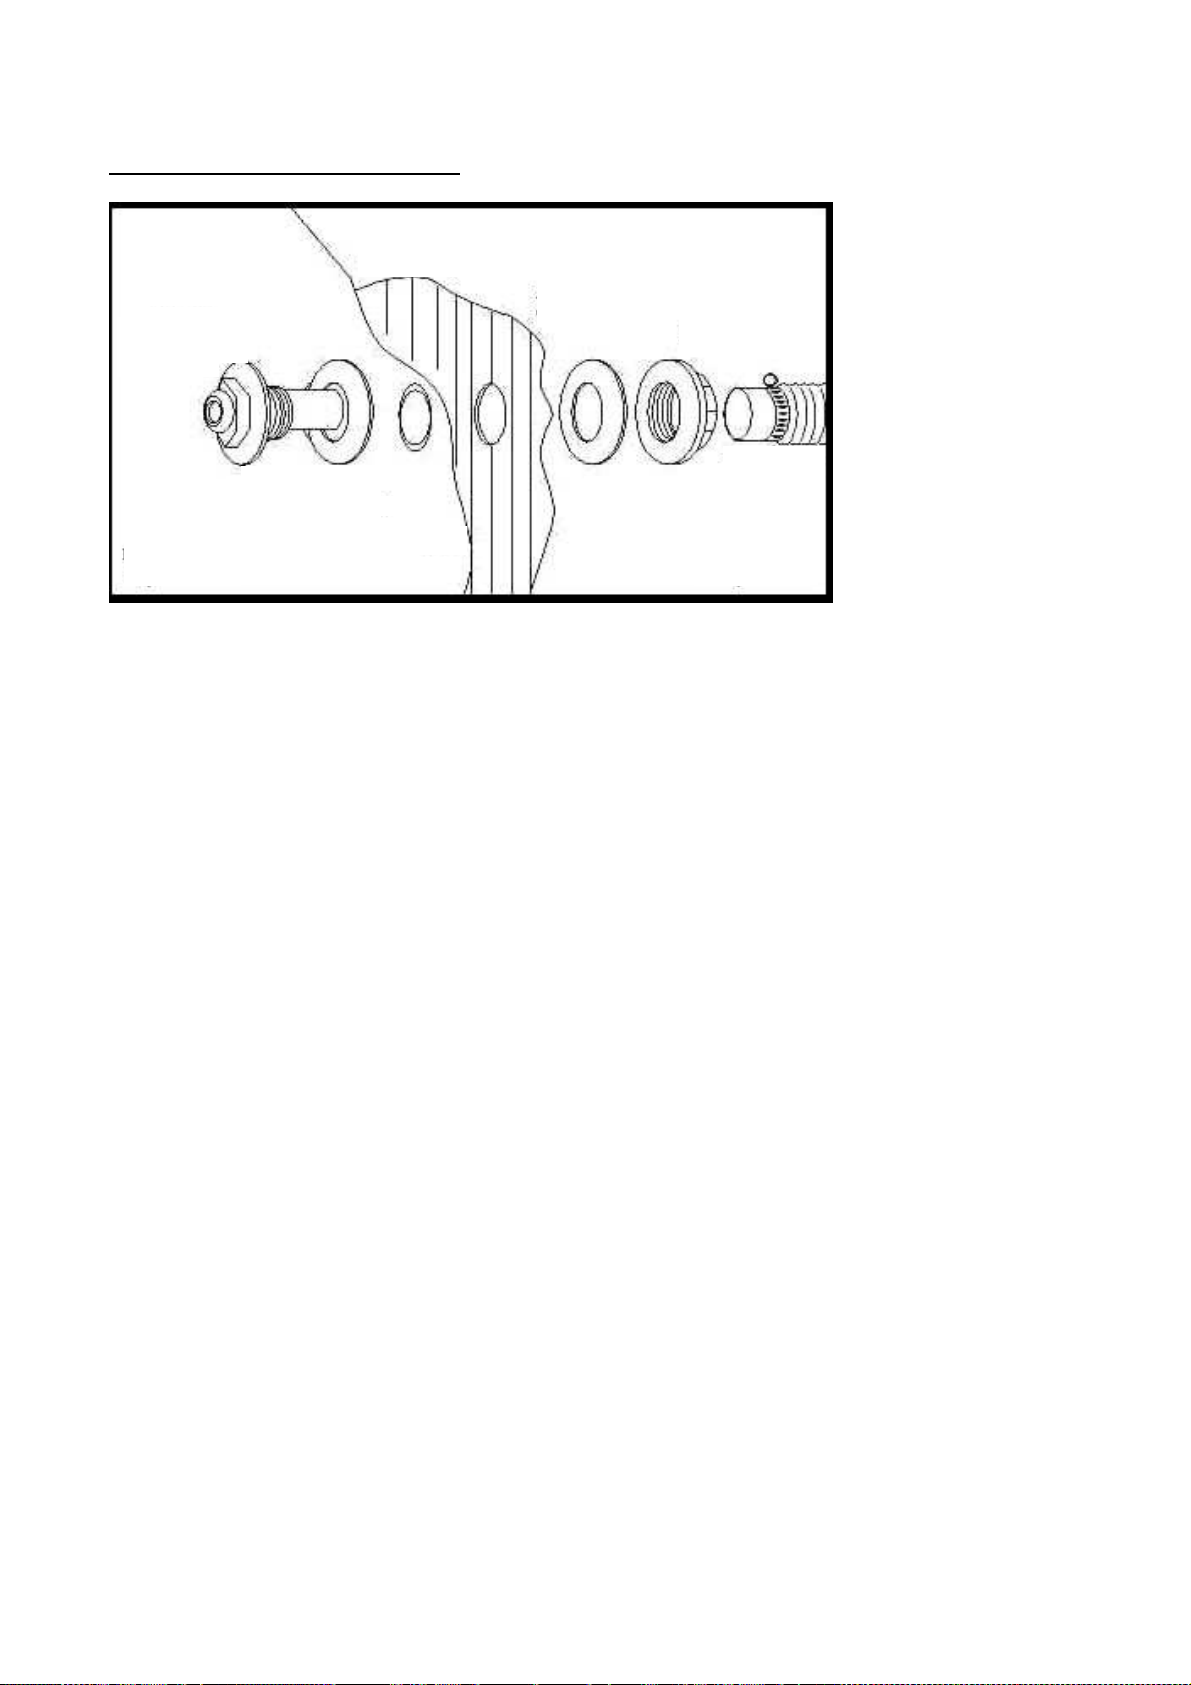
INSTALLING THE RETURN VALVE
1) Mark the holes on the liner (L) with a felt pen. By using a sharp blade, cut an “X”
on the liner covering the holes, while holding the liner against the wall. The “X”
should not exceed the size of the holes.
2) Cover the connection threading with teflon.
3) Place the rubber washer (B) on the steerable grid (A) and place it into the hole on
the inside of the pool. From the inside to the outside, cut the piece of liner that
exceeds on the outside.
4) Place the carton washer © on the outside of the pool and while holding the
connection from the inside, tighten the threading (D) of the large nut. Introduce the
filter hose (E) and fix it with a clamp (H). Repeat this operation for the second
connection. Make sure that the liner is free of wrinkles.
For a more efficient filtration, we advise to direct the water jet. For this purpose, loosen the clamp. Move the
directionable ball towards one of the sides of the swimming pool and slightly to the top and tighten the clamp
again. In this way, the impurities will be directed towards the skimmer.
IMPORTANT: To avoid leaks, re-tighten the nuts after 48 hours.
STEERABLE
GRID (A)
LINER (L)
RUBBER
WASHER (B)
FILTER
HOSE (E)
THREADING (D)
CLAMP (H)
OUTSIDE OF
THE POOL
INSIDE OF
THE POOL
CARTON
WASHER ©
WALL (CH)

13
INSTALLING THE SKIMMER
Keep on filling the swimming pool with water
until 5 cm below the cutted skimmer hole
die. With a felt pen mark on the liner the
square hole for the installation of the
skimmer and cut with a sharp blade the
piece of liner marked. Place the double
rubber washer (Z) on the steel wall. The
steel wall and liner must go inside the
grooves (K) of the washer. Consecutively,
install the skimmer frame with the screws.
Make sure that all the holes are lined up
(washer, die and skimmer). Fix the holes
with the screws one after the other, but do
not screw them up too much until a perfect
matching is assured. Start screwing and
finally tighten the screws firmly following the
same order.
Cover the coupling (M) threading with teflon
and screw up firmly into the skimmer. Fix
one hose end on the coupling (M) with a
clamp (H). Connect the other hose end to
the filter water inlet and tighten with a clamp.
It is important to use teflon for all threadings
so as to assure total waterproofness. Install
the floodgate (P) with a screwdriver.
Finally, place the basket (S) inside the
skimmer and the lid (V) on it.
CONNECTING A VACUUM CLEANER TO YOUR SKIMMER
For filters with a capacity of 6m3/h minimum. Install the vac plate (XM) on the basket (S) inside the skimmer
(Q). Connect one hose end to this adapter and the other end to the vacuum cleaner (or robot, if you filter
capacity allows this). Connect the vacuum cleaner to a stick or a pole.
Fill the swimming pool until half the floodgate of the skimmer. So, the water will go inside the skimmer and fill
the filtering system.
COVER (V)
VAC PLATE (XM)
BASKET (S)
HOSE ADAPTOR (M)
FLOODGATE (P)
DOUBLE
RUBBER
WASHER (Z)

14
SWIMMING POOL MAINTENANCE
Water maintenance
All swimming pools need chemical treatment to maintain the water disinfected and crystal clear. Consult your
chemical products supplier to determine those that are best for your needs. Water treatment procedure is not
the same in all regions, because it depends on the water quality in each region.
The best water quality is obtained by using the right preventive treatment. To prevent the growth of algae and
bacteria, use bactericide, algaecide,water pH correctors and flocculants (except for cartridge filters). Apply
the first chlorine treatment within 24 hours of filling the pool.
Never add chemical products directly to the water. Chemicals must be diluted before being introduced into
the water. Otherwise, the liner could be damaged.
However, it is easier to keep the water clean than to clean contaminated water. Use your filter frequently.
Water maintenance is the most important factor in making your pool liner look excellent and last for a long
time. Therefore, follow the instructions in the filter manual. The filter capacity must be high enough to filter the
water of the pool 3 times in every 24 hours. The filter must be connected when there is nobody in the pool.
Make sure to check the water at least once a week, to keep the pool in optimum conditions.
Make sure that you do the following on frequent basis:
a) Analyze the water pH and make sure it is between 7.2 and 7.6.
b) Analyze the chlorine level and make sure it is between 0.5 and 2 grams per cubic meter.
c) Remove any leaves and insects from the water.
Make sure that you do the following on weekly basis:
a) Add the correct ‘maintenance quantity’ of algaecide.
b) Add anticalcareous if lime is formed or the water is hard.
c) Use flocculants to improve filtering (except when using a cartridge filter).
Handling chemical products and safety measures.
The following precautions must be taken when handling chemical products:
1) Use gloves to protect your hands and masks or goggles for eye protection.
2) No smoking where the products are stored or used. Many products are flammable.
3) Wash your hands and face after using the products.
4) Store the products in a dark and dry place. Do not leave the products in the sun.
5) Make sure that the containers are closed. Tighten their caps or lids.
6) Do not leave the products within the reach of children. Make sure that the products are
stored in a high and safe place.
7) Do not reuse the empty containers.
8) Keep the products in their original containers.
9) Do not remove the labels from the containers.
10) Make sure that the storage area for chemical products has proper ventilation.
11) When raining, increase the level of chlor and antialgae-bactericide
12) When adding water in the pool, check again the chlor and antialgae-bactericide level.
13) Well ventilate the place where the chemical products are stored.
Pool maintenance
After your pool has been completely installed, follow these instructions to keep it clean and in good condition.
1. Liner a. Regularly check for leaks in the liner.
b. Use the repair kit for small repairs on the liner.
2. Pool wall
15
a. Keep the pool wall clean. Clean the wall with a neutral soap. Do not use abrasives,
chemicals or cleaning solutions.
b. Clean up spilt chemical product, used for water treatment, right away.
c. Coat all showing screw heads with clear outdoor varnish.
d. Check the metal parts for rust, at least once a year.
e. Coat all scratches and rusted areas with an anti-rust paint. Follow the instructions for paint
application.
f. At the end of the season, drain the water until the water level is 30 cm. Remove the upper
part of the liner and check for possible rust on the inner side of the pool wall.
g. Pay special attention to leaks in the filter and outlet holes. Leaks must be repaired right
away.
Care during winter months
If the pool is not disassembled during the winter, compliment following instructions at the end of the
season to prepare your swimming pool for the winter. During wintering, do not drain all the water. Never
leave a swimming pool dry outside. Decrease the water level just below the skimmer opening. Cover the
pool with a cover. To keep the cover flat, place an inflatable object or floater between the water and the
cover. This way, the liner is not damaged by rain and / or freezing. You can also add a chemical product to
the water in order to protect the liner against freezing. This product also facilitates the cleaning of the liner
after the winter time.
To avoid that the water starts freezing, let several empty plastic bottles (or balls made of Porespan) float on
the water. In case of snow, remove the snow of the cover regularly so as to avoid extra weight on the cover.
1. Check all joints and screws.
a. Check that all joints are correctly adjusted. Check that the pool wall has not come out of the
lower profiles.
b. Check that the screws are tight.
2. Check rusted areas
a. Paint all scratches or rusted areas using anti-rust paint.
3. Check liner
a. Check that the upper part of the liner is still joined to the pool wall with plastic copings. DO
NOT remove the pool liner. Removal of the liner shall void the product warrantee and/or
guaranty.
4. Find any leaks
a. Check that there are no leaks in the liner. Leaks can cause great damage to your pool during
the winter.
5. Pool accessories
a. Remove all accessories, including the ladder, from the pool.
b. Wash the ladder with water and neutral soap.
c. Wash the rest of the accessories with water and neutral soap.
6. Filter
a. Remove the filter from the pool.
b. Wash the whole filter with water and neutral soap.
d. Read the filter installation and maintenance manual.
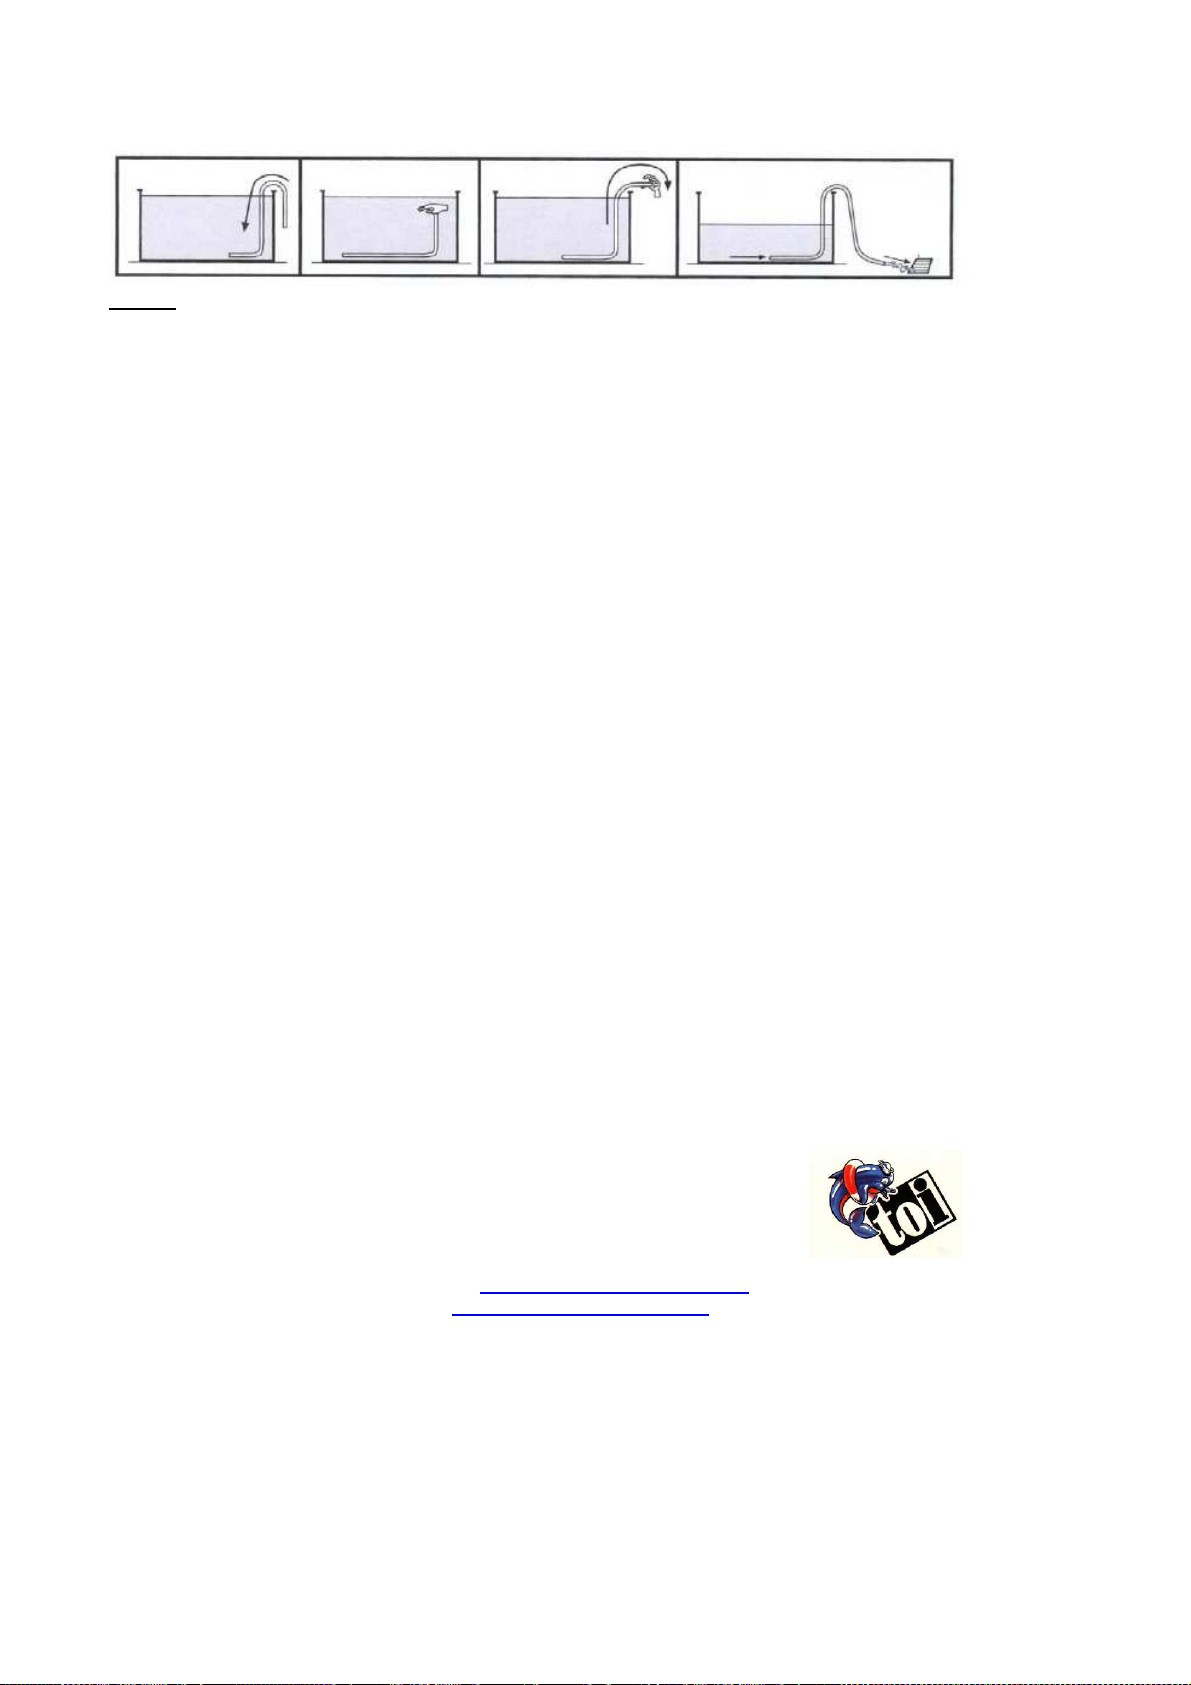
To empty, disassemble and store your pool:
First check the filter instructions to make sure that your filter has the ‘option for emptying’.
Use ‘the communicating vessels principle’: first, completely submerge a hose in the pool until it is full of
water, then, cover one end with your finger and take it out of the pool. Water will start to come out. Make sure
to keep the other end of the hose submerged to empty the pool.
water
16
Caution: Keep into account the amount of water you are going to empty in order to avoid unnecessary
surplus water on the site. Check at any time that the water flow out of the pool is properly evacuated.
Otherwise, the excess of water could cause damage to people as well as material damage.
Always keep in mind the amount of water that will be drained in order to avoid any problem. It is useful to
have a drain close.
After all the water is drained, carefully disassemble the pool. In order to avoid any damage, deformation or
tear, disassemble the parts in the inverse order to the installation. Check all the parts to make sure that they
are perfectly clean and dry before storage.
Prior to storing, wash the liner with water and neutral soap that does not contain any chemical products. To
conserve the liner in optimum condition and avoid bad odors and humidity, wipe the liner on both sides and
dry it with a cloth or paper towel.
To make sure that the liner is not pierced, fold and store it in a separate place.
Keep the pool sections and parts in their original containers.
Keep the sections and parts of the pool in a dry and covered place.
If any of the pool elements are damaged, replace them as soon as possible with original TOI accessories.
See the address at the end of this manual.
Assembled pool start up.
You should start up the pool at the beginning of the season. The proper procedure must be followed to avoid
problems during the period of the year that the pool is used.
a) Check that your pool equipment (filter, skimmer, cartridges) are in good condition and work
correctly.
b) If necessary, drain the pool and wash the liner with water and neutral soap or a disincrustant
product. The liner must be cleaned when the sun is low. Maintain the walls and floor wet. Leave
the product for a while and then rinse with water.
c) When the liner is completely clean, fill up the pool.
d) Begin the chlorination treatment. If it takes more than a day to fill up the pool, add the chlorine
gradually throughout this time.
e) To maintain the water in optimum condition, analyze the water pH and make sure it is between
7.2 and 7.6.
To reassemble your pool, follow the instructions beginning from the ‘INSTALLATION’ section.
For further consultations, please contact us:
TORRENTE INDUSTRIAL, S.L.
C/ Buitrera, s/n
46180 Benaguacil (Valencia)
SPAIN
Tel. +34.96.273.01.36
Fax. +34.96.273.05.45
E-Mail: infor@torrenteindustrial.com
www.torrenteindustrial.com
drain
Table of contents
Other TOI Swimming Pool manuals


