ToKViA T221 Service manual

T221
Quick Reference Manual
For PDF version,
For after-sales support,
Please contact

This mobile phone is unlocked. It only supports 2G GSM SIM card. If
your SIM card is not accepted by the phone, please contact your SIM
card provider to check if the SIM card supports 2G GSM.
A microSD memory card (up to 16GB, not included in the equipment
supplied) is necessary, for instance, when you want to use the
camera or use the PhotoContact function.
How to open the battery cover to insert the battery and SIM card?
As illustrated on page 4, the battery cover door locates at the bottom
right of the phone. Use your fingernail or a tool such as a screwdriver
to open it.
2

3
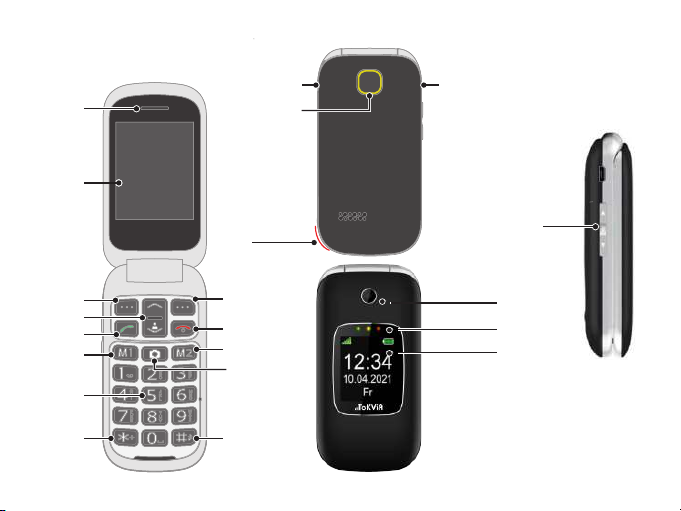
General View
The illustration on the following page shows details of the mobile phone. Famil-
iarise yourself with all the operating elements before starting to use the mobile
phone.
1Loudspeaker
11 Favourites key M2
2Display
12 Camera key
3Softkey, left
13 Hash key
4Navigation key
14 Headphone connection port
5Call key
15 Emergency call key (SOS)
6Favourites key M1
16 USB connection port
7Keypad 18Camera
8Star key
17Volume key/Torch key
9Softkey, right
19 Green: Missed call, new message
Red: Battery weak/Charging
White: Torch lamp
10 On-hook key
20 External Display
21Battery cover door
4
21
1
2
3
5
6
7
8
11
10
9
15
14
12
4
13
16
17
19
18
20

Inserting the SIM Card
Only use SIM cards of the size illustrated
(Standard SIM). If you want to use a micro or nano
SIM card, you will need an appropriate adapter.
Insert the SIM card in the slot labelled SIM.
Inserting the MicroSD Memory Card
If you want to increase the memory capacity of the
mobile phone, you can insert a microSD memory card
(not included in the equipment supplied) with a
memory of up to 16 GB in the mobile phone. A
microSD memory card is necessary, for instance, when
you want to use the camera.
Place the microSD memory card with the contacts
facing down in the compartment, as illustrated.
Ensure the microSD memory card is aligned correctly.
Before taking the first photo, press the left menu key
(marked with 3 dots) and switch the storage to
memory card.
5

6
Inserting the Battery
Open the battery cover door and insert the battery as
illustrated. Ensure the battery is aligned correctly.
Charging the Battery
1 Connect the power adapter to a properly
installed power socket.
2 Connect the USB plug to the USB
connection port on the mobile phone.
7
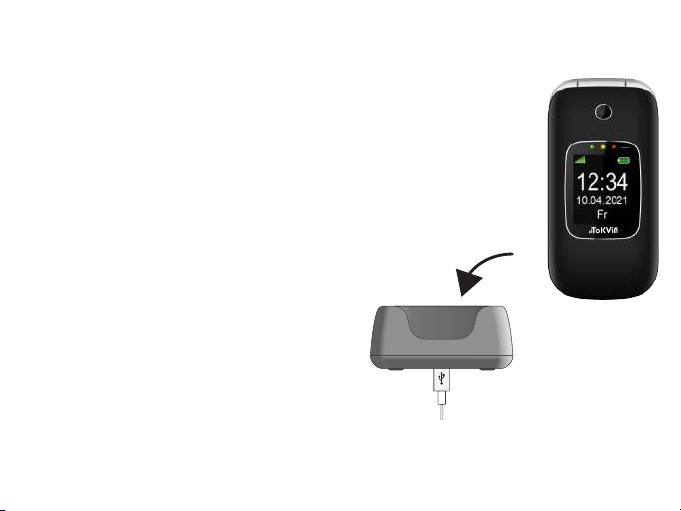
Charging Cradle
1 Connect the power adapter to a properly installed
power socket.
2 Connect the USB plug to the USB connection
port on the charging cradle.
3 Place the mobile phone in the charging cradle.
4 When the phone battery is fully charged, disconnect
the connection to the power supply. This reduces power
consumption.
8
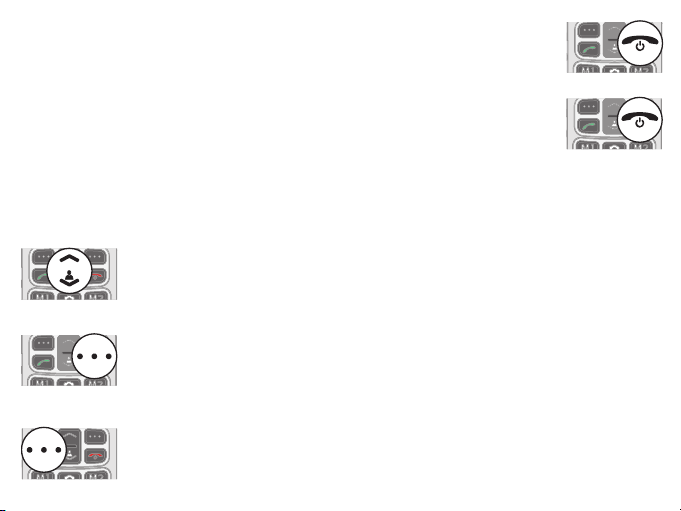
Switching On the Mobile Phone
Press the On-hook key for 3 seconds.
Switching Off the Mobile Phone
Press the On-hook key for 3 seconds.
Operating the Mobile Phone
Use the following keys to navigate through the menus provided by the mobile
phone. Some keys are assigned two functions depending on the menu.
Navigating in the menu.
On the Start Screen, press Navigation down will open
PhotoCall.
Discard the settings or navigate one menu level back.
On the start screen: Open the PhoneBook.
Open a submenu or confirm your entries.

9
When you want to enter phone numbers and digits or delete entries, use the
following keys:
Take an incoming call or begin a conversation.
End a call in progress.
Reject an incoming call.
Delete entries. Enter digits and letters.
When you want to take, end or reject calls, use the following keys:

10
The operating elements on the sides or rear of the phone are assigned the
following functions:
Trigger an emergency call to the stored phone numbers.
Charge the mobile phone battery or establish a connection
to a computer.
Switch the torch on and off.
During a call conversation, increase/decrease the call
volume.

11
Overview of the Most Important Functions
Italics texts are provided in the following operating steps. These italics indicate
texts which can appear in the display of the mobile.
Setting the language
1 Press the left-hand softkey to open the main menu.
2 Navigate to the Settings > Phone settings > Language.
3 Select the required language.
Setting the time and date
1 Press the left-hand softkey to open the main menu.
2 Navigate to the Settings > Phone settings > Set date and time .
3 Enter the current time and date.
4 Select Save to activate the setting.
Changing ringtone and other alarm tones
1 Press the left-hand softkey to open the main menu.
2 Navigate to the Settings > Profiles, choose a profile, press Option >
Customize, then change the ringtone or other alarm tones.

12
Adding a contact to the phone book
1 Press the left-hand softkey to open the main menu.
2 Navigate to the Phonebook > Add new contact menu option.
3 Select the storage location required To SIM or Phone.
4 Enter the name and phone number.
5 Select Option > Save. The new contact is saved.
Searching a contact
1 Press the left-hand softkey to open the main menu.
2 Navigate to Phonebook.
3 Simply click the letters of the name you would like to select.
Number announcement for visual impairment
The number is announced when it is dialed. It helps with people who are
visual impaired.
1 Press Left-hand softkey to open the main menu.
2 Navigate to Settings > Profiles >General (or another profile) > Customize
> Keypad > Change.
3 Select Human voice tone, then press Option > Save.

13
Setting Direct Number key M1 and M2
1 Press the left-hand softkey to open the main menu.
2 Navigate to Phonebook > Direct Number > OK > M1/M2.
3 Enter name and number, press Save.
4 On the start screen, long press M1 or M2, the number is dailled.
Speed dial
1 Press the left-hand softkey to open the main menu.
2 Navigate to the Phonebook > Speed dial. Set the speed dial
contacts. 8 contacts are able to be stored to digit 2-9.
3 On the start screen, press and hold a digit, the stored contact is dialled.
Flip to answer
1 Press the left-hand softkey to open the main menu.
2 Navigate to Setting > Call setting > Answer mode > Cover answer.
3 Press ON, then press Done.
When there is an incoming call, flip the phone cover to accept the call
automatically. Close the cover to end the call.

14
3 Press the Call key. The phone number is dialled.
Adding contacts to PhotoCall
1 Press the Navigation down to open the PhotoCall.
2 Select the entry you want and select the Edit option.
3 Enter the name and phone number of the picture contact.
4 Select Option> Save. The contact is saved.
Adding a picture to PhotoCall
When you want to assign a picture to a contact, you can either use
the camera integrated in the mobile phone or transfer a picture
stored on your computer to the mobile phone. In this case, you need
a microSD memory card.
1 Press Navigation down to open the PhotoCall
2 Select the required picture contact.
3 Select Edit > Option > Edit > Caller picture > Option > Select.
4 Use the File Manager to assign a picture or take a photo with the camera.
5 Press the lef-hand Softkey to confirm your settings with Save.
Dialling PhotoCall
1 Press the Navigation down to open the PhotoCall.
2 Select the required picture contact.

15
Emergency Call Function (SOS)
The emergency call key (SOS) on your mobile phone has an emergency call
function. Press and hold the emergency call key (SOS) for approx. 3 seconds
to trigger an emergency call. An alarm signal sounds and an emergency text
mes-sage is sent to stored phone numbers. After that, the respective phone
numbers stored are dialled in succession in handsfree mode. You can store up to
5 phone numbers which can be assigned to the emergency call function.
Activating the emergency call function
1 Press the left-hand softkey to open the main menu.
2 Navigate to Settings > SOS > Set SOS.
3 Press the left-hand softkey to turn on/off.
Adding a phone number to the emergency call function
1 Press the left-hand softkey to open the main menu.
2 Navigate to the Settings > SOS > SOS numbers.
Do not assign any official emergency call service numbers. A false alarm can
lead to considerable costs which could be charged to you.
3Select a free storage location and enter the required phone number or select
a contact from the phone book.
4 Press the left-hand softkey and confirm your settings by selecting OK.

16
Bluetooth
The Bluetooth function, a standard for data transfer via wireless communication,
can be used to connect a compatible headphone to the mobile phone without
the need for any cables.
Activating Bluetooth
Switch the Bluetooth function on when you want to connect compatible devices
to your mobile phone.
1 Press the left-hand softkey to open the main menu.
2 Navigate to Settings > Bluetooth > Bluetooth > Status.
3 Press the left-hand softkey and switch the Bluetooth function On.
Restore factory settings
1 Press the left-hand softkey to open the main menu.
1 Navigate to Settings
> Restore factory setting > OK.
2 Enter password (default 0000).
3 Press OK to confirm.
Please note: By performing this function, all settings will be restored to factory
default. All information includes contacts will be erased. Please ensure backup
all your contacts to SIM card before performing this function.

Menu paths for other settings
Blacklist: Settings > Call settings > Advanced settings > Blacklist, set the
status to "On". And set the Blacklist numbers.
Block the contact in Phonebook: Open Phonebook, then select a contact,
click Option > Add to Blacklist.
FM radio: Multimedia > FM radio. Use "M1" and "M2" button to select
channels. Press camera button to pause FM radio.
Camera: On home screen, press camera button to open camera. A
memory card is needed to take photos. Before taking the first photo, press
the left menu key (marked with 3 dots) , click storage and switch the storage
to memory card.
Torch/Flashlight: Click and hold the torch key/Volume key on the left side
of the phone to turn on the torch. Click and hold again to turn off.
Alarm: Organizer > Alarm. Click M1/M2 button to set the alarm to be "ON" or
"OFF".
Calculator: Organizer > Calculator. Click the navigation key ^ v M1 M2 and
camera button to select the calculation.
Tasks, Calendar settings are also in the menu of ORGANIZER.
17

Switch between Silence/Vibration/General mode: Long press # button.
Change Alarm tone, Ringtone, Ring volume, Message tone, keypad
tone, Cover open/close tone and system alarm tones: Settings >
Profiles > General (or another profile you will use) > Customize.
Caller ringtone: Assign ringtone to a contact, go to Phonebook, select a
contact, Option > Edit > Caller ringtone. Click M1/M2 button to select a ringtone.
SOS: Settings > SOS settings. Then set the SOS numbers, customize the SOS
message. Set the SOS to OFF if you don't need this function.
Set date / time, Language, Input method: Settings > Phone settings.
Turn off LEDs: If you find the LED disturbing (LED light for charging,
reminding of missed calls and messages), you can turn off the LEDs: Settings >
Phone settings > LED mode > Close all LED.
Change display brightness: Settings > Phone settings > Brightness, then
click M1 to decrease or M2 to increase the display brightness
Auto redial: Settings > Call settings > Advanced settings > Auto redial > On.
Network selection: Settings > Network settings.
Phone / SIM lock: Settings > Security settings.
18

Q & A
How to open the battery cover
Battery cover door locates at the bottom right of the back side, as showed in
Page 4. Open it with fingernail or a tool (such as a screwdriver) .
Does it support 3G/4G/5G/MMS/Whatsapp/Spotify/Wi-Fi/GPS
No, it's for voice call and short message only. Please make sure that your SIM
card is a 2G GSM SIM card. If it can not accept your SIM card, please contact
the SIM card provider to check if the SIM card supports 2G.
microSD memory card
It supports all main stream microSD card, up to 16GB.
A microSD card is necessary, such as to take pictures, or to add a
PhotoContact. Before taking the first picture, press the left menu key (three
dots key) and switch the storage to Memory card.
What is the formats of SIM card
SIM card slot is for standard SIM card. A set of SIM card adapters are included
in the box. With the SIM card adapter, nano/micro SIM are also supported.
How to adjust the call volume
During the call conversation, press the volume key (at the left side of the
phone) to increase or decrease the call volume.
Does the cell phone has speaker function
Yes. During the phone call, press the right menu key (with 3 dots) to activate.
19

20
Technical Properties
Frequency band GSM: 850 / 900 / 1,800 / 1,900 MHz
Bluetooth: 2,402 - 2,480 GHz
Sending power (max.) GSM: 2.47 W
Bluetooth: 2.67 mW
Power supply Input: 100 - 240 V, 50 - 60 Hz, 0.3
A Output: 5 V, 550 mAh
Battery 3.7 V, 1000 mAh
Up to 250 h standby
Up to 5 h talk time
Max. 2 h charging time
Display 2.4″ LCD with back-lighting
Dimensions Approx. 101 x 50.5 x 19.6 mm
Weight Approx. 93 g incl. battery
Permissible ambient
conditions
-10 °C to 45 °C at 30% to 75% humidity
Connections USB, 3.5 mm jack socket
Table of contents


