TOM SHOT 360 YAS-ME+7 User manual
110g
Lightweight
Compact
Click Stops
Strong Nylon
360° x 180°
Panorama
3 4
6 8
ULTRALIGHT PANOHEAD
for Yasuhara Madoka E +7°
TOMSHOT360.COM
EAN: 0700814123031
MPN: YAS-ME+7
MADE IN GERMANY
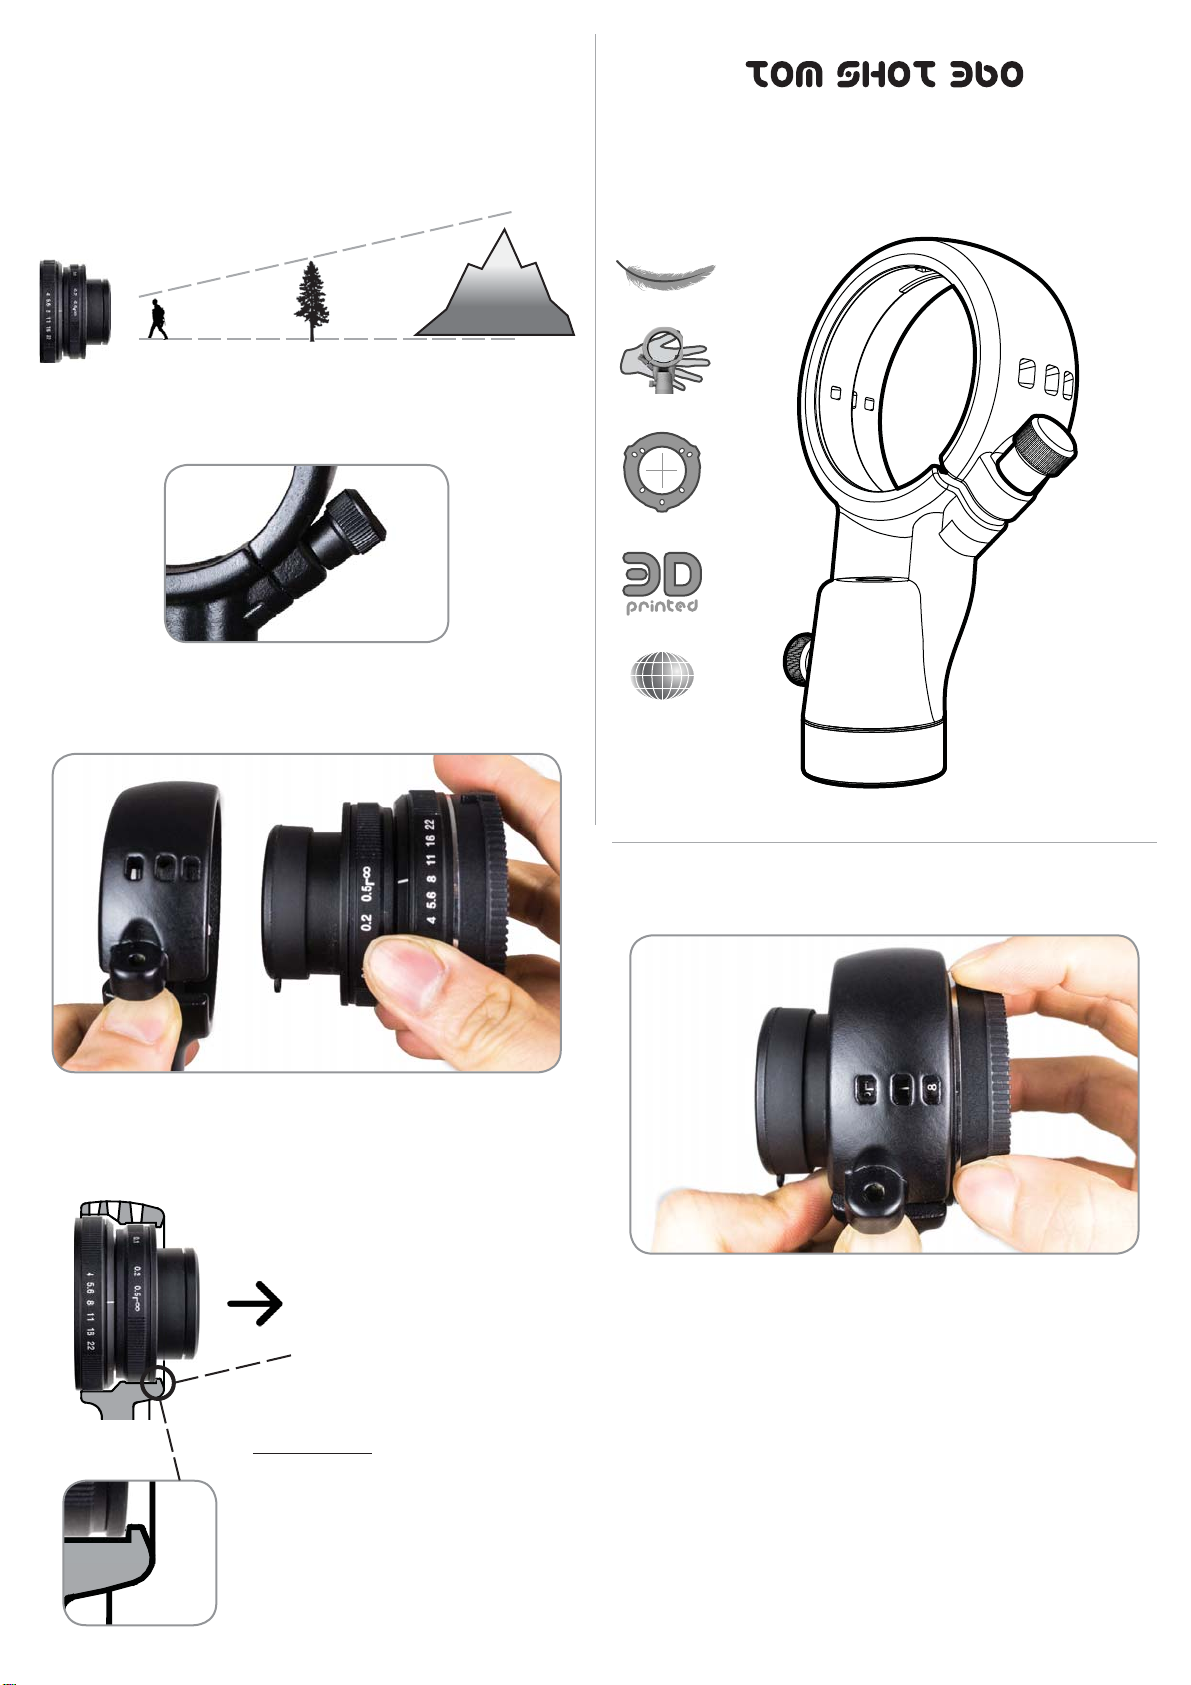
Assembly Instructions
1. Set Aperture & Focus
Find the best focus for objects at 3 meters to 30 meters, while aperture is widest @
f4. If shooting landscapes such as mountains, focus on an object half the distance
to the mountains. Then set aperture to a higher value, f8 is recommended.
Aperture lower than f5.6 have softer edges and shallow focus range, while
aperture higher than f11 have sharper edges and softer centers.
2. Insert Lens into Panohead
First, remove the clamping screw. (a)
a) Remove the clamping screw before inserting the lens. Attach again after. Finger tighten only.
Then insert the lens only from the back of the panohead. Apply light force to
open the ring, only as wide as necessary for insertion, by pressing your thumb
into the gap. (b)
(b) Insert lens only from the front of panohead. Do not insert from the opposite side. Remove from
the same side.
Then push the lens forward until it touches the contact point. This position is the
no-parallax-point or nodal point at the horizon for 3 and 4 rotations. (c)
3. Align, Check Lens Settings, & Clamp
Align the lens setting mark, the white line, either to the side viewport for portrait
orientation, or the top viewport for landscape orientation. (d)
(d) Align the mark in the viewport, and check your settings.
Check that the lens settings are as desired. Adjust the focus by pressing your
thumb into the gap so that the aperture ring is not touching the panohead, then
use another nger to turn the focus ring from the front. (d)
Insert and tighten the clamping screw, nger tight only. (a) Do not overtighten,
or damage may occur. Then attach the camera body, and install panohead on
tripod. It is recommended not to use a ball head, simply attach directly to the
tripod column.
3m 30m or halfway
*Insertion from wrong direction may cause damage. Do not
apply excessive bending. Do not open the ring wider than
7mm wide gap / slot for insertion. It is normal to have a 2
to 3mm gap when assembled.
Insert Direction*
Lens from back of panohead
Contact Point
Front of focus ring (c)
Maximum load: 1.2kg

cause damage. Do not force a rotation when the locking screw is engaged.
Remember to disengage the lock after use. (g)
The locking screw can be useful for shooting 360 video or time lapse.
Shots Required
With APS-C sensor:
Minimum shots = 3
Recommended shots = 4
Optional shots = 6
Nadir shot is optional
4. Check Level & Unlock
Check the bubble level, and adjust your tripod so it is close to leveled. (f)
(f)
Make sure the locking screw is unlocked. Do not rotate the panohead with the
lock engaged, or damage may occur. (g)
(g) Disengage the lock before rotating.
5. Rotate & Shoot
With the locking screw unlocked, rotate the panohead and shoot 3, 4, or 6 stops
around 360 degrees. It is recommended to shoot in manual mode, with the same
white balance, aperture, shutter speed, and ISO settings for all shots. It is also
recommended to rotate in clockwise direction to prevent the unscrewing of the
panohead from the tripod. Auto Exposure Bracketing, HDR, D-lighting, and RAW
are optional and can be used to improve the image quality.
6. Optional Handheld Nadir Shot
Shooting a handheld nadir is optional for patching over the tripod or hole. When
shooting the nadir, the locking screw can be locked to resist rotation against
gravity. The locking screw should only be nger tight, as overtightening may
Cleaning
Wipe with damp towel.
Do not rinse or submerge metal parts in water.
Water may corrode springs and ball bearings.
Do not apply alcohol.
Additional Warnings
When the camera or the panohead is attached to a tripod, only lift them by
grabbing the tripod directly. Never lift from the camera or the panohead because
this could damage your equipment. Doing this and turning the tripod 90 degrees
horizontal is adding an equivalent load of 15kg, or 2 bowling balls on top of your
lens! The same warning applies when using a monopod, only lift by grabbing the
monopod directly. Never lift from the camera or panohead.
Max. recommended temperature: 70 °C (158 °F)
Max. temperature for adhesive components: 80 °C (176 °F)
Max. temperature for nylon body: 150 °C (302 °F)
Click Stops
The new rotator has selectable 3, 4, 6, and 8 clicks.
Install the screws no closer than 1/4 turn from stop, or damage may occur.
The detent plate is made of stainless steel.
• Each screw is set optimally to each hole. It is best not to remove the screws
from the holes. The Lock Strip will also wear out after 2 complete removals.
• To disengage the screw, simply turn it 1 revolution counterclockwise and
leave it in the hole.
• To engage the screw, turn it slowly clockwise until you feel resistance, or
when it stops. Then turn it counterclockwise by 1/4 to 1/2 turns.
Detent click screw
Lock Strip
Visit for the latest news and updates:
www.tomshot360.com
This manual suits for next models
1
Popular Camera Accessories manuals by other brands


Dragonfly Energy
Dragonfly Energy BB8D Manual and installation guide

Guilin Feiyu Technology
Guilin Feiyu Technology SPG Plus instruction manual

Taico
Taico TS5000 user manual

Energizer
Energizer e2 Photo L91 Product safety data sheet

LINHOF
LINHOF TECHNO ROLLEX operating instructions

Westcott
Westcott 1893 Setup instructions