TOM TM1300 User manual

1. ASSEMBLY INSTRUCTIONS
RAPIDS MINI CANISTER FILTER
Aquariums and Nano Tanks
INSTRUCTIONS for TM1300
Aquariums up to 20 Gallons
80 Gallons Per Hour Flow Rate
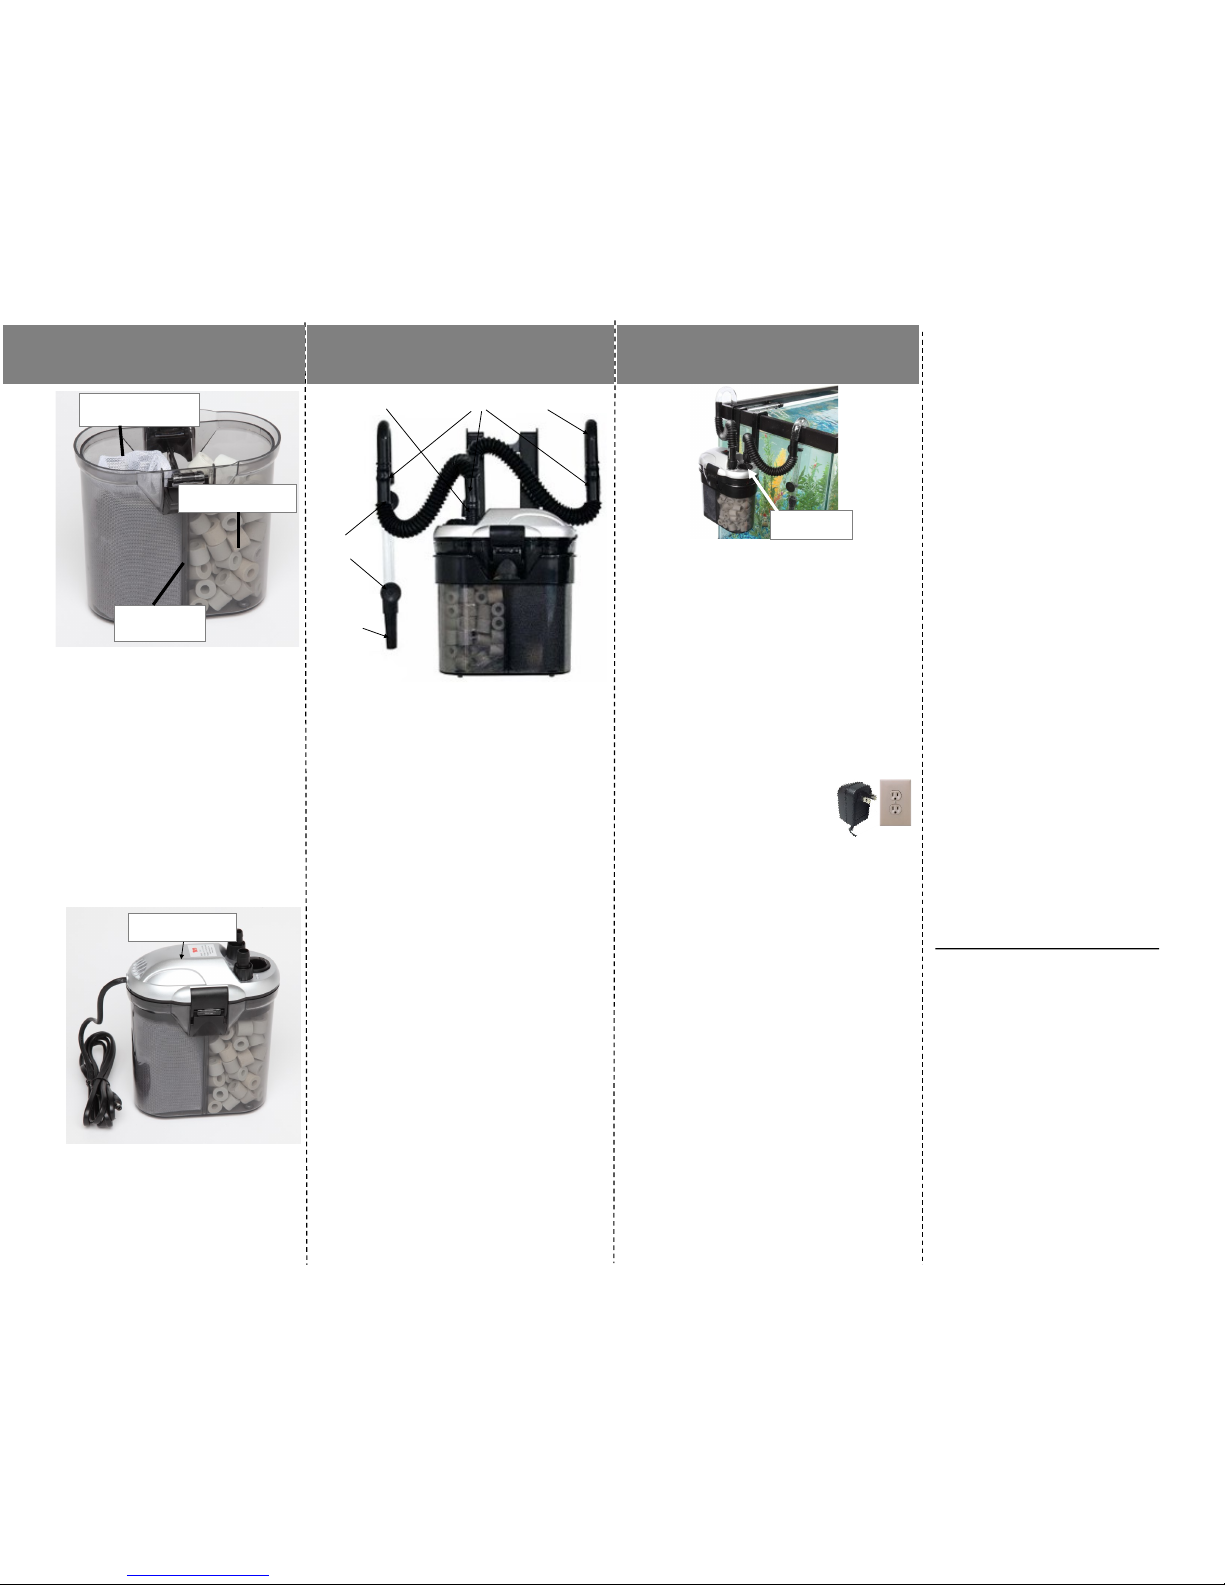
Number
Code Descripon
1End Cap for Spray Bar
2Spray Bar
3Sucon Cup
4U-Tube Outlet
5U-Tube Intake
6Expandable Hose
7Hose Nut
8Water Fill Cap
9O-Ring for Fill Cap
10 Intake Tube
11 Strainer
12 Power Unit
13 O-Ring for Canister Body
14 Impeller
15 Impeller Cover
16 Media Core Tube
17 Ceramic Cylinder Filter Media
18 Filter Compartment Paron
19 Floss/Carbon Filter Media
20 Filter Hanger
21 Canister Housing
22 Rubber Feet Pads
23 AC Adaptor 120V-12V
24 AC 12V Plug
Remove lter from box and conrm there are
no missing parts (see parts diagram). Refer
to diagram to idenfy parts.
PLEASE READ THESE
INSTRUCTIONS BEFORE
ASSEMBLING FILTER
Children under the age of 13 should
be supervised by an adult with the
lter and maintenance.
2. PARTS DIAGRAM
KOLLERCRAFT
LIMITED WARRANTY
KOLLERCRAFT a Division of Koller Enterprises,
Inc. warrants this aquarium product to be free
from defects in material and workmanship under
normal use and service and according to the
provisions as specified in the accompanying
assembly and operating instructions, for a period
of 2 years from date of purchase.
This warranty does not cover and
KOLLERCRAFT is not liable for the cost of
repair or replacement of parts which have been
subject to misuse, negligence, accident, improp-
er installation, damage during shipment or han-
dling, normal deterioration due to wear and
exposure or defects caused by unauthorized
parts or modification.
UNDER NO CIRCUMSTANCES WILL
KOLLERCRAFT BE LIABLE FOR
ACCIDENTAL OR CONSEQUENTIAL DAM-
AGES, INCLUDING BUT NOT LIMITED TO
LOSS OF PROPERTY OR EQUIPMENT.
Some states do not allow the exclusion or
limitaon of incidental or consequenal
damages, or limitaon on how long an im-
plied warranty lasts, so the above limitaons
or exclusions may not apply to you. This
warranty gives you the legal rights, which
vary from state to state.
IF ANY COMPONENTS ARE
DAMAGED OR MISSING
DO NOT RETURN TO THE STORE
email cservice@koller-cra.com
Warranty Repairs or Replacement
FOR HELP OR COMMENTS
cservice@koller-cra.com or
(800) 545-1344
3. Assembling Filter Media
4. Filter Assembly
TOM items and components are
registered trademarks of Koller
Enterprises, Inc. and its aliates.
Manufactured and distributed by
KOLLER CRAFT Fenton, MO 63026 USA
a) Paron
b) Bio-Cylinders
c) Filter Media
d) Power Unit
Place the Canister in the Hanger and posion on the
frame of the aquarium.
Open Water Fill Cap (if too ght use needle-nose
pliers to remove cap) and ll Canister with water to
top of opening (a).
Wait 5 minutes. The Filter Media will absorb water
and addional water will be needed to top o the
Canister.
Reinsert the Water Fill Cap, making sure the O-Ring
on the Fill Cap is properly posioned.
Plug AC Adaptor into standard 120V electrical recep-
tacle. Note; do not force polar-
ized plug into non-polarized
receptacle.
Check for leaks to conrm
Canister is properly sealed .
Use of a GFCI (Ground Fault Circuit Interrupter) is
always recommended when using electrical appli-
ances around water.
The Mounng Bracket is removable if you wish to
place the Canister next to the aquarium and not
hang on the tank.
Trouble Shoong-Canister lter not pumping water
Unplug Canister Filter and li lter, pping it back
and forth to remove possible trapped air inside the
canister. Plug lter back into electrical outlet.
Check spray bar or water diuser to conrm water
is owing.
If sll not pumping, unplug the lter from electrical
outlet. Unscrew Fill Cap (see (a) above), turning it
counter clockwise. If dicult to remove, use pliers
to grasp Cap and turn. Fill the canister completely
to the top of the ll hole and replace Fill Cap on
lter. Make sure Fill Cap locks into place, the lter
may not operate properly if Cap is not locked
properly.
5. Priming and Starng Filter
e) Spray Bar
b) Aach
Strainer
Slide two Sucon Cups onto the longer
plasc U-Tube (a).
Press the Strainer onto the long-end of the
same Intake Tube (b).
Take one of the Corrugated Hoses and con-
nect the larger diameter end of the Hose to
the short-end of the Intake Tube (c).
Connect the opposite smaller-diameter end
of the Corrugated Hose to the Power Unit
hose connector and ghten the Hose Nut
(d).
Slide two Sucon Cups onto the Spray Bar.
Aach elbow connector to Spray Bar.
Take the shorter plasc U-Tube and connect
the Spray Bar with elbow onto one end of
the U-Tube (e).
Take the second Corrugated Hose and con-
nect the large-diameter end to the opposite
end of the U-Tube.
Connect the smaller-diameter end of the
Corrugated Hose and connect to the Power
Unit (out), then ghten Hose Nut.
c) Connect Hose
d) Hose Nut
a) Fill Cap
a) Sucon
Cup
Place the Power Unit (d) onto the
Filter Housing and press the Clips
downward to seal the Canister Filter.
Conrm Filter Compartment
Paron is securely in place (a).
Remove Ceramic Cylinders from
plasc bag and place Ceramic
Cylinders in Biological Chamber (b).
Roll Floss/Carbon Media bag and
place in the Media Compartment
(c), then posion Media Core Tube
with Power Unit into middle of lter
media and aach Power Unit. Or
wrap lter media around Media
Core Tube and insert into canister
body, snapping clips into place.


