D.T. System H20 1810 Series User manual

H20
Series
Electronic DogTrainer
Owner's
Manual
H201810 Series
H201820Series
H201830Series
H201850 Series
LJm
D.b
Systems,
Inc.

r
3
NOTICE!
According
to
how
you
uw
your
transmitterr, the transmitting range
might
be
much difkrent.
You
will
have
more
range
if
you
use your transmitter
apart
from
your
body
as
foll~s:
3
Maximum
Range
Typical
Range
Minimum
Range
k
d

TABLE
OF
CONTENTS
Tableof Contents
..................................
3
............................................
Introduction 4
PackageContents
.................................
5
Model Features
......................................
6
Adjusting and Positioning
.......................
Your Collarfor Proper Fit
7
Parts and Functions
...............................
8
................................................
Batteries
13
..........................
Setting IntensityLevels 14
............................
ProgrammingITesting
16
ImportantSafety Notes
..........................
18
..........................................
Maintenance
19
................................................
Warranty
20
...................................
FCC Compliance
22
...............................
Contact Information
24
3

Congratulationsandthank you for purchasingour
HzO
Series
TM
Training Collar. The H20series
representsthe absolute latesttechnological
advancement inthe ElectronicDogTrainingWorld.
It offers Maxx-RangeTM,the industry'sonly
internallywoven antenna inthe collar. With up to a
one mile range, they are perfectfor hunting,basic
obedience and professionaltraining. H20series
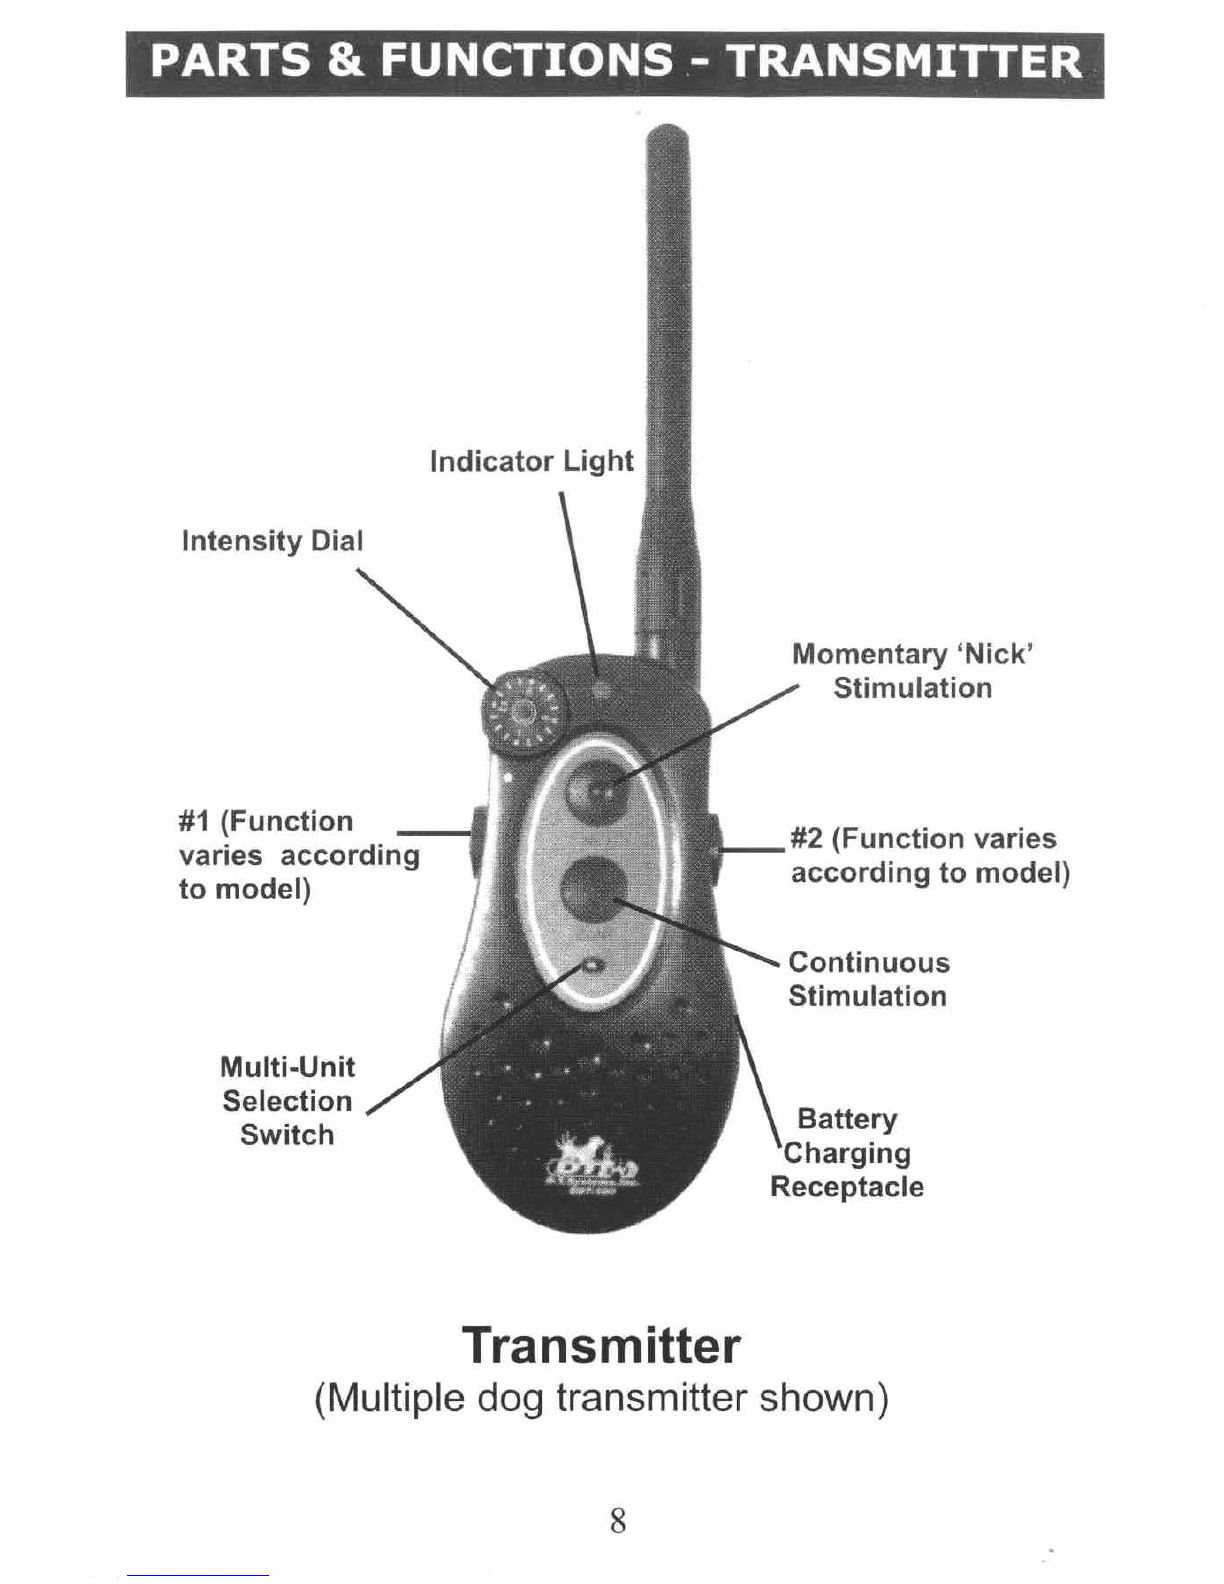
collarsfeature Sixteenlevelsof stimulation
intensity,with an easy 'no-look' clickingintensity
selectiondial. Easyone hand operation allowsfor
maximumcontroland safety. Eachmodelincludes
both Constant and Momentary"Nick" stimulation.
Additionalfeatures include PositiveVibration, Jump
stimulation,Risestimulation,and a beeperwith
Locate, RunIPointand Pointonly modes. The
transmitterand collars are both 100%waterproof,
and the collar can beworn even when the dog is
submerged. The H20Series DogTraining Collar is
durable, safe and very humanewhen used
correctly. The automaticsafetyshut-off feature
stopsthe stimuluson boththetransmitterand the
receiverto preventaccidentalor prolonged
stimulation.
Thanks againfor choosing D.T. Systemsfor your
dog training needs.

IMPORTANT
NOTE:
Please readthis owner's manualin its entirety
beforeoperating this unit. Should you have any
questionsabout our collars or their operation
please contactour Customer Servicedepartment
(seeback pagefor address and phonenumber
information).
Transmitter
Collar Receiver(twofor each
2
dog model, three
for each
3
dog model)
4"
Antennafor theTransmitter
Rechargeable Batteriesfor boththe Collarand
Transmitter
BatteryCharger
a
Splitter Cablefor simultaneouscharging
Test Light
Owner's Manual
CarryingCase

60Series
-
DigitalTechnology
One mile rangetrainer
Lightweight, waterproof collar and transmitter
16adjustableintensitylevelsof Momentary
('Nick') Stimulation, and ConstantStimulation
Rechargeable Ni-MH batterysystem
GentleTouch SystemTMExtra Mild Stimulation
MAXX-RangeTMInvisible, EmbeddedCollar
Antenna
Built in safetyshut-off system
All modelsavailable intwo and three dog
systems
PositiveVibration (H201820,1822,
&
1823only)
NEW Jump feature allows you to instantly"jump"
to a predeterminedintensitylevel (H201830,
1832
&
1833only)
NEW
Risefeature graduallyincreases
stimulation levelthe longer you hold down the
"Rise"button (H201830, 1832
&
1833only)
Three beeperfunctions
-
Locate, RunIPoint,
Pointonly (H201850, 1852
&
1853only)
Baritonebeeper easierto hear and easieron the
dog
(H20
1850, 1852
&
1853only)

AUJUP
I
ANU
QL
rua~
I
AUNANU
TUUK
COLLAR FOR PROPER
FIT
Proper collartightnessand position
are very importantto insuresafety
and correct functioningevery time
you use
the
collar.
All electroniccollars need to be
very snug to work properly.
They must bejust tight enough
to allow the "prongs"or
electrodesto makegood skin
contact.
Ifyour collar istoo loose, the stimulationmay not
work properlybecausegood skin contact is not
beingachieved. This can directlyaffectthe
stimulation performanceandwhether or notthe dog
will receivethe stimulation. Always check for good
"prong" contact if itappears that your dog is not
respondingto the stimulation.
A
loosecollar can promoteskin irritationfrom
movingor rubbingtoo much on a dog's neck while
they are runningor training. The propersnugfit will
help preventthis from occurring.
Properfit of the collar is important. Itshouldbetight
enough on the dog's neckto makegood skin
contact and allow the dog to breath normally. The
collar should never beso tight on the dog's neck
that it restrictsthe dog's normalbreathingpattern.
For properpositioningof your collar receiverbox, it
should be placedon the center of the dog's neck.
7

Intensity Dial
Indicator Light
#I
(Function
varies accordi
to model)
Multi-Unit
Selection
Switch
Momentaw 'Nick'
stimulaiion
#2
(Functionvaries
accordingto model)
Continuous
Stimulation
\
ChargingBattery
Transmitter
(Multiple
dog
transmittershown)

Collar
Belt
with
EmbeddedAntenna
\Beeper
Horn
Collar
Receiver
Turnina the Unit On:
Press and holdthe OnIOff button on the Collar Receiver.
The Red LED Indicator will light solidly for two seconds.
Continue holding the Button until the Red light goes off.
The unit is now On. The LED lndicator will now flash
approximately every two seconds. (Note: The
Transmitter is always in a permanent sleep state. It is
only On when a button is being pressed, and does not
needto beturned off bythe user),
Turnina the Unit Off:
When you are readyto shutthe unitoff, simply press and
holdthe OnlOff buttonfor three seconds. The Red LED
indicatorwill again lightsolidly for two seconds, Holdthe
Buttonuntilthe lightgoes off. The Unit is now Off.
9

Intensity Selection Dial
The intensityselectiondial allows
you to choose between sixteen
different levelsof stimulation,
allowingfor very precisecontrol.
Transmitter Indicator Linht
When orle of the push buttonswitches on the
transmitter is pushed,the
RED
lightwill turn on to
indicatethat the transmitter is beingoperated, When
the batteryneeds charging the
RED
lightwill blink
once every
112
secondwhile holdingthe continuous
stimulationbutton.
Transmitter Antenna
Bevery carefulwhen screwingthe
4"
antennaintothe
transmitter. Handtighten only. Over tighteningcould
cause damageto the antenna or the antennamount.
Momentarvand ContinuousStimulations
Pressingthe upper buttoncauses the collarto
administera MomentaryStimulationor 'Nick'.
Pressingthe lowerbuttongives the Continuous
Stimulation.
Thesetwo buttons are the same on
every model of the
H20
series.
MultipleDon Model Selection Switch
(H20
181211 81311 8221182311832118331185211853)
Switchingbetween units can becontrolled by moving
the toggle selectionswitch to the desired unit.

I
PARTS
&
FUNCTIONS CONT.
Vibration Buttons
(H20
18201182211823)
Pressingthe buttonon the left (#I)of the transmitter
causesthe collarto vibrate. Pressingthe buttonto the
right (#2)of the transmitter causes the collarto vibrate
for 112 second. After 112 second, continuous stimula-
tion will beappliedsimultaneouslywith the Positive
Vibration.
Jump Button
lH20
18301183211833)
Pressingthe buttononthe left
(#I)
of the transmitter
causesthe collarto administera 'Jump' Stimulation.
Thisfeature allows you to instantly"jump" to
a
prede-
termined intensitylevel (see p.15).
Rise Button
(H20
18301183211833)
Pressingthe buttonon the right (#2) of the transmitter
causesthe collarto administer a stimulationthat
graduallyincreasesin intensitylevelthe longeryou
holddown the 'Rise' button.
Locate and RunlPoint Buttons
(H20
18501185211853 only)
Pressingthe 'Locate' buttonon the leftside (#I)of the
Transmitterwill makethe Collar Receiver beep.
Pressingthe 'RunIPoint' buttonon the right side (#2)
of the Transmitterwill activatethe RunIPointmode on
the Collar Receiver. Press it again and itwill go into
the Pointonly mode. Pressthe 'Locate' buttonto can-
cel the RunIPointmodes.
11

Battery Charging Receptacles
The batterycharging receptacleis locatedon the side
of the Transmitter, and on the side of the Collar
Receiverfacing the dog's neck. After charging,
always close the jack with the rubber plugto prevent
foreign particlesfrom getting insidethe unit.
Collar Indicator Light
When the Collar Receiveristurned on, the RED light
will flash steadilyonce every two secondsto indicate
that the unit is active. The RED light changesto a
rapidflash (twice per second) when the batteryis low
and in need of charging.
Electrodes
Electrodesshouldfit snugly on the dog's neck to
ensure good contact with the skin. For more
informationon the properfit of the collar, see page
7.
Beeper Horn
(H20
18501185211853)
The Beeper horn is attachedto the collar belt. It will
emit a loudtone audiblefrom up to
450
yards away.
Collar Beltwith EmbeddedReceiverAntenna
The embedded collar antenna iswoven intothe collar
belt, and runs the along the entire lengthof the belt.
Do not cutthe collar belt.
Doingso will damage the antenna and may result in

All
H20
Series
TM
collars are equipped with
rechargeable NickelMetalHydride (NiMH) batteries.
NiMH batteriesare not memorysensitiveand do not
requiredepletionbefore recharging.
The batteriescome partiallycharged from thefactory.
However, it is recommendedthat you give the battery
a full charge (about
12
hours) beforethe first use.
Remember
-
Always keep batteriesaway from
flammablesubstances (especiallywhen charging).
Whenstoringthe unitfor long periods remember to
regularlygive the batteriesa full charge
(1
2
hours)
once every
4
to
6
weeks.
BatteryCharging
Procedure
1.
Turn the unit off.
2.
Plugthe charger intoa
standardelectricaloutlet.
3.
Charge the batteriesfor upto
12
hours. This can bedone
I
either separatelyor
simultaneously.
4.
After charging, disconnect the batterycharging
cablesfrom the receptacles and securely replace
the rubber battery receptaclecovers.
5.
Testthe system to makesure that everythingis
working properly.

The first and most importantstep intrainingyour dog
with your H20Training System is determining the
correct lntensity Levelto providethe propertraining
stimulationwithout over-shockingyour dog.
To do this placethe Collar on the dog's neck and turn
it on. Placethe lntensitySelectiondialso that the
System is set on Level One. Press either the 'NICK'
or the 'CONT' Button. Increasethe lntensityLevel in
incrementsof one untilthe dog isfeelingthe
stimulation. You should be able to tell when the dog is
feeling the shock bythe outwardsigns of discomfort or
confusionon it'sface. At this point, increasethe
lntensity Levelbyone or two. This should beyour
dog's idealtraining level. (Note: Some dog's may
requiremore or less stimulationdepending upon their
individualnatureor size.)
Usingthe RiseStimulation:
(H20
18301183211833
only)
The Risefunction will graduallyincreasefrom your
current intensitylevelto the maximum intensitylevel
(level
16)
while the rise button is being pressed. The
intensitylevelwill returnto its originalsettingwhen the
button is released.

Settincl the Jump Stimulation Level:
(H20
18301183211833
only)
1.
Set the intensitylevelto the levelthat you would
like itto "jump"to
2. On the transmitter,press and hold buttons
#I
and
#2 ('Jump' and 'Rise' buttons)at the sametime.
3.
When you see the LEDflashing, releaseboth but-
tons. The numberof times the LED lightflashes
shows you the intensitylevelfor the Jump Stimula-
tion.
4.
Likethe Risestimulation,the intensitylevelwill
returnto itsoriginalsettingafter the Jumpfeature
has been used.
To avoidaccidentallyshockingyour dog, please make surethat
the collar is
NOT
on the dog
whilesetting the
jump
level.
If
the
two buttons are not pushedat the
EXACT
sametime, you will
runthe risk of emittinga shock.

Pressand hold the power buttonon the Collar Re-
ceiver. You will see the LED lighton the collar blink
7
times beforestayingsolid. You mustholddown the
power
buttonuntilthe
LED
lightbecomessolid. Si-
multaneously, pressand releasethe nick and continu-
ous buttons. Inafew seconds, you will see the LED
light blink
3
times. The collar ID is now programmed,
and the collar receiveris now ON.
Beforetesting, makesure that both units arefully
charged andthe powerto the Collar Receiver is "ON".
To Test the ElectronicStimulation:
A)
Placethe tester firmly on the electrodesof the
Collar Receiver.
B)Set the intensity(note
-
an intensity
level setting of
4
or less might not be
&ough to lightthe tester).
C) Pusheitherthe 'NICK' or 'STIMU'
button.
D)The tester lightwill quicklyflash for
intensity,the brighterthe test light).
the Nickfunction and lightsteadilywhen the
ConstantStimulationis pushed (the higher the

To Test the Vibration:
(H20
18201182211823
only)
A)
Followthe directionsfor testingthe Electronic
Stimulation, and pressthe button on the leftside
of the transmitter.
B) Ifyou pressthe buttonon the rightside of the
transmitter,the unitshouldvibratefor 112 second
and thenthe tester should lightwhile vibrating at
the same time.
To Test the Beeper:
(H20
18501185211853
only)
A)
Pressthe buttonlocatedon the left side of the
transmitter (Locatebutton). The collarshould
beep any timethis button is pressed.
B) Pressthe buttonon the right side ofthe transmitter
(RunlPoint button)to activatethe RunlPoint Mode.
Pressthe buttonagain to change to Pointonly
mode. Inthe RunlPointmode, the collar should
beep every 4-5 seconds while your dog ison the
run, and every 1-2seconds when your dog ison
point. Inthe Pointonly mode,the collarwill beep
onlywhen your dog ison point. You can shake
the collarto simulateyour dog onthe run. Press
the 'Locate' buttonto cancel these modes.

Beforebeginningtraining, your dog should be
examinedby a veterinarianto assure that your dog
isingood health.
Never leave your don unattendedwith the unit
on.
Since no electronicdevice is perfect,there is a
-
very slight possibilitythat your dog may receivean
unintentionalelectric stimulation.
Your
H20
Series
TM
training collar isa very valuable
tool if used correctly. Itis extremelyimportantthat
you completelyunderstandall the functions of the
collar and how to properlytrain with it before placing
it on your dog.
The electrodeson this collar are madewith high
grade stainlesssteel to help prevent any chemical
or allergic reactionswith your dog's skin.
To prevent neck irritation, the collar should
never beworn for morethan
12
hoursa day.
Channinnthe collar location on the don's neck
daily will also help prevent irritations. It is
importantto keepthe collar clean.
Cleanthe
electrodes regularlywith a mildanti-bacterialsoap.
Ifan irritation isfound, carefullywash the dog's neck
with soap andwater and then wipe the area with
Hydrogenperoxide. Drythoroughlyand apply an
antibiotic ointment.
18

Itisve importantto periodicallyclean your
H20
Seriesy"'
systemsfor maximum performance.
Regular cleaningwill also lengthenthe lifeof your
unit.
Cleanthe
H20
Series
TM
collar boxwith lukewarm
water anda mild anti-bacterial soap.
Take careto thoroughly cleanthe space between
the electrodesand the belt.
The beltand buckleshouldbe cleanedwith water
and a mildsoap then allowed to dry completely.
Always allowthe entire unitto completelydry before
using.

--
D.T. Systems Premium LifetimeWarranty is the best
warrantyoffered inthe industry. This warranty isfree to
participatingU.S. customers. (The warranty
registrationcard must be returnedwithin
30
days of
original purchase). This changes our normal one year
parts and laborwarranty to a limited lifetimewarranty
against manufacturingdefects on partsand a one year
warranty on labor.
What
is
covered:
D.T.Systems Premium LifetimeWarrantycovers all
parts to befree from manufacturingdefectsfor
as
long
as the unit is held bythe originalowner.
What
is
not covered:
Batteriesare not part of our lifetimewarranty.
Rechargeable batteriesare warranted against
defectsfor one year from the original purchase date.
Our warranty does not cover parts that malfunction
due to abuse, misuse,impropermaintenance, or
incorrecthandling.
Damagefrom dogs chewing or wear and tear from
excessivefield use is notcovered.
Our warranty does not cover the cost of shippingthe
unitto our repaircenter. Return ground shipping
(insidethe continental UnitedStates)to the
customer is covered. However, next day or second
day air shipping is notcovered, butavailable
by
requestfor an extra shippingfee.
This manual suits for next models
3
Table of contents
Other D.T. System Pet Care Product manuals

D.T. System
D.T. System Micro-iDT Z3000 User manual

D.T. System
D.T. System Micro-iDT PLUS Series User manual

D.T. System
D.T. System EZT 1000 User manual

D.T. System
D.T. System ULTRA MIN-E 2090 User manual

D.T. System
D.T. System Micro-iDT PLUS Series User manual

D.T. System
D.T. System SPT 2420 User manual

D.T. System
D.T. System R.A.P.T. 1400 User manual