manuals.online logo
Brands
  1. Home
  2. •
  3. Brands
  4. •
  5. PawHut
  6. •
  7. Pet Care Product
  8. •
  9. PawHut D06-095 User manual

PawHut D06-095 User manual

WARNING
Children have died or been seriously injured
when gates are not securely installed.
• ALWAYS install and use gates as directed
using all required parts.
• YOU must install wall cups to keep gate in
place.Without wall cups, child can push out and
escape.
• STOP using when a child can climb over or
dislodge the gate.
• USE only with the locking mechanism securely
engaged.
• NEVER use to keep child away from pool.
• NEVER leave child unattended.
• Intended for use with children between 6 and
24 months. • Install according to manufacturer’ s
instructions.
• KEEP INSTRUCTIONS FOR FUTURE USE.
• READ ALL INSTRUCTIONS BEFORE
ASSEMBLY AND USE OF GATE.
• KEEP SMALL PARTS AWAY FROM
CHILDREN DURING ASSEMBLY.
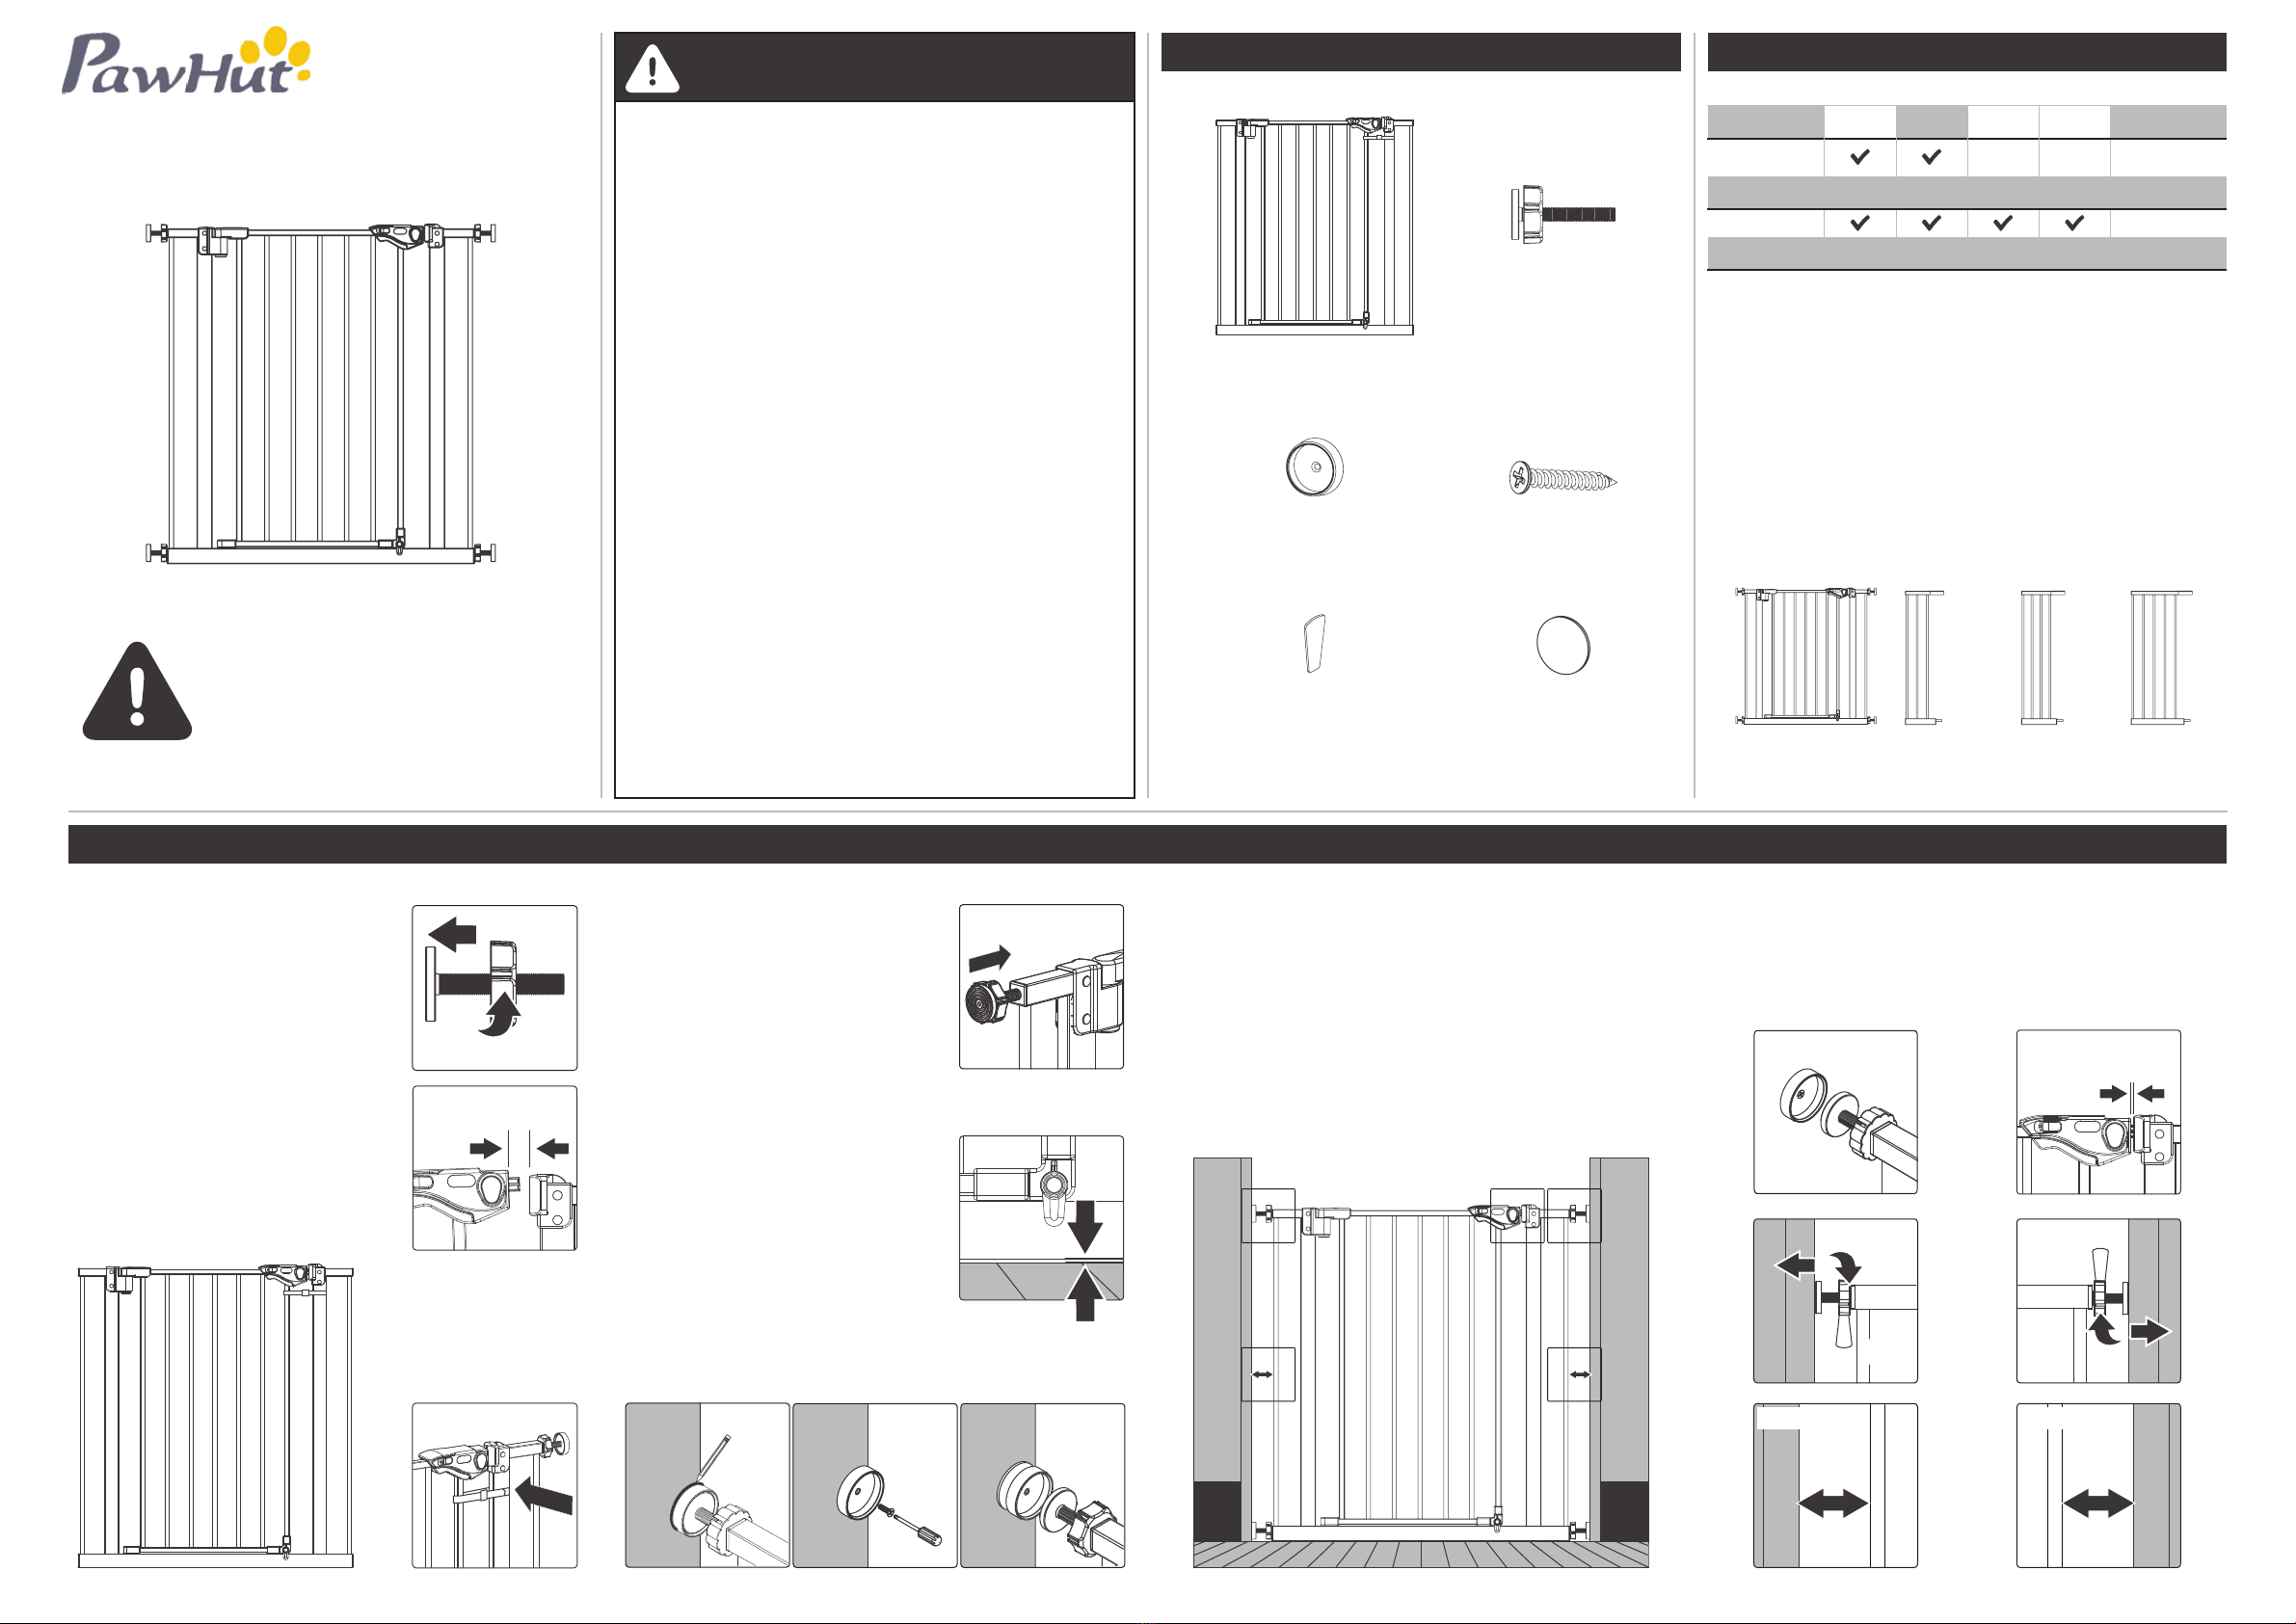
BEFORE ASSEMBLY
C:
Wall Cups (4)
D:
Screws (4)
E:
Spanner (1)
B:
Threaded Spindle
Rods (4)
F:
Sticker (4)
A:
Gate Frame (1)
EXTENSIONS AND MAX SIZE
MAX SIZE12 in8 in
6.9 in
NoMODEL NO.
D06-096
29-58 in
D06-095
29-38 in
With 6.9 inch
36-38 inch
With 8inch
37-39 inch
With 12 inch
41-43 inch
No EXTENSION
29-31 inch
NOTE The gap between the gate and the wall should not
exceed more than 2.5 inch on either side (Figure 3-4 and 3-5)
If the gate has been installed properly the gap
between the door latch and frame should now be
closed (Figure 3-6)
Spanner
Figure 3-2
Figure 3-1
Spanner
Figure 3-3
2.5 inch
Figure 3-4
2.5 inch
Figure 3-5
3/64 inch
Figure 3-6
INSTALLING YOUR GATE
STEP 1
Locate the (4) threaded spindle rods (B).
Rotate the adjustment wheels along the
threading, eliminating the gap between
the adjustment wheel and the rubber
foot (Figure 1-1).
NOTE You may notice a slight gap
between the gate door latch and the
frame (Figure 1-2).
THIS IS NOT A DEFECT this gate is
a pressure mounted gate and this gap
will disappear once you tighten the gate
in its opening.
Figure 1-1
DO NOT REMOVE
THE ZIP TIE UNTIL
INSTALLATION IS
COMPLETE.
(Figure 1-3)
Figure 1-3
Figure 1-2
STEP 3
Insert all 4 threaded spindle rods into the wall cups (Figure 3-1).
Tighten the wheels using the spanner tool. (Figure 3-2 and Figure
3-3) Do not over tighten. It may be necessary to hold the
threaded spindle rods while rotating the adjustment wheels to
ensure that the entire unit does not rotate while installing the
gate.
NOTE if your door latch is not properly engaging with the
receiving component, ensure that your gate is level, mounted
properly and that you have not over-tightened the adjustment
wheels.
STEP 2
Insert the threaded spindle rods with
adjustment wheels into the hole on all
four corners of the sides of the gate.
(Figure 2-1)
Place the gate in desired opening with
the bottom close to the floor. The
distance between the bottom of the gate
and the floor should be less than 1/8
inch (Figure 2-2). Once you are satisfied
with the placement of your gate trace
the spindle rods rubber feet onto the
surface of your opening making sure
these are level (Figure 2-3). Then remove
the gate from the opening. Then screw
the 4 wall cups to the wall using the
screws (Figure 2-4), or paste the 4 wall
cups using the stickers provided (Figure
2-5).
Figure 2-4
Figure 2-3 Figure 2-5
1/8 inch
Figure 2-2
Figure 2-1
INdbb067_UK_D06-095_D06-096
Periodically check the gate for signs of damage,
wear, or missing components. Do not use if any
part is missing, worn or damaged. Check the
gate regularly to ensure all the hardware and
mountings are tightened. Do not use abrasive
cleaners or bleach. Clean by sponging with warm
water and a mild detergent.
CARE AND MAINTENANCE
To remove your gate from the wall, rotate the
adjustment wheels on each of the (4) threaded
spindle rods to depressurize the gate from its
doorway or opening. Then, gently pull or push the
gate free from its doorway or opening.
REMOVING YOUR GATE FROM THE WALL
• Improper installation could result in the gate
becoming unstable or dislodged from the doorway.
• Base locks are to be used at all times, on both
sides of the gate.
• This product will not necessarily prevent all
accidents.
• Check the gate regularly to see if all the
hardware and mountings are tightened.
• Do not use if any components are missing or
damaged.
• STOP using when a pet can climb over or
dislodge the gate.
• Additional or replacement parts should only be
obtained from the manufacturer or distributor.
IMPORTANT
USE AT THE TOP OF STAIRS
If the gate is used at the top of stairs, we recommend the
safe distanced to the 1st step is at least 16 inch. (Figure A)
Using the wall cups will affix your gate more firmly
in the doorway or opening.
Figure A
16 inch
OPERATING THE DOOR LATCH
Figure 4-1
Figure 4-2
Figure 4-3
To Open - Ensure that the base locks at the bottom of the gate
door are in the horizontal position (Figure 4-1). Pull the spring lock
away from the easy open latch while simultaneously lifting the
lock lever upwards (Figure 4-2 and 4-3). This will release the
locking latch from the gate frame and allow the door to push or
pull open.
To Close - Pull the door shut and ensure that the door latch on
top closes and then place the lock at the bottom of the gate
down on the side occupied by the child, Gate will swing both
ways unless one of the swing stops is down. Gate will not swing
at all if both swing stops are down.(Figure 4-4)
Figure 4-4
Once the gate is opened,it can close up automatically
and lock up.
When the opening width of the gate is 8 inch, the gate has the
function of Automatic Closing (Figure 4-5).
NOTE When the gate opening width is greater than 23 inch,
the gate will be normally open.(Figure 4-6)
8 inch
Figure 4-5 Figure 4-6
23 inch
ADDING A GATE EXTENSION
STEP 1
Remove the top and bottom threaded
spindle rods.(Figure 5-1)
STEP 2
Assemble the gate and extension as
illustrated (Figure 5-2 and 5-3). Reposition
the gate and fit in accordance with the
gate fitting instructions.
NOTE: It is preferable to install any
extensions on the hinge side of the gate.
Figure 5-2
Figure 5-1
Figure 5-3

This manual suits for next models

1

Other PawHut Pet Care Product manuals

PawHut D00-166V00 User manual

PawHut

PawHut D00-166V00 User manual

PawHut D30-765V00 User manual

PawHut

PawHut D30-765V00 User manual

PawHut D30-752V00 User manual

PawHut

PawHut D30-752V00 User manual

PawHut D6-0044 User manual

PawHut

PawHut D6-0044 User manual

PawHut D00-158V00 User manual

PawHut

PawHut D00-158V00 User manual

PawHut D04-064V01 Installation guide

PawHut

PawHut D04-064V01 Installation guide

PawHut D06-115 Installation guide

PawHut

PawHut D06-115 Installation guide

PawHut D06-161V00 User manual

PawHut

PawHut D06-161V00 User manual

PawHut D40-006V01 Installation guide

PawHut

PawHut D40-006V01 Installation guide

PawHut D10-059 User manual

PawHut

PawHut D10-059 User manual

PawHut D30-763V00 User manual

PawHut

PawHut D30-763V00 User manual

PawHut D00-105V01 Installation guide

PawHut

PawHut D00-105V01 Installation guide

PawHut D00-141 Installation guide

PawHut

PawHut D00-141 Installation guide

PawHut D40-016V80 Installation guide

PawHut

PawHut D40-016V80 Installation guide

PawHut D30-420 User manual

PawHut

PawHut D30-420 User manual

PawHut D08-027 Installation guide

PawHut

PawHut D08-027 Installation guide

PawHut D02-021 Installation guide

PawHut

PawHut D02-021 Installation guide

PawHut D02-062 Installation guide

PawHut

PawHut D02-062 Installation guide

PawHut D02-133V00 User manual

PawHut

PawHut D02-133V00 User manual

PawHut 5663-1307 Installation guide

PawHut

PawHut 5663-1307 Installation guide

PawHut D30-756V00 User manual

PawHut

PawHut D30-756V00 User manual

PawHut D31-012 User manual

PawHut

PawHut D31-012 User manual

PawHut D02-062 Installation guide

PawHut

PawHut D02-062 Installation guide

PawHut D04-057 Installation guide

PawHut

PawHut D04-057 Installation guide

Popular Pet Care Product manuals by other brands

Petsafe Easy Walk manual

Petsafe

Petsafe Easy Walk manual

Leuchtie Mini manual

Leuchtie

Leuchtie Mini manual

I-Semble PET WALL BED 52000 installation instructions

I-Semble

I-Semble PET WALL BED 52000 installation instructions

Petsafe PBC17-16000 operating guide

Petsafe

Petsafe PBC17-16000 operating guide

VNT electronics Dog Trace d-ball UP user guide

VNT electronics

VNT electronics Dog Trace d-ball UP user guide

ebi Mango user guide

ebi

ebi Mango user guide

elive EP50W instruction manual

elive

elive EP50W instruction manual

Dennerle CO2 Correct operating instructions

Dennerle

Dennerle CO2 Correct operating instructions

SportDOG YardTrainer 105 user guide

SportDOG

SportDOG YardTrainer 105 user guide

TransWorld Aquatic MT-NZ3 owner's manual

TransWorld Aquatic

TransWorld Aquatic MT-NZ3 owner's manual

LitterMaid LitterMaid Self-Cleaning Litter Box quick start guide

LitterMaid

LitterMaid LitterMaid Self-Cleaning Litter Box quick start guide

Patpet p-collar 310 Operating and training guide

Patpet

Patpet p-collar 310 Operating and training guide

BravoWalk Collar owner's manual

BravoWalk

BravoWalk Collar owner's manual

Dogtra 2300NCP EXPANDABLE owner's manual

Dogtra

Dogtra 2300NCP EXPANDABLE owner's manual

Dogtra element 300M Series owner's manual

Dogtra

Dogtra element 300M Series owner's manual

Go Pet Club HGT-501 instructions

Go Pet Club

Go Pet Club HGT-501 instructions

Suncast DCW13624 owner's manual

Suncast

Suncast DCW13624 owner's manual

Dogtra 1200 series owner's manual

Dogtra

Dogtra 1200 series owner's manual

manuals.online logo
manuals.online logoBrands
  • About & Mission
  • Contact us
  • Privacy Policy
  • Terms and Conditions

Copyright 2025 Manuals.Online. All Rights Reserved.