TOMCAR Utility Vehicle User manual
TOMCAR
Service Manual
06222010-v2.0

Table of Contents
PreRideInspection 1
MaintenanceChart 2
Lubrication Specification 4
PeriodicMaintenance 6
Brake System
Brake Pedal Adjustment 15
Brake Pad Replacement 17
Brake Caliper Removal 18
Brake Caliper Installation 19
Brake Rotor Replacement 20
Brake Booster Replacement 24
Master Cylinder Replacement 26
Steering System
Steering Alignment 28
Steering Tie-Rod End Replacement 33
Steering Rod Replacement 34
Ball Joint Replacement 35
A-Arm Removal and Installation 38
CVT System
CVT Belt Removal and Installation 40
CVT Removal and Installation 45
Transmission CVT Reconditioning 49
Engine CVT Reconditioning 58
Shock System
Removal and Installation 63
Shock Disassembly and Assembly 64
Accumulator Disassembly and Assembly 85
TOMCARUSA, Inc. |1727 E. Deer Valley Road |Bldg. 2, Ste. 1 |Phoenix, AZ 85024
06222010-v2.0

TOMCARUSA, Inc. eer Valley Road Z 85024
|1727 E. D |Bldg. 2, Ste. 1 |Phoenix, A
Final Drive
Final Drive and Axle Removal 91
Final Drive Disassembly 93
Final Drive Assembly 103
Final Drive and Axle installation 123
Transmission
Transmission Removal 125
Transmission Disassembly and Assembly 127
Transmission Installation 135
Engine
Engine Removal 137
Engine Installation 141
Water Pump Replacement (Diesel) 145
06222010-v2.0

Pre Ride Inspection
Item Pre
Ride * Remarks
1 Steering System I
2 Suspension I
Max air pressure 200psi
3 Tires I
7psi front 15psi rear
4 Brake Fluid Level I
5 Brake Pedal Travel I
6 Wheel Lugs Nuts I
80ft lb (Steel) 110 ft lb (alum)
7 Frame Hardware I
Frame nuts, bolt, and fasteners
8 Engine Oil Level I
9 Front Air Filter I,C
10 Rear Engine Air Filter I,C
11 Coolant Level I
12 Headlights / Taillights I
13 Hand Brake Operation I
14 CVT Belt I
I = Inspect C = Clean
TOMCARUSA, Inc. |1727 E. Deer Valley Road |Bldg. 2, Ste. 1 |Phoenix, AZ 85024
1
06222010-v2.0

1500 Miles Maintenance Chart
Item
1 Check tires and wheels
2 Check and adjust tire pressure (maximum 7psi front & 15psi rear)
3 Check for free play in wheel bearings
4 Remove wheels
Check A-Arm bushings
Adjust and grease ball joints (replace rubber boots as needed)
Check steering rod ends
Check shock mounts
5 Fill shock air chambers ( maximum air pressure 200psi)
6 Remove drums/disc inspect brake shoes/pads & drums/disc
7 Check for free play in rear end
Final drives
Shock mounts
8 Change engine oil and filter (refer to engine maintenance chart)
9 Change fuel filters (refer to engine maintenance chart)
10 Check rear air filter
Inspect air intake hoses
11 Check spark plugs (refer to engine maintenance chart)
12 Check coolant level
Inspect radiator hoses
13 Change transmission oil
14 Change final drive oil 1 qrt 80w90 gear oil each side
15 Grease CVT and axles
16 Grease the engine CVT (CVT will have to be removed )
17 Inspect CVT belt for cracks and proper tension
18 Install wheels
19 Adjust parking brake
20 Check for leaks
21 Check electrical system
Lights
Horn
Warning lights
Windshield wipers
22 Check wiper blades
TOMCARUSA, Inc. |1727 E. Deer Valley Road |Bldg. 2, Ste. 1 |Phoenix, AZ 85024
2
06222010-v2.0

TOMCARUSA, Inc. eer Valley Road Z 85024
|1727 E. D |Bldg. 2, Ste. 1 |Phoenix, A
23 Check front air filter (clean/replace as needed)
24 Check brake fluid Dot 4
25 Clean battery terminals
26 Inspect fuses
27 Grease steering box and check steering system for free play
28 Check windshield washer fluid
29 Inspect throttle cable and linkage
30 Test CVT for proper operation
31 Test drive vehicle
3
06222010-v2.0

Lubrication and Fluid Recommendations
Make sure that all the components listed in the Periodic Maintenance Chart are checked and lubricated at
their required intervals. Items not listed in the chart should be lubricated at the General Lubrication
interval.
Item Lubricant Capacity Procedure
Engine Oil TMx7C [Gas] SEA 5W-30 Below -20C Oil Dipstick Should Indicate
SEA 15W-40 Above -
20C Safe Range.
TMx7B
[Diesel] Engine Oil: SEA 15W-
40
Transmission Case
Oil SEA 80W140 synthetic 2.4L Maintain as Recommended
Final Drive Oil SEA 80W90 0.75L Per
Side Maintain as Recommended
Brake Fluid DOT 4 0.5L Maintain Level Between
Lines
Coolant
Front Ball Joints
Steering Box Multipurpose Grease As Needed Locate Fittings and Grease
Rear Drive Shafts
CVT (Transmission Side)
TOMCARUSA, Inc. |1727 E. Deer Valley Road |Bldg. 2, Ste. 1 |Phoenix, AZ 85024
4
06222010-v2.0

Maintenance & Lubrication
Diesel Engine 300 Miles
1500 Miles
3000 Miles 18,000 Miles
500km
2500 km
5000 km 30000km
Alternator Belt Check/Adjust
Check/Adjust Replace/2 Years
Oil Filter Replace
Replace Replace
Engine Oil* Replace
Check
Replace Replace
Air Filter Clean
Clean/Replace
Clean/Replace Replace
Fuel Filter
Replace Replace
Coolant Check/Add
Check/Add
Check/Add Replace
Cooling System
Hoses Check/Tighten
Check/Tighten
Check/Tighten
Valve Adjustment
Check/Adjust
Fuel Injector
Pressure
Check/Adjust
Preliminary Fuel
Filter Replace
Replace
Replace Replace
Repeat Every
1500M
Repeat Every
3000M Repeat Every
18000M
*Engine Oil: SEA 15W40
TOMCARUSA, Inc. |1727 E. Deer Valley Road |Bldg. 2, Ste. 1 |Phoenix, AZ 85024
5
06222010-v2.0

Periodic Maintenance ProceduresPeriodic Maintenance Procedures
Tires/WheelsTires/Wheels
Check the wheels for dents, cracks and leaks.
Inspect all tires for wear and/or damage.
Always replace tire when tread depth is worn to
less then 8mm.
Adjust the tire pressure.
Front - 7 psi max
Rear - 15 psi max
Wheel bearing
Raise the wheel off the ground.
With one hand on the top of the tire and the
other hand on the bottom, alternate pushing and
pulling the top while pushing and pulling the
bottom.
A 1 to 2 mm of free play is normal
If the wheel bearings have excessive free play,
replace wheel bearings.
A-arm bushing inspection
Raise the front wheels off the ground and secure
vehicle on jack stands.
Remove the front wheels.
Aggressively shake the a-arms while observing
the a-arm hinge points. There should be no free
play.
TOMCARUSA, Inc. |1727 E. Deer Valley Road |Bldg. 2, Ste. 1 |Phoenix, AZ 85024
6
06222010-v2.0

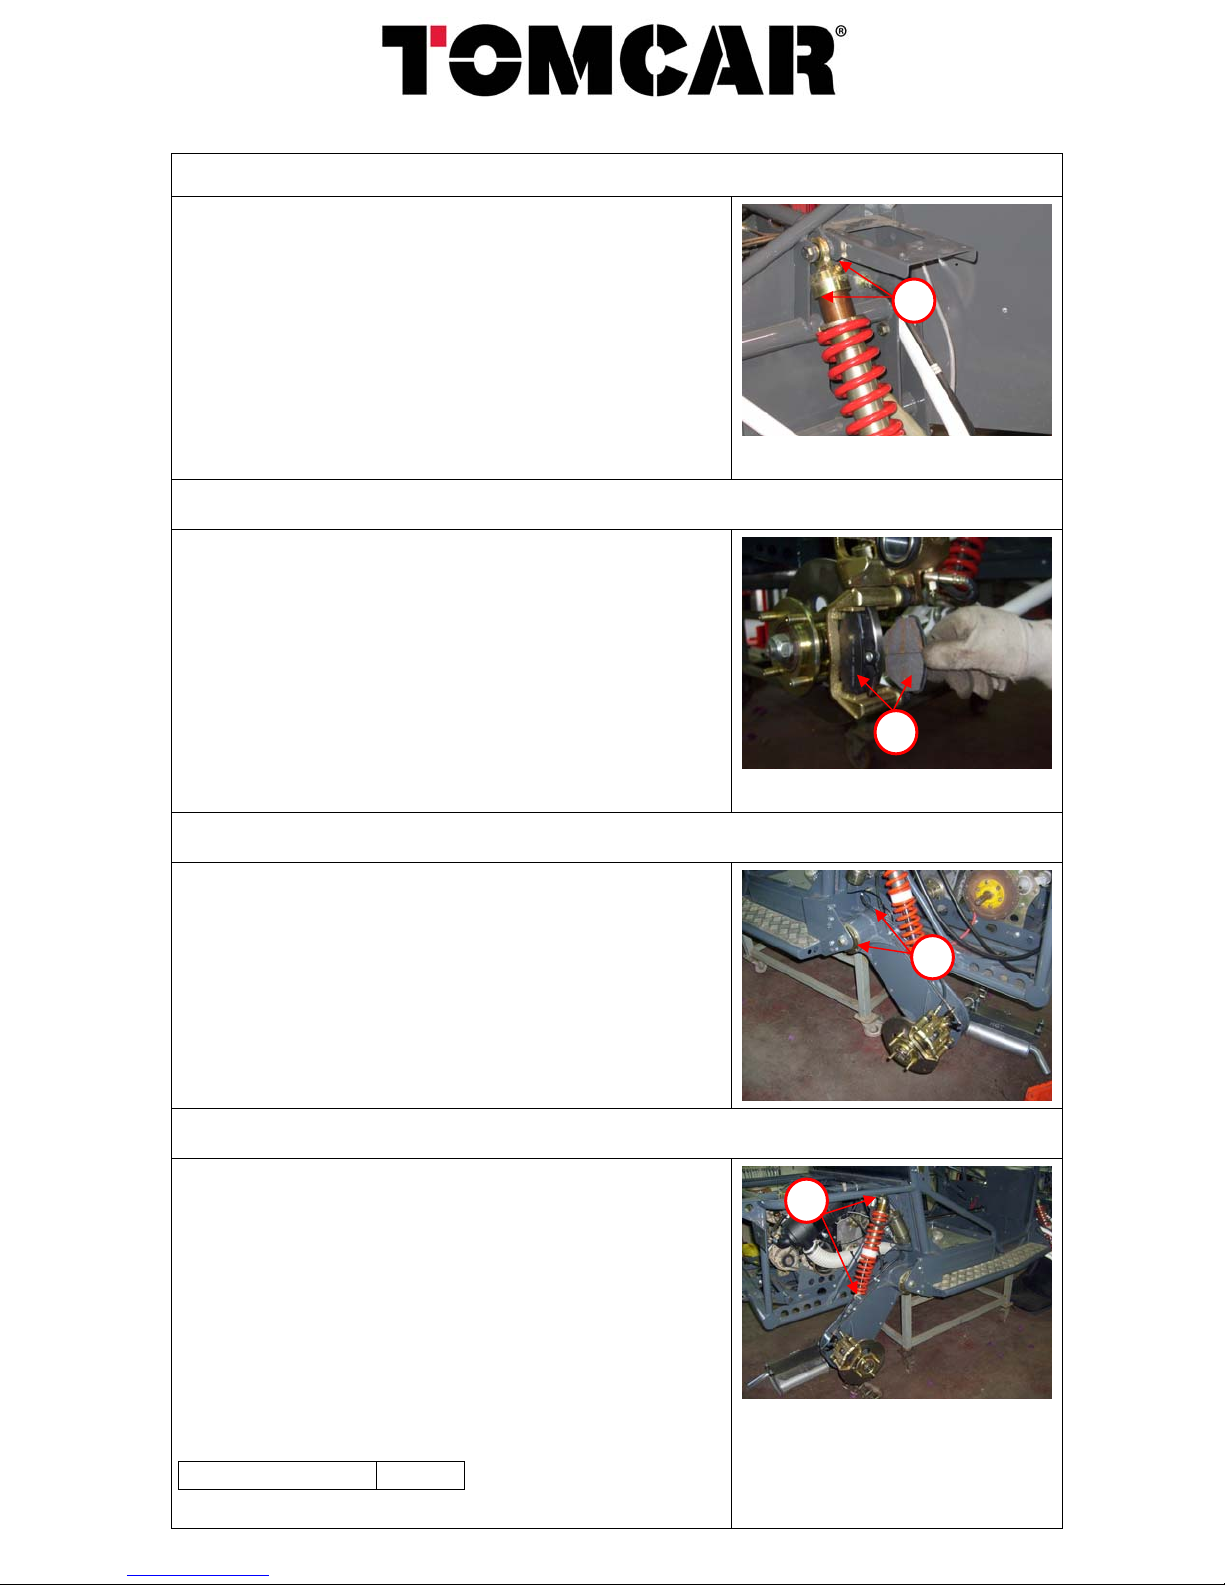
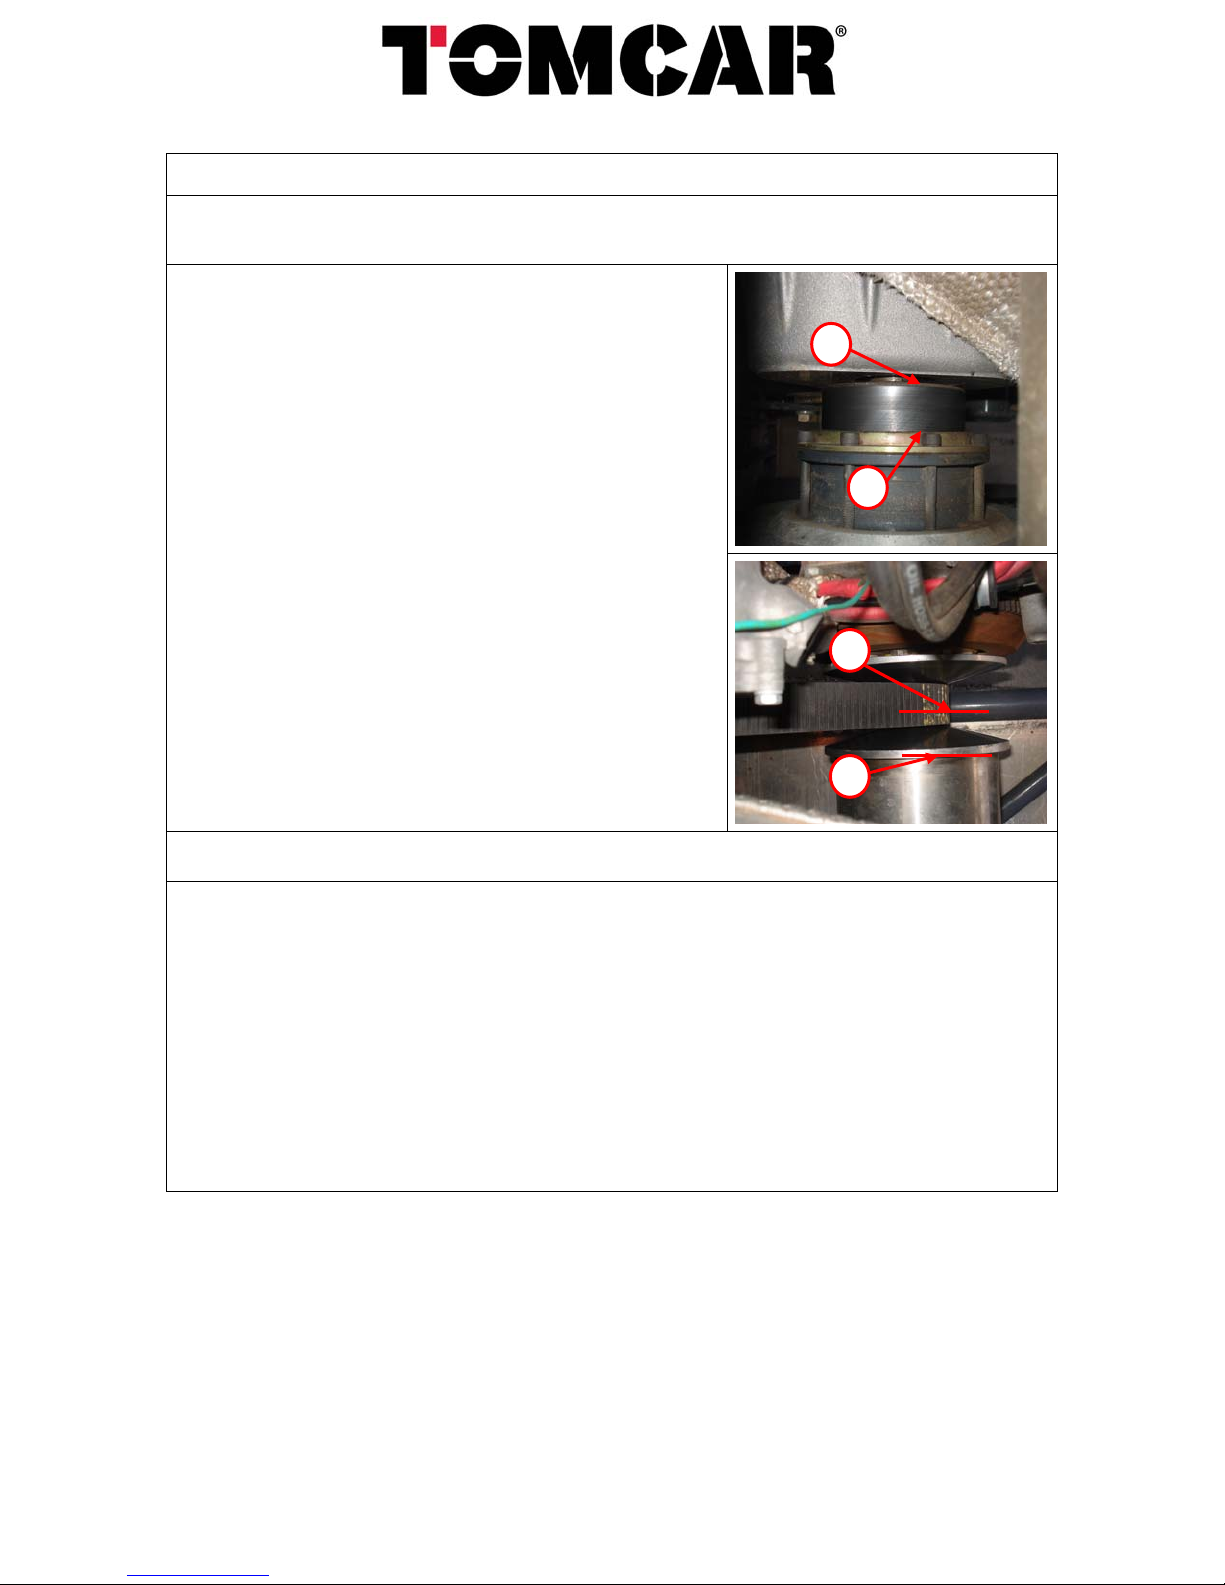
Front ball joint adjustmentFront ball joint adjustment
Loosen the 2 set screws (1) located on the sides
of the ball joint housing.
Tighten the ball joint cap (2) all the way
Tighten the ball joint nut (3).
Loosen the ball joint cap (2) 1/8th turn.
Tighten the set screws (1).
Repeat this process to all 4 of the front ball
joints.
Add 1 – 2 pumps of grease to each ball joint.
Steering tie rods
Inspect the steering tie rods for damage. Make
sure the rubber boot at the tie rod ends and the
steering rack are not torn, dry and/or cracked.
Inspect that the tie rod end is straight. The
threaded section is the weakest point and will
bend first.
Make sure the tie rod end lock nut (1) and the
ball joint nuts (2) are tight.
Shock mounts
With the wheel raised off the ground grab the
bottom of the a-arm and quickly lift and release
the a-arm repeatedly.
The suspension should feel solid and not have
more than 2 to 3 mm of free play at the shock
mounts (1) and (2)
If more than 2 to 3 mm of free play is present
replace the shock ball joints.
Inspect the shock for leaks.
Shock Ball Joint TJ15
3
2
1
1
1
2
2
TOMCARUSA, Inc. |1727 E. Deer Valley Road |Bldg. 2, Ste. 1 |Phoenix, AZ 85024
7
06222010-v2.0
Shock air chamberShock air chamber
Raise the wheel off the ground and secure with
jack stands.
Fill the shock air chamber with up to 200psi. Do
not check pressure with a gauge. The volume is
too small to measure accurately.
Spray the valve stem and the area where the
top cap is attached to the shock tube (1) and
look for bubbles indicating an air leak.
Front brake pads
Remove the lower caliper bolt and swing the
caliper up to access the brake pads.
Inspect the brake pads for wear and/or damage
(1).
Inspect the caliper piston and hose for leaks.
Check brake fluid level. Use DOT 3 or 4 brake
fluid
Upper final drive bearings
CAUTION: For this step, make sure the vehicle is
completely secure and solidly supported by jack
stands.
Grab the brake rotor and repeatedly push and
pull the final drive assembly checking for free
play at the upper bearings. If large amount of
free play is present replace bearings.
Rear shock mounts
CAUTION: For this step, make sure the vehicle is
completely secure and solidly supported by jack
stands.
Grab the bottom of the brake rotor and
repeatedly lift up and release the final drive.
Look for play in the upper and lower shock
mounts. If more than 2 to 3 mm of free play is
present replace shock ball joints.
Inspect the shocks for leaks.
Shock Ball Joint TJ15
1
1
1
1
TOMCARUSA, Inc. |1727 E. Deer Valley Road |Bldg. 2, Ste. 1 |Phoenix, AZ 85024
8
06222010-v2.0
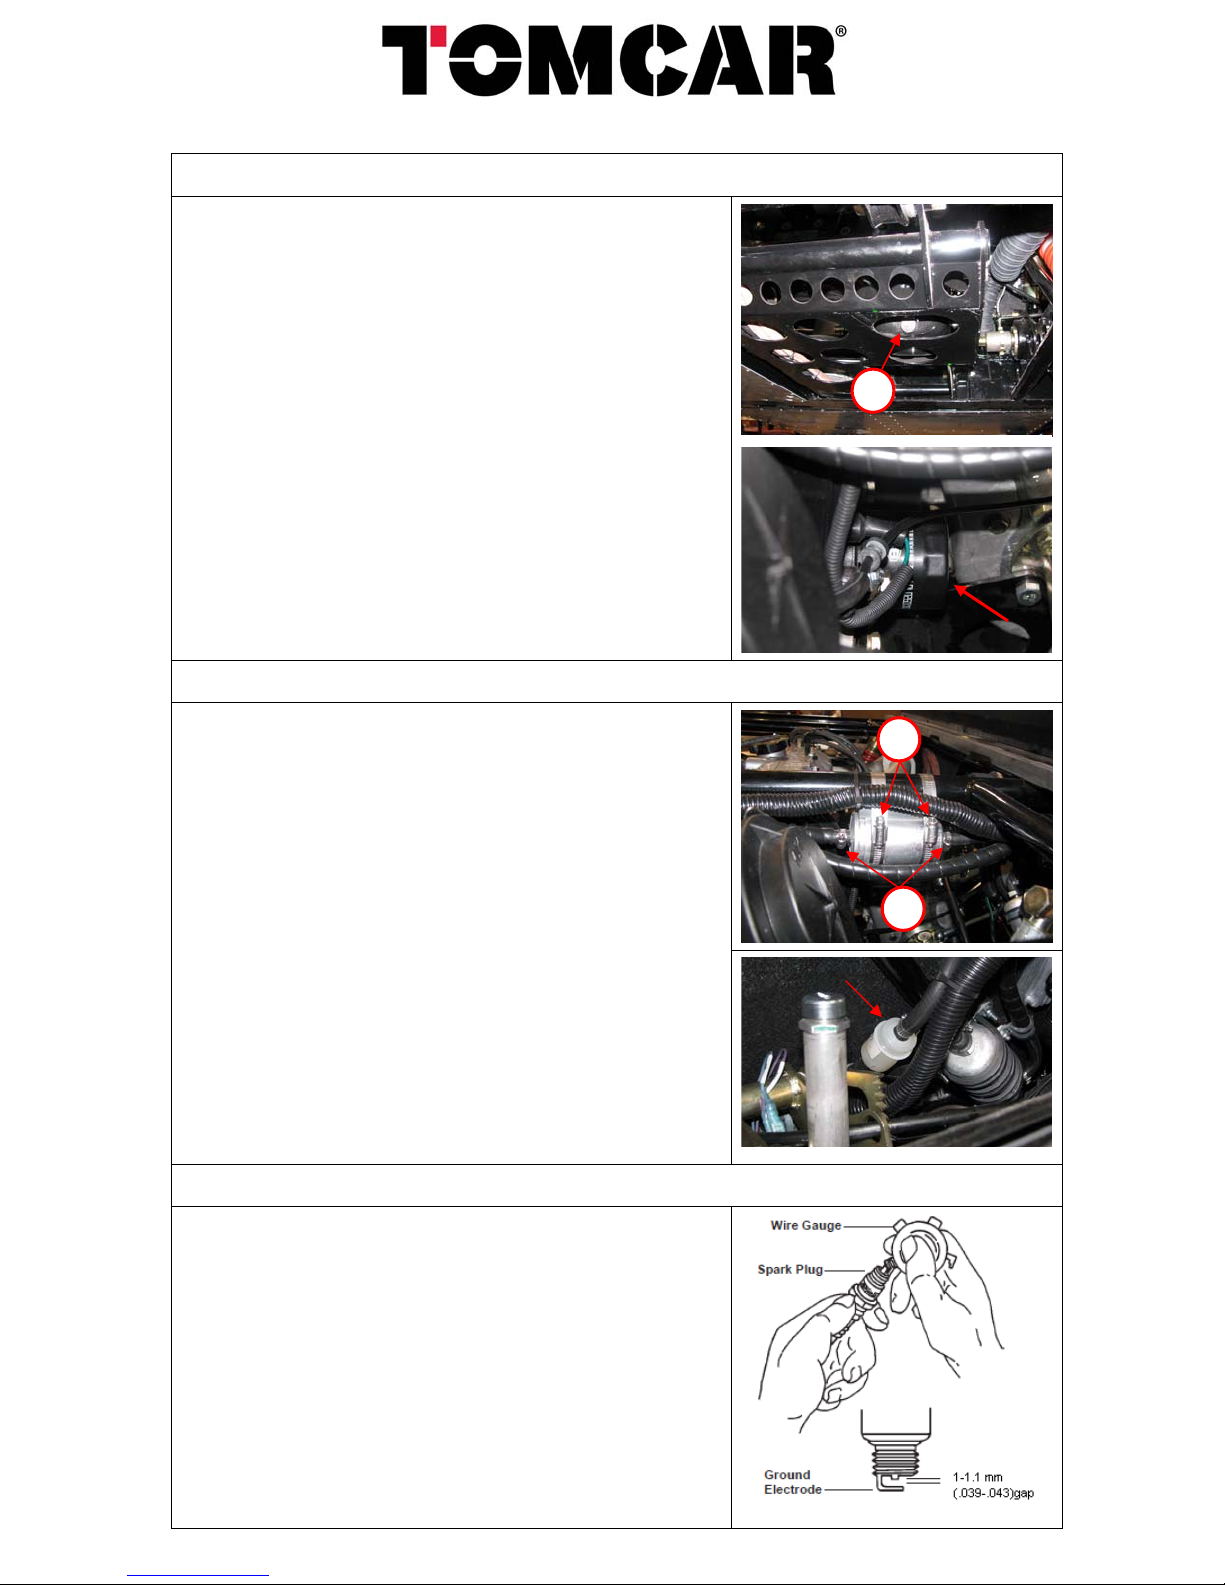
Engine oil and filter (Gas engine TM**C models)Engine oil and filter (Gas engine TM**C models)
Run engine at an idle for 15 min.
Allow engine to cool enough to safely drain
engine oil.
Drain engine oil by removing drain plug (1).
Remove and replace engine oil filter.
Refill engine with the recommended lubricating
oil.
Start the engine and allow engine to idle for
several minutes.
Shut off engine.
Recheck engine oil level.
Drain plug torque 40Nm
* Refer to Lubrication and Fluid
Recommendations for specifications. *
Fuel filters
Carefully remove the hose clamps (1) securing
the fuel lines to the filter.
Remove and replace the filter by removing the
filter clamps. Pay close attention when installing
the filter, there is an arrow indicating the
direction of flow.
Located close to the rear firewall next to the fuel
pump is the suction fuel filter. Remove and
replace filter paying close attention to the
direction of flow indicated by an arrow stamped
on the filter.
Spark plug service
Before removing the spark plug, thoroughly
clean the area around the base of the plug to
keep dirt and debris from getting in the engine.
Check the gap using a feeler gauge. Adjust the
gap to 1.0 – 1.1mm (0.039 – 0.043 in) carefully
bending the ground electrode.
2
1
1
TOMCARUSA, Inc. |1727 E. Deer Valley Road |Bldg. 2, Ste. 1 |Phoenix, AZ 85024
9
06222010-v2.0

Engine oil and filter (diesel engine TM**B models)Engine oil and filter (diesel engine TM**B models)
Run engine at an idle for 15 min.
Allow engine to cool enough to safely drain
engine oil.
Drain engine oil.
Remove and replace engine oil filter.
Refill engine with the recommended lubricating
oil.
Start the engine and allow to idle for several
minutes.
Shut off engine.
Recheck engine oil level.
Drain plug torque 40Nm
* Refer to Lubrication and Fluid
Recommendations for specifications. *
Fuel filters
Carefully remove the spin on primary fuel filter
and install a new filter.
Change fuel filter every 5000 Km
Fuel filter bleed and primer procedure
Locate the fuel filer housing. Using a 19mm
wrench, loosen the rear Banjo Bolt to allow fuel
to escape as pressure is built up.
Using the prime lever on the fuel pump (1), build
fuel pressure by pressing down several times
until fuel begins to leak from the Banjo Bolt at
the fuel filter housing. If a new filter was
installed, it may take some time for fuel to fill the
filter before dripping from the Banjo Bolt.
1
TOMCARUSA, Inc. |1727 E. Deer Valley Road |Bldg. 2, Ste. 1 |Phoenix, AZ 85024
10
06222010-v2.0
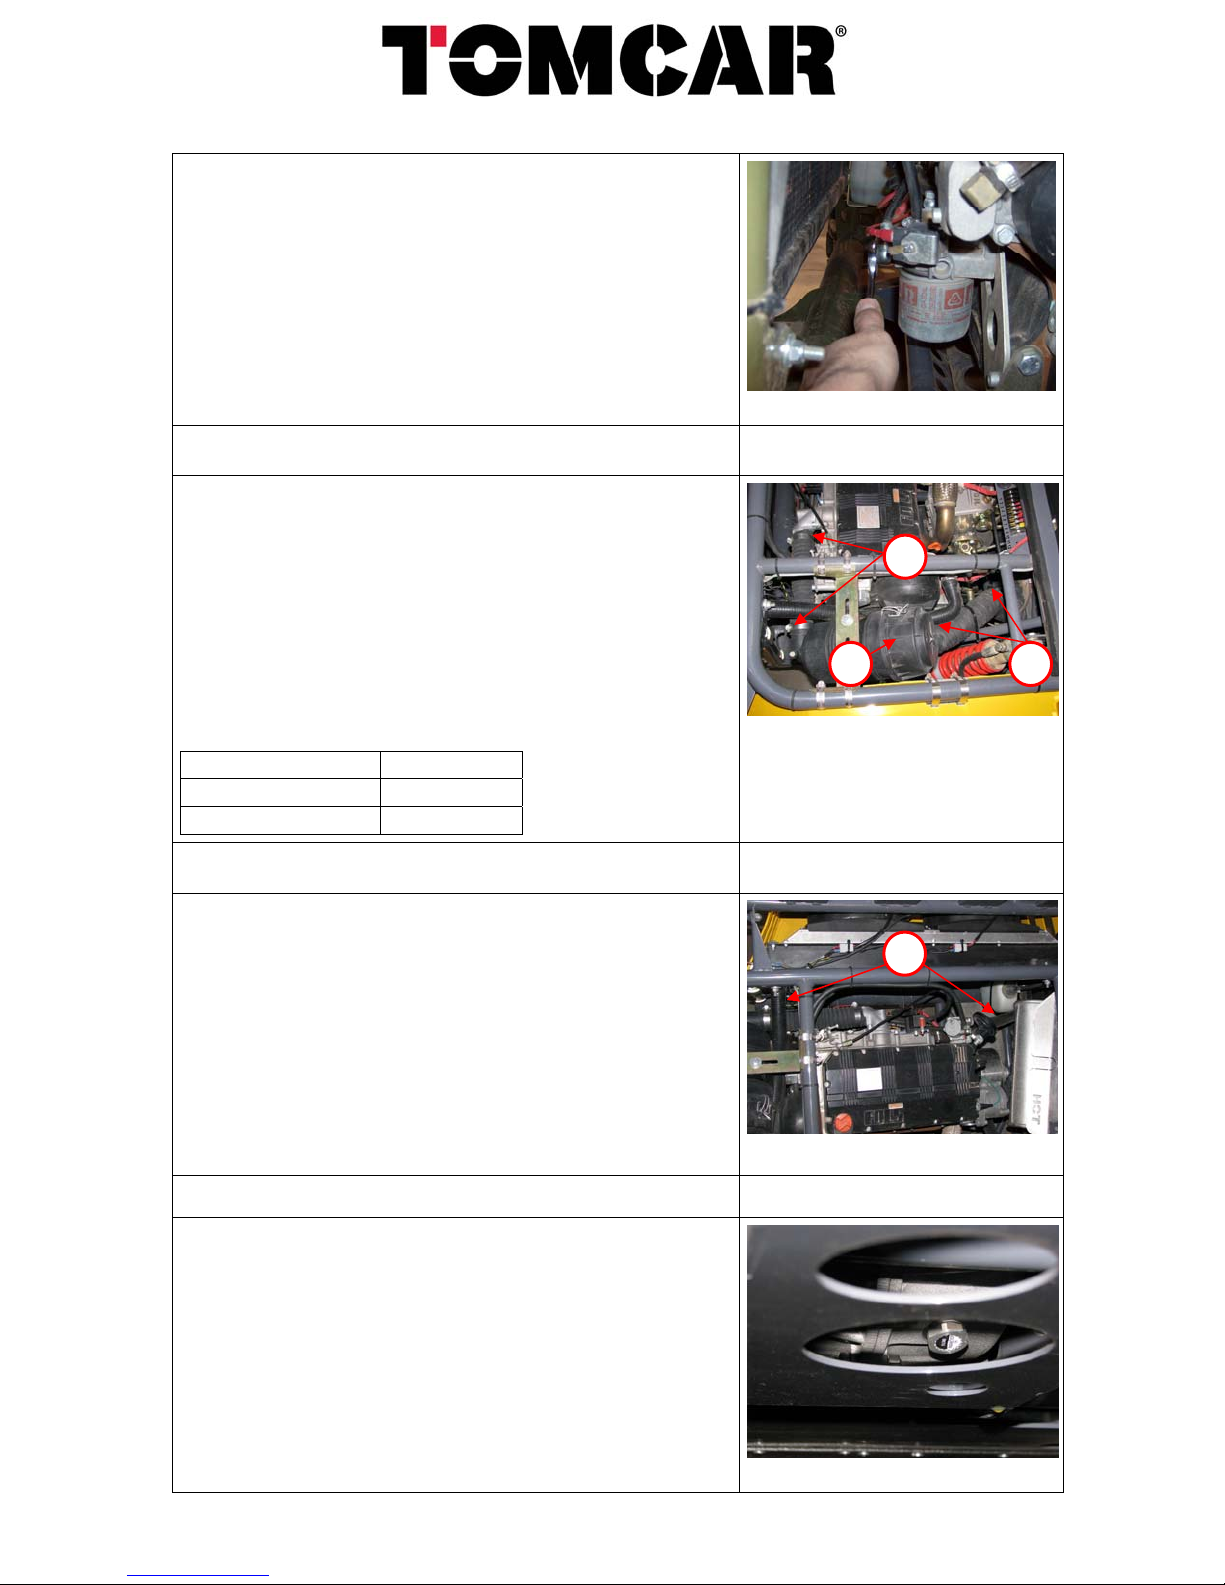
Tighten the Banjo Bolt. Start the engine and
inspect the fuel filter housing and Banjo Bolt for
leaks before driving.
Tighten the Banjo Bolt. Start the engine and
inspect the fuel filter housing and Banjo Bolt for
leaks before driving.
Air intake system
Inspect all air intake hoses for any visible
damage.
Check that all hose clamps (1) and (2) are tight
and are positioned correctly.
Remove and clean the front cone filter.
Remove and replace the rear air filter (3).
Front Filter TM3801
Inner Air Filter TM84050
Outer Air Filter TM84040
Cooling system
Inspect the upper and lower radiator hoses (1)
for damage.
Make sure all hose clamps are tight and
positioned properly.
Inspect the radiator and fans, and thoroughly
clean area.
Inspect the radiator cap. Make sure the rubber
seal is in good condition.
Check the coolant overflow bottle for leaks and
fill bottle to the full level.
Transmission oil
Position vehicle on level ground
Remove the fill plug.
Remove the drain plug and drain oil into drain
pan.
Clean and reinstall drain plug. Small metal
shavings on magnet are normal.
Fill transmission with 2.5 qrt of 80w90 gear oil.
Make sure the transmission breather is clean.
Reinstall fill plug.
3
1
2
1
TOMCARUSA, Inc. |1727 E. Deer Valley Road |Bldg. 2, Ste. 1 |Phoenix, AZ 85024
11
06222010-v2.0

Final driveFinal drive
Position vehicle on level ground
Remove the fill plug (1).
Remove the drain plug (2) and drain oil into
drain pan.
Clean and reinstall drain plug.
Fill the final drive with 1 qrt of 80w90 gear oil.
Reinstall fill plug.
Transmission CVT
Thoroughly clean the inner collar hub (1).
Grease the CVT. The grease fitting (2) is located
on the inner collar. 2 to 3 pumps from a grease
gun are all that is required.
Drive axles
Inspect the drive axles and make sure the o-ring
is not exposed and/or torn.
Grease the axle grease fittings. There are 2, one
at each end of each axle. 1 to 2 pumps from a
grease gun is all that is required.
CVT belt
The gap should be 5-7 cm (2.0-2.9in) measured
at midpoint between the two CVTs. If an
adjustment is necessary see Belt Tension
Adjustment
Belt should not be dry, cracked, or otherwise
damaged.
1
2
1
2
TOMCARUSA, Inc. |1727 E. Deer Valley Road |Bldg. 2, Ste. 1 |Phoenix, AZ 85024
12
06222010-v2.0

Install wheelsInstall wheels
Install wheels and lug nuts.
Tighten lug nuts in a criss-cross pattern
Torque vehicles with steel wheels to 80 ft-lb
Torque vehicles with aluminum wheels to
110 ft-lb
Parking brake
Make sure parking brake is disengaged.
Loosen the lock nuts and adjust the parking
brake cable free play to 2 – 5 mm.
Tighten the lock nuts and check that when the
parking brake is applied the vehicle will not
move.
Leak Check
Check vehicle for leaks.
Brake fluid
Coolant
Engine oil
Transmission oil
Final drive oil
Shock oil
Note: Small leaks/oil built up around the breathers and shafts of the final
drives and transmission are normal.
Electrical System
Check that all electrical components are in operating condition.
Check for any loose cables and/or connectors.
Inspect harness to make sure the harness is clear of all moving
parts and all hot surfaces. Add zip ties if original ties have come
loose.
Inspect and clean battery terminals.
4
3
2
1
TOMCARUSA, Inc. |1727 E. Deer Valley Road |Bldg. 2, Ste. 1 |Phoenix, AZ 85024
13
06222010-v2.0
TOMCARUSA, Inc. eer Valley Road Z 85024
CVT operation
Lift the cargo box up to expose engine work area.
Place transmission in neutral and engage parking brake.
1. Slowly rev engine several times while
watching both CVTs.
2. Both CVTs should open and close in a smooth
continuous motion. From (1) to (2).
3. If there is any hesitation or they do not reach
full travel, there is a problem in one or both
of the CVTs.
See CVT repair section.
Test drive
Test drive vehicle and check:
Steering operation
Brake operation
Acceleration
Noises
Gauge operation
Seat belt operation
Transmission operation High/Low/ Reverse/Diff lock
1
2
2
1
|1727 E. D |Bldg. 2, Ste. 1 |Phoenix, A
14
06222010-v2.0

Brake Pedal AdjustmentBrake Pedal Adjustment
Brake fluid levelBrake fluid level
1. Park vehicle on level ground.
2. Open the brake fluid reservoir.
3. Check that the fluid reaches the full mark on
the reservoir.
4. If the fluid level is low check for leaks and
replace the fluid to the required level. Use
DOT3 or DOT4 brake fluid only.
5. Change the brake fluid every 10,000 Km or 2 years.
Adjusting the distance of the brake pedal to the booster.
If the booster or rod were changed the pedal push-rod length will have to be
checked.
Note: There is a small amount of free play encountered when pushing on the brake
pedal before the pressure starts to build up, this is ok but it should not be more than
a 2-7mm movement at the pedal end.
1. Break loose the ball joint jam nut (1).
Remove the bolt (2) and nut (3) that hold the
push rod to the pedal.
1
23
TOMCARUSA, Inc. |1727 E. Deer Valley Road |Bldg. 2, Ste. 1 |Phoenix, AZ 85024
15
06222010-v2.0
TOMCARUSA, Inc. eer Valley Road Z 85024
2. Make sure that the brake pedal return spring
is connected.
3. Adjust the push-rod length by releasing (1) &
(2) jam nuts on the brake pedal push-rod (3),
and by turning the push-rod to achieve the
required length.
1 - 14mm wrench
2 - 17mm wrench
3 - 14mm wrench
4. The appropriate length is reached, once the
hole in the push rod ball joint is aligned with
the hole in the brake pedal, and the bolt can
be inserted freely into the holes. Lock the bolt
with a new self lock nut.
Bolt/nut – 19mm
Retighten jam nut (1 & 2) shown in top
picture, once push rod distance is set. Make
sure that the ball joint can pivot freely on the
bolt and does not bind.
Tech Tip: It is very important that the push rod is adjusted properly. If
the push rod is not adjusted correctly the brakes can drag and or lock
up.
3
1
1
2
|1727 E. D |Bldg. 2, Ste. 1 |Phoenix, A
16
06222010-v2.0

Brake Pad ReplacementBrake Pad Replacement
Rear padsRear pads
1. Raise the vehicle and take off the wheel.
Remove the rear caliper bolt
2. Raise caliper and remove brake pads. Clean
the exposed piston surface. Push piston back
into caliper. Install new pads. Install and
tighten caliper bolt.
Front pads
1. Remove the caliper bolt.
Raise caliper and remove brake pads. Clean
the exposed piston surface. Push piston back
into caliper. Install new pads. Install and
tighten caliper bolt.
Rear brake pads
1. When replacing the rear brake pads it will be
be necessary to reset the caliper piston.
Using a brake caliper wrench reset the
piston by rotating the wrench clockwise until
the piston completely retracted back into
the piston housing.
WARNING:
TOMCARUSA, Inc. |1727 E. Deer Valley Road |Bldg. 2, Ste. 1 |Phoenix, AZ 85024
17
06222010-v2.0
Table of contents
Other TOMCAR Utility Vehicle manuals

Popular Utility Vehicle manuals by other brands


Equinox Systems
Equinox Systems Canyon Assembly Instructions and Operations Handbook

The Handy
The Handy THFST Operator's manual

Egholm
Egholm City Ranger 2250 Operator's manual

PRONAR
PRONAR T780 Translation of the original instructions

Columbia
Columbia Summit SU5-L-2 2017 Owner's and operator's manual

Clam
Clam Polar Trailer 8272 manual