pitsco RAY CATCHER SPRINT DELUXE User manual

Ray Catcher Sprint Deluxe User Guide 58963 V0513 1
Cautionary and Warning Statements
• Thiskitisdesignedandintendedforeducationalpurposesonly.
• Useonlyunderthedirectsupervisionofanadultwhohasreadandunderstoodtheinstructionsprovidedin
thisuserguide.
• Readwarningsonpackagingandinmanualcarefully.
• Alwaysexercisecautionwhenusingsharptools.
• Safetyglassesrequiredwhensoldering.
Soldering Iron Safety Tips
•Alwaysgetpermissionfromanadultbeforeusingasolderingiron.
•Besuretoreadandfollowallofthemanufacturersinstructionsprovidedwithyoursolderingiron.
•Nevertouchtheelementortipofthesolderingiron.
•Alwaysreturnthesolderingirontoitsstandwhennotinuse.
•Turnunitofforunplugitwhennotinuse.
IfyouarecompetingintheJuniorSolarSprintcompetition,weencourageyoutocreateyourowndesign.Refer
totheofficialJuniorSolarSprintruleswhendesigningyourvehicletomeetthosespecifications.Thisuserguideis
intendedforthosenot participatingintheJSScompetitionandrepresentsoneofmanywaystobuildthevehicle.
Materials Included
ThesolarpanelandmotorareofficialpartsrequiredbytheJuniorSolarSprintcompetition.
•Solarpanelblank(10-1/2"x5"plastic-coatedpaper) •4nylonspacers
•2balsawoodsheets(10-1/2"x4"x3/16") •2steelaxles
•2alligatorclips •Plasticgearfont
•2rear(wide)wheels •2No.14rubberbands
•2front(narrow)wheels •Two-cellAAbatteryholder
•2widerubberbands •Motor280
•2screweyes •RayCatcherSolarPanel(shareditem)
Items Required (not included)
•Solderingironandsolder •Needle-nosepliers
•Hobbyknifeorcopingsaw •2C-clamps
•Cool-meltgluegunandglueslugs •Ruler
•Sandpaper
Making the Chassis
1. UsingaNo.2pencil,drawLineAdownthecenterofabalsasheet
(Figure1).
2. Turn over the balsa sheet.DrawLineB3/4"fromoneendofthe
sheet(Figure2onthenextpage).
Line A
5-1/4"
5-1/4"
Figure1
User Guide
58963 V0513
Ray Catcher
Sprint Deluxe

2 Ray Catcher Sprint Deluxe User Guide 58963 V0513
3. Atthesameend,
drawa5/8"x1-1/2"
notch1"fromthe
topofthesheet
(Figure2).
4. DrawLineC2-1/2"
fromtheotherend
ofthesamesheetof
balsawood(Figure
2).
5. Usingahobbyknife
oracopingsaw,cut
outthenotchdrawn
inStep3.
6. Locatetheothersheet
ofbalsawood.Draw
alineparalleltoand
1-1/8"fromoneofthe
narrowends.Cutalong
thelinetoproduce
a1-1/8"x4"panel
supportmember.
7. Usingacool-meltgluegun,runasmallbeadofgluealongoneofthe4"edgesofthepanelsupportmember
andattachitfirmlyatLineA(Figure3).Afteritisinplace,runanadditionalbeadofglueoneachside
ofthejointbetweenthechassisandthesupportmember.
Wheels, Gears, and Axles
Installingwheelsandgearsonaxlescanbedifficult.Thegearsandwheelsshouldfitsnuglytotheaxleandprovide
powertothewheels.Yourteacherhastroubleshootingtipsonwhattodoifthegearsandwheelsarenotsnug.
Rear Axle Assembly
1. Deburrtheaxlesbybrushingtheendsagainstsandpaper.Thismakesiteasiertopushtheaxlesintothewheels.
2. DetachGearIfromthegearfont.Usingasharpknife,carefullyremoveanyplasticflashingbetweenthegearteeth.
3. Placethegearonatable.Insertoneofthesteelaxlesintothegear.
Slidethegear1-7/8"fromoneendofthe
axle.Itshouldbe3-3/8"fromtheotherendoftheaxle(Figure4).
4. Slidetwonylonspacersontotheaxle,oneoneachsideofthegear(Figure4).
5. Placeoneoftherearwheelsflatonatable.Keepingthespacersinplace,insertoneendoftheaxleintothewheel.
Slidetheaxleintothewheeluntilitisflushwiththeoppositesideofthewheel.
6. Laytheotherrearwheelflatonthetable.Withspacersstillinplace,slidethefreeendoftheaxleintothewheel
untilitisflushwiththeoppositesideofthewheel.
7. Stretchawiderubberbandaroundeachofthewidewheels.Theseactastiresandprovidetractionforyour
vehicle.
Figure3
Figure4
Figure2

Ray Catcher Sprint Deluxe User Guide 58963 V0513 3
Front Axle Assembly
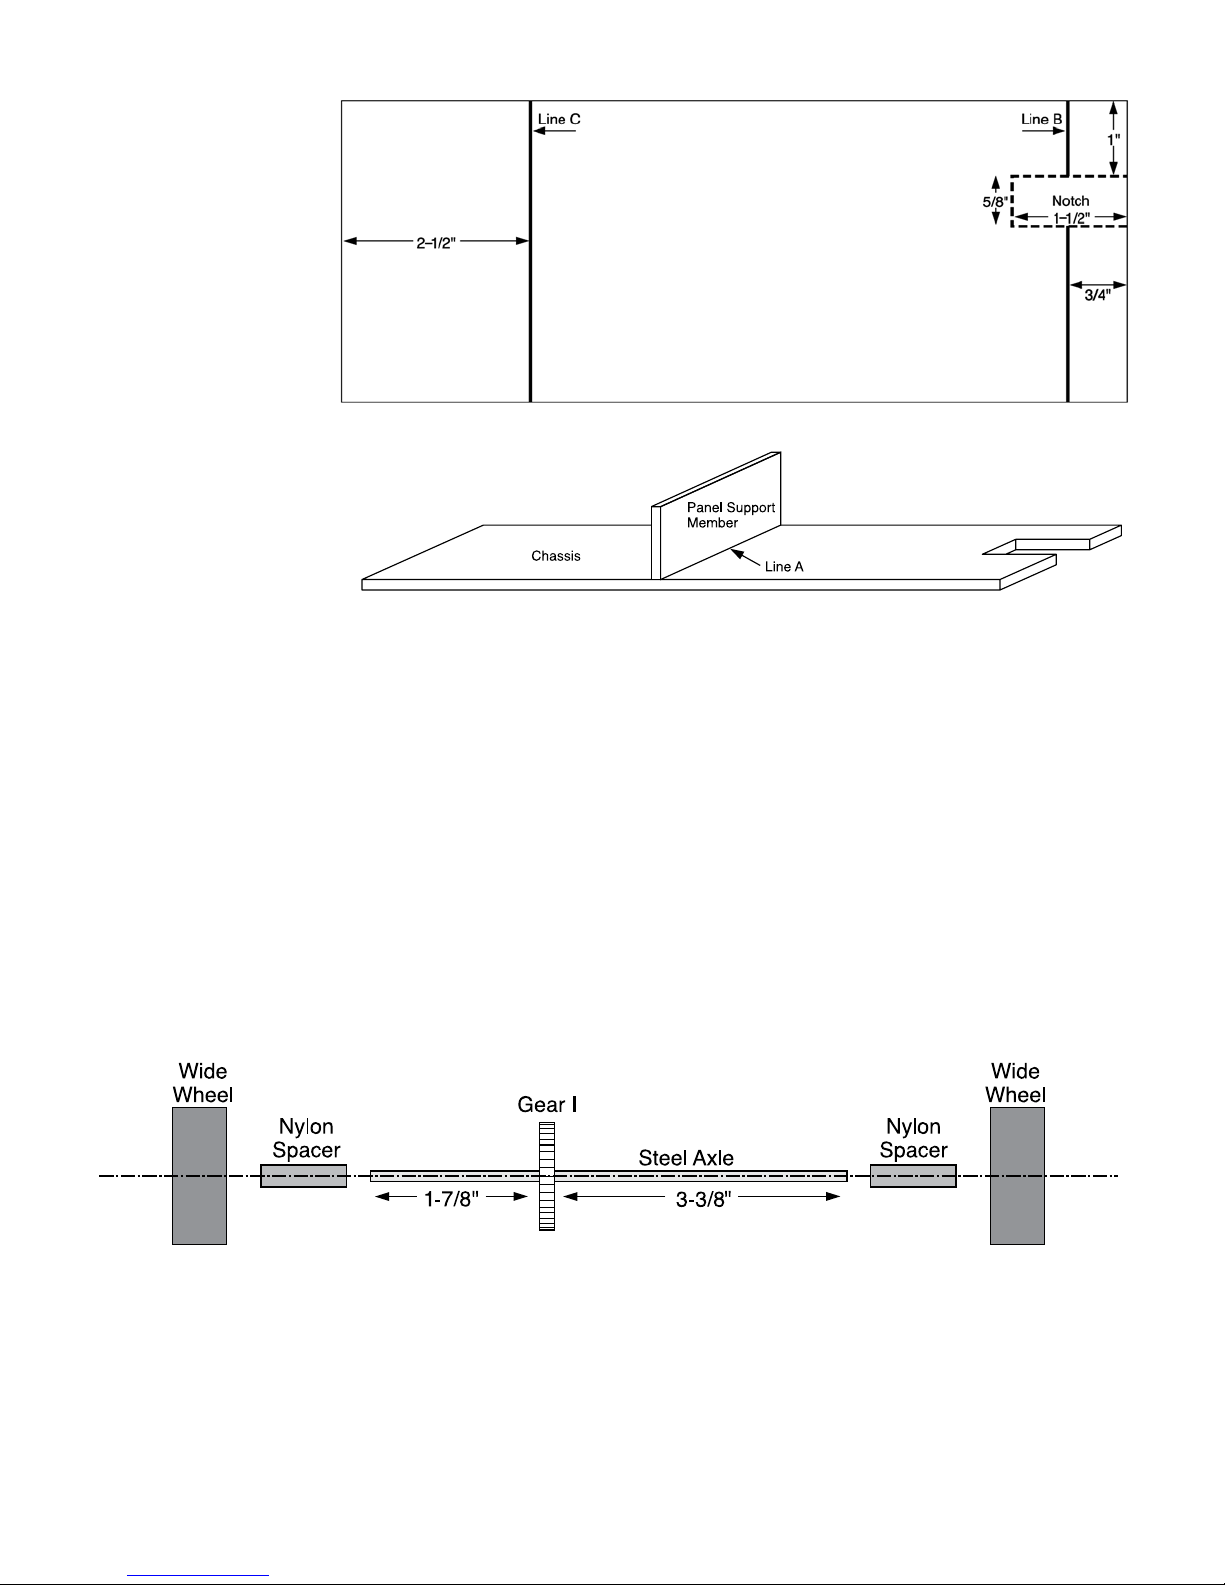
1. Placeoneofthefrontwheelsflatonthetable.Insertoneendoftheremainingsteelaxleintothewheeluntil
theendoftheaxleisflushwiththeoppositesideofthewheel.
2. Slidetwonylonspacersontothefreeendoftheaxle.
3. Whilekeepingthespacersontheaxleshaft,slidethefreeendoftheaxleintotheotherfrontwheeluntilthe
endoftheaxleisflushwiththeoppositesideofthewheel.
Attaching Axle Assemblies to Chassis
1. Positionthenotchedchassisonthetablesothenotchedendofthebalsawoodsheetishangingoverthe
tableedgeandLinesBandCarefacingup.
2. Carefullypositiontherearaxleassemblyso:
•GearIiscenteredinthenotchedareaofthechassis.
•TheaxleispositionedalongLineB.
•Thenylonspacersarepositionedwithin1/16"ofeachwheel.
3. WhentherearaxleispositionedasdescribedinStep2,usesmallC-clampsoraskafriendtoholdtherear
axleassemblyinthecorrectposition.Nowgentlyapplyabeadofcool-meltgluealongthesidesofthenylon
spacerswheretheytouchthechassis.Holdtherearaxleassemblyinplaceuntilthegluecools.
4. PlacethefrontaxleassemblyalongLineC. Positiontheaxlesothewheelsareequidistantfromthechassis.
5. Slidethespacerstowithin1/16"ofeachwheel.Holdthisassemblyinplaceandgentlyapplyabeadofcool-
meltgluealongthesidesofthenylonspacerswheretheycontactthechassis.
6. Holdthefrontaxleassemblyuntilthegluedries.
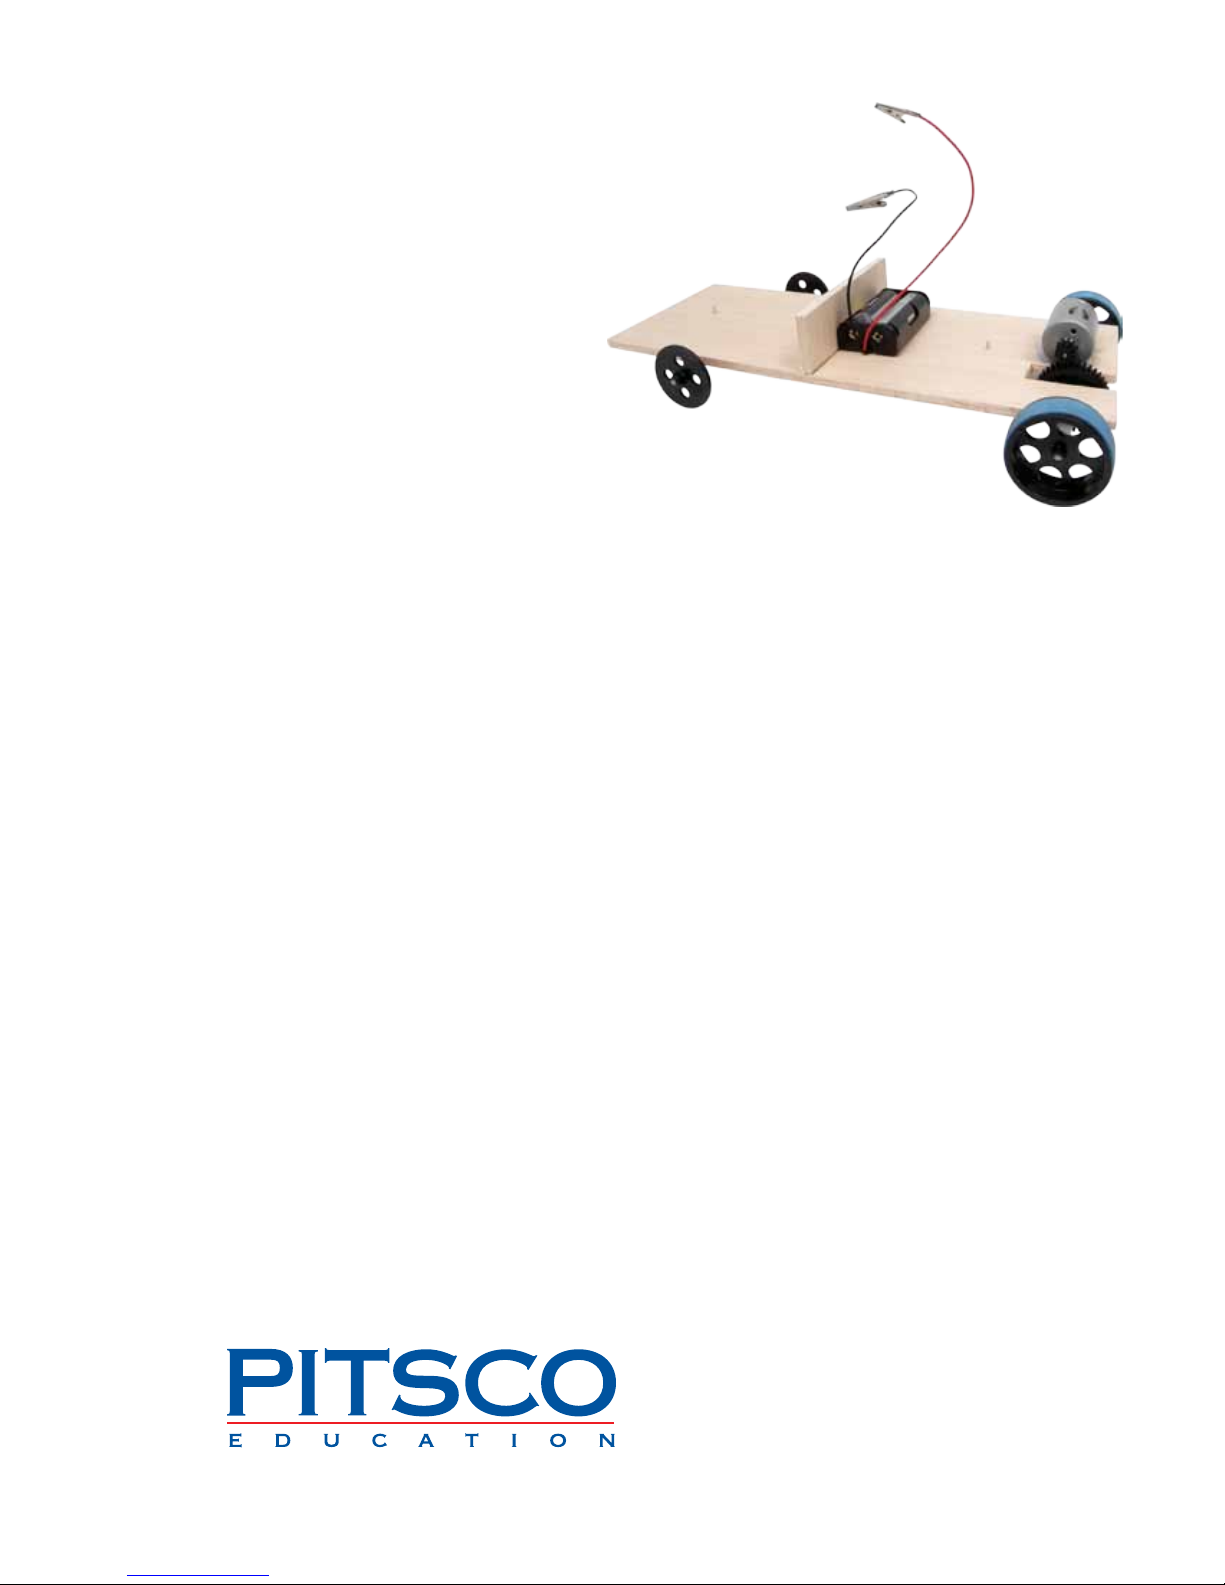
Attaching Motor Assembly to Chassis
1. RemoveGearFfromthegearfontandcutoffanyexcessplasticbetweentheteethofthegear.
2. InserttheshaftofthemotorintoGearFtowithin1/8"ofthebodyofthemotor.
3. Setthechassisonthetablewiththeaxleassembliesfacingdown.
4. Usingacool-meltgluegun,createa1/2"x1"rectangleofglueabout1/8"deep(Figure5).
5. Whiletheglueisstillliquid,place
themotoronitsside(withvent
holesup)onthegluesoGearFsits
directlyontopofandengagesGear
I(Figure5).Besurenottoblock
theventholeswithglue.Holdthe
motorinplacewhilethegluecools.
6. Applyanotherbeadofcool-melt
gluebehindandinfrontofthe
motor(Figure5).Thiswillkeepthe
motorinplaceifthevehiclecomes
toasuddenstoporcrashes.
7. Ifthemotordislodges,usethetip
oftheglueguntosoftentheglue
onthechassiswherethemotor
was.Addasmallamountofglue
andreattachthemotorasyoudid
before.
GearF
GearI
Figure 5 – In this illustration, Gear F engages Gear I.

4 Ray Catcher Sprint Deluxe User Guide 58963 V0513
Battery Holder Assembly
1. Connectthealligatorclipstothebatteryholder
assemblybyinsertingoneofthetwoleads
throughthesmallholeinanalligatorclip.
2. Usingapairofpliers,bendthetabsonthe
alligatorclipoverthelead.
3. Soldertheleadtothealligatorclip.Besureto
heatthemetalaroundtheleadthoroughlyso
solderflowsfreelyandattachestotheclip.
4. RepeatSteps1through3forthesecondleadof
thebatteryholder.
5. Positionthebatteryholderbehindthepanel
supportmember(Figure6).Makesuretheleads
areonthesamesideofthechassisasthemotor
terminals.
Motor Connections
1. Solderthetwowireleadsonthesolarpaneltothetwoalligatorclips.Tip: Toprotecttheconnection,placea
daboflow-tempglueonthesolderjoint.
2. Connectthealligatorclipstothetwomotortabs.
3. Takethesolarvehicleoutsideandexposeittosunlight.Ifthewheelsdonotspinforward,switchthe
alligatorclipsonthemotor.
Final Assembly
1. Usingacool-meltgluegun,runasmallbeadofglueonthetop,extremefrontofthechassis.Allowtheglue
tocool.Thiswillprovidealedgeonwhichthesolarpanelorsolarpanelblankcanrest.
2. Runanotherbeadofgluealongthefrontedgeofthechassistoprovideabumperforyourvehicle.
3. Positionthesolarpanelblankonthechassissoitrestsatthefrontofthevehicleandonthepanel
supportmember.Theblankisusedtoshowthepositionandeffectofthesolarpanelonthevehicleasyou
testyourvehiclewiththebatterypack.Whenyouarereadytodoasolartestorrace,usethesolarpanelthat
yourteacherprovidesandreplacetheblankwithit.
4. StretchoneoftheNo.14rubberbandsaroundthefrontofthechassisandthesolarpanelblank.Stretchthe
otherNo.14rubberbandaroundthechassisandpanelblankandpositionitataboutthecenterofthepanel
blank.
5. Connectthebatterypack’salligatorclipwiththeredleadtothemotorterminalthathasarounddot.Then
connectthealligatorclipwiththeblackleadtotheothermotorterminal.
Optional
Ifyouarerunningyourcaronaguidedwireorfishingline,usethescreweyestokeepyourcarinline.Insert
thescreweyesintothebottomofthechassis,onetowardthefrontofthevehicleandanothertowardtherear,
centeredbetweenthesidesandin-linewiththedirectionoftravel.
Figure 6
P.O. Box 1708 • Pittsburg, KS 66762
www.pitsco.com
Tolll-Free Orders 800-835-0686
Table of contents
Popular Utility Vehicle manuals by other brands

Radical Design
Radical Design Cyclone IV Trekking instructions

Madill
Madill 123 SWING YARDER manual

Toro
Toro 130-5615 installation instructions

Carry-On Trailer Corporation
Carry-On Trailer Corporation 7x16CG User's manual - safety guide

PRONAR
PRONAR T700M Operator's manual

Club Car
Club Car DS Golf Car 1992 owner's manual