Ifor Williams Trailers TT2012 User manual

Page | 1
Owner’s Manual –Tipper and Tiltbed Trailers
Tipping Trailers –TT2012, TT2515, TT3017, TT3621
Tiltbed Trailers –CT166, CT167, CT177, TB4021, TB4621, TB5021, TB5521
Please enter the following information for your own records:
Trailer Model: (from Manufacturers plate)
VIN Number: (from Manufacturers Plate)
SCK
Date of purchase:
Purchased from:
Maximum Gross Weight (MGW):
Unladen Weight: (from CoC)
Payload: (MGW minus Unladen Weight)
Drawbar Security Code: (from RH drawbar)
Having recorded this information, please take a further moment to fill in and return the Guarantee
Registration Card. This is a big step towards protecting your trailer against theft.
It is suggested this page is removed from the manual (so that the manual can be kept with the trailer
without risk of losing both trailer and this important information) and kept in a place of safety with
the purchase receipt and the Certificate of Conformity*.
Manufacturer’s Plate
The trailer is fitted with a Manufacturer’s Plate to the right hand side drawbar which will show the
following information:
•The manufacturers name and address details
•The trailer model
•The trailer serial number
•Maximum gross weight for the trailer
Drawbar Security Code:
This is a code –numbers and letters –cut into the right-hand drawbar but only on TT, CT166 and
CT167 models. It is not on CT177, TT2012 and TB drawbars.
INTENDED USE
The following are permitted:
• (Tipper) Transport of loose aggregates,
wood chips
• (Tilt bed) Transport of wheeled or tracked
vehicles

Page | 2
•Contents
General –All Types Covered by this Manual ...................................................................................... 4
1.1 Introduction ............................................................................................................................4
1.2 –Overview of Trailer Types covered by this Manual.................................................................... 4
2 –Load Security..................................................................................................................................... 8
3 –Operation –Tipping Trailers.............................................................................................................. 9
3.1 –Safe Operation of Tipping Trailers ............................................................................................. 9
3.2 –Use of the Safety Prop ............................................................................................................. 11
3.3 Loading........................................................................................................................................12
3.4 –Unloading .................................................................................................................................13
3.4.1 –Rear Discharge –Tilting Tailboard Function .....................................................................13
3.4.1.2 –Bottom Hinged Unloading (If applicable)....................................................................... 14
3.4.1.3 TT2012 Tailboard removal ................................................................................................15
3.4.2 –Tipping –Electric Tip .........................................................................................................16
3.4.2.1 –Tipping the Trailer Body.................................................................................................17
3.4.2.2 –Lowering the trailer bed/body.......................................................................................17
3.4.3 –Tipping –Manual Tip.........................................................................................................18
3.4.3.1 –Raising the Trailer Body TT2012.....................................................................................19
3.4.3.2 Raising the Trailer Body TT2515 (Manual pump) .............................................................20
3.4.3.3 –Lowering the Trailer Body. .............................................................................................20
3.4.4 –Side Discharge ...................................................................................................................20
3.5 - Loading Skids.............................................................................................................................20
3.5.1- Removing skids ...................................................................................................................21
3.5.2 –Use of Loading Skids.......................................................................................................... 22
3.5.3 –Replacing Skids..................................................................................................................22
3.6 –Electric Winch (Not available on TT2012)..........................................................................22
3.7 –Removal and Replacement of Sideboards, Tailboard and Headboard ....................................22
3.7.1 –Removing Sideboards........................................................................................................23
3.7.2 –Removing Centre Side-Post (where fitted) ....................................................................... 23
3.7.3 –Removing Tailboard and Rear Corner Pillars ........................................................................ 23
3.7.4 –Removing Headboard........................................................................................................23
3.7.5 –Re-fitting Headboard, Tailboard and Sideboards..............................................................24

Page | 3
4 –Operation –Tiltbed Trailers ............................................................................................................25
4.1 –Safe Operation of Tiltbed Trailers............................................................................................ 25
4.2 –Loading Tiltbed Trailers with Vehicles or other Rolling Loads ................................................. 26
4.2.1 –General Notes on Loading –Manual Tilt........................................................................... 26
4.2.2 –Loading Vehicles or Rolling Loads with an Electric Winch ................................................ 31
4.2.3 –Loading Vehicles or Other Rolling Loads with a Manual Winch .......................................33
4.2.4 –Loading Vehicles and other Plant under Own Power .......................................................34
4.2.5 –Notes Specific to Different Tiltbed Types..........................................................................34
5.3 –Unloading Tiltbed Trailers carrying Vehicles or other Rolling Loads .......................................35
4.4 Using Tiltbed Trailers as Flat Trailers (Tiltbed function not used) .............................................. 37
4.5 Fitting and Using the Wheel Chock Kit on TB Trailers................................................................. 37
4.6 –Fitting and Using CT177 Ski-Jump Kit.......................................................................................38
5 Maintenance ......................................................................................................................................39
5.2 –Hydraulic System......................................................................................................................39
5.2.1 –Hydraulic System Maintenance ........................................................................................39
5.2.2 –Draining the Tank ..............................................................................................................39
5.3 –Battery......................................................................................................................................41
5.3.1 –Battery Maintenance ........................................................................................................42
5.4 –Parts ...................................................................................................................................43
5.4.1 Replacement parts ...............................................................................................................43
5.4.2 Accessories...........................................................................................................................43
5.5 –Tyres......................................................................................................................................... 43
5.5.1 Pressure, Load, Speed and Interchangability.......................................................................43
5.5.2 Tyre Repairs .........................................................................................................................44
5.5.3 Changing a Wheel ................................................................................................................44
5.7.3 –Wheel Bearings ................................................................................................................. 46
5.7.4 –Brake Cables......................................................................................................................46
5.8 Coupling Maintenance ................................................................................................................47
5.8.1 –Bellows ..............................................................................................................................47
5.8.2 –Coupling Head ................................................................................................................... 47
5.8.3 –Coupling Damper ..............................................................................................................47
5.9 –Breakaway Cable......................................................................................................................48
5.9.1 –Checking the Breakaway Cable .........................................................................................48
5.9.2 –Replacing the Breakaway Cable ........................................................................................48

Page | 4
5.10 –Suspension .............................................................................................................................49
5.10.1 –Suspension Inspection.....................................................................................................49
5.12 Washing ....................................................................................................................................49
7 –End of Life Disposal .........................................................................................................................52
8 –Technical Data.................................................................................................................................52
8.1 All Versions..................................................................................................................................52
8.3 Tiltbed –CT ................................................................................................................................. 53
8.4 Tiltbed –TB ................................................................................................................................. 54
EC DECLARATION OF CONFORMITY..............................................................................................55
General –All Types Covered by this Manual
1.1 Introduction
Please take the time to read the contents of this manual before you attach the trailer to the towing
vehicle or attempt to load it. It is a good idea when reading this manual, to take a tour of the trailer
with all persons who will be using it.
Make sure everyone responsible is fully conversant with the procedures for attaching to the towing
vehicle, towing, loading, unloading and maintaining the unit. By following, understanding and
practising the information and procedures in this manual, the trailer will give you many
miles/kilometres of safe use.
Certain information in this manual is governed by law and is subject to change without prior notice.
Great care has been taken to ensure that the information is correct at the time of publication.
However, it is the trailer user’s sole responsibility to ensure that they fully comply with all legal
requirements.
We reserve the right to implement changes and improve specifications without prior notice.
Whilst every effort has been made to ensure the accuracy of these instructions, they are intended
only as a guide to the user.
1.2 –Overview of Trailer Types covered by this Manual
Tiltbed trailers can tilt their load-bed through a small angle, until the rear touches the ground, to
allow the loading and unloading of wheeled or tracked vehicles. Ifor Williams Tiltbed trailers always
tilt by lifting their front wheels off the ground.
Tipping trailers are intended primarily for the carriage of loose loads such as sand and gravel and can
tip their load bodies through a large angle such that the load then slides out the back. Unlike
Tiltbeds, Tipping trailers keep all their wheels on the ground during discharge.
Both Tiltbed and Tipping trailers use hydraulic actuators to tilt or tip their load-beds.
Page | 5
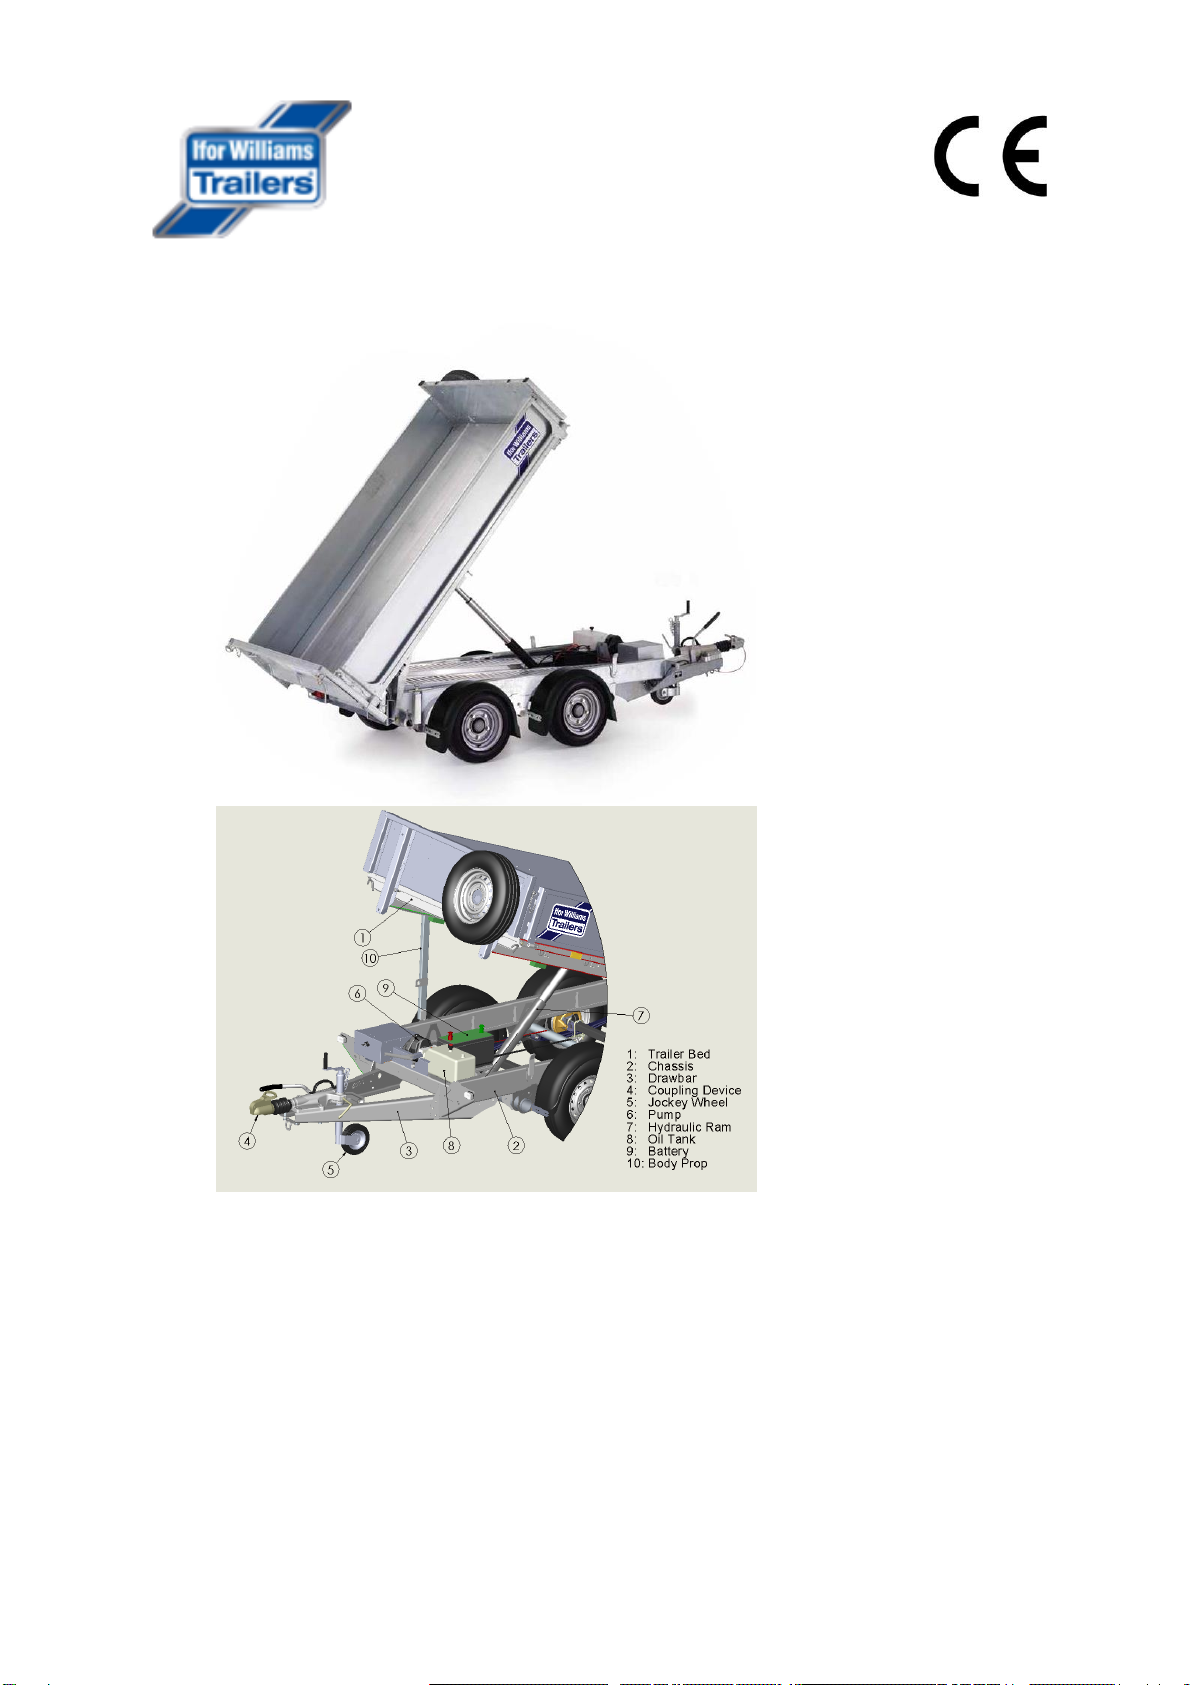
Tipper –TT Series
Page | 6
1. Trailer bed
2. Chassis
3. Drawbar
4. Coupling Device
5. Jockey Wheel
6. Pump
7. Hydraulic Ram
8. Safety Prop
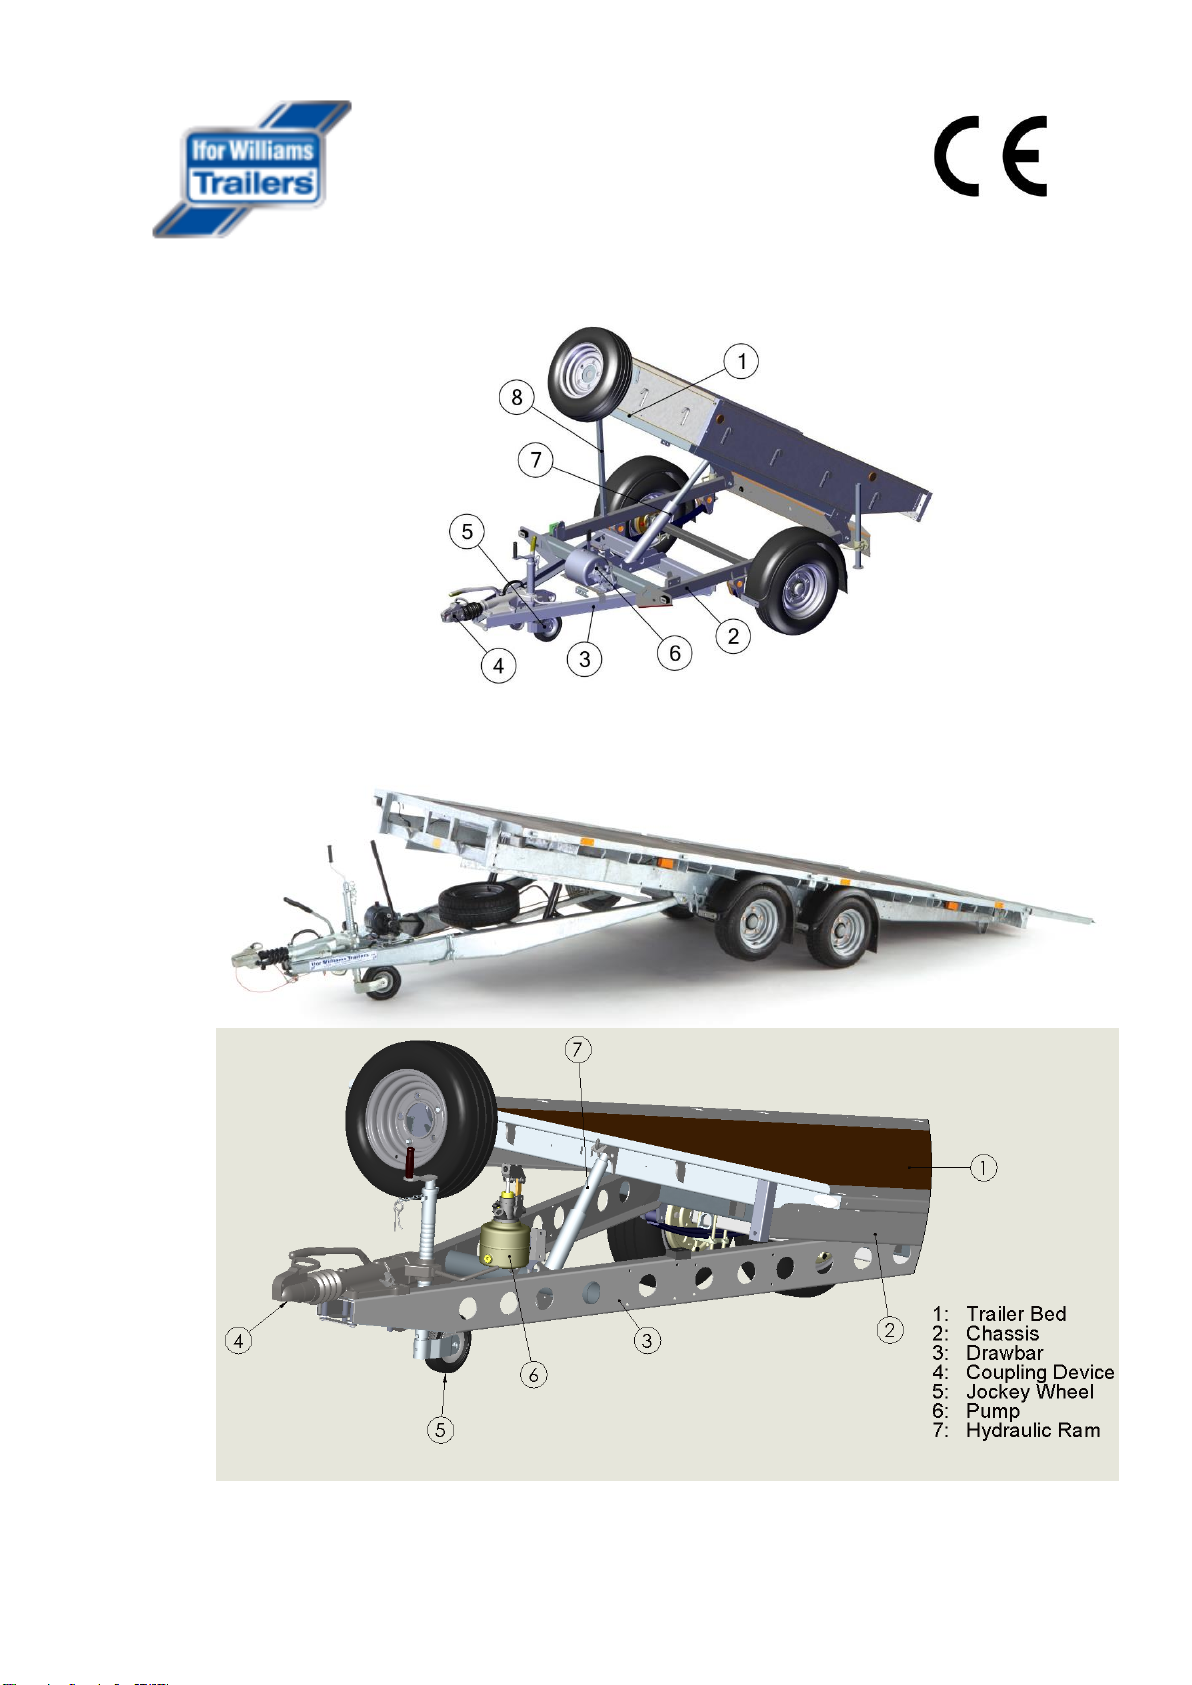
Tiltbed –CT166 and CT167
TT2012

Page | 7
Tiltbed –TB Series
Tiltbed –CT177

Page | 8
2 –Load Security
•Except in the case of tipping trailers carrying aggregate loads –sand and gravel for instance -
always ensure the load is secured against movement.
•Be aware that the highest loads occur during braking and restraint against forward movement
is particularly important. For that reason, lashings running diagonally, forwards from a rear
lashing point, around the front of the load and rearwards to the opposite lashing point are
preferred to those going straight across the load. A similar front, rearwards, front lashing
restrains against rearwards movement. A third lashing might be fitted directly over side to
side.
•The UK Code of Practice: Security of Loads in Transport gives some guidance but is biased
towards Heavy Goods Vehicles. At variance with advice in that document, Ifor Williams rope
hooks are 800 kg rated lashing points. All the rated lashing points for a particular trailer type
are shown pictorially on a decal fitted to the front of the trailer. Each lashing point is rated at
either 500kg or 800kg and the sum total of lashing points used should exceed the weight of
the load restrained. For example: 2500 kg load, use 2 pairs of lashing rings: capacity 2 x 2 x 800
= 3200 kg.
•All the oval holes in the floor of TB and CT177 trailers are 800 kg rated attachment points for
ratchet tensioner “claws”.

Page | 9
•In the special case of transporting cars and vans (wheeled vehicles with pneumatic tyres),
special ratchet tensioning wheel securing straps, Ifor Williams part P1042,
should be used at every wheel. Lashing any other part of the vehicle to
the trailer is likely to result in the lashing “tugging” as the transported
vehicle suspension moves and this may break or loosen the lashings or at
least overload the lashing points.
•Winches are designed to pull loads not hold them in place during transit and should never be
used as a means of securing the vehicle. If used in this way, winch cables will always loosen in
transit as the cables tighten themselves onto the cable drum.
•During extended journeys, carry out regular checks on the condition of the load securing
system.
3 –Operation –Tipping Trailers
3.1 –Safe Operation of Tipping Trailers
•DO NOT LEAVE THE TRAILER UNATTENDED WITH THE BODY RAISED UNLESS THE SAFETY
PROP IS IN PLACE. (See use of safety prop –Section 4.2)
Page | 10
•It is recommended that Personal Protection Equipment such as safety boots and gloves be
worn when operating the trailer.
•It is recommended that new users practice operating the tipping mechanism with the trailer
empty to ensure familiarity with the controls.
•By cordoning off, or by some other means, prevent encroachment of people and, so far as
possible property, into the “working area”. This may be defined as 2m behind and 3m either
side of a Tipping Trailer.
•Ensure lighting is adequate.
•The trailer lighting could be obscured when tilting/tipping. Ensure that measures are taken to
compensate for this when operating on a public road, such as placing a warning tri-angle or
lights behind the vehicle.
•Tipping Trailers must be stationary, coupled to the towing vehicle with the handbrake applied.
•Do not open the tailboard while trailer body is raised. Tailboards must be opened before
tipping commences.
•Tipping results in the centre of gravity being elevated with consequent risk of rollover. This
risk increases dramatically if the trailer has an initial side-slope or is on soft ground. Tipping
should not be attempted if the initial side-slope exceeds 5 degrees (90mm in 1m) or the
surface beneath the wheels is not sufficiently firm to prevent “sinking in” on one side as the
load transfers to one side or the other.
•If the load slides out the rear but sticks in the front –as is often the case with wet sand and
earth –be aware that the centre of gravity is now higher than before any load discharged and
the trailer is now in its least stable condition. Providing the trailer is still level it is safe to go on
tipping until the load at the front discharges.

Page | 11
•If any part of the load is stuck in the front of the trailer and will not discharge when the
maximum tip angle is reached, the only safe solution is to fully lower the body and shovel the
remaining load until loose. Then tip again. Using the towing vehicle to try and jerk the stuck
load free is VERY UNSAFE.
•Similarly, if the partly discharged load forms a pile that prevents the rest coming out the only
safe solution is to lower the body at least half way, pull the trailer forwards slightly and then
tip the remaining load. Do not drive forwards with the body fully elevated.
•Prop stands, load-spreader pads and chocks may be used to supplement stability where
ground conditions are marginal.
•Immediately after the load has discharged the elevated tipping body is vulnerable to strong
side winds. Where strong winds exist the orientation of the trailer should be such as to
minimize this risk.
•After discharge is complete, do not drive off until the body is fully lowered. Even when the
above limitations are respected, Operators should ensure the working area either side of a
Tipping Trailer is clear of people and, so far as is possible, property taking account of where
the fully elevated body might fall in the event of a rollover.
•Do not operate Tipping Trailers in the vicinity of overhead cables.
•No-one except the Operator should be in the working area while tipping.
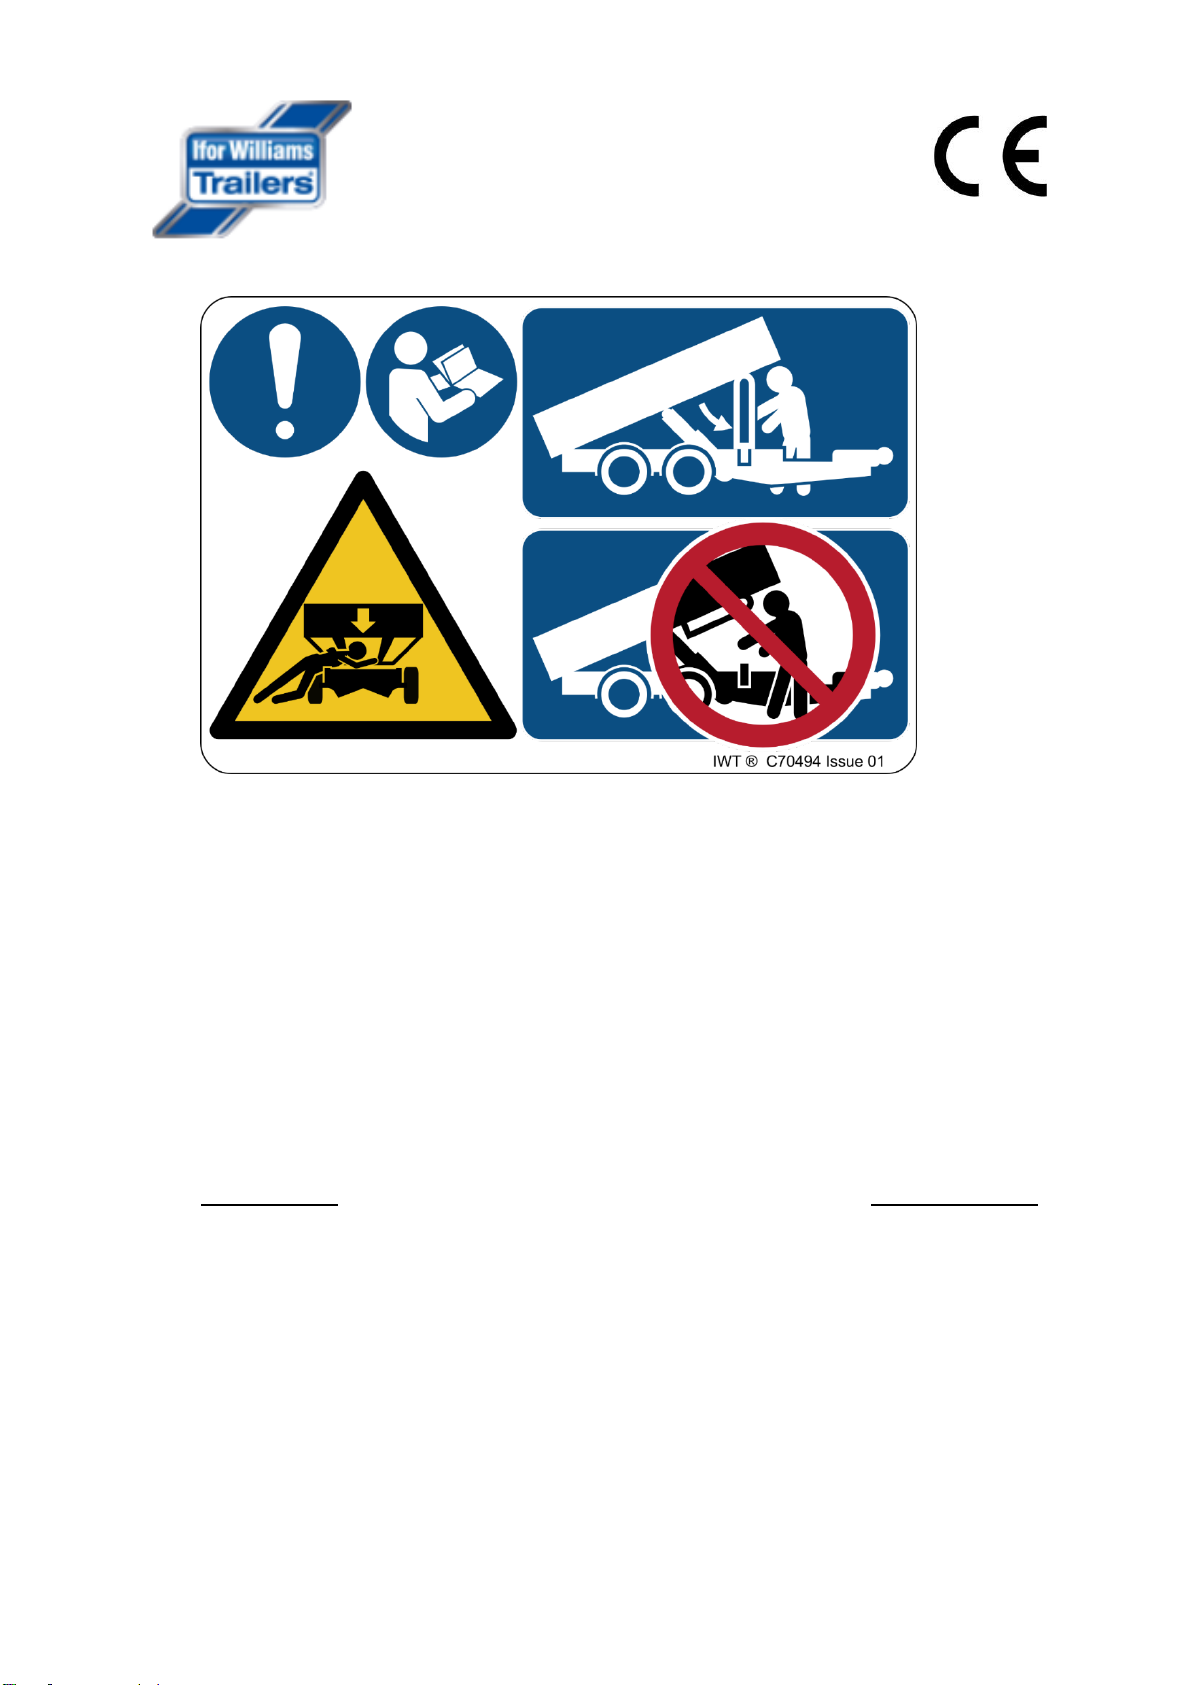
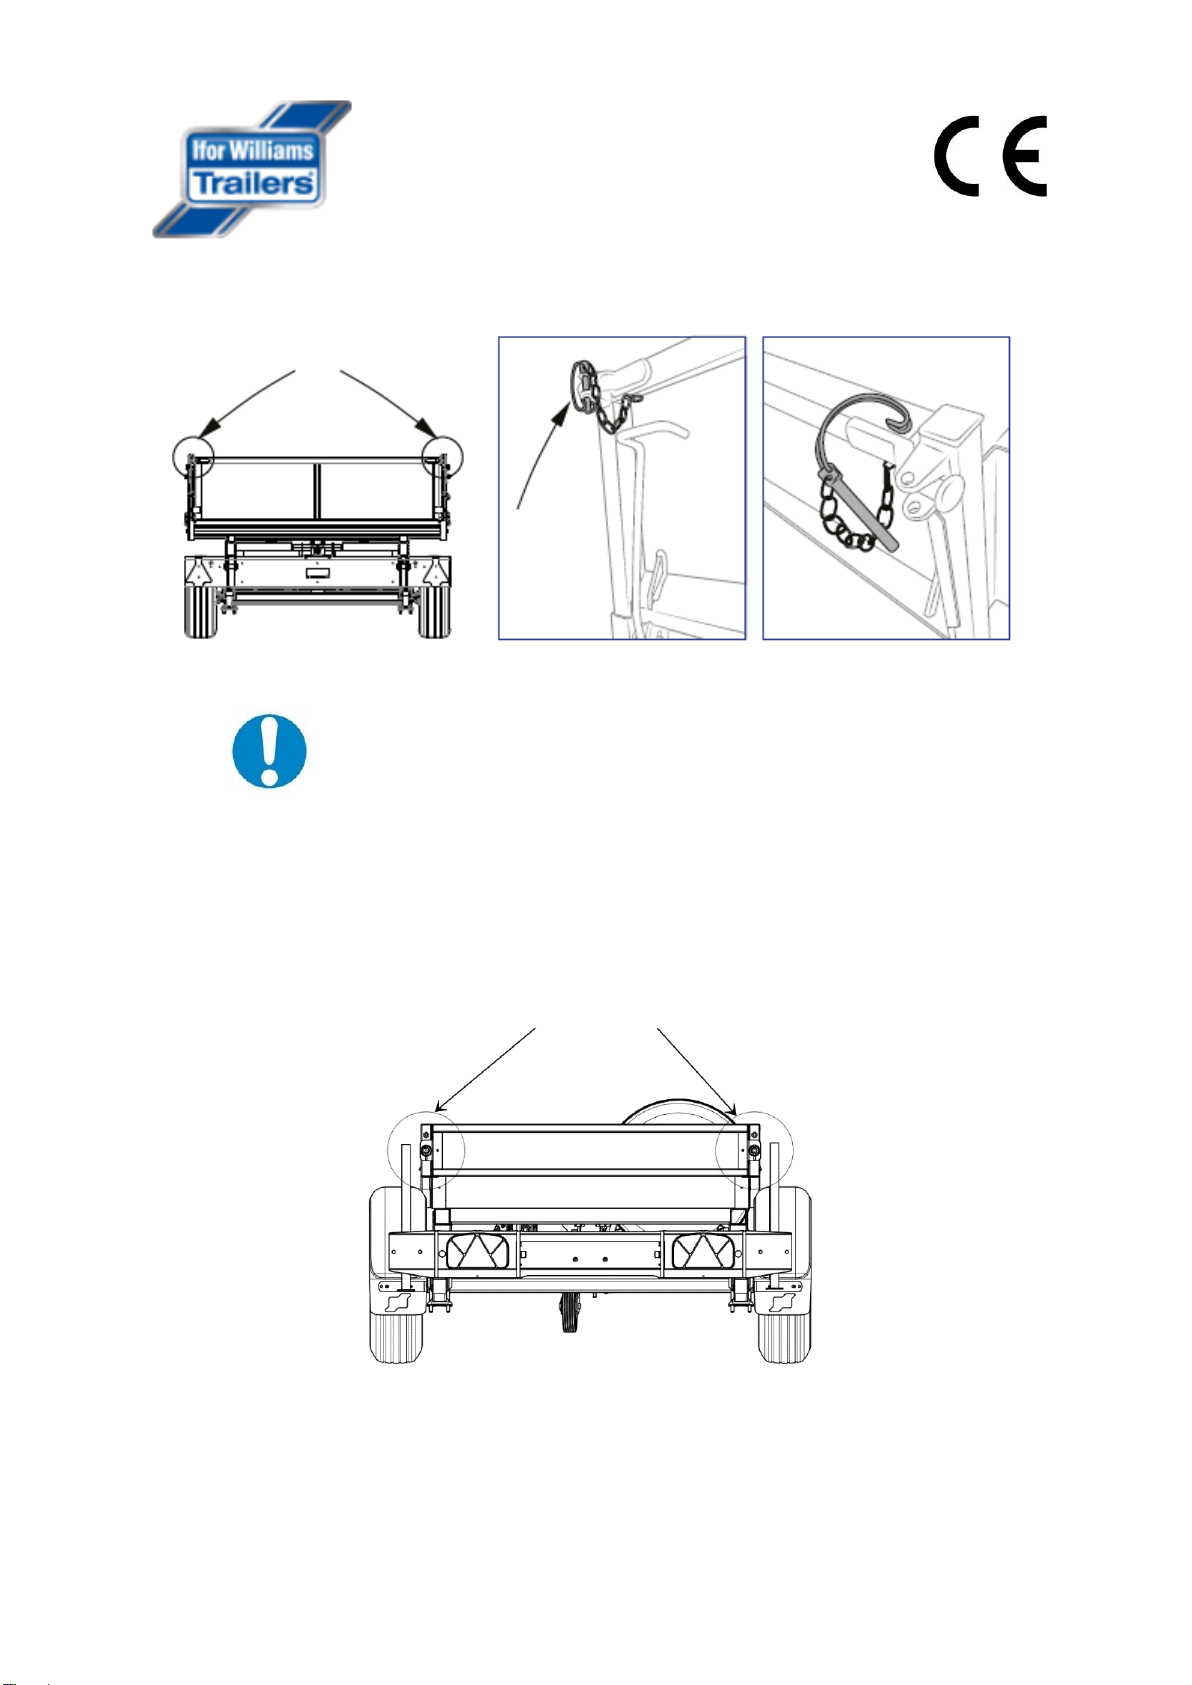
3.2 –Use of the Safety Prop
DO NOT ENTER, LEAN INTO OR REACH INTO THE AREA UNDER THE RAISED BODY UNLESS THE
PROP IS LOCKED IN THE SAFETY POSITION AS SHOWN: IF UNABLE TO DO SO EMPLOY THE USE
OF A SECOND PERSON
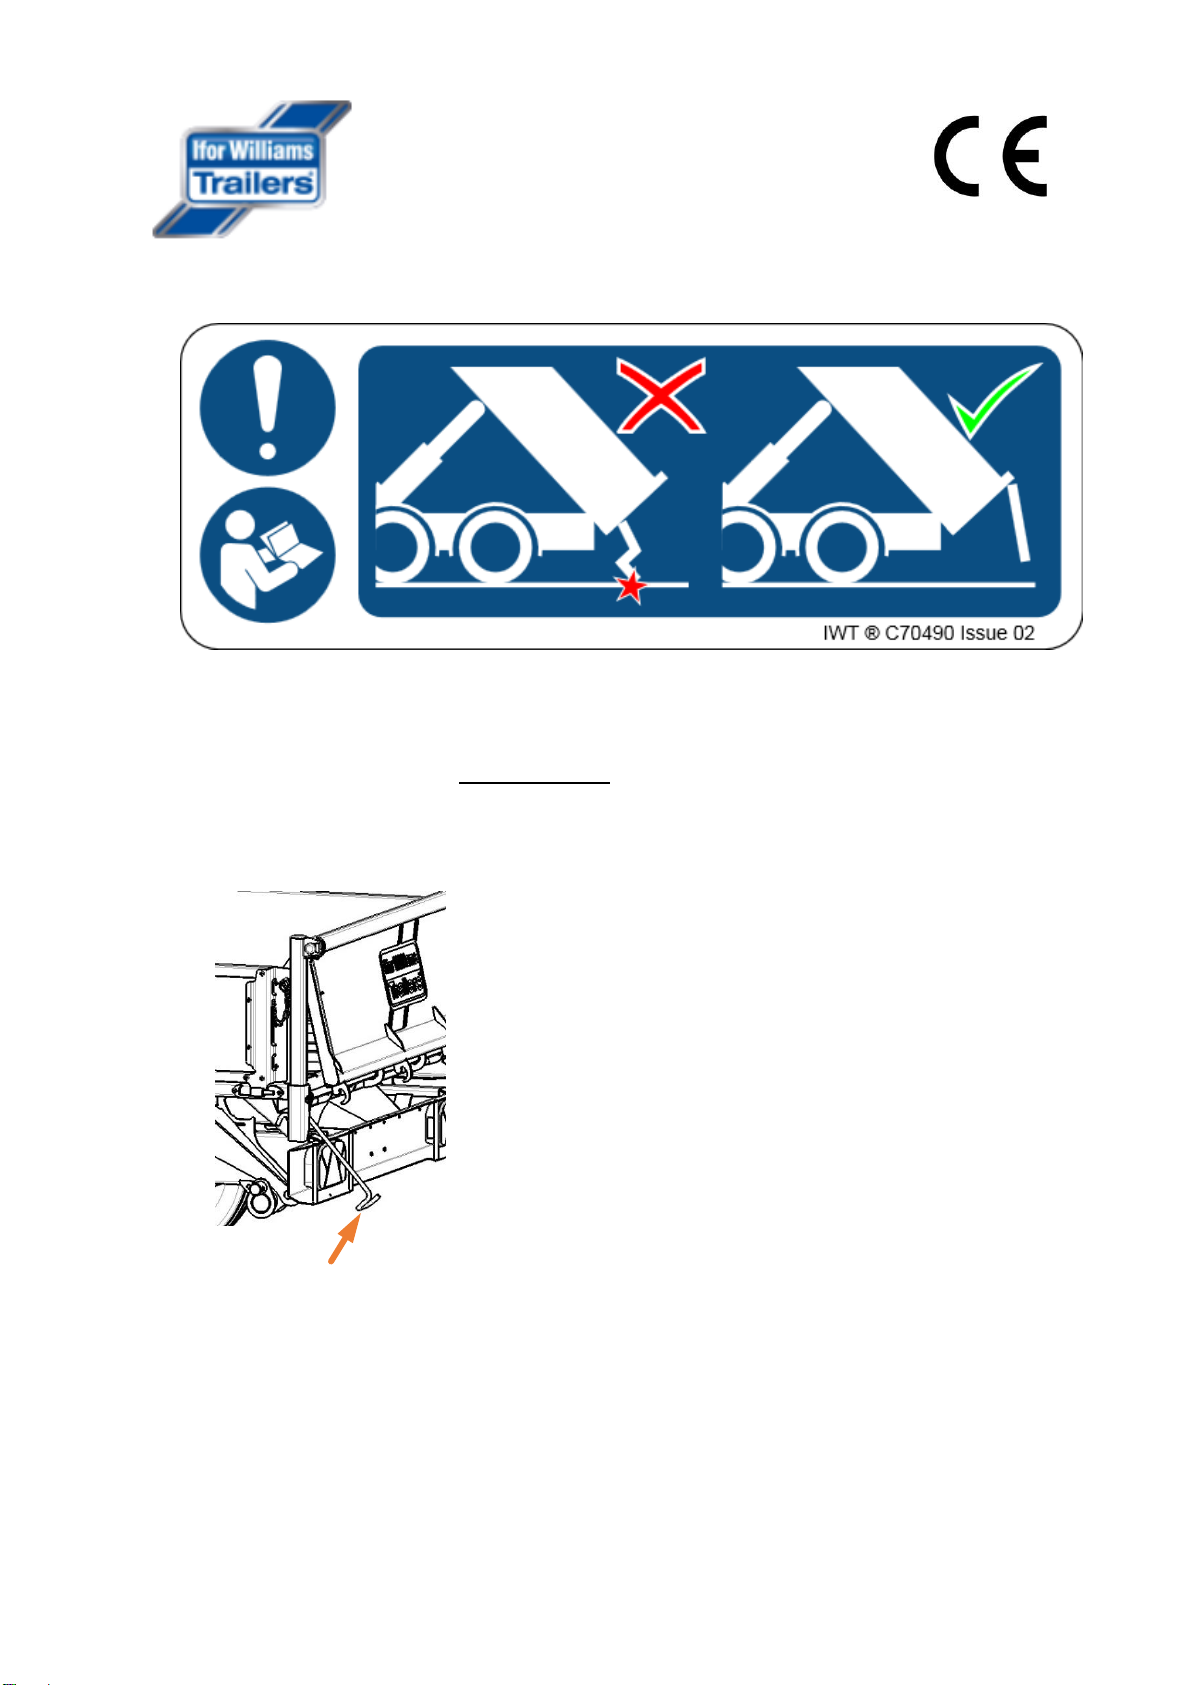
Fig. 1 prop in safety position
Fig. 2 prop in safety position (chassis end)
Fig. 3 prop fixed under body in transport position

Page | 12
Safety prop specific to TT2012 shown below
3.3 Loading
•All Ifor Williams Tipping Trailers should achieve correct weight distribution if loaded evenly
over the entire length of the body or the centre of the load mass is just forward of the centre
of the trailer wheel
set.
Figure 1
Figure 2
Figure 3
Figure 1
Figure 2
Figure 3

Page | 13
•Tipping Trailers can be used as flatbed trailers when bodywork is removed. However, it is
inadvisable to do so with the headboard removed –this being the last line of defence against
the load sliding forwards under emergency braking.
•Where weight distribution permits, the load should be placed against the headboard so that,
in the event of it sliding forwards during emergency braking or an accident, the headboard
does not suffer additional force due to impact.
•Where the load is short and weight distribution demands that is positioned some way behind
the headboard it is recommended that substantial wooden spacers are fitted between
headboard and load.
•Loads must always be secured against rolling sliding sideways by a combination of chocks and
ratchet tensioner straps. A load that comes loose in an accident may be judged to have caused
the accident.
•The load must be secured against sliding or rolling into sideboards which will not survive the
resulting impact loads.
•Vehicles which have been loaded using the optional skids must be restrained using special
straps similar to Ifor Williams part P1042.
3.4 –Unloading
3.4.1 –Rear Discharge –Tilting Tailboard Function
•The tailboard will hinge at the top or the bottom. The choice depends on the nature of the
load.
•Use the top hinged method for aggregate type loads (typically sand or gravel) where the free-
flowing nature of the load means that it will easily pass underneath the top edge of the
tailboard. Using the top hinged method is always preferred because it means the tailboard
cannot hit the ground.
•Use the bottom hinged method where it is likely that the load will jam against the top edge of
the tailboard. Logs would be a good example of such a load. However, using the bottom-
hinged method means that the tailboard will hit the ground well before maximum tip angle is
achieved. If the tailboard does strike the ground damage is almost certain so a bottom-hinged
tip requires careful monitoring of the clearance between ground and tailboard.
Page | 14
•If the nature of the load is such that it is likely to both jam against the top edge of the
tailboard and yet is not sufficiently free-flowing to come out at the limited tip angle dictated
by bottom hinging, then the tailboard may be removed altogether. First release the bottom,
then release both top pivots at the same time (therefore requires two people).
3.4.1.1 –Top Hinged Unloading
▪Standing to the left hand side of the rear of the trailer,
pull the lever to the left then back to release the lever
from its retainer then lower the lever to release the
tailboard. (Fig.4)
▪Step to the side immediately
3.4.1.2 –Bottom Hinged Unloading (If applicable)
•Un-clip and remove both retaining pins from the gudgeon forkets
•Lower the tailboard away from the trailer body
•Step aside immediately
Fig.4
Release lever
Page | 15
•Note that when the tailboard is down the rear lamps and reflectors are obscured.
IN SUCH SITUATIONS ON PUBLIC ROADS, A WARNING TRIANGLE OR OTHER
SUCH DEVICE MUST BE USED TO WARN OTHERS OF THE PRESENCE OF THE
VEHICLE ON THE ROAD.
(Any such device used must be in accordance with national requirements for use on the road.)
3.4.1.3 TT2012 Tailboard removal
•Un-clip and remove both retaining pins
•Remove tailboard from body and place safely to one side
Page | 16
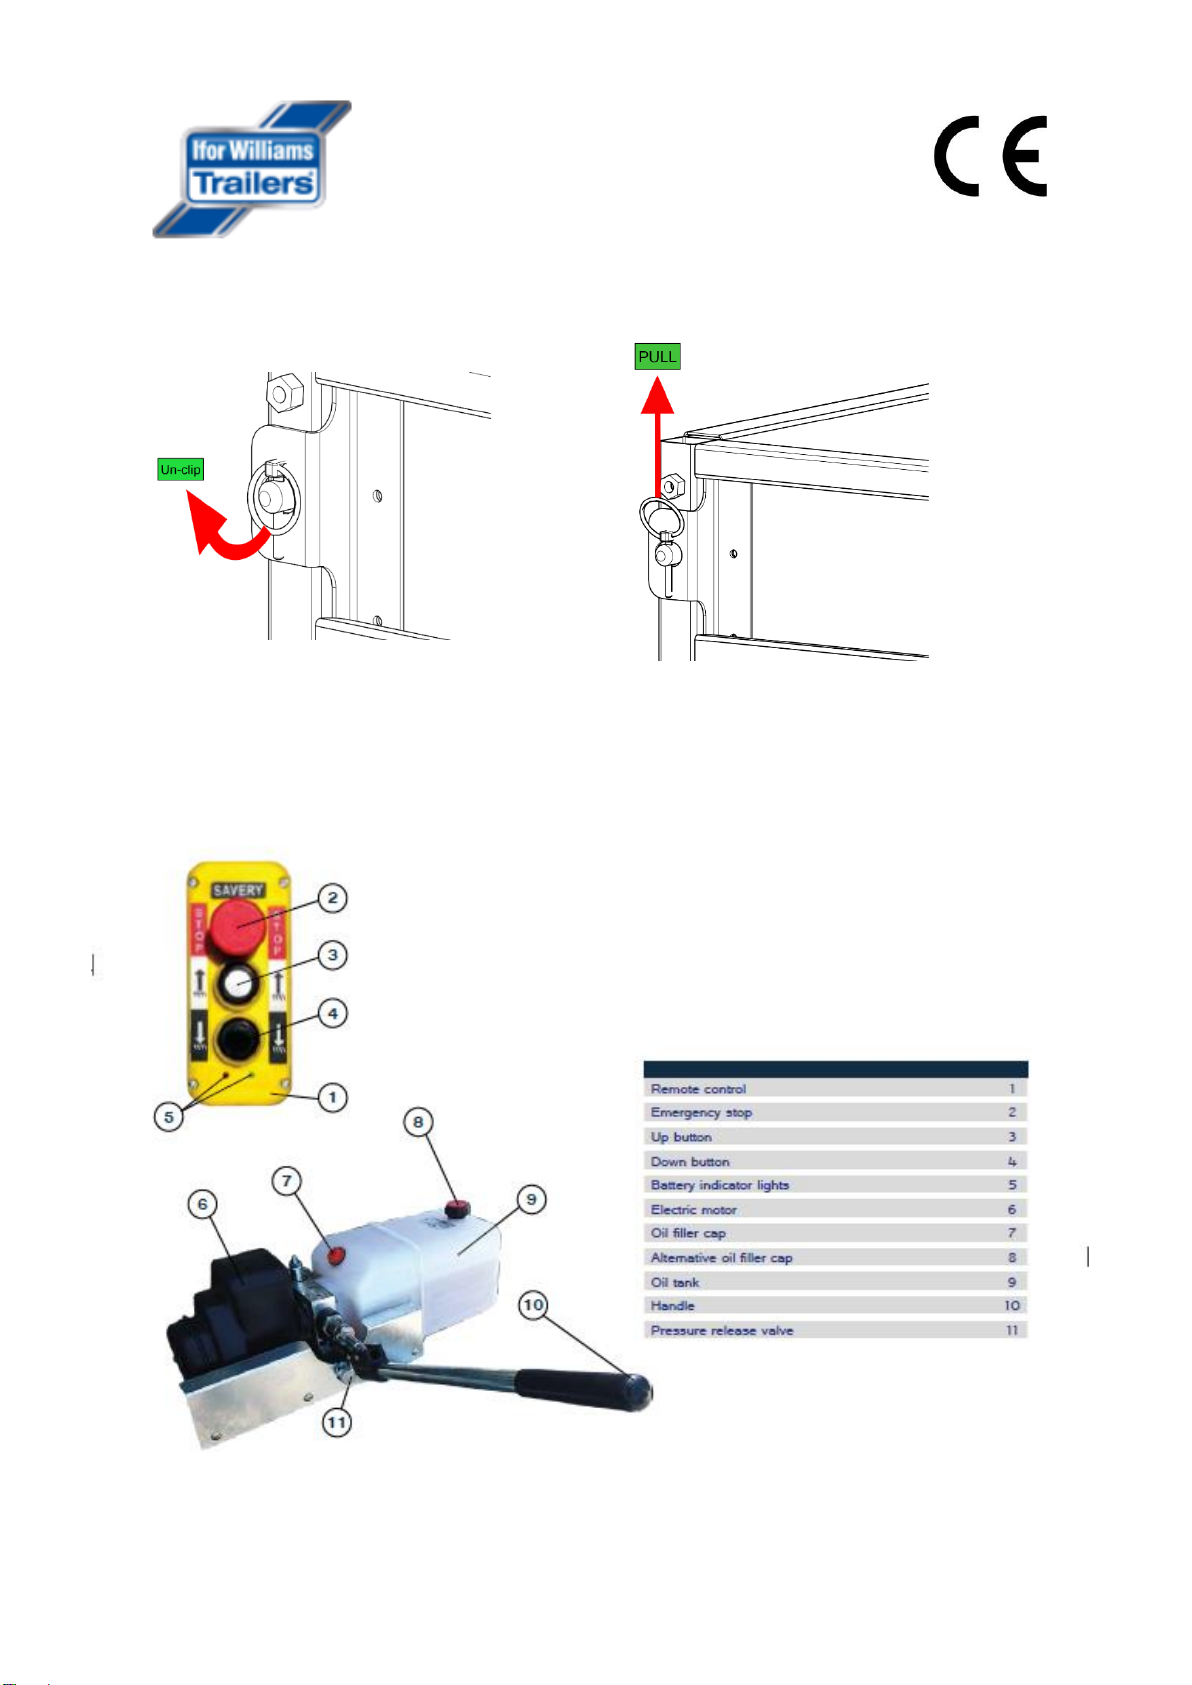
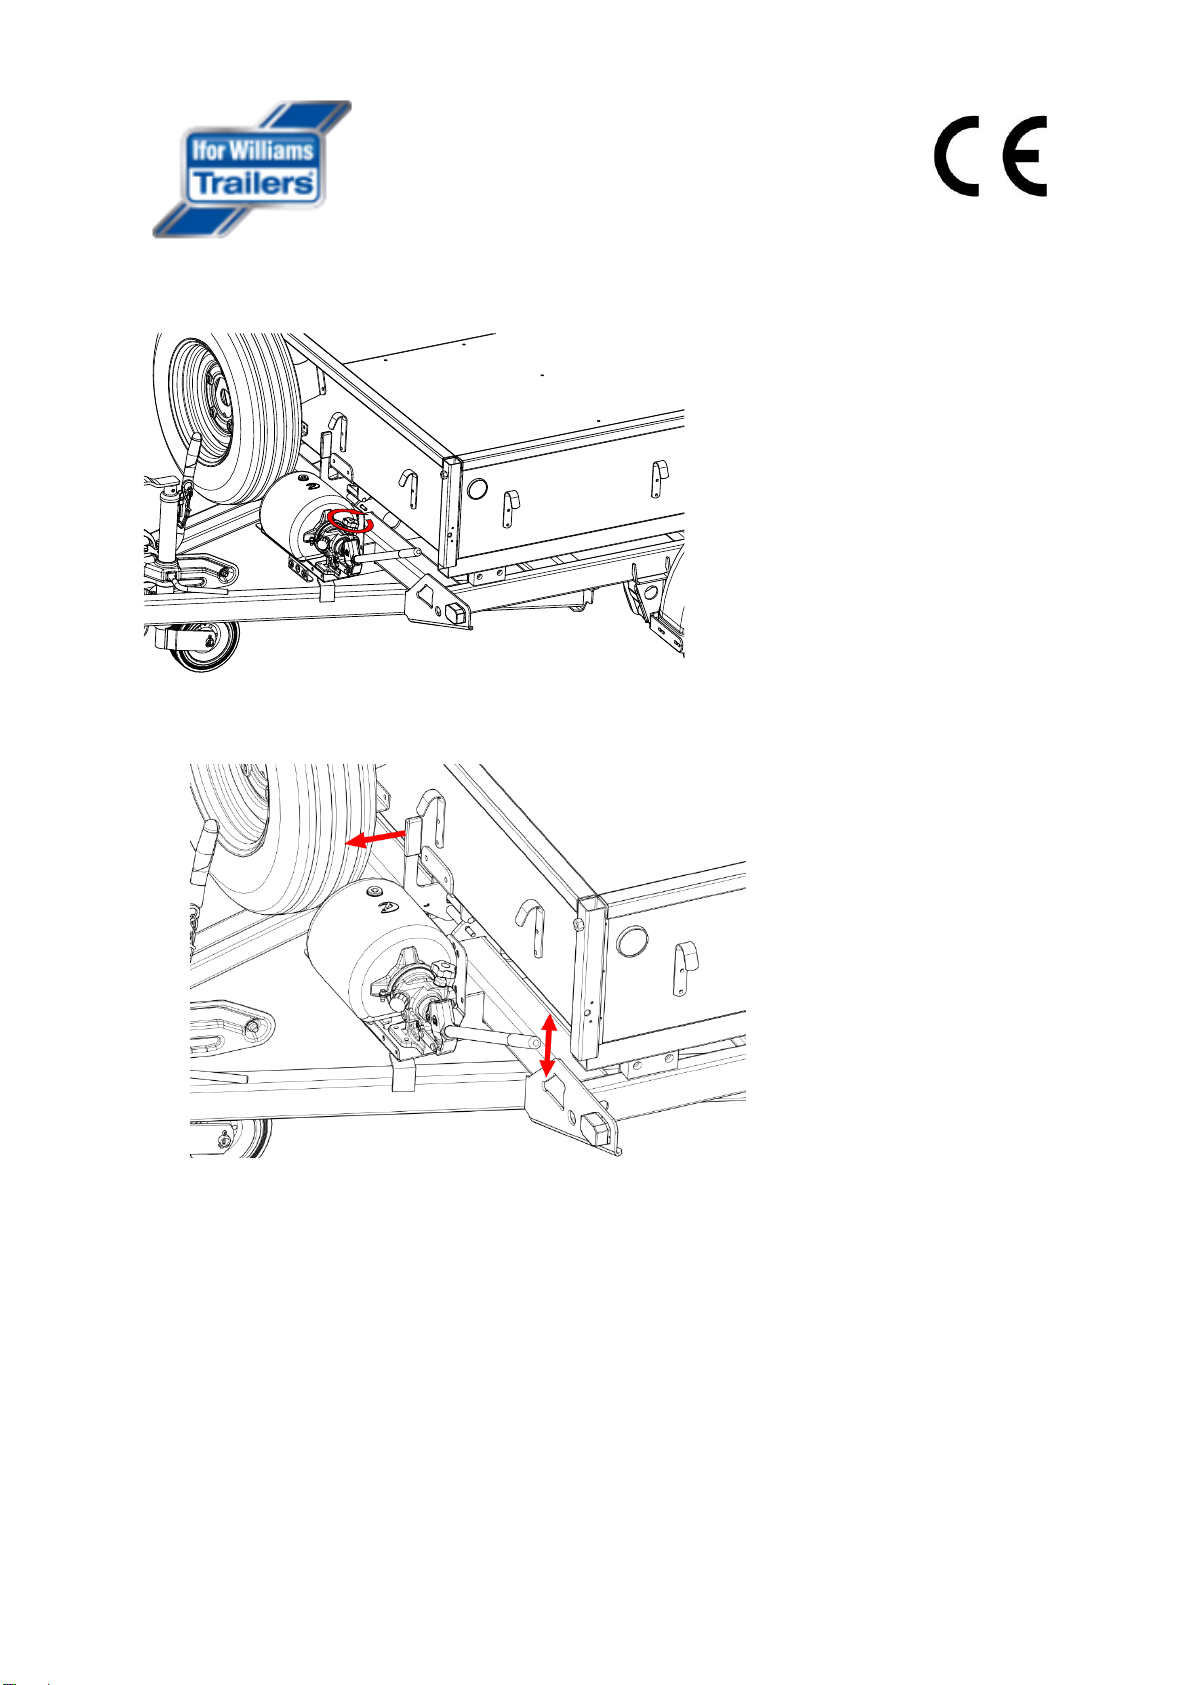
3.4.2 –Tipping –Electric Tip
This system uses an electro-hydraulic pump powered by an on-board 12V battery and controlled by
a cabled handset. A main isolator switch operated by a removable key deters unauthorised use.
An override system allows the pump to be operated manually if required. Follow the Manual Pump
instructions to operate.

Page | 17
3.4.2.1 –Tipping the Trailer Body.
•Connect remote control to socket
•Insert key into isolator switch and turn clockwise 90°to switch on the system.
•Ensure pressure release valve is closed (turned fully clockwise).
•Using the remote control, press the ‘up button’ to raise the trailer body, release to stop. It is
important to release the raise (up) button on the handset as soon as the ram reaches full
stroke.
•When using the remote control, note the battery indicator lights. Green indicates battery
charge is sufficient. If the red light is showing, this indicates the battery needs charging. Use
the manual override until the battery has been charged.
3.4.2.2 –Lowering the trailer bed/body.
•Ensure that the area between the chassis and platform is clear of obstruction.
•Do not rest a hand on the control box lid.
Page | 18
•Lower the trailer bed/body by pressing the ‘down button’ or opening the pressure release
valve.
•Once lowered switch off the isolator, remove the key and store safely.
•Disconnect the remote control from the socket.
Note. The remote-control unit supplied is generally splash-proof but is not fully
waterproof. It should never be immersed in water and should be stored safely when
not in use. If it is damaged, it should be removed from service immediately, and
replaced if not repairable.
3.4.3 –Tipping –Manual Tip
Page | 19
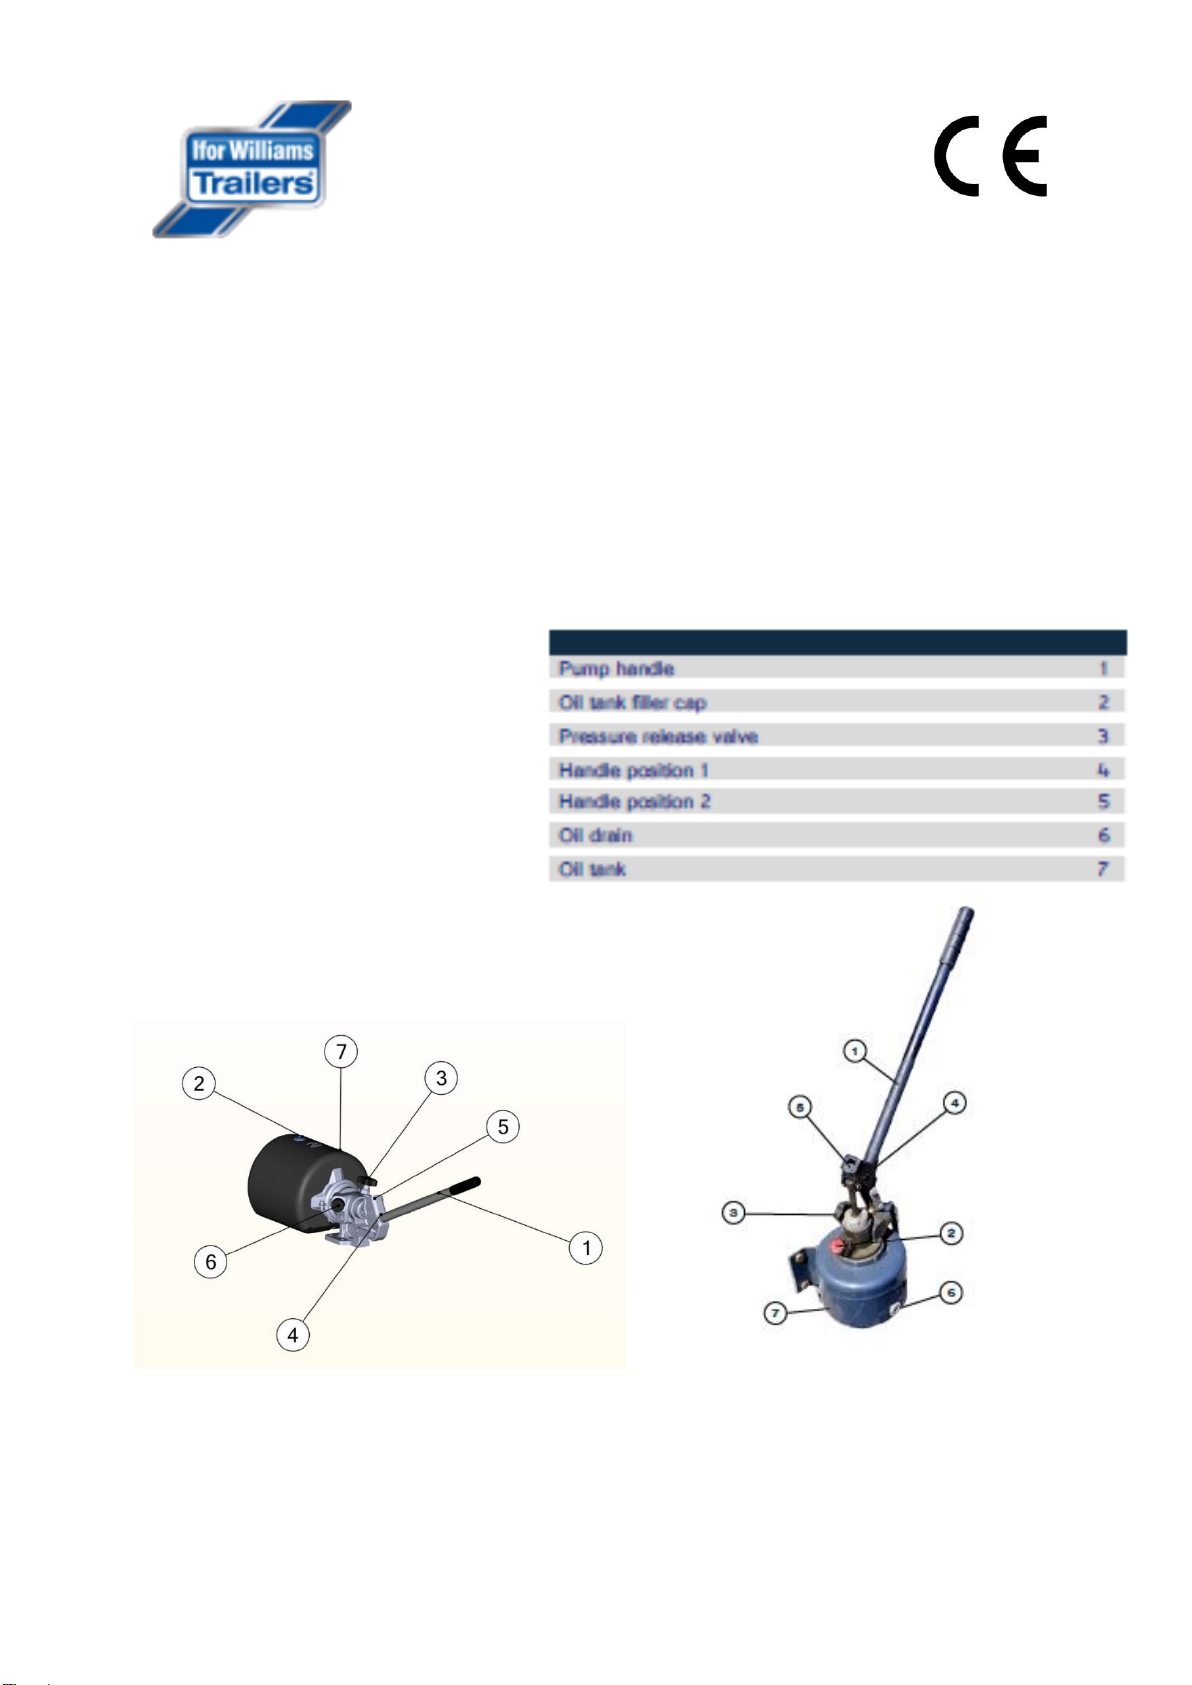
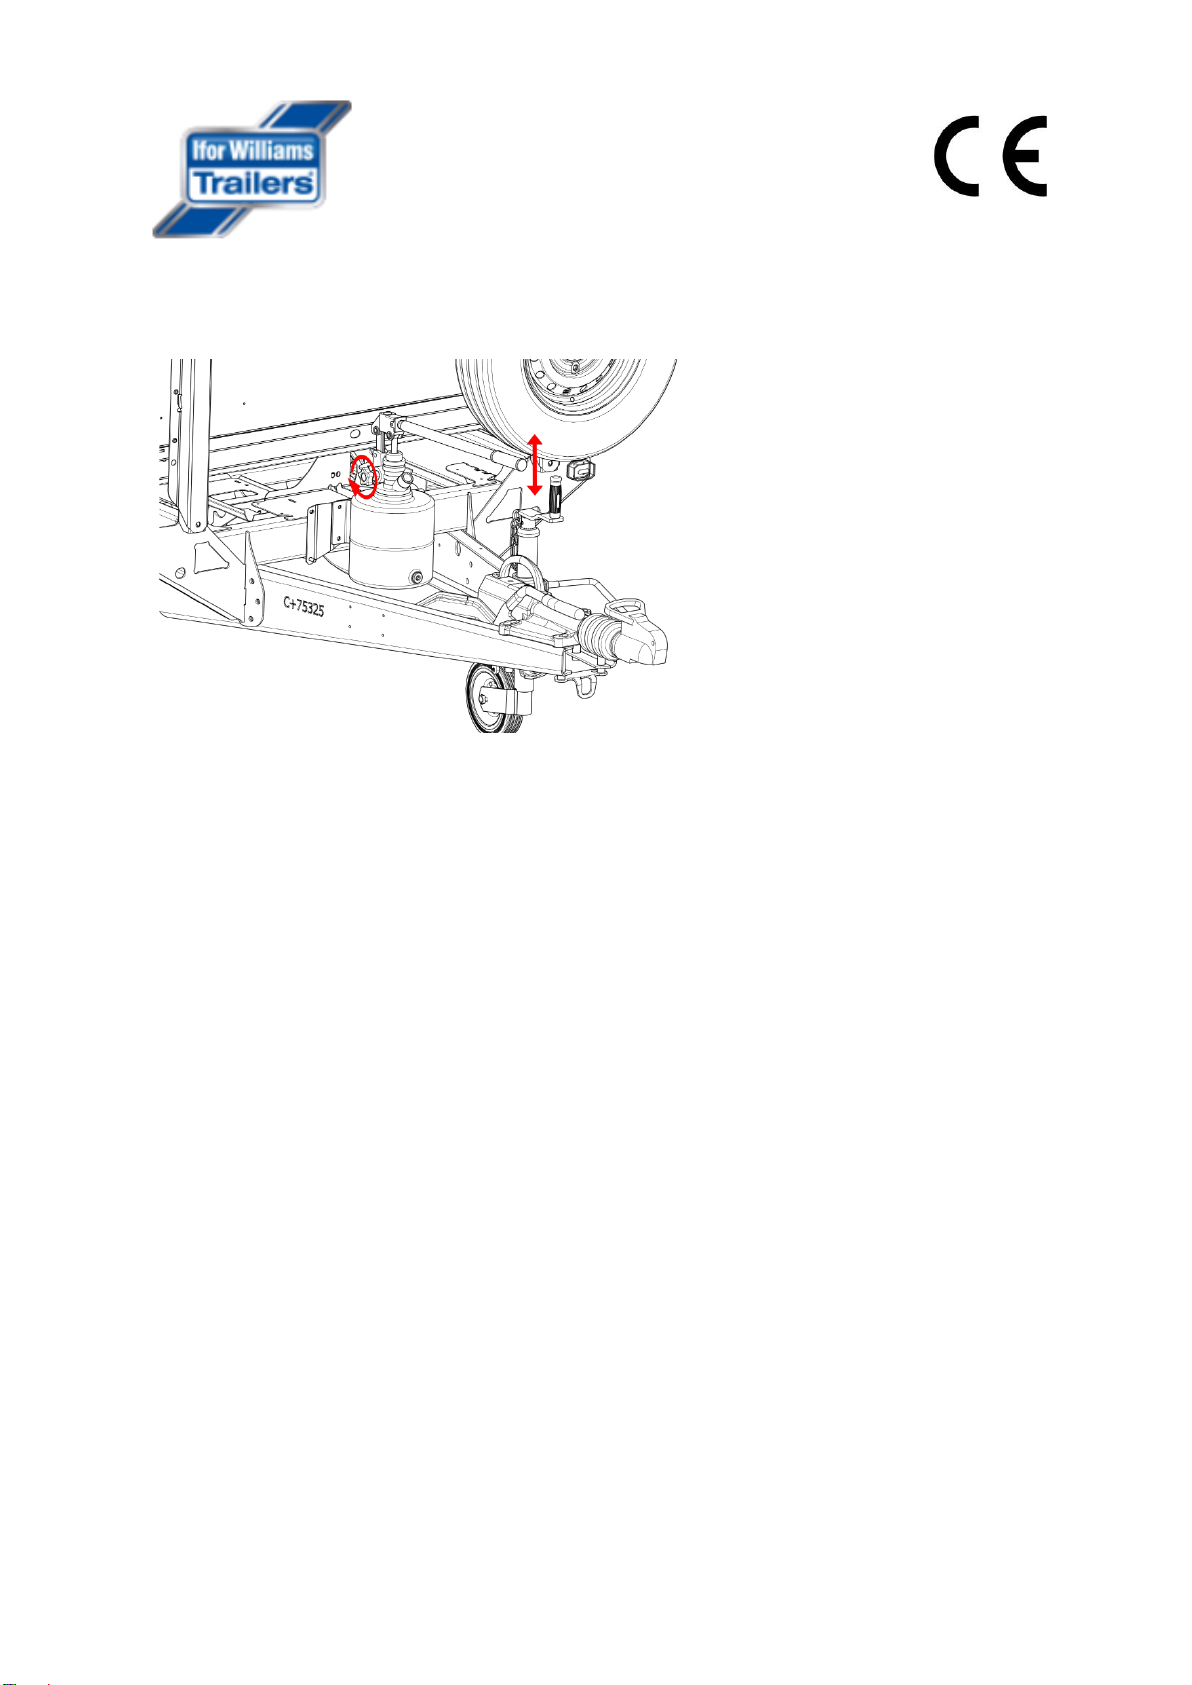
3.4.3.1 –Raising the Trailer Body TT2012
•Close pressure release valve by
turning the release valve clockwise
•Pull safety catch lever to
release locking mechanism
•Whilst holding the safety
catch operate the pump handle
until the catch is no longer
engaged.
•Release safety catch and
continue to pump the lever
until body is at the required
height.
Page | 20
3.4.3.2 Raising the Trailer Body TT2515 (Manual pump)
•Insert the pump handle into the
pump mechanism.
•Close pressure release valve by
turning the release valve clockwise.
•Pump the handle until body has
reached desired height.
3.4.3.3 –Lowering the Trailer Body.
•Ensure that the area between the chassis and platform is clear of obstruction.
•Slowly open pressure release valve by turning anti-clockwise. Control the rate of decent by
adjusting the valve position.
•If the release valve is opened too quickly too soon the flow of high pressure hydraulic fluid out
of the ram may be such that it simulates a bust hose and the burst valve screwed into the base
of the ram then closes, locking the trailer in a partly tilted condition.
•Once the body is fully lowered, ensure the pressure release valve is left open to avoid a build-
up of pressure in the hydraulic system.
•On TT2012 ensure body catch has fully engaged.
3.4.4 –Side Discharge
•Ifor Williams Tipping Trailers do not side-tip but it may often be convenient to open the
sideboards on one side to shovel off aggregate loads or, if the side centre pillar is removed, to
roll or drag other cargo off the side. N/A for TT2012
3.5 - Loading Skids
Where loading skids are fitted the procedure for using them is as follows. It is assumed that skids are
used to load wheeled vehicles. Where an (optional) electric winch is fitted, please refer to the winch
operating section in the Tiltbed section of this manual.
This manual suits for next models
10
Table of contents
Other Ifor Williams Trailers Utility Vehicle manuals


