Tommy Timmy Spot Blaster Pro User manual

Caution / Note
Please consult with your doctor or a dermatologist before use of this device. Please read all of these instructions
before using the Spot Blaster Pro. If during use your skin starts to feel uncomfortable or you or you become
concerned, stop use immediately and consult your doctor.
Package Contents
Spot Blaster Pro, Standard treatment tip, Ultra-fine needle tips, USB Charging Cable
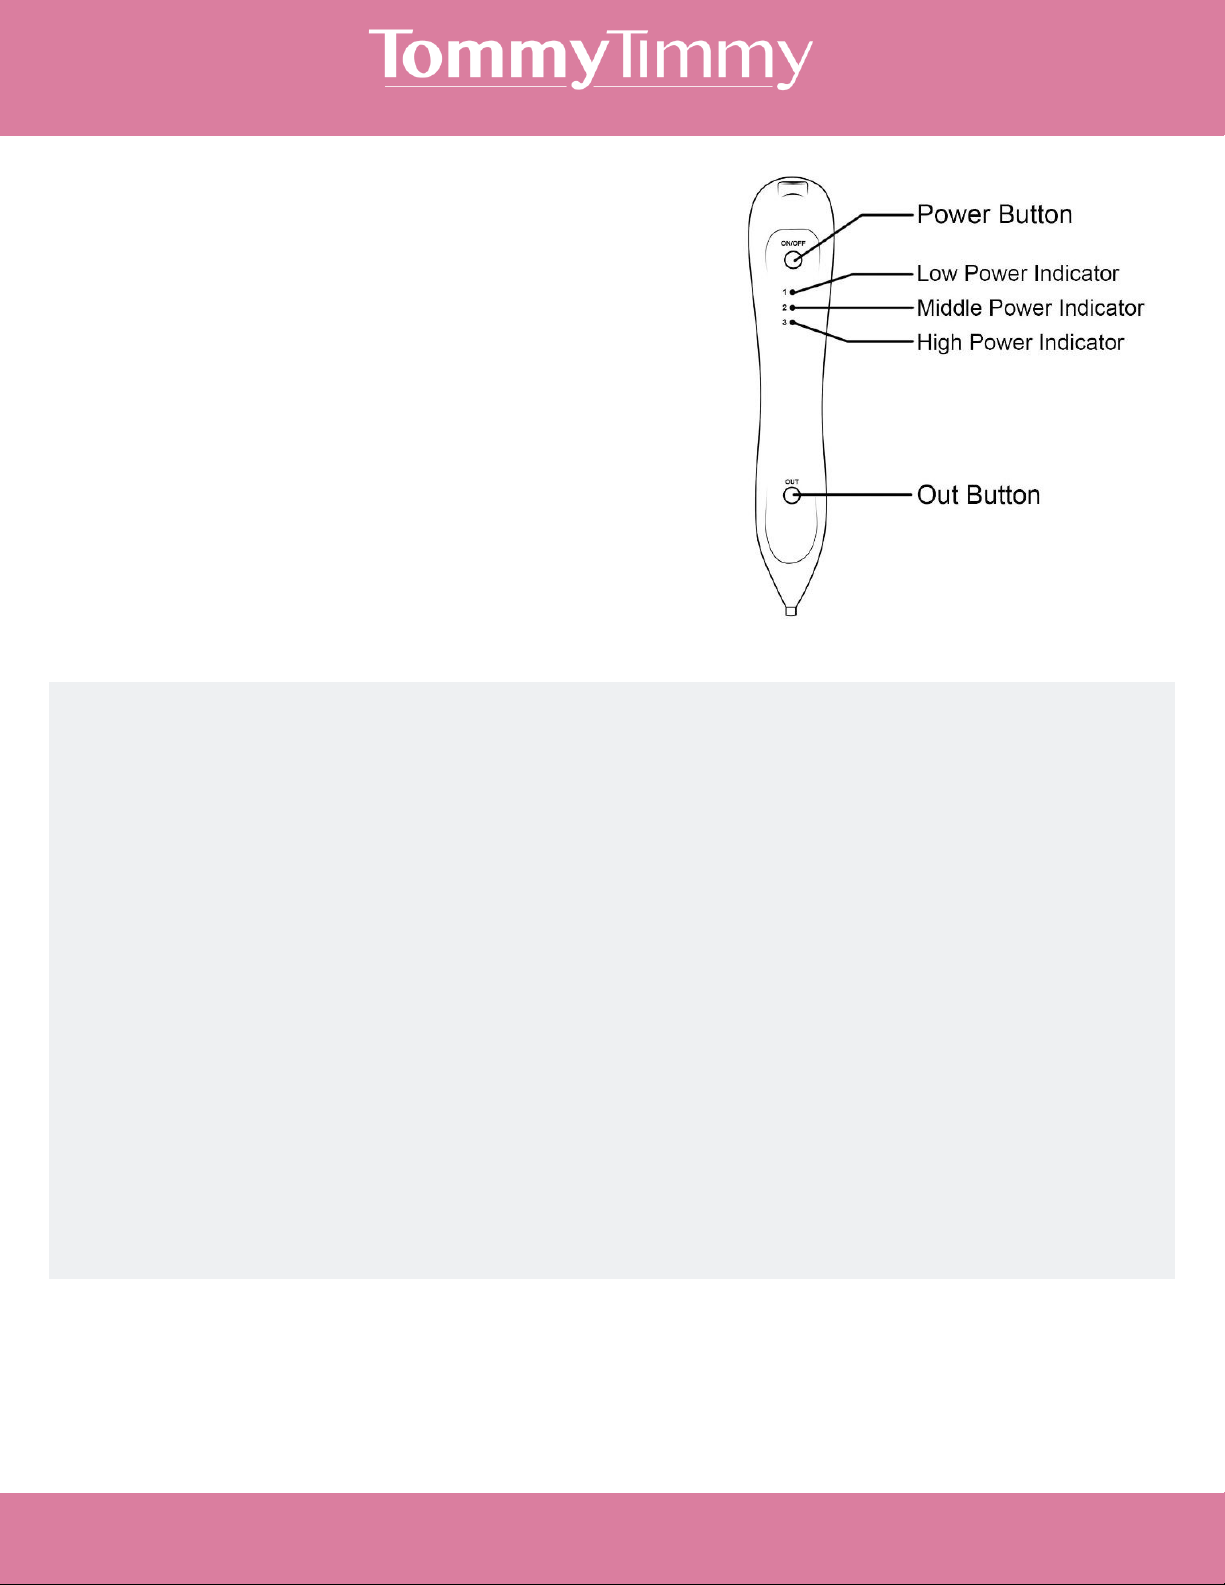
Selecting Ion Tip Size & Power Level
1. Standard point tip - for most uses (moles, warts,
granulations, tattoos)
2. Ultra-fine needle - for smaller areas (freckles, sun
spots, blood spots, minor blemishes)
>Standard tip can be screwed into device and finger-
tightened.
>Needle tip needs to be inserted into collar and then
attached to device.
You are advised to clean the tips before and after use
with rubbing alcohol / medical cleaning solution.
Turn on device and select treatment power level by
repeatedly pressing the ON/OFF button. The red
indicator light will show the chosen power level...
1.Low, 2.Medium, 3.High
Start the treatment on the low setting and increase the
power to suit your comfort level.
Charging / Power On
The device should be fully charged before first use. Charge unit
using USB Charging Cable. Power source can be a computer or
AC/DC adaptor.
Indicator lights (1,2,3) will flash green while unit is charging.
When fully charged all three lights will be a constant green.
Approximately 30 minute charging should provide up to five hours
of use.
Unplug charging cable before use. Device will not turn on when
in charging mode.
Turn on/off device by pressing and holding ON/OFF button for
three seconds.
Device will Auto-Power Off after about ten minutes if not in use.
To check the battery level quickly press the ON/OFF button
twice when the device is on: battery level will be indicated by
the three green lights.
Assembly
PRECAUTION:
>Keep out of the reach of children and others who don’t
know how to use this product.
>Do not over clean the treatment area after using this device
(simple cleaning is OK).
>When the scab area is itchy (new skin growing period), do
not scratch it. The scab will fall off naturally.
>When not in use for extended periods of time, charge it
every 3 to 4 months to ensure battery longevity.
>To avoid injury, do not attempt to take the unit apart for any
reason.
>Do not clean this equipment with water or other liquid.
Spot Blaster Pro Instructions
For Complete Instructions visit www.TommyTimmy.com/Instructions
Usage Instructions (Output Ionic Charge)
1. Clean treatment site prior to use
2. Hold the device in your hand in a relaxed manner with your
thumb or finger pressing the OUT button. To output ionic charge
press and hold OUT button. Red power level indicator will turn
green.
3. You can press the button for up to two minutes for continuous
output. After two minutes of continuous use the device will stop
outputting charge. Release the OUT button for five seconds and
then you can begin the next treatment.
4. Hold treatment nib gently against skin blemish and slowly move
back and forth until the whole blemish has been treated.
5. As the device touches your skin for the first time you may feel a
mild ionic charge on your skin..
6. During treatment you may notice the blemish becoming darker
in color. You may also notice a slight burning smell as the upper
surface of the skin ionizes.
7. You are strongly advised to first test the treatment process on
an inconspicuous area of skin.
What to Expect / After Treatment Care
The treated blemish may turn a darker color during or after the treatment. This will naturally exfoliate and the healing process will
begin. Clean the treated area with your regular cleansing regimen; do not over clean, artificially exfoliate or scratch the treated
area. Allow the area to naturally exfoliate Once this has happened, allow a healing period for the new skin.
Repeating Treatment
If the skin blemish was shallow, one treatment may be sufficient for removal. For deeper skin blemishes subsequent treatments
may be required. Only treat the same area after the skin has had sufficient time to fully heal.
Granulation Removal
Target the treatment at the root of
the granulation root cells. This will
encourage these skin cells to die
and stop 'feeding' the granulation. A
week after treatment you should
start to see the edges exfoliate.
After healing period, repeat
treatment so that granulation tissue
gradually reduces in size. If the
granulation is large, treat the
blemish in sections so that the
healing period is shortened.
Skin Tag Removal
Skin tags are tiny flaps of skin
connected by a thin “stalk”.
Generally skin tags can be removed
by the Spot Blaster Pro in one
session. 1) Make sure the standard
tip the unit came with is attached. 2)
With a pair of flat edge tweezers pull
the tag away from the skin 3) Treat
the entire base or stalk of the skin
tag with the device until the tag is
fully dislodged. 4) The area may
scab over. This is normal. It will heal
in about 5-10 days.
Mole Removal
If there is a chance that your mole
could be cancerous please consult a
doctor or a dermatologist before using
this device. Moles can vary
considerably in their form. The most
common difference is whether it sits
on the upper level of the skin, dermis,
or has ‘roots’ deeper in the epidermis
or even the subcutaneous tissue.
Even though you may feel the
blemish is 'large' you need to treat
moles in stages. Gradually treat the
surface of the mole and repeat the
treatment numerous times (allowing
for healing period in between) until
the desired results have been
obtained.
Tattoo Removal
For most tattoos, divide the surface
areas to be treated and address a
small section at a time. You can
treat different areas of the the tattoo
at the same time. Allow time for
each area to heal before treating a
different part of the tattoo.
Specific Use Cases
For Complete Instructions visit www.TommyTimmy.com/Instructions
Spot Blaster Pro Instructions


