Toolex 597438 User manual


1
SPECIFICATIONS & SAFETY INSTRUCTIONS
PLEASE READ & UNDERSTAND THESE INSTRUCTIONS!
STORE THESE INSTRUCTIONS IN A SAFE PLACE!
WARNING!Read all safety warnings and all instructions. Failure to follow the warnings and instructions
may result in electric shock, fire and/or serious injury.
Save all warnings and instructions for future reference
The term “power tool” in the warnings refers to your mains operated (corded) power tool or battery operated
(cordless) power tool.
1) Work area safety
a) Keep work area clean and well lit. Cluttered and dark areas invite accidents.
b) Do not operate power tools in explosive atmospheres, such as in the presence of flammable
liquids, gases or dust. Power tools create sparks which may ignite the dust or fumes.
c) Keep children and bystanders away while operating a power tool. Distractions can cause you to
lose control.
2) Electrical safety
a) Power tool plugs must match the outlet. Never modify the plug in any way. Do not use any
adapter plugs with earthed (grounded) power tools. Unmodified plugs and matching outlets will
reduce risk of electric shock.
b) Avoid body contact with earthed or grounded surfaces such as pipes, radiators, ranges and
refrigerators. There is an increased risk of electric shock if your body is earthed or grounded.
c) Do not expose power tools to rain or wet conditions. Water entering a power tool will increase the
risk of electric shock.
d) Do not abuse the cord. Never use the cord for carrying, pulling or unplugging the power tool.
Keep cord away from heat, oil, sharp edges or moving parts. Damaged or entangled cords
increase the risk of electric shock.
e) When operating a power tool outdoors, use an extension cord suitable for outdoor use. Use of a
cord suitable for outdoor use reduces the risk of electric shock.
f) If operating a power tools in a damp location is unavoidable, use a residual current device (RCD)
protected supply. Use of an RCD reduces the risk of electric shock.
3) Personal safety
a) Stay alert, watch what you are doing and use common sense when operating a power tool. Do
not use a power tool while you are tired or under the influence of drugs, alcohol or medication.
A moment of inattention while operating power tools may result in serious personal injury.
b) Use personal protective equipment. Always wear eye protection. Protective equipment such as
dust mask, non-skid safety shoes, hard hat, or hearing protection used for appropriate conditions will
reduce personal injuries.
c) Prevent unintentional starting. Ensure the switch is in the off-position before connecting to
power source and/or battery pack, picking up or carrying the tool. Carrying power tools with your
finger on the switch or energizing power tools that have the switch on invites accidents.
d) Remove any adjusting key or wrench before turning the power tool on. A wrench or a key left
attached to a rotating part of the power tool may result in personal injury.
e) Do not overreach. Keep proper footing and balance at all times. This enables better control of the
power tool in unexpected situations.

2
f) Dress properly. Do not wear loose clothing or jewellery. Keep
your hair, clothing and gloves away from moving parts.
Loose clothes, jewellery or long hair can be caught in moving parts.
g) If devices are provided for the connection of dust extraction
and collection facilities, ensure these are connected and
properly used. Use of dust collection can reduce dust-related
hazards.
4) Power tool use and care
a) Do not force the power tool. Use the correct power tool for your application. The correct power tool
will do the job better and safer at the rate for which it was designed.
b) Do not use the power tool if the switch does not turn it on and off. Any power tool that cannot be
controlled with the switch is dangerous and must be repaired.
c) Disconnect the plug from the power source and/or the battery pack from the power tool before
making any adjustments, changing accessories, or storing power tools. Such preventive safety
measures reduce the risk of starting the power tool accidentally.
d) Store idle power tools out of the reach of children and do not allow persons unfamiliar with the
power tool or these instructions to operate the power tool. Power tools are dangerous in the hands of
untrained users.
e) Maintain power tools. Check for misalignment or binding of moving parts, breakage of parts and
any other condition that may affect the power tool’s operation. If damaged, have the power tool
repaired before use. Many accidents are caused by poorly maintained power tools.
f) Keep cutting tools sharp and clean. Properly maintained cutting tools with sharp cutting edges are less
likely to bind and are easier to control.
g) Use the power tool, accessories and tool bits etc. in accordance with these instructions, taking
into account the working conditions and the work to be performed. Use of the power tool for
operations different from those intended could result in a hazardous situation.
5) Service
a) Have your power tool serviced by a qualified repair person using only identical replacement
parts. This will ensure that the safety of the power tool is maintained.
SPECIFIC SAFETY RULES FOR MULTI-TOOL
ℓNever use your Multi-Tool to perform sanding or separating operations in wet conditions
ℓAlways wear eye protection.
ℓAlways wear ear protection during extended periods of operation.
ℓAlways wear a dust mask if the operation is dusty.
ℓWear protective gloves when changing application accessories. Application accessories become hot after
prolonged usage.
ℓAlways inspect for and remove all nails, screws, staples, etc. before sanding.
ℓAlways check walls and ceilings to avoid hidden power cables and pipes. A metal detector (available
separately) is very helpful for this purpose.
ℓWhenever possible, use clamping devices or other suitable means to secure the work piece to a firm surface.
ℓWhen working with the machine, always hold it firmly with both hands and provide for a secure stance. The
power tool is guided more securely with both hands.
ℓKeep your workplace clean. Blends of materials are particularly dangerous. Dust from light alloys can burn or
explode.
3
ℓAvoid unintentionally switching on the tool. Ensure that the on/off switch is in the OFF position before
inserting the battery pack. Do not carry the power tool with your finger on the on/off switch or insert the
battery pack into power tools that have the switch on.
ℓDo not open the battery. Danger of short-circuiting.
ℓDo not scrape wet or dampened materials (e.g. wallpaper) or on moist surfaces. Penetration of water into the
machine increases the risk of an electric shock.
ℓDo not treat the surface to be worked with solvent-containing fluids. Materials being heated by the scraping
can cause toxic vapors to develop.
ℓExercise extreme caution when handling the scraper accessory. The accessory is very sharp; danger of
injury.
ℓUse only original Toolex Industrial Accessories or the brands that are recommended by your local Gasweld
outlet.
ℓOnly use application accessories in good condition. Do not use them if they are torn or worn.
ℓDo not restart a cutting operation in the work piece. To resume a cutting operation: while keeping the tool
from contacting the work piece, allow the tool reach full speed and then carefully guide the cutting accessory
into the cut.
ℓKeep your hands away from the cutting area. Do not reach under the material being cut.
ℓHold power tools by their insulated gripping surfaces when performing an operation where the cutting tool
may contact hidden wiring or its own cord. Contact with a “live” wire will make exposed metal parts of the tool
“live” and shock the operator.
ℓChildren and pregnant women must not enter the work area.
ℓDo not eat, drink or smoke in the work area.
PRODUCT SPECIFICAITONS
Power Supply:
230-240V~50Hz, 220W
Variable Speed:
11,000 ~ 20,000/min (no load)
Oscillating angle:
2.8 o
Cable & Plug:
1.8m cable with SAA plug
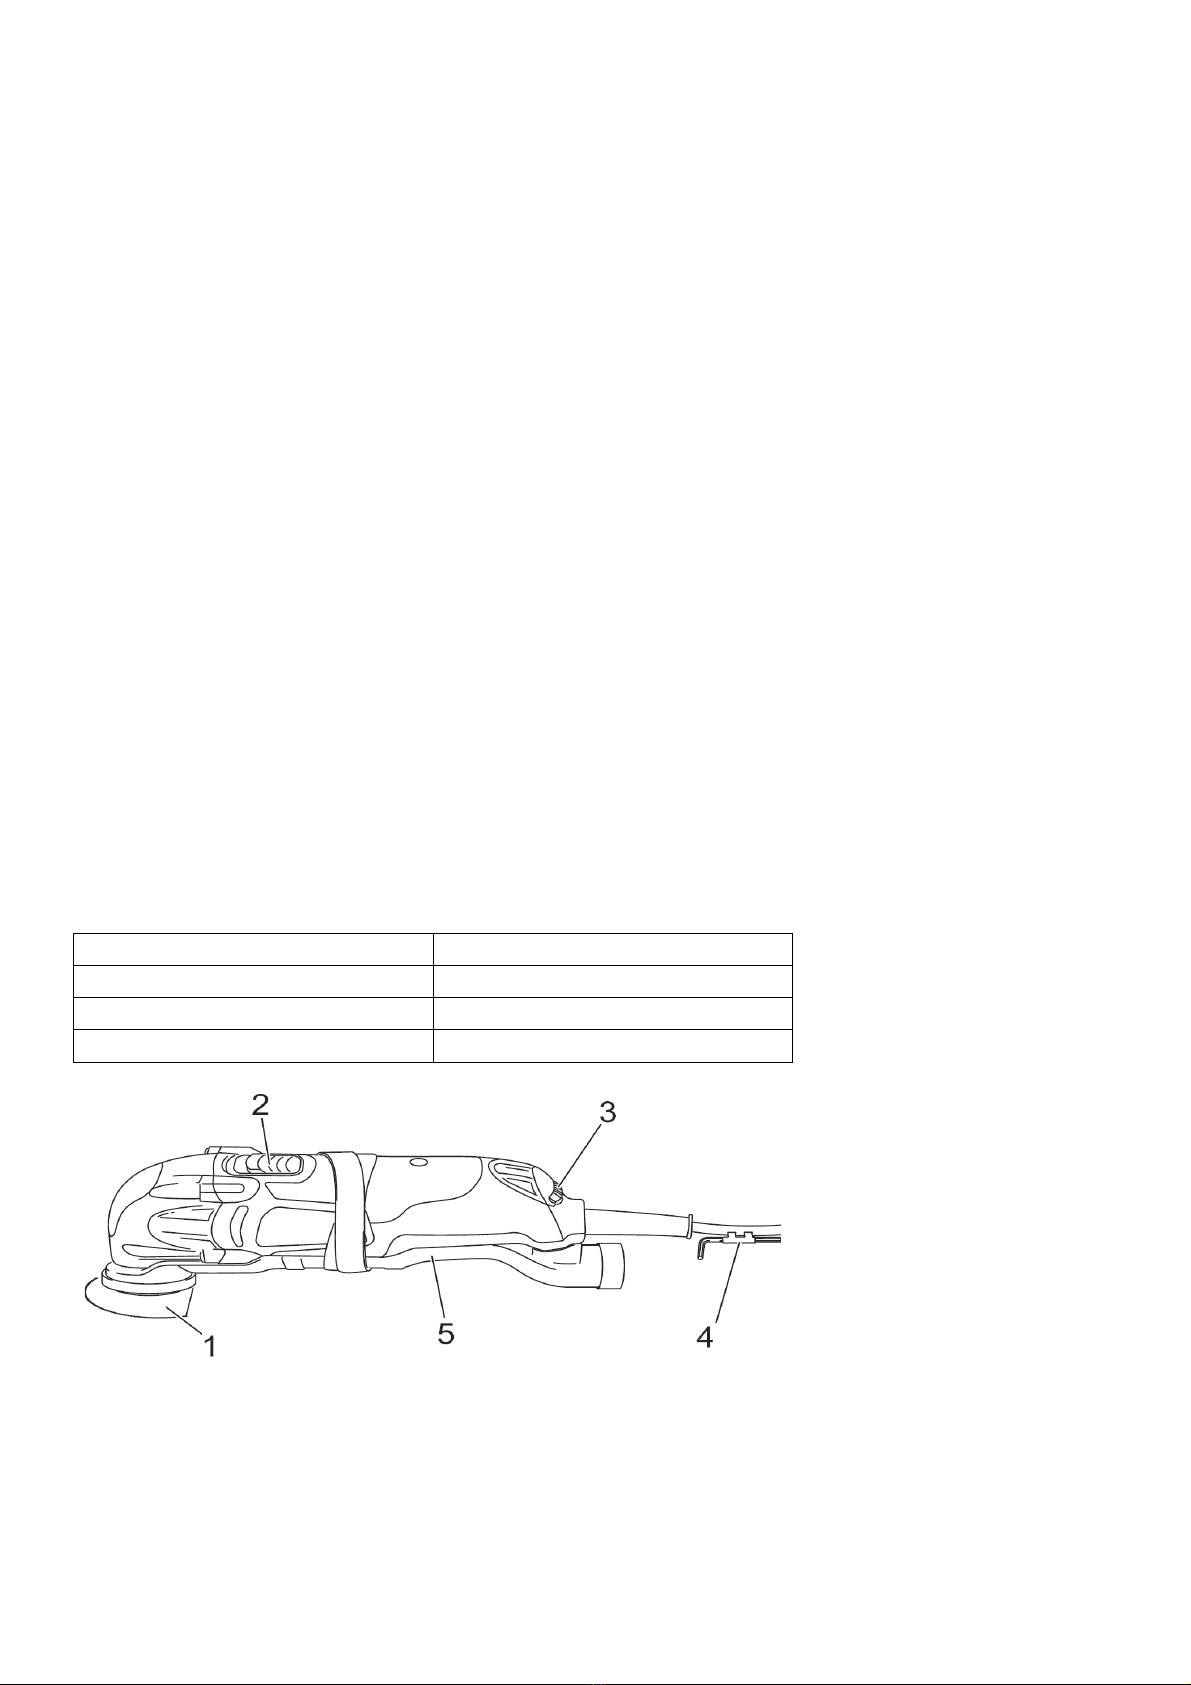
1. Working accessory
4. Hex wrench
2. On/Off switch
5. Dust suction device
3. Variable speed dial
4
OPERATION
NOTE: remove the plug from the socket before carrying out adjustment, servicing or maintenance.
EXTRACTION SYSTEM:
This multi tool has extraction system (suction device), with this system, it
can be connected to a vacuum cleaner.
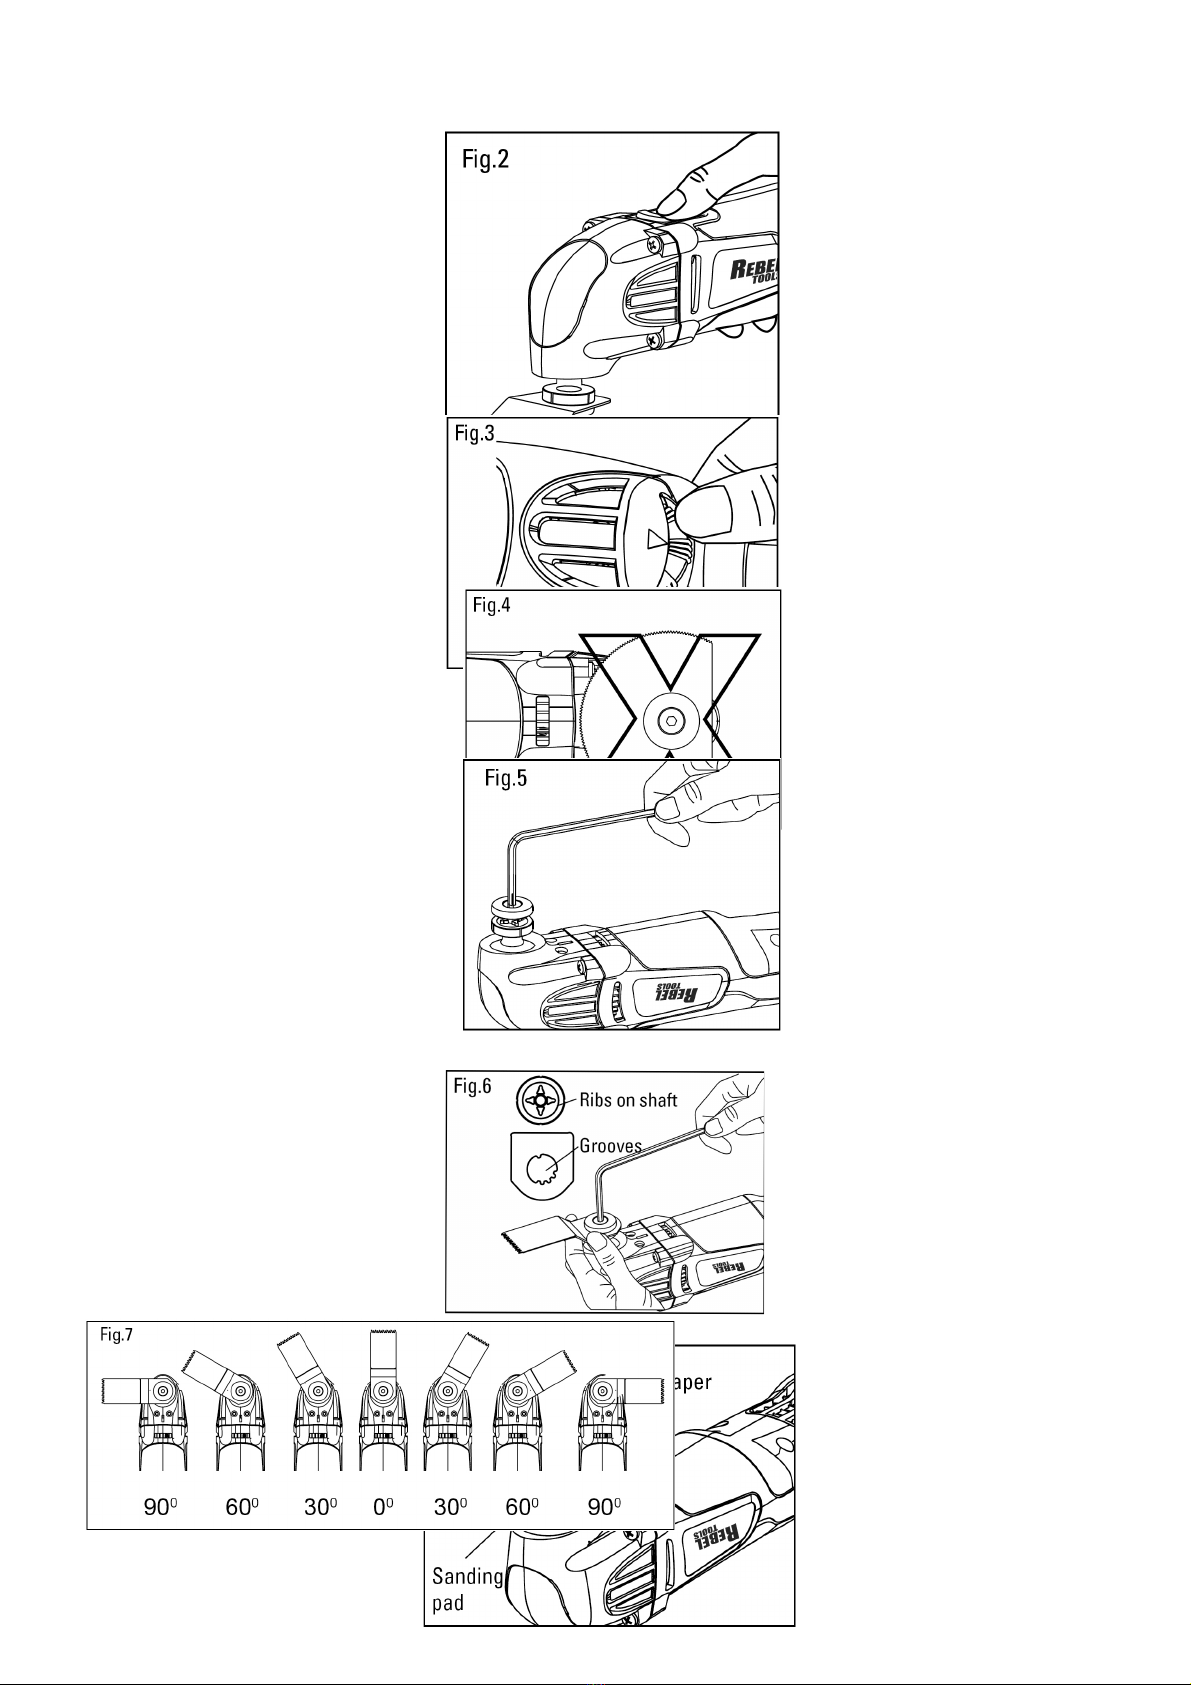
ON/OFF SWITCH (fig. 2)
1. To turn the tool ON, push the on/off switch forward.
2. To turn the tool OFF, pull the switch backward.
VARIABLE-SPEED CONTROL (fig. 3)
The variable speed feature of this tool enhances the overall
performance of your tool and saves the application accessory from
undue wear.
The speed can be adjusted from 11000 to 20000 oscillations per
minute, by adjusting the variable speed dial located in the rear of the
tool .The speed dial is numbered “1”through “6”, with position
“1”the lowest speed and position “6”the highest speed.
ATTACHING THE APPLICATION TOOL (Fig.4-7)
WARNING! Failure to disconnect the tool from power source when
assembling parts, making adjustments, or changing accessories could
result in accidental starting causing possibly serious injury.
CAUTION! For all work or when changing application tools, always
wear protective gloves. The sharp edges of the application tools will
cause personal injury. Application tools can be very hot while working.
WARNING! Check that the application tools are correctly attached.
Incorrect or insecurely fastened application tools can come loose
during operation and cause a hazard.
WARNING! Do not attach the Circular Grout or the Plunge Cut Saw Blade
facing backwards (Fig. 4), as operation in this position may cause
serious injury.
1. Disconnect the tool from the power source.
2. Loosen the flange bolt with the hex key supplied. (Fig. 5)
3. Ensure that the inner threads and the drive shaft are clean.
4. Align the grooves on the application tool with the four raised
ribs on the drive shaft; put the application tool onto the drive shaft.
(Fig.6)

5
5. With your gloved hand holding the blade, put on and tighten the flange bolt using the hex key.
NOTE: Attach the application tool at the desired orientation for the task at hand. The shaft is configured so that
the application tool can be attached every 30°around the shaft, from left 90°to right 90°. (Fig.7)
MOUNTING/CHANGING THE SANDPAPER (Fig.8)
1. Disconnect the tool from the power source.
2. Follow the directions for Attaching the Application Tool to attach the sanding pad to the Multi Tool.
3. Align the sandpaper with the sanding pad and use your hand to press it firmly on the sanding pad.
4. Press the sandpaper firmly against a smooth surface for a short period, then switch on the tool. The burr will
form a non-slip bond with the outer edge of the sandpaper felt. This will avoid premature wear.
5. If one point has become worn, pull off the sandpaper, turn it 120°and place it on the sanding pad again.
Attached Accessories Application:
1)HCS Precision Plunge Cut Saw Blade, 32.5mm
For precisely and quickly cutting Wood, Plastic, Drywall.
2)Bi-metal Precision Plunge Cut Saw Blade, 10mm
For precisely and quickly cutting Wood, Plastic, soft Metal and Drywall.
3) Segmented Saw Blade
For cutting Wood, Plastic, Drywall, soft Metals.
Contact your nearest Gasweld Store Outlet for a comprehensive range of Universal Accessories to suit
most brands of Multi-Tools.
WARNING! Use sharp, undamaged saw blades only. Deformed, blunt saw blades or saw blades that are
otherwise damaged can break.
WARNING! For all accessories, work with the accessory away from the body. Never position hand near or directly
in front of working area. Always hold the tool with both hands and wear protective gloves.
CUTTING
Saw blades (sold separately)are ideal for making precise cuts in tight areas, close to edges or flush to a surface.
Select a medium to high speed for making the initial plunge; start off at medium speed for increased control. After
making your initial cut, you can increase speed for faster cutting ability.
Plunge cutting blades are intended to make precise cuts to allow for installation of flooring or wall material.
When plunge cutting, it is important not to force the tool. If you experience a strong vibration in your hand during
the plunge cut, this indicates that you are applying too much pressure. Back the tool out and let the speed of the
tool do the work. While keeping the teeth of the blade in the work surface, move the back of the tool in a slow
sideways motion. This motion will help expedite the cut.
Plunge cut saw
blade
Seg. Saw Blade

6
The Segmented saw blade is ideal for making precise cuts in wood, plaster, drywall material.
Applications include cutting openings in flooring for venting, repairing damaged flooring, cutting openings for
electrical boxes. The blade works best on softer woods such as pine. For harder woods, the blade life will be
limited.
Select a medium to high speed.
GROUT REMOVAL
Grout removal blades (sold separately) are ideal for removing damaged or cracked grout.
Grout blades come in different shape to tackle different grout line.
Select a medium to high speed.
To remove the grout, use a back and forth motion, making several passes along the grout line. The hardness of
the grout will dictate how many passes are needed. Try to keep the grout blade aligned with the grout line and be
careful not to apply too much side pressure on the grout blade during the process. To control the plunge depth,
use the carbide grit line on the blade as an indicator. Be careful not to plunge beyond the carbide grit line to avoid
damage to the backer board material.
If you notice the blade clogging during the grout removal process, you can use a brass brush to clean the grit, thus
exposing the grit again.
SCRAPING
Scrapers (sold separately) are suitable for removing old coats of varnish or adhesives, removing bonded
carpeting, e.g, on stairs/steps and others mall/medium size surfaces.
Select low to medium speed.
Excessive pressure can gouge or damage the background surfaces (e.g., wood, plaster).
SANDING
Sanding accessories (sold separately) are suitable for the dry sanding of wood, metal, surfaces, corners and
edges and hard to reach areas. Work with the complete surface of the sanding pad, not only with the tip.
Sand with a continuous motion and light pressure. DO NOT apply excessive pressure. Excessive pressure will
result in poor handling, vibration, and unwanted sanding marks and premature wear on the sanding sheet.
The following suggestions may be used as a general guide for abrasive selection, but the best results will be
obtained by sanding a test sample of the work piece first.
Grit Application
Course For rough wood or metal sanding, and rust or old finish removal.
Medium For general wood or metal sanding。
Fine For final finishing of wood, metal, plaster and other surfaces.
ENVIROMENT PROTECTION
Recycle unwanted materials instead of disposing of them as waste. All tools and packaging should be
sorted, taken to the local recycling centre and disposed of in an environmentally safe way.
PLUG REPLACEMENT
If the plug & supply cord need replacement have it serviced at your local authorized service centre.
Issue 2014
Table of contents
Other Toolex Power Tools manuals


