Toolex 595951 User manual

595951
PETROL
JACK HAMMER
INSTRUCTION MANUAL

Page 2
CONTENTS
1. Specications .................................................................2
2. Parts Location ................................................................3
3. General Safety Rules ......................................................4
4. Symbols ..........................................................................5
5. Assembly ........................................................................5
6. Fuelling ...........................................................................6
7. Starting The Machine .....................................................7
8. Running & Stopping The Machine ..................................7
9. Maintenance ...................................................................8
10. Problems.......................................................................8
11. Maintenance Cycle .......................................................10
12. Part List of 595951 Jack Hammer ................................11
13. Part List of Petrol Engine ..............................................13
1. SPECIFICATIONS
Model Number 595951
LxWxH 603x280x375
Fuel Mixing Ratio 25:1 2 stroke
Fuel Tank Capacity 0.9L
Displacement 32.6cc
Max. Power And Speed 900W (7000 RPM)
Max Torque And Speed 1.45Nm (5300 RPM)
Consumption Rate ≤0.5L/h
Impact Frequency 1700-2100 BPM
Impact Energy 25-45J
Starter System Hand pull start
Net Weight 12kg
Carburettor Type H119-00
Spark Plug Type L6

Page 3
1. Handle 10. Assist Handle
2. Mufer 11. Cylinder Block
3. Stop Button 12. Drill Seat Installation Set
4. Throttling Handle 13. Sliding Sleeve
5. Starter Handle 14. Protect Cover
6. Air Filter 15. Drill
7. Tank Cap 16. Admitting Switch
8. Spark Plug 17. Carburettor
9. Gearbox 18. Gearbox Cover
2. PARTS LOCATION
Fig 1. Fig 2.

Page 4
3. GENERAL SAFETY RULES
WARNING When using the unit, basic safety precaution, including the following should always
be followed to reduce the risk or serious personal injury and damage to the unit. Read all these
instructions before operating this unit and save this instruction manual for further reference.
• Do no operate this unit when you are tired, ill, or under the inuence of alcohol, drugs, or
medication.
• Do not operate in poor lighting.
• Keep all parts of your body away from any moving parts and all hot surfaces of the unit
• Wear a face lter mask in dusty conditions to reduce the risk of injury associated with the
inhalation of dust.
• Check the work area before each use. Remove all objects such as rocks, broken glass, nails,
wire, or string which can be thrown or became entangled in the machine.
• Keep rm footing and balance. Do no overreach. Overreaching can result in loss of balance
or exposure to hot surfaces.
• To reduce the risk of the re and burn injury, handle fuel with care. It is highly ammable.
• Empty fuel tank and restrain the unit from moving before transporting in a vehicle.
• Turn the unit off before setting it down.
• Before storing, allow the engine cool.
• Do not smoke while handling fuel.
• Mix and store fuel in a container approved for petrol.
• Mix fuel outdoors where there is no sparks or ames.
• Select bare ground, stop engine, and allow cool before refuelling.
• Loosen fuel cap slowly to release pressure and to keep fuel from escaping around the cap.
• Tighten the fuel cap securely after refuelling.
• Wipe spilled fuel from the unit. Move 30 feet (9 m) away from refuelling site before starting
engine.
• Never attempt to burn off spilled fuel under any circumstance.
• Maintain the unit per maintenance instructions in this Operator’s Manual.
• Inspect the unit before each use for loose fasteners, fuel leaks, etc. Replace damaged parts.
• Do not allow children or untrained individuals to use the unit.
• Do not start or run the engine in a closed area; breathing exhaust fumes can kill.
• Wear clothes tting, tough work clothing that will provide protection. Such as heavy long
pants, safety work shoes, heavy duty work gloves, hard hat, a safety face shield, or safety
glasses for eyes protection and ear plugs or muffs for hearing protection.
• Keep children, bystander, and animals 50 feet (15m) away. If approached stop unit
immediately.
• To reduce the risk of injury associated with objects being drawn into the rotating parts, do not
wear loose clothing, scarves, necklace, and the like. Secure long hair so it is above shoulder
level to prevent entanglement in any rotating parts.
• Comply with all re prevention regulations. Compliance with all local, state, or federal laws is
the user’s responsibility. Never operate the unit without a spark arrestor screen; this screen is
located inside the mufer.

Page 5
Danger Indicates an imminently hazardous situation which, if not avoided,
will result in death.
Warning Indicates a potentially hazardous situation which, if not avoided,
could result in death or serious injury.
Caution Indicates a potentially hazardous situation which, if not avoided,
may result in minor or moderate injury.
Warning
Read the Instruction manual
Wear eye protection, ear muffs
and helmet
Wear foot protection
Wear gloves
4. SYMBOLS
5. ASSEMBLY
WARNING
Stop the engine and put the switch to “STOP” before installing parts, making
adjustments, cleaning, or when not in use. Failure to do so could result in possible
serious personal injury.
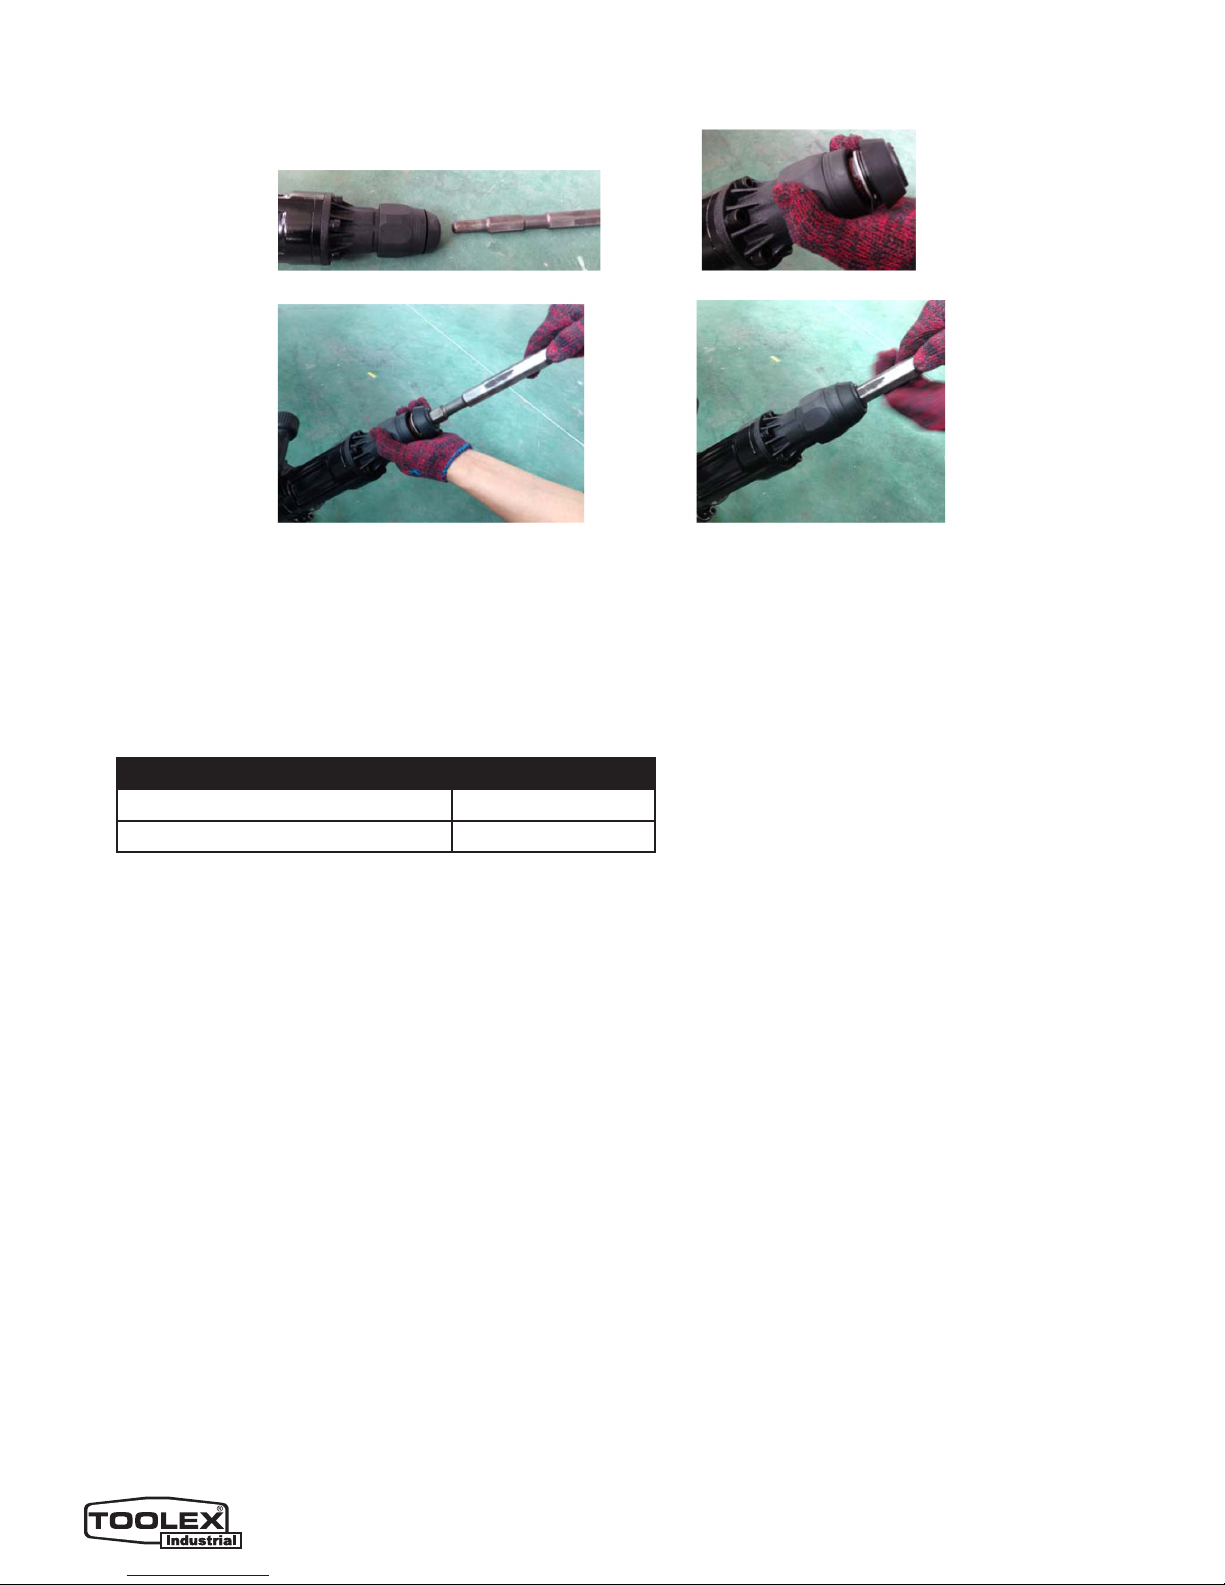
Installation Of The Point Or Chisel
1. Lubricate the point or chisel.
2. Pull the gripping chuck back, insert the point or chisel then release the gripping chuck, make
sure it is locked and the point or chisel is not released by moving it up and down.
(See Fig 3. & Fig 4.)
Fig 3.
Page 6
6. FUELLING
MOTOR FUEL: MIX THE PETROL AND OIL
Conditions Petrol : Engine Oil
Work within 20 hours 20:1
Work after 20 hours 25:1
1. Use fresh unleaded petrol. You must use 100% synthetic oil specically made for heavily
stressed two stroke engines.
2. Mix the petrol and oil in an approved container. Never mix fuel directly in the fuel tank.
3. Place the machine upright on the ground or on a sturdy bench and wipe any debris from
around the fuel cap.
4. Unscrew the fuel tank cap and pour the mixture into the tank with the aid of a funnel.
5. Be careful not to spill any mixture. If this happens, wipe the spill with a clean rag.
6. Start the engine at least three metres away from the area where the fuel tank has been lled
up in order to avoid any risk of re.
Danger of re and burn injuries.
• Always use extreme care when handling fuel! Fuel is highly ammable.
• Never attempt to fuel the machine if the fuel system components are damaged or are leaking.
• Never attempt to refuel the engine while it is running or still warm, allow it to cool before
fuelling.
• Never smoke or light any res near the machine or fuels.
• Always transport and store fuels in an approved container.
• Never place ammable material close the engine mufer.
Fig 4.

Page 7
• Never operate the machine without a properly functioning mufer and spark arrestor installed.
• Never operate the machine unless it is property assembled and in good working condition.
• Do not use petrol which contains ethanol or methanol as it may damage the fuel lines and
other engine parts.
• Mix only enough fuel for your immediate needs. If fuel must be stored longer than 30 days, it
should rst be treated with a stabilizer or similar product.
7. STARTING THE MACHINE
1. Before starting the new machine, repeat pressing the transparent fuel bubble (See Fig.5) to
fully ll the Carburettor with fuel. (Close the air vent when the engine is cold, open the air vent
only when the engine is hot)
2. Put the machine at on the oor. Hold the operation handle with one of your hands and
quickly pull the pulling handle for about 50cm with the other hand. Do not let the pulling
handle go back freely in your repeat pulling, but hold it and put it down with its resilience to
protect the starter.
3. Open the air vent completely when the petrol engine is started.
8. RUNNING & STOPPING THE MACHINE
1. After petrol engine starts, run at a low speed for 2 to 3 minutes to warm-up the machine.
2. To stop the machine, press the STOP button
Fig 5.
Air Vent (Off in
cold Starting)
Start Button
Fuel Bubble

Page 8
9. MAINTENANCE
Replacing and cleaning the air lter
For proper performance and long life, keep air lter clean.
1. Push down the cover of the air lter.
2. Remove the air lter and clean it in warm soapy water. Let dry completely. For best
performance, replace the air lter annually.
3. Reinstall the air lter into the lter base.
4. Push the cover back in place. Push the latch back into the slot and ensure the cover is locked
in place.
Clean Fuel Filter
1. Fuel tank is tted with a lter.
2. Filter is situated at the free end of fuel pipe and can be picked out through fuel port with a
piece of hooked wire or the like.
3. Check the fuel lter periodically. Do not allow dust to enter the fuel tank. Clogged lter will
cause difculty when starting engine or abnormalities in engine performance.
4. When the lter is dirty, replace the lter.
5. When the inside of the fuel tank is dirty, it can be cleaned by rinsing the tank out with petrol.
Checking the spark plug
1. Check the spark plug every 10-15 hours of use.
2. Remove the spark plug cover.
3. Use the spark plug wrench to remove the spark plug, by turning it counter-clockwise.
4. Clean and adjust the spark plug gap to 0.6- 0.7mm
5. Replace any damaged or visibly worn plug with a TORCH L8RTC or equivalent spark plug.
6. Install the spark plug nger tight in the cylinder head, and then tighten it rmly with the spark
plug wrench.
10. PROBLEMS
Power loss or sudden stopping of the engine:
• Check whether the fuel tank is empty.
• The mixture does not reach the carburettor. Clean the fuel lter in the fuel tank.
• There is water in the mixture. Drain and rinse all the fuel system.
• The air lter is dirty. Clean the air lter.
• There are carbon deposits in the cylinder exhaust pipe or the mufer. Clean those or change
the mufer.
Starting a ooded engine:
• Disconnect the spark plug lead, and use the plug wrench to remove the spark plug in a
counter clockwise direction.
• If the spark plug is fouled or is soaked with fuel, clean or replace the plug as required.

Page 9
• Clean excess fuel from the combustion chamber by cranking the engine several times while
the spark plug is removed.
• Install the spark plug and rmly tighten it with the spark plug wrench.
• Repeat the starting procedure as if the machine was already warm.
If the engine won’t stop:
• If the engine continues to run after switching the on/off switch to off, stop the engine by
pushing the choke lever to the fully closed position. If this condition continues, have the
machine serviced before using it again.

Page 10
11. MAINTENANCE CYCLE
General Maintenance

Page 11
12. PART LIST OF 595951 JACK HAMMER

Page 12
Page 13
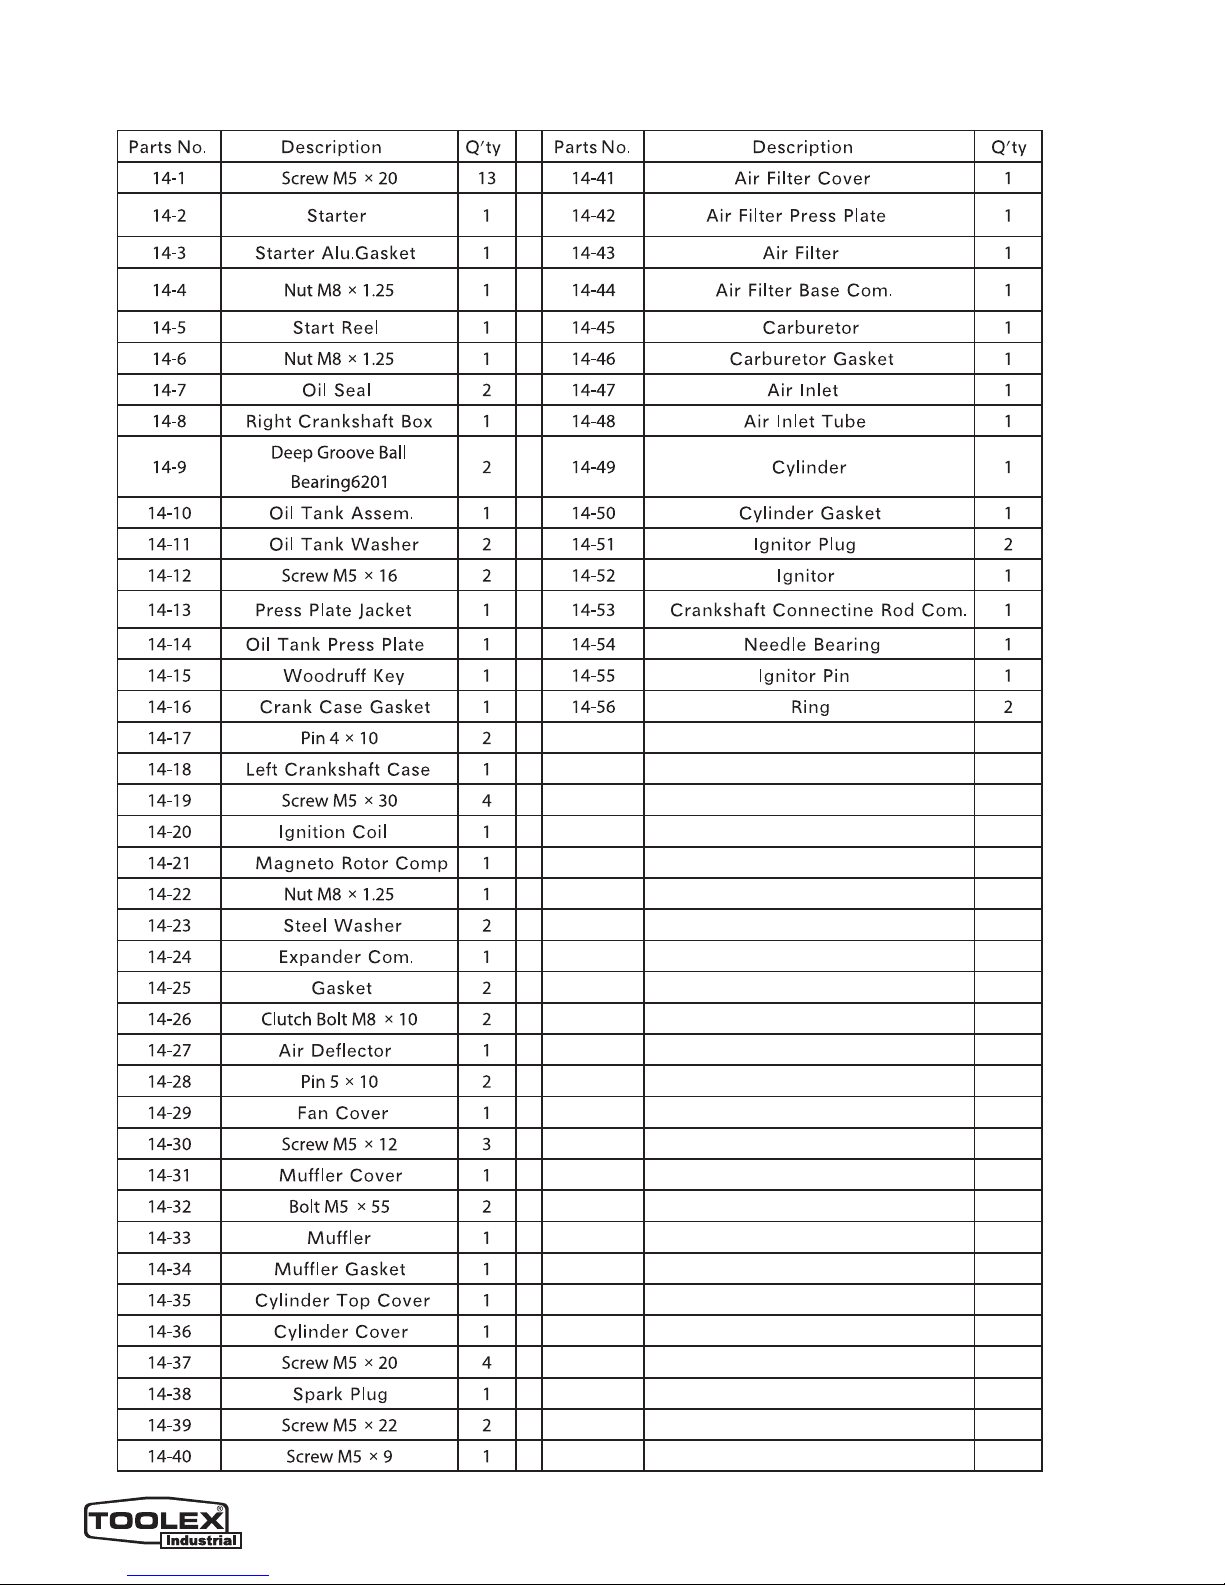
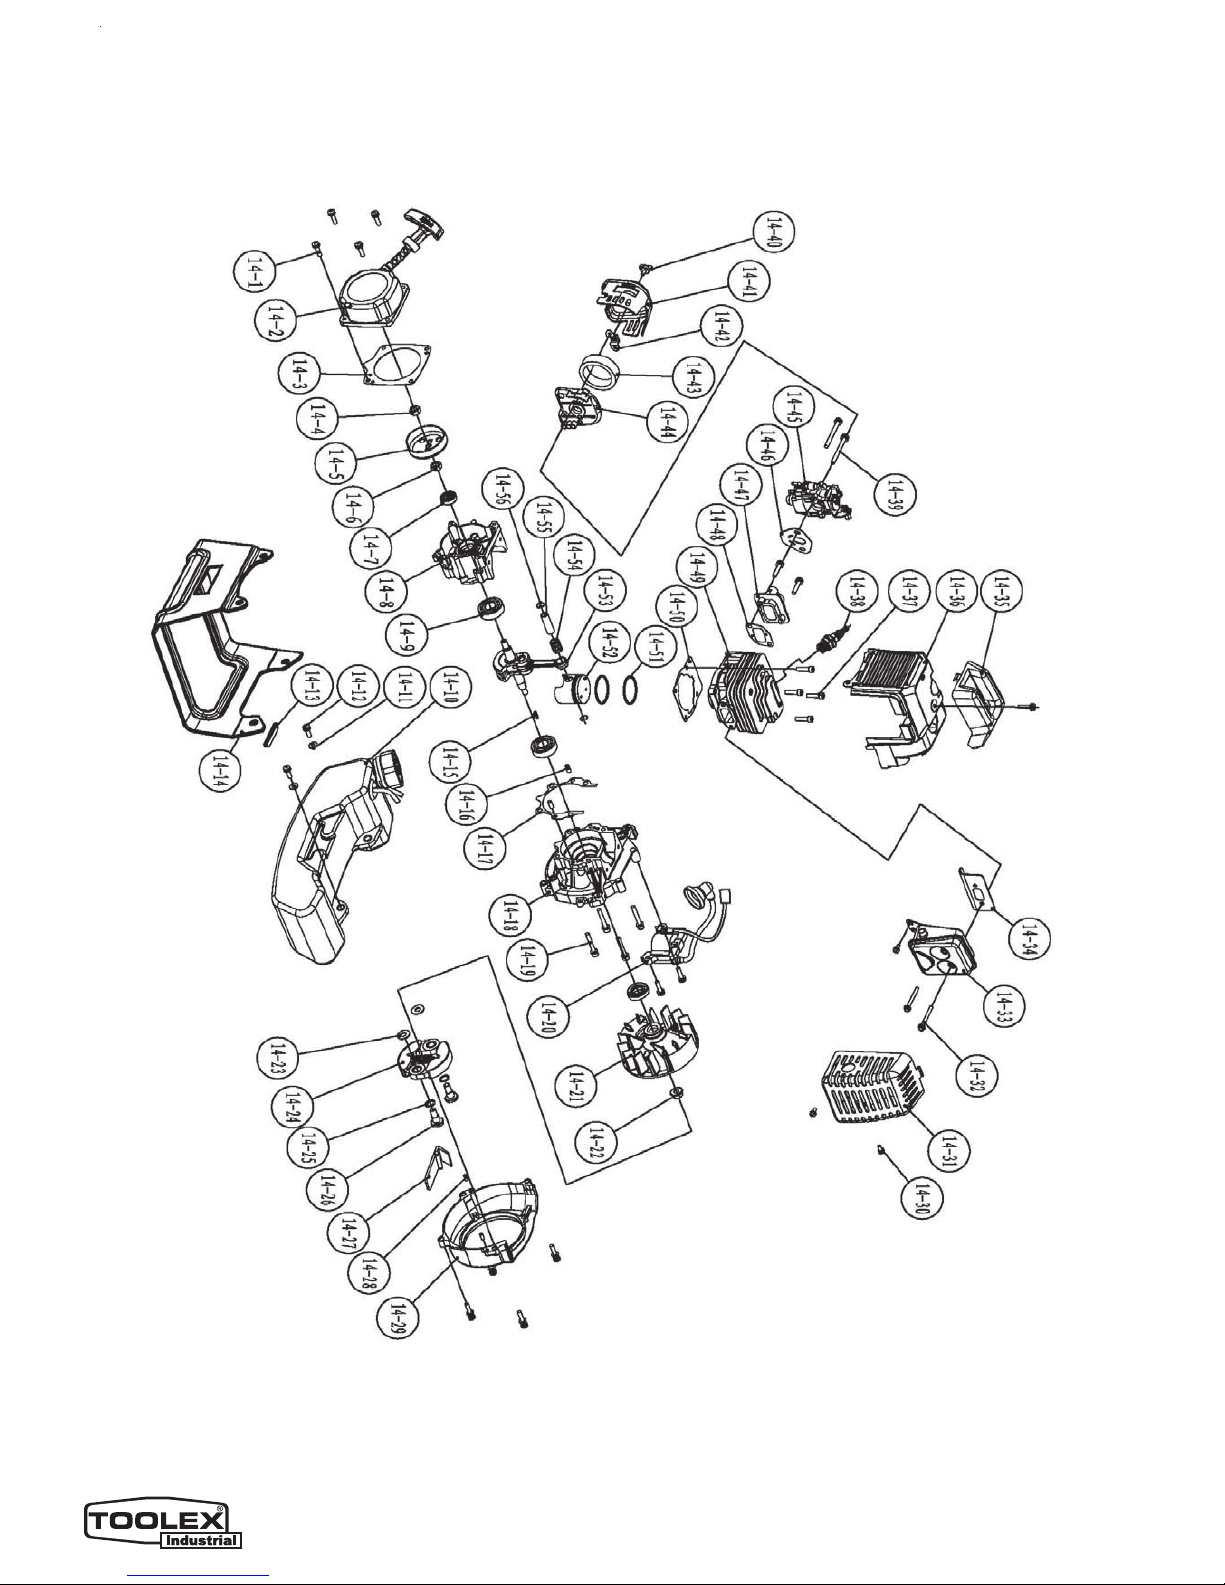
13. PART LIST OF PETROL ENGINE
Page 14

CONSUMER SERVICE CENTRE
PO BOX 1012
HAMILTON NSW 2303 AUSTRALIA
Made in P.R.C.
Table of contents
Other Toolex Power Tools manuals


