Toolots M6DDW4751 User manual
Owner's Manual
1
Please read this manual carefully before attempting
to operate, maintain or install the product.
Failure to follow the manual could result in personal injury and/or property
damage! Save this manual for future reference.
Electric
Pressure Washer
32
Electric Pressure Washer Electric Pressure Washer
CALIFORNIA PROPOSITION 65
This product may contain chemicals known
to the State of California to cause cancer and
birth defects or other reproductive harm.
Wash hands after handling.
When unpacking this product, check to make sure parts listed below are included and carefully
inspect for any damage that may have occurred during transit. If any part is missing and
damaged, do not attempt to assemble or use the product.
UNPACKING
SPECIFICATIONS
GENERAL SAFETY INFORMATION
IMPORTANT SAFETY INSTRUCTIONS
WARNING – When using this product basic
precautions should always be followed,includ-
ing the following:
1.Read all the instructions before using the
product.
2.To reduce the risk of injury, close supervision
is necessary when a product is used near
children.
3.Know how to stop the product and bleed
pressures quickly. Be thoroughly familiar with
the controls.
4. Stay alert – watch what you are doing.
5. Do not operate the product when fatigued
or under the influence of alcohol or drugs.
6. Keep operating area clear of all persons
7.Do not overreach or stand on unstable
support. Keep good footing and balance at all
times.
8.Follow the maintenance instructions specifi-
ed in the manual.
WARNING – Risk of Injection or Injury– Do
Not Direct Discharge Stream At Persons.
SAVE THESE INSTRUCTIONS
with the words “Double Insulation "or “Double
Insulated.” Product may also be marked with
symbol shown below.
SERVICING OF A DOUBLE- INSULATED
APPLIANCE
In a double-insulated product, two systems of
insulation are provided instead of grounding.
No grounding means are provided for a dou-
ble-insulated product, nor should grounding
means be added to the product. Servicing a
double-insulated product requires extreme
care and knowledge of the system, and should
be done only by qualified service personnel.
Replacement parts for a double-insulated
product must be identical to the original
parts. A double-insulated product is marked
Double Insulated Symbol
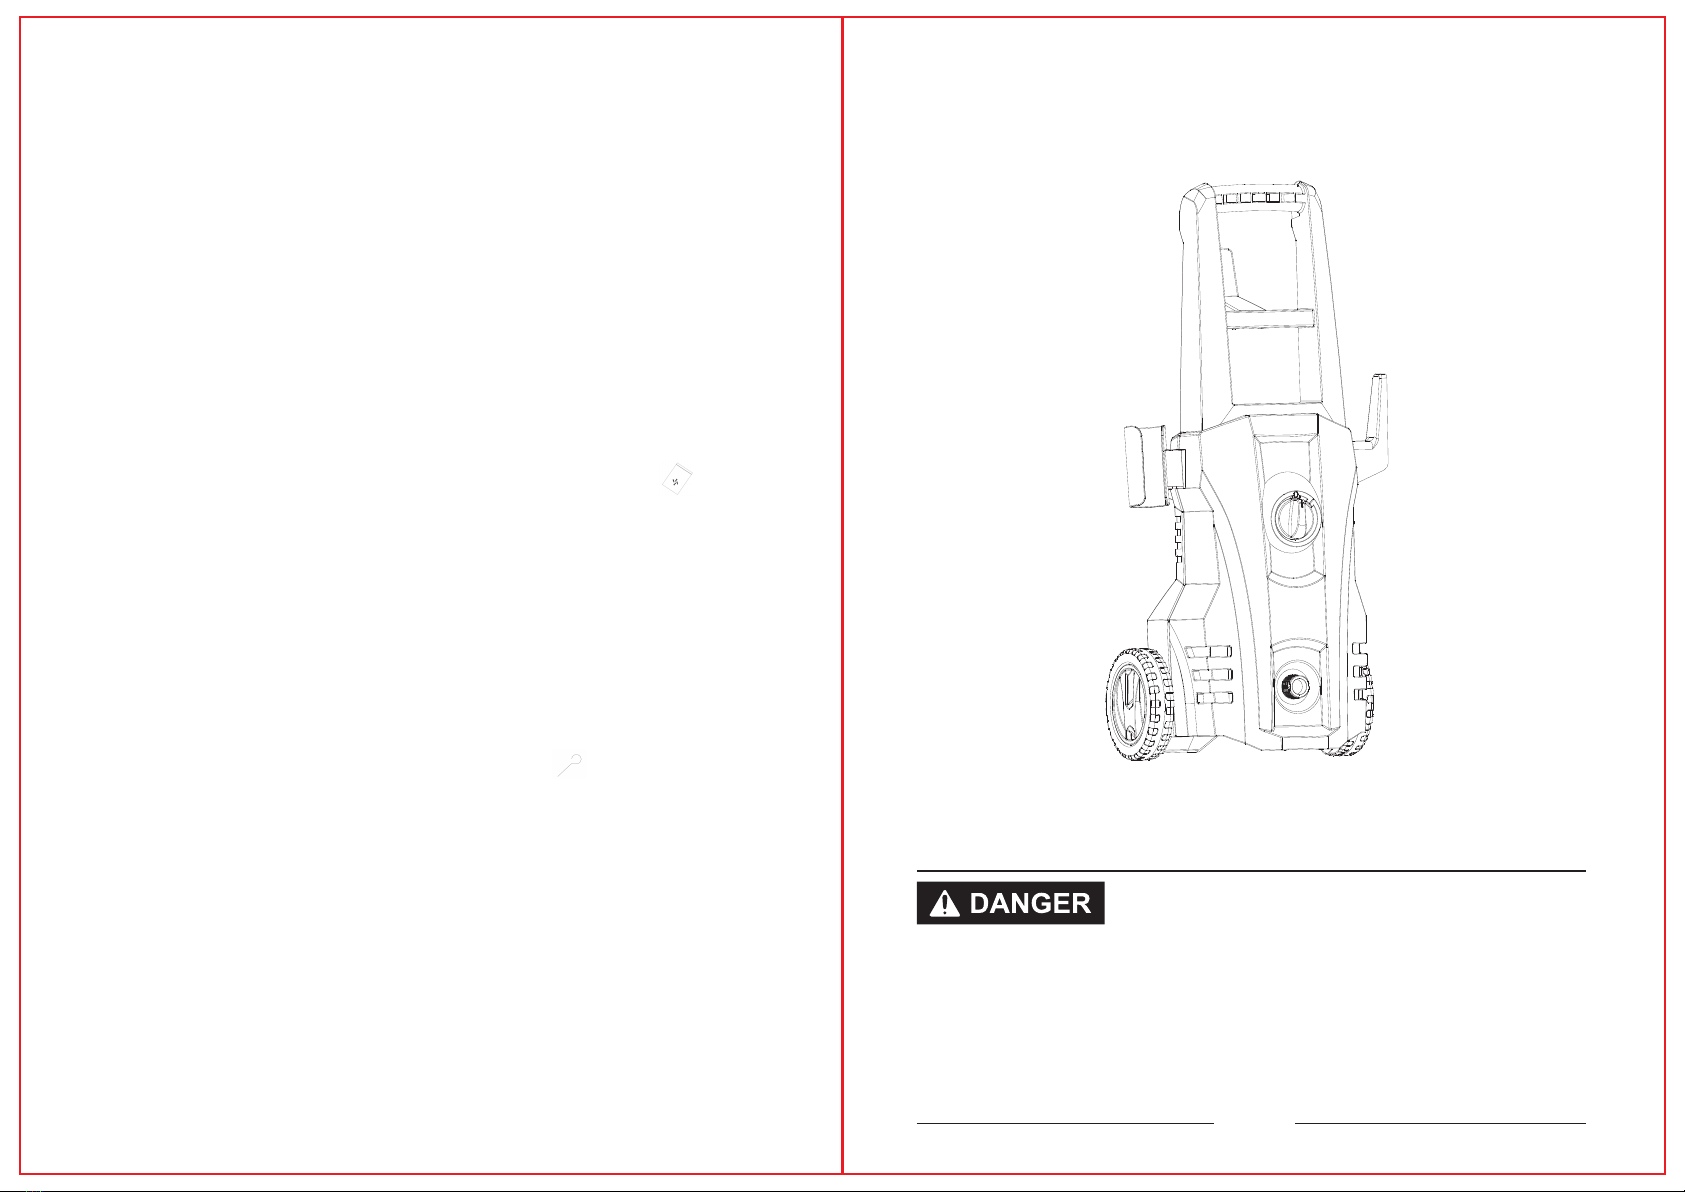
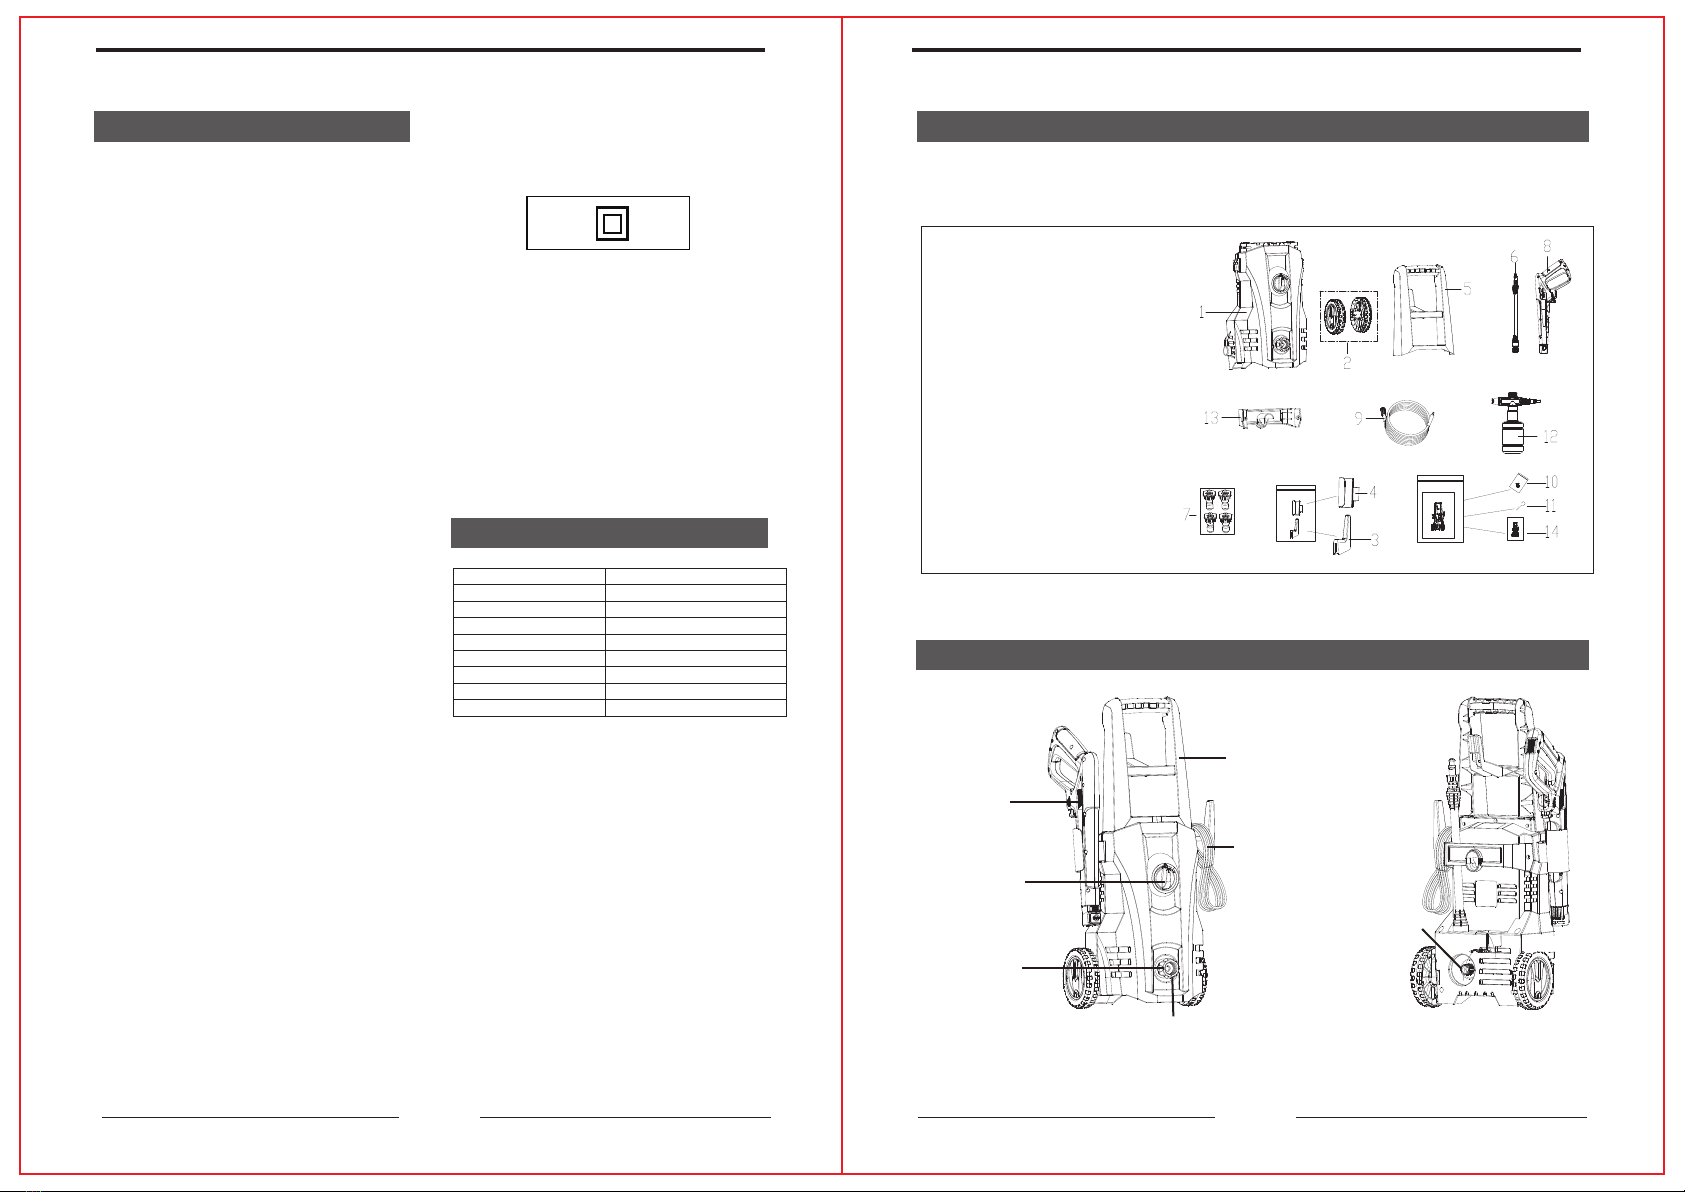
FUNCTIONAL DESCRIPTION
1. Pressure Washer Unit
2. Wheel
3. Power Cable Hook
4. Gun Holder
5. Handle With High Pressure Hose Hoo
6. Spray Wand
7. Quick Connect Nozzle (4Pcs)
8. Spray Gun
9. High Pressure Hose
10. Screw (Taped on the manual)
11. Spray Tip Cleaning Tool
12. Detergent Bottle
13. Detergent Bottle Bracket
14. Manual
k
Spray Gun
On/Off Switch
Water Outlet
Water Inlet
Handle
Power Cord
Garden Hose Connector
(Assembled on machine,Double side
are America standard 3/4-11.5GHT)
(Taped
on the manual)
ModelXP101C-80C
Rated pressure2500PSI
Max pressure 3000PSI
Rated flow rate 1.8GPM
Max flow ratw 2.3GPM
Power Supply Voltage120V/60Hz
Rated electrical current 13.5 A
PowerRate 1400 W
Max. Water Temperature 104 °F
54
Electric Pressure Washer Electric Pressure Washer
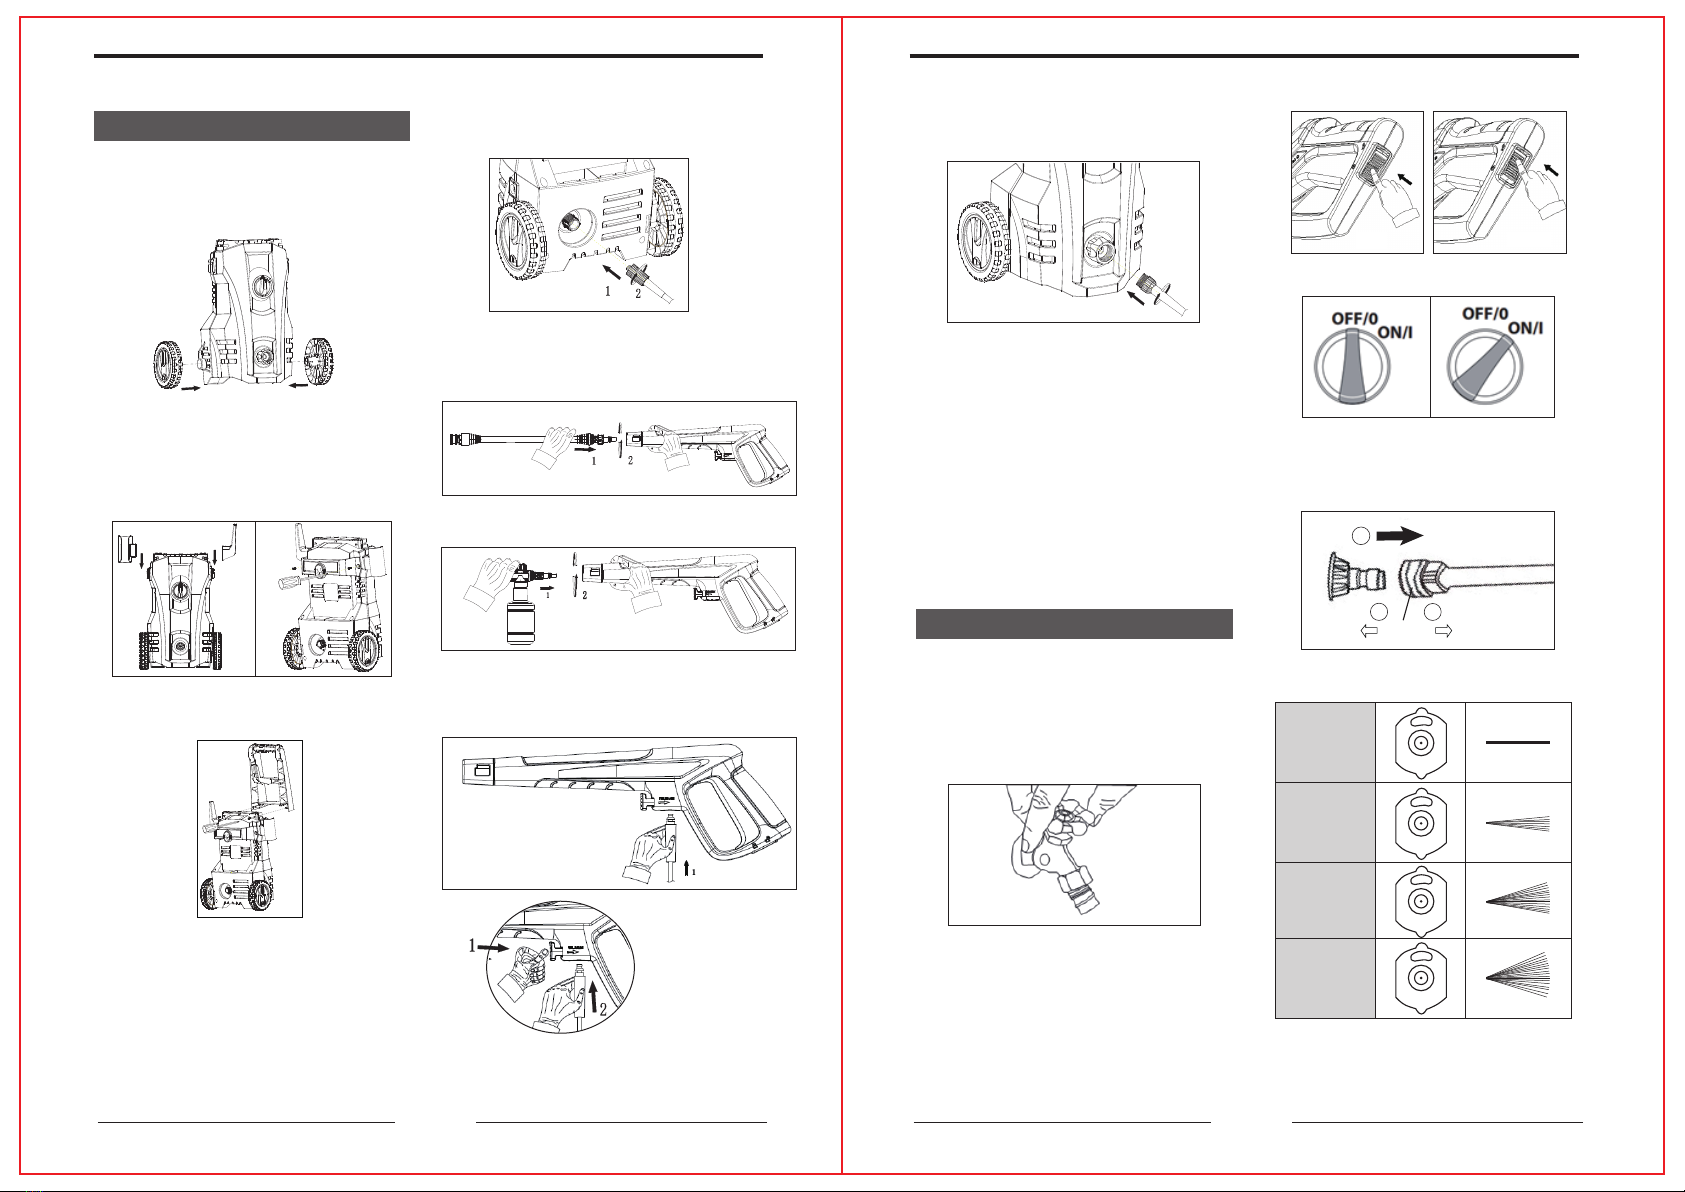
3.Attach the Handle(5) tight to the main unit.
6. Attach High Pressure Hose(9) to Spray
Gun(8) .
7. Screw the Garden Hose on to Garden
hose connector.
8. Connect the garden hose to water source.
WARNING: The appliance is INTENDED
to be used at a temperature above 0
degree.
TO WASH WITH WATER
1.Turn the water source on.
Warning: DO NOT USE DIRTY WATER,It
may clog the filter and other parts of unit
inside.
OPERATION
2.Press the UNLOCK button in the Spray Gun
(8) handle. Squeeze the trigger of gun about
1 minute until low pressure water flow out to
empty air out of the unit.
LOCK UNLOCK
PREPARATION OF OPERATION
2.Attach Gun Holder(4) and Power Cable
Hook(3) with "click" sound which indicate to
be fixed well. Screw Detergent Bottle
Bracket(13) to the main unit.
3.Turn the switch to ON(I) position.
4.Select proper nozzle ,pull the collar and
insert the nozzle, then put the collar to return
to place.
FIXED ANGLE NOZZLE
0° Nozzle
(1)
15°Nozzle
(2)
25°Nozzle
(3)
40°Nozzle
(4)
0°
15°
25°
40°
Collar
9. Connect to the power supplier.
Note: When using an electric pressure
washer, always plug it into a properly
grounded GFCI outlet.
5. Connect Spray Wand(6) to Spray Gun(8)by
pushing and twisting. For Detergent Bottle (12),
directly connect to Spray Gun (8).
1
2
3
click click
4. Attach High Pressure Hose(9) to the
pressure water outlet of the machine.
HOW TO SET UP YOUR UNIT
1.Attach Wheel (2) with "click" sound which
indicate to be fixed well.
Push button to
remove the hose

76
Electric Pressure Washer Electric Pressure Washer
10. Lock the trigger and put the Spray Gun(8)
into Gun Holder(4) ,power cable to Power
Cable Hook(3).
PUMP GUARD
Specially formulated to protect your pressure
washer from freezing, corrosion and premature
wear.The pump Guard also adds lubrication
to valves and seals to prevent sticking.Highly
recommended for all POWRYTE pressure
washers!
WINTERIZING AND LONG-TERM
STORAGE
1. Disconnect all water connections.
2. Turn on the machine for a few second,
until the remaining water in the pump exits.
Turn off immediately.
3. Do not allow high-pressure hose to become
kinked.
4. Store the machine and accessories in a
room that does not reach freezing tempera-
tures. Do not store near furnace or other
sources of heat as it may dry out the pump
seals.
TIPS FOR EXTENDING THE LIFE OF
YOUR PRESSURE WASHER
1.Never operating the machine is more than
30s without water supply.
2.Pressure washer is not meant to pump hot
water. Never connect to hot water supply –
this will significantly reduce life of the pump.
3.Using detergent other than those formulated
for pressure washers may cause damage to
pump components (o-rings, etc.). This also
applies to chemicals such as bleach, dish
soap, etc.
WATER FILTER AND NOZZLE CLEAN-
ING INSTRUCTIONS
A clogged or partially clogged water filter(in
the Garden Hose Connector) or nozzle can
cause significant reduction of water pressure
coming out of the nozzle and/ or cause the
unit to pulsate while spraying.
1.The water filter was inside the Garden hose
connector(8),should be cleaned periodically.
2.Using the Nozzle Cleaning Wire(13) (taped
to the manual) provided, insert the wire into
the nozzle hole and move back and forth until
debris is dislodged. Back flush water through
the nozzles using garden hose and highest
pressure available (either standard water
nozzle or use your thumb over the nozzle to
create water pressure for back flush).
MAINTENANCE
Choose the best nozzle for the job.
Warning: Please confirm the nozzle is
pluged in position and the nozzle holder is
returned to position before squeezing the
trigger.
The angle of spray is smaller the water outlet
pressure is higher, and the material of surface
need be cleaned should be tough enough to
support higher pressure water. Detail of
intended use see items (1)-(4) below:
(1)0° nozzle,Red, Fine spot spray means
delivering a high-pressure pencil-point jet
stream. It is used to cut heavy dirt deposits in a
small concentrated area. It is ideal for dissolv-
ing stubborn substances, like tar and grease
spots on concrete, or for removing caked mud
from equipment. It is also used to clean
hard-to-reach areas including the facades of
2-story buildings or undersides of lawn mowers
and tractors.
Note: Care should be taken when setting
nozzle spray to avoid permanently gouging
wood or damaging fragile surfaces.
(2)15° nozzle,Yellow, for intense cleaning jobs
on hard surfaces that can withstand the
high-pressure. Applications include stripping
paint, removing oil stains, grease, heavy
mildew stains, and rust from steel.
(3) 25° nozzle, Green, for cleaning home
siding, brick patios, wood decks, driveways,
sidewalks, cars or furniture.
(4) 40° nozzle, White, for cleaning items
such as cars, trucks, boats, patio furniture, or
lawn equipment.
5.Squeeze the trigger of gun,the high
pressure water will flow out.(see below
picture)
6.When you finish your clean job turn the
switch to OFF(O) position.
7.Unplug the power cord from the power
outlet
8.Turn off water supply.
9.After motor and water supply are turned off,
trigger Spray Gun(8) to depressurize system.
2. Squeeze the trigger, detergent will come out
through the nozzle .
3.Apply detergent so it thoroughly covers
cleaning surface.
4. Allow detergent to remain on the surface for
a few minutes. This is a good time to use a
brush to lightly scrub heavily soiled areas.
5. Change to Spray nozzle, Rinse detergent
from surface.
6. Cleaning up: Always draw fresh water
through the detergent bottle when done to
flush any remaining detergents from the
injection system. The bottle could be
detached if necessary in this process.
11.After each use, wipe all surfaces of the
pressure washer with a clean, damp cloth.
TO WASH WITH DETERGENT
1.Screw out the bottle and fill bottle with
detergent.Connect Detergent Bottle(6) to
Spray Gun (11).
CAUTION: NEVER using pressure washer
is more than 30S after water supply off.
Serious damage could occur to the pump
and / or motor.
WARNING: NEVER disconnect high pre-
ssure discharge hose from machine while
system is pressurized. To depressurize,
turn motor off, turn water supply off and
squeeze gun trigger 2-3 times.
WARNING:Acids, alkalines, bleaches,
solvents, can corrode the soap nozzle.

9
LIMITED WARRANTY
This tool is warranted by the manufacturer to
the original purchaser from the original
purchase date for two (2) years subject to the
warranty coverage described herein. If this
product is used for commercial, industrial or
rental purposes, the warranty will apply for
ninety days from the date of purchase. This
tool is warranted to the original user to be
free from defect in material and workmanship.
If you believe that a tool is defective, return
the tool, with proper proof of purchase to the
point of purchase. If it is determined that the
tool is defective and covered by this warranty,
the distributor will replace the tool or refund
the purchase price. Freight costs must be
borne by you.
This warranty is void if: defects in materials
or workmanship or damages result from
repairs or alterations which have been made
or attempted by others or the unauthorized
use of nonconforming parts; the damage is
due to normal wear, damage is due to abuse
(including overloading of the tool beyond
capacity), improper maintenance, neglect or
accident; or the damage is due to the use of
the tool after partial failure or use with
improper accessories or unauthorized repair
or alteration.
This limited warranty does not apply to normal
wearing parts such as O-rings, seals, piston
springs, bumper, drive blades and other
related items.
This warranty gives you specific legal rights,
and you may also have other rights that vary
from state to state.
8
TROUBLESHOOTING
WARNING: Follow all safety precautions whenever diagnosing or servicing the
product.
Problem
Possible Cause
Possible Solution
No detergent suction
Unit begins to smoke
Injector clogged on pump
Overheated, overloaded or
damaged motor
Unit is pressurized
Plug is not well connected
or electric socket is faulty
Extension cord too long or
wire size too small
Main voltage supply too
low
Thermal safety switch has
tripped
Squeeze trigger on gun
Check plug, socket and fuse
Remove extension cord
Check that main supply
voltage is adequate
Switch off unit and allow motor
to cool down
1.
2.
3.
4.
5.
Water inlet filter is clogged
Pump sucking air from
hose connections
Nozzle worn or not correct
size
Unloader clogged or worn
Valves clogged or worn
1.
2.
3.
4.
5.
Pump sucking in air
Clogged nozzle
Valves dirty, worn or stuck
Water seals worn
1.
2.
3.
4.
Extension cord too long or
wire size too small
Thermal safety switch has
tripped due to overheating
1.
2.
Remove extension cord
Check that main supply
voltage corresponds to
specifications
1.
2.
Check that hoses and
connections are tight
Clean with tip cleaner
Contact service
Contact service
1.
2.
3.
4.
Clean water inlet filter
Check that connections
and locking ring are
properly tightened
Contact service
Contact service
Contact service
1.
2.
3.
4.
5.
1.
2.
3.
4.
5.
Turn off unit and Contact
Service
Contact Service.
Pressure washer
does not start up
Pump does not
reach necessary
pressure
Fluctuating
pressure
Motor stops
suddenly
Electric Pressure Washer Electric Pressure Washer
Table of contents


