TOP FIN PRO Series User manual

en Operating manual
fr Mode d'emploi
es Manual de instrucciones
AQUARIUM HEATER
PRO150 W
(Type 5310051)
PRO200 W
(Type 5310053)
PRO300 W
(Type 5310052)

A
min.
water
level
B
C
Technical data
Type HEATER
TOPFIN
Ø
LWatt
US gal
5310051 150 Ø 1.26 × 12.87 inch 150 W 120 V / 60 Hz up to 79
5310053 200 Ø 1.26 × 15.19 inch 200 W 120 V / 60 Hz up to 106
5310052 300 Ø 1.26 × 19.13 inch 300 W 120 V / 60 Hz up to 160
b
c
d
e
g
f
a

USA
3
IMPORTANT SAFETY
INSTRUCTIONS
WARNING- To guard against injury, basic safety precautions should
be observed, including the following.
‧FOR HOUSEHOLD USE ONLY
‧WARNING! RISK OF ELECTRIC SHOCK!
‧DO NOT RUN DRY!
READ AND FOLLOW ALL
SAFETY INSTRUCTIONS.
‧DANGER – To avoid possible electric shock, special care
should be taken since water is employed in the use of aquarium
equipment. For each of the following situations, do not attempt
repairs by yourself. Return the appliance to an authorized service
facility for service or discard the appliance.
‧If the appliance shows any sign of abnormal water leakage,
immediately unplug it from the power source.
‧Carefully examine the appliance after installation. It should not be
plugged in if there is water on parts not intended to be wet.
‧Unplug the appliance from the socket outlet to disable any remote
command.
‧Do not operate any appliance if it has a damaged cord or plug,
or if it is malfunctioning or has been dropped or damaged in any
manner.
‧To avoid the possibility of the appliance plug or receptacle getting
wet, position aquarium stand and tank to one side of a wall-mount-
ed receptacle to prevent water from dripping onto the receptacle
or plug. A ”drip loop”, shown in the gure, should be arranged by
the user for each cord connecting an aquarium appliance to a
receptacle. The ”drip loop” is that part of the cord below the level
of the receptacle, or the connector if an extension cord is used, to
prevent water traveling along the cord and coming in contact with
the receptacle. If the plug or socket does get wet, DON’T unplug
the cord. Disconnect the fuse or circuit breaker that supplies
power to the appliance. Then unplug and examine for presence of
water in the receptacle.
‧Close supervision is necessary when any appliance is used by or
near children.
‧To avoid injury, do not touch moving parts or hot parts such as
heaters, reectors, lamp bulbs, and the like.
‧Always unplug an appliance from an outlet when not in use, before
putting on or taking o parts, and before cleaning. Never yank cord
to pull plug from outlet. Grasp the plug and pull to disconnect.
‧Do not use an appliance for anything other than its intended use.
The use of attachments not recommended or sold by the appli-
ance manufacturer may cause an unsafe condition.
DRIP LOOP
POWER
SUPPLY
CORD

USA
4
‧Do not install or store the appliance where it will be exposed to the
weather or to temperatures below freezing.
‧Make sure an appliance mounted on a tank is securely in stalled
before operating it.
‧Read and observe all the important notices on the appliance.
‧If an extension cord is necessary, a cord with a proper rating
should be used. A cord rated for less amperes or watts than the
appliance rating may overheat. Care should be taken to arrange
the cord so that it will not be tripped over or pulled.
‧This appliance has a polarized plug (one blade is wider than the
other). As a safety feature, this plug will t in a polarized outlet only
one way. If the plug does not t fully in the outlet, reverse the plug.
If still does not t, contact a qualied electrician. Never use with an
extension cord unless plug can be fully inserted. Do not attempt to
defeat this feature.
‧Check that the voltage shown on the label of the unit corresponds
to the voltage of the mains supply.
‧Disconnect all electrical appliances from the mains before placing
hands in the water.
‧The line cord of this unit cannot be replaced or repaired. Should
the line cord become damaged the appliance must be discarded.
SAVE THESE INSTRUCTIONS
FCC WARNING STATE-
MENT (US only)
FCC CAUTION
‧This device complies with part 15 of the FCC Rules. Operation is
subject to the following two conditions:
‧(1) This device may not cause harmful interference, and (2) this
device must accept any interference received, including interfer-
ence that may cause undesired operation.
‧Any changes or modications not expressly approved by the
party responsible for compliance could void the user’s authority to
operate the equipment.
‧This equipment complies with FCC radiation exposure limits set
forth for an uncontrolled environment. This equipment should be
installed and operated with a minimum distance of 20 cm between
the radiator and your body.
NOTE:
This equipment has been tested and found to comply with the limits for
a Class B digital device, pursuant to Part 15 of the FCC Rules. These
limits are designed to provide reasonable protection against harmful
interference in a residential installation. This equipment generates,
uses and can radiate radio frequency energy and, if not installed and
used in accordance with the instructions, may cause harmful interfer-
ence to radio communications. However, there is no guarantee that
interference will not occur in a particular installation. If this equipment
does cause harmful interference to radio or television reception, which
can be determined by turning the equipment o and on, the user is
encouraged to try to correct the interference by one or more of the
following measures:
‧Reorient or relocate the receiving antenna.
‧Increase the separation between the equipment and receiver.

USA
5
‧Connect the equipment into an outlet on a circuit dierent from that
to which the receiver is connected.
‧Consult the dealer or an experienced radio/TV technician for help.
English
6
Operating manual
TOP FIN
®
Pro Adjustable Aquarium Heater
General User Instructions
Follow all operating manual instructions
▶Before using the appliance for the rst time, the operating
manual must be read fully and understood.
▶Consider the operating manual as part of the product and keep
in a safe and accessible location.
▶Enclose this operating manual if passing the appliance on to
a third party.
Symbol explanation
The following symbols are used on the appliance:
The appliance must only be used indoors, and exclusively for
aquariums.
The appliance is of protection class II.
The symbol indicates that the appliance is protected against
permanent submerging.
The following symbols and signal words are used in this operating manual:
DANGER!
Risk of serious personal injury or death from a general source
of danger.
DANGER!
Danger of electric shock with the risk of serious personal injury
or death.
WARNING!
Danger of serious personal injury or health hazard.
WARNING!
Warning of hot surfaces with possible burns as a result.
CAUTION!
Note on the risk of material damage.
Note with useful information and tips.
Typographical conventions:
Reference to a gure; in this case, reference to gure A
You are prompted for an action.
Application
The TOP FIN
®
Pro heater is an adjustable heater for aquariums. The temperature
range is 64 – 90°F ± 1°F or 18 – 32°C ±0.5°C.
The appliance and all parts included in the scope of delivery are intended for
private use and must only be used:
‧For the heating of aquarium water in fresh and salt water
aquariums
‧In compliance with the technical data
The following limitations apply to the appliance:
‧Do not use for commercial or industrial purposes
‧Corrosive, highly ammable, aggressive or explosive
substances, foodstus and drinking water must not be come
into contact with the appliance
‧Do not ever operate dry (without water)
IP68
⌦A
English
7
Safety Instructions
Risks for persons and property can arise from
this appliance if the appliance is improperly
used or not used as intended or if the safety
instructions are not heeded.
For your safety
‧Do not let the appliance packaging and
small parts get into the hands of children as
hazards can arise (danger of suocation!).
Keep away from animals!
‧Before use, carry out a visual inspection to
ensure that the appliance, especially the main
cable and plug, are undamaged.
‧Do not use the device if it does not function
properly or if it is damaged.
‧Never use the appliance with a damaged
main cable.
‧The connecting line of this device can not
be replaced. When the line is damaged, the
device must no longer be used.
‧Repairs must only be carried out by an
EHEIM service center.
‧Do not carry the appliance by the main cable.
To disconnect appliance, always pull on the
plug and not the cable or appliance.
‧Protect the main cable from heat, oil, and
sharp edges.
‧Only carry out the work described in these
instructions.
‧Never make technical modications to the
appliance.
‧Only use original spare parts and accessories
for the appliance.
‧The device should be protected by means
of a residual current protective device with
a maximum rated residual current of 30 mA.
Ask your electrician.
‧If not in use, always disconnect all devices in
the aquarium from the power supply before
you install/remove any parts and before all
cleaning and maintenance work.

English
8
‧Protect the socket and
plug against moisture. It is
recommended to form a drip
loop with the cable to prevent
any water running along the
cable to the socket.
‧The electrical data of the appliance must
match the data of the power source.
This data is found on the type plate,
the packaging, and in these instructions.
‧Only connect the device to a power outlet.
Current correctly installed with contact
grounding. Unplug the device from socket
outlet to disable remote command.
‧
‧Danger of burning! The appliance is very hot
during and directly after operation. Never
touch hot parts or the heating zone
d
!
Commissioning
Installing the heater (⌦A)
1. Remove the transportation protection
e
.
2. Connect the suction device
c
to the suction device mount
b
.
3. Connect the suction device mount to the heater (not in the area
of the heating zone
d
, the control light
f
and the indicator
LED
g
).
4. Attach the appliance below water level on the inside of your
aquarium (⌦B/C). Take care of the minimum water level.
▶The heater must be rinsed well in order to guarantee consistent
water heating. Therefore, place the heater in an area with a
strong ow.
▶Only install the heater in a vertical position.
Operation
System requirements
Wireless Connection (Wi-Fi) capable device (smart phone, tablet, desktop
computer, etc.)
Creating a network
1. Plug in aquarium heater to begin operation. The Wi-Fi indicator
LED
g
light on the heater will light up.
‧White ashing LED: Network is being sought or created.
‧Blue LED: Network is connected and ready to start.
Connecting to the WLAN network
2. Open the network settings on your device (smart phone,
tablet, etc.).
3. Connect it to the WLAN network (SSID) that was just created by
your aquarium heater: EHEIM heater XXXXXXXX
4. Enter the network security key.
You nd the SSID and the network security key on the mains cable
or scan the QR-Code 1 for connection setup.
Navigating to the Website
5. Open your internet browser and go to http://192.168.1.1
You can also use the QR code 2 to open the software in the browser.

English
9
Start the conguration
6. Select your desired language in the language selection eld
and proceed with the initial conguration. Follow the instructions
accordingly.
Control light
f
‧Lights up red: Heater is heating.
‧Light o: Heater is not heating.
LED indicator
g
‧Lights up white: Network is being sought or created.
‧Lights up blue: Heater is in master mode.
‧Lights up green: Heater is connected to another EHEIM digital
device.
Before you remove the heater
WARNING! Burning and re hazards due to hot surfaces.
▶Allow the appliance to cool down in the water for at least
30 minutes before removing it.
If you have accidentally removed the heater during operation:
▶Do not submerge the heater back into the water.
▶Do not touch any hot surfaces.
▶Remove the main plug and allow the heater to cool down for at
least one hour on a heat-resistant base.
Thermal circuit breaker
The heater is equipped with a thermal circuit breaker as protection against
overheating and any associated re hazards. In the event of the heater being
accidentally operated outside the water or when the water level is too low, it will be
switched o. The heater will switch back on automatically after cooling down.
Maintenance
CAUTION! Material damage.
▶Do not use hard objects or aggressive cleaning agents for
cleaning.
▶The appliance is not dishwasher-safe! Do not clean the
appliance in the dishwasher.
Cleaning
1. Disconnect the heater from the power supply.
2. Allow the appliance to cool down in the water for at least
30 minutes.
3. Take the appliance out of the aquarium.
4. Clean the heater under running water.
Shut o
Storage
1. Take the appliance out of the aquarium.
2. Clean the appliance
3. Store the appliance in a frost-proof place.
Spare parts
4 piece suction device (art. no. 7271100), suction device mount incl. 2 suction
devices (art. no. 7443900)

English
10
Wireless connectivity manual
Contents
1 Symbols.........................................................................................11
2 Initial conguration ......................................................................12
3 Home page ....................................................................................18
4 Heater overview ............................................................................20
5 Heater mode ..................................................................................22
5.1 Manual control .................................................................23
5.2 Smart control ...................................................................24
6 Settings home ...............................................................................26
6.1 Connect with available network.......................................29
6.2 E-mail adress for heater messages.................................31
6.3 Deactivating WLAN .........................................................32
6.4 Activating WLAN..............................................................33
7 Heater settings..............................................................................34
8 Status LED indicator ....................................................................37
9 Reset ..............................................................................................39
10 Connecting with other TOP FIN
®
Pro device .............................39
11 Information ....................................................................................42

English
11
1 Symbols
Home page
Settings
Remove
Change
Save
Add device
Overview
Manual control
Smart Control
Temperature / Current
water temperature
Heater
Time
Temperature setpoint
Factory Defaults
Attention
English
12
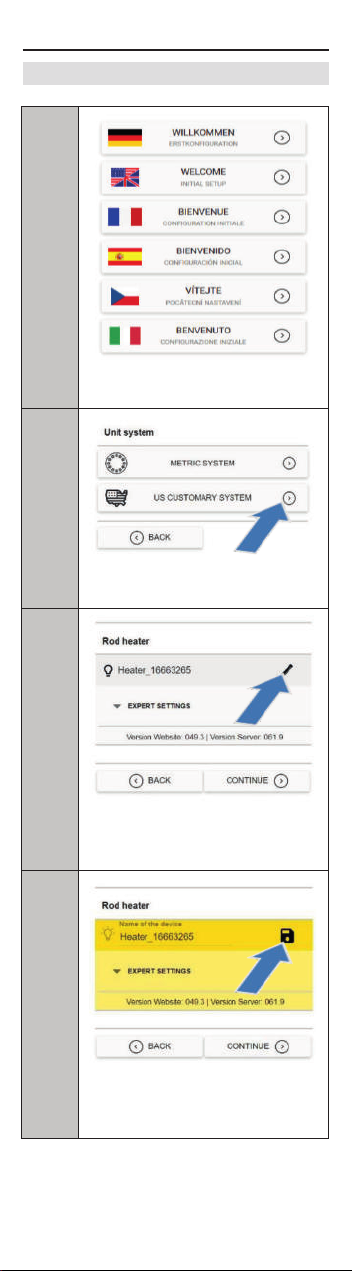
2 Initial conguration
1
Select language.
2
Select unit system.
3
Change name of heater
(optional).
4
Enter and save preferred
name (optional).

English
13
5
Select next setting.
6
Add a new aquarium
to network.
7
Change name (optional).
8
Select next setting.
Continue with Step 12.

English
14
.
.
.
Continue with Step 12.
9
Connecting with an existing
aquarium (optional).
10
Selecting an aquarium from
the list.
11
Connecting the aquarium.
12
Select heater regulation
type
MANUAL CONTROL.
.

English
15
.
13
Set the setpoint temperature
by moving the slider.
14
Save the settings.
Continue with Step 24.
15
Select heater regulation
type
SMART CONTROL.
OP FIN Pro

English
16
.
.
16
Search for other
TOP FIN®Pro devices.
17
Select your device.
18
Select your filter.
19
Pair with device.
for .
EHEIM Filter_XXXXXXX

English
17
.
.
20
To pair this filter it must be
configured in Bio Mode.
21
Set the setpoint temperature
for the day.
Filter XXXXXXX
Filter XXXXXXX
22
Set the temperature
difference for nighttime.
Filter XXXXXXX

English
18
25
Change name.
for time
23
Save settings.
Filter XXXXXXX
for time
24
HOME PAGE
Overview of aquarium with
all connected devices.
3 Home page

English
19
.
26
Enter and save preferred
name.
27
Add a new aquarium.
28
Remove aquarium.
29
Add device.
.
.

English
20
30
Change to view the heater
overview.
.
.
21
31
Heater Overview: The
current heater mode,
temperature setpoint and
current water temperature.
32
Heater ON/OFF.
4 Heater overview
This manual suits for next models
6
Table of contents


