manuals.online logo
Brands
  1. Home
  2. •
  3. Brands
  4. •
  5. VOGEL&NOOT
  6. •
  7. Heater
  8. •
  9. VOGEL&NOOT VONARIS VSV User manual

VOGEL&NOOT VONARIS VSV User manual

Vorlauf
Flow
Départ
Rücklauf
Return
Retour
5
3
7
8
77 6
4
N
50 55
2 1A 9
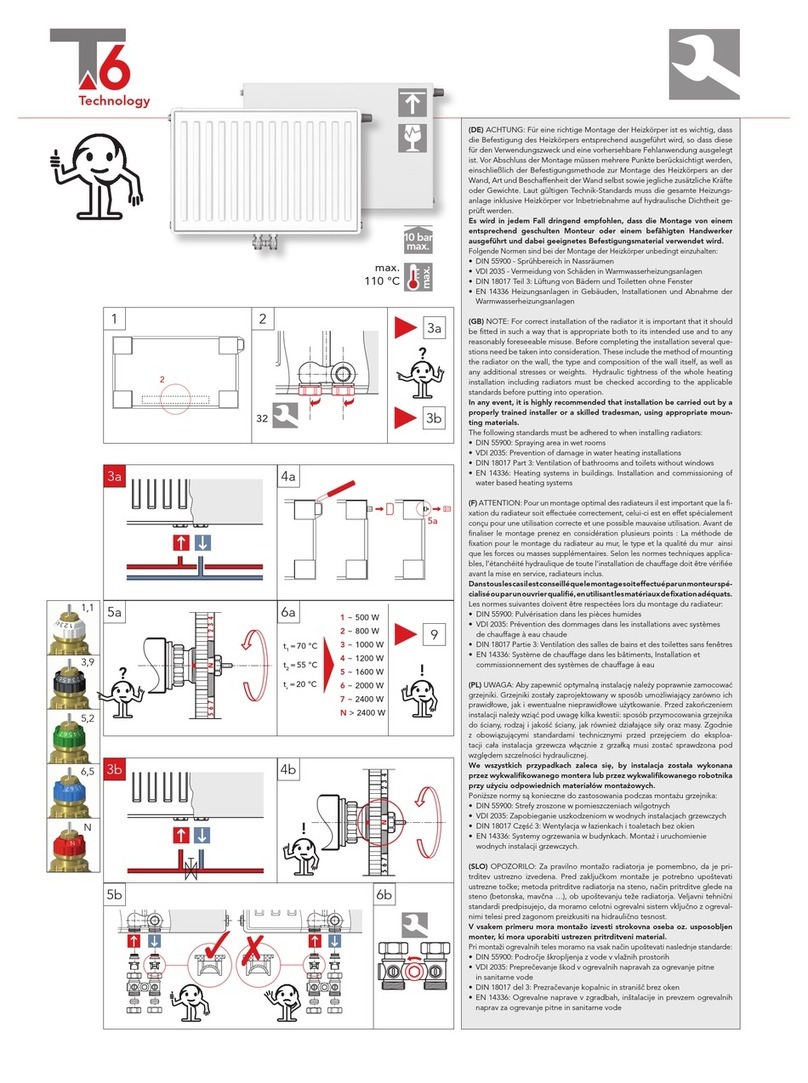
Montageanleitung VONARIS Senkrechte Ausführung Type VSV
Installation Instructions VONARIS Vertical Radiator Type VSV
KMBA07
Abgebildete Darstellung: rechter Anschluss
Linker Anschluss: spiegelverkehrt
Illustration: Right hand connection
Left hand connection: mirror image
N1234567
Einstellring
Adjustment ring
Bague de réglage
Markierung
Marking
Index
Detail A
Detail A
VOGEL
&
NOOT
1.) VOR DER WANDMONTAGE DES VSV IST ZU BEACHTEN:
•Das Ventil des VSV ist werkseitig auf Zweirohrbetrieb mit dem größten kv-Wert
voreingestellt.
•Die Anschlüsse des VSV befinden sich standardmäßig rechts. Bezugspunkt dafür ist
die VSV Frontseite, auf welcher sich diese Montageanleitung befindet.
•Entfernen der Verpackung im VSV - Anschlussbereich.
•Demontage der Abdeckkappen von den 3/4” Außengewinden.
2.) ZWEIROHRBETRIEB - VOREINSTELLUNG:
•Demontage der Baustellenkappe 1.
• Detail A: Einstellring des Ventiles 2gegen den Uhrzeigersinn auf die gewünschte
Voreinstellung drehen - der gewünschte Einstellwert (1, 2,..7, N) muß über der
Markierung positioniert sein.
kv-Werteinstellungen bei 2K Proportionalabweichung (Richtwerte):
Voreinstellung 1 für VSV bis ca. 500 Watt
Voreinstellung 2 für VSV bis ca. 800 Watt
Voreinstellung 3 für VSV bis ca. 1000 Watt
Voreinstellung 4 für VSV bis ca. 1200 Watt
Voreinstellung 5 für VSV bis ca. 1600 Watt
Voreinstellung 6 für VSV bis ca. 2000 Watt
Voreinstellung 7 für VSV bis ca. 2400 Watt
Voreinstellung N für VSV über 2400 Watt
3.) EINROHRBETRIEB:
•
Eine Ventilvoreinstellung ist nicht notwendig, da das Ventil 2 werkseitig
auf Voreinstellung N justiert wurde.
Achtung: Um eine unerwünschte Erwärmung des VSV im Einrohrbetrieb bei
geschlossenem Ventil möglichst gering zu halten, ist bei der Montage des
Einrohrverteilers 3zu beachten, daß der Rücklaufeinsatz 4im Rücklauf und der
Vorlaufeinsatz 5im Vorlauf eingebaut sind.
1.) BEFORE INSTALLING THE VSV, THE FOLLOWING SHOULD BE NOTED:
•The VSV valve is factory set for two-pipe operation with the largest kv-value.
•The VSV connections are on the right hand side as standard. The reference point
for this is the front side of the VSV where these fitting instructions are located.
•Remove packaging around the VSV connection area.
•Remove protective caps 1 from 3/4” male threads.
2.) TWO-PIPE OPERATION - PRE-SETTING:
•Remove protective cap 1.
• Detail A: Turn the adjustment ring of valve 2counter-clockwise to the required
pre-setting - the pre-set value (1, 2,..7, N) should be positioned over the marking.
kv-value settings at 2K proportional deviation (approximate values):
default setting 1 for VSV to 500 Watt
default setting 2 for VSV to 800 Watt
default setting 3 for VSV to 1000 Watt
default setting 4 for VSV to 1200 Watt
default setting 5 for VSV to 1600 Watt
default setting 6 for VSV to 2000 Watt
default setting 7 for VSV to 2400 Watt
default setting N for VSV above 2400 Watt
3.) SINGLE-PIPE OPERATION:
• No valve pre-setting required, as valve 2 is factory set to pre-setting N.
Important: To minimise undesirable warming of the VSV in single-pipe operation
with closed valve, ensure that when fitting the single-pipe manifold 3the return
flow cartridge 4is installed in the return and the flow cartridge 5is installed in
the flow.
DGB
Rücklauf
Return
Vorlauf
Flow
Einstellring
Adjustment ring
Markierung
Marking
Achtung: Die zulässige Druckstufe (5,0 bzw 8,0 bar) und die zulässige
Temperatur (110 °C) sind einzuhalten.
BL 430 - 862
BH 1600, 1800, 2000
130
107107
BL 430 mm - 862 mm
90
40
358
BH 1600, 1800, 2000
130
90
7171
BL 358 mm
40
286
BH 1600, 1800, 2000
130
7171
BL 286 mm
90
40
90
214
BH 1600, 1800, 2000
130
90
40
90
BL 214 mm
Important: The permissible pressure level (5.0 or 8.0 bar) and the permis-
sible temperature (110 °C) must be adhered to.
LASCHENAUFSCHWEISSBILD BRACKET WELDING DIAGRAM
•Vor der Einstellung des Heizkörperanteiles ist die Abdeckkappe 6am Einrohrverteiler
3zu entfernen und die darunter befindliche Beipaßspindel nach rechts bis zum
Anschlag einzudrehen.
Einstellwerte bei 2K Proportionalabweichung
(Richtwerte bei TV= 70 °C, TR= 55 °C und TL= 20 °C):
HK-Anteil 30% - 3,50 Umdrehungen
HK-Anteil 35% - 3,00 Umdrehungen
HK-Anteil 40% - 2,50 Umdrehungen
HK-Anteil 45% - 2,00 Umdrehungen
HK-Anteil 50% - 1,75 Umdrehungen
4.) WANDMONTAGE UND ANSCHLUSS VON VOR- UND RÜCKLAUF:
•VSV an die Wand montieren (siehe Montagehinweise).
•Bei Einrohrsystemen Einrohrverteiler 3montieren und Vorlauf- und Rücklaufleitung
mit Klemmverschraubungen 7anschließen. Bei Zweirohrsystemen sollten Absperr-
verschraubungen 8eingebaut werden.
5.) THERMOSTATKOPFMONTAGE:
Die Thermostatköpfe ”RA 2000” und ”RAW” Fa. Danfoss, ”VK” Fa. Heimeier, ”D”
Fa. Herz, ”thera-DA” Fa. MNG und ”UNI-LD” Fa. Oventrop sind direkt montierbar.
•Demontage der Baustellenkappe 1.
•Montage des Thermostatkopfes 9.
6.) ÄNDERUNGEN DER EINSTELLWERTE IM
ZWEIROHR- UND EINROHRBETRIEB:
Bei Bedarf können die entsprechenden Einstellwerte auch unter Anlagendruck
verstellt werden.
ACHTUNG: Bei der Montage von Heizkörpern ist zu beachten, dass die
Befestigung von Heizkörpern so dimensioniert wird, dass sie für die bestim-
mungsgemäße Verwendung und vorhersehbarer Fehlanwendung geeignet ist.
Hierbei sind insbesondere die Verbindung mit dem Baukörper sowie dessen
Beschaffenheit, die Geeignetheit des Montagezubehöres und die möglichen
Belastungen nach erfolgter Montage zu prüfen.
Hinweis: VSV gibt es nur mit aufgeschweißten Laschen
•Zur Montage der VSV Typen sind ausschließlich die Wandaufhängungen WA 10
und WA 11 zu verwenden.
•Die Wandaufhängungen WA 10 und WA 11 können bei allen VSV Typen verwendet
werden.
•An den Stirnflächen der Schutzecken die Schrumpffolie öffnen.
•Schutzecken entfernen und den darunterliegenden Karton im Bereich der Aufhänge-
laschen mittels Tapeziermesser vorsichtig aufschneiden.
•Befestigung der Wandaufhängung WA11 laut Laschenaufschweißbild.
•VSV in die Wandaufhängung WA11 einhängen und Distanzierung auf die unteren
Aufhängelaschen aufklipsen.
•VSV in horizontaler und vertikaler Richtung ausrichten.
•Before setting the radiator part, the protective cap 6 on the single-pipe manifold 3
should be removed and the bypass spindle below screwed in fully clockwise against
the stop.
Setting values at 2K proportional deviation
(approximate values at TV= 70 °C, TR= 55 °C and TL= 20 °C):
Radiator part 30% - 3.50 turns
Radiator part 35% - 3.00 turns
Radiator part 40% - 2.50 turns
Radiator part 45% - 2.00 turns
Radiator part 50% - 1.75 turns
4.) WALL MOUNTING AND CONNECTION OF FLOW AND RETURN:
•Fit the VSV to the wall (see hints for installation).
•For single-pipe systems install single-pipe manifold 3 and connect flow and return
using compression fittings 7. For two-pipe systems shut-off fittings 8should be used.
5.) THERMOSTAT HEAD INSTALLATION:
The thermostat heads ”RA 2000” and ”RAW” by Danfoss, ”VK” by Heimeier, ”D” by
Herz, ”thera-DA” by MNG and ”UNI-LD” BY Oventrop are suitable for direct installation.
•Remove the protective cap 1.
•Install the thermostat head 9.
6.) ADJUSTMENT OF SETTING VALUES IN
TWO-PIPE AND SINGLE-PIPE OPERATION:
If required, the relevant setting values may also be adjusted under system pressure.
ATTENTION: For the correct installation of radiators it is essential that the
fixing of the radiator is carried out in such a way that it is suitable for intended
use ANDpredictable misuse. A number of elements need to be taken into
consideration including the fixing method used to secure the radiator to the
wall, the type and condition of the wall itself, and any additional potential forces
or weights, prior to finalising installation.
Note: VSV available with welded brackets only.
•For fitting the VSV models only use wall mounting brackets WA 10 and WA 11.
•The wall mounting brackets WA 10 and WA 11 are suitable for all VSV models.
•Open the shrink wrapping on the corner protector front faces.
•Remove the corner protectors and carefully cut the cardboard behind in the area
of the mounting brackets using a wallpaper knife.
•Fit the wall mounting bracket WA 11 in accordance with the bracket welding diagram.
•Attach the VSV to the wall mounting bracket WA 11 and clip spacers onto the bottom
mounting brackets.
•Align the VSV in both horizontal and vertical direction.
ZU VERWENDENDE AUFHÄNGUNGEN DMOUNTINGS TO BE USED GB
MONTAGEHINWEISE FÜR VSV DHINTS FOR INSTALLATION OF VSV GB
Vorlauf
Flow
Départ
Rücklauf
Return
Retour
5
3
7
8
77 6
4
N
50 55
2 1A 9
Instructions de montage pour radiateurs verticaux VONARIS type VSV
Instrukcja montażu VONARIS wersja pionowa VSV
KMBA07
Représentation: raccord à droite
Raccord à gauche: inversé
Widok: zawór z prawej strony
Zawór z lewej: lustrzane odbicie
N1234567
Einstellring
Adjustment ring
Bague de réglage
Markierung
Marking
Index
Détail A
Szczegół A
1.) A PRENDRE EN COMPTE AVANT DE MONTER LE VSV AU MUR :
• Le robinet du VSV est préréglé à l’usine sur service bitubulaire à la
valeur kv maximum.
•Les raccords standard du VSV sont placés à droite, vu de l’avant du VSV là où se
trouvent ces instructions de montage.
•Enlever l’emballage au niveau du raccord VSV.
•Démonter les capuchons des filets extérieurs 3/4”.
2.) SERVICE BITUBULAIRE - PRÉRÉGLAGE:
•Démonter le bouchon de protection 1.
• Détail A: Tourner la bague de réglage du robinet 2 dans le sens inverse des
aiguilles d’une montre jusqu’au préréglage désiré. La valeur de réglage désirée
(1, 2,..7, N) doit se trouver sur la marque.
Réglages des valeurs kv pour un écart proportionnel de 2K
(valeurs indicatives):
préréglage 1 pour VSV jusqu’à env. 500 Watt
préréglage 2 pour VSV jusqu’à env. 800 Watt
préréglage 3 pour VSV jusqu’à env. 1000 Watt
préréglage 4 pour VSV jusqu’à env. 1200 Watt
préréglage 5 pour VSV jusqu’à env. 1600 Watt
préréglage 6 pour VSV jusqu’à env. 2000 Watt
préréglage 7 pour VSV jusqu’à env. 2400 Watt
préréglage N pour VSV plus de 2400 Watt
3.) SERVICE MONOTUBULAIRE :
• Il n’est pas nécessaire de prérégler le robinet étant donné que le robinet
2 a été préréglé à l’usine sur N.
• Attention: Pour limiter au maximum un réchauffement indésirable du VSV en
service monotubulaire lorsque le robinet est fermé, il faut s’assurer lors du montage
du distributeur monotubulaire 3que l’embout retour 4 est bien monté dans le retour
et l’embout départ 5 dans le départ.
1. PRZED MONTAŻEM VSV NALEŻY ZWRÓCIĆ UWAGĘ NA:
• Zawór 2 ustawiony jest fabrycznie na najwyższą wartość kv.
• Podłączenia grzejnika VSV znajdują sie standardowo po prawej stronie. Punktem
odniesienia jest strona czołowa VSV, na której znajduje się instrukcja montażu.
• Usunąć opakowanie wokół przyłącza grzejnika.
• Usunąć zaślepki ochronne z tworzywa sztucznego z przyłączy GZ 3/4".
2. EKSPLOATACJA W INSTALACJI DWURUROWEJ - NASTAWY WSTĘPNE:
• Zdjąć osłonę zaworu 1.
• Szczegół 1: Obrócić pierścień nastawy 2 w kierunku przeciwnym do ruchu
wskazówek zegara. Ustawić żądaną wartość (1,2,...7,N) naprzeciw znacznika.
Ustawienia wartości kv dla instalacji dwururowej z zakresem
proporcjonalności 2K:
nastawa wstępna 1 dla VSV do ok. 500 Wat
nastawa wstępna 2 dla VSV do ok. 800 Wat
nastawa wstępna 3 dla VSV do ok. 1000 Wat
nastawa wstępna 4 dla VSV do ok. 1200 Wat
nastawa wstępna 5 dla VSV do ok. 1600 Wat
nastawa wstępna 6 dla VSV do ok. 2000 Wat
nastawa wstępna 7 dla VSV do ok. 2400 Wat
nastawa wstępna N dla VSV od 2400 Wat
3. EKSPLOATACJA W INSTALACJI JEDNORUROWEJ:
• Regulacja nastawy wstępnej nie jest konieczna, ponieważ zawór jest
ustawiony fabrycznie na wartość N = maks. otwarcie.
• UWAGA: Montując rozdzielacz systemu jednorurowego, należy zwrócić uwagę na
właściwe umieszczenie wkładek (wkładka zasilania 5na wejściu i wkładka powrotu 4
na wyjściu z grzejnika).
FPL
Retour
Powrót
Départ
Zasilanie
Bague de réglage
Pierścień nastawy
Index
Znacznik
VOGEL
&
NOOT
Attention: Respecter impérativement le palier de pression admissible
(5,0 ou 8,0 bars) et la température admissible (110 °C).
BL 430 - 862
BH 1600, 1800, 2000
130
107107
BL 430 mm - 862 mm
90
40
358
BH 1600, 1800, 2000
130
90
7171
BL 358 mm
40
286
BH 1600, 1800, 2000
130
7171
BL 286 mm
90
40
90
214
BH 1600, 1800, 2000
130
90
40
90
BL 214 mm
UWAGA: Nie wolno przekraczać dopuszczalnych parametrów pracy grzejników:
ciśnienia roboczego 5 bar lub 8 bar (wersja wysokociśnieniowa) oraz maks.
temperatury (110 °C).
SCHÉMA DE SOUDURE DES PATTES WIDOK MIEJSC PRZYSPAWANIA ZAWIESZEK
•Avant de régler la partie radiateur, enlever le capuchon 6 du distributeur
monotubulaire 3et tourner vers la droite jusqu’à la butée la tige by-pass
située dessous.
Valeurs de réglage pour un écart proportionnel de 2K
(valeurs indicatives pour TD = 70 °C, TR = 55 °C et TA = 20 °C):
Part radiateur 30 % - 3,50 tours
Part radiateur 35 % - 3,00 tours
Part radiateur 40 % - 2,50 tours
Part radiateur 45 % - 2,00 tours
Part radiateur 50 % - 1,75 tours
4.) MONTAGE MURAL ET RACCORDEMENT DU DÉPART ET DU RETOUR:
•Monter le VSV au mur (voir consignes de montage).
•Pour les systèmes monotubulaires, monter le distributeur monotubulaire 3et
raccorder les conduites départ et retour avec les raccords de serrage à vis 7. Pour
les systèmes bitubulaires, monter les raccords d’arrêt à vis 8.
5.) MONTAGE DU BOUTON THERMOSTATIQUE:
Les boutons thermostatiques ”RA 2000” et ”RAW” Ets
Danfoss, ”VK” Ets Heimeier,
”D” Ets Herz, ”thera-DA” Ets MNG
et ”UNI-LD” Ets Oventrop peuvent être montés
directement.
•Démonter le bouchon de protection 1.
•Monter le bouton thermostatique 9.
6.) MODIFICATION DES VALEURS RÉGLÉES EN SERVICE
MONOTUBULAIRE ET BITUBULAIRE:
Si cela est nécessaire, les valeurs réglées concernées peuvent être également
modifiées lorsque l’installation est sous pression.
ATTENTION: Pour une parfaite installation des radiateurs, il est primordial que la fixa-
tion du radiateur soit effectuée de manière appropriée pour l’utilisation prévue ET toute
mauvaise utilisation prévisible. Un certain nombre d’éléments doivent être pris en
considération avant de réaliser l’installation comme le type et la qualité de la fixation
entre le radiateur et le mur, le type et l’état du mur lui-même ainsi que les charges
possibles après le montage.
Nota: Le VSV n’existe qu’avec pattes soudées.
•Pour monter le VSV types, utiliser uniquement la suspensions murale WA 10 et
WA 11.
•Les suspensions murales WA 10 et WA 11 sont utilisable pour tous les VSV types.
•Ouvrir la pellicule rétractable à l’avant des coins de protection.
•Retirer les coins de protection et découper avec précaution au cutter le carton qui se
trouve dessous au niveau des pattes de suspension.
•Fixer la suspension murale WA11 conformément au schéma de soudure des pattes.
•Accrocher le VSV dans la suspension murale et fixer les éléments d’écartement sur
les pattes de suspension inférieures.
•Redresser le VSV horizontalement et verticalement.
• Przed ustawieniem udziału grzejnika należy zdjąć osłonę 6i przekręcić trzpień
w prawo do oporu.
Wartości nastaw na rozdzielaczu przy odchyleniu proporcjonalnym 2K oraz
przy T1= 70°C, T2= 55°C i Ti= 20°C:
udział grzejnika 30% - 3,50 obrotu
udział grzejnika 35% - 3,00 obroty
udział grzejnika 40% - 2,50 obrotu
udział grzejnika 45% - 2,00 obroty
udział grzejnika 50% - 1,75 obrotu
4. INSTALACJA I PODŁĄCZENIA ZASILANIA I POWROTU:
• Należy zamontować grzejnik zgodnie ze wskazówkami montażu .
• Dla instalacji jednorurowej zainstalować właściwy rozdzielacz 3a zasilanie i powrot
podłączyć przy użyciu złączek zaciskowych 7.
• Dla instalacji dwururowej należy zastosować właściwe zawory odcinające 8.
5. MONTAŻ GŁOWICY TERMOSTATYCZNEJ:
Bezpośrednio na zawór można zamontować następujące głowice termostatyczne:
CosmoHEAD, Danfoss (RAW 2994, RAW 5115, RAX), Heimeier VK,
Herz D, Honeywell thera-DA, Oventrop Uni XD.
• Zdjąć osłonę zaworu 1.
• Zamontować bezpośrednio na zawór głowicę termostatyczną 9.
6. KOREKTY NASTAW ZAWORU:
Korekty nastaw zaworu można wprowadzać także w trakcie pracy instalacji jedno-
i dwururowej.
UWAGA: W celu zapewnienia prawidłowej instalacji grzejników ważne jest
wykonanie mocowania grzejnika w sposób, który jest zgodny z przeznaczeniem
grzejnika i w sposób zapobiegający jego nieprawidłowemu użytkowaniu. Przed
końcową instalacją należy wziąć pod uwagę między innymi metodę mocowania
grzejnika do ściany, rodzaj i stan ściany do której będzie mocowany grzejnik oraz
wszystkie potencjalne siły i obciążenia.
Wskazówka: VSV dostępne są jedynie w wersji z przyspawanymi zawieszkami.
Do montażu typów VSV używane mogą być w zależności od szerokości grzejnika
zawieszki ścienne WA10 lub WA11.
• Naciąć folię na powierzchni czołowej narożników ochronnych.
• Usunąć narożniki i nożem tapicerskim naciąć poniżej znajdujący się karton
w obrębie zawieszek.
• Montaż zawieszki ściennej na ścianie; WA10 przy szerokości 214 mm a WA11 przy
szerokości 286-862 mm według rozmieszczenia zawieszek przyspawanych do grzejnika.
• Powiesić VSV na zawieszce ściennej WA10 lub WA11 i zamocować element dystansujący
na dolnych zawieszkach.
• Wyrównać w poziomie i pionie grzejnik.
SUSPENSIONS À UTILISER FGRZEJNIKI Z PRZYSPAWANYMI Z TYŁU ZAWIESZKAMI PL
CONSIGNES DE MONTAGE POUR VSV FWSKAZÓWKI MONTAŻOWE DLA VSV PL

Other VOGEL&NOOT Heater manuals

VOGEL&NOOT VELINO User instructions

VOGEL&NOOT

VOGEL&NOOT VELINO User instructions

VOGEL&NOOT BAWA-VM User instructions

VOGEL&NOOT

VOGEL&NOOT BAWA-VM User instructions

VOGEL&NOOT LOWA-VM User instructions

VOGEL&NOOT

VOGEL&NOOT LOWA-VM User instructions

VOGEL&NOOT BAWA User instructions

VOGEL&NOOT

VOGEL&NOOT BAWA User instructions

VOGEL&NOOT CAVALLY User instructions

VOGEL&NOOT

VOGEL&NOOT CAVALLY User instructions

VOGEL&NOOT PARIS-V User instructions

VOGEL&NOOT

VOGEL&NOOT PARIS-V User instructions

VOGEL&NOOT CAVALLY GRAZ User instructions

VOGEL&NOOT

VOGEL&NOOT CAVALLY GRAZ User instructions

VOGEL&NOOT PISA User instructions

VOGEL&NOOT

VOGEL&NOOT PISA User instructions

VOGEL&NOOT DELLA WAVE User manual

VOGEL&NOOT

VOGEL&NOOT DELLA WAVE User manual

VOGEL&NOOT KONTEC KS User manual

VOGEL&NOOT

VOGEL&NOOT KONTEC KS User manual

VOGEL&NOOT WIEN-LEFT User instructions

VOGEL&NOOT

VOGEL&NOOT WIEN-LEFT User instructions

VOGEL&NOOT FULDA-VM User instructions

VOGEL&NOOT

VOGEL&NOOT FULDA-VM User instructions

VOGEL&NOOT DFLMZMAP0B User instructions

VOGEL&NOOT

VOGEL&NOOT DFLMZMAP0B User instructions

VOGEL&NOOT DELLA ELEKTRO Series User manual

VOGEL&NOOT

VOGEL&NOOT DELLA ELEKTRO Series User manual

VOGEL&NOOT KASAI User instructions

VOGEL&NOOT

VOGEL&NOOT KASAI User instructions

VOGEL&NOOT DELLA WAVE User instructions

VOGEL&NOOT

VOGEL&NOOT DELLA WAVE User instructions

VOGEL&NOOT Cosmo STANDARD User manual

VOGEL&NOOT

VOGEL&NOOT Cosmo STANDARD User manual

VOGEL&NOOT VONARIS VHV User manual

VOGEL&NOOT

VOGEL&NOOT VONARIS VHV User manual

VOGEL&NOOT LEVO E User manual

VOGEL&NOOT

VOGEL&NOOT LEVO E User manual

VOGEL&NOOT FULDA-VM User instructions

VOGEL&NOOT

VOGEL&NOOT FULDA-VM User instructions

VOGEL&NOOT FATALA User instructions

VOGEL&NOOT

VOGEL&NOOT FATALA User instructions

VOGEL&NOOT FULDA User instructions

VOGEL&NOOT

VOGEL&NOOT FULDA User instructions

VOGEL&NOOT FATALA-LEFT User instructions

VOGEL&NOOT

VOGEL&NOOT FATALA-LEFT User instructions

VOGEL&NOOT DION-VM User manual

VOGEL&NOOT

VOGEL&NOOT DION-VM User manual

Popular Heater manuals by other brands

MESTIC MKK-300 User instructions

MESTIC

MESTIC MKK-300 User instructions

Drayton Wiser user guide

Drayton

Drayton Wiser user guide

Sawo PNX3-45Ni2 manual

Sawo

Sawo PNX3-45Ni2 manual

Russell Hobbs RH11C Instructions and warranty

Russell Hobbs

Russell Hobbs RH11C Instructions and warranty

Blumfeldt Cosmic Beam manual

Blumfeldt

Blumfeldt Cosmic Beam manual

COLORATO CLHR-150A instruction manual

COLORATO

COLORATO CLHR-150A instruction manual

Futura FCV1000 user manual

Futura

Futura FCV1000 user manual

Pfannenberg PFH operating instructions

Pfannenberg

Pfannenberg PFH operating instructions

EUROM 363883 instruction manual

EUROM

EUROM 363883 instruction manual

EINHELL GCH 2000 Original operating instructions
EINHELL

EINHELL GCH 2000 Original operating instructions

Protemp PT-45-KF User's manual & operating instructions

Protemp

Protemp PT-45-KF User's manual & operating instructions

Siku Infraplate pro Classic instruction manual

Siku

Siku Infraplate pro Classic instruction manual

Alpina LQ801 instruction manual

Alpina

Alpina LQ801 instruction manual

Solaira Alpha H2SALPHAH2-20240 Reference manual

Solaira

Solaira Alpha H2SALPHAH2-20240 Reference manual

Somogyi Elektronic HOME FK 52 instruction manual

Somogyi Elektronic

Somogyi Elektronic HOME FK 52 instruction manual

Arlec Osville CEH553 user manual

Arlec

Arlec Osville CEH553 user manual

Stadler Form Max operating instructions

Stadler Form

Stadler Form Max operating instructions

cecotec Ready Warm 1800 Thermal instruction manual

cecotec

cecotec Ready Warm 1800 Thermal instruction manual

manuals.online logo
manuals.online logoBrands
  • About & Mission
  • Contact us
  • Privacy Policy
  • Terms and Conditions

Copyright 2025 Manuals.Online. All Rights Reserved.