Topdon ITC629 User manual
EN
3
EN
PS
E
Infrared Thermographic Camera
USER MANUAL
ITC629

EN
4 5
Content
Welcome
About
Package List
Features
Operation Introduction
Menu Introduction
Lens Cleaning
Specifi cations
Troubleshooting
Warranty
Warnings
Cautions
FAQ
Español
Deutsch
日本語
Français
Português
한국어
3
3
3
4
9
11
22
23
25
26
27
28
29
31
59
89
117
148
178

EN
6 3
Package List
1.TOPDON ITC629 Infrared Thermographic Camera
2.5V/2A USB Charger Adapter
3.USB to Micro USB Cable
4.User Manual 5.Carry Case
Welcome
Thank you for purchasing TOPDON ITC629 Infrared
Thermographic Camera. Please take time to read and
understand this User Manual before operating this product.
About
With latest integrated circuit packaging technology
and professional infrared sensor and advanced image
algorithms, TOPDON ITC629 Infrared Thermographic
Camera delivers better performance than most of the high-
end thermal imager and provide more convenience for
households and commercial user.
English

EN
4 5
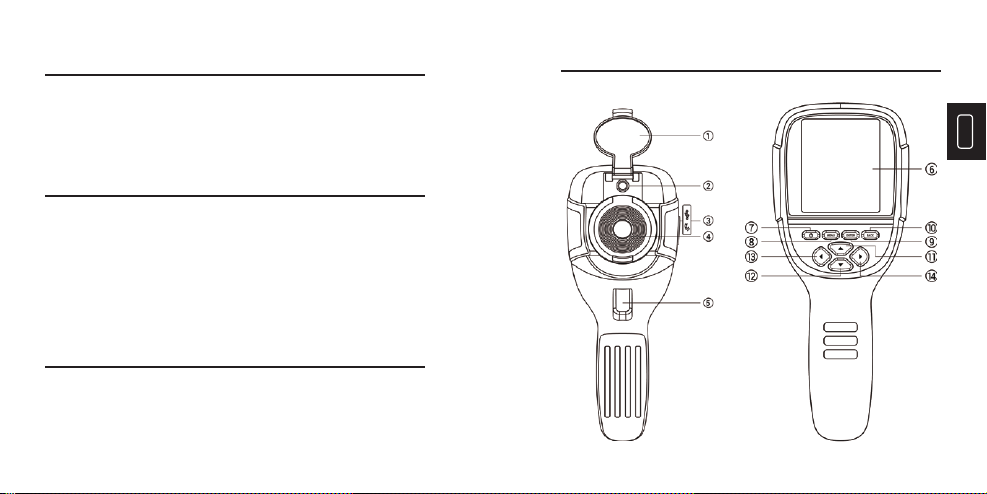
Features NO. Function Operation
2
3
4
5
6
7
Visible Light Camera Capture visible light images
Charge the device or upload
images via USB cable
Capture infrared thermal
images
Press to capture an image
Displays image and results
Press and hold to turn
on/off the camera
Press to select “Functions”
Confi rm; Enter and proceed
Micro USB
Infrared Imaging Sensor
Image Capture Key
LCD Display
On/Off Key
MENU
ENTER
1Protect the lensCap
8
9
10 Cancel; Return to the
previous page
BACK

EN
6 7
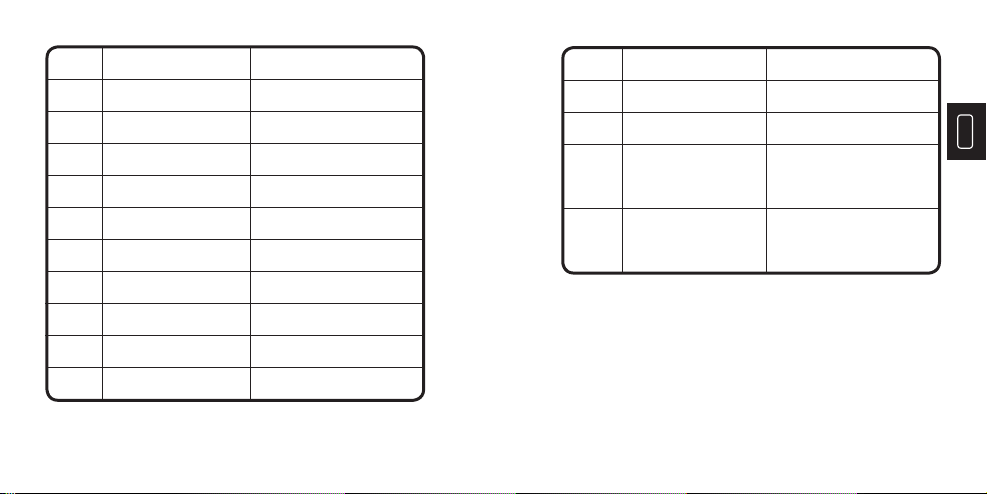
NO. Function Operation
12
13
14
▼Page down, or decrease the
testing values
Switch the degree of fusion
between infrared thermal
images and visible images
Switch the degree of fusion
between inferred thermal
images and visible images
▼
▼
11 Page up, or increase the
testing values
▲

EN
8 9
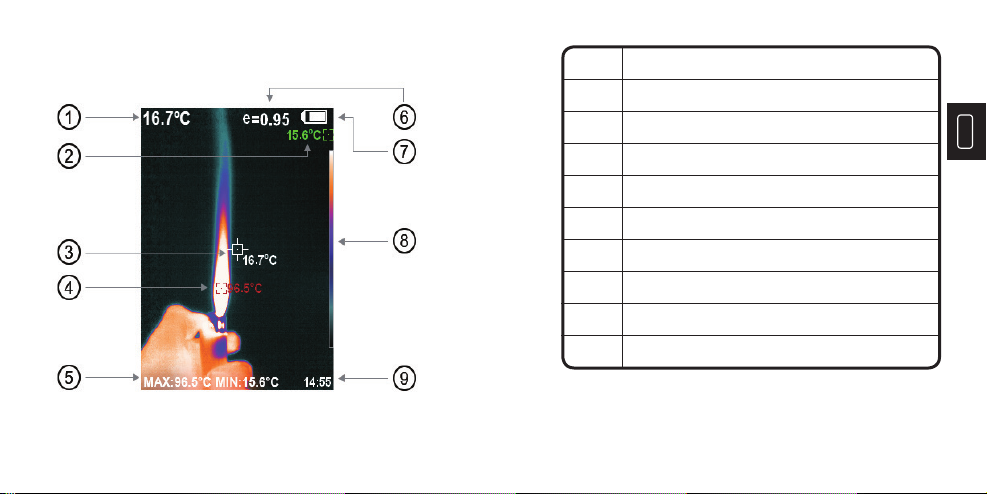
NO. Display
2
3
4
5
6
7
The Lowest Temperature
Central Point Temperature Cursor
The Highest Temperature
Max & Min Temperature Value
Current Emissivity
Remaining Battery
Color Code
Time
1 Central Point Temperature
8
9
Note: Color Code: to mark the color corresponding to the
relative temperature from low to high.
Operation Introduction
Image Operation:

EN
10 11
Image capture
Press the image capture key and the screen will display
“store photo?” Press “ENTER” to save the image and
press “BACK” to cancel the image.
View image
Press the “MENU” to enter the main menu, and select
“Image”. Press “
▼
” to view and press “▲” or “▼” to
select images. Press “ENTER” to view image. Press
“BACK” to return.
Image output
The saved images can be sent to a computer via Micro
USB. Use USB cable to connect with computer to read
the images or save it into computers.
Supported PC systems: WINXP, WIN7, WIN 8, WIN 10,
and IOS.
Better to use the attached USB cable or USB cable with
higher quality.
Delete images
Note:When connecting with a computer, pull off the USB
cable after selecting “pop out device safely” to avoid causing
fi le system damage and other problems. If “unable to save”
and other problems occur, you may fi nd the hard disc in the
computer and fi x it.
Menu Introduction
1. “Image Overlapping” Submenu
1.1 Description of Image Overlapping
Image overlapping makes it easier for users to
understand the infrared images by using aligned
visible-light images and infrared images. Image
overlapping technology can capture the visible-light
image of every infrared image so as to display the
distribution in the target region correctly and share
with other people effectively.
When viewing the images, press “▲” and it will display “Delete photo?”.
Press “ENTER” to delete the image and press “BACK ”to cancel delete.
1.2 Calibration of Image Overlapping
EN
12 13
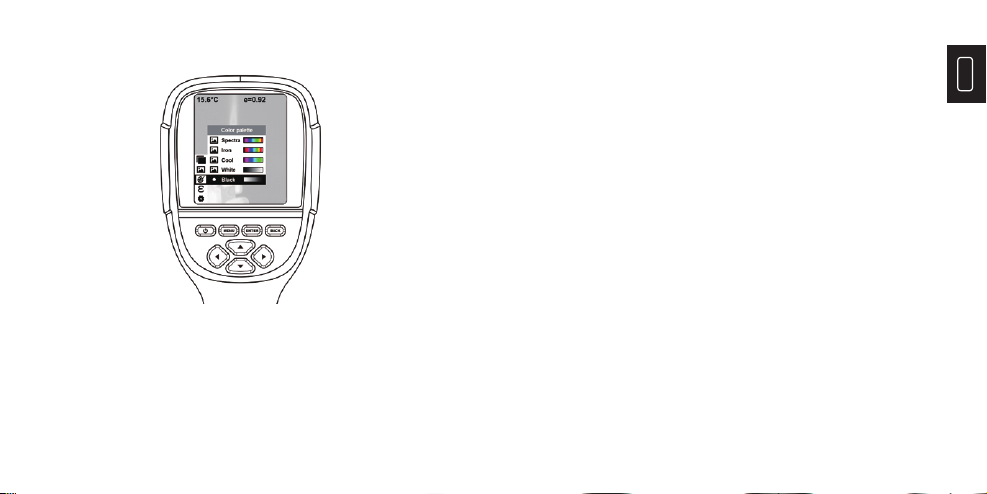
2. “Color Palette” Sub-menu
2.1 Color Palette Description
The palette can be used to change the pseudo-color
display of the infrared image on the display. The
palette is divided into: rainbow, iron red, cool, white
hot, black hot. These palettes work best with high
thermal contrast and provide additional color contrast
between high and low temperatures.
Suitable selection of color palette displays the details
of the target objective better. Rainbow, iron oxide
red and cold color palettes focus on display of color,
1) Press the “MENU” and select “Image Calibration”.
2) Press the “ENTER” to enter the image overlap
adjustment mode.
3) Press the navigation keys (up, down, left and right
buttons) to perform the visible image shift operation.
4) Press the “BACK” to exit the image blending mode
(If there is no operation for more than 6 seconds, it will
automatically exit the image blending mode).
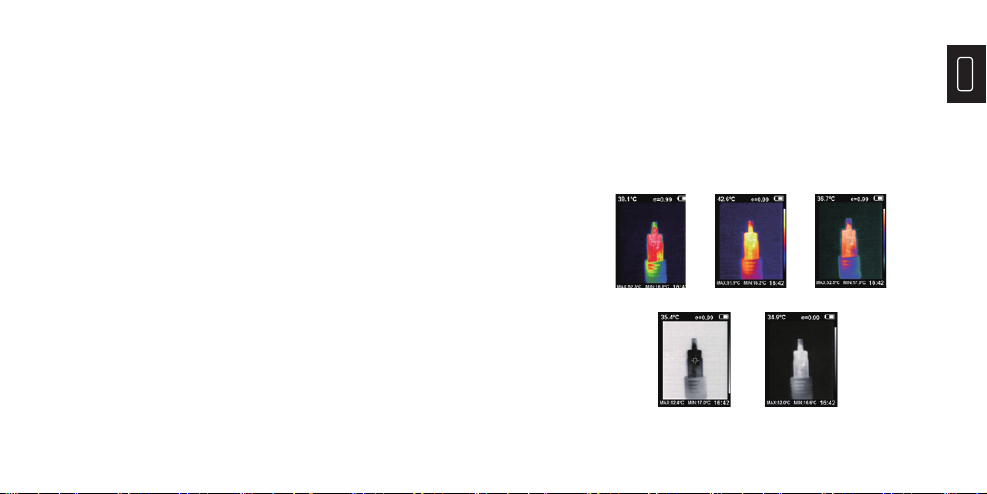
Rainbow Iron oxide red Cold color
White heatBlack heat
which are very suitable for high heat contrast and
are used to improve the color contrast between high
temperature and low temperature. But the black &
white and white & black color palettes display even
linear color.
The following is the image of the same object with
different color palettes.
EN
14 15
2.2 Application of Color Palette
1) Press “MENU” and select “Color palette” options and
press “
▼
” to enter the color palette list.
2) Press “▲” and “▼” to select the color palette.
3) Press “ENTER” to select the color palette.
4) Press “
▼
” or ”BACK”to return.
5) Press “MENU” to exit from the menu.
3. “Emissivity” Sub-menu
3.1 Emissivity Description
The emissivity of the product can be adjusted from
0.01 to 1.00 with the default value of 0.95. Many
common objects and materials (such as timber,
water, skin and textile fabric) can reflect the heat
energy effectively. So it is easy to obtain relatively
correct measurement value. The emissivity is usually
set as 0.95 when the coarse objects that are easy
to give out energy. For semi-matte objects that give
out less energy, the emissivity is usually about 0.85
and the emissivity of semi-gloss objects is 0.6. The
shiny objects are divided into materials with low
radiation coeffi cient. The emissivity is usually set as
0.3. Correct setting of the value of emissivity is very
important to carry out the most correct temperature
measurement. The surface emissivity will produce
giant impact on surface temperature measured by the
product. Good knowledge of the surface emissivity
helps obtain correct temperature measurement result.

EN
16 17
The product is provided with 4 types of object
measurement modes:
Coarse object (0.95) Semi-matte object (0.85)
Semi-shiny object (0.60) Shiny object (0.30)
3.2 Emissivity Setting
According to the characteristics of the measured
objects, users may set the emissivity value through
the “self-defi ne” option (please refer to the table of
“emissivity of common materials”).
The operating step is as the following:
The operating step is as the following:
1) Press “MENU” and select “emissivity” option and press
“
▼
“to enter.
2) Press “▲” and “▼”to select the emissivity. Then press
“ENTER” key to determine selection of the emissivity.
3) Press “
▼
” or ”BACK” to return.
Note: If you select “self-defi ned” emissivity, press the
“ENTER” to enter the editing state. Press “
▼
” / “
▼
” to select
the number to be changed, press “▲” “▼”to change the
value. After the modifi cation is completed, press “ENTER”
to confi rm.
EN
18 19
3.3 The Emissivity Value of Common Materials
Substance Substance
Thermal
radiation
Thermal
radiation
Concrete
Cement
Sand
Earth
Water
Ice
0.94 Human skin 0.98
Foam 0.75-0.80
Charcoal dust 0.96
Paint 0.80-0.95
Matte paint 0.97
Black rubber 0.94
Plastic 0.85-0.95
Timber 0.90
0.96
0.90
0.92-0.96
0.92-0.96
0.96-0.98
0.83
0.90-0.95
Bitumen Black cloth 0.980.90-0.98
Snow
Glass
Ceramics Paper 0.70-0.940.90-0.94
Substance Substance
Thermal
radiation
Thermal
radiation
Mortar
Brick
0.89-0.91 Ferric oxide 0.78-0.82
Textile 0.900.93-0.96
Gypsum Copper oxide 0.780.80-0.90
Marble Chromium
hemitrioxide 0.810.94
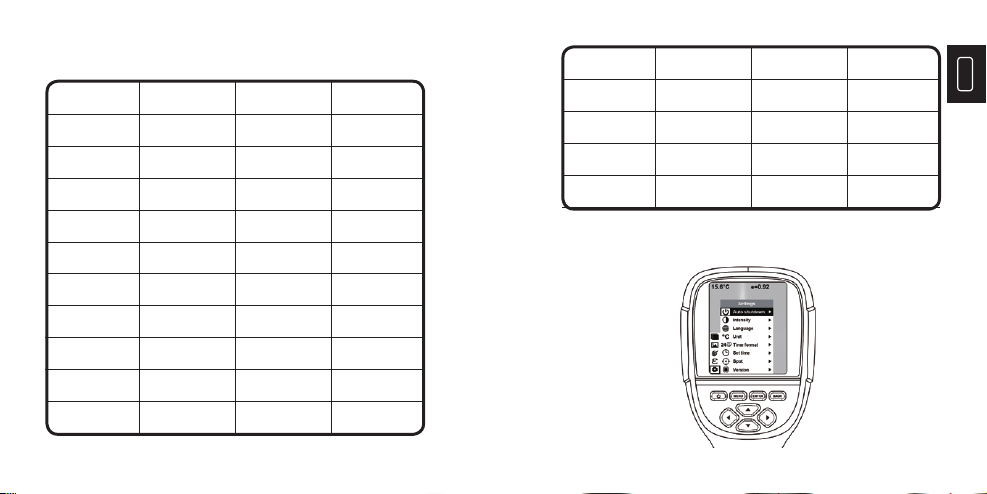
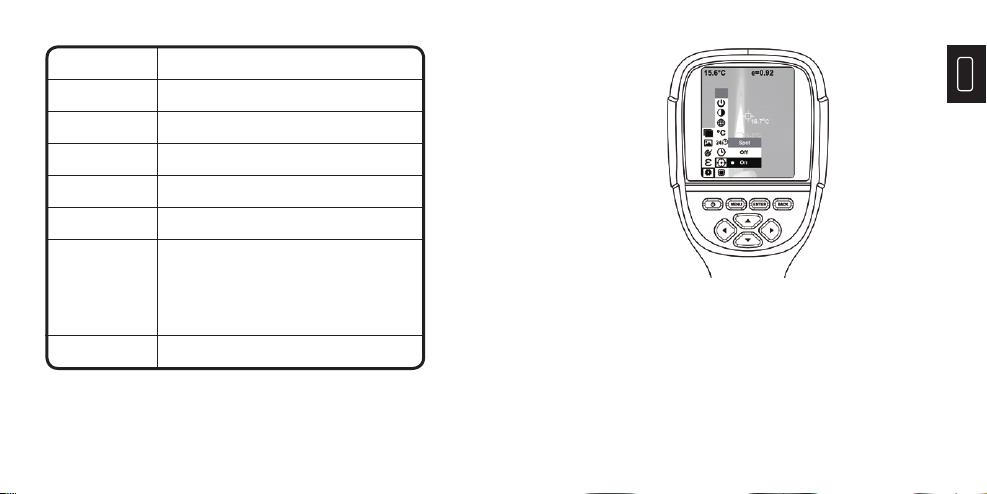
4. “Setting” Sub-menu
Press “MENU” and select “Setting”. Press “
▼
” to enter.
EN
20 21
Settings
Intensity
Language
Unit
Time Format
Set Time
Spot
Low,Medium,High
English,Chinese,Italian,German
Celsius,Fahrenheit
24 hour,AM/PM
Year 2019
Month 10
Day Hour 25
Day Hour 15
Second 15
Off,On
Auto Shutdown No,5min,20min
Enable/disable of the highest and lowest
Temperature cursor
1) Press the “
▼
” to enter the cold hotspot setting.
2) Press “▲” / “▼”to select “enable” or “disable” the option.
3) Then press “ENTER” to select.
4) After the setting is completed, press “
▼
” or ”BACK” to
return.Press “MENU” to exit to from the menu.

EN
22 23
Lens Cleaning
Clean the infrared lens carefully. The lens is designed
with refi ned anti-reflection coating.
Don’t clean with force to prevent damage of the anti-
reflection coating.
Please use cleaning solution for lens maintenance
such as alcohol-containing commercial lens cleaning
solution, alcohol or isopropanol as well as a piece of
lint free cloth or paper tissue.
The compressed air tank or dry nitrogen ion gun
(if apply USB cable) may be used to blow the loose
particles on the lens surface.
Dip the lint free cloth in alcohol.
Squeeze the excessive alcohol in the cloth or apply the
lint free cloth on dry cloth lightly.
Wipe the lens surface by making circular motion. Then
discard the cloth.
Specifi cations
Model ITC629
Display Screen 3.2 ″ full angle TFT display screen
320 ×240
300,000 pixel
35°×26°
0.15M
0.07℃
-20℃to 450℃(-4°F to 842°F)
±2%
LCD Resolution
Visible Image Solution
Field Angle
Shortest Focus Length
Thermal Sensitivity
Temperature
Measurement Range
Measurement Accuracy
220x160
Infrared Image
Resolution
Adjustable from 0.01 to 1.00Emissivity

EN
24 25
Model ITC629
Focus Mode Fixed
Rainbow, iron oxide red, cold color, black
& white, white & black
Built-in 3G (above 20 thousand
image stored)
Built-in Lithium Battery
3hours
Selectable:5 minutes/20 minutes/ not
power off automatically
English,Chinese,Italian,German
90mm×105mm×223mm
Color Palette
Storage Capacity
Power Supply
Continuous Work Time
Automatic Power-
off Time
Language
Head Unit Size
8-14umWavelength Coverage
389g
0℃to 45℃
9Hz
Head Unit Weight
Work Temperature
Frame Rate of Thermal
Images
Troubleshooting
If you meet any problem when using, please use the
following table for reference.
Indication SolutionFailure Reason
ITC629 cannot start
The battery is not
installed Install the battery
Replace with new
battery or charge it
Replace with new
battery or charge it
Restart or change the
time for automatic
power off after
restarting (refer to 5.1)
The power of the
battery is used up
The power of the
battery is used up
The time set for
automatic power off is
due
The lens cover is
unopened Open the lens cover
ITC629 powers off
automatically
No thermal images

EN
26 27
the enclosure of the device.
DO NOT remodel the adapter and the USB cable.
DO NOT weld the battery without permission.
DO NOT touch the electric wire with wet hands.
DO NOT use it if the charger adapter is damaged.
DO NOT disassemble the tester.
DO NOT bring the instrument into low temperature
environment from high temperature environment in a
short time.
DO NOT put the product close to strong heat
source directly.
Misused, disassembled, altered or repaired by a non-TOPDON
technical repair specialist.
Careless handling and violation of operation.
Warranty
TOPDON One Year Limited Warranty
This limited warranty is void under the following conditions:
The TOPDON Company warrants to its original purchaser
that TOPDON products will be free from defects in material
and workmanship for 12 months from the date of purchase
(Warranty Period). For the defects reported during the
Warranty Period, TOPDON will, according to the technical
support analysis and confi rmation, either repair or replace
the defective part or product.
Warnings
DO NOT use it continuously if the product case is damaged.
DO NOT use it if the product is found with smoke, spark
and the burnt smell during using.
DO NOT use abradant, isopropanol or solvent to clean
Cautions
Please use the original adapter of the company to charge
the product.
If the product has water condensation inside, please

EN
28 29
power it off immediately.
Pull off the adapter on the power socket when charging is
fi nished.
If the product has water condensation inside, please
power it off immediately.
Q: How long it takes to charge?
A: ITC629 should be charged for two hours at least every
three months for longer battery lifespan.
Q: Can this camera work in a total darkness?Will its
performance be affected by environment light?
A: Infrared Thermographic Camera is used for detecting
infrared radiation from object which won't be affected by
the strength of any visible light. It performs in darkness
as well as under sunshine.
Q: Why the temperature I get from the camera is far below the
real data it should be?
FAQ
A: Different material and same material with different
surface may be different in IR emissivity. To adjust the IR
emissivity according to the table in our manual is
important so that you would be able to get the most accurate
temperature results.
Q: Why I can see 2 images not align with each other?
A: When you are in IR-VL mode, the visible light image and
infrared rays image are all on the monitor. You may need to
calibrate the image while the detecting distance is changed.
Please refer to the Image calibration instruction in the manual.
Q: Can this detect electrical power lines or hot water pipe
behind the walls?
A: That's really depends on the scenario. Generally, you can't
detect the object behind a barrel such as a wall that
does not allow infrared rays going through. But in most
of scenario we can indirectly ‘see’ the hot water pipe
behind a wall as it heats up the wall and generate typical
thermal distribution on the surface of a wall.
Q: What is the farthest distance it can detect?
A: The best test distance is 5cm-1000cm which covers most

30
Español
of professional test scenario. But it doesn't mean you
can't detect object 100m or 1km away, the farthest object
we have tested is the sun.
ES
32 33
Lista del Embalaje
1. Cámara Infrarroja TOPDON ITC629
2. Adaptador de Cargador USB de 5V / 2A
3. Cable USB a Micro USB
4. Manual del Usuario 5. Estuche de Transporte
Bienvenido
Gracias por comprar la Cámara Infrarroja TOPDON ITC629.
Por favor lea y entienda este Manual del Usuario antes de
operarlo.
Sobre
Basando en la última tecnología de embalaje de circuito
integrado y el profesional sensor infrarrojo y los avanzados
algoritmos de imagen, la Cámara Infrarroja TOPDON ITC629
entrega mejor rendimiento que la mayoría de las cámaras
infrarrojas de gama alta y proporciona más conveniencia
para los usuarios domésticos y comerciales.
Características
ES
34 35
NO. Función Operación
2
3
4
5
6
7
Cámara de Luz Visible Capturar las imágenes
de luz visible
Cargar el dispositivo o subir
imágenes a través del cable USB
Capturar imágenes infrarrojas
Pulsar para capturar
una imagen
Mostrar imagen y resultados
Mantener pulsado para
encender / apagar la cámara
Pulsar para seleccionar
“Funciones”
Confi rmar; Entrar y proceder
Micro USB
Sensor Infrarrojo
de Imagen
Tecla de Captura
de Imagen
Pantalla LCD
Tecla Encendido /
Apagado
MENÚ
ENTER
1Proteger la lenteTapa
8
9
10 Cancelar; Regresar a la
página anterior
RETROCEDER
NO. Función Operación
12
13
14
▼Mover hacia abajo por páginas,
o disminuir los valores de prueba
Conmutar el grado de
fusión entre las imágenes
infrarrojas y las imágenes
visibles
Conmutar el grado de
fusión entre las imágenes
infrarrojas y las imágenes
visibles
▼
▼
11 Mover hacia arriba por páginas, o
aumentar los valores de prueba
▲
ES
36 37
NO. Pantalla
2
3
4
5
6
7
La Temperatura Mínima
Cursor de Temperatura de Punto Central
La Temperatura Máxima
Valor de Temperatura Máximo y Mínimo
Emisividad de Corriente
Batería Restante
Código de Color
Tiempo
1 Temperatura de Punto Central
8
9
Nota: Código de Color: para marcar el color correspondiente a la
temperatura relativa de bajo a alto.
Table of contents
Languages:


