TOPPIN Comfy Air TPHM002 User manual
©Libro Corp. All Rights Reserved.
Manufacturer: Shenzhen Libro Technology Co., Ltd.
Address: Building 3, Cloud Park, Shenzhen, China, 518129
Phone: 0086-0755-28268050
JP Importer:SUNSEA商事株式会社
Made in China
FOR HOUSEHOLD USE ONLY.
READ AND SAVE THESE INSTRUCTIONS.
この度はTOPPIN本製品をお買い上げいただき、誠にありがとうございます。
・この取扱説明書をよくお読みになり、正しくお使いください。
・この取扱説明書はいつでも見ることができるよう大切に保管してください。
Comfy Air Ultrasonic Cool Mist Humidifier
ComfyAir超音波式クールミスト加湿器
取扱説明書
User Guide
Model: TPHM002
TPHM002_V1.1
Model: TPHM002
AC Adaptor Input: AC110V , 60Hz , 25W
This device complies with Part 18 of the FCC Rules.
This equipment has been tested and found to comply with the limits for a Consumer ISM
equipment, pursuant to Part 18 of the FCC Rules. These limits are designed to provide reasonable
protection against harmful interference in a residential installation. This equipment generates,
uses and can radiate radio frequency energy and, if not installed and used in accordance with
the instructions, may cause harmful interference to radio communications. However, there is no
guarantee that interference will not occur in a particular installation.
Please note changes or modifications of this product is not expressly approved by the party
responsible for compliance could void the user’s authority to operate the equipment.
If this equipment does cause harmful interference to radio or television reception, which can be
determined by turning the equipment off and on, the user is encouraged to try to correct the
interference by one or more of the following measures:
- Reorient or relocate the receiving antenna.
- Increase the separation between the equipment and receiver.
- Connect the equipment into an outlet on a circuit different from that to which the receiver is
connected.
- Consult the dealer or an experienced radio/TV technician for help.

BEFORE EACH USE - 1
SAFETY PRECAUTIONS - 2
HOW IT WORKS - 4
PRODUCT DIAGRAM - 4
OPERATIONS AND FUNCTION - 5
CLEANING AND MAINTENANCE - 7
SPECIFICATIONS - 9
WHAT’S IN THE BOX - 10
TROUBLESHOOTING - 10
WARRANTY - 11
Contents
THANK YOU
FOR CHOOSING TOPPIN
Page 1 Page 2
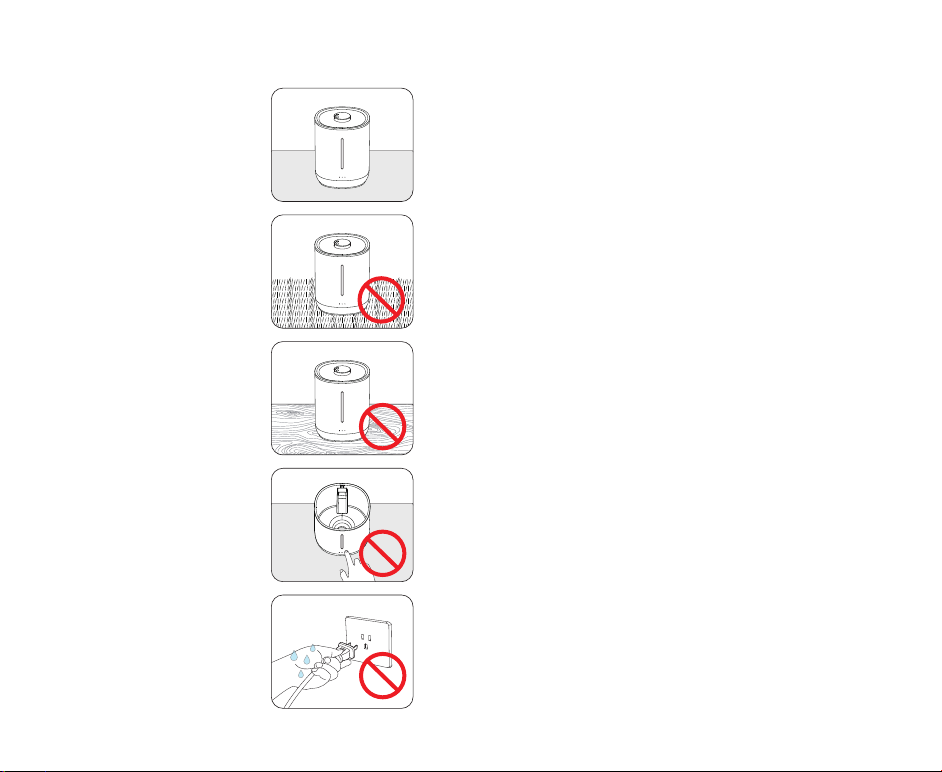
Place the humidifier on a clean, solid,
waterproof, non-metallic, and level
surface at least 5 inches away from
walls and heat sources.
When using electrical appliances, basic precautions should always
be followed to reduce the risk of fire, electric shock, and injury to
persons, including the following
Fully unwind the power cord before use.
Connect only to a 110V power outlet.
DO NOT let the power cord hang over the edge of a bench or table,
touch hot surfaces or become knotted.
To protect against electric shock, DO NOT immerse the power cord,
power plug or appliance in water or any other liquid or allow moisture
to come in contact with the part, unless it is recommended in the
cleaning instructions.
This appliance can be used by children aged from 8 years and above
and persons with reduced physical, sensory or mental capabilities or
lack of experience and knowledge if they have been given supervision
or instruction concerning use of the appliance in a safe way and
understand the hazards involved children shall not play with the
appliance.
Cleaning and user maintenance shall not be made by children without
supervision.
If the supply cord is damaged, it must be replaced by the
manufacturer, its service agent or similarly qualified persons in order
to avoid a hazard.
When the appliance is not in use and before cleaning, unplug the
appliance from the outlet firstly.
Care should be taken when using the appliance due to the emission of
hot water vapour.
Unplug the appliance during filling and cleaning.
Always place this humidifier on a firm, flat and level surface. This
humidifier may not work properly on an uneven surface.
Place this humidifier in an area where it is not accessible to children.
DO NOT place the humidifier near any heat sources such as stoves,
radiators, and heaters.
DO NOT use the humidifier outdoors.
DO NOT submerge the unit in water to avoid risk of electric shock.
DO NOT put fingers, hands, or any object into the unit while operating.
DO NOT touch the water while unit is operating.
DO NOT fill water through the nozzle.
Before using the humidifier, check the power cord for any signs of
damage. If the cord is found to be damaged, DO NOT USE and return
the humidifier to the manufacturer under the warranty agreement for
repair.
•
•
•
•
•
•
•
•
•
•
•
•
•
•
•
•
•
•
READ AND SAVE THESE SAFTY INSTRUCTIONS BEFORE USING THIS HUMIDIFIER
DO NOT place it on top of a towel or a
carpeted surface. The air inlet may
be blocked and the device gets
overheated.
DO NOT place the humidifier on a
wood surface or near the furniture
that can be damaged by too much
moisture.
DO NOT operate without water in the
water tank. The humidifier will not
mist at low water level.
DO NOT plug in the cord with wet
hands, or an electric shock could
occur.
BEFORE EACH USE - CHECK HUMIDIFIER PLACEMENT SAFETY PRECAUTION

Page 3 Page 4
This top-fill cool mist humidifier works based on an ultrasonic
technology with touch button control. Featuring 3 mist levels, 3
timer settings, sleep mode, and lower water protection, it’s quite
convenient and safe to use and keep a comfortable humidity in
your house or office.
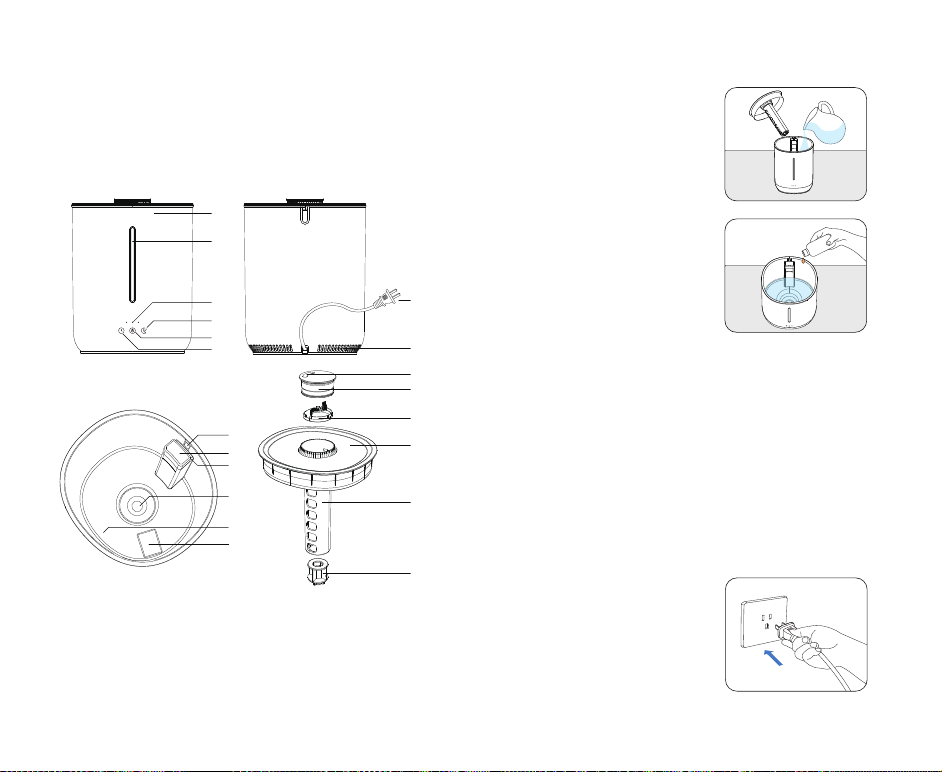
1 - Water Tank
2 - Water Window
3 - LED Indicators
4 - Light/Sleep Mode Button
5 - Power/Mist Button
6 - Timer Button
7 - Power Cord
1
2
3
7
8
15
16
17
18
19
20
4
5
6
9
10
11
12
13
14
8 - Air Inlet
9 - Overflow Hole
10 - Air Outlet
11 - Max Water Level Line
12 - Nebulizer (equipped
with Ceramic Disc)
13 - Tank Light
14 - Low Water Sensor
15 - Nozzle
16 - Top Cap
17 - Mist Shaping Ring
18 - Tank Cover
19 - Mist Tube
20 - Float
This appliance has a polarized plug (one blade is wider than the other).
To reduce the risk of shock, this plug is intended to fit only one way in a
polarized outlet. If the plug does not fit securely in the outlet, reverse
the plug. If it still does not fit, contact a qualified electrician. DO NOT
attempt to defeat this safety feature.
To disconnect the humidifier, first touch the Power button to turn it off, then
grip the plug and pull it from the wall outlet. Never pull by the cord.
A loose fit between the AC outlet (receptacle) and plug may cause
overheating and a distortion of the plug. Contact a qualified electrician
to replace loose or worn outlet.
The humidifier should always be unplugged and emptied when not in
operation or while being cleaned.
Never tilt or attempt to move the humidifier while it is operating or filled with
water. UNPLUG the humidifier from the outlet before moving.
This humidifier requires regular cleaning. Follow the CLEANING
instructions provided in this guide. DO NOT clean in other manner
unless instructed.
DO NOT direct moisture flow directly at individuals, walls or furniture.
When a humidifier is used in a closed room or small rooms, check
periodically for proper ventilation, as excessive humidity can cause
condensation stains on walls.
Turn the humidifier OFF if you notice moisture on the inside of your
windows. For proper humidity reading use a hygrometer, which is
available in many hardware and department stores.
Any maintenance other than cleaning should be performed by
professionals only.
DO NOT use this appliance for anything other than its intended use.
DO NOT use in moving vehicles or boats.
During electrical storms, the appliance should be disconnected from the
power source at the wall socket to prevent any electrical surges that may
arise during the storm and which may inadvertently cause damage to the
appliance and its electronic componentry.
Before cleaning, always turn the appliance off, unplug from the power
outlet, and allow all parts to cool.
DO NOT place this appliance on or near a heat source, such as hot
plate, oven or heaters.
Position the appliance at a minimum distance of 5inch away from
walls, curtains and other heat or steam sensitive materials and
provide adequate space above and on all sides for air circulation.
•
•
•
•
•
•
•
•
•
•
•
•
•
•
•
•
HOW IT WORKS
PRODUCT DIAGRAM
2H 4H 8H
LM H

Page 5 Page 6
If there is not enough water inside the water tank, the humidifier
will not mist*.
To cancel the timer setting, tap the Timer button to select Timer Off
(all the 3 LEDs will flash on and go out).
*Low Water Auto-Off Protection
When a low water level is detected by Low Water Sensor, the
humidifier will stop misting. 3 beeps will be heard, and tank light will
flash and then go out. It is designed for safety concern to prevent the
humidifier from possibly overheating and damaging the nebulizer.
Remove the tank cover, fill the water
tank with tap water till the Max
Water Level Line. Put the tank cover
back on. Make sure it fits securely
for smooth misting.
Add drops of essential oil directly to
the tank (if needed) when there’s
enough water.
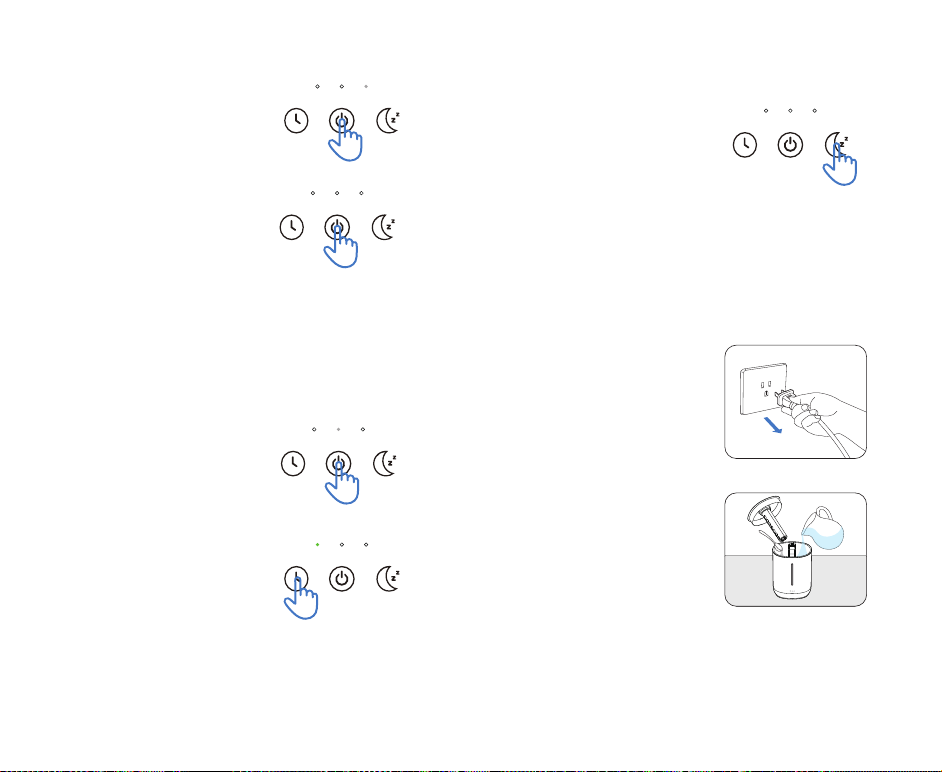
Tap the Power button to power on
the device. The button and mist
indicator will light up white showing
the current level of mist speed (high
by default) with a beep sound.
When the unit is on, tap the Mist
button to cycle through L -> M -> H
mist levels. The corresponding LED
indicator will light up solid white with
a beep sound.
Tap the Timer button to set the timer
as 2H / 4H / 8H / Timer Off. The
corresponding LED indicator will light
up green with a beep sound for each
timer setting and then go out, while
all the 3 LEDs will be on and off when
timer is set off.
Tap and hold the Power button for
about 3s to turn the device off (both
mist and light off). The airflow will
continue for 15s after mist off to
dry the mist tube.
(3 seconds)
Note: Excessive water will flow out from the overflow hole when
you overfill the tank.
Connect the power cord of the
humidifier to a power source, the
unit is in standby mode.
Add Water
Mist Adjustment
Timer Setting
Power On & Off
OPERATIONS AND FUNCTION
2H 4H 8H
LM H
2H 4H 8H
LM H
2H 4H 8H
LM H
2H 4H 8H
LM H

Page 7 Page 8
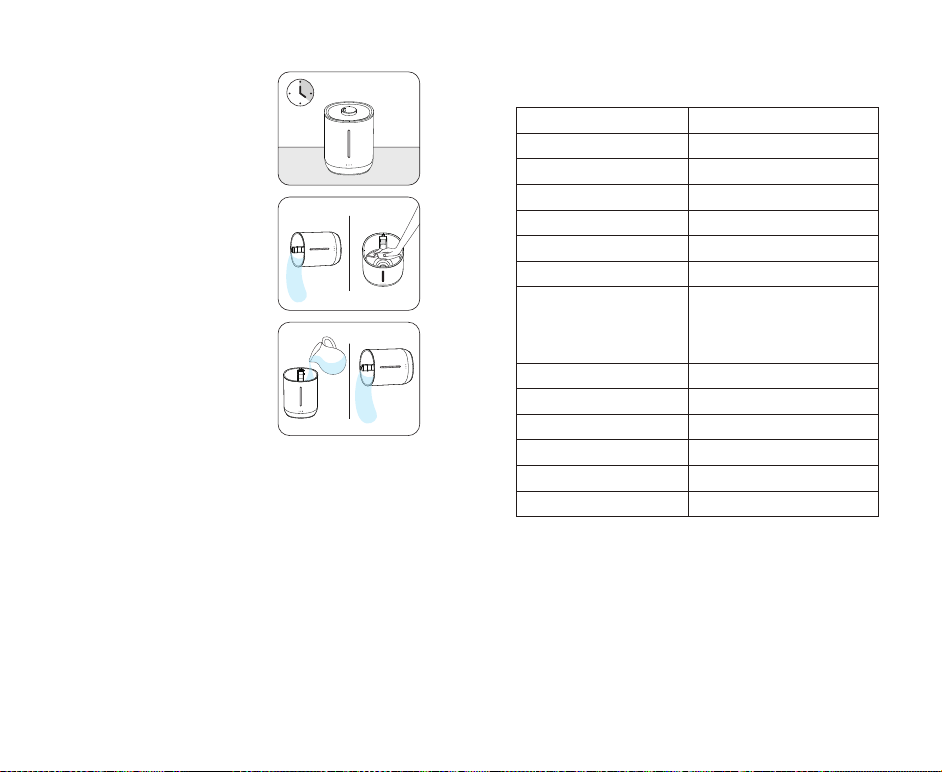
3. Leave it still for 15-20mins.
4. Empty the tank, wipe clean the
interior with a soft, clean cloth
expecially the nebulizer at the
bottom.
5. Add tap water to tank and clean
thoroughly, repeat a few times until
the smell of white vinegar or other
agents becomes unobservable. Dry
thoroughly with a soft cloth.
For daily cleaning and maintenance of the exterior of the humidifier,
use a soft, damp cloth to wipe clean in case of dust or stains.
Follow the steps to clean the water tank:
1. Turn off the humidifer, unplug from
the wall outlet.
2. Remove the tank cover, fill the
tank with tap water, add one
teaspoon of white vinegar or other
clearning agents to remove possible
buildup.
When the mist is on, touch the Sleep
Mode button to turn the Sleep Mode
on. All the indicators and the tank
light will be off. The mist level will
change to Low; to adjust the timer
and mist, just tap the button, and the
corresponding LED indicator will light
up (no beep will be heard).
To wake up Sleep mode, tap the Sleep Mode button.
Sleep Mode Setting
Daily Cleaning & Maintenance
Water Tank Cleaning
CLEANING AND MAINTENANCE
2H 4H 8H
LM H
Page 9 Page 10
1 x Ultrasonic Cool Mist Humidifier
1 x User Guide Kit
WHAT’S IN THE BOX
For a deep cleaning of the Top Cap part, rotate the Top Cap counterclockwise to
detach from the Tank Cover, pull out the Mist Shaping Ring. Take the Float out.
Wash all parts under tap water thoroughly and wipe clean. Pay attention to the
direction of the Mist Shaping Ring and the Float when reassembling all parts.
Pay attention when lifting the top cover in case of water drops on the surface.
Empty water from the water tank away from the air outlet.
The ceramic disc should not come in contact with any hard or sharp objects.
To remove possible buildup, rinse with a white vinegar and water solution.
Dry thoroughly with a soft cloth.
Do not use strong cleaning agents.
Make sure the power cord and plug are let dry before next use.
Notes:
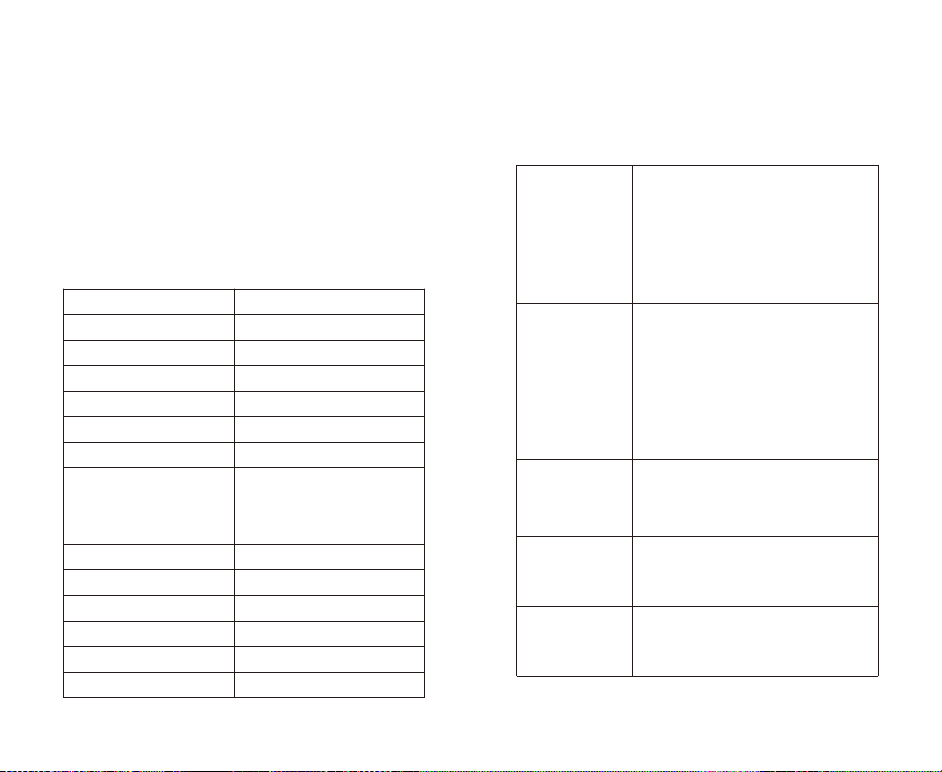
Model
Water Tank Material
Working Voltage
Power Consumption
Frequency
Water Tank Capacity
Mist Level
Run Time per Tank
Timer Options
Humidifying Capacity
Operating Noise
Low Water Level Protection
Dimensions
Net Weight
TPHM002
PP
AC110V, 60Hz
25W
1.7±0.1MHz
2.8L / 94oz
3 levels (Low / Medium / High)
Up to 12H (high mist level)
Up to 16H (medium mist level)
Up to 24H (low mist level)
3 options (2H / 4H / 8H)
Up to 6.8±1.4oz/h
≤38dB (from 3.3ft away)
Supported
7.6 x 7.1 x 9.8in
2.6lbs
SPECIFICATIONS
•
•
•
•
•
•
•
•
•
•
•
•
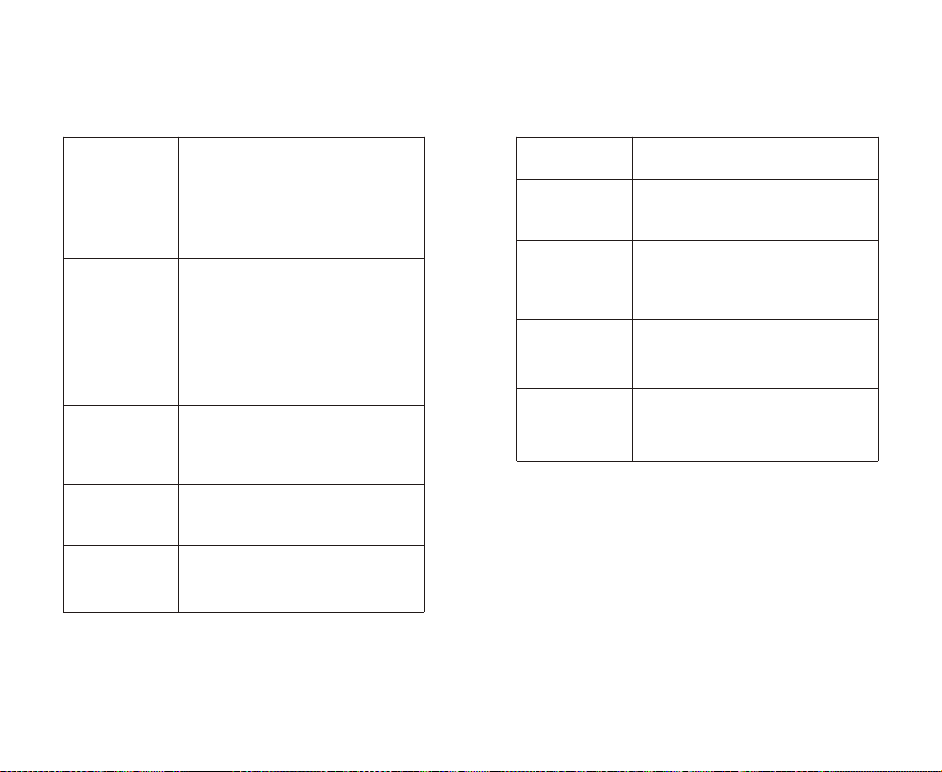
Water vapor and
humidity are not
produced.
Air blows but water
vapor is not
produced.
Humidity level is
low.
The mist has a bad
smell.
White dust is
forming on nearby
furniture.
Power plug - unplug cord from the
humidifier, try again.
Power failure - when power is restored, try
again.
Tank cover installation - make sure tank
cover is attached correctly.
The surface of the nebulizer is dirty - wipe
with soft cloth.
•
•
•
Dirty tank - wash out tank and try again.
Dirty nebulizer – wipe clean the part with a
soft cloth.
Use of distilled water - 3 pinches of salt
must be added to distilled water, stir to
ensure thorough mixing. Caution: Add salt
only by pinch, because too much salt added
to the water can cause excessive boiling,
blowing of fuse, or a stuck circuit breaker.
•
•
The surface of the nebulizer is dirty - Wipe
the part with a soft cloth.
The water in the unit is too cold - replace
with cool, but not cold, water.
• Poor maintenance or dirty water - clean the
tank thoroughly according to instructions
above and fill with fresh water.
• Hard water may deposit a dust-like residue.
In addition, dust in the air may settle due to
the added humidity in the room.
TROUBLESHOOTING
Page 11 Page 12
12-month warranty
Life-time support
for warranty extension or any questions about the product.
CHECK THE FOLLOWING IF YOUR HUMIDIFIER IS NOT WORKING CORRECTLY:
WARRANTY
•
•
•
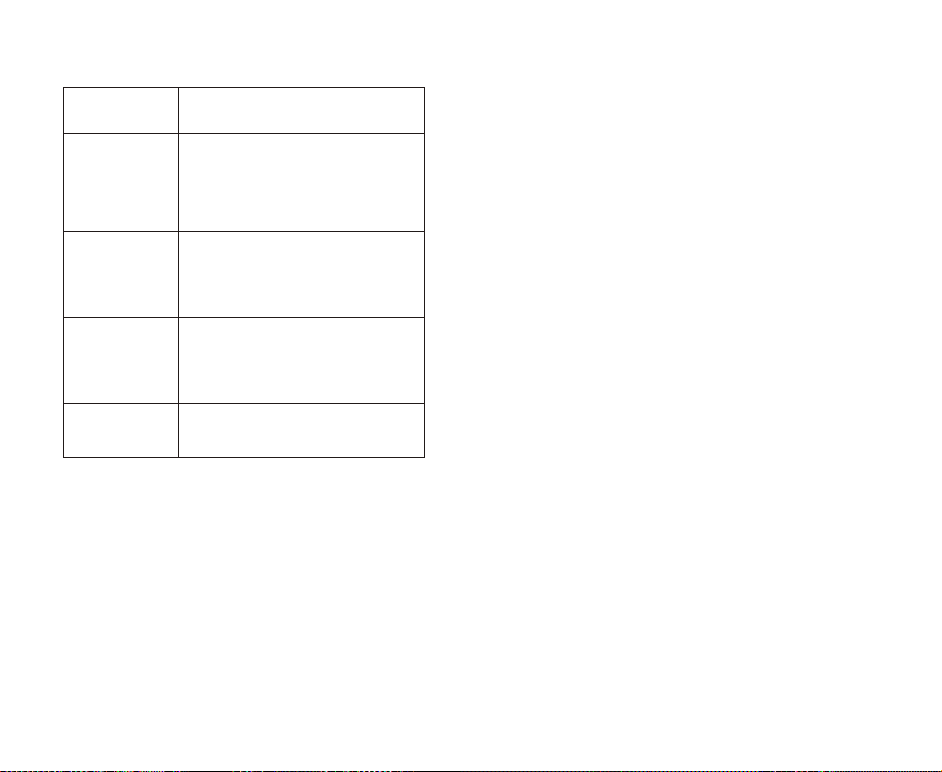
Unit has stopped
working.
Water is
accumulating
outside of unit or
area surrounding
unit.
Water dripping
when reflling.
Increased noise
level.
Tank light flashing
after 3 beeps.
Low to no water - unplug unit and refill
tank.
•
•
Saturation of humidity - lower mist control
setting.
Unit not level - unplug and place on level
surface. Raise unit on a water-resistant
level surface 2-3 feet off of floor.
•
•
Loose cap - tighten cap by slighly moving
unti it snaps into place.
Water remaining on bottom of tank - wipe
tank or tilt to drain before transporting.
• Unit on uneven surface - unit must be
placed on a flat, hard surface. Make sure it
is NOT placed on a soft or absorbent
surface.
•Indicates low water - unplug and refill tank.
使用する前に、加湿器の位置の確認-13
安全上のご注意-14
使用上の注意-16
動作原理-17
各部の名称-17
水の入れ方-18
使い方-18
お手入れ-20
仕様-22
セット内容-22
故障だと思ったら-23
保証とアフターサービス-24
目次

Page 13 Page 14
壁や熱源から少なくとも13センチ離れ
て、清潔で堅固な防水性のある非金属
製の平らな面に加湿器を置きます。
ここに示した注意事項は、お使いになる方や他の人々への危害や損害を未然に防止
するためのもので、「警告」「注意」の二つに分けて説明しています。
いずれも安全に関する重要な内容ですので、必ずお守りください。
警 告:
誤った取り扱いをすると、人が死亡または重傷を負う恐れがある内容を示しています。
●分解・修理・改造をしない
▲火災や感電、故障の原因になります。
修理技術者以外の方が修理を行うことは危険です。修理については、お買い上げの
販売店にご相談ください。
●水まわり、風呂場など湿気のある場所では絶対に使用しない。
●本体を水につけたり、本体に水をかけない
▲発火・感電の原因になります。
●異常・故障時には、直ちに使用を中止し、電源を切り、電源プラグをコンセントから
抜く
▲発煙・発火・感電の恐れがあります。
【異常の例】
●異常な音や匂いがする
●電源プラグ・電源コードが異常に熱くなる
●電源コードを動かすと、通電したりしなかったりする
●運転中時々止まる
●触れるとビリビリ電 気を感じる
→使用を中止し、お買い上げの販売店へお問い合わせください。
電 源 プラグ ・電源コードは正しく使う
●電源プラグのほこりは定期的にとる
▲ほこりがたまると、湿気などで絶縁不良になり、火災や感電の原因になります。
●電源プラグはコンセントの奥まで確実に差し込む
▲ショートによる発火・感電の原因になります。
●お手入れや点検、移動の際は、必ず電源プラグをコンセントから抜く
▲感電やけがの原因になります。
●濡れた手で電源プラグの抜き差しをしない
▲感電・やけど・けがの原因になります。
●交流110V以外では使わない
▲発火・火災の原因になります。
●電源コードや電源プラグが傷んだり、コンセントの差し込みが緩い時は使わない
▲ショートによる発火・感電の原因になります。
●電源コードを傷つけない
●傷つける、加工する、無理に曲げる、引っ張る、ねじる、重いものを乗せる、挟み込む
などしないでください。
ご使用になる前に、この「安全上のご注意」をよくお読みの上正しくお使いください。
吸気口が塞がられると、製品が過熱す
る恐れがあるため、タオルやカーペッ
トの上には置かないでください。
過度の湿気によって損傷を受ける恐れ
があるため、木の表面や家具の近くに
加湿器を置かないでください。
水タンクに水がない状態で操作しない
でください。水位が低いと、加湿器はミ
ストを噴き出しません。
感電の恐れがあるため、濡れた手で電
源コードを差し込まないでください。
使用する前に、加湿器の位置を確認 安全上のご注意

Page 15 Page 16
▲電源コードは破損し、火災・感電の原因になります。
●電源コードを束ねて通電しない
▲火災の原因になります。
●持ち転び時や収納時に電源コードを引っ張らない
▲火災・感電の原因になります。
●電源プラグの抜き差しによる運転や停止をしない
▲運転や停止は必ず本体の電源を使用してください。火災・感電の原因になります。
●屋外では使用しない
▲故障してショートや発火の原因になります。
●スプレーをかけない(殺虫剤・整髪料・潤滑油など)
●引火性のもの(灯油・ガソリン・シンナーなど)、火の気のあるもの(たばこ・線香な
ど)、可燃性のもののそばで使わない
●油煙の舞う場所や近くで使用しない
▲発火・火災の原因になります。
●隙間からものや手を入れない
▲感電やけがの原因になります。
●子供など取り扱いに不慣れな方だけで使わせたり、幼児に触れさせたりしない
▲けがや感電の恐れがあります。
注 意:
誤った取り扱いをすると、人がけがをしたり、物的損害が発生する内容を示していま
す。
●火気・暖房器具などに近づけない
●可燃性のものや火のついたたばこ・線香などを近づけない
▲発火・火災の原因になります。
●製品の上に乗ったり、寄りかかったり、物を置いたりしない
▲転倒によるけがや火災の原因になります。
●水タンクや蓋を正しく取り付ける
●蓋は必ず取り付けて使用する
▲水漏れや周囲の汚損の原因になります。
●吸気口や吹き出し口をふさがない
▲吸気口や吹き出し口をタオルやカーテンでふさがないでください。水漏れや加熱
の原因になります。
●加湿された風が、家具や壁、カーテン、電気製品などに直接当たらないところに設
置する
●設置の際は、カーテン、壁、家具などから、20cm以上の距離を離す
▲家具や壁、カーテンなどの汚損の原因になります。また、電気製品に結露したり水
のミレラル分が付着したりすると、電気製品の故障の原因になります。
吹き出し口は家具や壁、カーテン、電気製品などの方向へ向けないでください。
●水平で安定した台の上で使用する
▲毛足の長いカーペットや布団などの上に設置すると、転倒してけがをしたり水漏
れしたりする恐れがあります。また、床濡れの恐れがありますので、必ず台の上に設
置してください。
●暖房機・テレビ・ホットカーペットなど電気製品の上で使用しない
▲転倒すると水がこぼれ、火災や電気製品の故障の原因になります。
水タンクの水 について
●毎日新しいものに取り替える
水タンクは毎日振り洗いし、常に清潔にしてください。古い水を使用すると、 異臭を
発したり健康を害する原因になります。
●一週間以上使用しない場合は、必ず水タンク内の水を捨てる
▲水が入ったまま放置すると、異臭や周囲の空気の汚れの原因になります。
●凍結しそうなときは、水タンク内の水を捨てる
▲凍結すると、故障・水漏れにより周囲の汚損の原因になります。
●水道水以外は使用しない
▲40℃以上の水・化学薬品・芳香剤・ミネラルウォーター・アルカリイオン水 ・井戸水・
浄水器の水などは使用しないでください。かびや雑菌が繁殖しやすくなったり、変形
・ひび割れ・変色などを起こして、水漏れや周囲の汚損の原因になります。
●電源プラグを抜く時は、電源コードを持たずに必ず電源プラグを持って引き抜く
▲電源コードが破損し、発火・感電の原因になります。
●長期間使わないときは、必ず電源プラグをコンセントから抜く
▲絶縁低下により、火災・感電の原因になります。
●移動するときは、本体を持つ
▲水タンクや蓋を持つと、外れて落下する恐れがあります。
使用上のご注意
●直射日光の当たる場所や暖房器具の近くで使用しない
▲変形・変色する恐れがあります。
●ベンジンやシンナーで拭いたりしない
▲破損・故障の原因になります。
●ラジオやテレビに近づけない
▲ラジオやテレビにミストが入る場合があります。
●スピーカーやIH調理器(電気調理器)など磁気の出る機器の近くに置かない
▲正常に動作しないことがあります。
使用環境について
●室温は5〜35℃で使用してください。
室温が低いと床濡れや結露が起こりやすくなります。ボタンで加湿量を調節したり、
室温を上げたりして使用してください。
また、窓際や冷気の影響を受けやすい壁などは、定期的に結露を拭き取るなどして
使用してください。
●加湿のしすぎによる床濡れや結露に注意してください。
本製品は自動で加湿を調節できません。部屋の環境に注意しながら、こまめに加湿
を調節してください。
廃棄について
製品や梱包材の廃棄については、お住まいの自治体の取り決めに従って処理してく
ださい。
1.タンクカバーを取り外し、最大水位線まで水
タンクに水道水を入れる
2.タンクカバーを元に戻します。スムーズに噴
霧できるようにしっかりと閉めてください。
3.十分な水がある場合は、必要に応じてアロマ
オイルを直接にタンクに入れてください。
ご注意:
●タンクをいっぱいにすると、オーバーフロー穴から過剰な水が流出します。
●必ず水道水を使用してください。
40℃以上の水・汚れた水・ミネラルウォーター・アルカリイオン水・井戸水・浄水器の
水などは使用しないでください。
●水に薬品・香料・エッセンシャルオイルなどを入れないでください。
▲かびや雑菌が繁殖しやすくなったり、変形・ひび割れ・変色などを起こして、水漏れ
や周囲の汚損の原因になります。
●タンクキャップは確実に閉めてください。
▲タンクキャップが斜めになっていたり緩んでいるすると、水がこぼれて本体が故障
したり周囲を汚損する原因になります。
1.電源コードをコンセントに差し込んでくださ
い。本製品は待機モードになります。
電源オン
動作原理
この上から注水するクールミスト加湿器は、タッチボタンでコントロールを備えた超
音波技術に基づいて動作します。3段階のミストレベル、3つのタイマー設定、スリー
プモード、低水位保護機能を備えており、家やオフィスで快適に湿度を維持して非常
に安全で便利です。
各部の名称
水の入れ方
使い方
Page 17 Page 18
1-水タンク
2-水窓
3-LEDインジケーター
4-ライト/スリープモードボタン
5-電源/ミストボタン
6-タイマーボタン
7-電源コード
1
2
37
8
14
15
16
17
18
19
4
5
6
8-吸気口
9-オーバーフロー穴
10-エアアウトレット
11-最大水位線
12-ネブライザー(セ
ラミック ディスク 搭 載 )
13-タンクライト
14-低水位センサー
15-吹き出し口
16-トップキャップ
17-ミストシェイプリング
18-タンクの蓋
19-ミストチューブ
20-フロート
2H 4H 8H
LM H
9
10
11
12
13
14
Page 19 Page 20
ミストレ ベ ル 調 整
3.電源ボタンを約3秒間タッチし続けて、加湿
器をオフにします(ミストとライトの両方もオ
フにします)。ミストチューブを乾 燥させるため
に、加湿器をオフにしてから空気の流れが15秒
間ぐらい続きます。
加湿器の電源を入れる時に、ミストボタンをタ
ッチして、L->M->Hのミストレベルを切り替え
ます。対応するLEDインジケーターがビープ音
とともに白く点 灯します。
スリープモード設定
ミストがオンになっている時に、[スリープモー
ド]ボタンをタッチして、スリープモードをオン
にします。すべてのLEDインジケーターとタン
クライトが消灯します。ミストレベルは現在の
レベルのままです。タイマーとミストレベルを
調整するには、ボタンをタッチするだけで、対
応するLEDインジケーターが点灯します(ビー
プ音は鳴りません)。
スリープモードを再開するには、[スリープモード]ボタンをタッチします。
以下の手順に従って水タンクを清掃してください。
1.加湿器をオフして、壁のコンセントからプラ
グを抜きます。
2.タンクカバーを取り外し、タンクに水道 水 を
入れ、小さじ1杯の白酢またはその他の洗浄剤
を加えて、汚れを取り除きます。
タイマー設 定
タイマーボタンをタッチして、タイマーを2H/
4H/8H/タイマーオフに設定できます。対応
するLEDインジケータは、タイマー設定ごとに
ビープ音で緑色に点灯し、その後消灯します。
タイマーがオフになると、3つのLEDがすべて
点灯し、その後消灯します。
タイマー設定をキャンセルするには、タイマーボタンをタッチして[タイマーオフ]を選
択します。(3つのLEDがすべて点滅して消えます)。
4.水タンク内に十分な水がない場合は、加湿器はミストしません。*
*低水位オートオフ保護機能
低水位センサーが低い水位を検出すると、加湿器はミストを停止します。ビープ音が
3回鳴り、タンクライトが点滅してから消えます。これは加湿器が過熱してネブライザ
が損傷するのを防ぐために、安全性を考慮して設計されたのです。
お手入れ
2.電源ボタンをタッチして、電源を入れます。
ボタンとミストインジケーターが白く点灯し、
現在のミストレベル(デフォルトでは高速)とビ
ープ音が鳴ります。
2H 4H 8H
LM H
2H 4H 8H
LM H
2H 4H 8H
LM H
2H 4H 8H
LM H
2H 4H 8H
LM H
Page 21 Page 22
1×超音波式クールミスト加湿器
1×取扱説明書
3.15-20分そのままにしておきます。
4.タンクを空にして、柔らかくてきれいな布で
タンクの内側特に底部のネブライザを拭いて
ください。
5.水道水をタンクに入れて、完全に白酢やそ
の他の洗浄剤の匂いがなくなるまで数回繰り
返して洗浄してください。柔らかい布で拭いて
乾かします。
注:
・トップキャップパーツを深くクリーニングするには、トップキャップを反時計回りに
回転させてトップカバーから外し、ミストシェーピングリングを保持し、特定の位置ま
で回転させて引き出します。フロートを取り出します。すべての部品を水道水で完全
に洗い、きれいに拭きます。フロートの向きに注意して取り付け直してください。
・表面に水滴が付いた場合は、上部カバーを持ち上げる時に注意してください。
・強力な洗浄剤を使用しないでください。
・ネブライザ(セラミックディスク搭載)は硬いものや鋭利なものに触れないでくださ
い。
・次回に使用する前に、電源コードとプラグが乾いていることを確認してください。
仕様
セ ット 内 容
品番
水タンク材 料
電源電圧
消費電力
電源周波数
水タンク容 量
ミストレ ベ ル
加湿時間
タイマーオプション
加湿量
動作音
低水位オートオフ保護機能
サイズ
重量
TPHM002
PP
100-240V,50/60Hz
25W
1.7±0.1MHz
2.8L/94oz
三つレベル(弱/中/強)
最大12時間(強レベル)
最大16時間(中レベル)
最大24時間(弱レベル)
三つオプション(2H/4H/8H)
最大200±40ml/h
≤38dB1M以外
サ ポ ート
7.6x7.1x9.8in/19x18x25cm
2.6lbs/1.2kg
Page 23 Page 24
•保証期間12ヶ月
•生涯サポート
保証延長また製品に関するご質問は、[email protected]のカスタマーサー
ビスにお問い合わせください。
使用中に異常が生じた場合は、修理を依頼される前に、本書をよくお読みの上、以下
の点を確認してください。
加湿器が正しく機能しない場合は、以下を確認してください。
警告:ご自分での分解・修理・改造はしないでください。
故障だと思ったら
保証とアフターサービス
水蒸気や湿度は発生
しません。
空気は吹きますが、水
蒸気は発生しません。
湿度が低い
ミストの匂いが悪い。
近くの家具に白いほこ
りがあります。
・電源プラグ-電源コードを抜き、再度お試しくださ
い。
・電源障害-電源が回復したら、再度お試してくださ
い。
・タンクカバーの取り付 け-タンクカバーが正しく取
り付けられていることを確 認してください。
・ネブライザの表面が汚れている-柔らかい布でネ
ブライザを拭いてください。
・ネブライザの表面が汚れている-柔らかい布でネ
ブライザを拭いてください。
・タンク内の水が冷すぎる-冷水ではなく生水を使用
してください。
・メンテナンス不良または汚れた水-上記の指示に
従ってタンクを完全に洗浄して、生 水で洗い流してく
ださい。
・硬水はほこりのような残留物を蓄積させることが
あります。また、室内の湿度が高くなり、空気中のほ
こりが落ち着く場合があります。
・タンク汚れている-タンクを洗浄して、再度お試行し
てください。
・ネブライザが汚れている‒柔らかい布でネブライ
ザを拭いてください。
・蒸留水を使用する場合は、3つまみの塩を水に加
えて完全に混合する必要があります。注意:塩はつ
まみだけで入れてください。塩が多すぎると、過度の
ボイリング、ヒューズが飛んだり、回路ブレーカーが
切れたりする可能性があります。
加湿器は動作を停止
しました 。
加湿器の周りに水が
たまっている。
水が不足--プラグを抜き、タンクに水を補充します。
・湿度の飽和-ミストレベル設定を下げる。
・本体は傾けている-プラグを抜き、水平面に置きま
す。本体を2〜3フィートの防水の平面に置きます。
水を補充する時に水
が 垂 れ る 。
・キャップが緩んでいる-カチッとはまるまで動かし
て、キャップを締めます。
・タンクの底に残っている水-補充する前に、タンク
の底を拭いてください。
騒音レベルの増加 ・商品は平らでない表面にある-商品は平らで硬い
表面に置く必要があります。柔らかい表面や吸収性
のある表面に置かないでください。
騒音レベルの増加
ビープ音が3回鳴った
後 、タンクライトが 点 滅
します。
・低水量を示します-プラグを抜き、タンクに水を補
充してください。
Table of contents
Other TOPPIN Humidifier manuals


