TOPPIN Comfy Air H1 User manual
FOR HOUSEHOLD USE ONLY.
READ AND SAVE THESE INSTRUCTIONS
この度はTOPPIN本製品をお買い上げいただき、誠にありがとうございます。
・この取扱説明書をよくお読みになり、正しくお使いください。
・この取扱説明書はいつでも見ることができるよう大切に保管してください。
Comfy Air H1 Ultrasonic Humidifier
ComfyAirH1超音波加湿器
取扱説明書
User Guide
Model / 品番:TPHM001
©Libro Corp. All Rights Reserved.
Manufacturer: Shenzhen Libro Technology Co., Ltd.
Address: Building 3, Cloud Park, Shenzhen, China, 518129
JP Importer: 合同会社三和
Made in China
TPHM001_V1.0
Intertek
CM
合同会社
三和
Model: TPHM001
AC Adaptor Input: AC110V , 60Hz , 30W
This device complies with Part 18 of the FCC Rules.
This equipment has been tested and found to comply with the limits for a Consumer ISM
equipment, pursuant to Part 18 of the FCC Rules. These limits are designed to provide reasonable
protection against harmful interference in a residential installation. This equipment generates,
uses and can radiate radio frequency energy and, if not installed and used in accordance with
the instructions, may cause harmful interference to radio communications. However, there is no
guarantee that interference will not occur in a particular installation.
Please note changes or modifications of this product is not expressly approved by the party
responsible for compliance could void the user’s authority to operate the equipment.
If this equipment does cause harmful interference to radio or television reception, which can be
determined by turning the equipment off and on, the user is encouraged to try to correct the
interference by one or more of the following measures:
- Reorient or relocate the receiving antenna.
- Increase the separation between the equipment and receiver.
- Connect the equipment into an outlet on a circuit different from that to which the receiver is
connected.
- Consult the dealer or an experienced radio/TV technician for help.

BEFORE EACH USE – CHECK HUMIDIFIER PLACEMENT 1
SAFETY PRECAUTIONS 1
PRODUCT DIAGRAM 5
OPERATIONS AND FUNCTION 7
Add Water 7
Power On & Off 7
Mist Adjustment 7
Timer Setting 8
Night Light Setting 8
Humidity Setting 9
Low Water Protection 9
CLEANING AND MAINTENANCE 10
Daily Cleaning & Maintenance 10
Water Tank Cleaning 10
SPECIFICATIONS 11
WHAT’S IN THE BOX 11
TROUBLESHOOTING 12
WARRANTY 14
Contents
使用する前に、加湿器の位置の確認
安全上のご注意
使用上のご注意
動作原理
各部の名称
使い方
注水について
電源のオンとオフについて
ミストレベルの調整について
タイマー設定について
ナイトライトの設定について
湿度設定について
低水位保護について
お手入れ
仕様
故障かな?と思ったら
保証とアフターサービス
目次
15
15
18
18
19
21
21
21
21
22
22
22
23
24
25
26
28

Fully unwind the power cord before use.
Connect only to a 100-120V power outlet.
DO NOT let the power cord hang over the edge of a bench or table,
touch hot surfaces or become knotted.
To protect against electric shock, DO NOT immerse the power
cord, power plug or appliance in water or any other liquid or allow
moisture to come in contact with the part, unless it is
recommended in the cleaning instructions.
This appliance can be used by children aged from 8 years and
above and persons with reduced physical, sensory or mental
capabilities or lack of experience and knowledge if they have
been given supervision or instruction concerning use of the
appliance in a safe way and understand the hazards involved
children shall not play with the appliance.
Cleaning and user maintenance shall not be made by children
without supervision.
Place the humidifier on a clean, solid, waterproof, non-metallic,
and level surface at least 5 inches away from walls and heat
sources.
DO NOT place it on top of a towel or a carpeted surface. The air
inlet may be blocked, and the device gets overheated.
DO NOT place it on a wood surface or near the furniture that can
be damaged by too much moisture.
DO NOT operate without water in the water tank, otherwise the
humidifier will not mist.
DO NOT plug in the cord with wet hands, or an electric shock could
occur.
BEFORE EACH USE – CHECK HUMIDIFIER PLACEMENT
SAFETY PRECAUTIONS
If the supply cord is damaged, it must be replaced by the
manufacturer, its service agent or similarly qualified persons in
order to avoid a hazard.
When the appliance is not in use and before cleaning, unplug the
appliance from the outlet firstly.
Care should be taken when using the appliance due to the
emission of hot water vapour.
Unplug the appliance during filling and cleaning.
Always place this humidifier on a firm, flat and level surface. This
humidifier may not work properly on an uneven surface.
Place this humidifier in an area where it is not accessible to
children.
DO NOT place the humidifier near any heat sources such as
stoves, radiators, and heaters.
DO NOT use the humidifier outdoors.
DO NOT submerge the unit in water to avoid risk of electric shock.
DO NOT put fingers, hands, or any object into the unit while
operating.
DO NOT touch the water while unit is operating.
DO NOT fill water through the nozzle.
Before using the humidifier, check the power cord for any signs
of damage. If the cord is found to be damaged, DO NOT use and
return the humidifier to the manufacturer under the warranty
agreement for repair.
This appliance has a polarized plug (one blade is wider than the
other). To reduce the risk of shock, this plug is intended to fit
only one way in a polarized outlet. If the plug does not fit securely
in the outlet, reverse the plug. If it still does not fit, contact a
qualified electrician. DO NOT attempt to defeat this safety
feature.
To disconnect the humidifier, first touch the Power button to turn
it off, then grip the plug and pull it from the wall outlet. Never pull
by the cord.
A loose fit between the AC outlet (receptacle) and plug may
READ AND SAVE THESE SAFETY INSTRUCTIONS BEFORE USING THIS
HUMIDIFIER
When using electrical appliances, basic precautions should always be
followed to reduce the risk of fire, electric shock, and injury to
persons, including the following
Page.1 Page.2

This top-fill cool mist humidifier works based on an ultrasonic
technology with touch button control. Featuring 3 mist levels, night
light, 1H-24H timer settings, and low water and dry run auto-off
protection, it’s quite convenient and safe to use and keep a
comfortable humidity in your house or office.
HOW IT WORKS
cause overheating and a distortion of the plug. Contact a
qualified electrician to replace loose or worn outlet.
The humidifier should always be unplugged and emptied when
not in operation or while being cleaned.
Never tilt or attempt to move the humidifier while it is operating
or filled with water. UNPLUG the humidifier from the outlet before
moving.
This humidifier requires regular cleaning. Follow the CLEANING
instructions provided in this guide. DO NOT clean in other manner
unless instructed.
DO NOT direct moisture flow directly at individuals, walls or
furniture.
When a humidifier is used in a closed room or small rooms, check
periodically for proper ventilation, as excessive humidity can
cause condensation stains on walls.
Turn the humidifier OFF if you notice moisture on the inside of
your windows. For proper humidity reading use a hygrometer,
which is available in many hardware and department stores.
Any maintenance other than cleaning should be performed by
professionals only.
DO NOT use this appliance for anything other than its intended
use. DO NOT use in moving vehicles or boats.
During electrical storms, the appliance should be disconnected
from the power source at the wall socket to prevent any
electrical surges that may arise during the storm and which may
inadvertently cause damage to the appliance and its electronic
componentry.
Before cleaning, always turn the appliance off, unplug from the
power outlet, and allow all parts to cool.
DO NOT place this appliance on or near a heat source, such as hot
plate, oven or heaters.
Position the appliance at a minimum distance of 5 inches away
from walls, curtains and other heat or steam sensitive materials
and provide adequate space above and on all sides for air
circulation.
Page.3 Page.4
Information regarding the potential risk of electric shock due to
overfilling or cleaning the product and removal of the heating
element portion of the product without disconnecting the
power-supply cord.

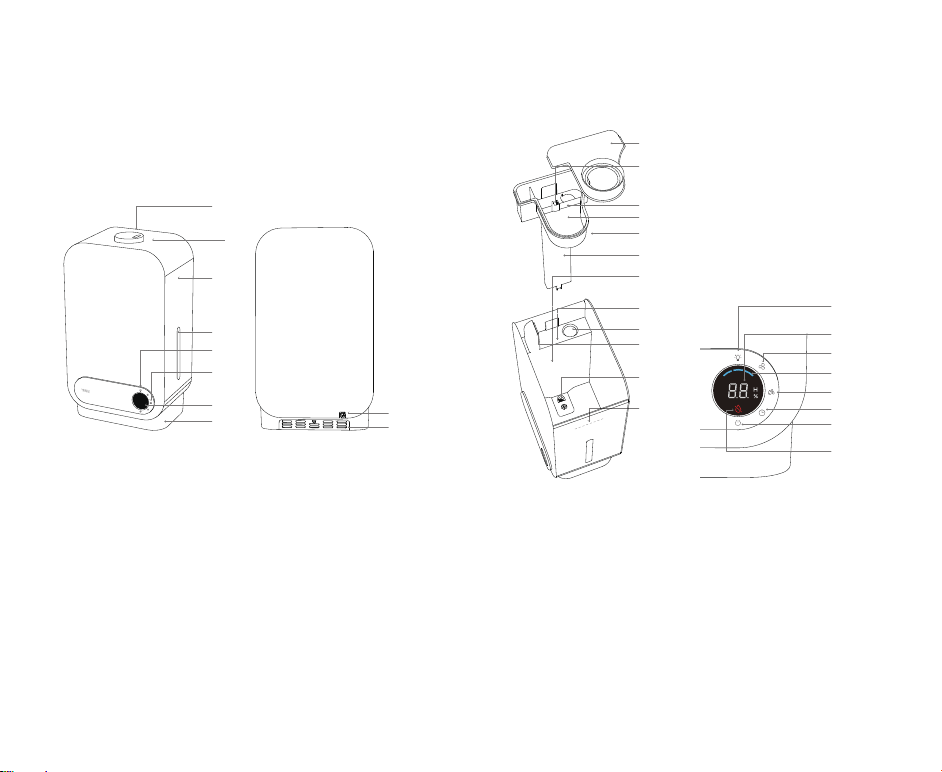
Front View
1.Nozzle
2.Tank Cover
3.Water Tank
4.Water Window
5.Night Light
6.Control Panel
7.LED Display
8.Base
Inside View
1.Mist Cover
2.Water Inlet (from pump)
3.Overflow Hole x 2
4.Mist Chamber
5.Mist Chamber Section
6.Water Tube
7.Low Water Sensor (tank)
8.Low Water Sensor (chamber)
9.Nebulizer (equipped with Ceramic Disc)
10.Fan Vent
11.Pump Out Hole
12.Max Water Level Line
Control Panel & LED Display
1.Light Button
2.Humidity Level (30-85%) / Timer (00-24H)
3.Mist Level Button (Low / Medium / High)
4.Mist Level Ring Indicators (Low / Medium /
High)
5.Humidity Button
6.Timer Button
7.Power Button
8.Low Water Icon
Back View
9.Power Cord
10.Air Inlet
PRODUCT DIAGRAM
1
4
5
6
7
8
2
3
1
2
3
8
4
5
6
79
10
8
9
10
11
12
1
6
4
5
2
7
3
Page.5 Page.6
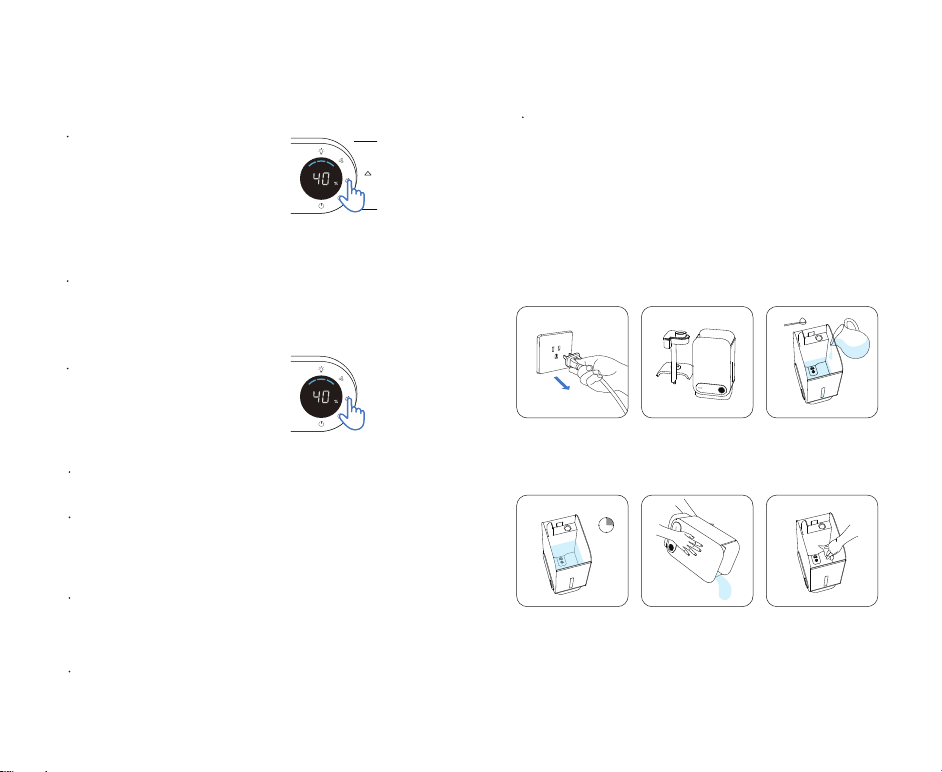
Add Water
Mist Adjustment
Timer Setting
Night Light Setting
Power On & Off
Remove the tank cover,
fill the water tank with
water till the Max Water
Level Line. Put the tank
cover back on. Make
sure it fits securely for
smooth misting.
When the unit is on, tap the Mist Level button to cycle through Low
-> Medium -> High mist levels. The corresponding LED indicator(s)
will light up solid blue with a beep sound.
Note: When powered on again, the device will memorize the last mist level
setting if not disconnected.
Note:
Note:
If there is not enough water inside the water tank or mist chamber (Low
Water icon will blink 3 times and turn off), the humidifier will not mist.
(Refer to the Troubleshooting section of this Guide.)
Do not lift the tank / mist cover when misting in case of leakage.
Connect the power cord
of the humidifier to a
power source. A beep
sound will be heard; the
LED display will light up
and dim after 2s if no
button is touched. The
unit is now in standby
mode.
OPERATIONS AND FUNCTION
Tap the Timer button to enter the timer
settings. Tap the Timer button again to
choose from 1H – 24H and the LED
display will show the number
accordingly.
To cancel the timer setting, tap the
Timer button repeatedly until “00” is
shown on the LED display after “24H”.
When you’re setting the timer, the humidity level number will dim; 2s after
setting is completed, the device will exit the timer setting mode and the
humidity level will show again.
Tap and hold the Timer button for 2s to exit timer setting.
When it’s powered on, you need to set the timer again if needed (last setting
not memorized).
Note:
When the device is powered off (tap the Power button when it’s on), all
settings including mist, timer, night light and LED display will be off.
Note:
Do not add essential oils to the water tank.
Do not add water in the fan vent.
Excessive water will flow out from the overflow hole when you overfill the
tank.
When putting back the tank cover, try the other way if it doesn’t fit well.
When the humidifier is in standby mode, tap the Night Light
button to turn on the night light; to turn the light off, tap the
button again.
When the humidifier is powered on (LED display is on), tap the
Night Light button to turn on the night light; tap the button again,
both the night light and LED display will be off. Tap a third time,
LED display will be on but night light stays off; a fourth tap will
turn on the night light.
When the humidifier is in standby mode, tap the Night Light
button to turn on the night light, tap the button again to turn the
light off; the LED display stays off all the time.
Powered ON 123
Turn OFF the night
light & LED display
Turn ON the LED
display / Night light
stays OFF
Turn ON the
night light
Page.7 Page.8
Humidity Setting
Daily Cleaning & Maintenance
Water Tank Cleaning
CLEANING AND MAINTENANCE
Low Water Protection
Your Toppin humidifier has a sensor to detect changes to humidity
and temperature in the surrounding area. The humidity level control
function thus can keep the humidity level as you set via the sensing
technology.
When the humidifier is on, the current humidity level will be
detected by the sensor and shown in percentage (relative humidity
level, depending on the ambient air temperature) on the LED
display.
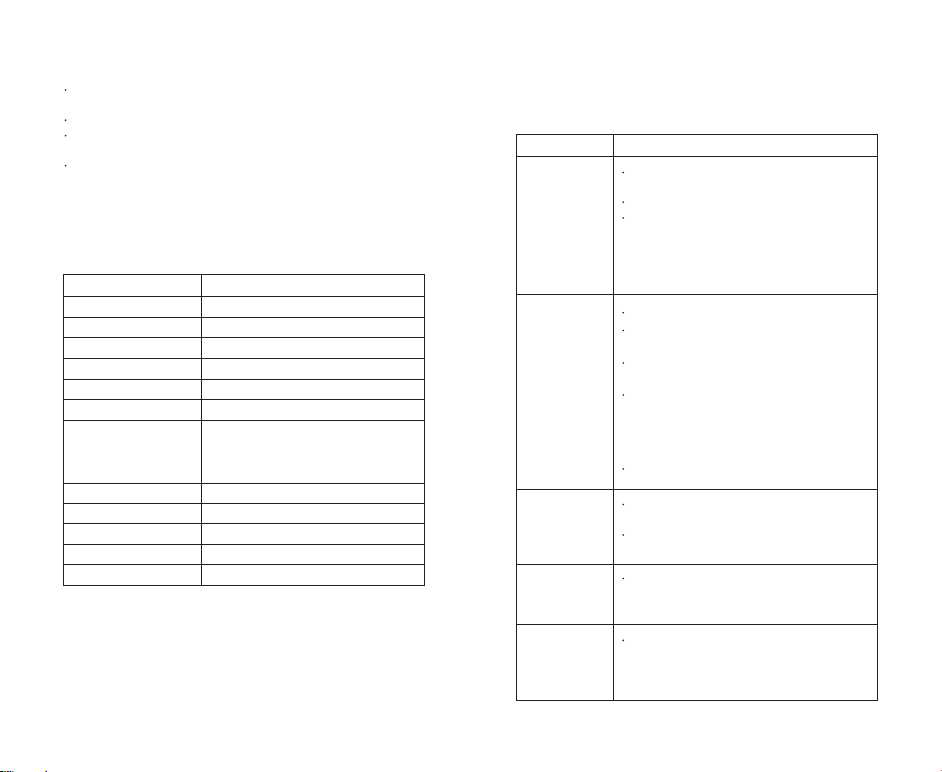
For daily cleaning and maintenance of the exterior of the humidifier,
use a soft, damp cloth to wipe clean in case of dust or stains.
Follow the steps to clean all detachable parts and the water tank:
When the humidifier is powered on, tap the
Humidity button to enter humidity setting. The
current humidity number will turn blinking,
waiting for desired humidity setting. Tap the
button again to increase humidity to the level of
the smallest multiple of 5 (for example, when
the current humidity level is 51%-54%, tap to
increase to 55%); each tap brings an increment
of 5%, until to the maximum level of 85% (tap
again to cycle from 30%).
After the humidity is set, the current humidity
percentage will be shown again. Tap the
Humidity button once to check the last desired
humidity; tap the button again to increase the
humidity by 5% increment as described in the
last step.
To cancel the humidity setting, tap and hold the
Humidity button for 2s. The humidity number will
turn to a dash, blinking 3 times (once every 1s),
and the current humidity percentage will be
shown again.
Note:
When you’re setting the timer, the humidity level number will dim; 2s after
setting is completed, the device will exit the timer setting mode and the
humidity level will show again.
Tap and hold the Timer button for 2s to exit timer setting.
When it’s powered on, you need to set the timer again if needed (last
setting not memorized).
Low water level in water tank
When a low water level is detected in the water tank, the humidifier will be
off (fan off 20s later). 3 beeps will be heard (once every 3s) and the Low
Water icon flashes 7s. It is designed for safety concern to prevent the
humidifier from possibly overheating and damaging the nebulizer.
Low water level in mist chamber
When a low water level is detected in the mist chamber, the nebulizer will
be off (pump and fan still work). 10s later if there’s still no water
detected in the chamber, the humidifier will be off (similar process with
the “low water level in water tank” situation).
Dry run of nebulizer
When a dry run of the nebulizer is detected, the humidifier will be off
(similar process with the “low water level in water tank” situation).
Turn off the humidifier, unplug
from the wall outlet.
Leave it still for 15-20mins. Empty the tank. Add water to
tank and clean thoroughly.
Repeat a few times until the
smell of white vinegar or other
agents becomes unobservable.
Wipe clean the interior with a
soft clean cloth especially the
nebulizer. And dry thoroughly
with a soft cloth.
Remove the tank cover, mist cover
and mist chamber section.
Fill the tank with water, add one
teaspoon of white vinegar or
other cleaning agents to remove
possible build-up.
1 2 3
4 5 6
85%
MAX
MIN
+5%
30%
Each tap
Hold for
2s
Page.9 Page.10
SPECIFICATIONS
WHAT’S IN THE BOX
TROUBLESHOOTING
Water vapor
and humidity
are not
produced.
Air blows but
water vapor is
not produced.
Humidity level
is low.
The mist has a
bad smell.
White dust is
forming on
nearby
furniture.
Power plug - unplug cord from the humidifier,
try again.
Power failure - when power is restored, try
again.
Tank/Mist cover installation - make sure both
tank cover and mist cover are attached
correctly.
The surface of the nebulizer is dirty - wipe
with soft cloth.
Dirty tank - wash out tank and try again.
Dirty mist chamber - wash out chamber and
try again.
Dirty nebulizer – wipe clean the part with a
soft cloth.
Use of distilled water - 3 pinches of salt must
be added to distilled water, stir to ensure
thorough mixing. Caution: Add salt only by
pinch, because too much salt added to the
water can cause excessive boiling, blowing of
fuse, or a stuck circuit breaker.
Ambient humidity is higher than desired level.
The surface of the nebulizer is dirty - Wipe the
part with a soft cloth.
The water in the unit is too cold - replace with
cool, but not cold, water.
Poor maintenance or dirty water - clean the
tank and chamber thoroughly according to
instructions above and fill with fresh water.
Hard water may deposit a dust-like residue. In
addition, dust in the air may settle due to the
added humidity in the room. If this becomes a
nuisance, use distilled water.
1 x Toppin Comfy Air H1 Ultrasonic Humidifier
1 x Clean Brush
1 x User Guide Kit
Note:
Pay attention when lifting both the covers in case of water drops on the
surface.
Empty water from the water tank away from the air outlet.
The ceramic disc should not come in contact with any hard or sharp objects.
To remove possible buildup, rinse with a white vinegar and water solution.
Dry thoroughly with a soft cloth.
Do not use strong cleaning agents.
Make sure the power cord and plug are let dry before next use.
Model
Water Tank Material
Working Voltage
Power Consumption
Frequency
Water Tank Capacity
Mist Level
Run Time per Tank
Timer Options 1H – 24H
≤29dB (from 3ft away)
Supported
368 x 210 x 146mm / 14.5 x 8.3 x 5.7in
1.7kg / 3.75lbs
Operating Noise
Low Water Level Protection
Dimensions
Net Weight
TPHM001
Problem Possible Causes & Solution
ABS
110V~,60Hz
30W
1.7±0.1MHz
5L / 1.3gal
3 levels (Low / Medium / High)
Up to 14H (high mist level)
Up to 30H (medium mist level)
Up to 72H (low mist level)
Page.11 Page.12

WARRANTY
Unit has
stopped
working.
Low to no water - unplug unit and refill tank.
Water is
accumulating
outside of unit
or area
surrounding
unit.
Water dripping
when refilling.
Increased
noise level.
Lower Water
icon flashing
after 3 beeps.
Saturation of humidity - lower mist control
setting.
Unit not level - unplug and place on level
surface. Raise unit on a water-resistant level
surface 2-3 feet off of floor.
Loose cap - tighten cap by slightly moving
unit it snaps into place.
Water remaining on bottom of tank - wipe
tank and chamber or tilt to drain before
transporting.
Unit on uneven surface - unit must be placed
on a flat, hard surface. Make sure it is NOT
placed on a soft or absorbent surface.
Indicates low water - unplug and refill tank.
Check whether there’s water in the tank if
water level in the chamber is up the Low
Water Sensor (tank); if yes, the pump may be
broken, please contact Toppin customer
support.
When the ambient humidity level
detected is lower than the minimum
detection value(30%), the error code
“L” will be displayed.
When the ambient humidity level
detected is higher than the maximum
detection value(85%), the error code
“H” will be displayed.
No L or H displayed when low water
level is detected.
12-month warranty
Life-time support
for warranty extension or any questions about the product.
CHECK THE FOLLOWING IF YOUR HUMIDIFIER IS NOT WORKING CORRECTLY:
LED Display Error Messages
Error Code
/
Low water level detected by
the Low Water Sensor
(chamber): The Lower
Water icon flashes for 3
times (for about 7s) with 3
beeps. The humidifier will
enter standby mode and
then turn off (fan off 15s
later).
Low water level detected by
the Low Water Sensor
(tank): The Lower Water icon
flashes for 3 times (for
about 7s) with 3 beeps. The
humidifier will enter standby
mode and then turn off (fan
off 15s later).
Dry run: The Lower Water
icon flashes for 3 times
(for about 7s) with 3 beeps.
The humidifier will enter
standby mode and then
turn off (fan off 15s later).
Add water till
max water
level line, tap
the Power
button to
turn on
Add water till
max water
level line, tap
the Power
button to
turn on
Add water till
max water
level line, tap
the Power
button to
turn on
ActionPossible Causes
Page.13 Page.14

壁や熱源から少なくとも 13cm 離れて、清潔で堅固な防水性のある非金属製の
平らな面に加湿器を置きます。
吸気口が塞がれ、製品が過熱する可能性があるため、タオルやカーペットの上
には置かないでください。
過度の湿気によって損傷を受ける可能性のあるため、木の表面や家具の近くに
加湿器を置かないでください。
水タンクに水がない状態で操作しないでください。水位が低いと、加湿器はミス
トを噴き出しません。
感電の恐れがあるため、濡れた手で電源コードを差し込まないでください。
使用を中止し、お買い上げの販売店へお問い合わせください。
使用する前に、加湿器の位置の確認
ご使用になる前に、この「安全上のご注意」をよくお読みの上正しくお使いくだ
さい。
ここに示した注意事項は、お使いになる方や他の人々への危害や損害を未然に
防止するためのもので、「警告」「注意」の二つに分けて説明しています。
いずれも安全に関する重要な内容ですので、必ずお守りください。
【異常の例】
●分解 / 修理 / 改造をしない
▲火災や感電、故障の原因になります。
修理技術者以外の方が修理を行うことは危険です。修理については、お買い上げ
の販売店にご相談ください。
●水まわり、風呂場など湿気のある場所では絶対に使用しない。
●本体を水につけたり、本体に水をかけない
▲発火 / 感電の原因になります。
●異常 / 故障時には、直ちに使用を中止し、電源を切り、電源プラグをコンセント
から抜く
▲発煙 / 発火 / 感電の恐れがあります。
電源プラグ/ 電源コードは正しく使う
●電源プラグのほこりは定期的にとる
▲ほこりがたまると、湿気などで絶縁不良になり、火災や感電の原因になります。
●電源プラグはコンセントの奥まで確実に差し込む
▲ショートによる発火 /感電の原因になります。
●お手入れや点検、移動の際は、必ず電源プラグをコンセントから抜く
▲感電やけがの原因になります。
●濡れた手で電源プラグの抜き差しをしない
▲感電 /やけど /けがの原因になります。
●交流 110V~,60Hz以外では使わない
▲発火 /火災の原因になります。
●電源コードや電源プラグが傷んだり、コンセントの差し込みが緩い時は使わない
▲ショートによる発火 /感電の原因になります。
●電源コードを傷つけない
●傷つける、加工する、無理に曲げる、引っ張る、ねじる、重いものを乗せる、挟
み込むなどしないでください。
▲電源コードは破損し、火災 /感電の原因になります。
●電源コードを束ねて通電しない
▲火災の原因になります。
●持ち転び時や収納時に電源コードを引っ張らない
▲火災 /感電の原因になります。
●電源プラグの抜き差しによる運転や停止をしない
▲運転や停止は必ず本体の電源を使用してください。火災/感電の原因になります。
●屋外では使用しない
▲故障してショートや発火の原因になります。
●スプレーをかけない(殺虫剤 /整髪料 /潤滑油など)
●引火性のもの(灯油 /ガソリン /シンナーなど)、火の気のあるもの(たばこ /線
香など)、可燃性のもののそばで使わない
●油煙の舞う場所や近くで使用しない
▲発火 /火災の原因になります。
●隙間からものや手を入れない
▲感電やけがの原因になります。
●子供など取り扱いに不慣れな方だけで使わせたり、幼児に触れさせたりしない
▲けがや感電の恐れがあります。
警 告:
誤った取り扱いをすると、人が死亡または重傷を負う恐れがある内容を示しています。
安全上のご注意
異常な音や匂いがする
電源プラグ / 電源コードが異常に熱くなる
電源コードを動かすと、通電したりしなかったりする
運転中時々止まる
触れるとビリビリ電気を感じる
Page.15 Page.16

使用上のご注意
動作原理
注意:
誤った取り扱いをすると、人がけがをしたり、物的損害が発生する内容を示してい
ます。
●火気 / 暖房器具などに近づけない
●可燃性のものや火のついたたばこ / 線香などを近づけない
▲発火 / 火災の原因になります。
●製品の上に乗ったり、寄りかかったり、物を置いたりしない
▲転倒によるけがや火災の原因になります。
●水タンクや蓋を正しく取り付 ける
●蓋は必ず取り付けて使用する
▲水漏れや周囲の汚損の原因になります。
●吸気口や吹き出し口をふさがない
▲吸気口や吹き出し口をタオルやカーテンでふさがないでください。水漏れや加熱
の原因になります。
●加湿された風が、家具や壁、カーテン、電気製品などに直接当たらないところに
設置する
●設置の際は、カーテン、壁、家具などから、20cm 以上の距離を離す
▲家具や壁、カーテンなどの汚損の原因になります。また、電気製品に結露したり
水のミレラル分が付着したりすると、電気製品の故障の原因になります。
吹き出し口は家具や壁、カーテン、電気製品などの方向へ向けないでください。
●水平で安定した台の上で使用する
▲毛足の長いカーペットや布団などの上に設置すると、転倒してけがをしたり水漏
れしたりする恐れがあります。また、床濡れの恐れがありますので、必ず台の上に
設 置 してくだ さ い 。
●暖房機 / テレビ / ホットカーペットなど電気製品の上で使用しない
▲転倒すると水がこぼれ、火災や電気製品の故障の原因になります。
水タンクの 水 に つ いて
●毎日新しいものに取り替える
水タンクは毎日振り洗いし、常に清潔にしてください。古い水を使用すると、 異
臭を発したり健康を害する原因になります。
●一週間以上使用しない場合は、必ず水タンク内の水を捨てる
▲水が入ったまま放置すると、異臭や周囲の空気の汚れの原因になります。
●凍結しそうなときは、水タンク内の水を捨てる
▲凍結すると、故障 / 水漏れにより周囲の汚損の原因になります。
●水道水以外は使用しない
▲40℃以上の水 / 化学薬品 /ミネラルウォーター / アルカリイオン水 / 井戸水 / 浄
使用上のご注意
●直射日光の当たる場所や暖房器具の近くで使用しない
▲変形 / 変色する恐れがあります。
●ベンジンやシンナーで拭いたりしない
▲破損 / 故障の原因になります。
●ラジオやテレビに近づけない
▲ラジオやテレビにミストが入る場合があります。
●スピーカーや IH 調理器(電気調理器)など磁気の出る機器の近くに置かない
▲正常に動作しないことがあります。
使用環境について
●室温は 5 〜 35℃で使用してください。
室温が低いと床濡れや結露が起こりやすくなります。ボタンで加湿量を調節した
り、室温を上げたりして使用してください。
また、窓際や冷気の影響を受けやすい壁などは、定期的に結露を拭き取るなど
して使用してください。
●加湿のしすぎによる床濡れや結露に注意してください。
本製品は自動で加湿を調節できません。部屋の環境に注意しながら、こまめに
加湿を調節してください。
廃棄について
製品や梱包材の廃棄については、お住まいの自治体の取り決めに従って処理してく
ださい。
この上から注水するクールミスト加湿器は、タッチボタンでコントロールを備えた超
音波技術に基づいて動作します。3 つのミストレベル、ナイトライト、1H-24H タイ
マー設定、低水位保護機能、空焚き防止機能を備えており、家やオフィスで快適に
湿度を維持できます。
水器の水などは使用しないでください。かびや雑菌が繁殖しやすくなったり、変形
/ ひび割れ / 変色などを起こして、水漏れや周囲の汚損の原因になります。
●電源プラグを抜く時は、電源コードを持たずに必ず電源プラグを持って引き抜く
▲電源コードが破損し、発火/感電の原因になります。
●長期間使わないときは、必ず電源プラグをコンセントから抜く
▲絶縁低下により、火災/感電の原因になります。
●移動するときは、本体を持つ
▲水タンクや蓋を持つと、外れて落下する恐れがあります。
Page.17 Page.18
各部の名称
1
4
5
6
7
8
2
3
1
2
3
8
4
5
6
79
10
内部図
1 .ミストカバー
2.注水口(ポンプから)
3.溢水口x2
4.ミストチャンバー
5.ミストチャンバーセクション
6.水道
7.低水位センサー(タンク)
8.低水位センサー(チャンバー)
9 . ネ ブラ イザ( セラミック ディスク 搭 載 )
10.ファンの通気口
11.ポンプアウトホール
12.最大水位線
正面図
1.ノズル
2.タンクカバー
3.水タンク
4.水窓
5 . ナ イトラ イト
6.コントロールパネル
7.LEDディスプレイ
8.ベース
背面図
9.電源コード
10.吸気口
8
9
10
11
12
1
6
3
4
5
2
7
コント ロ ール パネルとL E Dディスプレイ
1 . ナ イトラ イトボタン
2.湿度レベル(30-85%)/タイマー(00-24H)
3.ミストレベルボタン(低/中/高)
4.ミストレベルインジケーター(低/中/高)
5.湿度ボタン
6.タイマーボタン
7.電源ボタン
8.低水位アイコン
Page.19 Page.20

使い方 タイマー設定について
ナイトラ イトの 設 定 に つ いて
湿度設定について
ミストレベルの調整について
注水について
タンクカバーを取り外し、最 大
水位線まで水タンクに水道水
を入 れます。タンクカバーを
元に戻します。
タイマーボタンをタップしてタイマー設
定に入ります。タイマーボタンをもう一度
タップして 1H〜24H から選択できます。
LED ディスプレイにそれに応じた数字が表
示されます。
タイマー設定を解除する場合は、「24H」
の後に LED ディスプレイに「00」が表示さ
れるまでタイマーボタンを繰り返しタップし
てくだ さ い 。
ご注意:
デバイスの電源をオフにする時、ミスト、タイマー、ナイトライト、LED ディスプ
レイを含むすべての設定もオフになります。
TOPPIN 加湿器には、周辺地域の湿度と温度の変化を検出するセンサーがあります。
したがって、湿度レベル制御機能は、センシング技術を介して設定した湿度レベル
タイマーを設定する時、LED ディスプレイに湿度レベルの数値が暗くなります。
タイマー設定が完了してから 2 秒後、デバイスはタイマー設定モードを退出して、
湿度レベルが再び表示されます。
タイマーボタンを 2 秒間押し続けて、タイマー設定を退出します。
電源をオンにしてから、必要に応じてタイマーを再設定する必要があります。(最
後に設定したタイマーは記憶されません)。
加湿器が待機モードになる時に、【ナイトライト】ボタンをタップしてナイトライ
トをオンにします。オフにするには、もう一度ボタンをタップしてください。LED ディ
スプレイはオフのままです。
加湿器の電源ボタンをタップしてから、LED ディスプレイが点灯します。【ナイト
ライト】ボタンをタップしてナイトライトをオンにします。このボタンをもう一度タッ
プすると、ナイトライトと LED ディスプレイの両方もオフになります。三回目にタッ
プすると、LED ディスプレイはオンになりますが、ナイトライトはオフのままです。
四回目にタップすると、ナイトライトが点灯します。
電源のオンとオフについて
加湿器の電源コードを電源に接続します。ビープ音が聞こえます。ボタンに触れ
ない場合は、LED ディスプレイは 2 秒後に点灯して暗くなります。この時は待機モー
ドになりま す。
ミストレベルボタンをタップして、低 -> 中 -> 高のミストレベルを切り替えます。
対応する LED インジケーターがビープ音とともに青色に点灯します。
ご注意:電源を再度オンにすると、切断されていない場合はデバイスは最後に設
定したミストレベルを記憶します。
電源ボタンをタップして加湿器の電源を
入れます。ミストが噴出します。LED ディ
スプレイに現在の湿度レベル(30%〜
85%)が表示されます。デフォルトでは、
低ミストレベルで動作します。
電源ボタンをタップしてデバイスをオフ
にします。(ミスト、ナイトライト、LED ディ
スプレイもオフにします)。オフにしてか
ら、ミストチューブを乾燥させるために
ミストは 15 秒間ぐらい続きます。
水タンクまたはミストチャンバー内に十分な水がない場合は、加湿器はミストし
ません。低水位インジケーターが 3 回点滅して消灯します。(本書の「故障かな?
と思ったら」部分を参照してください。)
水漏れを避けるために、ミストしている時に水タンクとミストカバーを持ち上げ
な い で くだ さ い 。
パワーオン 123
ナイトラ イトと
LED ディスプレ
イが消灯する
LED ディスプレイが
点灯するが、ナイト
ライトが消灯する
ナイトラ イト
が点灯する
ご注意:
ご注意:
加湿器にエッセンシャルオイルを追加しないでください。
ファンの通気口に水を入れないでください。
タンクをいっぱいにすると、溢水口から過剰な水が流出します。
タンクカバーを元に戻すとき、うまく合わない場合は別の方法を試してください。
ご注意:
Page.21 Page.22
お手入れ
加湿器の電源がオンになったら、【湿度】
ボタンをタップして湿度設定に入ります。現
在の湿度数字が点滅して、ご希望の湿度の
設定を待っています。もう一度【湿度】ボ
タンをタップすると、湿度が 5 の最小倍数
のレベルに増加します。例えば、現在の湿
度レベルが 51%〜54%の場合は、タップし
て 55%に増加します。タップごとに 5%ず
つ増加し、最大レベルは 85%になります。(も
う一度タップすると 30%から循環します)。
湿度を設定してから、現在の湿度のパーセ
ンテージが再び表示されます。【湿度】ボタ
ンを 1 回タップして、設定した湿度をチェッ
クします。もう一度ボタンをタップすると、
この前に説明したように、湿度が 5%ずつ
上 がりま す。
湿度設定をキャンセルするには、【湿度】ボ
タンを 2 秒間押し続けてください。湿度の
数値がダッシュに変わり、3 回(1 秒に 1 回)
点滅してから、現在の湿度のパーセンテー
ジが再び表示されます。
低水位保護について
水タンクの水位低下の場合
水タンクで水位が低下していることが検出されると、加湿器がオフになります。20
秒後にファンもオフになります。ビープ音が 3 回鳴り(3 秒に 1 回)、低水位のアイ
コンが 7 秒点滅します。これは加湿器が過熱してネブライザを損傷する可能性を防
ぐために、安全性を考慮して設計されたのです。
ミストチャンバー内の水位低下の場合
ミストチャンバーで水位が低下していることが検出されると、ネブライザはオフにな
一般的 なメンテナンス
毎日加湿器の外側の清掃とメンテナンスのために、ほこりや汚れが付いた場合は、
柔らかく湿った布で拭いてください。
水タンクの清掃について
以下の手順に従って、すべての取り外し可能な部品と水タンクを清掃してください。
加湿器をオフして、壁のコ
ンセントからプラグを抜き
ます。
15-20 分そのままにしてお
きます。
水タンクとミストチャン
バーを空にしてから中 に
水を追加して、白酢や他
の臭いがなくなるまで数
回繰り返して完全に洗浄
して下さい。
きれいで柔らかい布で、特
にネブライザの内部を拭い
てください。最後に柔らか
い布で完全に乾かして下さ
い。
水タンクカバ ー、ミストカ
バー、ミストチャンバ ーを
取り外します。
水タンクを水で満たし、
小さじ 1 杯の白酢または
他の洗浄剤を加えて、付
着物を取り除きます。
1 2 3
4 5 6
85%
最大
最小
30%
タップご
とに5%増加
2秒間
押し続 ける
ご注意:
りますがポンプとファンは動作します。10 秒後、チャンバー内にまだ水が検出され
ない場合、加湿器はオフになります。20 秒後にファンもオフになります。ビープ音
が 3 回鳴り(3 秒に 1 回)、低水位のアイコンが 7 秒点滅します。
ネブライザの空運転の場合
ネブライザの空運転が検出されると、加湿器がオフになります。20 秒後にファンも
オフになります。ビープ音が 3 回鳴り(3 秒に 1 回)、低水位のアイコンが 7 秒点
滅します。
設定したい湿度レベルが現在の湿度レベルより低い場合は、ミストは動作しませ
んが、ファンは動作します。設定したい湿度レベルが現在の湿度レベルより高い
場合にのみミストは動作します。
電源をオンにしてから、湿度設定に入ると、初期設定に戻ったから、現在の湿度
レベルを表示しています。必要に応じて湿度を再設定する必要があります。(最
後に設定した湿度は記憶されません)。
を維持できます。
加湿器がオンになっていると、現在の湿度レベル(周囲の気温に応じた相対湿度
レベル)がセンサーに検出され、パーセンテージで LED ディスプレイに表示され
ます。
Page.23 Page.24
1H‒24H
TPHM001
ABS
110V~,60Hz
30W
1.7±0.1MHz
5L/1.3gal
三つレベル(低/中/高)
最大 14時間( 高レベル )
最大 30 時間( 中レベル )
最大 72時間( 低レベル )
仕様
故障 かな?と思ったら
セ ット 内 容
ご使用中に異常が生じた場合は、修理を依頼する前に、本書をよくお読みの上、以
下の点を確認してください。
1xTOPPINComfyAirH1 超音波加湿器
1x クリーニングブラシ
1x 取扱説明書
品番
水タンク材 料
考えられる原因と解決方法問題
ミストや湿気は
噴き出しません
電圧
消費電力
周波数
水タンク容 量
ミストレ ベ ル
加湿時間
タイマーオプション
動作音
低水位保護機能
サイズ
重量
≤29dB1M 以外
サ ポ ート
368x210x146mm/14.5x8.3x5.7in
1.7kg/3.75lbs
電源プラグ - 加湿器からコードを抜き、もう一度お試し
くだ さ い 。
電源障害 - 電源が回復したら、再試行してください。
タンク / ミストカバーの取り付 け - タンクカバ ーとミスト
カバーの両方が正しく取り付けられていることを確認し
てくだ さ い 。
ネブライザの表面が汚れている - 柔らかい布で拭いて
くだ さ い 。
ネブライザの表面が汚れている - 柔らかい布で部品を
拭 い てくだ さ い 。
タンク内の水が冷たすぎる - 冷水ではなく常温の水に
交 換 してくだ さ い 。
汚れたタンクまたは汚れた水 - 上記の指示に従ってタ
ンクとチャンバーを完全に洗浄して、真水で洗い流して
ください。きれいな水を交換してください。
硬水はほこりのような残留物を堆積させることがありま
す。また、室内の湿度が高くなると、空気中のほこり
が落ち着くことがあります。困ると思う場合は、蒸留水
を使用してください。(3 ピンチの塩が必要)
空気は吹きます
がミストは 噴 き
出しません
湿度が低い
ミストの匂い
が悪い
近くの家具に白
い ほ こりが あ りま す
汚れたタンク - タンクを洗浄して、再試行してください。
汚れたミストチャンバー - チャンバーを洗浄して、再試
行してくだ さ い 。
汚れたネブライザ‒柔らかい布で部品を拭いてくださ
い。
蒸留水を使用した - 蒸留水に 3 ピンチの塩を追加し、
攪拌して完全に混合します。注意:水に塩を入れすぎ
ると、過度の沸騰、ヒューズの溶断、または回路遮断
器のスタックが発生する可能性があるため、ピンチで
のみ塩を追加してください。
周囲の湿度が高い。
水滴が表面に付かないように、二つのカバーを持ち上げるときに注意してくださ
い。
強力な洗浄剤を使用しないでください。
ネブライザ(セラミックディスク搭載)は、硬いものや鋭利なものに触れないで
くだ さ い 。
次回に使用する前に、電源コードとプラグが乾いていることを確保してください。
ご注意:
Page.25 Page.26

保証とアフターサービス
加湿器が正しく動作しない場合は、以下を確認してください。
LE D ディスプレイのエラーメッセージ
それでも解決できない時は、お買い上げの販売店へお問い合わせください。
警告:ご自分での分解 / 修理 / 改造はしないでください。
•保証期間 12 ヶ月
•生涯サポート
保証延長また製品に関するご質問は、[email protected]のカスタマーサー
ビスにお問い合わせください。
水が少ない - プラグを抜き、タンクに水を補充します。加湿器は動作
を停止しました
湿度飽和 - ミストレベルを下げてください。
本体は傾けている - プラグを抜き、水平面に置きます。
本体を 60-90cm の防水平面に上げます。
キャップが緩んでいる - カチッとはまるまで少し動か
して、キャップを締めます。
タンクの底に残っている水 - 輸送する前に、タンクと
チャンバーを拭くまたは傾けて排水してください。
加湿器の周りに
水がたまっている
水を補充する時
に水が垂れる
平らでない表面に置いた - 加湿器は平らで硬い表面
に置く必要があります。柔らかい表面や吸収性のある
表面に置かないでください。
騒音がうるさくなる
考えられる原因 アクションエラーコード
/
水不足を示します - プラグを抜き、タンクに水を補充
します。
チャンバー内の水位が最低水位線を上回っている場
合、タンク内に水があるかどうかを確認してください。
水があれば、ポンプが破損している可能性があります。
この場合は、TOPPIN カスタマーサポートに連絡して
くだ さ い 。
検出された環境湿度レベルが最小検出
値より低い場合、エラーコード「L」が
表示されます。
検出された環境湿度レベルが最大検出
値より高い場合、エラーコード「H」
が表示されます。
低水位が検出された時に L または H
は表示されません。
ビープ音が 3 回
鳴った後に低水
位アイコンが点滅
する
低水位センサーで検出された低水位:
低水位アイコンが3 回(約 7 秒間)点滅し、
ビープ音が 3 回鳴ります。加湿器は待機
モードに入ってからオフになります。(15
秒 後 にファン もオフ に なりま す )。
低水位センサーで検出された低水位:
低水位アイコンが3 回(約 7 秒間)点滅し、
ビープ音が 3 回鳴ります。加湿器は待機
モードに入ってからオフになります。(15
秒 後 にファン もオフ に なりま す )。
空運転:低水位アイコンが 3 回(約 7
秒間)点滅し、ビープ音が 3 回鳴ります。
加湿器は待機モードに入ってからオフに
なります。(15 秒後にファンもオフになり
ま す )。
最大水位線ま
で水を追加
し、電源ボタ
ンをタップし
てオンにしま
す。
最大水位線ま
で水を追加
し、電源ボタ
ンをタップし
てオンにしま
す。
最大水位線ま
で水を追加
し、電源ボタ
ンをタップし
てオンにしま
す。
Page.27 Page.28
This manual suits for next models
1
Table of contents
Other TOPPIN Humidifier manuals


